Daewoo DCVC100 User manual

DCVC100
Window Vacuum Cleaner
EN
NL
DE
FR
USER MANUAL
GEBRUIKERSHANDLEIDING
GEBRAUCHSANWEISUNG
MODE D’EMPLOI
2
11
20
29

EN
2
TECHNICAL SPECIFICATIONS
Warning!
Risk of electric shock and for potential risk of death and/or
serious irreversible injury!
Safety Warning!
It requires special attention to read and follow the instructions,
otherwise a potential hazard, injury, death or serious condition
may happen.
Class II
For equipment where protection against electric shock does
not solely rely on basic insulation, but where additional safety
precautions like double insulation or reinforced insulation are
taken, and there is no protective earthing or reliance upon
installation conditions.
CE marking
Indicates that the product sold in Europe has been assessed to
meet high safety, health, and environmental protection require-
ments.
Wheelie Bin (WEEE)
Instructions for protecting the environment (Waste Electrical &
Electronic Equipment directive)

EN
3
Read the instructions for use carefully and keep them safe. If
you give this device to other people, please also pass on this
manual.
SAFETY INFORMATION:
When using any electrical appliance, basic safety precautions should always
be considered to reduce the risk of re, electrical shock, leaking batteries of
personal injury, including the followings:
• Never immerse unit or charger in water or other liquid
• Do not insert objects into the air vents.
• This appliance can be used by children aged from 14 years and above
and persons with reduced physical, sensory, or mental capabilities or
lack of experience and knowledge if they have been given supervision or
instruction concerning use of the appliance in a safe way and understand
the hazards involved. Children shall not play with appliance. Cleaning
and user maintenance shall not be made by children without supervision.
• This appliance is powered by safety low voltage corresponding to the
marking on the appliance.
• Before using the appliance and after any impact, check for any sign of
wear or damage.
• Do not use the appliance if any parts is damaged or defective.
• Only use the charger supplied with the product. Do not attempt to use
any chargers from other products to charge the appliance.
• Using a charger from different product may cause re and or electrical
shocks.
• Before use, check the charger cord for signs of damage or ageing.
• Do not attempt to charge a damaged battery.
• The appliance must be disconnected from main supply when removing
the battery.
• Always unplug the appliance before cleaning and/or maintenance.
• Always unplug the charger from the main supply if it is not used for
charging.
• Keep the charger cord away from hot surfaces and sharp edges.
• Do not handle the charger with wet hands.
• Do not store or charge the unit at outdoor.

EN
4
STORAGE
• Store in an upright position
• Store in a dry place
• Store out of reach of children
• Ensure the appliance is not plugged-in during storage
INTENDED USE
• Use only as instructed in this manual. The use of any accessory or opera-
tion with this appliance other than those recommended in this instruction
manual may have the risk of personal injury.
• Use this battery-operated appliance only for cleaning moist, smooth
surfaces such as windows, mirrors, or tiles.
• It is not recommended to use the appliance on surfaces that can be
easily scratched such as wood, steel, varnished and high glossy surfaces,
otherwise it will damage the rubber lips.
• Only use this appliance with conventional window cleaner (no spirit, no
foam), otherwise leakage may happen from air vents. If this happens,
stop the appliance immediately.
START UP
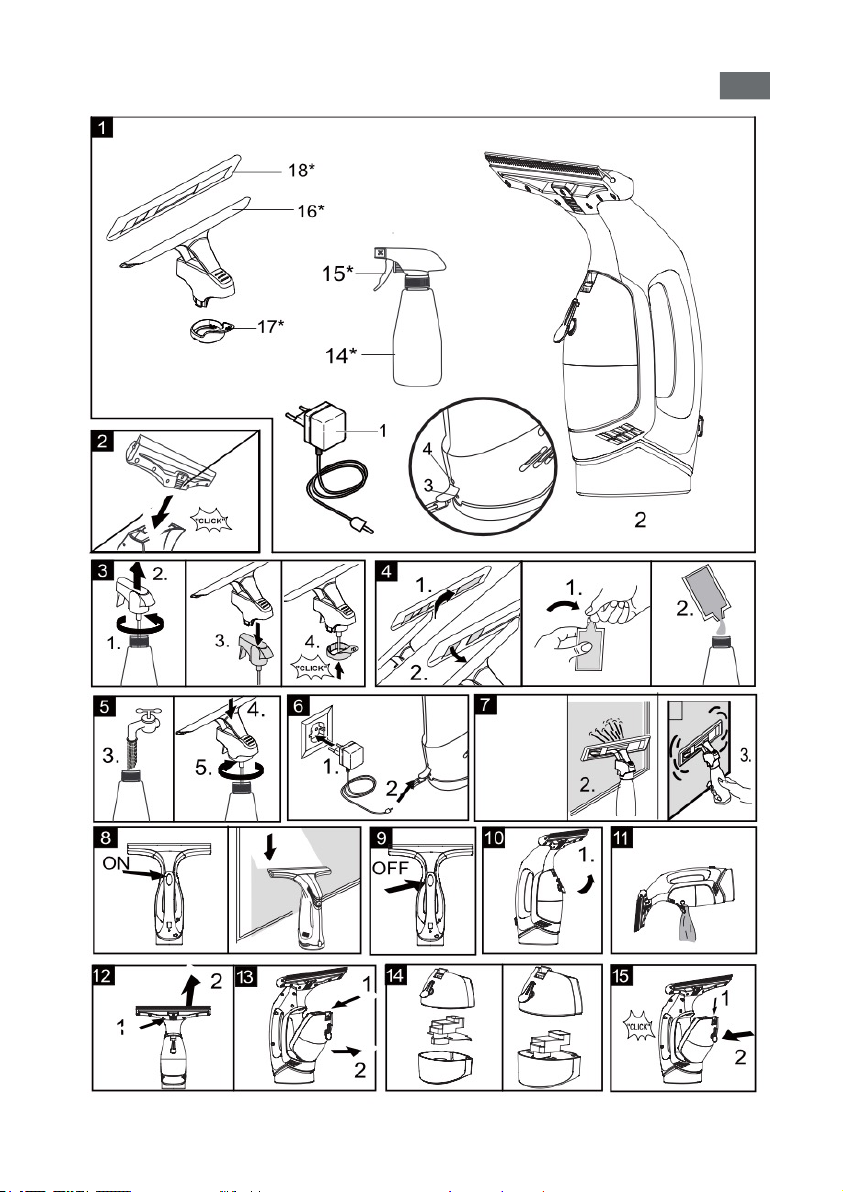
• Before you start, unpack the product, remove all protective cartons, and
make sure no accessories are missing and none of the package have
been damaged (Fig. 1).
• Attach the suction nozzle to the main unit until it snaps in place (Fig. 2).
• Assemble the sprayer and wipe bre and add detergent/window cleaner,
water into sprayer tank (Fig. 3, 4 and 5).
• Charge the battery of appliance for 3 hours before use (Fig. 6).
• After fully charging the appliance, the operating time of the appliance is
about 30 minutes.
INSTRUCTIONS
• Apply detergent/window cleaner on the windows surface evenly (Fig.
7-2).
• Rub and loosen the dirt on window using the wipe bre (Fig. 7-3)
• Prior to use, make sure the squeegees are clean.
• Turn the appliance on and move the appliance from top to bottom of
window (Fig. 8) and vacuum up the detergent/window cleaner.
• Hard to reach areas can be vacuumed vertically or horizontally.

EN
5
• If battery level is low, the charging/power indicator starts ashing
slowly. If this happens, charge up the battery as soon as possible.
• The appliance can be switched off (Fig. 9) while the spray bottle
is in use. This will save battery power and extend operating time.
• Switch off the appliance and set it in upright position if there is a need
for an interrupt during the cleaning process.
CLEANING THE APPLIANCE
Emptying water tank
• Once the max. level (150ml mark) of the water tank is reached, dirt water
inside the water tank has to be discarded, otherwise water may get into
the suction system.
• If the appliance is being used with its handle facing down (e.g., cleaning
rooight), it is recommended to empty the water tank after cleaning each
window.
• Turn off the appliance and pull out the cover lock (Fig. 10) of the water
tank.
• Drain out the water from water from water outlet hole (Fig. 11).
• Only open the water tank when cleaning is necessary.
Cleaning water tank
• For hygienic reason, it is recommended to empty and clean the water
tank after several uses.
• Push down the release button of water tank and take it out from the main
unit (Fig. 13).
• To open the water tank, apply force to pull the top half and bottom half
of water tank apart (Fig. 14).
• Each time to open the water tank, be cautious for the inner assembled
parts.
• Remove the tube separator by pulling it out of the main unit and clean it
and the inside of water tank under running water, or with a cloth.
• Components of the window vacuum cleaner are NOT dishwasher safe!
• Connect the tube separator back to water tank bottom half unit.
• Connect the water tank top and bottom half units back in place.
• Put the water tank back to the main unit by pushing the top part into the
main unit until it snaps in place.

EN
6
Cleaning main unit
• Turn off the appliance.
• The main unit as well as the squeegee can be cleaned or wiped with a
damp cloth.
• Squeegee can be detached from the main unit by releasing the lock in
the middle (Fig. 12).
• Do not use solvents or polishes to clean the outside of the unit.
• The appliance contains electrical components, never immerse the
unit in water.
• Do not clean it in a dishwasher, washing machine, or under running
water.
• Store the appliance in a dry place with put the appliance in an upright
position.
BATTERY CHARGING
• Charge the battery for 3 hours before use for the rst time.
• Turn off the appliance before charging.
• Connect the charging plug of charger to the charging socket located
below the power button of apparatus.
• Plug the charger to a suitable electrical socket.
• The light indicator will be ashing in blue colour during charging.
• After charging is completed, the light indicator will remain blue.
• Unplug the charger from main socket. Do not pull the charger cord.
• Disconnect the charging plug from the apparatus.
• It takes about 3 hours to fully recharge the battery if the apparatus is
automatically stopped due to low battery power.
• If the appliance is connected to the charger while it is on, the motor will
stop immediately, and it will start charging.
• To maintain the good performance of the battery, it is recom-
mended the unit to be fully discharged and completely recharged at
least once a month.

EN
7
LIGHT INDICATOR
TROUBLESHOOTING
Machine does not start
Check the light indicator
• Light is off/slow blinking: charge the apparatus.
• With a rapidly blinking signal with charged battery: inform your dealer of
after-sales service
Streaks while cleaning
• Clean the pull-off lip.
• Reverse the used pull-off lip: Pull the silicon squeegee to the side. Wet
the squeegee in the curved area with water or detergent. Slide the sili-
con squeegee back in the holder of reverse order.
• Replace the pull-off lip if necessary: If both edges are worn after turning
the silicon squeegee around, a new silicon squeegee is required. Re-
place silicon squeegee as described above.
• Adjust the dosing of cleaning solution.
Water is leaking from the air louvers
Empty the water tank (max. 150ml capacity)

EN
8
INSTRUCTIONS FOR PROTECTING THE ENVIRONMENT
(WEEE, the waste electrical and electronic equipment directive)
Your product has been manufactured using high quality material and com-
ponents which can be recycled and used again. At the end of its life, this
product cannot be disposed in normal domestic waste, but must be taken
to a special collection point for recycling electrical and electronic equip-
ment. This is indicated in the user manual and in the packaging by the waste
container marked with cross symbol. Used raw materials are suitable for
recycling.
By recycling used appliance or raw materials, you are playing an important
role in protecting our environment. You can ask your local council about the
location of your nearest collection point.
Do not dispose batteries in your household waste. Dispose of batteries by
taking them to your local recycling station. Contact your local government
ofce for details.

EN
9

EN
10
EU DECLARATION OF CONFORMITY
We,
Elmarc B.V.
Kolenbranderstraat 28, 2984 At Ridderkerk,
The Netherlands
Declare under our sole responsibility that the product:
• Product Brand: Daewoo
• Product Model No: DCVC100
• Product Description: Window Vacuum Cleaner
• Product Rating: 3.7V , 20W, IPX4
• Charger Input: 100 - 240 V~, 50/60 Hz, 0.2A, Class II, IPX0
• Charger Output: 5V , 800mA
Following the provisions of the Directives:
• Electromagnetic Compatibility (EMC) Directive: 2014/30/EU
• Low Voltage Directive (LVD): 2014/35/EU
• Energy Related Products (ERP) Directive: 2009/125/EC
• Restriction of the use of certain Hazardous Substances in Electrical and Electronic
Equipment Directive (RoHS): 2015/863amending 2011/65/EU
And standards to which Conformity is declared:
EMC (Window Vacuum Cleaner & Charger):
• EN 55014-1:2017
• EN 55014-2:2015
• EN 61000-3-2:2014
• EN 61000-3-3:2013
LVD (Window Vacuum Cleaner):
• EN 60335-2-2:2010/A1:2013
• EN 60335-1:2012/A13:20117
• EN 62233:2008
LVD (Charger):
• EN 60335-2-29:2004+A2:2010+A11:2018
• EN 60335-1:2012+A11:2014+A13:2017+A1:2019+A2:2019+A14:2019
• EN 62233:2008
ERP (Charger):
• EU 2019/1782
Place: The Netherlands
Date of issue: 20 April 2022

NL
11
TECHNISCHE SPECIFICATIES
Waarschuwing!
Gevaar voor elektrische schokken en voor mogelijk lev-
ensgevaar en/of ernstig onomkeerbaar letsel!
Veiligheidswaarschuwing!
Het vereist speciale aandacht om de instructies te lezen en op
te volgen, anders kan er een potentieel gevaar, verwonding,
dood of ernstige toestand ontstaan.
Klasse II
Voor apparatuur waarbij de bescherming tegen elektrische
schokken niet alleen berust op de basisisolatie, maar waarbij
extra veiligheidsmaatregelen worden genomen zoals dubbele
isolatie of versterkte isolatie en er geen sprake is van bes-
chermende aarding of afhankelijkheid van de installatievoor-
waarden.
CE-marking
Geeft aan dat het in Europa verkochte product beoordeeld
is op naleving van hoge eisen op het gebied van veiligheid,
gezondheid en milieubescherming.
Rolcontainer (WEEE)
Instructies voor de bescherming van het milieu (richtlijn betref-
fende afgedankte elektrische en elektronische apparatuur)

NL
12
Lees de handleiding zorgvuldig en bewaar deze goed. Als u dit
apparaat aan andere mensen geeft, geef dan ook deze handle-
iding door.
VEILIGHEIDSINFORMATIE:
Bij het gebruik van om het even welk elektrisch apparaat moet steeds
rekening gehouden worden met de basisveiligheidsmaatregelen om het
risico van brand, elektrische schok, lekkende batterijen of lichamelijk letsel te
verminderen, met inbegrip van de volgende zaken:
• Dompel het apparaat of de lader nooit onder in water of een andere
vloeistof
• Steek geen voorwerpen in de luchtroosters.
• Dit apparaat kan gebruikt worden door kinderen vanaf 14 jaar en perso-
nen met verminderde lichamelijke, zintuiglijke of geestelijke vermogens
of met gebrek aan ervaring en kennis, op voorwaarde dat zij onder toe-
zicht staan of instructies hebben gekregen over het veilige gebruik van
het apparaat en de gevaren ervan begrijpen. Kinderen mogen niet met
het apparaat spelen. Reiniging en gebruikersonderhoud mogen niet
door kinderen zonder toezicht worden uitgevoerd.
• Dit apparaat wordt gevoed door veiligheidslaagspanning die overeen-
komt met de markering op het toestel.
• Alvorens het apparaat te gebruiken en na elke schok moet u controleren
of er tekenen van slijtage of beschadiging zijn.
• Gebruik het apparaat niet als er onderdelen beschadigd of defect zijn.
• Gebruik alleen de bij het product geleverde lader. Probeer geen oplad-
ers van andere producten te gebruiken om het apparaat op te laden.
• Het gebruik van een oplader van een ander product kan brand en of
elektrische schokken veroorzaken.
• Controleer vóór gebruik het snoer van de lader op tekenen van bescha-
diging of veroudering.
• Probeer een beschadigde batterij niet op te laden.
• Het apparaat moet losgekoppeld worden van de hoofdvoeding wanneer
u de batterij verwijdert.
• Trek altijd de stekker uit het stopcontact voordat u het apparaat schoon-
maakt en/of onderhoud pleegt.
• Trek altijd de stekker van de lader uit het stopcontact als hij niet gebruikt
wordt om op te laden.
• Houd het snoer van de lader uit de buurt van hete oppervlakken en
scherpe randen.

NL
13
- Hanteer de lader niet met natte handen.
- Bewaar of laad het apparaat niet op in de open lucht.
OPSLAG
• Rechtop opbergen
• Opbergen op een droge plek
• Buiten bereik van kinderen bewaren
• Zorg ervoor dat het apparaat niet aangesloten is op het lichtnet tijdens
de opslag
BEDOELD GEBRUIK
• Gebruik het alleen volgens de aanwijzingen in deze handleiding. Het
gebruik van een ander accessoire of een andere bediening met dit
apparaat dan in deze handleiding wordt aanbevolen, kan het risico van
persoonlijk letsel inhouden.
• Gebruik dit op batterijen werkende apparaat alleen voor het schoon-
maken van vochtige, gladde oppervlakken, zoals ramen, spiegels of
tegels.
• Het is niet aan te bevelen het apparaat te gebruiken op oppervlakken
die gemakkelijk bekrast kunnen worden, zoals hout, staal, geverniste en
hoogglanzende oppervlakken, anders zullen de rubberen lippen bes-
chadigd worden.
• Gebruik dit apparaat alleen met conventionele ruitenreiniger (geen spir-
itus, geen schuim), anders kan er lekkage ontstaan uit de luchtroosters.
Als dit gebeurt, moet u het apparaat onmiddellijk uitschakelen.
BEGINNEN
• Voordat u begint, moet u het product uitpakken, alle beschermende
kartons verwijderen, en controleren of er geen accessoires ontbreken en
of er niets van de verpakking beschadigd is (g. 1).
• Bevestig het zuigmondstuk aan de hoofdeenheid tot het vastklikt (g. 2).
• Zet de sproeier en vezeldoek in elkaar en voeg reinigingsmiddel/ruiten-
reiniger en water toe in het reservoir van de sproeier (g. 3, 4 en 5).
• Laad de batterij van het apparaat gedurende 3 uur op voor gebruik (g.
6).
• Nadat het apparaat volledig is opgeladen, bedraagt de bedrijfstijd van
het apparaat ongeveer 30 minuten.

NL
14
INSTRUCTIES
• Breng een reinigingsmiddel/ruitenreiniger gelijkmatig op het oppervlak
van de ruiten aan (g. 7-2).
• Wrijf en maak het vuil op het raam los met de vezeldoek (g. 7-3)
• Vóór gebruik moet u ervoor zorgen dat de wissers schoon zijn.
• Zet het apparaat aan en beweeg het apparaat van de bovenkant naar de
onderkant van het raam (g. 8) en zuig het reinigingsmiddel/raamreini-
ger op.
• Moeilijk bereikbare plaatsen kunnen verticaal of horizontaal gestofzuigd
worden.
• Als het batterijniveau laag is, begint de laad-/stroomindicator langzaam
te knipperen. Als dit gebeurt, laadt u de batterij zo snel mogelijk op.
• Het toestel kan uitgeschakeld worden (g. 9) terwijl de sprayes in ge-
bruik is. Dit zal de batterij sparen en de bedrijfstijd verlengen.
• Schakel het apparaat uit en zet het rechtop als er een onderbreking
nodig is tijdens het reinigingsproces.
HET APPARAAT SCHOONMAKEN
Leegmaken van waterreservoir
• Zodra het max. niveau (150ml-markering) van het waterreservoir bereikt
is, moet vuil water in het waterreservoir weggegooid worden, anders kan
er water in het zuigsysteem komen.
• Als het toestel met de handgreep naar beneden wordt gebruikt (bv. bij
het schoonmaken van dakramen), is het raadzaam het waterreservoir te
legen na het schoonmaken van elk raam.
• Zet het toestel uit en trek de dekselvergrendeling (g. 10) van het water-
reservoir eruit.
• Laat het water uit het waterafvoergat weglopen (g. 11).
• Open het waterreservoir alleen als schoonmaken noodzakelijk is.
Reiniging waterreservoir
• Om hygiënische redenen is het aan te bevelen het waterreservoir na
enkele keren gebruik te legen en schoon te maken.
• Druk de ontgrendelknop van het waterreservoir naar beneden en neem
het uit de hoofdeenheid (g. 13).
• Om het waterreservoir te openen, moet u kracht uitoefenen om de
bovenste helft en de onderste helft van het waterreservoir uit elkaar te
trekken (g. 14).
• Telkens wanneer u het waterreservoir opent, moet u oppassen voor de

NL
15
binnenste gemonteerde onderdelen.
• Verwijder de buisscheider door hem uit de hoofdeenheid te trekken
en maak hem en de binnenkant van het waterreservoir schoon onder
stromend water, of met een doek.
• De onderdelen van de vacuüm ruitenreiniger zijn NIET vaatwasma-
chinebestendig!
• Sluit de buisscheider weer aan op de onderste halve eenheid van het
waterreservoir.
• Sluit de bovenste en onderste halve eenheden van het waterreservoir
weer op hun plaats aan.
• Zet het waterreservoir terug op de hoofdeenheid door het bovenste
gedeelte in de hoofdeenheid te duwen tot het vastklikt.
Reinigen van de hoofdeenheid
• Schakel het apparaat uit.
• Zowel de hoofdeenheid als de ruitenwisser kunnen met een vochtige
doek schoongemaakt of afgeveegd worden.
• De wisser kan van de hoofdeenheid losgemaakt worden door de ver-
grendeling in het midden los te maken (g. 12).
• Gebruik geen oplosmiddelen of poetsmiddelen om de buitenkant van
het apparaat schoon te maken.
• Het apparaat bevat elektrische onderdelen, dompel het toestel
nooit onder in water.
• Maak het niet schoon in een afwasmachine, wasmachine, of onder
stromend water.
• Bewaar het apparaat rechtop op een droge plaats.
BATTERIJ OPLADEN
• Laad de batterij 3 uur op voordat u hem voor het eerst gebruikt.
• Zet het apparaat uit voordat u het oplaadt.
• Sluit de oplaadstekker van de oplader aan op de oplaadbus die zich
onder de aan/uit-knop van het toestel bevindt.
• Steek de stekker van de oplader in een geschikt stopcontact.
• Het lampje knippert in blauwe kleur tijdens het opladen.
• Nadat het opladen voltooid is, blijft het lampje blauw branden.
• Trek de stekker van de lader uit het stopcontact. Trek niet aan het snoer
van de lader.
• Haal de oplaadstekker uit het apparaat.
• Het duurt ongeveer 3 uur om de batterij volledig op te laden, als het
apparaat automatisch gestopt wordt omdat de batterij bijna leeg is.

NL
16
• Als het apparaat op de lader wordt aangesloten terwijl hij aan staat,
zal de motor onmiddellijk stoppen, en zal hij beginnen met laden.
• Om de goede prestaties van de batterij te behouden, is het aan
te bevelen het apparaat ten minste eenmaal per maand volledig te ont-
laden en weer volledig op te laden.
LICHTINDICATOR
PROBLEEMOPLOSSING
Machine start niet
Controleer de lichtindicator
• Lampje is uit/langzaam knipperen: laad het apparaat op.
• Met een snel knipperend signaal bij opgeladen batterij: informeer uw
dealer voor service na verkoop
Strepen tijdens het schoonmaken
• Maak het lipje van de trekker schoon.
• Keer de gebruikte treklip om: Trek de siliconenwisser naar de zijkant.
Maak het gebogen gedeelte van de ramenwisser nat met water of afwas-
middel. Schuif de siliconenwisser in omgekeerde volgorde terug in de
houder.
• Vervang de treklip indien nodig: als beide randen versleten zijn na het
ronddraaien van de siliconenwisser, is een nieuwe siliconenwisser nodig.
Vervang de siliconenwisser zoals hierboven beschreven.
• Pas de dosering van de reinigingsvloeistof aan.
Er lekt water uit de luchtroosters
• Leeg het waterreservoir (max. 150 ml inhoud)

NL
17
INSTRUCTIES VOOR DE BESCHERMING VAN
HET MILIEU
(WEEE, de richtlijn betreffende afgedankte elektrische en elektronische
apparatuur)
Uw product is vervaardigd uit materiaal en onderdelen van hoge kwaliteit,
die gerecycled en opnieuw gebruikt kunnen worden. Aan het einde van zijn
levensduur kan dit product niet bij het normale huisvuil, maar moet het naar
een speciaal inzamelpunt voor recycling van elektrische en elektronische
apparatuur gebracht worden. Dit wordt aangegeven in de gebruiksaan-
wijzing en op de verpakking door de afvalcontainer met het kruissymbool.
Gebruikte grondstoffen zijn geschikt voor recycling.
Door gebruikte apparaten of grondstoffen te recyclen, speelt u een belan-
grijke rol in de bescherming van ons milieu. U kunt bij uw gemeente in-
formeren naar de plaats van het dichtstbijzijnde inzamelpunt.
Gooi batterijen niet bij het huisvuil. Gooi de batterijen weg door ze naar uw
plaatselijke milieustraat te brengen. Neem contact op met uw plaatselijke
overheidskantoor voor nadere bijzonderheden.

NL
18

NL
19
EU-VERKLARING VAN OVEREENSTEMMING
Wij,
Elmarc B.V.
Kolenbranderstraat 28, 2984 At Ridderkerk,
Nederland
Verklaren onder onze uitsluitende verantwoordelijkheid dat het product:
• Productmerk:Daewoo
• Productmodelnummer: DCVC100
• Productbeschrijving: Vacuüm ruitenreinger
• Productbeoordeling: 3.7V , 20W, IPX4
• Laderingang: 100 - 240 V~, 50/60 Hz, 0.2A, klasse II, IPX0
• Laderuitgang: 5V , 800mA
Volgens de bepalingen van de richtlijnen:
• Richtlijn elektromagnetische compatibiliteit (EMC): 2014/30/EU
• Laagspanningsrichtlijn (LVD): 2014/35/EU
• Richtlijn energiegerelateerde producten (ERP): 2009/125/EC
• Richtlijn betreffende beperking van het gebruik van bepaalde gevaarlijke stoffen in
elektrische en elektronische apparatuur (RoHS): 2015/863amending 2011/65/EU
En normen waarnaar de Conformiteit verklaard wordt:
EMC (Vacuüm ruitenreiniger & oplader):
• EN 55014-1:2017
• EN 55014-2:2015
• EN 61000-3-2:2014
• EN 61000-3-3:2013
LVD (Vacuüm ruitenreiniger):
• EN 60335-2-2:2010/A1:2013
• EN 60335-1:2012/A13:20117
• EN 62233:2008
LVD (oplader):
• EN 60335-2-29:2004+A2:2010+A11:2018
• EN 60335-1:2012+A11:2014+A13:2017+A1:2019+A2:2019+A14:2019
• EN 62233:2008
ERP (oplader):
• EU 2019/1782
Plaats: Nederland
Datum van uitgifte: 20 April 2022

DE
20
TECHNISCHE DATEN
Warnung!
Stromschlaggefahr und möglicherweise Lebensgefahr bzw.
schwere irreversible Verletzung!
Sicherheitswarnung!
Besondere Aufmerksamkeit ist geboten, die Anweisungen zu
lesen und zu befolgen, da andernfalls eine potenzielle Gefahr,
Verletzung, Tod oder Lebensgefahr eintreten kann.
Klasse II
Für Geräte, bei denen der Schutz gegen elektrischen Schlag
nicht nur auf der Basisisolierung beruht, sondern bei de-
nen zusätzliche Sicherheitsvorkehrungen wie doppelte oder
verstärkte Isolierung getroffen werden und bei denen keine
Schutzerdung oder Abhängigkeit von den Installationsbedin-
gungen besteht.
CE-Kennzeichnung
Zeigt an, dass das in Europa verkaufte Produkt dahingehend
bewertet wurde, dass es hohe Sicherheits-, Gesundheits- und
Umweltschutzanforderungen erfüllt.
Table of contents
Languages:
Other Daewoo Vacuum Cleaner manuals

Daewoo
Daewoo RC-370F User manual

Daewoo
Daewoo RC-406 User manual

Daewoo
Daewoo Cyclone Lyte User manual

Daewoo
Daewoo RC-1700P User manual

Daewoo
Daewoo RC-230 User manual

Daewoo
Daewoo RC-6005B User manual

Daewoo
Daewoo RC-108 User manual

Daewoo
Daewoo RCC-11GR EU User manual

Daewoo
Daewoo RC-300 User manual

Daewoo
Daewoo RC-407 User manual

Daewoo
Daewoo RC-2200FR User manual

Daewoo
Daewoo RC-350BKN User manual

Daewoo
Daewoo A2161 User manual

Daewoo
Daewoo RC-1780GA User manual

Daewoo
Daewoo RC-700M User manual

Daewoo
Daewoo RC-400B User manual

Daewoo
Daewoo RCU-3006 Series User manual

Daewoo
Daewoo RC-172 User manual

Daewoo
Daewoo DAVC 90-20L User manual

Daewoo
Daewoo RCG-110 Series User manual