Dagger Recreational User manual

O W NER ’ S M A N U A L


WELCOME TO DAGGER EUROPE BE PART OF THE COMMUNITY
CONTENTS
You are in good company. Over the years Dagger
has crafted a reputation for being at the cutting
edge of paddlesport, which is why so many of the
worlds most passionate and well-known paddlers
choose to use our boats. Like them, you’ll find
your Dagger kayak will provide years of adventure
wherever you want to go, and maybe places you
haven’t thought of yet.
Formed in the late 80’s, Dagger has spent over
two decades innovating and developing to create
classic designs that always deliver performance,
comfort and value. This guide will help you get
the best from your new Dagger kayak and also
ensure it stays in good condition throughout your
paddling adventures.
Thank you for choosing Dagger kayaks.
From the mountains to the sea, Dagger paddlers
are relentless in the pursuit of adventure and play.
Join in at www.daggereurope.com to share your
experiences, see what the team have been doing
and get the latest news.
4Kayak Key Features: Recreational/Touring
5Kayak Key Features: Whitewater
6Outfitting
12 Storage & Transport
13 Care & Maintenance
14 Additional Equipment
15 Your Safety
16 Warranty
17 Service & Support
This owner’s manual and additional information is available at www.daggereurope.com

KAYAK KEY FEATURES: RECREATIONAL / TOURING
Skeg
(some models)
Stern Large hatch
Security bar
Seat & seatback
Cockpit
Small hatch
Compass Bow
Grab handle
Chine
Deck lines, bow and stern
Foot brace bolts
Skeg/rudder lanyard
Hull
Rail
Sidewall
Thighbraces
Backband adjuster
Deck
Deck rigging
Rudder (some models)
4
FEATURES IN DETAIL
BOW/NOSE: The front of the kayak.
STERN/TAIL: The back of the kayak.
DECK: The top of the kayak.
HULL: The bottom of the kayak.
SIDEWALL: The side of the kayak.
CHINE: The edge where the hull meets the sidewall.
RAIL: The edge where the sidewall meets the deck.
COCKPIT: The area where you sit – surrounded by the
cockpit rim.
FOOT BRACE: Adjustable pedals to rest your feet
against – also used to steer the rudder fitted in some
kayaks.
THIGHBRACES: Shaped, padded braces under which
your thighs and knees are placed to help control the
roll of the kayak.
SEAT & SEATBACK: The seat includes an integral
seatback or adjustable backband to provide lumbar
support.
RUDDER: A movable blade at the stern of the kayak
which helps the boat to turn and track.
SKEG: A fixed blade at the stern of the kayak which
helps the boat to track.
RUDDER LANYARD: Used to deploy and retract
the rudder.
GRAB HANDLE: Moulded plastic handles and both end
used to carry the kayak.
COMPASS: Some touring kayaks feature a position for a
deck-mounted compass.
HATCHES: Allow gear to be stowed inside the kayak –
hatches have a moulded rubber hatch cover to keep
water out and your gear in.
DECK RIGGING: Useful pattern of elasticised rope on the
deck of the kayak, used to store additional items.
DECK LINES: Additional rigging on bow and stern for
attachment and storage.

Skeg
(some models)
Stern Large hatch
Security bar
Seat & seatback
Cockpit
Small hatch
Compass Bow
Grab handle
Chine
Deck lines, bow and stern
Foot brace bolts
Skeg/rudder lanyard
Hull
Rail
Sidewall
Thighbraces
Backband adjuster
Deck
Deck rigging
Rudder (some models)
KAYAK KEY FEATURES: WHITEWATER
Stern/Tail
Drain plug
Rail
Hull
Sidewall
Chine
Footbrace bolts
Grab handle Security bar
Backband Seat Thighbrace
Backband adjuster
Deck
Grab handle
Bow/Nose
Cockpit
5
FEATURES IN DETAIL
BOW/NOSE: The front of the kayak.
STERN/TAIL: The back of the kayak.
DECK: The top of the kayak above the waterline.
HULL: The bottom of the kayak below the waterline.
SIDEWALL: The side of the kayak.
CHINE: The edge where the hull meets the sidewall –
below the waterline.
RAIL: The edge where the sidewall meets the deck –
above the waterline.
COCKPIT: The area where you sit – surrounded by the
cockpit rim.
FOOTBRACE: Adjustable pedals to rest your feet against
– also used to steer the rudder fitted in some kayaks.
THIGHBRACES: Shaped, padded braces under which
your thighs and knees are placed to help control the
roll of the kayak.
SEAT & SEATBACK: The shaped seat, sometimes adjustable,
includes an integral seatback or adjustable backband
to provide lumbar support.
SECURITY BAR: A fixed bar which can be used to lock
your kayak to prevent theft.
GRAB HANDLE: Handles at bow and stern used to carry
the kayak.
DRAIN PLUG: Plastic plug that screws into a threaded
insert at the stern – used to easily empty whatever
water has accumulated in the kayak.

OUTFITTING: SEAT
6
Most Dagger kayak seats are designed for use
by the majority of people without any adjustment.
However, our seats are easily adjustable to ensure
maximum performance.
Try paddling the boat with the seat in a neutral
position before moving it to any degree.
ADJUSTING THE SEAT: REC/TOURING KAYAK
To adjust the seat in Dagger touring kayaks,
unscrew and remove the plastic thumb nuts from
the sides of the seat. Lift the sides of the seat off
the retaining bolts.
Move the seat forward/backward as desired and
test the fit by sitting in the kayak on the water.
When the correct position is attained, line up the
holes in the side of the seat with the retaining
bolts, replace and tighten the plastic thumb nut.
1
2
3
ADJUSTING THE SEAT: WHITEWATER KAYAK
To adjust the seat in Dagger whitewater kayaks,
unscrew and remove the plastic thumb nuts from
either the sides or bottom of the seat.
Lift seat off remaining bolts.
Move the seat forward or backward as desired
and test the fit by sitting in the kayak on the water.
When the correct position is attained, replace
and fully tighten the thumb nuts.
1
2
One of the most important considerations in
using your kayak is the way it feels to you –
how comfortably it fits and how easy it is
to get in and out of.

7
OUTFITTING: SEAT
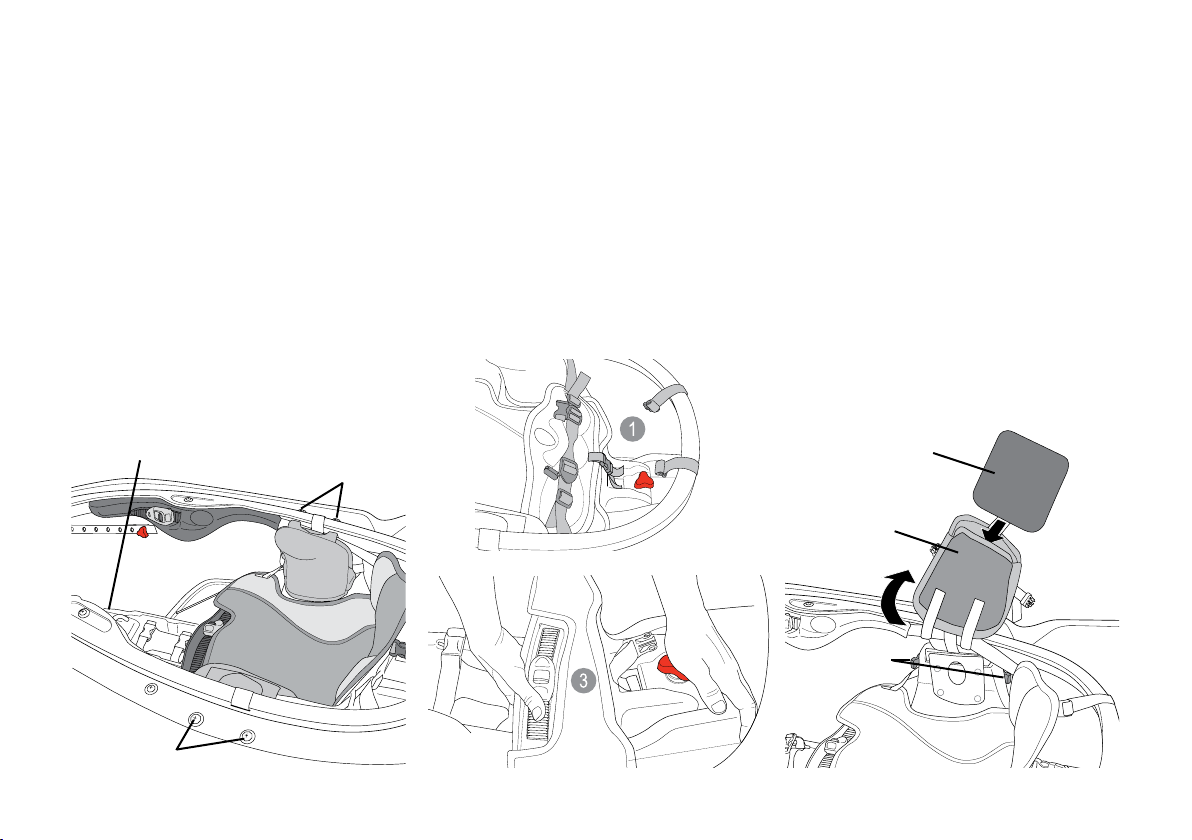
CREEK SEAT ADJUSTMENT HIP PAD ADJUSTMENT
For ultimate strength some Dagger whitewater
boats are fitted with the creek seat.
1 Loosen, but DO NOT remove, five seat adjust-
ment screws.
2 With both hands, slide the seat assembly fore or
aft to the desired location.
3 Tighten five adjustment screws securely.
For increase your contact with the boat, the
hip pads can be adjusted.
1 Disconnect two buckles.
2 Swing hip pad upward.
3 Insert foam padding into the pocket on the back
of the hip pad.
4 After you have inserted as much foam padding
as desired, reseal and lower hip pad and Velcro®
into desired position, FASTEN BOTH BUCKLES,
and tighten the straps.
5 Stow the straps by wrapping them back behind
the buckles and fastening to the Velcro® tabs.
6 Never allow your outfitting to impair exit in an
emergency.
Seat
adjustment
screws
Seat
adjustment
screw
Seat
adjustment
screws
PLAY SEAT ADJUSTMENT
For lightweight connection some Dagger
whitewater boats are fitted with the play seat.
1 Unfasten the upper back band straps.
2 Loosen the seat adjustment knob by turning five
to six times but DO NOT remove it.
3 With both hands positioned as shown, press
down on the rear adjustment knob and slide the
seat assembly foward or back.
4 Tighten the adjustment knob securely.
5 Fasten both upper back band straps.
Foam pad
Hip pad
Buckles

OUTFITTING: THIGHBRACES /BACKREST
8
THIGH BRACE ADJUSTMENT
Some Dagger kayaks are outfitted with
adjustable thigh braces, which help to hold
your knees against the inside of the kayak.
1 Climb into the cockpit and get comfortable.
2 Using a Phillips screwdriver, remove both thigh
brace set screws.
3 Loosen, but DO NOT remove, the thigh brace
adjustment screws.
4 Position both thigh braces comfortably against
your thighs by sliding fore or aft.
5 Securely tighten all four adjustment screws.
6 Install and securely tighten both set screws.
Slide seat back up and down
Pull loose strap to tension
BACKBAND ADJUSTMENT
All Dagger Europe kayaks have adjustable
backbands to ensure you get the best fit and
provide lumbar support. The backband should
be adjusted enough that you feel secure while
remaining comfortable. Do not overtighten as
this could impair your exit or cause back injury.
Zone Outfitting: The height of the seat back can
be raised or lowered. To raise simply grasp any
section of the backrest and slide upwards.
To lower, grasp the yellow adjustment lever
and rotate it forwards and down.
1
2Free standing backband: Use the sliders on the
back of the backband to adjust tension.
Backbands featuring ratchets on the thighbraces
can be adjusted here whilst sitting in the kayak.
Thigh brace
set screws
Thigh brace
adjustment screws

OUTFITTING: FOOTBRACES
9
FOAM FOOTBRACES
Dagger playboats are fitted with foam
footbraces. These are lightweight, simple and
allow you to get a custom fit. To maximise
footroom, be sure to outfit your boat wearing
the gear you’ll wear on the water.
1 Loosen strap and add/remove foam shims to
achieve desired comfort.
2 Tighten strap, place in boat and check for com-
fort and fit.
SLIDELOCK FOOTBRACES
Hand-adjustable footbraces allow you to reposi-
tion your foot pedals quickly and easily while
ashore or underway. To adjust pedal position,
locate the adjusting lever below the pedal
track and lift so that it slides.
To lengthen the pedals, push the lever forward.
To shorten, pull the lever back towards the
seat. Once in position, drop the lever and push
with your toes.
By knowing and understanding your
kayak and its different parts, you will
be able to use it more efficiently and
your kayaking experience will be
more rewarding.
Lift Lift
Push
Pull
Foam mountain
Foam shims

OUTFITTING: FOOTBRACES
10
BULKHEAD FOOTBRACES
Bulkhead footbraces help to distribute the
force of a frontal impact and are fitted in most
of our whitewater kayaks. To adjust the
foot brace:
We recommend adding additional foam
padding to bulkhead footrests for comfort
and shock absorption.
1
2
Unscrew and remove the retaining thumb nuts
and move the aluminium runners backwards or
forwards until correct fit is achieved. Always test
the fit by sitting in the kayak. Adjust the bulkhead
to be comfortably tight without hindering your
exit from the cockpit.
Some bulkheads are also adjustable for width
and height. You should adjust them to the maxi-
mum area as allowed by the internal dimensions
of the kayak. Some kayaks come with several
different sized bulkheads. Fit the bulkhead of
the maximum size allowed by the position
of the footbraces.
Adjusting the bulkhead for maximum width and height
Unscrew and remove plastic thumb nuts, adjust runners and replace
Fitting the foot plates and adjusting for maximum size

OUTFITTING: STOWING YOUR GEAR
11
STOWING
DECK RIGGING
There is stowage space behind the seat and in
front of the footbraces of all Dagger kayaks.
This is accessed through the cockpit. To stow
gear in other areas of a Dagger touring/recreational
kayak, simply open one of the hatches and
slide it in.
Heavier items should be placed towards the
bottom and centre of the kayak and lighter
equipment on top and towards the ends.
Dagger recreational/touring kayaks feature
deck rigging for stowing useful items: A spare
take-apart paddle, bilge pump, dry bag, first
aid kit, sun hat etc.
You can also stow maps flat under the elastic.
On some Dagger kayaks there are attachment
points to hold waterproof navigational chart
cases to the deck of your kayak.
Valuable items should be tied to the rigging
to prevent loss. Check the security of stashed
gear periodically and remember that heavy
items attached to the deck of the kayak can
reduce the stability of the craft.
If gear is stowed in the main cockpit area, ensure
that there are no loose items impeding your
exit from the kayak. It is also a good idea to
place your items in a waterproof bag and tie
it in to prevent loss in the event of a capsize.
Most Dagger kayaks with hatches have foam
bulkheads that create compartments. Do not
overfill these compartments as this can damage
the bulkheads and in some cases cause them
to leak.
Full deck rigging
and decklines
Rigging only
Expedition deck rigging
Basic deck rigging
Ensure that all
hatch covers are
fitted properly
before taking to
the water
We recommend you use Palm Gear Carriers to keep your equipment dry
Load heavier
gear first
Put lighter
gear on top
Bulkhead Bulkhead

OUTFITTING: RUDDERS
12
RUDDER OPERATION
Sit in the kayak and check the footbrace pedal
positions. The pedals should be adjusted to
fit the length of your legs and equal distances
from the seat. Once adjusted, any slack in the
rudder cables should be removed by tightening
at the footbrace.
Release the bungee loop securing the rudder
blade so that it is free to lift.
Pull one of the balls on the rudder line until the
rudder hangs vertically downwards. Test by pushing
on the footrests pedals with your feet.
To stow rudder, pull the second ball to reset the
rudder on the deck.
1
2
3
Some Dagger touring kayaks have a rudder
fitted. Rudders are operated by the foot
brace pedals which slide forward and back,
controlling the angle of the rudder.
RUDDER INSTALLATION
The rudder assembly is stored in the rear hatch.
Remove the split-ring and plastic washer from
the pintle (rudder post). Insert the pintle into the
vertical hole of the gudgeon (moulded-in rudder
mount). Replace the washer and split-ring.
Attach the rudder cables. To do this, thread the
‘D’-shackles through the holes on each side of
the rudder assembly and re-tighten the pins.
1
Insert pintle into gudgeon
Rudder cable
with D-shackle
Gudgeon
Attach rudder
cables at both sides
Always secure the
rudder blade with the
bungee loop when
transporting your
kayak
2

OUTFITTING: SKEGS
13
DROP SKEG
DROP SKEG OPERATION
For skegs with lanyards, locate and release the
ball from its clamp. The ball is to the right of the
cockpit at the end of the skeg line. The weight
of the skeg will allow it to drop into the water.
If your kayak features a slider instead, use this
to drop the skeg. If it doesn’t, check for dirt or
debris caught in the mechanism and clean
accordingly.
To stow the skeg pull on the line to retract it into
the hull and re-hook the ball. Alternatively, slide
the slider back to its original position.
1
2
Some Dagger Europe kayaks are fitted with a
skeg. A skeg acts like a surfboard fin in the water
and helps to keep you tracking in a straight line
if you are fighting wind or current. By deploying
the skeg, you can concentrate on efficient forward
paddling and making headway.
Skeg with lanyard
Skeg with slider
Releasing the skeg using lanyard and
slider systems

CARE / MAINTENANCE
14
CARE HULL DISTORTION
Our roto-moulded kayaks are made of high-
density Super EXL linear polyethylene, which is
virtually maintenance free. A minimal amount
of care in storage and transporting will help the
kayak maintain a like-new condition for many
years.
Polyethylene will become more flexible when
in warm conditions such as a hot, sunny day.
Improper storage or transportation of a plastic
boat, especially in the heat, can potentially distort
the shape of the hull on your boat.
If your kayak does become the victim of slight
distortion, correction is a simple process.
Brief exposure to the heat of the sun is often
all it takes to restore the hull to its original
shape. If that doesn’t work, the hull can usually
be restored by applying heat to the outside
of the boat with a hair dryer. Take care –
high, focused heat could cause damage.
When the hull is pliable enough, it can be
pushed back into shape by hand. A weight
can be placed inside the boat to maintain the
shape of the hull as it cools. Allow 24 hours to
ensure the process is completed.
CLEANING
Usually, a quick rinse of fresh water is all that
is necessary to keep your kayak clean as well
as functioning in good order. This is very
important after paddling in salt water, particularly
if your kayak is outfitted with a rudder system.
Be sure to rinse the rudder, cables, and foot-
braces with fresh water to remove salt residue.
WHITEWATER CARE
Whitewater kayaks are built to withstand
more aggressive use than recreation or touring
models. However, a certain amount of impact
and abrasion damage is to be expected
due to the nature of whitewater paddling.
Continual exposure to abrasion can roughen
the hull surface. Scratching is often cosmetic or
superficial and requires no repair.
It is important to be able to determine when
damage is cosmetic or extends to impacting
the structure of the hull. Impacts are much
more likely than scratches to result in structural
damage. Inspect your hull after suffering a collision.
As strong and durable as it is, polyethylene is
not indestructible. However, should the worst
happen, it is repairable – simply contact your
local Dagger dealer.
REPAIR OPTIONS
Although it is unlikely that your Dagger kayak
will need any repairs during its lifetime, it is
possible that a hull crack or puncture may occur
due to extreme impact or contact with a sharp
object. If this happens, first contact Dagger Europe
or your local Dagger dealer to determine if the
damage falls under the boat’s warranty (see
warranty section).
We will need the serial number of your kayak,
a good description of the damage (a photo-
graph is required) and a description of the
incident during which the damage occurred.
A warranty return form is available on our web
site www.daggereurope.com.
All of this information will help us determine
the best course of action.
WARNING
Avoid dragging your kayak across the
ground to prolong its life and maintain its
look and performance. Two people, using
the carrying handles, is the best way to
transport a longer kayak.

STORAGE / TRANSPORT
15
Use slings or webbing
straps suspended from
the ceiling or wall
Use foam to pad the
areas where the kayak
comes into contact
with the wall
Bow and
stern lines
Foam cradle or pad
Carry a single kayak
cockpit down
Carry two or more
kayaks cockpit to
cockpit - use upright
roof bars
Your boat can also be stored hull up on
parallel bars with weight supported evenly
throughout.
STORING YOUR KAYAK
Boats made from polyethylene plastic are
strong, rigid and highly impact resistant, but
due to the nature of plastic in general, it is
important to store your boat properly. It is always
best to store your kayak indoors, out of direct
sunlight and protected from inclement weather.
Preferably, you should stand your boat on end
or hang it suspended by slings. Hanging your
boat from its grab loops or handles increases
the chance of warpage. You can also store your
boat on the floor, upside down, but only as a
last resort.
TRANSPORTING YOUR KAYAK
Because of their light weight and shape,
kayaks are ideally suited for car topping.
Your primary concern in carrying your kayak
is that it stays securely tied to the vehicle.
But, as with storage, another concern should
be potential distortion of the hull.
Car-topping the kayak is best done with a quality
roof rack specifically designed for attaching
kayaks (e.g. Thule). Foam cradles attached to
the rack are another option. The boat should
be tied to the vehicle as well as the rack by its
grab handles.
Over tightening bow and stern lines will increase
the likelihood of warpage as will leaving the
boat tied tightly in the sun for prolonged periods.

ADDITIONAL EQUIPMENT
16
ESSENTIALS CHECKLIST:
OPTIONAL EXTRAS:
PADDLE
THROWLINE
AIRBAGS
HELMET
SPLIT PADDLE
OUTERWEAR
GOOD RIVER SHOES
BUOYANCY AID / PFD
FIRST AID KIT
SPRAYDECK
SLING / KARABINER
INSULATING LAYERS
Paddles vary from 180cm to about
230cm. Given variations in pad-
dling style, height, arm and boat
length we recommend testing
different paddle lengths and blade
shapes.
Never go whitewater kayaking
without a throwline and rescue
knife and learn how to use them.
Ask your local stockist for details
of course providers.
Using airbags in your kayak keeps
some of the water out of the boat
in the event of a capsize, making it
easier to empty and increasing its
buoyancy.
Always wear an approved kayaking
helmet when appropriate. A good
fitting helmet could save your life.
There is a great choice of helmets
designed specifically for kayakers
(check it’s approved to EN1385).
If you loose or break your original
set you could be in trouble.
Make sure you have at least one
spare set per group.
The correct choice of clothing
is a major consideration when
kayaking. The type of waterproof
protective clothing is dictated by
water temperature, the weather
conditions and type of activity.
Obvious, but essential. You’ll need
shoes with good grip and firm
soles.
Never go kayaking without wear-
ing an approved, correctly fitting
buoyancy aid. Always try on
buoyancy aids before you buy and
remember to always inspect for
wear or diminished flotation foam
before you get on the water.
There are several self-contained
waterproof versions for watersports
available or put one together
yourself.
We recommend using a spraydeck
on moving water to keep water
out of the boat and allow you to
perform an Eskimo roll. Ensure you
are comfortable releasing the deck
and exiting the boat before use.
A simple but important piece of
whitewater rescue equipment.
A sling has a variety of uses from
belay anchor to improvised short
throwline. Karabiners are essential to
clip into boats, paddles or people.
Quick drying synthetic fabrics are
a must – don’t wear cotton.
A range of polyester thermal layers
designed specifically for kayaking
are available from palmequip-
menteurope.com
Visit palmequipmenteurope.com or your local retailer to learn more.

YOUR SAFETY
17
Safety must be the foremost consideration in
any watersport activity. While kayaking is a
challenging and rewarding sport, it presents
a risk of serious injury. Any person using Dagger
Europe kayaks assumes all risks and takes complete
responsibility for any and all damages, or injuries,
including death, which may result from use of
Dagger kayaks.
• Get paddlesports instruction from an
approved provider.
• Be sure you can exit easily from your
boat. Practice wet exits in a pool or
another controlled situation before
venturing out.
• Join a club. Local canoe clubs are a
great way to meet like-minded people
and gain skills in a safe, social and fun
environment.
• Dress accordingly for the weather.
• Get first aid and rescue training and carry
first aid and rescue equipment.
• Check your equipment before each use
for signs of wear or failure.
• Always inspect unfamiliar waters before
paddling.
• Tell someone where you’re going and
how long you’re likely to be.
• Follow manufacturers recommendations
for use and outfitting of your kayak.
• Subscribe to some paddlesport maga-
zines. You can find most of them in your
local news agents or online. There are
also several excellent instructional DVDs
and books available.
• Never exceed your ability, so assess how
far and how long you can paddle
or swim.
• Never paddle alone.
• Never consume drugs or alcohol prior
to or during paddling.
• Never paddle in flood conditions.
• Don’t allow minors to use the boat
without adult supervision.
• Avoid bracing yourself in the kayak in
such a way that you have to release any
outfitting to escape.
• Do not impair entry or exit access to the
kayak when installing additional outfitting.
DON’T
DO
Kayaking is an acquired skill and there is no
substitute for experience and correct training.
While the inherent risk in paddlesport can
never be eliminated, it can be greatly reduced
by following a few simple steps before using
any Dagger product.
Visit palmequipmenteurope.com or your local retailer to learn more.

LIMITED WARRANTY
TERMS AND CONDITIONS
18
For the original retail purchaser (“Consumer”), Dagger
Europe kayaks (excluding whitewater models) are
warranted against material or manufacturing defects
in the hull and deck for three (3) years from date of
original purchase of the kayak. Parts, accessories, and
outfitting are warranted for a period of one (1) year
against material or manufacturing defects from the
date of purchase.
Dagger whitewater kayak models are warranted
against material or manufacturing defects in the hull
and deck for three (3) years from the date of purchase
based on the coverage levels detailed below.
Parts, accessories, and outfitting are warranted for a
period of one (1) year against material or manufacturing
defects from the date of purchase.
The following schedule details whitewater kayak coverage
levels during the warranty term:
During the first year of ownership, this warranty covers re-
pair or replacement of the hull, deck, outfitting, and
all parts and accessories at 100% of the original retail
price.
During the second year of ownership, this warranty
covers repair or replacement of the hull and deck up
to 80% of the original retail price.
During the third year of ownership, this warranty cov-
ers repair or replacement of the hull and deck up to
60% of the original retail price.
This limited warranty is only valid with the purchase
of a Dagger kayak from a Dagger authorised dealer.
This warranty is non-transferable.
HOW TO REGISTER YOUR BOAT
Please fill out the warranty registration form online at
www.daggereurope.com or fill in and send off your
warranty registration card. Registration forms must
be completed within 30 days of original purchase to
be activated. We suggest you keep hold of your origi-
nal sales receipt should it be required in the future as
proof of purchase.
OBTAINING WARRANTY SERVICE
If you have a problem with your kayak and suspect
that it may be due to defective materials or workman-
ship, contact Dagger Europe and arrange to have the
problem inspected.
Please return the kayak to Dagger Europe and enclose
the original receipt, kayak serial number, date of purchase,
plus your name, address and telephone number and
the name of the retailer you purchased the boat from.
A warranty return form can be downloaded from our
web site at www.daggereurope.com.
If our inspection indicates a defect that may be
due to materials or workmanship, Dagger Europe will
repair or replace your kayak or affected part free of
charge, at our discretion, based on the type of kayak
and time of ownership corresponding to the warranty
coverage schedule detailed in the terms and conditions.
The customer is responsible for transportation costs
to and from the Dagger Europe factory in Clevedon,
UK.
LIMITATIONS AND EXCLUSIONS
This limited warranty does not apply to:
• Normal wear and tear and ageing of product.
• Kayaks damaged by extreme weather
or environmental conditions
• Kayaks damaged by accident, neglect,
improper use or handling
• Kayaks designated as prototypes
• Kayaks sold as “demos” or in “as is” condition
• Kayaks that have been structurally
or dimensionally altered or modified
• Kayaks with unauthorised repairs
• Kayaks used for commercial, rental or professional
purposes only carry the guarantee for 12 months
from the date of consumer purchase.
The 2nd and 3rd year warranty is automatically
cancelled.
This limited warranty does not affect your statutory
rights.
All Dagger Europe kayaks are fully covered
by a 3-year warranty and all materials and
workmanship are guaranteed.

SERVICE / SUPPORT
19
FINDING YOUR SERIAL NUMBER
The serial number is located at the stern of the
boat. On most boats it is engraved in an indentation
on the right side of the boat, some models also
have this written on the inside of the cockpit
rim.
SERVICE AND SUPPORT
If you have a problem with your kayak that you
believe is covered under warranty, please contact
dealer from which you bought the boat. You
can find a listing of all dealers on our web site:
www.daggereurope.com.
CONTACT US
Customer Service: +44 (0)1275 798100
Fax: +44 (0)1275 798110
Our opening hours are Monday – Friday,
9 a.m to 5 p.m.
Dagger Europe
Kenn Business Park
Kenn Road
Clevedon
North Somerset
BS21 6TH
United Kingdom
www.daggereurope.com
info@daggereurope.com
IMPORTANT INFORMATION
Boat Model:
Serial Number:
Date of Purchase:
Dealer Name:

Dagger Europe
Kenn Business Park
Clevedon
North Somerset
BS21 6TH
www.daggereurope.com
DUP0531
© 2013 Dagger Europe
20
This manual suits for next models
2
Table of contents
Other Dagger Boat manuals
Popular Boat manuals by other brands

Yamarin Cross
Yamarin Cross 75 owner's manual

Sevylor
Sevylor Sit On Top instruction manual

Horizon Yacht Charters
Horizon Yacht Charters Bavaria 31 'Sunny Side Up' 2008 Information & operation manual

Bestway
Bestway Hydro-Force Cove Champion owner's manual

Four winns
Four winns 310 Horizon owner's manual

RS
RS RS100 Rigging guide