Daitsu RG57H(B)/BG(C)E User manual

CR190-RG57H
1611700000083X
AIR CONDITIONER
REMOTE CONTROLLER ILLUSTRATION
Thank you very much for purchasing our air conditioner.
Please read this owner's manual carefully before using
your air conditioner.
The design and specifications are subject to change without prior
notice for product improvement. Consult with the sales agency or
manufacturer for details.

1
CONTENTS
2
Model
Rated Voltage
8m
3.0V(Dry batteries R03/LR03×2)
Environment
Signal Receiving Range
RG57H(B)/BG(C)E;
RG57H3(B)/BG(C)EF
RG57H1(B)/BG(C)E; RG57H2(B)/BG(C)EF;
。 。
-5 C 60 C
~
2
3
4
5
6
13
Handling the remote controller ......................................................
Remote controller Specifications...................................................
Function buttons .................. .........................................................
Remote LCD screen indicators .....................................................
How to use the basic functions........................................................
How to use the advanced functions ...............................................
Remote Controller Specifications
ON/O FF
TEMP
SHORT
CUT
TIME R
ON
TIME R
OFF
MODE
FAN
SLEE P SWING LED
ON/O FF
TEMP
SHORT
CUT
TIME R
ON
TIME R
OFF
MODE
FAN
LED
ON/O FF
TEMP
SHORT
CUT
TIME R
ON
TIME R
OFF
MODE
FAN
SLEE P
FOLLOW
ON/O FF
TEMP
SHORT
CUT
TIME R
ON
TIME R
OFF
MODE
FAN
LED
RG57H(B)/BG(C)E
SLEE P SWING
ION
LED
ME
SLEE P
FOLLOW
ME
RG57H1(B)/BG(C)E RG57H2(B)/BG(C)EF RG57H3(B)/BG(C)EF

3 4
Before you begin using your new air conditioner, make sure to familiarize yourself with its remote
control. The following is a brief introduction to the remote control itself. For instructions on how to
operate your air conditioner, refer to the How to Use Basic Functions section of this manual.
SHORT CUT
Sets and activates your
favorite pre-settings.
ON/OFF
Turns the unit on or off.
MODE
Scrolls through operation
modes as follows:
AUTO
g
COOL
g
DRY
g
HEAT
g
FAN
FAN SPEED
Selects fan speeds in
the following order:
AUTO g LOW g
MED g HIGH
SLEEP
Saves energy during
sleeping hours.
ION
TEMP
p
Increases temperate in
O
1 C increments.
Max. temperature is
O
30 C .
TEMPq
Decreases temperate in
O
1 C increments.
Min. temperature is
O
17 C .
TIMER ON
Sets timer to turn unit
on (see How to Use
Basic Functions for
instructions)
TIMER OFF
Sets timer to turn unit
off (see How to Use
Basic Functions for
instructions)
SWING
Starts and stops louver
movement.
LED
Turns indoor unit s LED
,
FOLLOW ME
Temperature sensing
and room temperature
display button.
NOT SURE WHAT A FUNCTION DOES?
Refer to the How to Use Basic Functions and
How to Use Advanced Functions sections
of this manual for a detailed description of
how to use your air conditioner.
SPECIAL NOTE
Button designs on your unit may differ
slightly from the example shown.
If the indoor unit does not have a particular
function, pressing that function s button
on the remote control will have no effect.
When there are wide differences between
Remote controller Illustration and
USER'S MANUAL on function description,
the description of USER'S MANUAL
shall prevail.
TIPS FOR USING REMOTE CONTROL
The remote control must be used within 8
meters of the unit.
The unit will beep when remote signal is
received.
Curtains, other materials and direct sunlight
can interfere with the infrared signal receiver.
Remove batteries if the remote will not be
used more than 2 months.
Inserting and Replacing Batteries
Your air conditioning unit comes with two AAA
batteries. Put the batteries in the remote control
before use.
1. Slide the back cover from the remote
Control downward, exposing the battery
compartment.
2. Insert the batteries, paying attention to match
up the (+) and (-) ends of the batteries with
the symbols inside the battery compartment.
3. Slide the battery cover back into place.
BATTERY NOTES
For optimum product performance:
Do not mix old and new batteries, or
batteries of different types.
Do not leave batteries in the remote control
if you don t plan on using the device for
more than 2 months.
BATTERY DISPOSAL
Do not dispose of batteries as unsorted
municipal waste. Refer to local laws for
proper disposal of batteries.
,
,
ON/OFF
TEMP
SHORT
CUT
TIMER
ON
TIMER
OFF
MODE
FAN
LED
Press this button, the
Ionizer is energized and
will help to remove pollen
and impurities from the
air.
If you are sensitive to
light when you go to
sleep, you can press the
LED button to turn off
the LED display on the
unit. Press the button
again to turn it back on.
Function Buttons Handling The Remote Controller
,
,,
,
,
,
,
,
,
,,
,
ION
SLEEP
FOLLOW
SWING
ME
display on and off.
NOTE:
Swing, Ion and Follow me features are optional.
NOTE:Please do not select
HEAT mode if the machine you
purchased is cooling only type.
Heat mode is not supported by
the cooling only appliance.

5 6
MODE display
Displays the current
mode, including:
AUTO
COOL
DRY
HEAT
FAN
Transmission Indicator
Lights up when remote sends
signal to unit
ON/OFF display
Appears when the unit is turned on,
and disappears when it is turned off
TIMER ON display
Displays when TIMER
ON is set
TIMER OFF display
Displays when TIMER
OFF is set
SLEEP display
Battery display
SILENT display
ECO display
Displays when
SLEEP function
is activated
FOLLOW ME
display
Indicates that
the FOLLOW ME
function is on
FAN SPEED display
Displays selected FAN SPEED:
HIGH, MED,
or LOW
This display is blank when
set to AUTO speed or DRY mode.
Temperature/Timer display
Displays the set temperature by default, or timer setting
when using TIMER ON/OFF functions
o
Temperature range: 17-30 C
Timer setting range: 0-24 hours
This display is blank when operating in FAN mode.
1. Press the MODE button to select
COOL mode.
2. Set your desired temperature using
the Temp or Temp button.
3. Press the FAN button to select the
fan speed: AUTO, LOW, MED,or
HIGH.
4. Press the ON/OFF button to start the
unit.
In AUTO mode, the unit will automatically
select the COOL, FAN, HEAT or DRY mode
based on the set temperature.
1. Press the MODE button to select Auto mode.
2. Set your desired temperature using the
Temp or Temp button.
3. Press the ON/OFF button to start the unit.
,
NOTE: FAN SPEED can t be set in Auto mode.
SETTING TEMPERATURE
AUTO operation
The operating temperature range for units is
O
17-30 C. You can increase or decrease the
O
set tmeperature in 1 C increments.
COOL operation
1
3
2
1
3
2
4
Not available for this unit
Not available for
this unit
Not available for
this unit
Low battery
detection
Remote LCD Screen Indicators How To Use The Basic Functions
ON/OFF
ON/OFF
TEMP
TEMP
SHORT
CUT
SHORT
CUT
TIMER
ON
TIMER
ON
TIMER
OFF
TIMER
OFF
MODE
MODE
FAN
FAN
SLEEP
SLEEP
LED
LED
FOLLOW
ION
SWING ME
FOLLOW
ION
SWING ME

78
1. Press the MODE button to select DRY
mode.
2. Set your desired temperature using the
Temp or Temp button.
3. Press the ON/OFFbutton to start the unit.
,
NOTE: FAN SPEED can t be changed in
DRY mode.
1. Press the MODE button to select FAN
mode.
2. Press FAN button to select the fan
speed: AUTO, LOW, MED or HIGH.
3. Press the ON/OFFbutton to start the
unit.
,
NOTE: You can t set temperature in FAN
mode. As a result, your remote control s
LCD screen will not display temperature.
DRY operation(dehumidifying)
FAN operation
,
1. Press the MODE button to select
HEAT mode.
2. Set your desired temperature using
the Temp or Temp button.
3. Press the FAN button to select the
fan speed: AUTO, LOW, MED,or HIGH.
4. Press the ON/OFF button to start the
unit.
HEAT operation
NOTE: As outdoor temperature drops,the
performance of your unit s HEAT function
may be affected. In such instances, we
recommend using this air conditioner in
conjunction with other heating appliance.
,
1
1
2
3
3
2
1
3
2
4
How To Use The Basic Functions How To Use The Basic Functions
ON/OFF
TEMP
SHORT
CUT
TIMER
ON
TIMER
OFF
MODE
FAN
LED
ON/OFF
TEMP
SHORT
CUT
TIMER
ON
TIMER
OFF
MODE
FAN
SLEEP LED
ON/OFF
TEMP
SHORT
CUT
TIMER
ON
TIMER
OFF
MODE
FAN
SLEEP LED
ION
SLEEP
FOLLOW
SWING ME
ION
FOLLOW
SWING ME
FOLLOW
ION
SWING ME

910
NOTE:
" 0.0h "
When setting the TIMER ON or
TIMER OFF functions, up to 10 hours,
the time will increase in 30 minute
increments with each press. After 10
hours and up to 24, it will increase in 1
hour increments. The timer will revert to
zero after 24 hours.
You can turn off either function by
setting its timer to .
2. Press the TIMER ON button repeatedly
to set the time when you want the unit to
turn on.
3. Wait 2 seconds, then the TIMER ON
function will be activated. The digital
display on your remote control will then
return to the temperature display.
2. Press the TIMER OFF button repeatedly
to set the time when you want the unit to
turn off.
3. Wait 2 seconds, then the TIMER OFF
function will be activated. The digital
display on your remote control will then
return to the temperature display.
Example
hours.
: Setting unit to turn on after 2.5
Example
hours.
: Setting unit to turn off after 5
2sec
ON/OFF
MODE
FAN
SHORT
CUT
TIMER ON
TIMER OF
F
TEMP
S
LEEP
1sec
x5
1
3
2
4
TIMER OFF function
The TIMER OFF function allows you to
set a period of time after which the unit
will automatically turn off, such as when
you wake up.
1.
This number indicates the
amount of time after the current time
that you want the unit to turn on.
For example, if you set TIMER ON for
2 hours, will appear on the
screen, and the unit will turn on after
2 hours.
Press the TIMER ON button. By
default, the last time period that you
set and an "h" (indicating hours)will
appear on the display.
Note:
" 2.0h "
1.
This number indicates the
amount of time after the current time
that you want the unit to turn off.
For example, if you set TIMER OFF for
2 hours, will appear on the
screen, and the unit will turn off after
2 hours.
Press the TIMER OFF button. By
default, the last time period that you
set and an "h" (indicating hours)will
appear on the display.
Note:
" 2.0h "
2sec
x10
ON/OFF
MODE
FAN
SHORT
CUT
TIMER ON
TIMER OF
F
TEMP
S
LEEP
1sec
1
3
2
4
TIMER ON function
The TIMER ON function allows you to set
a period of time after which the unit will
automatically turn on, such as when you
come home from work.
Your air conditioning unit has two
timer-related functions:
TIMER ON- sets the amount of timer after
which the unit will automatically turn on.
TIMER OFF- sets the amount of time after
which the unit will automatically turn off.
TIMER ON TIMER ON
TIMER OFF TIMER OFF
Continue to press
TIMER ON or
TIMER OFF until
desired time is
reached.
Setting the TIMER function
ON/OFF
TEMP
SHORT
CUT
TIMER
ON
TIMER
OFF
MODE
FAN
SLEEP LED
Timer on
FOLLOW
SWIN G
ION
ME

11
Example: Setting the unit to turn on after 6 hours, operate for 2 hours, then turn off
(see the figure below)
Your remote display
Timer is set To turn ON
6 hours from current time
Timer is set to turn OFF
8 hours from current time
Current
time 1PM
2PM 3PM 4PM 5PM 6PM 7PM 8PM 9PM
Timer starts Unit turns Unit turns
ON OFF
6 hours later
8 hours later
Timer on
Timer off
12
Setting both TIMER ON and TIMER OFF at the same time
Keep in mind that the time periods you set for both functions refer to hours after the
current time. For example, say that the current time is 1:00 PM, and you want the unit
to turn on automatically at 7:00 PM. You want it to operate for 2 hours, then automa-
tically turn off at 9:00 PM.
Do the following:
ON/OFF
ON/OFF
MODE
MODE
SHORT
SHORT
CUT
CUT
TIMER ON
TIMER ON
TEMP
TEMP
3
3
sec
sec
4
8
3
7
X12
X16
2
6
1
5
TIMER ON TIMER ON
TIMER OFF TIMER OFF

13
The FOLLOW ME function enables the
remote control to measure the temper-
ature at its current location. When using
AUTO, COOL, or HEAT functions,
measuring ambient temperature from
the remote control (instead of from the
indoor unit itself) will enable the air
conditioner to optimize the temperature
around you and ensure maximum comfort.
1. Press FOLLOW ME button to activate
function. The remote control will send
temperature signal to the unit every
three minutes.
2. Press FOLLOW ME button again to
turn off this function.
FOLLOW ME function
SHORTCUT function
SWING Function
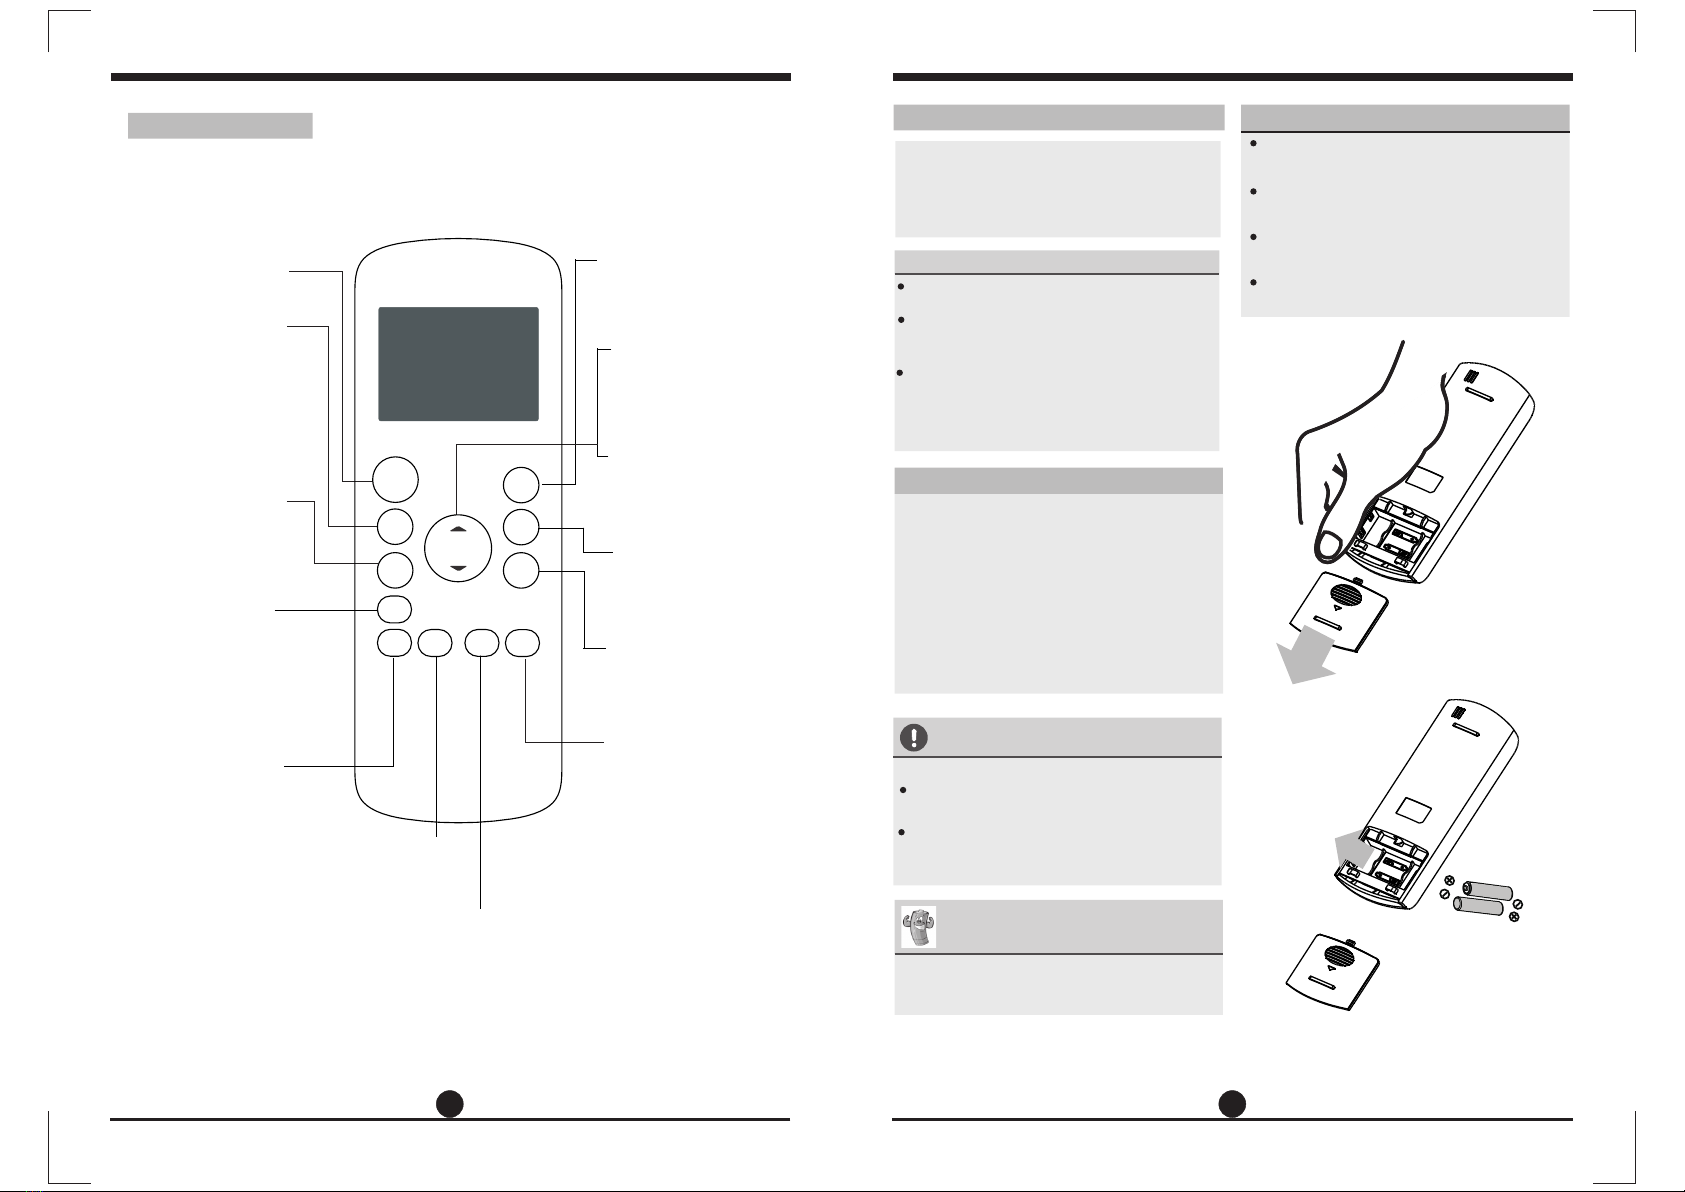
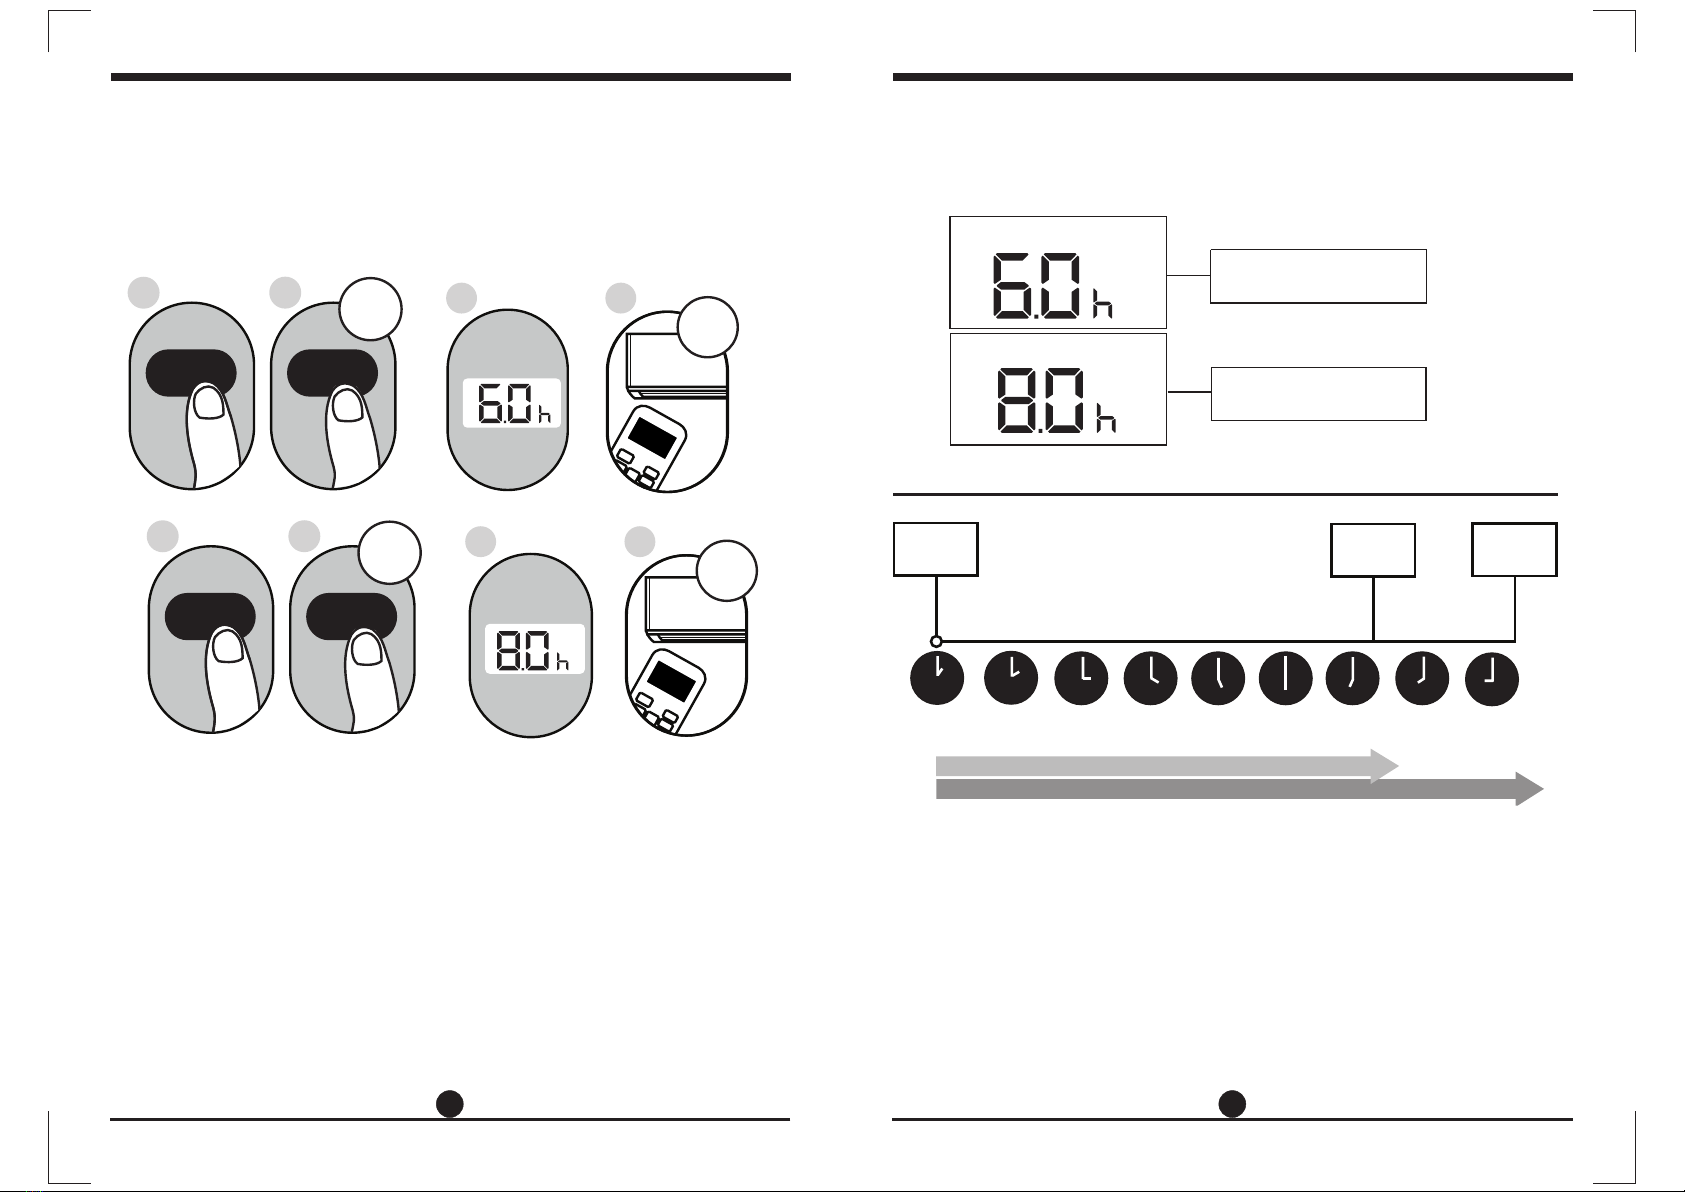
The SLEEP function is used to decrease
energy use while you sleep (and don t need
the same temperature settings to stay
comfortable). This function can only be
activated via remote control.
Note: The SLEEP function is not available
in FAN or DRY mode.
,
Used to restore the current settings or resume
previous settings.
On the first time connecting to the power, if
push the SHORTCUT button, the unit will
O
operate on AUTO mode, 26 C, and fan speed
is Auto.
Push this button when remote controller is on,
the system will automatically revert back to
the previous settings including operating mode,
setting temperature, fan speed level and sleep
feature (if activated).
If pushing more than 2 seconds, the system
will automatically restore the current operation
settings including operating mode, setting
temperature, fan speed level and sleep
feature(if activated ).
Used to stop or start louver movement and set
the desired left/right air flow direction. The louver
changes 6 degrees in angle for each press(some
models without). If keep pushing more than 2
seconds, the louver auto swing feature is activated.
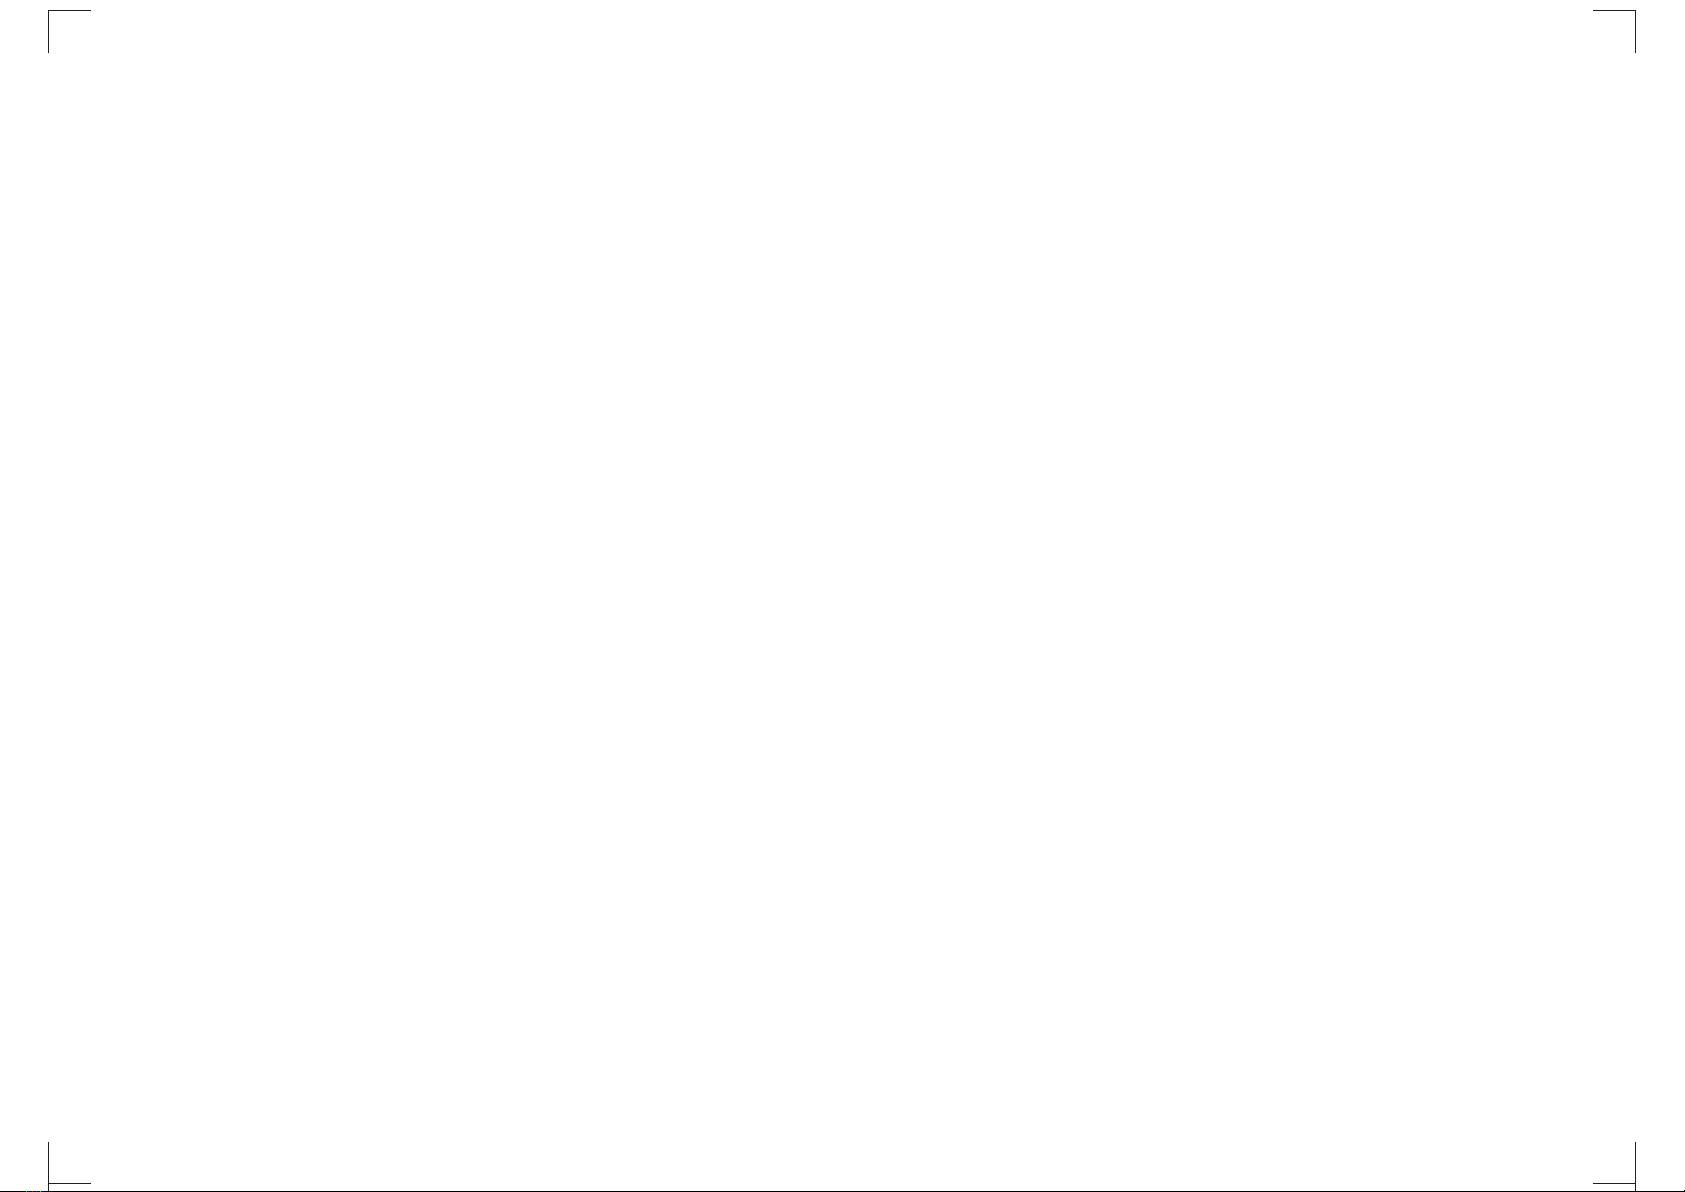
How To Use The Advanced Functions
ON/OFF
TEMP
SHORT
CUT
TIMER
ON
TIMER
OFF
MODE
FAN
LED
14
ION
SLEEP
FOLLOW
SWING ME
SLEEP Function
NOTE:
-Buttons design is based on typical model and might be slightly different
from the actual one you purchased, the actual shape shall prevail.
-All the functions described are accomplished by the unit, if the unit has
no this feature, there is no corresponding operation happened when
press the relative button on the remote controller.
-When there are wide differences between Remote controller Illustration
and USERS MANUAL on function description, the description on USERS
MANUAL shall prevail.
-The device could comply with the local national regulations. In Canada,
it should comply with CAN ICES-3(B)/NMB-3(B). In USA, this device
complies with part 15 of the FCC Rules. Operation is subject to the
following two conditions: (1) This device may not cause harmful interfe-
rence, and (2) this device must accept any interference received,
including interference that may cause undesired operation.
-This equipment has been tested and found to comply with the limits for
a Class B digital device, pursuant to part 15 of the FCC Rules. These
limits are designed to provide reasonable protection against harmful
interference in a residential installation. This equipment generates, uses
and can radiate radio frequency energy and, if not installed and used in
accordance with the instructions, may cause harmful interference to radio
communications. However, there is no guarantee that interference will
not occur in a particular installation. If this equipment does cause harmful
interference to radio or television reception, which can be determined by
turning the equipment off and on, the user is encouraged to try to correct
the interference by one or more of the following measures:
Reorient or relocate the receiving antenna.
Increase the separation between the equipment and receiver.
Connect the equipment into an outlet on a circuit different from that to
which the receiver is connected.
Consult the dealer or an experienced radio/TV technician for help.
Changes or modifications not approved by the party responsible for
compliance could void suers authority to operate the equipment.

AIRE ACONDICIONADO
INSTRUCCIONES DEL MANDO A DISTANCIA
Muchas gracias por adquirir nuestro aire acondicionado.
Lea atentamente este manual de instrucciones antes
de usar su aire acondicionado.

1
ÍNDICE
Especicaciones del mando a distancia ....................................................2
Botones de funciones ..................................................................................3
Manejo del mando a distancia.....................................................................4
Indicadores de la pantalla LCD del mando a distancia.............................5
Funciones básicas .......................................................................................6
Funciones avanzadas ................................................................................13

2
Especicaciones del mando a distancia
Modelo RG57H(B)/BG(C)E; RG57H1(B)/BG(C)E;
RG57H2(B)/BG(C)EF; RG57H3(B)/BG(C)EF
Tensión nominal 3,0 V (pilas R03/LR03×2)
Rango de recepción
de la señal
8m
Condiciones ambientales -5 ºC a 60 ºC

3
Botones de funciones
Antes de empezar a utilizar su nuevo aire acondicionado, familiarícese con su mando a distancia.
A continuación le ofrecemos una breve presentación del mismo. Si desea instrucciones sobre cómo
manejar su aire acondicionado, consulte la sección Funciones básicas de este manual.
SHORT CUT ["Atajo"]
Ajusta y activa sus
preajustes favoritos.
TEMP ▲
Aumenta la temperatura
a pasos de 1 ºC.
La temperatura máxima
es de 30 ºC.
TEMP ▼
Reduce la temperatura
a pasos de 1 ºC.
La temperatura mínima
es de 17 ºC.
TIMER ON ["Encendido
por programador"]
Ajusta el programador
para encender la unidad
(véanse las instrucciones
en "Funciones básicas")
TIMER OFF ["Apagado
por programador"]
Ajusta el programador
para apagar la unidad
(véanse las instrucciones
en "Funciones básicas")
LED
Enciende y apaga
la pantalla LED
de la unidad interior.
Si su luz le molesta
para dormir, puede pulsar
el botón "LED" para
apagar la pantalla LED
de la unidad. Si vuelve
a pulsarlo, se encenderá
de nuevo.
ON/OFF ["Encendido/apagado"]
Enciende y apaga la unidad.
MODE ["Modo"]
Se desplaza por los modos de
funcionamiento del siguiente
modo: AUTO ["Automático"]
COOL ["Refrigeración"]
DRY ["Deshumidicación"]
HEAT ["Calefacción"] FAN
["Refrigeración"]
NOTA: No seleccione el modo de
calefacción si su máquina solo ofrece
el modo de refrigeración. El modo
de calefacción no está disponible
en equipos de solo refrigeración.
FAN SPEED
["Velocidad de ventilación"]
Selecciona las velocidades de
ventilación en el siguiente orden:
AUTO ["Automática"] LOW
["Baja"] MED HIGH ["Alta"]
ION
Pulsando este botón
se activa el ionizador, que
ayuda a eliminar el polen
y las impurezas del aire.
SLEEP ["Sueño"]
Ahorra energía durante
las horas de sueño.
SWING ["Oscilación"]
Inicia y detiene el movimiento
de las lamas.
FOLLOW ME ["Sígame"]
Botón de detección de
temperatura y visualización
de temperatura ambiente.
NOTA:
Las funciones "Swing" ["Oscilación"], "Ion" ["Ión"] y "Follow me" ["Sígame"] son opcionales.

4
Manejo del mando a distancia
¿QUIERE SABER LO QUE HACE CADA
FUNCIÓN?
En las secciones "Funciones básicas"
y "Funciones avanzadas" de este manual
encontrará una descripción detallada de cómo
manejar su aire acondicionado.
NOTA ESPECIAL
●Los diseños de los botones de su unidad
pueden variar ligeramente del ejemplo
mostrado.
●Si la unidad interior no dispone de una
función determinada, al pulsar el botón
correspondiente del mando a distancia
no ocurrirá nada.
●En caso de grandes diferencias entre
la ilustración del mando a distancia y la
descripción de funciones presentadas en el
MANUAL DE USUARIO, deberá darse prioridad
a la descripción del MANUAL DE USUARIO.
Introducción y cambio de las pilas
Su unidad de aire acondicionado viene
con dos pilas AAA. Introdúzcalas en el mando
a distancia antes de su uso.
1. Deslice la cubierta trasera del mando
a distancia hacia abajo, descubriendo de
este modo el compartimento de las pilas.
2. Introduzca las pilas prestando atención
a que los polos positivo y negativo de las
mismas coincidan con los símbolos (+) y (-)
marcados dentro del compartimento.
3. Vuelva a colocar la cubierta de las pilas
en su sitio.
INDICACIONES SOBRE LAS PILAS
Para un rendimiento óptimo del producto:
●No mezcle pilas nuevas con pilas usadas
ni pilas de tipos diferentes.
●No deje las pilas puestas en el mando
a distancia si no tiene pensado emplear
el dispositivo durante más de 2 meses.
ELIMINACIÓN DE LAS PILAS
No deseche las pilas como residuos urbanos
generales. Respete la normativa local sobre
gestión de pilas usadas.
CONSEJOS SOBRE EL MANDO A DISTANCIA
●Este mando a distancia debe emplearse
dentro de un radio de 8 metros de la unidad.
●La unidad emite un pitido cada vez que recibe
una señal del mando a distancia.
●Elementos tales como cortinas, otros
materiales y la radiación solar directa
pueden interrumpir la señal hasta
el receptor de señales infrarrojo.
●Retire las pilas si no va a usar el mando
a distancia durante más de 2 meses.

5
Indicadores de la pantalla LCD del mando a distancia
Indicador de modos
Muestra el modo actual.
Posibles valores:
●AUTO
●COOL ["Refrigeración"]
● DRY ["Deshumidicación"]
●HEAT ["Calefacción"]
●FAN ["Ventilación"]
Indicador de transmisión
Se enciende cuando el mando a
distancia envía una señal a la unidad
Indicador de encendido/apagado
Se muestra al encender la unidad,
y se oculta al apagarla.
Indicador de encendido
por programador
Se muestra cuando la función de
encendido por programador está ajustada
Indicador de apagado por programador
Se muestra cuando la función de apagado
por programador está ajustada
Indicador "ECO"
No disponible
para esta unidad
Indicador
de batería
Detección
de batería baja
Indicador "SLEEP"
["Sueño"]
Se muestra cuando
la función SLEEP
["Sueño"]
está activada
Indicador
"FOLLOW ME"
["Sígame"]
Se muestra cuando
la función FOLLOW
ME ["Sígame"]
está activada
No disponible
para esta unidad
Indicador "SILENT" ["Silencio"]
No disponible para esta unidad
Indicador de temperatura/programador
Por defecto, muestra la temperatura de consigna. Alternativamente,
muestra los ajustes de programador al ajustar las funciones
de encendido o apagado por programador
●Rango de temperatura: 17-30 ºC
●Rango de ajuste del programador: 0-24 horas
Este indicador se muestra en blanco cuando la unidad funciona
en modo de ventilación.
Indicador de velocidad de ventilación
Muestra la velocidad de ventilación
seleccionada: HIGH
["Alta"], MED ["Media"],
o LOW ["Baja"]
Este indicador se muestra en blanco
en los modos de velocidad automática
y deshumidicación.

6
Funciones básicas
Modo de refrigeración
1. Pulse el botón MODE ["MODO"] para
seleccionar el modo COOL ["Refrigeración"].
2. Ajuste la temperatura deseada
con los botones Temp ▲ y Temp ▼.
3. Pulse el botón FAN ["Ventilación"]
para ajustar la velocidad de ventilación:
AUTO ["Automática"], LOW ["Baja"],
MED o HIGH ["Alta"].
4. Pulse el botón ON/OFF ["Encendido /
Apagado"] para encender la unidad.
AJUSTE DE TEMPERATURA
El rango de temperatura de servicio de las
unidades es de 17 a 30 ºC. Puede aumentar
o disminuir la temperatura de consigna a pasos
de 1 ºC.
Modo automático
En el modo AUTO ["Automático"], la unidad
selecciona automáticamente los modos
de refrigeración, ventilación, calefacción
y deshumidicación en función de
la temperatura de consigna.
1. Pulse el botón MODE ["MODO"]
para seleccionar el modo "Auto".
2. Ajuste la temperatura deseada
con los botones Temp ▲ y Temp ▼.
3. Pulse el botón ON/OFF ["Encendido /
Apagado"] para encender la unidad.
NOTA: La velocidad de ventilación no
se puede ajustarse en el modo automático.

7
Funciones básicas
Modo de ventilación
1. Pulse el botón MODE ["MODO"] para
seleccionar el modo FAN ["Ventilación"].
2. Pulse el botón FAN ["Ventilación"] para
ajustar la velocidad de ventilación:
AUTO ["Automática"], LOW ["Baja"],
MED o HIGH ["Alta"].
3. Pulse el botón ON/OFF ["Encendido /
Apagado"] para encender la unidad.
NOTA: En el modo de ventilación no es posible
ajustar la temperatura. Por tanto, la pantalla
LCD de su mando a distancia no mostrará
la temperatura.
Modo de deshumidicación
1. Pulse el botón MODE ["MODO"]
para seleccionar el modo DRY
["Deshumidicación"].
2. Ajuste la temperatura deseada
con los botones Temp ▲ y Temp ▼.
3. Pulse el botón ON/OFF ["Encendido /
Apagado"] para encender la unidad.
NOTA: La velocidad de ventilación
no se puede ajustarse en el modo
de deshumidicación.

8
Funciones básicas
Modo de calefacción
1. Pulse el botón MODE ["MODO"] para
seleccionar el modo HEAT ["Calefacción"].
2. Ajuste la temperatura deseada
con los botones Temp ▲ y Temp ▼.
3. Pulse el botón FAN ["Ventilación"] para
ajustar la velocidad de ventilación: AUTO
["Automática"], LOW ["Baja"], MED o HIGH
["Alta"].
4. Pulse el botón ON/OFF ["Encendido /
Apagado"] para encender la unidad.
NOTA: Conforme baja la temperatura
exterior, puede empeorar el rendimiento de
la función de calefacción de su unidad. En
tales casos, le recomendamos emplear este
aire acondicionado en combinación con otro
equipo de calefacción.

9
Ajuste de la función
de programador
Su unidad de aire acondicionado tiene
dos funciones de programación:
●Con TIMER ON ["Encendido por
programador"] se ajusta el tiempo en que
deberá encenderse automáticamente
la unidad.
●Con TIMER OFF ["Apagado por
programador"] se ajusta el tiempo
en que deberá apagarse automáticamente
la unidad.
Función de encendido por programador
La función TIMER ON ["Encendido por
programador"] le permite ajustar un tiempo
al cabo del cual la unidad se encenderá
automáticamente (por ejemplo, cuando
vuelva usted del trabajo).
1. Pulse el botón TIMER ON ["Encendido por
programador"]. Por defecto, en la pantalla
aparecerán el último tiempo que haya
ajustado y la letra "h" (de "horas").
Nota: Este número indica la cantidad de
tiempo, a partir de este momento, al cabo
del cual desea que se encienda la unidad.
Por ejemplo, si ajusta el encendido por
programador a 2 horas, el mensaje "2,0 h"
aparecerá en la pantalla, y la unidad
se encenderá al cabo de 2 horas.
2. Pulse el botón TIMER ON ["Encendido
por programador"] varias veces para
ajustar el tiempo en que desea que
se encienda la unidad.
3. Espere 2 segundos, y la función de
encendido por programador se activará.
La pantalla digital de su mando a distancia
volverá a mostrar la temperatura.
1s 2s
Ejemplo: Ajuste de la unidad para que
se encienda al cabo de 2,5 horas.

10
Función de apagado por programador
La función TIMER OFF ["Apagado por
programador"] le permite ajustar un tiempo
al cabo del cual la unidad se apagará
automáticamente (por ejemplo, cuando
usted se levante).
1. Pulse el botón TIMER OFF ["Apagado por
programador"]. Por defecto, en la pantalla
aparecerán el último tiempo que haya
ajustado y la letra "h" (de "horas").
Nota: Este número indica la cantidad de
tiempo, a partir de este momento, al cabo
del cual desea que se apague la unidad.
Por ejemplo, si ajusta el apagado por
programador a 2 horas, el mensaje "2,0 h"
aparecerá en la pantalla, y la unidad
se apagará al cabo de 2 horas.
2. Pulse el botón TIMER OFF ["Apagado
por programador"] varias veces para
ajustar el tiempo al cabo del cual desea
que se apague la unidad.
3. Espere 2 segundos, y la función de
apagado por programador se activará.
La pantalla digital de su mando a distancia
volverá a mostrar la temperatura.
1s 2s
Ejemplo: Ajuste de la unidad para que
se apague al cabo de 5 horas.
NOTA: Al ajustar las funciones de encendido
o apagado por programador, el tiempo
aumentará a pasos de 30 minutos cada vez
que pulse el botón hasta las 10 horas. Entre
las 10 y las 24 horas, el tiempo aumentará
a pasos de 1 hora. Después de las 24 horas,
el programador volverá a ponerse a cero.
Puede desactivar ambas funciones ajustando
su programador a "0,0 h".
Continúe pulsando
los botones TIMER
ON ["Encendido
por programador"]
y TIMER OFF
["Apagado por
programador"]
hasta obtener el
tiempo deseado.

11
Ajuste del encendido por programador y el apagado por programador al mismo tiempo
Tenga en cuenta que el tiempo ajustado para ambas funciones equivale a horas a partir de la hora
en que se ajusten. Pongamos, por ejemplo, que son las 13:00 y desea que la unidad se encienda
automáticamente a las 19:00 para funcionar durante 2 horas y volver a apagarse a las 21:00.
Haga lo siguiente:
3s
3s
This manual suits for next models
3
Table of contents
Other Daitsu Remote Control manuals