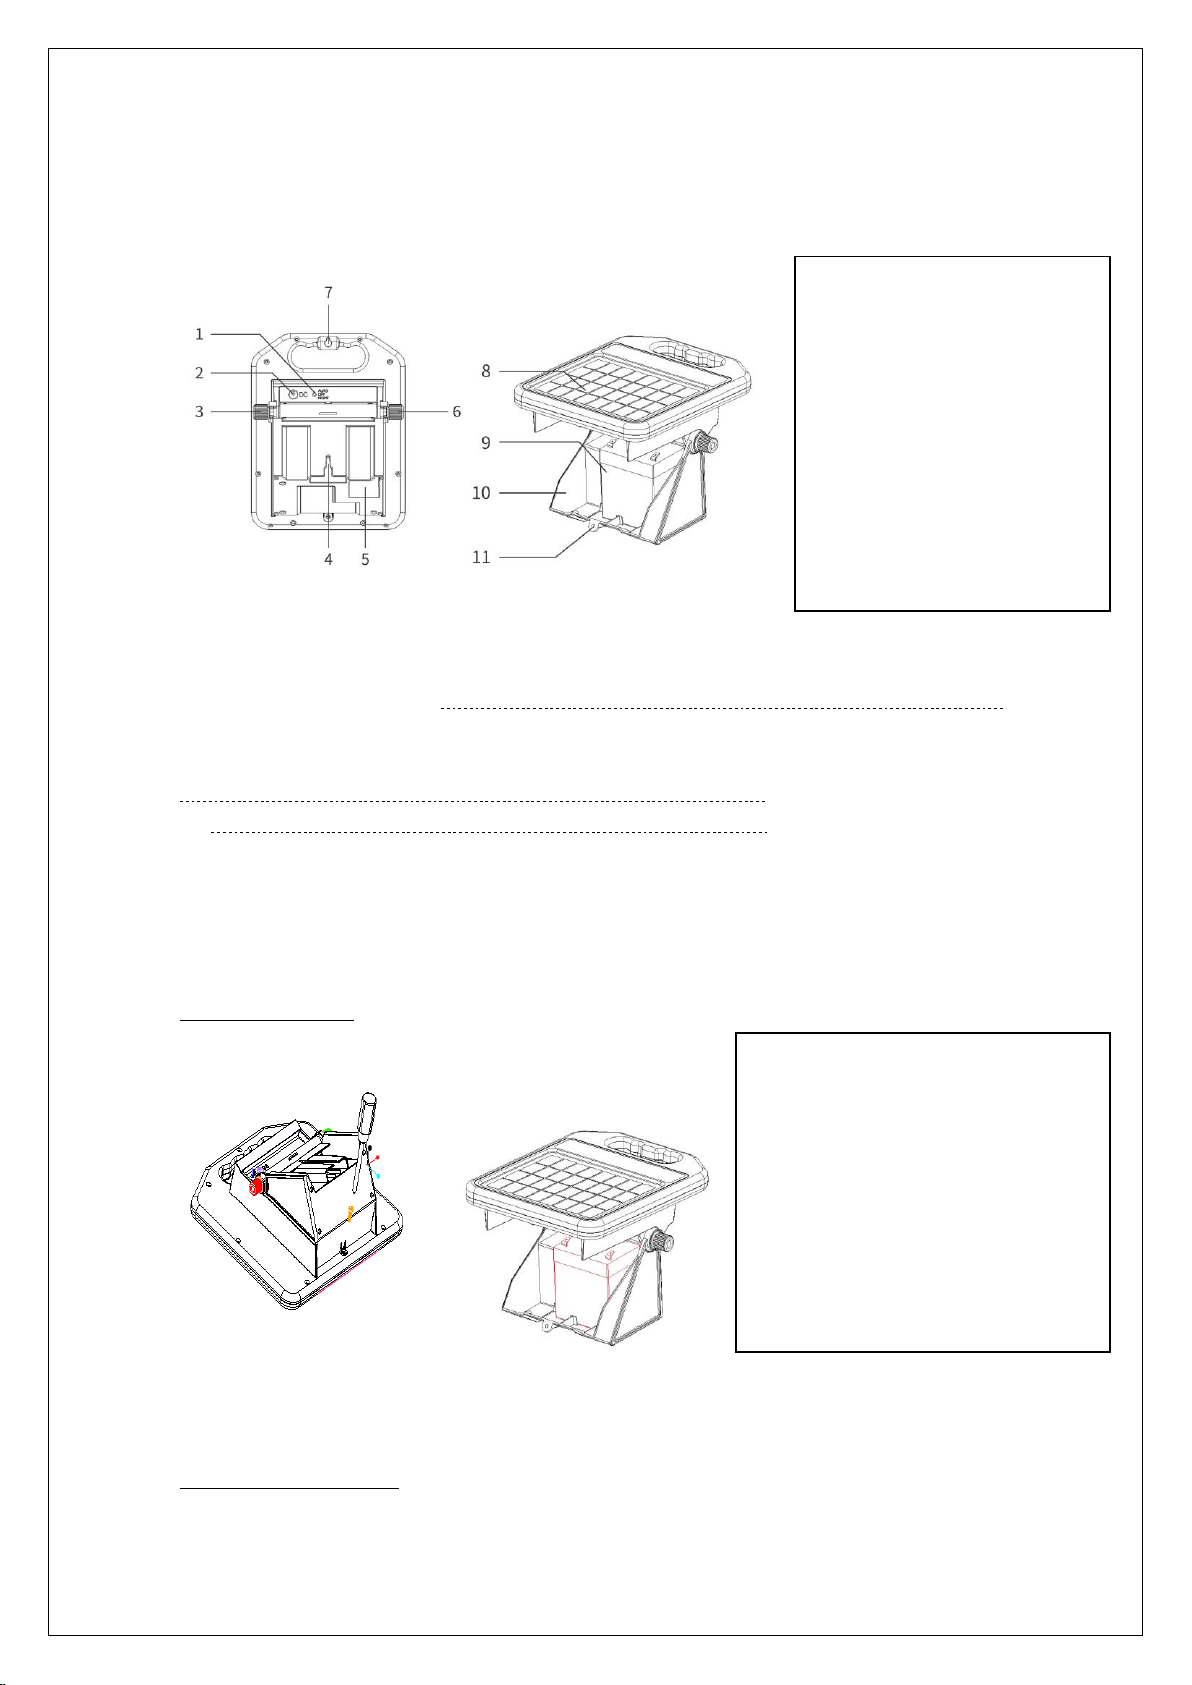
Daken S1600 User manual

Solar Powered Electric Fence Energisers
Models S1600, S4000

Foreword
This Energizer has built-in lightning protection devices to reduce the incidence of lightning
damage and built-in RFI (Radio Frequency Interference) Suppressed Circuitry.
Please read this manual carefully before using this product and store it for future reference. Do not
let children operate or play with an electric fence energiser.
1. Introduction
This manual refers to Electric Fence Energiser model:
0.16J model S1600
0.4J model S4000
2. Important safety introduction
WARNING: Read all instructions
⚫This product contain High Voltage do not open or attempt to repair unless suitably qualified.
⚫Do not work on your fence while the Energiser is NO.
⚫Do not connect or allow more than one energiser on a fence line
⚫Do not install when it my flood in immerse the energiser.
⚫Do not install on the ground
⚫For the control of animals, domesticated and feral only.
Refer to the Daken Electric Fencing manual for more safety
and installation requirements

3. Specification
Parts of the electric fence energizer system
Model S1600 S4000
Range Up to 1.6km Up to 4km
Power source 12V, 4AH, 12V, 4.5AH rechargeable lead-acid battery
Maximum output Voltage up to 8.1KV up to 8.3KV
Voltage under 500ohm up to 2.5KV up to 3KV
Energy 0.11 J 0.3J
Stored energy 0.16 J 0.4J
Unless otherwise stated, values are typical and normal production tolerances of ±10% should be
allowed for
4. Installation guide
Installing the battery
Caution! When connecting the battery, be careful not to short-circuit the supply terminals.
Positioning the energiser
Install the energizer adjacent to the electric fence, preferably in the middle of the electric fence in
a position where it will receive the most sun, ideally in excess of 6 hours of full sun a day. Its
1 ON/OFF/Night mode switch
2 DC charging input
3 Earth output terminal.
4 Locking hole
5 Star Post mount
6 Fence output terminal
7 Locking hole
8 Solar panel
9 Battery
10 Battery box
11 Battery box fixing hole
1 Place the energizer on a flat surface.
Open the battery compartment using a
screwdriver (see diagram below).
2 Insert the battery.
3 Connect the positive (red) lead to the
positive (+) terminal on the battery.
4 Connect the negative (black) lead to
the negative (–) terminal on the battery.
5 Close the battery compartment.

position may need to be changes between summer and winter.
On firm ground away from flooding and out of reach of animals and children (inside a protective
fence, if required). The solar panel should face true north in the southern hemisphere.
Mounting the energizer
The energizer can be mounted directly onto a steel Y-post via the post-mounting receptacle. To
mount onto a wooden post, use the hardware provided. Screw two screws 205mm apart leaving
approximately 10mm exposed. Slip the bottom screw into the slot on the base of the Battery
compartment and line the top screw to the teardrop in the handle.
Connecting to an electric fence
1 Drive a 1 m (3’3‛) earth rod fully into firm ground.
2 Connect the black lead from the Fence earth terminal on the energiser to the earthing rod.
3 Connect the red lead from the Fence output terminal on the energiser to the fence. Make sure
there is a good contact.
Caution! Make sure the connecting leads drop downwards from the energizer to prevent water
from collecting at the terminals.
Operation
Switching on and off
1 To switch ON, The pulse indicator light flashes once for each output pulse.
2 To switch OFF, the pulse indicator light stops.
3 Switch to Nigh mode. Reduces the pulse rate at night and automatically returns to the normal
rate during daylight hours.
Warning Never charge the battery when connected to the fence
Battery protection mode
An intelligent battery management feature puts the energiser into Battery protection mode when
battery charge falls below a ‘safe operating level’. When in Battery protection mode, the energiser
is still on, but it will deliver a reduced pulse to the electric fence.
The energiser will resume delivering normal pulses when the solar panel has charged the battery
so that it is above the ‘safe operating level.
Alternatively, the battery can be disconnected, recharged with a battery charger, then returned to
the battery compartment and reconnected.
Night mode
Switching the energiser to night mode slows the pulse rate and conserves power, if your stock is
less active during evening hours night mode can be used. Night mode is not recommended if you
stock is under stress for feed, water or the urge to mate. It’s also not recommended when trying to
fence for feral animals

Battery information
Battery charging
The solar panel can fully charge a flat battery in three days, provided the energiser is switched off
and there is adequate sunlight. The battery can also be charged using a 14.4V battery charger
suitable for charging rechargeable lead-acid batteries. This should have an output voltage of 14.4V
and output current not exceeding 1A. Charging can be carried out two ways, buy removing the
battery and charging or by plugging the correct charger directly into the unit at the DC Charging
point, this should be carried out with the energiser switched off. The energiser must not be
connect to the fence when charging from a mains powered charger.
When fully charged, the battery should be able to power the energiser for three weeks (S1600
model) and two weeks (S4000 model) with no sunlight.
Replacing the battery
If a replacement battery is required, use a 12V, 4.5Ah, rechargeable lead-acid battery (suitable for
both models). Replacement Daken Part number is 70303D. Do not use a non-rechargeable battery.
Do not dispose of the battery in a land-fill or in a fire.
In the event of a spill or leakage from a lead-acid battery:
Contain small spills with dry sand, earth and vermiculite. Do not use combustible materials. If
possible, carefully neutralise spilled acid with soda ash, sodium bicarbonate, lime, etc.
Wear acid-resistant clothing, boots, gloves and a face shield.
Do not let acid get into the sewerage system.
Neutralised acid must be managed in accordance with approved local, state and federal
requirements. Consult your state environmental agency and/or federal EPA.
Energiser maintenance
Clean the solar panel regularly with a soft cloth using glass cleaner or a mild solution of detergent
and water. This ensures the solar panel functions efficiently.
When transporting the energiser, protect the solar panel to prevent the glass surface from being
damaged.
Energiser storage
If the energiser is stored for an extended period, the battery may discharge and become damaged.
The energiser should be stored inside, next to a window, where sunlight can shine on the solar
panel each day.
If the energiser cannot be stored in a sunny position, it should be kept in a cool place. The battery
should be fully charged and disconnected from the energizer. The battery should be recharged
manually every six months using a suitable 12 V battery charger.

Troubleshooting
1 The Pulse indicator light is flashing, but the electric shock delivered by the fence is weak.
Check that the energiser is adequate for the length of the fence. If necessary, reduce the length of
the fence or reduce the number of fence wires. Alternatively, divide the fence-line into smaller
zones, with each zone powered by a separate energizer.
2 The Pulse indicator light is not flashing, Battery is not connected properly, or battery is dead flat
3 The battery needs frequent replacement.
Check that the solar panel is clean and is not damaged. Make sure the energiser is positioned to
receive maximum sunlight. If necessary, remove any objects or vegetation that might be casting a
shadow on the energizer.
4 After the energiser is switched on, the pulse indicator light gives three long permanent flashes,
and then the energiser appears to be off, the battery is very low and needs recharging.
5. Maintenance
Warning: Do not open or attempt to repair or modify, as warranty will be voided.
Fault
Solution
The Pulse indicator
light is flashing, but
the electric shock
delivered by the
fence is weak.
Check that all connections in the fence and earth system are firm and
secure. If necessary, clean away any corrosion.
Check that the earth rod is pushed firmly into firm ground.
Check for faults in the fence-line caused by trees or vegetation. If
necessary, remove obstructions and mend the fence.
Check that the energiser is adequate for the length of the fence. If
necessary, reduce the length of the fence or reduce the number of fence
wires. Alternatively, divide the fence-line into smaller zones, with each
zone powered by a separate energizer.
The Pulse indicator
light is not flashing.
Check that the energiser is switched on.
If there has been insufficient sunlight to charge the battery, the
energizer may be in Battery protection mode. Charge the battery by
placing the energizer in full sunlight with the solar panel facing true
north in the southern hemisphere.
Ensure the battery is connected correctly with the positive (red) lead to
the positive(+) terminal on the battery and the negative (black) lead to
the negative (–)terminal on the battery.
Try charging the battery manually using a suitable battery charger.
Replace the battery with a new battery. Before installing a new battery,
charge it fully using a suitable battery charger.
If the pulse indicator light is still not flashing, return the energizer to the
dealer

The battery needs
frequent charging
or replacement.
Check that the solar panel is clean and is not damaged. Make sure the
energiser is positioned to receive maximum sunlight. If necessary,
remove any objects or vegetation that might be casting a shadow on the
energizer.
5. Maintenance
Warning: Do not open or attempt to repair or modify, as warranty will be voided. Apart from the
Battery there is no serviceable items in this product.
6. Guarantee
The S1600 and S4000 are covered by a 24 months warranty, starting from the date of the purchase.
The Battery is covered by a 12 month warranty. We will only perform warranty services when the
faulty unit is returned to us together with a copy of the invoice. The unit should be returned in its
original or equivalent packaging, please preserve the original packing. In addition, the type label
on the unit must be fully legible. Any return should include details of the fault or reason for return
and your full contact details. Warranty claims are excluded for direct or indirect damages due to:
1) Beyond warranty date;
2) Immersion
3) Improper use, operation and refitting;
4) Non-observance to the relevant safety instructions and work in the severe environment out
the recommended ones in this manual;
5) Beyond installation and use areas of the relevant international standards;
7) Influence of foreign objects and force majeure (lightning strike, overvoltage, severe weather,
fire etc).
8) Battery Failure for improper placement, incorrect storage, incorrect charging. Battery used for
other uses.
The design and specification shall be subject to any due changes without prior notice. The final
interpretation right of this event is reserved by our company.
This manual suits for next models
1
Table of contents
Other Daken Power Supply manuals