manuals.online logo
Brands
  1. Home
  2. •
  3. Brands
  4. •
  5. Dallmer
  6. •
  7. Bathroom Fixture
  8. •
  9. Dallmer 48 KE Operator's manual

Dallmer 48 KE Operator's manual

This manual suits for next models

1

Other Dallmer Bathroom Fixture manuals

Dallmer SOLOS User manual

Dallmer

Dallmer SOLOS User manual

Dallmer PRONTO Primus User manual

Dallmer

Dallmer PRONTO Primus User manual

Dallmer ORIO User manual

Dallmer

Dallmer ORIO User manual

Popular Bathroom Fixture manuals by other brands

Kohler Mira Sport Max J03G Installation and user guide

Kohler

Kohler Mira Sport Max J03G Installation and user guide

Moen 186117 Series installation guide

Moen

Moen 186117 Series installation guide

Hans Grohe Raindance Showerpipe 27235000 Instructions for use/assembly instructions

Hans Grohe

Hans Grohe Raindance Showerpipe 27235000 Instructions for use/assembly instructions

Signature Hardware ROUND SWIVEL BODY SPRAY 948942 Install

Signature Hardware

Signature Hardware ROUND SWIVEL BODY SPRAY 948942 Install

fine fixtures AC3TH installation manual

fine fixtures

fine fixtures AC3TH installation manual

LIXIL HP50 Series quick start guide

LIXIL

LIXIL HP50 Series quick start guide

KOLO ATOL PLUS installation manual

KOLO

KOLO ATOL PLUS installation manual

Hans Grohe PuraVida 15073000 Instructions for use/assembly instructions

Hans Grohe

Hans Grohe PuraVida 15073000 Instructions for use/assembly instructions

Toto TS111B8 Installation and owner's manual

Toto

Toto TS111B8 Installation and owner's manual

Kohler K-1158-H2 Homeowner's guide

Kohler

Kohler K-1158-H2 Homeowner's guide

Coram Showers OFFSET QUADRANT manual

Coram Showers

Coram Showers OFFSET QUADRANT manual

baliv DU-2010 manual

baliv

baliv DU-2010 manual

odass OD-1710 instruction manual

odass

odass OD-1710 instruction manual

Oxygenics Evolution Easy installation instructions

Oxygenics

Oxygenics Evolution Easy installation instructions

Bradley Express SS Series installation instructions

Bradley

Bradley Express SS Series installation instructions

Helvex TH-974 installation guide

Helvex

Helvex TH-974 installation guide

DURAVIT C.1 C15240 0090 Instructions for mounting and use

DURAVIT

DURAVIT C.1 C15240 0090 Instructions for mounting and use

Sunshower PURE SOLO manual

Sunshower

Sunshower PURE SOLO manual

manuals.online logo
manuals.online logoBrands
  • About & Mission
  • Contact us
  • Privacy Policy
  • Terms and Conditions

Copyright 2025 Manuals.Online. All Rights Reserved.

15°
195 (140)
Ø108
86,5
40,5
50
DN50 (Ø56)
9,3
143
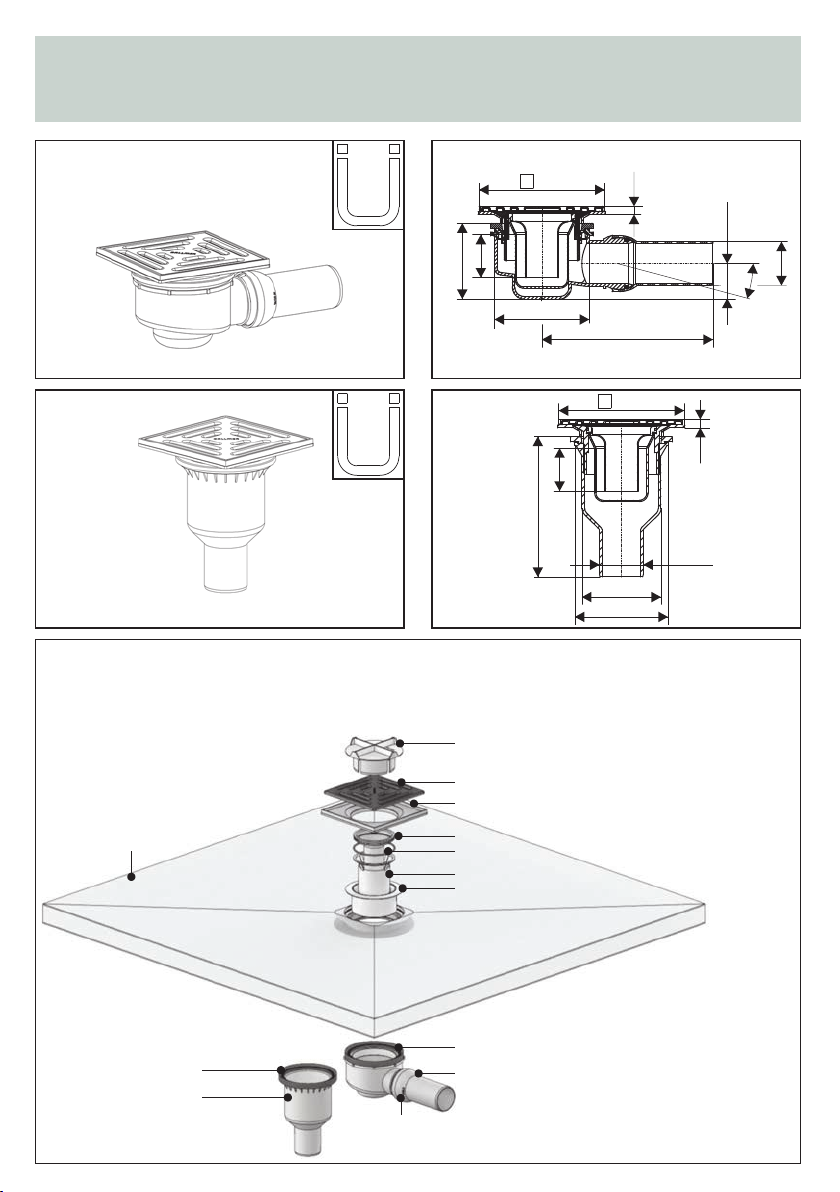
Duschablauf 48 KE / 49 KE
Shower drain type 48 KE / 49 KE
Avaloir de douche 48 KE / 49 KE
480231 DN 50
481467 2" BS
0,68 l/s
480224 DN 50
1,0 l/s
Dichtung/seal/Joint
Dichtung/seal/Joint
bauseits/on site/sur place
Ablaufghäuse/drain body/Boîtier d‘écoulement
Ablaufghäuse/drain body/
Boîtier d‘écoulement
Dichtung/seal/Joint
Geruchverschluss-Einsatz/trap insert/Tasse du siphon
Schraubventil/screwed housing/Valve á vis
Geruchverschluss/dip-tube/Fermeture anti-odeur
K-Rahmen/K frame/Cadre synthétique
Rost E/stainless steel grate/Grille en acier inoxydable
Bauschutzdeckel/protective cover/Couvercle de protection
Ablaufstutzen nicht demontieren, sonst erlischt die Gewährleistung!
Do not remove the drain plug; otherwise, the warranty will be void!
Ne pas démonter la tubulure d'écoulement, sinon la garantie expire !
9,3
143
50
DN50
Ø90
Ø106
160
DALLMER
DIN
EN
274
DALLMER
DIN
EN
274
Nur in Verbindung mit auf die Abläufe abgestimmten Bodenkonstruktionen oder Fertigelementen
(Mindestaufbauhöhe 20mm) einsetzbar.
For use with prefabricated shower-floors, minimum 20mm thick.
Utilisable uniquement avec des constructions au sol ou des éléments préfabriqués adaptés aux avaloirs (hauteur de
construction minimum 20mm).
1.
6.
5.
3.
Einbau
Installation
Pose
4.
1. Beton / concrete / Béton
2. Höhenausgleich Mörtel / levelling screed / Mortier de lissage
1
2
Duschboard mit eingebautem Rahmen paßgenau auf das Ablaufge-
häuse aufsetzen. Prüfen, daß das Ablaufgehäuse mittig unter der
Ablauföffnung sitzt (evtl. korrigieren).
Lay the shower underlay element with the built-in frame exactly
onto the drain body. Check that the drain body sits centrally
under the opening of the drain (adjust as necessary).
Positionner avec précision le receveur de douche sur le boîtier
d‘écoulement. Vérifier que le boîtier d‘ecoulement soit centré
en-dessous de l‘ouverture d‘evacuation (corriger eventuellement
sa position).
Duschboard einbauen (s. Verlegeanleitung).
Install the shower underlay element (see manufacturers installation).
Installer le receveur de douche (cf. Instructions de pose).
Schraubventil einsetzen und mittels Bauschutz (zugleich Montage-
schlüssel) im Ablaufgehäuse festschrauben.
Insert the screwed housing, using the protective cover as a key.
Tighten.
Mettre en place la valve á vis et la visser á l‘aide du couvercle de
protection (faisant office en même temps de clé de montage) dans le
boîtier d‘écoulement.
2.
Test
7.
8.
9.
Geruchverschluss-Einsatz in das Schraubventil einsetzen,
Geruchverschluss mit Dichtung einsetzen und festdrücken.
Put the trap insert into the screwed housing, insert the dip
tube with seal and press firmly.
Mettre en place le tasse du siphon dans la valve á vis, et
mettre en place la fermeture anti-odeur avec son joint, puis
presser.
K-Rahmen einsetzen.
Insert the frame.
Mettre en place le cadre synthétique.
Abdichtung: s. Prospekt oder Verlegeanleitung.
Water proofing: refer to manufacturers catalogue or
installation instructions.
Etanchéité: cf. brochure ou instructions de pose.
Rost einsetzen und festdrücken.
Insert the grate and press firmly.
Mettre en place la grille, puis presser.
10.
Einbau
Installation
Pose
min. 20 mm
348480231 - 18/05
Dallmer GmbH + Co. KG
Wiebelsheidestraße 25
59757 Arnsberg
Germany
T +49 2932 9616 - 0
F +49 2932 9616 - 222
E info@dallmer.de
W www.dallmer.de
Hinweis: Die Einhaltung dieser Einbau-Empfehlung ist Voraussetzung für einen Gewährleistungsanspruch auf der Grundlage
unserer Verkaufs- und Lieferbedingungen.
Note: Installation according to these instructions is a condition for considering any guarantee claim. Please see our Conditions of
sale and terms of delivery.
Remarque : L'observation de cette recommandation de pose est la condition préalable pour un recours en garantie sur la base de
nos conditions de vente et de livraison.
DE
GB
FR
DE
GB
FR
Alle technischen Daten der Montageanleitung sind sorgfältig erstellt, bei offensichtlichen Irrtümern bleiben nachträgliche
Korrekturen vorbehalten.
All technical data of the installation manual has beenprepared with care, subject to subsequent corrections of obvious errors.
Toutes les informations techniques figurant dans la notice de montage sont élaborées avec soin. En cas d’erreurs manifestes,
des corrections ultérieures demeurent sous réserve.
Einbau
Installation
Pose
Zum Reinigen Geruchverschluss herausziehen, nicht drehen!
Remove dip tube for cleaning, do not turn!
Pour le nettoyage, retirer le siphon, ne pas tourner!
11.