Dancover TITAN Arch 320 User manual

14-05-2019
for
Greenhouse
TITAN Arch 320
Manual

Dear clients!
Aer making the decision of buying a greenhouse you received a carefully made item. Its
framework is made from special (1mm of thickness and 78mm width) proles produced
from galvanized metal which are extremely strong.
Due to uncomplicated instruction this greenhouse is easy to construct.
Because of additional items, you will be able to accomplish your ideas.
We keep the rights to make variations associated with the improvements of technolo-
gies. Some pictures and instructions may be dierent because of that.
We wish you a lot of joy and success with our greenhouse.
Attention!
Always use protective work measures (safety gloves, clothes) when constructing the
framework of the greenhouse and working with polycarbonate cover.
Tools you will need for the construction:
• Hexagon wrench with the diameter of 8 mm or wrench with open end.
• Cross-head screwdriver or screwdriver for battery
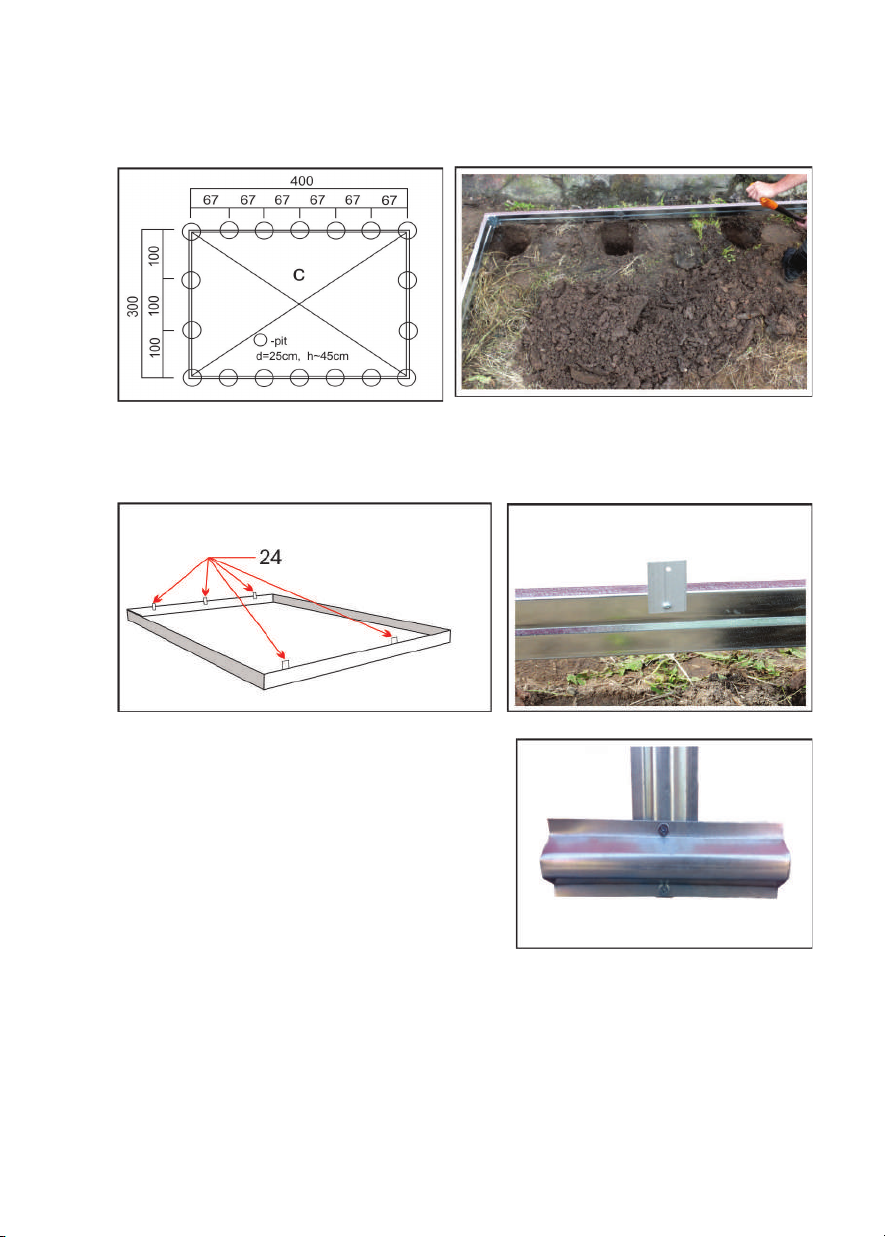
• Shovel to dig pits
• Spirit level to measure equability of the ground.
• Rope to measure the diagonal
• Knife to cut polycarbonate sheets
If necessary, follow the instructions from local building area.
In case of strong wind or storm close the windows and doors.
Before starting the construction, you should read all the instruction at least once and
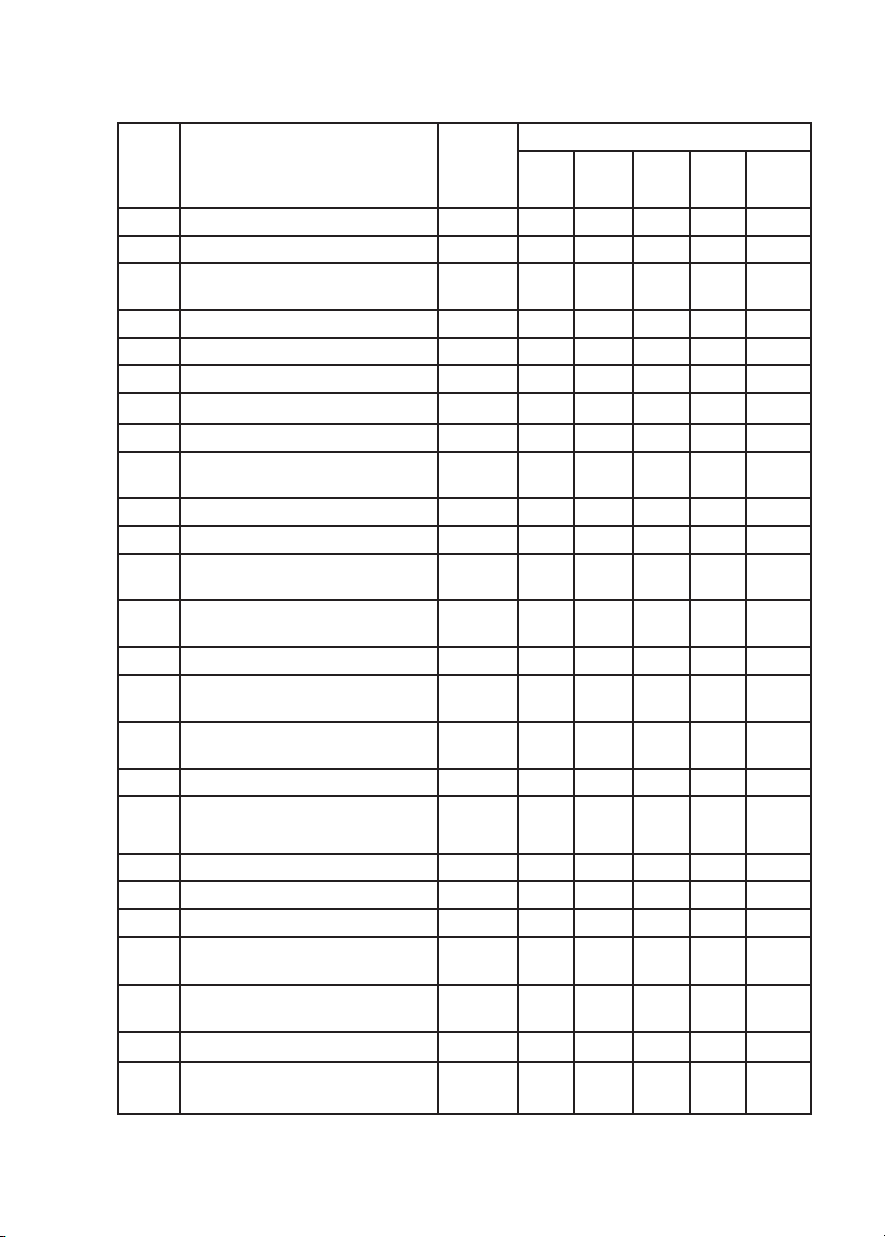
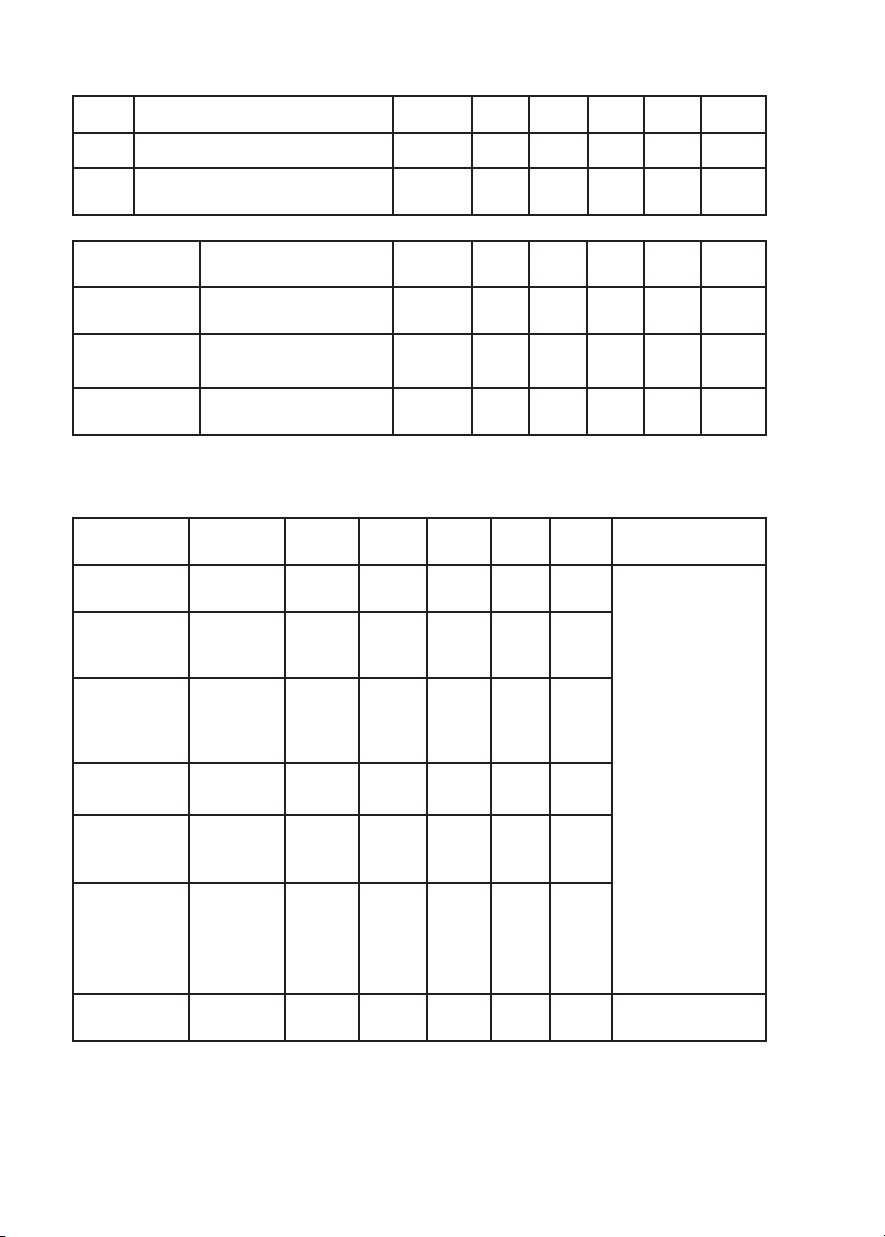
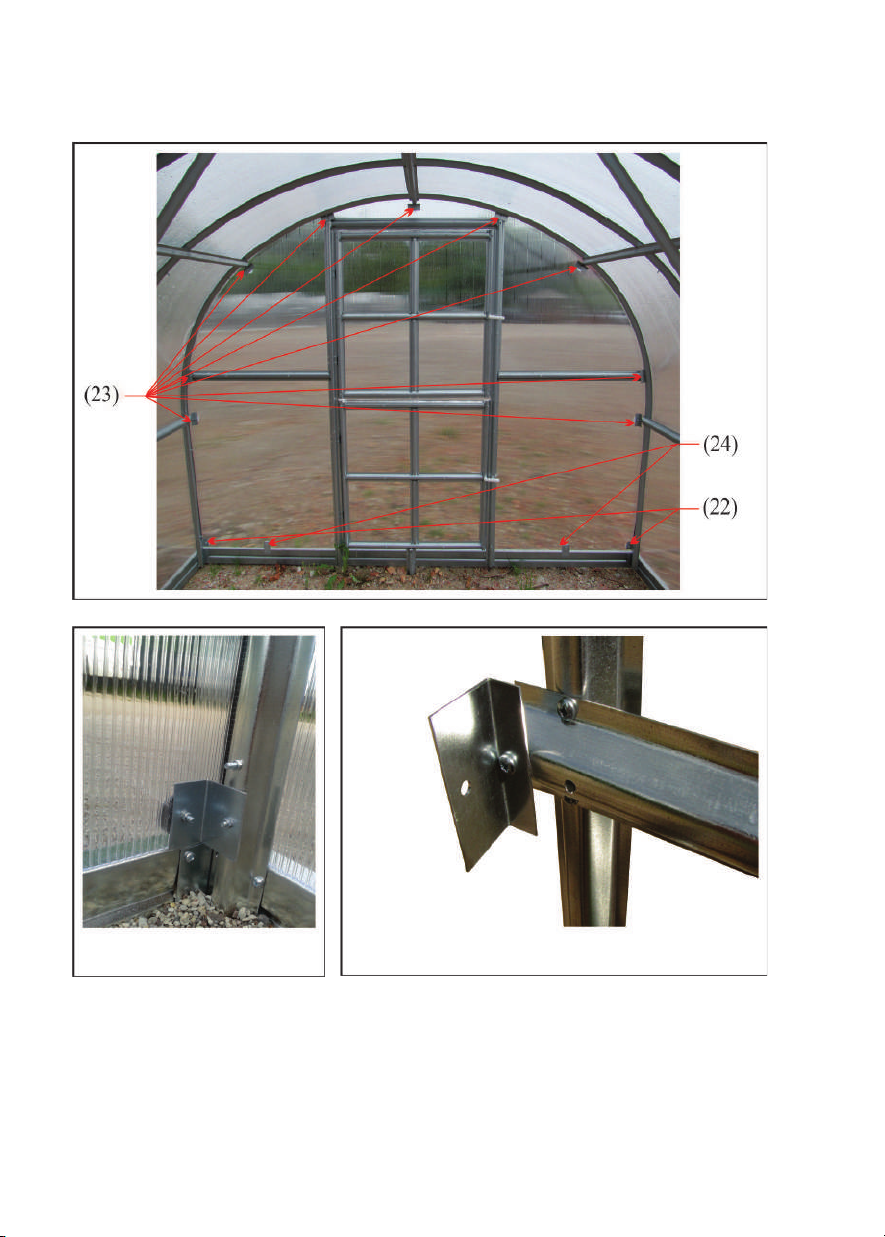
understand dierent sections and proles. is is a helpful guide for you. Compare the
list of parts with the parts in the package. en sort out the sections and leave them in
separate places.
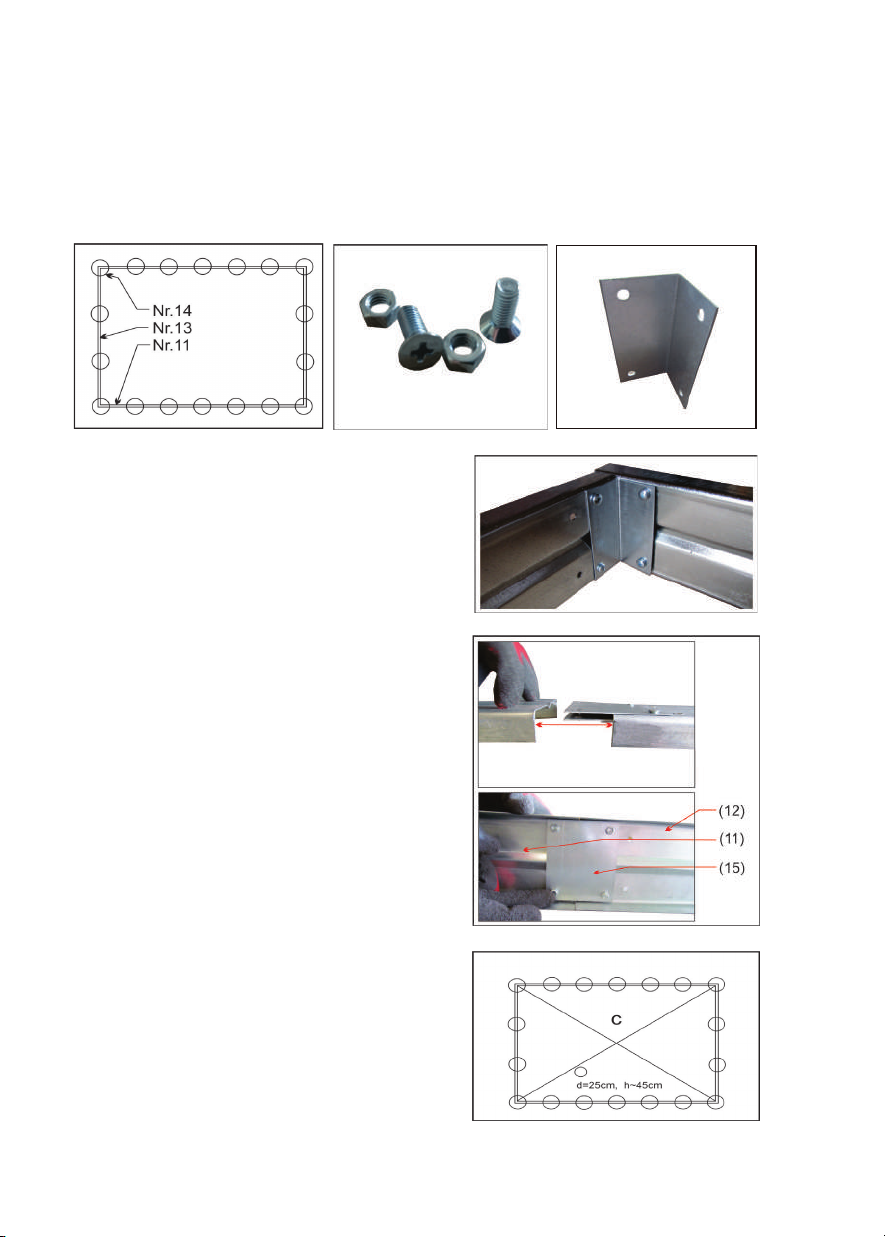
It is highly recommended to screw the screws easily with hands at rst – if needed, you
will be able to rotate sections. Aer the construction, you should measure equability of
the framework and only then tighten the screws.
1

e list of parts
No Name Length,
mm
TITAN Arch 320
6m212m218m224m230m2
NO. 1 Short arch (top) 1820mm 4 7 10 13 16
NO. 2 Side arch (le, right on top) 1200mm 8 14 20 26 32
NO. 3 Side – bottom stilt of the arch(le,
right)
1310mm 8 14 20 26 32
NO. 4 Pillars to the ground 200mm 12 18 24 30 36
NO. 5 Fastenings of the arches - crossbars 4000mm 5 5 10 10
NO. 6 Fastenings of the arches - crossbars 2030mm 5 5 5
NO. 7 Prole for the fastening 1465mm 2 4 6 8 10
NO. 8 Stilt of the door - window 2350mm 4 4 4 4 4
NO. 9 Side fastenings of the front – back
part
900mm 4 4 4 4 4
NO.10 Transversal stilt of the door - window 985mm 3 3 3 3 3
11 Sides of the foundation basis 4000mm 2 2 4 4
12 Extension of the side of the founda-
tion basis
1965mm 2 (2m)2 2
13 Front and back parts of the founda-
tion basis
3000mm 2 2 2 2 2
14 Angles of the foundation 4 4 4 4 4
15 Plates for linking the foundation
(from 18 m2)
448
16 Screws M5-12 with the injectable
head
l-12mm 285 350 430 510 590
17 Screws M5-40 l-40mm 112 146 180 214 248
18 Screws M5-20 to attach polycarbon-
ate to plates and angles
l-20mm 20 20 20 20 20
19 Internal screws M5 417 516 630 744 858
20 Gasket slides 124 154 184 214 244
21 Handle 33 333
22 Angles of attaching polycarbonate
and stilt (Big angle)
44444
23 Angles of attaching polycarbonate
and stilt (Small angle)
18 18 18 18 18
24 Plates for attaching polycarbonate 5 5 5 5 5
25 Protective band for sealing plates (for
doors)
m 5 5 5 5 5
2

DOOR NO. 1 Part of the door with
hinges
930mm 3 3 3 3 3
DOOR NO. 2 Part of the door with a
handle
930mm 3 3 3 3 3
DOOR NO. 3 Bottom/top part of the
door (horizontal part)
885mm 9 9 9 9 9
DOOR NO. 4 Transverse part of the door
(vertical parts)
400mm 6 6 6 6 6
Width/
Height
6 m212 m218m224 m230 m2Remark
1; 2; 3; 4
Side parts
1050x2000 4 4 4 4 4
Cutting sheets
depends on the
equipment
If you received only
big( 2,10x6,00m)
sheets (6 m2 – 2
pc; 12 m2 – 3 pc
etc.) All these parts
should be cut from
2,10x6,00 m 1 sheet.
5
e top part of
the door
1050x990 1 1 1 1 1
6
e bottom
part of the
door
1050x940 1 1 1 1 1
7
Window
1050x990 1 1 1 1 1
8
Bottom of the
window
1050x940 1 1 1 1 1
9
Upper
polycarbonate
of the window
of the door
1050x170 2 2 2 2 2
10
Top par t
2100x6000 1 2 3 4 5
Dimensions of polycarbonate
26 Plastic door opening handle 2 2 2 2 2
27 Screw with loop 2 2 2 2 2
28 Gum to seal gap between the wall and
the roof
m 12 12 12 12 12
3

Scheme for cutting polycarbonate
Correctly separate sides of the polycarbonate. Attach the side with UV
protection to the outside. UV protection layer is covered with the tape with note
signs, while other side (attaching to the inside) is covered with the clear sheet.
YOU MUST USE GLOVES WHILE CUTTING! It is recommended to cut sheet
with electric disc saw, saw or sharp knife.
ATTENTION! If you received 2,10x6,00 m sheets and additionally 1,05x2,00 m, you
shouldn‘t cut big sheets like it is shown in the scheme.
Big 2,10x6,00 m sheets are used for roof , 1,05x2,00 m sheets are used for ends, door
and window. Follow the measurements shown in the table “Dimensions of polycar-
bonate“
-1-; -2-; -3-; -4-; Side parts
-5- e top part of the door
-6- Bottom part of the door
-7- Windоw
-8- Bottom of the window
-9- Upper polycarbonate of
the window of the door
4

Installation instruction:
1. For the construction of the foundation basis you should use: Front and back parts of
the foundation basis (13), sides of the foundation basis (11). You should connect all 4
parts and make a rectangle. To make a rectangle use: angles of the foundation (14), screw
the parts together with screws M5-12 (16), internal screws M5 (19) (1.1 - 1.4 g.).
1.4 g
2 g
2.
Measure the diagonal of the foundation
basis. Lengths of the diagonals must be equal.
If they are equal – tighten the screws of the
foundation basis (2
g.).
5
For bigger than 12m2greenhouse, in order to
increase the length of the basis Plates for linking
the foundation (15) are used. ey are screwed
from both sides with screws M5-12 (16), inter-
nal screws M5 (19) (1.5 g.).
If the length of the greenhouse is 6m - founda-
tion basis is connected: 4m (11) +
1.965
m Ex-
tension of the foundation basis (12)
If the length of the greenhouse is 8m - founda-
tion basis is connected: 4m (11) + 4m Extension
of the foundation basis (11)
If the length of the greenhouse is 10m - foun-
dation basis is connected: 4m (11) + 4m (11) +
1.965
m Extension of the foundation basis (12)
1.5 g
1.1 g 1.2 g 1.3 g

3. Dig pits (25cm diameter, 40cm depth) for digging in Side – bottom stilt of the arch
(NO. 3). Dig them along the perimeter of the foundation basis, near the fastening points
marked on the foundation basis (3.1 - 3.2 g.).
3.1 g 3.2 g
4. To the top of front and back parts of the foundation basis (13) fasten the Plates for
attaching polycarbonate (24) with M5-12 screws (16) and internal screws M5 (19) (4.1
- 4.2 g.).
4.1 g 4.2 g
5. Preparing the stilt for digging in. To the bot-
tom of Side – bottom stilt of the arch (NO. 3),
screw Pillars to the ground (NO. 4) with the
screws M5-12(16) and internal screws M5 (19)
(5 g.).
5 g
6. Construction of arches. e most comfortable way is to collect all arches on the
ground. To Side – bottom stilt of the arch (NO. 3) connect side arches (NO. 2) from
the both sides. Connect short arch (NO. 1) on top, in the middle to the side arches. Use
screws (16) and internal screws (19) (6 g.).
REMARK: Every upper part covers the part that is underneath. End of the part NO. 2
which has 2 vertical connecting holes (for fastenings of the arches – crossbars (NO.5)
) is connected to the part NO. 1
6

7. To already constructed foundation basis screw arches with screws M5-12 (16) and
internal screws (19) (7.1 - 7.2 g.).
6 g
Соllected
arches
Foundation basis
7.1 g
7.2 g
8. To already constructed and screwed to the foundation arches, you should attach ve
fastenings of the archs – crossbars (NO. 5) with screws M5-12 (16) and internal screws
(19) (8.1 g.).
Vertical
mounting
holes
Approval of the arches in the middle
Approval of the archs in the corners and in the
connection place of the foundation
7

Foundation basis
8.1 fig
For bigger than 12m2arch greenhouse TITAN Arch 320, additional crossbars are
used to strengthen arches (8.2 fig.).
If length of the greenhouse is 6 m – fastenings to the arches – crossbars are attached:
(No. 5) + (No. 6).
If length of the greenhouse is 8 m – fastenings to the arches – crossbars are attached:
(No. 5) + (No. 5).
If length of the greenhouse is 10 m – fastenings to the arches – crossbars are attached:
(No. 5) + (No. 5) + (No. 6).
8.2 g
9. To the front and back arches you should screw fastening angles of the stilt and
polycarbonate. On the each side you should use 9 pcs small angles (23) and 2 pcs big
angles (22).
Positions of angles measuring from the foundation from le to right (Measured with
upright angle) (9.1 - 9.3 g.):
1) 5 cm big angle (22). Narrow part to the front
2) 83 cm small angle (23). Wide part to the front
3) 109 cm small angle (23). Wide part to the front
4) 170 cm small angle (23). Wide part to the front
5) 196 cm small angle (23). Wide part to the front
6) 202 cm small angle (23). Wide part to the front
7) 196 cm small angle (23). Wide part to the front
8) 170 cm small angle (23). Wide part to the front
9) 109 cm small angle (23). Wide part to the front
8

10) 83 cm small angle (23). Wide part to the front
11) 5 cm big angle (22). Narrow part to the front
9.1 g
9.2 g 9.3 g
10. Stilt of the door – window (No. 8) should be attached to foundation basis and
collected arches with the screws M5-12 (16) and internal screws (19). With the front of
the foundation basis (13) it is attached directly with the screws M5-12 (16) and internal
screws (19). Arch on top (No. 1) is attached with Angles of attaching polycarbonate and
stilt (23) (10.1 - 10.2
g
).
Big angle Small angle
9

10.1g 10.2 g
11. By the part (NO.8), screw Transversal stilt of the door – window 985mm (No. 10)
to Stilt of the door – window. Use screws M5-12 (16) and internal screws M5 (19)(11.1
- 11.2
g
.).
11.1 g 11.2 g
12. By the part (NO.8) and angles of attaching polycarbonate and stilt (Small angle) (23),
screw directly Side fastenings of the front – back part 900mm (No. 9) to Stilt of the door
– window(No. 8) and Angles of attaching polycarbonate and stilt (Small angle) (23). Use
screws M5-12 (16) and internal screws M5 (19) (12
g
.)
12 g
10

13. Firstly, screw proles for fastening 1465mm (No. 7) with screws M5-12 (16) and
internal screws M5 (19)to the side arch in height of 1,96m from the foundation basis.
Another part of the prole should be placed on fastening of the arch – crossbar (No. 5)
and screwed with screws M5-12 (16) and internal screws M5 (19) (13.1-13.4 g).
NOTE: It is recommended to screw with one M5-40 screw through all three parts:
side stilt, fastening of the arch – crossbar, prole for fastening.
13.1
g
13.2
g
13.3
g
13.4
g
1 fastening prole is designed to strengthen one 2m length segment on the both sides.
I.E. Greenhouse‘s length is 2m – 2pcs of fastening proles (one on each sides);
Greenhouse‘s length is 4m – 4pcs of fastening proles (two on both sides) and etc.
14. Aer collecting the framework of the greenhouse, cut the polycarbonate based on
the given measurements and attach it to the framework. Attach sheets of polycarbonate
(Scheme for cutting polycarbonate – 1; 2; 3; 4) – attach side parts to polycarbonate and
angles of attaching polycarbonate and stilt (22, 23) and plates for attaching polycarbon-
ate (24)with screws M5-12 (16) and internal screws M5 (19) and gasket slides (20). Also,
attach it to stilt of the door - window and crossbar (No. 8 No. 10) and side fastenings of
the front – back part (No. 9) with screws M5-12 (16) and internal screws M5 (19) and
gasket slides (20) (14
g.
).
Correctly separate sides of the polycarbonate. Attach the side with UV
protection to the outside. UV protection layer is covered with the tape with note
signs, while other side (attaching to the inside) is covered with the clear sheet.
YOU MUST USE GLOVES WHILE CUTTING! It is recommended to cut sheet
with electric disc saw, saw or sharp knife.
11

14
g
15. If sides of the polycarbonate are over the framework of arches, cut them along the
carcass. Place gum to seal gap between the wall and the roof (28) on the top of the
sheets and only then place upper part of the polycarbonate ( -10- 2100x6000mm) (15
g
).
15
g
16. Top parts (10) should be placed from the bottom to the top along the one side. Poly-
carbonate is attached with screws M5-12 (16) and internal screws M5 (19) and gasket
slides (20). On one band of the arch are are 5 (ve) attachment points. Attach ONLY
on those points. Another side must be attached from the top to the bottom. If the sheet
of polycarbonate is too long, cut it along the foundation basis (11). e front and back
polycarbonate sheets should be ush with the edges of the foundation (16
g.
).
12

16 g
17. Another sheet of polycarbonate (10)
should be placed on top of the tted sheet.
Screw it only on attachment points same
like in the step 16. Polycarbonate sheets
should be equal to the side of foundation
basis both in front and back. e front and
back polycarbonate sheets should be ush
with the edges of the foundation (17 g.).
17 g
18. Construction on door-window. All parts packed in door equipment should be joined
to square. (DOOR No. 1; DOOR No. 2; DOOR No. 3) with screws M5-12 (16) and in-
ternal screws M5 (19). Screw Transverse part of the door to the constructed framework.
Part of the door with hinges must be screwed to Stilt of the door - window with screws
M5-12 (16) and internal screws M5 (19) (18.2 g.).
NOTE: Door must be attached to the stilt of the door while being opened and with
the extended hinge to the hole, through polycarbonate (18.1 g.).
18.1 g
13
Opened doors Closed doors
Polycarbonate
attachment points

18.2 g
19. Based on the given scheme, cut the poly-
carbonate (5;6;7;8;9)
Polycarbonate parts of the door window
must be tted only when the door hinges
are attached to the framework of the green-
house.
Polycarbonate sheets of door – window are
attached with screws M5-12 (16) and inter-
nal screws M5 (19) and gasket slides (20) to
the door frame.
Polycarbonate ends of the door-window
must be sealed with protective band for seal-
ing plates (25). Join handles (21) to its place
(19 g.). Make a hole in polycarbinate sheet
with sharp knife. Cut X shaped holes oppo-
site the metal holes. Make a hole from the
outside of the cover.
20. Screw the screw with loop (27) on its place on
the same level as the door handle. Make a loop
from the given plastic door opening handle (26)
(20 g.).
19 g
20 g
14

Contact information
Head office:
Dancover A/S
Nordre Strandvej 119 G
3150 Hellebæk
Denmark
For more information
please visit:
www.dancovershop.com
National contact
Denmark: 70 26 76 20
denmark@dancover.com
UK: 020 8099 7570
uk@dancover.com
Spain: 911 436 828
espana@dancover.com
Italy: 02 479 21 198
italia@dancover.com
Germany: 041 0266 7040
germany@dancover.com
Switzerland: 0840 000125
schweiz@dancover.com
France: 0975 181 800
france@dancover.com
Austria: 0662 626935
austria@dancover.com
Sweden: 040 233 262
sverige@dancover.com
Finland: 0 931 581 720
suomi@dancover.com
Nederland: 0 858 880 524
nederland@dancover.com
Poland: 22 300 8602
polska@dancover.com
Ireland: 0 151 33 003
ireland@dancover.com
Luxembourg: +49 041 0266 7040
luxembourg@dancover.com
Portugal: 308 800 899
portugal@dancover.com
Belgium: 0 28 08 08 09
belgique@dancover.com
Norway: 231 00 690
norge@dancover.com
Table of contents
Other Dancover Lawn And Garden Equipment manuals