DANE-ELEC SO WORLD TV - User manual

User Manual
Personal Video Recorder
Full HD & DVB-T

2
BRIEF INTRODUCTION 3
Features 3
SO WORLD TV DETAILS 3
Packing List 3
Front View 3
Back View 4
REMOTE CONTROL 4
BASIC OPERATION 5
Power Connection 5
Connection of TV audio and video outputs 6
Connection Methods to Watch TV And General Use 7
Connection for Recording And General Use 7
Connection and Set-up of Network 10
OPERATION OF SO WORLD TV 19
Browser 20
Tv/Av In 27
Timer 28
Internet Services 30
File Copy 32
Set-up Menu 33
NETWORK FUNCTION 35
Wired Lan Set-up 35
Wireless Set-up 36
INSTALLATION AND USE OF BT/SAMBA (FOR ADVANCED USERS) 39
The First Installation 39
IP Address Setting 40
Neighbor Web Interface 40
HOW TO UPGRADE THE FIRMWARE 41
SO WORLD TV SPECIFICATIONS 43
MAINTENANCE NOTICE 43
FAQ 44
OTHERS 46

3
BRIEF INTRODUCTION
Features
So World TV is a Full HD (1080p) personal digital video recorder with a HD TV tuner which is MKV (H264) compatible and
has an HDMI 1.3 input/output. It is easy to use thanks to its LCD screen and, the So World TV is accessible via the network
(LAN) offering you access to all the data (music, photos, videos) stored in your computer and your memory card (SDHC
ash card reader).
Basic performance
TV shows: comatible with the DVB-T (TNT) digital terrestrial television signal reception and output functions.
Recording: Offers one-key rec, Time rec and Time shift recording.
Video decoding: MPEG 1/2/4, Divx, Xvid, H.264, VC-1, RM/RMVB
Video format: WMV, MKV, MOV, AVI, MP4, MPG, TS/M2TS/TP/TRP, FLV, ISO, IFO, VOB, DAT, RM/RMVB
Audio format: MP3, WMA, WAV, AAC, OGG, FLAC, Dolby Digital, DTS Digital
Image: JPG/BMP/PNG/GIF
Card reader: 3 in 1 card(SD/MMC/MS).
USB HOST: Connection USB mass storage device (like USB Flash Drive, MP3, USB, HDD, etc.)
USB2.0: High speed USB2.0 port.
HDMI: HDMI high denition port.
External DVD: Support USB external DVD drive to play DVD movies.
Internet: RJ45 port, 10/100Mbit/s, WLAN (IEEE 802.11 b/g/n) , internet service.
SO WORLD TV DETAILS
Packing list
When you receive your So World TV, check the including accessories, all the accessories below should be included.
No. Name Quantity
1 So World TV 1 pcs
2 Power Adapter 1 pcs
3 Remote Controller 1 pcs
4 AV cable 2 pcs
5 USB cable 1 pcs
6 User Manual 1 pcs
7 Batteries 2 pcs
Front view
Button denition
Element Denition Remark
1 LCD LCD Monitor Displays menu and playback information synchronously including
playback time, le name, set-up menu and so on.
2 Power/Stand-by Power LED Turns blue while switched on and turns red while switched off
1 2

4
Back View
Port denition
Port Port denition Instructions
1 USB DEVICE USB port Use this USB port to connect your PC
2 USB HOST Outside USB port Use this USB port to connect external storage devices
3 LAN Network port Use this internet port to connect to the network
4 HDMI High denition port Digital signal output via HDMI port
5 COAXIAL Fine output port 5.1 audio output via coaxial port
6 AV OUT Composite video output port Composite video and audio output port
7 AV IN Composite video input port Video and audio output when connected to video device
8 DC IN Power connection Power input
9 ANT IN RF input interface DVB-T (TNT) digital television signals input
10 LOOP RF output interface DVB-T (TNT) digital television signal output
REMOTE CONTROL
BUTTON FUNCTION
POWER Turn on and off in the stand by mode
MUTE Turn on or shut audio output
REC
Start recording in REC mode, and if you press this key
repeatedly you can select the recording time (Format: TS,
Codec: MPEG 2)
STANDBY Press it to enter the STANDBY mode, often using when the So
World TV is schedulprogrammed to recording.
BROWSER Enter the browser menu
TIMER Enter the Timer menu to edit, add, delete recording schedule
COPY Enter the copy mode
GUIDE (MENU) Enter the main menu
AV/TV Switch video input source between AV and TV
TELETEXT On / off with DVB-T (TNT) related advertising that contains
information such as the menu
EPG On / off television program guide menu
REC LIST A list of the documents listed in record
VOL- Press to decrease the volume
VOL+ Press to increase the volume
Navigation key for up, down, left and right
1 2 3 4 5 86 9
107

5
ENTER Press to con rm
RETURN Return to the previous menu
SET-UP Enter the menu
Press to input digital
GOTO Press to play the video at the chapter after setting schedule
TV SYSTEM Switch between different TV systems
OPTION Press to select option bar. To rename or delete the le.
PLAY Press to play le
Or play recording le under time shift mode.
STOP Press to stop play/recording
PAUSE/STEP Press to pause play/recording, and again for step playing
PREV Press to return to previous le / Previous page under browser
NEXT Press to go to next le / Next page under browser
FR Press to fast rewind from current play and again to select the
speed
FF Press to fast forward from current play and again to select the
speed
SUBTITLE Switch on/off the subtitles if available
DISPLAY Press to display time, title, information of chapter when playing
video or viewing photos.
AUDIO Change the audio format output
ZOOM
Press to zoom when playing back photos or Videos.
Photo zoom levels: 2X, 4X, 8X, 16X;
Video zoom levels: 2X, 3X, 4X, 8X.
TIME SHIFT
Press to activate time shift in recording mode.
Operation as follow:
Press “Time shift” and wait for the screen display, Press
“pause” to pause program, press “Play” to resume playback,
and press “Stop” to stop time shift function.If you need to use
the Timeshift function, please use the machine to format the
hard disk rst.
REPEAT Press to set repeat option: chapter, Title on or off
SELECT
Press to select the le and then press “con rm” to add or
delete a le in the playlist; Select copy les or folders in the
copy mode
CONFIRM Press to add or delete options in the playlist
BASIC OPERATION
Power connection
Take out power adapter from the package and connect it.

6
Connection of TV audio and video outputs
The So World TV is designed with multi-output, including composite (AV) and HDMI. You can select different interface
according to suit your needs. The So World TV can detect video output automatically, making the operation user-friendly
and convenient. Please refer to the following instructions for problem-free connection.
Composite output connection (AV)
Yellow
White
Red
Plug the yellow connector into the AV output of the So World TV and AV input of your TV, and plug the red and white
connector into the audio input of TV or HIFI. Turn on the TV and select AV mode. Turn on the So World TV and the TV
displays the interface of initiation.
Coaxial output connection
(cable not included)
Coaxial output: Connect the Coaxial connector of the media player with the coaxial connector of another video or audio
device using a coaxial cable. Then enter the So World TV audio interface, select the Digital Output option "SPDIF LPCM" or
"SPDIF RAW". You can enjoy 5.1 high quality sound through a multi channel decoder/ampli er with coaxial input.
HDMI output connection
(cable not included)
HDMI is an output that offers best audio and video effect with simultabeous digital video and audio composite output.
Connect the HDMI cable to the output of So World TV and a display device with HDMI input. Select HDMI mode on the TV
until it displays the start-up interface.

7
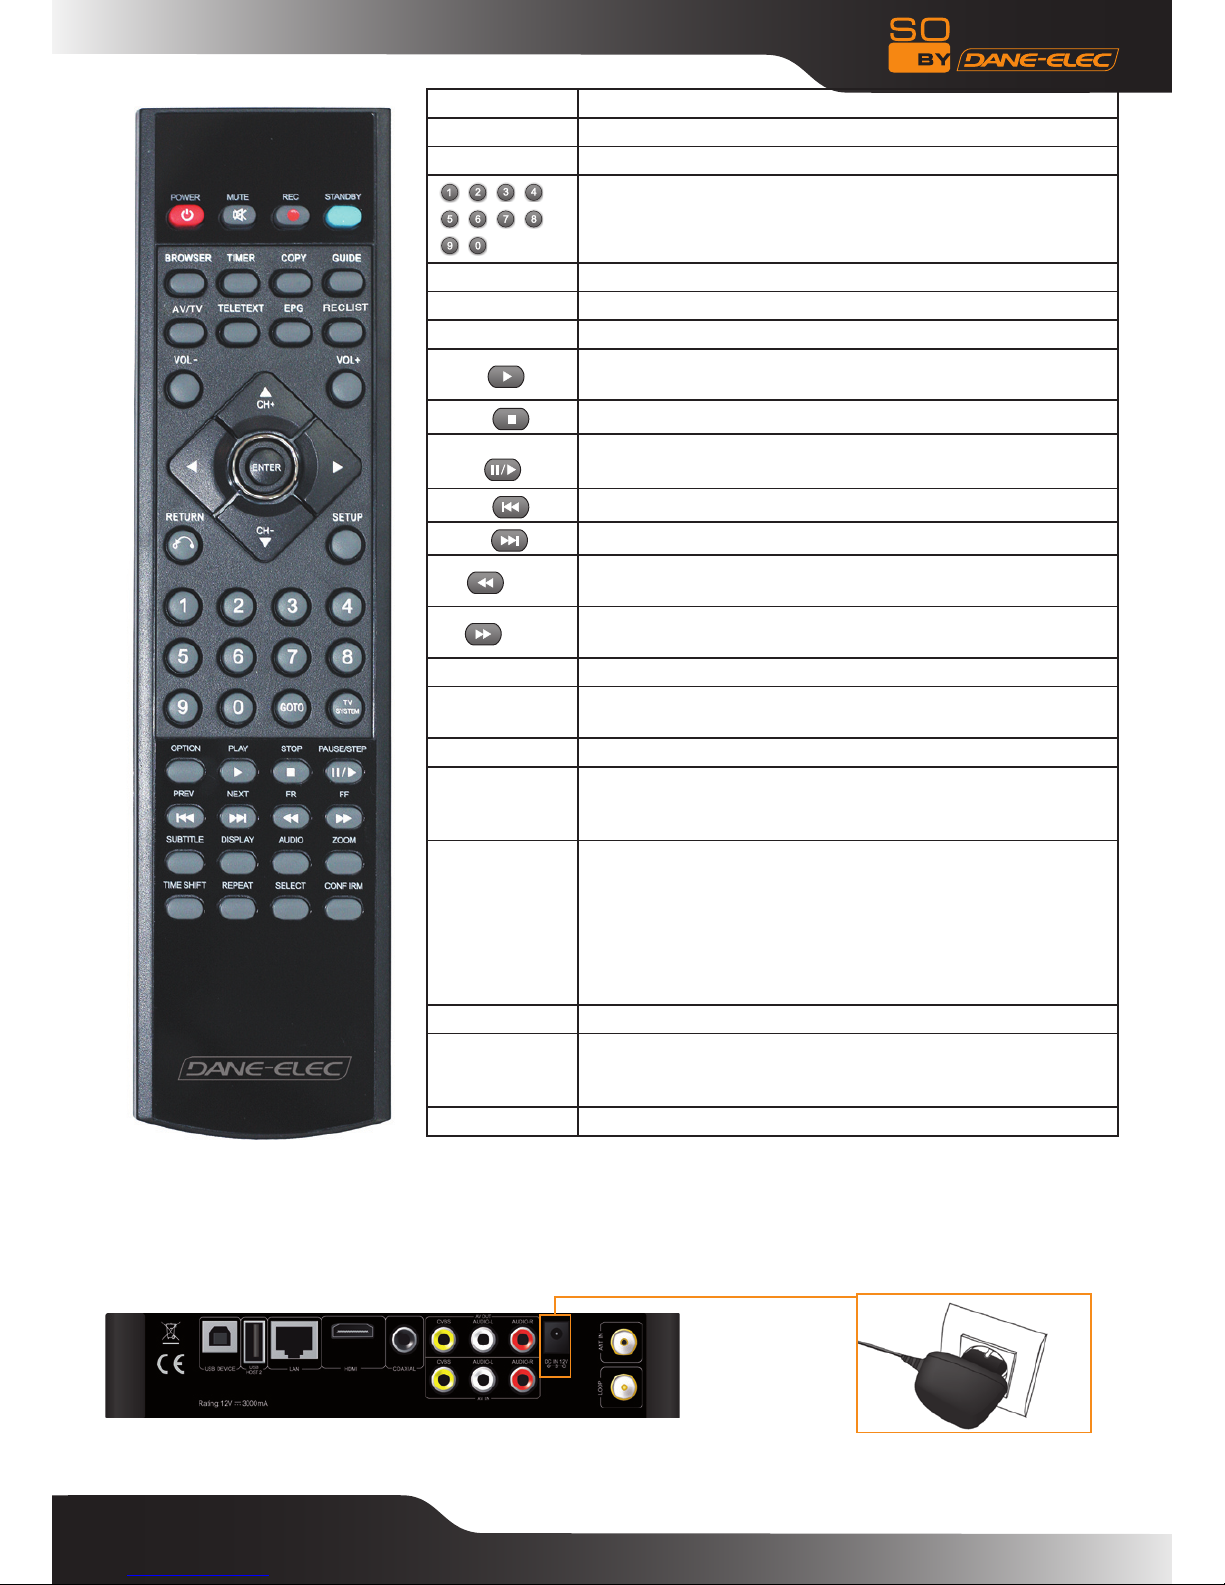
Connection methods to watch TV and for General usage
TV signal input interface
The ANT IN interface can receive DVB-T (TNT) digital television signals. The LOOP interface can output DVB-T (TNT)
digital television signals . After accessing the television signal, press SET-UP key to access the interface settings, select
TV, set to begin.
1: TV signal input interface:
The ANT IN interface can receive DVB-T (TNT) digital television signals. After accessing the television signals, press SET-
UP key to access the interface settings, select TV to enter.
2: TV signal output interface
The LOOP interface can output DVB-T (TNT) digital television signals to directly access the TV input interface. However,
there must be a TV signal input rst.
Operation Steps:
Step 1:The ANT IN (1) interface must have a DVB-T (TNT) digital TV signal input, and the other interface LOOP (2) outputs
a TV signal via the So World TV tuner or the So World TV’s other interfaces e.g. AV or HDMI video signal outputs.
Step 2: After turning on the So World TV, press SET-UP key to access to the settings interface. Select TV, enter the TV
Region, choose your country or region.
At the same time, choose Chanel Scan set. You can choose the AUTO SCAN auto-search television program.
You can also choose MANUAL SCAN to begin manual setting, but you need to know the DVB-T (TNT) digital television
programs speci c Bandwidth and Frequency parameters. If you do not know, ask your local DVB-T (TNT) digital television
signal provider to obtain access.
Select the appropriate channels (CH), Bandwidth, enter the correct Frequency, and then press "ENTER" key to start
scanning. You can see the screen displaying the number of channels and program signal quality. If the parameter setting is
wrong, it will display «Error». Please re-set the parameters for scanning.
You can watch television programs at the same time as recording television programs.
Press the "AV/TV" Remote control key to switch between different input sources.
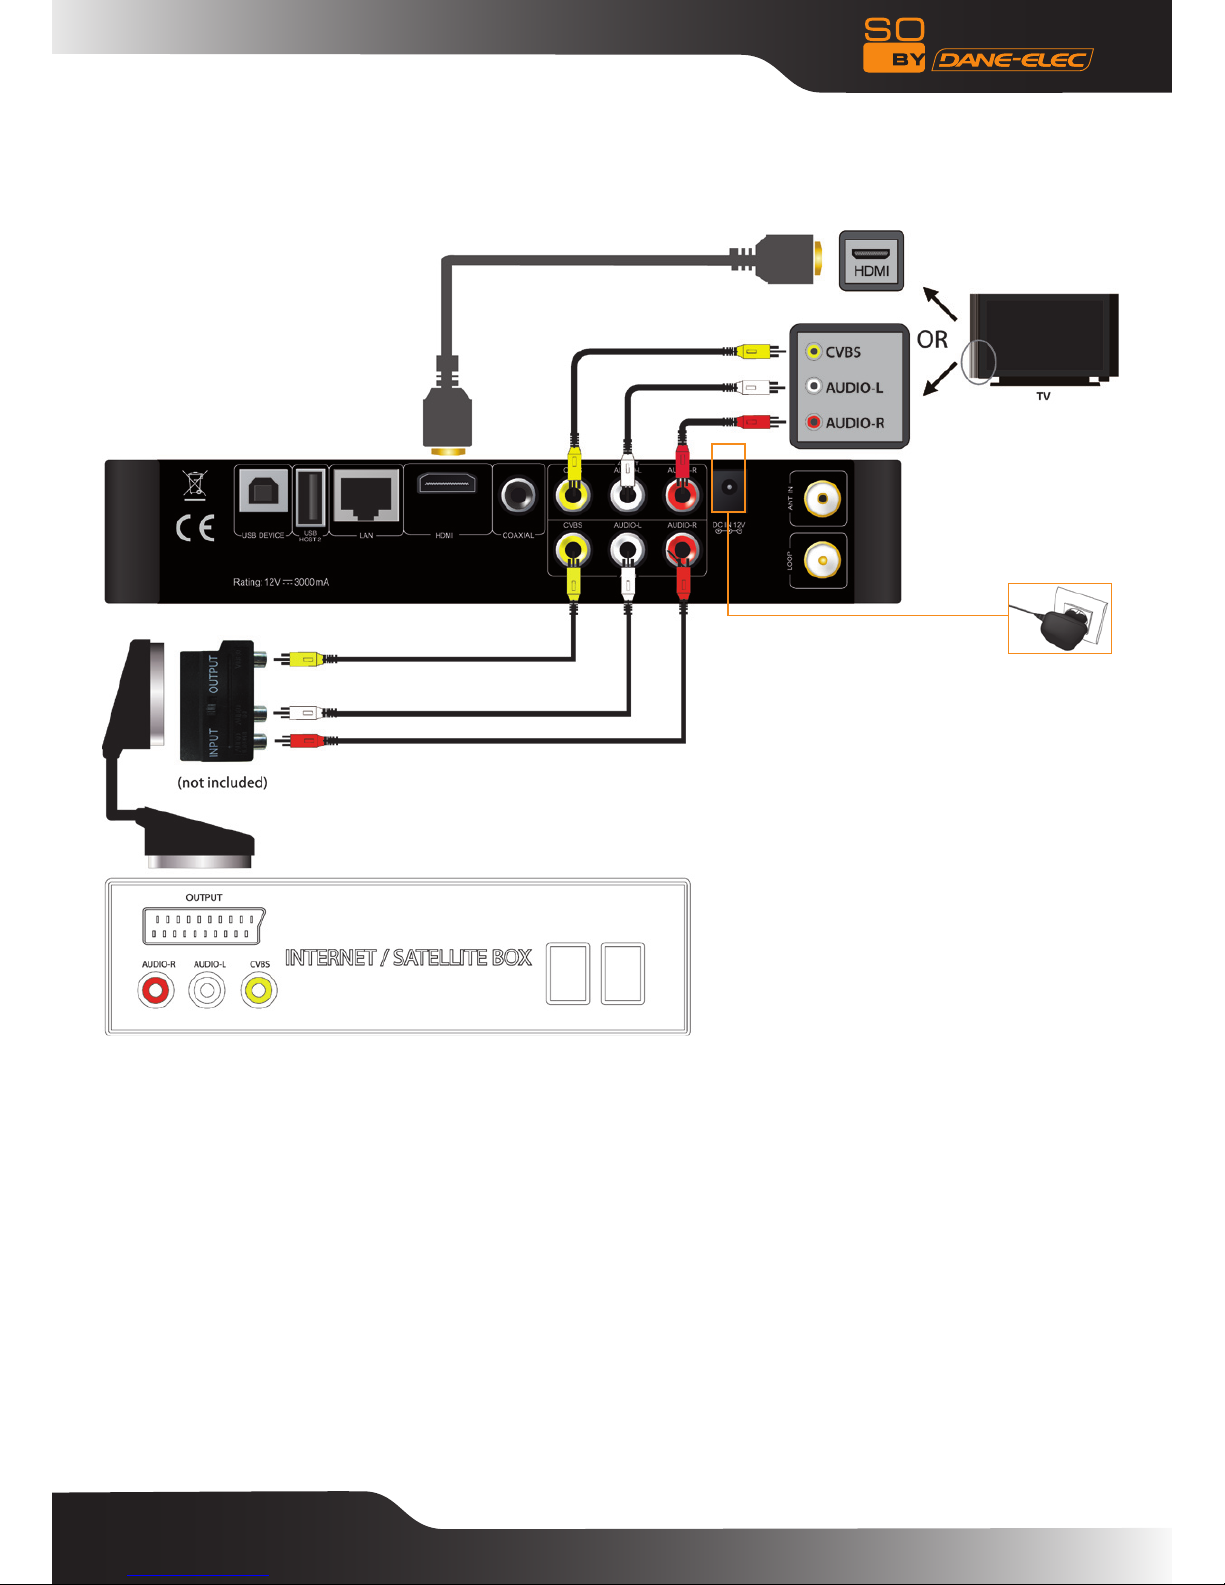
Connection or recording and general usage
The So World TV allows to watch television programs while recording another television program. In the DVB-T (TNT) mode
watching digital terrestrial television, you can press the REC key on the remote control to start recording.
In addition to recording television programs on their own, other input signals are recorded. A TV signal can be generated
from TV set-top box or satellite receiver, as long as they are equipped with a satellite TV set-top box or television receiver

8
users can use the recording function.
Important notice: The So World TV also offers TV recording from other set-top box or satellite TV receivers.
For a set-top box or satellite with one signal output, please refer to the connection described below.
Connect the AV IN and set-top box or satellite TV receiver and make sure the output of the set-top box or satellite TV
receivers works well. Turn on the TV and select AV mode. Turn on the So World TV and select AV IN on the menu. The TV
program displays on screen and is ready to record.
How to start recording
Before using recording ,choose the recording device .Press the SET-UP key to access the set-up interface, then choose
REC Device and you can choose HDD or USB device to record the channel.
1, Recording
When using the recording function, there are two input sources for recording: video and DTV. Press the "AV/TV" remote
control key to switch between different input sources. The AV IN mode and So World TV mode are the two methods for
recording.
a. TV IN mode DVB-T (TNT) signal input
The ANT IN interface can receive a DVB-T (TNT) digital television signal.Please refer to the following connection.After
accessing the television signal, press the SET-UP key to access the interface settings,select the TV option to begin
setting(see the previous chapter “Connection methods to watch TV and General use”).After setting, you can watch the

9
television program,
Press “REC” key on the Device or remote control, the “REC” LED on front panel of recorder turns red which shows that
recording has begun. Press the REC key repeatedly, and it can swich the recording time (ORT30min, ORT60min, and
ORT90min). Press the “■”key on the remote control or device to stop recording.
Watching while recording
When you’re watching one channel, you can also record the channel’s program at the same time. When your TV receives
a television signal ,enter the DTV interface and press the REC key to start recording,and a red circle will be display on the
upper right corner of the screen.
If you press the ENTER key, the screen will display the PR menu as follows. Press / key to select the channel you
want to watch. Then press the ENTER key to conrm. Thus you can watch the program on one channel while recording
another channel.
Note :
The contents you have recorded kept in the folder named with the time when you started recording.
b. AV IN mode
After the correct connection of the AV-in signal, power on the set-top box (or satellite TV receiver), TV and our recorder,
switch the TV signal to AV-in, if you only want to watch TV, do not turn off the recorder and keep the input signal of the TV
with the set-top box signal.
When you want to select the program which one like, please choose “the input video frequency” the option to enter the
television picture choose the television channel through the set-top box (Or satellite TV receiver).
Select “TV/AV IN” menu to access the TV menu, you can select the TV channel through the set-top box (or satellite TV
receiver). and press the REC key to start recording.

10
2. Watching a video recording
All the recorded les are recorded in a folder named “REC”. Press the “REC LIST” key on your remote control or enter
the “Browser” in the main menu and select “HDD”, you will nd this recorded videos were saved in subfoldersq named
according to the system time.
You can preview the recorded les by pressing the “ENTER” key to playback.
Connection and set-up of network
The So World TV can play the les stored in the network directly through the router or hub. Connect the RJ45 cable
according to the following illustration. The network is properly connected when the LED of network status and W/R LED
blinks.
Connect one end of the RJ45 cable to the So World TV and the PC and connect to the video output. Press “set-up” key
or select “set-up” menu in the start-up interface. Select the “Network” option in the set-up window and press “ENTER” to
conrm. Both automatic and manual IP set-up options are available. Press the “set-up” key again to exit after set-up. In
order to access the PC through the network by the So World TV, the media les must be shared on the network.

11
How to use the USB HOST interface
A player with the ability to expand a large-capacity.The USB HOST port can read an external mobile hard disk, USB key,
digital cameras, card readers and other data storage devices.
Even without the installation of hard drive players, you can connect external storage devices through the USB HOST
interface. To directly play a variety of high-denition formats high-delity audio and video les stored in external storage
devices. To watch HD movies and digital photos in a better way, at the same time the digital audio signals to audio equipment
can also benet from high-delity sound effects.
How to connect the USB interface to your PC
This HDD Recorder & Player is also a personal multimedia le storage device and can be used by connecting to a PC via
the USB interface.
1, Connect to the power supply.
While using the HDD recorder & player with your PC, power supply is still required.
2, Connect to your PC with a USB cable.
Connect the HDD Recorder & player to the PC with a USB cable to copy and transfer data.
Follow the instructions on the above picture to connect the device to PC.
Turn on the PC and enter the system. The PC detects the device automatically and then the device can be used as an
external USB storage device.
After data transfer has nished, please remove the USB storage device safely (click the USB device icon to stop the USB
device and then pull out the USB cable).
Notes:
1, Please don’t power off when connected to a PC for reading and writing.
2, If there is no USB detected after connected with USB cable, maybe the PC is operating another program, please
disconnect the USB cable and wait about 10 seconds then connect again.
The So World TV is also a personal multimedia les storage device and can be used by connected to the PC. You can
browse and copy les easily.
The following is the set-up for media le sharing on a PC (FOR ADVANCED USERS)
Operation of le sharing under Windows XP
Two conditions are necessary for a successful network connection.
- Folder sharing and security set-up
- Set the same gateway and subnet mark address.
1. Select the folder you wish to be shared, right click with the mouse and select the option ”Sharing and security”, left click
with the mouse.
2. Select “sharing” in the property option and select “share this folder on the network” and click “Apply” to conrming to exit.

12
3. Open “Control panel- Management tool-Computer management-Local users and groups” and click “Users” option. Right
click Guest and select “Properties”.
4. Select ‘users can not change your password’ and ‘password never expires’. Keep the other checkboxes unchecked.
5. Open ”Control panel- Network connection”, and select “Local Area connection” and right click to select “Properties”.
6. In the Pop-up window, select ‘Internet protocol (TCP/IP)’
7. Set up the relevant IP address, subnet mask and gateway, you can also choose to automatically assign.
8. Completion of Windows XP network sharing.
9. Finally, close the Windows Network Connection Firewall
Operation of le sharing under Windows Vista:
1. Please make sure that the Vista operation system is installed as Administrator supper user.
2. From the desktop select ”start- set-up-control panel-select user account”
3. Open User account and select” open a new account” and name it “Guest”
4. Select the folder you wish to share and right click with the mouse, then select the “sharing” option.
5. Open the shared folder and add guest account to the list
6. Give the right to all the users after adding the Guest into the list.
7. Select “sharing”, and then the folder is shared.
8. Finish sharing
9. Operate the device in the same way as in the XP system
Operation of le sharing under Windows 7:
1. Right-Click on the folder you want to share (for example "My Videos")
> Select "Properties" as shown below :

13
Choose the the "Share" tab and click on "Share"
This screen appears, write "Everyone" as below and click on "add"
"Everyone" appears on the next screen :

14
Click on "Read" and choose "Read and Write"
Then click on "Share"
This screen appears :
> Your folder is now shared

15
On the windows "Properties" click on "Advanced sharing" :
The next window appears :
Click on "Share this folder"
then on "Authorization" :

16
This screen appears :
Click on "Total Control":
Click "OK"
On "Properties" window, Click on "Advanced sharing settings"

17
This screen appears, select settings as below :

18
Now on the So World TV, select "Browser":
Select "Network":
Select your current domain (as in our example "/WORKGROUP/")

19
Select your computer name (as in our example "/PORTABLE-TECH/")
"Log on Succesfull" appears, now you could access to your shared folders :
OPERATION OF SO WORLD TV
Turn on the Player, the system shows a guide menu after a few seconds. There will be six function options, or you can enter
this guide menu by press “Guide” key on the remote control.
Note: (in case of reset setting)
When you connect the power supply for the rst time, the device will power on automatically.
Go to the set-up menu directly and set up the “Menu Language”, “TV Region”, “Time set-up” and so on when you use it for
the rst time.

20
Browser: Browse and play the media les.
With this function, you can browse movie, photo and music les stored on the HDD, card, net work and USB drive by
pressing the “Up” and “Down” navigation keys to choose the source devices and pressing the “ENTER” key to conrm. You
can also press the “Browser” key on the remote control to enter this function directly.
Rec_List: Quick automatic search function takes you directly into the player’s recording folder to play recorded les. The
time of the recording document matches to the order in which they are named.
TV/AV in: Select the input source to be watch and recorded.
Connect the device of the recording resources such as the DVB-T (TNT) digital terrestrial television or the set-top box
receiver with AV-in output, access the “TV/AV in” menu, then you can watch or record the current TV program.
Timer : Plan recording schedules.
With this function, you can create, edit or delete the schedule and view status and history.
Please read the following instructions carefully to understand the function of each option.
Internet Service: Enjoying various internet servics on TV.
With this function, you can access news, video, photos, weather, and download interface on line by watching TV. You can
enjoy many kinds of internet services, without using your PC to go to on the internet.
File copy: Copy les from one device to another
With this function, you can copy les from Hard Disk, NET, USB or Memory Cards from one media to another.
Set-up: Enter the set-up menu.
With this function, you can congure system, movie, music, photo, network and recording settings.
Browser
Select the “Browser” in the guide menu or press “Browser” key on the remote control to browse movie, photo and music les
stored in HDD, card, network and USB by pressing the “Up” and “Down” navigation keys to choose the source devices and
pressing the “ENTER” key to conrm and play the les in the selected device.
Select the le or folder by pressing the “Up” and “Down” navigation keys and press the “ENTER” key to enter and play the
les, press the “Return” key to return to previous list.
File Range function
To make le browsing and playing easier, there is a function to store all les into different folders named “All”, “Music”,
“Photo” and “Movie”, you can switch to any folder by pressing the “left” and “right” navigation keys.
Browsing Music
Use the left and right navigation arrows to select the Music tab.
Other manuals for SO WORLD TV -
2
Table of contents
Other DANE-ELEC DVR manuals