Danguard HS-200 User manual

Stand: 2.1 Januar 2015 // Technische Änderungen, Druckfehler und Irrtümer vorbehalten.
User manual
HS-200 / HS-210 / HS-400 / HS-410

1. General Information
1.1 Introduction ..................................................................03
1.2 Features........................................................................03
1.3 Delivery.........................................................................03
2. Designations ...................................................................04
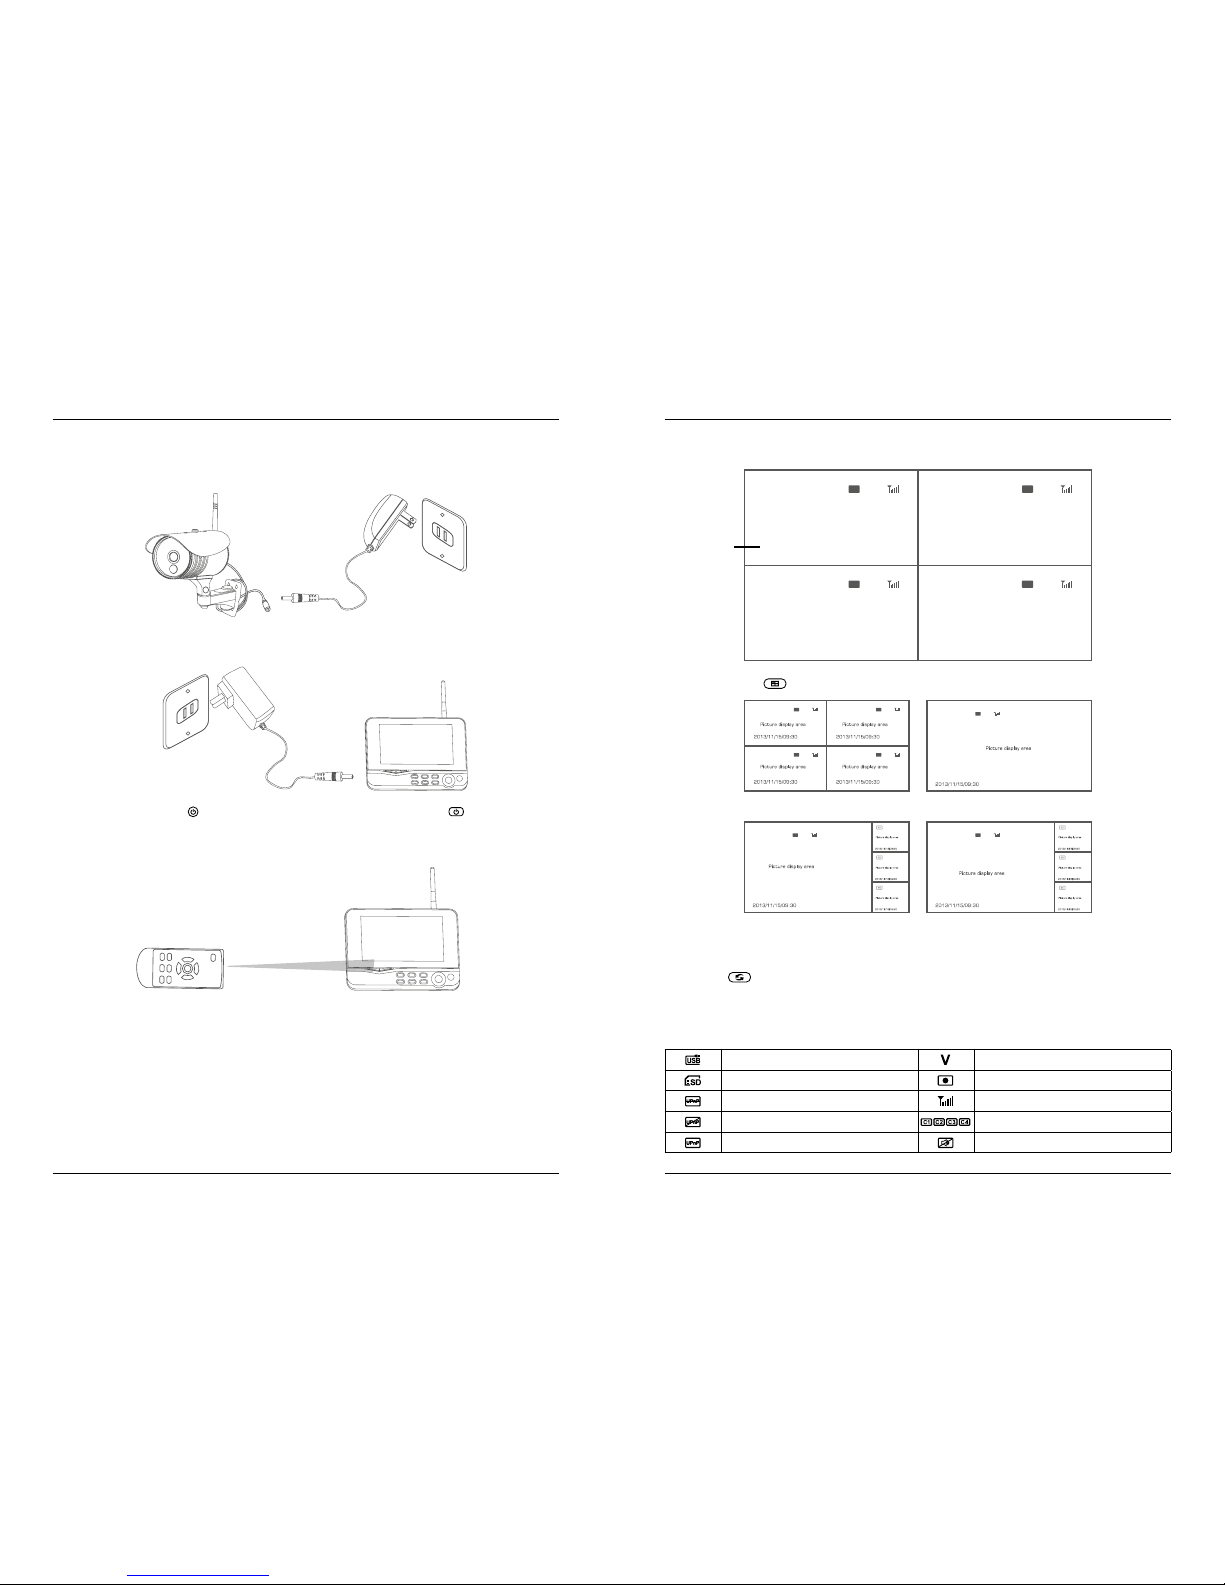
3. Installation.......................................................................05
4. Operating .........................................................................06
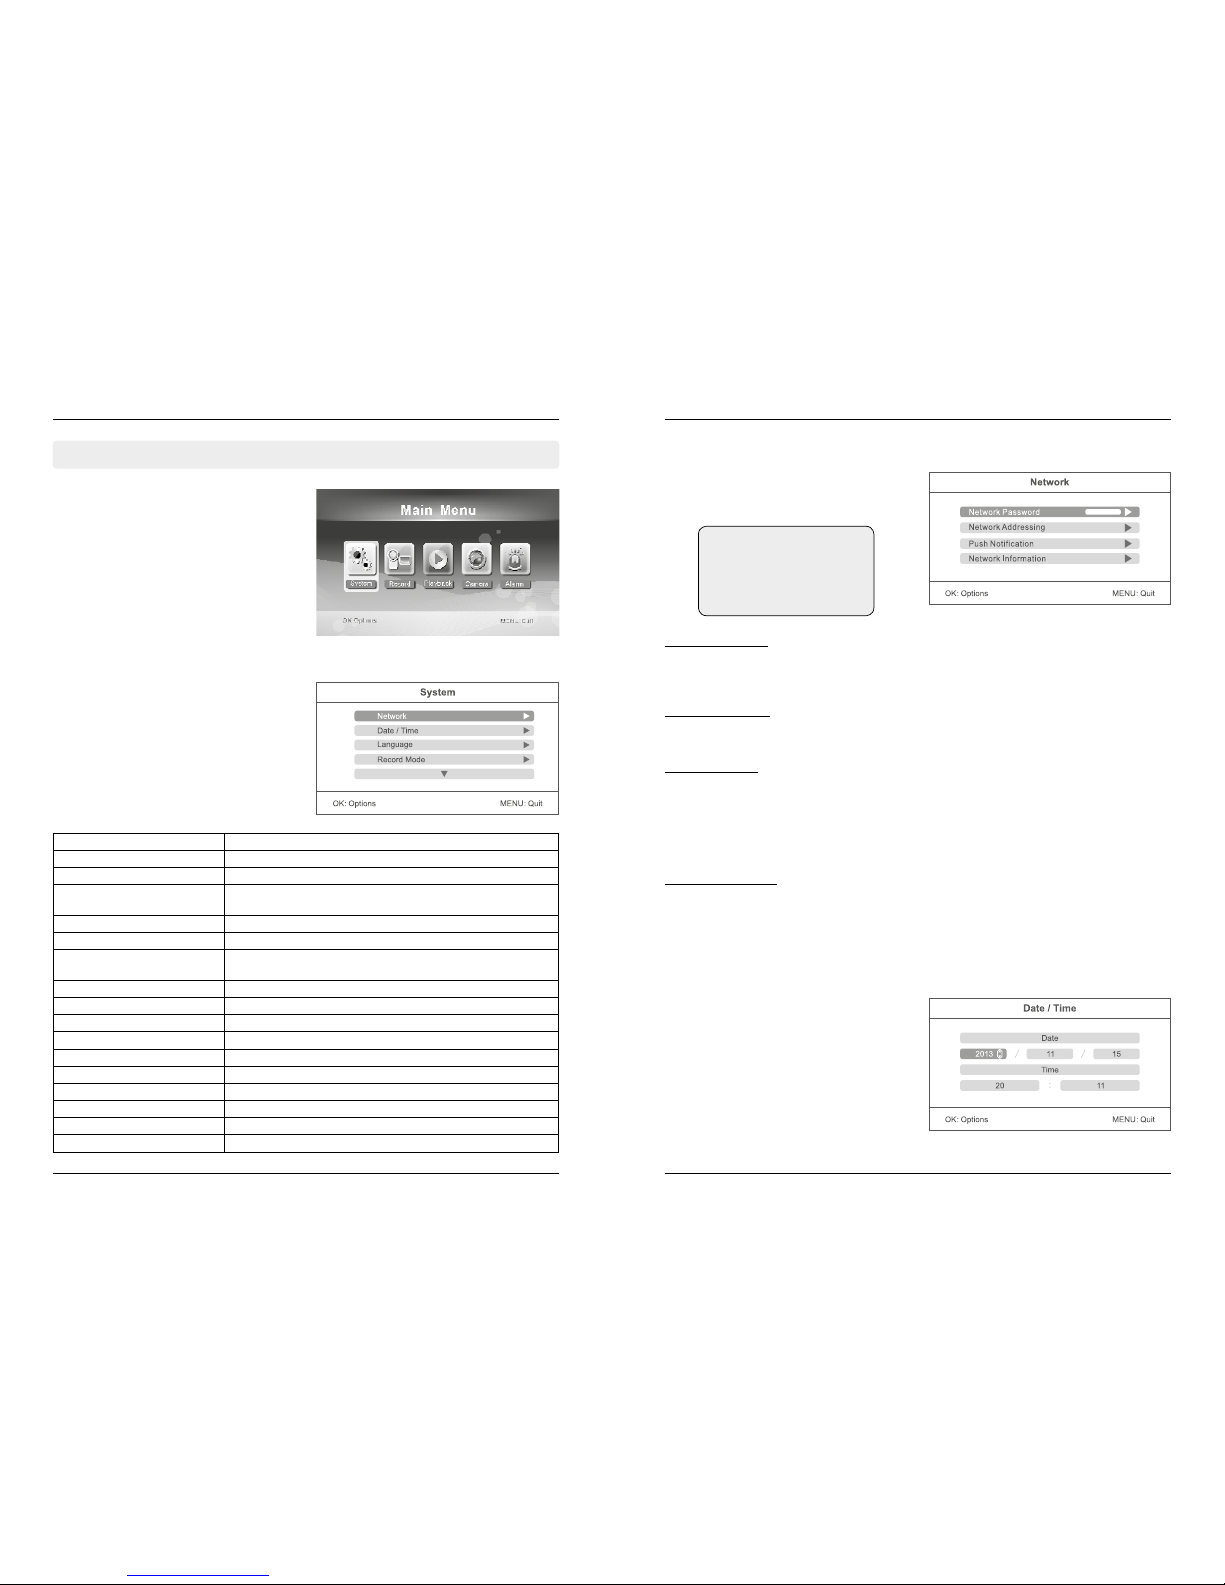
5. Main menu
5.1 System
Network (only at IP version) .........................................09
Date / Time ...................................................................09
Language......................................................................10
Record Mode................................................................10
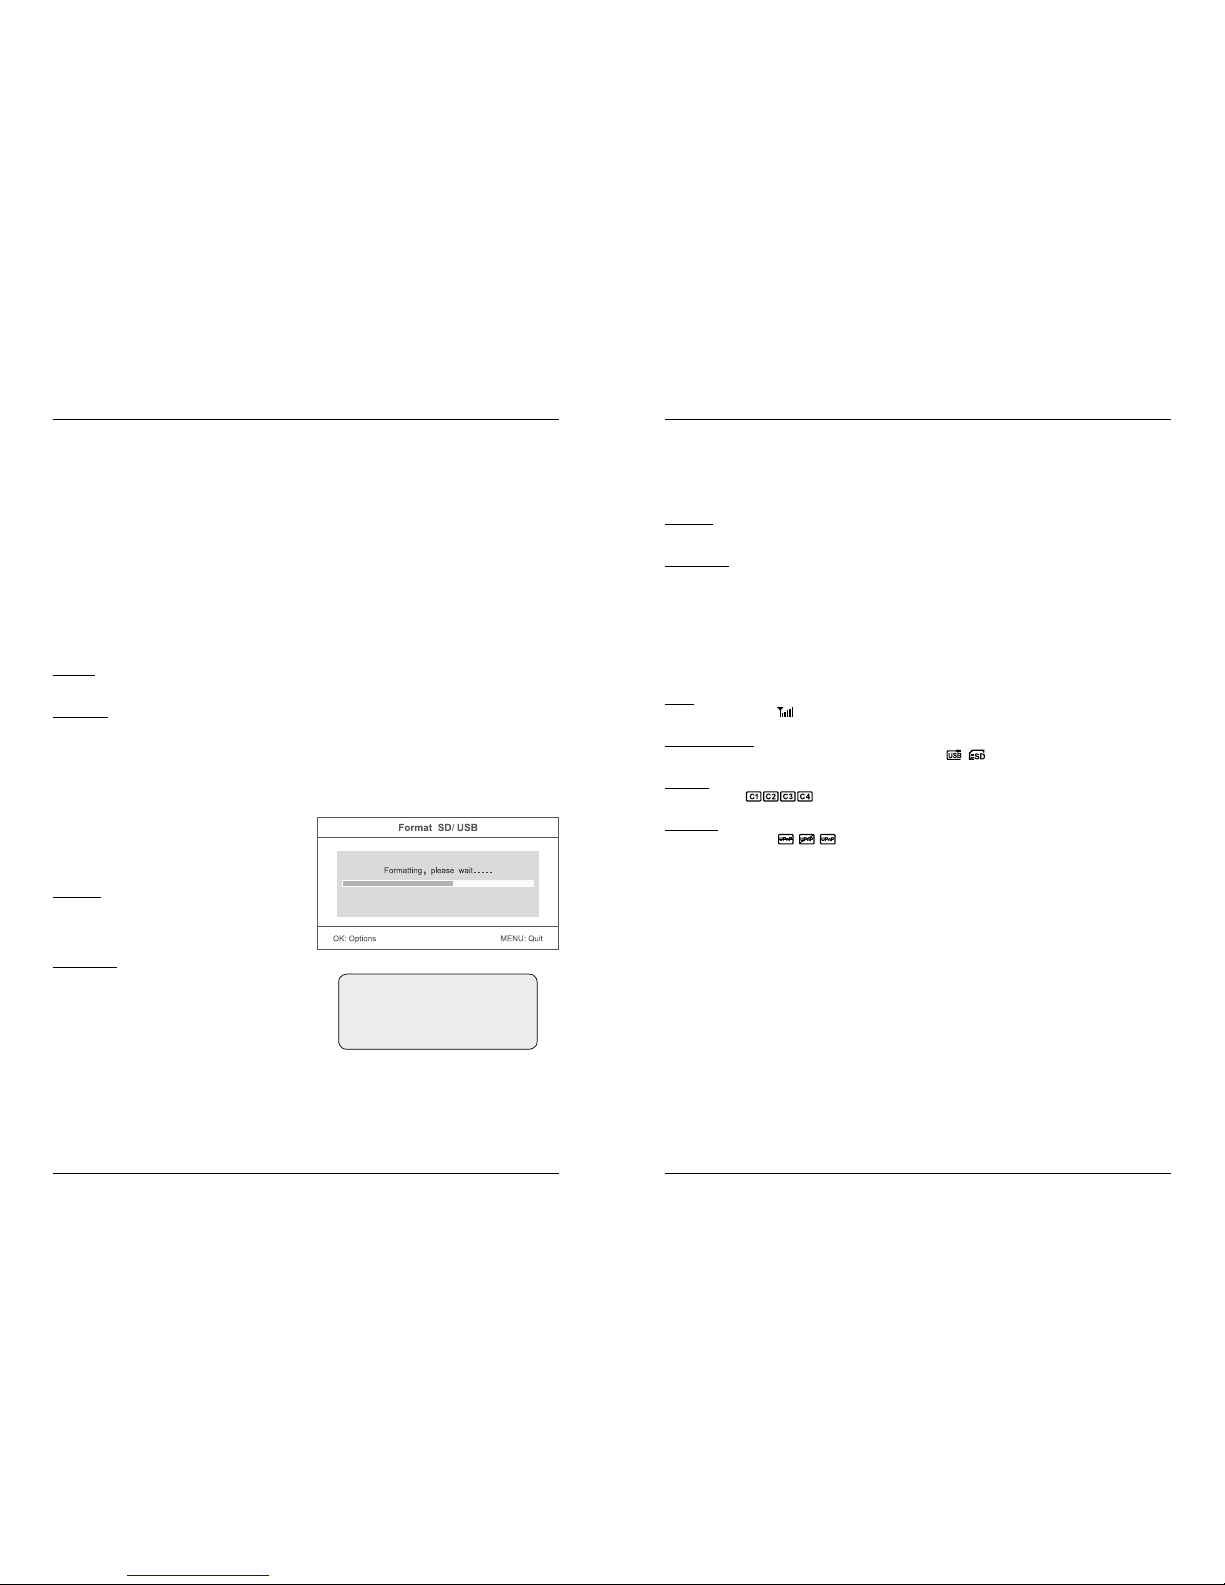
Format SD/USB.............................................................10
Storage for Recording ..................................................11
Display Items................................................................11
TV System.....................................................................11
System Information ......................................................11
System Upgrade...........................................................12
Scan Mode Periode ......................................................12
Mute .............................................................................12
Load Default .................................................................12
Brightness ....................................................................12
Volume..........................................................................13
Alarm Volume ...............................................................13
Power Saving Mode .....................................................13
5.2 Record
Timer Recording ...........................................................14
Motion Detection .........................................................15
PIR Recording...............................................................16
Manual Recording ........................................................16
5.3 Playback
Playback........................................................................17
Delete ...........................................................................17
Video Output ................................................................17
5.4 Camera
Pairing ...........................................................................18
Activation......................................................................19
PIP Setting ....................................................................19
5.5 Alarm ............................................................................20
6. Operating with Android devices
Connect to the network .....................................................21
Download & Operation of the app for Android devices.....21
Setting the Push Notification .............................................24
7. Operating with iOS devices
Connect to the network .....................................................25
Download & Operation of the app for iOS devices............25
Setting the Push Notification .............................................28
8. Specifications.................................................................29
9. Troubleshooting .............................................................30
This product is a wireless surveillance system with recording function. It consists of two, three, or
four cameras and a 7“ TFT LCD monitor. The display is four split-screen can display the monitoring
images from the connected cameras. In addition, the cameras have an infrared detection of the
human body with alarm function. Optionally, the video surveillance system over an IP feature that
allows you to transfer the surveillance video to your smartphone or tablet.
• Easy installation without cables
• Completely digital, no interference
• 7“ TFT LCD monitor with built-in VCR
• Supports SD cards (up to 32 GB - SDHC recommended) or external hard drives (up to 1TB)
• Supports up to 4 cameras / 24 hours / 7 days non-stop recording function
• Multiple recording modes: manual, schedule, motion, continuous recording
• 20 m night vision range
• Video quality: 4 channel VGA 10fps, 30fps VGA 1 channel
• Weatherproof outdoor cameras with up to 300 m transmission range
• Video output for larger monitors
• IR-cut function
2x camera set
•2x Ccamera
•3x Antenna
•1x 7“ TFT LCD Monitor
•1x Power adapter (monitor)
•2x Power supply (camera)
•1x AV cable
•1x Remote Control
•1x Allen key
•1x Screw set
•1x User manual
•1x Network adapter (optional)
4x camera set
•4x Ccamera
•5x Antenna
•1x 7“ TFT LCD Monitor
•1x Power adapter (monitor)
•4x Power supply (camera)
•1x AV cable
•1x Remote Control
•1x Allen key
•1x Screw set
•1x User manual
•1x Network adapter (optional)
Content
02 03
1. General Information
ENGLISH ENGLISH
1.1 Introduction
1.2 Features
1.3 Delivery
only at IP version

5. After successful pairing, the following real-time monitoring picture appears:
6. Press the button to switch between four display modes:
7. Press the button to enter cyclic mode display. Five cyclic intervals are available: 5s, 10s, 15s,
20s, and 30s and can be set under “System”.
Time stamp
four pics
one big,
three small pics
one pics
one big,
three small pics
4. Operation
06 07
4. Operation
ENGLISH ENGLISH
1. Connect the camera to the power supply. The power Indicator on the back is turned on.
2. Connect the receiver to the power supply.
3. Press the power switch on the receiver for 2s. or press the power switch on the remote
control (direct the remote control toward the receiver). The power indicator is turned on and the
power-on picture appears.
4. Pair the cameras and receiver respectively (at most four cameras can be connected at the same
time). Pairing is completed by default before delivery. If pairing is not completed, complete pairing
according to “Pairing” on page 18.
2013/11/15/09:30 2013/11/15/09:30
2013/11/15/09:30 2013/11/15/09:30
Picture display area Picture display area
Picture display areaPicture display area
Meanings of icons on the real-time monitoring picture:
Mobile hard disk inserted successfully Current camera
SD card inserted successfully Recording status
No open router Signal intensity
Network connection failure Camera name
Network connection successful Mute

5.1 System
5. Main Menu
08 09
5. Main Menu
ENGLISH ENGLISH
Press in the real-time monitoring the MENU but-
ton to enter the main menu.
Press the tor ubutton to select the menu
item SYSTEM. Confirm with OK.
Press the por qbutton to select the menu
item NETWORK. Confirm with OK.
Press the por qbutton to select the menu
item DATE / TIME. Confirm with OK.
Press the tor ukeys to select an option. Press
the por qkeys to a corresponding value set.
To save and exit the menu, press the OK button.
Network Password:
Enter any password as a security (12 characters max.). The same password you must enter in the
app on your smartphone or tablet. The function of the application to a mobile terminal is explained
in a later section.
Network Adressing:
Choose between a dynamic IP address (DHCP) or a static IP address. The dynamic IP address
applies in most cases.
Push Notification:
„Enable / Disable“ set the push notification (on or off). The notification is done on your mobile
device when the camera detects motion. With the „minimum push interval“ you can set the dis-
tance between the camera detection and notification (2, 5, 10, 20 or 30 minutes). Put in „period“
the period of time in which a push notification to be done. Under „Registered Mobile“ you will see
the selected mobile devices. If „None“ is displayed on the screen, no mobile devices are currently
connected to the camera system.
Network Information:
Here all the network information will be displayed when a network connection is available. This
option is available only at the IP version.
Network:
Date / Time:
The SYSTEM menu consists of several sub-items, which are explained in the following:
Network (only at IP version) Sets and views the network information.
Date / Time Sets the system time and date.
Language Sets the system language.
Record Mode Sets to stop recording or overwrite the earliest video record
when the storage medium is full.
Format SD/USB Sets whether to format the storage medium.
Storage for Recording Selects the storage medium.
Display Items Sets whether to display RSSI, SD/USB Status and Camera on
the screen and the recorded video.
TV System Selects a system.
System Information Views the system information.
System Upgrade For software upgrade.
Scan Mode Periode Sets the cyclic display interval of monitoring picture on the camera.
Mute Turns on/off the speaker on the receiver.
Load Default Sets whether to restore default settings.
Brightness Adjusts brightness of the LCD screen.
Volume Adjusts the volume.
Alarm Volume Adjusts the alarm volume.
Power Saving Mode Adjusts power saving mode.
Note:
The menu item „Network“ is
only available at the IP versi-
on of the camera system!

Infrared LEDs
Pairing
button
Antenna Antenna jack
Power supply
Power Indicator
Link indicator
USB Anschluss
SD Kartenslot
AV Ausgang
Stromanschluss
Lens
PIR Infrared
sensor
Microphon
Bracket
Bracket
Speaker
Link indicator
Antenna
7“TFT-LCD
Display mode
Video playback
On/Off
OK button
Navigate button
Power Indicator
Record/Stop Video
Quarter display button
Delete file/
LCD TV switch
Menu
On/Off Navigate button
OK button
Display mode
Video playback
Menu
Record/Stop Video
Aufnahme/Stop Video
Delete file/
LCD TV switch
Positioned on a level plane
Installieren Sie die Kamera
auf einer ebenen Fläche.
2. Designations
04 05
3. Installation
ENGLISH ENGLISH
1. Install the camera at the proper monitoring location and screw up the bracket.
2. Install the receiver at a proper location.
3. Insert the SD card or connect an external USB storage device.
Note:
1. It doesn’t support hot-swappable of SD card or external storage device.
2. The external mobile disk/SD card should be in format of Fat32.
3. Please format the SD card or external mobil disk if they have been used on other device.

Press the por qbutton to select the menu item LANGUAGE. Confirm with OK.
The following languages are available: German, English, Dutch, French, Portuguese, Italian, Spa-
nish, Russian, Japanese and Chinese. Press the por qbuttons to select a language. To save and
exit the menu, press the OK button.
Press the por qbutton to select the menu item RECORD MODE. You can choose between two
record modes:
Normal:
When the SD card or the mobile hard disk is full, the system stops recording automatically.
Overwrite:
When the SD card or the mobile hard disk is full, the system automatically deletes the earliest
videos and reserves a sufficient storage space to guarantee this recording.
Press the por qbutton to select the menu
item FORMAT SD / USB. Confirm with OK.
You can choose between two options:
SD-Card:
Confirm with the OK button. Select „OK“ to
format the SD card. Select „Cancel“ to cancle
the process.
USB device:
Confirm with the OK button. Select „OK“ to for-
mat the USB device. Select „Cancel“ to cancle
the process.
Press the por qbutton to select the menu item STORAGE FOR RECORDING. Confirm with OK.
You can choose between two options:
SD-Card:
Choose SD card to get the videos on an SD card.
USB device:
Choose USB device to get the videos on an USB device.
Press the por qbutton to select the menu item DISPLAY ITEMS. In this menu you can choose
which icons should be shown on the display.
RSSI:
Signal intensity icon:
SD / USB Status:
Whether the SD card or mobile hard disk is inserted:
Kamera:
Camera name:
Netzwerk:
Network connection:
If the icons are displayed, each option is provided with a marker. You can press the OK button to
activate the option or disable. Then press the MENU button to save and exit.
Press the por qbutton to select the menu item TV SYSTEM. In this menu you can select the TV
standard for the external monitor. You can choose between NTSC and PAL.
Press the por qbutton to select the menu item SYSTEM INFORMATION. In this menu, you will
see various information about the camera system, or the monitor.
Language:
Record Mode
Format SD/USB
Storage for Recording
Display Items
TV System
System Informationen
5. Main Menu
10 11
5. Main Menu
ENGLISH ENGLISH
Note:
When you format a disk, ALL
data will be deleted irrevocably!

5. Main Menu
12 13
5. Main Menu
ENGLISH ENGLISH
Press the por qbutton to select the menu item SYSTEM UPGRADE. In this menu, you can
update the firmware of the monitor, or the cameras.
1. Copy the firmware to an SD card or a USB stick and plug it into the monitor.
2. Select „Upgrade Firmware local“ with the por qkey and confirm with OK. Now press to start
the update process button (record button). A popup message appears. Press OK to confirm
or MENU to cancel.
Press the por qbutton to select the menu item SCAN MODE PERIODE. In this menu you can
set the interval of the video. If you have for example connected four cameras and set the monitor
to single-image display, change the camera images automatically after a certain time. You can
have an interval of 5, 10, set 15, 20 or 30 seconds.
Press the por qbutton to select the menu item MUTE. In this menu you can turn on or off the
volume of the monitor.
Press the por qbutton to select the menu item LOAD DEFAULT. In this menu, the monitor can
be reset to the default setting. All the settings you have made are lost. Confirm the operation by
clicking OK, or select „Cancel“ to leave the menu.
Press the por qbutton to select the menu item „BRIGHTNESS“. In this menu you can adjust
the brightness of the monitor. Use the tor ukeys to adjust brightness. Confirm with OK to save
and exit the menu.
Press the por qbutton to select the menu item „VOLUME“. In this menu you can adjust the
volume of the monitor. Use the tor ukeys to adjust the volume. Confirm with OK to save and
exit the menu.
Press the por qbutton to select the menu item „ALARM VOLUME“. In this menu you can adjust
the alarm volume of the monitor. Use the tor ukeys to adjust the volume. Confirm with OK to
save and exit the menu.
Press the por qbutton to select the menu item „POWER SAVING MODE“. In this menu you can
define an energy-saving model for the monitor. Choose between two options:
Time Interval:
Sets the monitor in a certain time in the sleep mode if at this time there is no operation on the
monitor. You can select between OFF, half a minute, 2 minutes, 5 minutes or 10 minutes.
Wake up on motion:
Select „Yes“, the monitor is automatically turned on again when the camera detects motion.
Select „No“, the monitor remains off until you press a button.
System Upgrade
Scan Mode Periode
Mute
Load Default
Brightness
Volume
Alarm Volume
Power Saving Mode

5.2 Record
Press in the real-time monitoring the MENU but-
ton to enter the main menu.
Press the tor ubutton to select the menu
item RECORD. Confirm with OK.
5. Main Menu
14 15
5. Main Menu
ENGLISH ENGLISH
Press the por qbutton to select the menu
item „Timer Recording“. In this menu you can
set a recording at a certain time.
Press the por qbutton to select the menu
item „Motion Detection“. In this menu, you can
specify that a camera automatically records
video when motion is detected.
Press the por qbutton to select a camera and confirm with OK. In the following menu you can
adjust various settings of the selected camera:
Sensitivity:
Select the sensitivity of motion detection. You can choose between low, medium and high. In „high“
are as good as all movements cause the camera starts recording.
Motion Detection:
Turns the motion detection of the selected camera on or off.
Stop Condition:
Select the time after which the recording will stop again if no movement is detected by the camera.
You can choose from 8 to 120 seconds.
Area Setting:
Choose an area of the camera on which the camera is focusing. This area of the image is particularly
sensitive when movement takes place.
When you have made your settings, press the MENU button to save and exit the menu.
After you have made all the settings, press the
OK button to set the timer to save and again
to check your settings in an overview. To save
the timer settings and exit the menu, press the
MENU button. If you want to add another recor-
ding, select „New Schedule“ and confirm with
OK. It can max. 6 recordings are programmed.
1. Press the por qbutton to select „Camera“. Using the tor ubutton to select whether a parti-
cular (camera 1-4) or all cameras to record a video.
2. Press the por qbutton to select „Date“. Using the tor ubutton to select on which day you will
record. It is also possible to set the following options: Mon-Fri, Mon-Sat, Sat-Sun, or on a specific day.
3. Press the por qbutton to select „Start Time“. Using the tor ukey to select a any desired hour.
Using the por qbutton to move to minutes.
4. Press the por qbutton to select „End Time“. Using the tor ukey to select a any desired hour.
Using the por qbutton to move to minutes.
Timer Recording
Motion Detection
Note:
The timer recordings are
saved only when you insert an
SD card or a USB device.
Note:
The motion detection not only responds
to people. Also, animals or other things
that move in front of the camera can trig-
ger recording.

Press in the real-time monitoring the MENU button to enter the main menu.
Press the tor ubutton to select the menu item PLAYBACK. Confirm with OK.
5. Main Menu
16 17
5. Main Menu
ENGLISH ENGLISH
Press the por qbutton to select the menu
item „PIR Recording“. In this menu, you can
specify that a camera automatically records vi-
deo when it perceives a heat source.
In the real-time monitoring, press the tor ubutton to select the camera for video recordings as
the current camera. Press the Record button on the monitor. The record icon is displayed
on the screen and confirmed that the recording starts. Press the recording button again to stop
the recording.
Press the por qbutton to select a camera and confirm with OK. Using the tor ubutton to
enable or disable the PIR recording.
Remarks:
• The infrared range of the PIR sensor is about 5 meters. If the distance is larger, the scan may fail.
• If a video recording is longer than 5 minutes, a video file will be saved automatically. Accor-
dingly, it is stored on the storage medium every 5 minutes a video.
• Simultaneous recordings with multiple cameras (max. 4 cameras) is possible. The recorded
videos of the respective cameras are placed independently of each other in a separate video
folder.
PIR Recording
Manual Recording
Playback
Delete
Video output
Hinweis:
Die Erkennung einer Wärmequelle reagiert
nicht nur auf Personen. Auch Tiere oder
sonstige Dinge die sich vor der Kamera
bewegen, können Wärme ausstrahlen und
dadurch eine Aufnahme auslösen.
5.3 Playback
Using the por qbutton to select a folder
and click OK. Then select with the por q
button of a video and press OK to play it.
Using the tor ubutton to fast forward and
rewind a video. Use the OK button to set the
video to pause, press MENU to exit the menu.
In PLAYBACK menu using the por qbutton
to select a folder, then press button to
erase. NOTE: Only empty folders can be de-
leted. Delete first the videos inside the folder.
You can connect the receiver to a larger monitor/TV to monitor video more clearly.
Press the button to switch display between the monitor/TV and the main monitor.
AV cable

5. Main Menu
18 19
5. Main Menu
ENGLISH ENGLISH
5.4 Camera
Press in the real-time monitoring the MENU but-
ton to enter the main menu.
Press the tor ubutton to select the menu
item CAMERA. Confirm with OK.
Press the por qbutton to select the menu
item „Pairing“. Now use the por qbutton to
select a camera from which you want to pair
and confirm with OK. Then a message box
appears that prompts you to press the pairing
button on a camera.
Press the por qbutton to select the menu
item „Activation“. Now use the por qbutton
to select a camera which you want to activate.
Press the tor ubutton to enable or disable a
camera. When a camera is disabled, it has no
function and will not record video or activate
an alarm.
Press the por qbutton to select „PIP Setting“
and confirm with OK. Now use the por qbutton
to select a camera and confirm again with OK.
Resolution Size:
Press the por qbutton to select a video re-
solution. You can choose between „high“ and
„low“. Confirm your selection with OK.
Quality:
Press the por qbutton so set the quality of
the videos. You can choose between „Low“,
„Medium“, „High“ or „Top“. Confirm your selec-
tion with OK.
To exit the menu and save the settings, press
the MENU button.
Press within 35 seconds on the back of the ca-
mera the pairing button for about 2 seconds.
Now the camera is connected to the monitor
and there are no other wireless frequencies
disturbed.
If pairing fails, the system prompts “Pairing fai-
led”. Please perform pairing again.
Pairing
Activation
PIP Setting
Note:
The cameras have already been factory
paired with the monitor. You must per-
form this step only if interference to other
wireless frequencies or if you buy more
individual cameras.
Note:
Higher the resolution and the quality is
set, more memory is required for each
video on the SD card or USB device.

5.5 Alarm
5. Main Menu
20 21
6. Operating with Android devices
ENGLISH ENGLISH
Press in the real-time monitoring the MENU button to enter the main menu.
Press the tor ubutton to select the menu item ALARM. Confirm with OK.
Insert the receiver in the pedestal, and connect
with the base power. Then connect the outer
net. Turn on the receiver.
Check the Google Play Store with your mobile device (eg smartphone). Search for the application
„Goscam GoStreaming“ and download it. Install the software.
After successful connection, go to the Main
Menu -> Network -> Network Information. In
the monitor display the following window will
be displayed.
Motion Detection:
Press the por qbutton to select the menu item „Motion Detection“. If you confirm „On“ by pres-
sing the OK button, the monitor will be playing an alarm sound when the camera detects motion. If
you select „Off“, this function is disabled. Exit the menu by pressing the MENU button.
PIR Detection:
Press the por qbutton to select the menu item „PIR Detection“. If you confirm „On“ by pressing
the OK button, the monitor will be playing an alarm sound when the camera detects heat source. If
you select „Off“, this function is disabled. Exit the menu by pressing the MENU button.
Note:
The network features with Android de-
vices is only in available at the IP version
of the camera system.
The monitor does not support Plug and
Play. First, plug the network adapter and the
LAN cable before you turn on the monitor.
Note:
If you want to stream the videos over the
phone network on your smartphone, you
must enable the UPnP function on your
Internet router.
Warning: uPnP is not supported by any
Internet router. Alternatively, you enter
the port that is displayed on the display
manually.
Connect to the network
Download & Operation the App for Android devices
5003
Networ k ready!
Networ k Informatio n
Golbal IP
Loca l IP
Port
Device ID

6. Operating with Android devices
22 23
6. Operating with Android devices
ENGLISH ENGLISH
1. Go into the settings and add there a new camera.
2. When the monitor and mobile phone can normally connect to outer net. You just need to input
device ID to the client. or scan the QR code to get the Device ID. the password is set up in the
receiver, and then input to the mobile phone and saving.
scannen
oder eingeben
Passwort festlegen
und eingeben
3. Click the play icon, the image will display on the smart phone.
4. Press and hold the device ID to enter the settings.

GoCam4CH
6. Operating with Android devices
24 25
7. Operating with iOS devices
ENGLISH ENGLISH
Go to the Main Menu -> System -> Network
-> Push notification. in the menu item „Enab-
le / Disable“, you can set the push notification
on or off. By „minimum time interval“, the time
delay of a push notification can be set.
Click at the Android app to „push notification settings“ to register an account. When motion is
detected by the camera, it sends a push notification to your phone.
Important notes:
1. Only when the receiver in the real-time state, to view the image.
2. If the Device ID was unable to get to the monitor, indicates that monitor did not normally
connect outer net, need to check your network.
3. If everything is normal, but still not in the mobile phone client to view images, please close the
client software running always in the background, please try it again.
4. The network adapter does not support hot-swappable, before open the monitor, The network
is connected with the monitor.
Setting the Push Notification
Note:
Only if the motion detection and/or heat
detection in the menu item „Recording“
is enabled, a push notice may be served.
5003
Networ k ready!
Networ k Informatio n
Golbal IP
Loca l IP
Port
Device ID
Insert the receiver in the pedestal, and connect
with the base power. Then connect the outer
net. Turn on the receiver.
After successful connection, go to the Main
Menu -> Network -> Network Information. In
the monitor display the following window will
be displayed.
Note:
The network features with iOS devices is
only in available at the IP version of the
camera system.
The monitor does not support Plug and
Play. First, plug the network adapter and the
LAN cable before you turn on the monitor.
Note:
If you want to stream the videos over the
phone network on your smartphone, you
must enable the UPnP function on your
Internet router.
Warning: uPnP is not supported by any
Internet router. Alternatively, you enter
the port that is displayed on the display
manually.
Connect to the network
Check the App Store with your mobile device (eg smartphone). Search for the application
„GoCam4CH“ and download it. Install the software.
Download & Operation the App for Android devices

7. Operating with iOS devices
26 27
7. Operating with iOS devices
ENGLISH ENGLISH
1. Click the APP and enter “Device list” interface. Click the „plus“ icon to add new camera.
oder scannen
eingeben
2. When RX and mobile phone can normally connect to outer net. You just need to input device ID
to the client or scan the QR code to get the Device ID. the password is set up in the receiver,
and then input to the mobile phone. and saving.
Passwort festlegen
und eingeben
3. To view the video image, you need to choose the right title in the Device list, then click the line
to enter the monitoring mode.
4. Click on the bottom „play“ icon. APP will try to connect the RX of the previous selected title, if
connection is successful, the video image will display on the client.
Take a photo
2013/11/15/16:43

Camera
Imaging Sensor ......................................1/5 inch Color CMOS
Video resolution .....................................656 x 488
Viewing angle.........................................50 °
Power supply..........................................5 volts
Current consumption .............................max. 500 mA
IP degree of protection ..........................IP66
Night vision distance..............................max. 20 m
Dimensions (W x D x H) .........................164 x 81 x 172 mm (including bracket)
Weight....................................................686 g
Monitor
LCD screen.............................................7 inch TFT LCD
LCD screen resolution ...........................800 x 480
SD card support .....................................up to 32 GB
Hard Drives supported...........................up to 1 TB
Video frame rate.....................................max. 30 fps
Video resolution .....................................CIF / VGA
Video format...........................................AVI
Data output ............................................USB 2.0
Power supply..........................................5 volts
Current consumption .............................max. 700 mA
Dimensions (W x D x H) .........................214 x 157 x 26 mm
Weight approx........................................492 g
Range .....................................................up to 300 m
Operating temperature ..........................-10 ° C ~ + 50 ° C
Humidity.................................................15 ~ 85% RH
* All specifications are subject to minor changes may be made without notice.
• Turn off the system when not in use.
• This product can only be completely disconnected from the power supply by removing the
power supply.
• Do not cut through the power cable of this product to make it operate with a different power
source.
Imortant notes:
7. Operating with iOS devices
28 29
8. Specications
ENGLISH ENGLISH
Go to the Main Menu -> System -> Network
-> Push notification. in the menu item „Enab-
le / Disable“, you can set the push notification
on or off. By „minimum time interval“, the time
delay of a push notification can be set.
Click at the Android app to „push notification settings“ to register an account. When motion is
detected by the camera, it sends a push notification to your phone.
Important notes:
1. Only when the receiver in the real-time state, to view the image.
2. If the Device ID was unable to get to the monitor, indicates that monitor did not normally
connect outer net, need to check your network.
3. If everything is normal, but still not in the mobile phone client to view images, please close the
client software running always in the background, please try it again.
4. The network adapter does not support hot-swappable, before open the monitor, The network
is connected with the monitor.
Setting the Push Notification
Note:
Only if the motion detection and/or heat
detection in the menu item „Recording“
is enabled, a push notice may be served.

Problems Solutions
No display Confirm the adapters of receiver and camera connect OK
Failed
Failure in USB connection. Confirm the USB plug connects OK
Failure in setting, see more details in the manual.
Failure in SD card connection. It is suggested to use SD card with brand like
Kingston SanDisk Panasonic Kingmax or Transcend
Failure in Mobile Hard disk connection. It is suggested to use hard disk with
brand like IBM, TOSHIBA or Seagate.
The format of mobile hard disk should be FAT32 instead of NTFS.
No alarm
interference in the surrounding environment, such as WIFI and other wireless devices.
The antennas of receiver and camera install unwell.
IR night version is on, which leads to the color cast.
Camera is off Confirm the adapter and camera connect OK.
Confirm the setting of both Active and Display Items. See details in the manual.
No alarm
or alarm
failed
Failure in alarm PIP setting. See more details in the manual.
blocked by some moving objects or barrier.
interference from light,thunder,infrared or microwave etc.
The stored recording image keeps unchanged, because the angle of the
pyroelectric sensor is wider than the camera angles, the sensor is triggered
beyond the camera view angle.
Objects pass through the recording effective area too quickly in less than 2s.
Fresnel shell is dirty.
This attesting conformity with the following directives / standards:
Electromagnetic Compatibility Directive 2004/108 / EC
EN 55013: 2001 + A1: 2003 + A2: 2006
EN 55020: 2007
EN 61000-3-2:2006 + A1:2009 + A2:2009
EN 61000-3-3:2008
Low Voltage Directive 2006/95/EG
EN 60065: 2002 + A1: 2006 + A11: 2008
9. Troubleshooting
30 31
Declaration of Conformity
ENGLISH ENGLISH
Notes:
FAQ
1. Why the screen doesn’t display any monitoring picture after the camera is connected?
Answer: 1. Please check whether “Active” is set to “ON”.
2. Please check whether pairing succeeds.
2. The recording time is set already or the motion detection recording is enabled, but the recei-
ver does not start recording when the time comes or a motion is detected. Why?
Answer: 1. Check whether the storage medium is inserted.
2. Check whether the storage medium is full.
3. The system does not respond when the playback button is pressed. Why?
Answer: Please check whether the current camera is in the recording status. If it is in
the recording status, the system will not respond when this button is pressed.
4. Why cannot see human body in the picture area, when the alarm occurs?
Answer: For the product, the angle of sensor is greater than that of lens. When human
body moves beyond the angle of lens and within the angle of senor, an alarm
can also occur on the device. However, the display device cannot display
human body‘s move in the picture area.

Status: 2.1 January 2015 // Technical changes, misprint and errors reserved.
This manual suits for next models
3
Table of contents