DANICUB V70 User manual

Air Sealing Preserver System
1
Automatic F
V70 User manual
ood Vacuum Sealer

2
CONTENTS
Vacuum Sealer Advantage.................................................................................03
Structure and Functions .....................................................................................04
Operating Instruction ..........................................................................................06
Vacuum Seal Bags and Vacuum Canister .....................................................08
Helpful Hints ...........................................................................................................10
Care and Cleaning ................................................................................................10
Troubleshooting ....................................................................................................11
Storage Guide and Technical Data .................................................................13

With the vacuum sealing system, you can buy food in advance or on sale and
THE VACUUM SEALER SAVES TIME AND MONEY
Why do you need a vacuum sealer?
Exposure to air can cause food to lose avour and nutrition, it can also
encourage the growth of bacteria and yeast which will cause the food to spoil.
The vacuum packaging system removes air and seals avour and freshness.
With the vacuum packaging system, you can keep your food fresh for up to 5
times longer.
Save Money:
preserve it in your desired portion size without being afraid to waste it.
Save Time:
Cook ahead for the week, prepare meals and save them in vacuum bags.
Marinate in minutes:
Vacuum packaging opens up the pores of food so you can get that great
marinated avour in just 20 minutes instead of overnight.
Make entertaining easy:
Prepare your favorite dishes and festival feast in advance so you can spend
time having fun with your guests instead of working in the kitchen.
Enjoy seasonal or specialty foods:
Keep highly perishable or rarely used items fresh longer.
Control portions for dieting:
Vacuum package sensible portions and write calories and/or fat content on
the bag.
Protect non-food items:
Keep camping and boating supplies dry and organized for outings, protect
polished silver from tarnishing by minimizing exposure to air.
3

4
2
3
64
1."DRY"-According to the food type touch DRY model, then touch START
panel, the machine start to suck out the air and seal.
2."MOIST"-According to the food type touch MOIST model, then touch
START panel, the machine start to suck out the air and seal.
3."SOFT"-According to the food type touch SOFT model, then touch START
panel, the machine start to suck out the air and seal.
4. "HAND VACUUM"- Soft touch the START/STOP panel to start and stop
the vacuum so that vacuum pressure inside the bag can be controlled to
avoid crushing delicate items. when get the effect you want, then touch
SEAL + START panel to start seal bag.
5."SEAL" -This is to seal bag without pumping the air out (intervals for 40
seconds are recommended each time).
6. "START/STOP" - Allow user to cancel any operation anytime.
★LED Light Indicators- When the light stops flashing, means it finished.
Press the release button
5
1
on both sides to open.
STRUCTURE AND FUNCTIONS

01 03 04 05
06 07 08 09 10 11 12 13
14 15 16 17 18 19 20 21
22 23 24 25 26 27 28 29
30 31 32 33 34 35 36 37
38 39 40 41 42 43 44 45
46 47 48 49 50 51 52 53
54 55 56 57 58 59 60 61
62 63 64 65 66 67 68 69
70 71 72 73 74 75
ABF
A
G
. Locking Hook-Press the cover down until it locksthe bag into place
tight.
B. Vacuum Chamber-The bag must be placed within the vacuum chamber
for the vacuum.
C. Rubber Lip-Makes seal flat.
D. Foam gaskets- Keep air out by pressing with upper gasket in the
vacuum chamber. Clean and dry or replace it when it is distorted or
broken.
E.
F. Bag Cutter-
Sealing Strip- Heating sealing strip make good seal.
Cut the bag to any size you want.
G. Release Button-Press the release buttons at two sides, then open the
cover and take out the sealed food.
C D E
5

OPERATING INSTRUCTION
1. Put the opening of the bag in to the vacuum chamber.
★Please reserve at least 2-2.4inch between the opening of the
bag and food, so as not to be too full and unable to seal or leak.
6
2. Press the cover down, click sound indicate the locking hooks lock
correctly.
Choose Mode:
* DRY -Touch DRY + START panel
* MOIST -Touch MOIST + START panel
* SOFT -Touch SOFT + START panel
* HAND VACUUM - Soft touch the START/STOP panel to start and stop
vacuum until get the effect you want, then touch SEAL + START panel
to start seal bag.
* SEAL -Touch SEAL + START panel. This is to seal bag without pumping
the air out (intervals for 40 seconds are recommended each time).

3. When the LED light stops flashing, means it finished.
Press "Release Buttons" to open the appliance and take out the sealed
food.
7

SEAL VACUUM BAGS AND SEAL PLASTIC BAGS
> Plug the machine in.
> Insert the opening of the bag into the vacuum chamber as shown in the
picture.
> Press down the locking hook of both sides at the same time until two click
sounds heard.
> Touch the "SEAL" panel and the Light will on.
When thelight stops flashing, the seal operation is fnished.
> Press“Release Button" to open the machine, then take out the sealed bag.
8

PRESERVATION WITH VACUUM BAG
> Plug the machine in.
> Put the items that you want to preserve inside the bag. Reserve at least 2-
2.4 inch between the opening of the bag and food, so as not to be too full
and unable to seal or leak.
> Clean and straighten the opening of the bag, make sure there are no wrinkle
on the opening.
> Insert the opening of the bag into the vacuum chamber as the above picture.
> Press down the locking hooks of two sides at the same time until two click
sounds heard.
> Mode:
According to the nature of the food choose the mode:
* DRY -Touch DRY + START panel
* MOIST -Touch MOIST + START panel
* SOFT -Touch SOFT + START panel
* HAND VACUUM - Soft touch the START/STOP panel to start and stop
vacuum until get the effect you want, then touch SEAL + START panel
to start seal bag.
When thelight stops flashing, the seal operation is fnished.
9
> Press the "Release Buttons" at two sides, then take out the sealed items.

HELPFUL HINTS
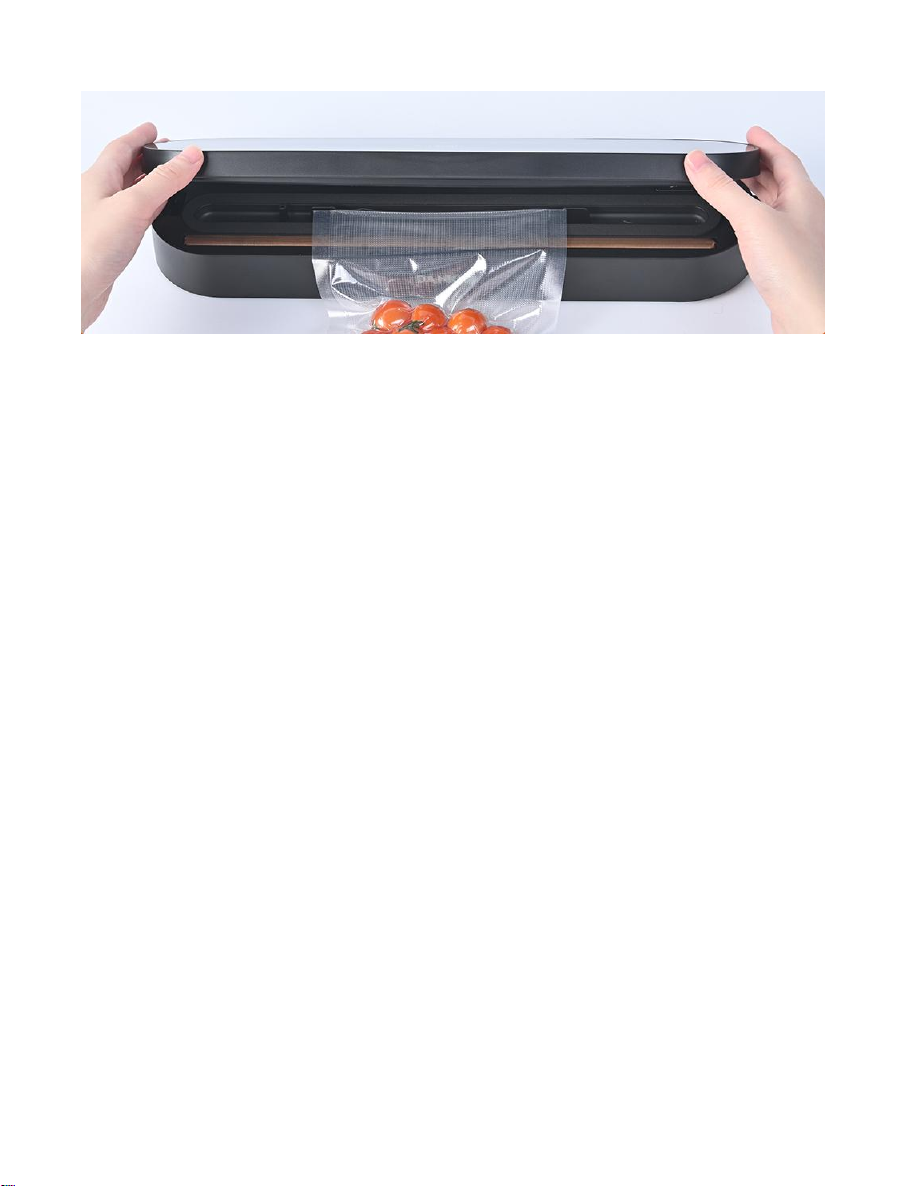
1. Do not overfill the bags, leave enough length (about 2-2.4 inch) at the opening
of the bag so that it can be placed in the vacuum chamber easily.
and seal tightly.
2. Ensure that the opening of the bag is not wet, otherwise may be difficult to melt
3. Vacuum seal can not completely replace the refrigeration and freezing,
perishable foods still need to be refrigerated or frozen.
4. Make the opening of plastic bags clean and flat, no foreign objects or folds
allowed, otherwise it will cause difficulty or leak during seal.
5. To prevent wrinkles in a seal when vacuum sealing bulky items, gently stretch
bag at while inserting into the vacuum chamber and hold it until the pump
begins to work.
6. When you are vacuum sealing items with sharp edges (dry spaghetti, silver
ware etc.), protect the bag from punctures by wrapping item in soft cushioning
material, such as tissue paper, you may need a canister or container instead of
a bag.
7. Pre-freeze fruits and blanch vegetables before vacuum sealing for the best
results.
10
CARE AND CLEANING VACUUM SEALERS
Care and Cleaning
1. Always unplug the unit before cleaning.
2. Don’t immerse the appliance in water o
8. Intervals for 40 seconds after seal or vacuum is recommended.
9. If you are unsure whether your bag was sealed properly, just reseal the bag.
10. For best results, please use Danicub brand Bags and Accessories.
rother liquid for cleaning.
3. Do not use abrasive cleaners to clean, because it is easy to scratch the surface
of the appliance.
4. Wipe the outside of the appliance with a damp cloth or sponge with mild soap
if necessary.
5. To clean the vacuum chamber, please wipe with a clean wet cloth or tissue
paper.
6. Dry thoroughly before using again.
7. Clean the liquid box termly.

TROUBLESHOOTING
Nothing happens when you try to vacuum package:
1. Check the volts and wattage of the power supply used, incorrect voltage and
wattage may cause non-response. Applicable: 120V ̄ 60Hz, 90Watt
2. Check if the power cord is tightly plugged into electrical outlet.
3. Check if the power cord is damaged.
4. Check if electrical outlet is working by plugging in another appliance.
5. Make sure the locking hooks are in the locked position.
6. Make sure bag is placed correctly inside Vacuum Chamber.
7. Allow the appliance to cool for 40 seconds before using it again
AIR IS STILL IN THE BAG AFTER THE VACUUM OPERATION
1. Make sure the opening of the bag is placed entirely inside Vacuum Chamber.
2. AIR IS STILL IN THE BAG AFTER VACUUM: Examine the bag for leaks-
Seal bag with air, then immerse it in water and apply pressure.
Bubbles indicate a leak, use a new bag if bubbles appear.
3. If you use a Bag with customized size, check the seal of bag. A wrinkle in the
bag along the seal may cause leakage and allow air to re-enter, just cut bag
and reseal.
4. Do not attempt to make your own side seams for an Bag, the bags are
manufactured with special side seams , which are sealed all the way to the
outer edge. Making your own side seams may cause leakage and allow air to
re-enter
11
Note: To prevent overheating of the appliance, allow the appliance to cool
for 40 seconds before using it again, and keep the cover open.

AIR WAS REMOVED FROM THE BAG, BUT NOW AIR HAS RE-ENTERED
1. Examine seal of bag. A wrinkle along the seal may cause leakage and allow air
to enter. Simply cut bag and reseal.
2. Sometimes moisture or food material (such as juices, grease, crumbs, powders,
etc.) along seal prevents bag from sealing properly.
Cut bag, wipe top inside of bag and reseal.
3. If you vacuum package sharp food items ,bag may have been punctured, use a
new bag if there is a hole. Cover sharp food items with a soft cushioning
material, such as a tissue paper, and reseal.
4. If there's air still in the bag, fermentation or the release of natural gases from
inside the foods may have occurred, when this happens ,food may have begun
to spoil and should be discarded.
THE BAG MELTS
If the bag melts, rubber lip may have become too hot, always wait at least
40 seconds for appliance to cool down before you vacuum package another
item.
12

Automatic Food Vacuum Sealer
Features:
★Automatic Vacuum Air Sealing Made Easy
★Save Time & Money with Smart Meal Prep
★Lab Tested to Eectively Increase Food Shelf Life
★Hassle-Free Operation & Simple Electric Plug-in Design
★Built-in Roll Cutter for Hassle-Free Sealing
★Used for Dieting by Pre-Determining Food Portions
★Creates Strong, Air-Tight Bags via Heat-Sealing
★Re-Usable & Waterproof Air-Sealing Bags
★High-Power Suction Element
★Top Panel Control Center
★Soft Touch panel Controls
★Stain-Resistant & Easy-to-Clean Housing
★Safe Placement on Any Kitchen Table/Countertop
★LED Indicator
★
Can Also be Used for Preserving/Waterproong Non-Food Items
Air Sealing Preserver System
13

What's in the Box:
1 x Vacuum Sealer Machine
6 x Vacuum Sealer Bags 7.8" * 11.8"
6 x Vacuum Sealer Bags 11.8" * 15.7"
1 x User Manual
Technical Specs:
14
High-Power Suction Element: 90 Watt
Sealable Bags: Environment Friendly Polyamide
Construction Material: Engineered ABS
Voltage: 120V ̄ 60Hz
Max Seal Width: 11.8 inches
Dimension: 14.5 x 3.8 x 2.1inches
Table of contents
Popular Food Saver manuals by other brands

Van Der Stahl
Van Der Stahl MD-950 NanoPak Series operating instructions

Andrew James
Andrew James Pro Vacuum Sealer user manual

Vesta Precision
Vesta Precision C20v user manual

Signode
Signode B-250 Operation, parts and safety manual

AmeriVacS
AmeriVacS AVS-20 owner's manual

NUTRICHEF
NUTRICHEF PKVS50STS user manual