Daniela DAN6FGS User manual

461308061 (001) 05/2012
INSTALLATION AND OPERATION MANUAL
BUILT-IN OVEN
MODEL: DAN6FGS

461308061 (001) 05/2012
2
Dear Owner,
Congratulations on the purchase of your new appliance. Now that you have your new built-in gas oven, please
take the time to do a couple of very simple tasks.
Firstly, read the user instructions contained in the rst section of this booklet. Your new appliance has been
designed and manufactured to the highest standards and incorporates a host of innovative styling and technical
features. The time invested in studying this booklet will familiarize you with these features and help you to achieve
the best results and get the most enjoyment from your appliance. It could also spare you the inconvenience of
any unnecessary service faults.
We wish you many years of cooking pleasure from your built-in gas oven. This booklet will serve as a valuable
reference guide and is best retained in a safe place.
The manufacturer shall not be held responsible for any damage to persons or property caused by incorrect
installation or use of the appliance.
Aduplicate data label and wiring diagram are contained in this booklet. Please attach these labels to an accessible
surface near by the appliance for easy reference.
The manufacturer will not be held responsible for any inaccuracies in this handbook due to printing or transcription
errors. Diagrams and gures are purely indicative, strict accuracy is not guaranteed.
The manufacturer also reserves the right to make any modications to the products as may be considered
necessary or useful, or also in the interests of the users, without jeopardizing the main functional and safety
features of the product themselves.
The appliance was designed and made in accordance with the International standards listed below:
=>IEC 60 335-1 and IEC 60 335-2-6 (electrical) plus relative amendments
The appliance complies with the prescriptions of the International Directives as below:
Electrical safety (BT).
Electromagnetic compatibility (EMC)
Gas safety.
CONTENTS
IMPORTANT NOTES AND PRECAUTIONS FOR USE 3
DESCRIPTION OF THE APPLIANCE 4-5
INSTRUCTIONS FOR THE USER 6-11
TROUBLESHOOTING 11
TECHNICAL FEATURES 12
INSTRUCTIONS FOR THE INSTALLER 13-17

3
461308061 (001) 05/2012
This new appliance is easy to use but before installing and
using it is important to read this handbook through
carefully. It provides information for a safe installation,
use and maintenance. Keep this handbook in a safe
place for future reference.
N.B.: the pictures shown in the gures in this handbook
are purely indicative.
• The installation, adjustments, conversions
and maintenance operations listed in section
«INSTRUCTIONS FOR THE INSTALLER» must only
be carried out by authorised personnel .
. Prior to connecting the appliance ensure that the
rating plate data correspond to those of the gas
and electricity mains (see part «5. TECHNICAL
FEATURES»).
• Once the outer wrapping and the inner wrappings of the
various parts have been removed, check and make
sure that the appliance is in perfect condition. If
you have any doubts do not use the appliance and call
in a qualied person.
• The packaging materials used (cardboard, bags,
polystyrene foam, nails, etc.) must not be left
anywhere in easy reach of children because they are a
potential hazard source. To safeguard the environment
all packaging materials are environment friendly and
recyclable.
• The electrical safety of this appliance is only
guaranteed if it is correctly connected to a suitable
earth system, as prescribed by the electrical safety
standards. The manufacturer disclaims all responsibility
if these instructions are not followed. Should you have
any doubts, seek the assistance of an authorised
person.
• The appliance must only be used for its original
purpose, that is, cooking for domestic use. Any
other use is considered improper and, as such,
dangerous. The manufacturer cannot be held
responsible for any damage to persons or property
resulting from an incorrect use of the appliance.
• Do not spray aerosols in the cavity of this appliance
while it is in operation.
• Do not use or store ammable materials near this
appliance. Do not modify this appliance
• Do not install this appliance on a marine craft or in
a caravan or do not use this appliance as a space
heater.
There are a few basic rules that must be observed
when using the appliance:
=> Do not touch any electrical appliance if hands or feet
are wet or damp.
=> Do not use the appliance bare footed.
=> Do not pull the power lead to take the plug out of the
socket.
=> Do not leave the appliance outside under the sun,
rain, etc.
•This appliance is not intended for use by persons
(including children) with reduced physical, sensory
or mental capabilities, or lack of experience and
knowledge, unless they have been given supervision
or instruction concerning use of the appliance by a
person responsible for their safety.
IMPORTANT NOTES AND PRECAUTIONS FOR USE
• Children must be supervised to make sure that they
do not play with the appliance
• Before cooking for the rst time, ensure the oven is
empty and its door closed, heat the oven at maximum
temperature for two hours.This will allow the protective
coating on the interior of the oven to be burnt off and
dissipate the associated smells. Ensure adequate
ventilation in the kitchen whilst burning off and don’t be
alarmed by a little bit of smoke during this process.
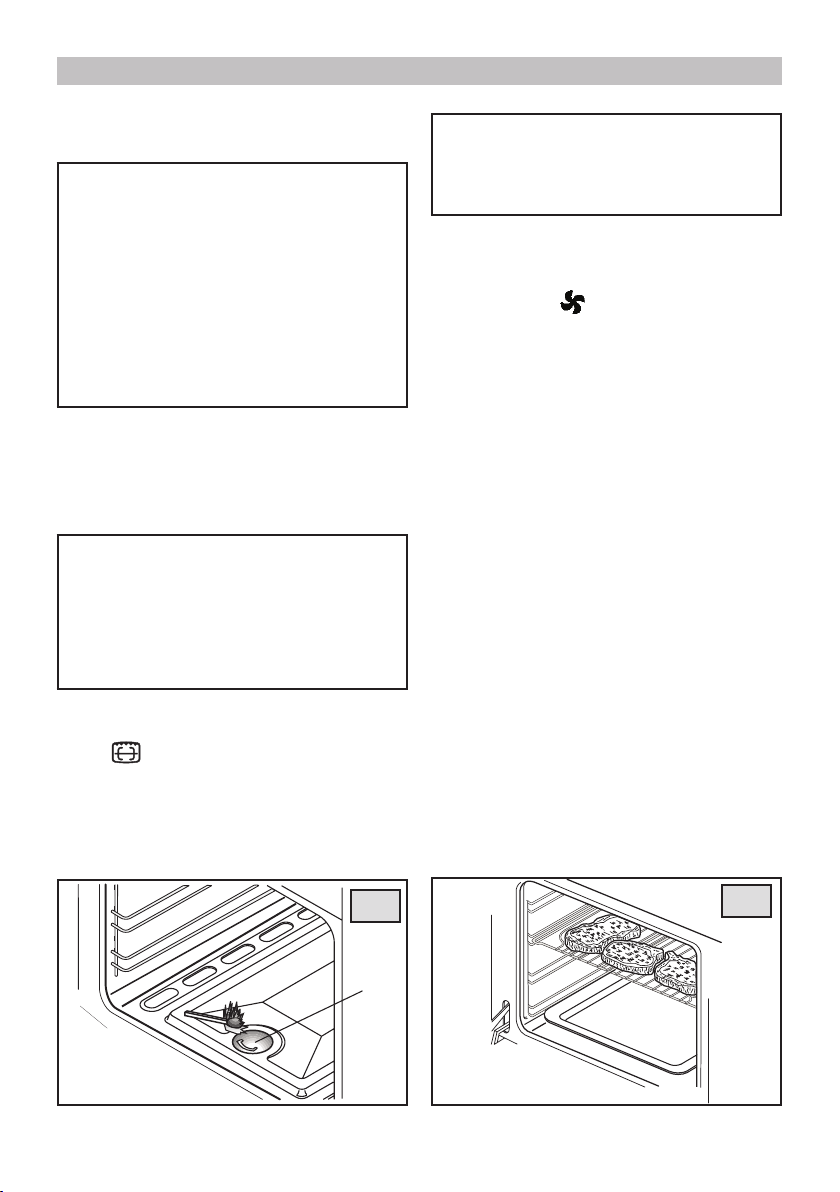
• When lighting the oven compartment burners the
oven door must always be kept open and if after
approximately 15 seconds, the burners fail to light,
release the knob and wait at least 1 minute before
trying again. Should the burner turn out accidentally,
turn the knob round to the closed position and wait at
least 1 minute before lighting it again.
• Always keep the oven door closed during baking. It
must only be left ajar when using the gas grill burner
(see relative instructions).
• ATTENTION!!! During and after use the glass of the
oven door and accessible parts may be very hot so it
is essential that young children be kept away from the
cooker.
• To open the oven door always grip the centre of it.
• Do not worry if condensation forms on the door and on
the inside walls of the oven during use. This does not
inuence how it works. When you open the oven door,
mind the boiling steam that escapes.
• When putting food in or taking it out of the oven make
sure the condiments do not drip copiously on the
bottom (overheated oils and fats easily ignite).
• During baking, to avoid bad results, do not cover the
bottom of the oven or the shelves with sheets of tin foil
or other material. Never cover the grill tray or grid with
cooking foil as this creates a re hazard.
• Keep the appliance clean. Food deposits could be a
re risk.
• Avoid using the oven as a larder or as a saucepan
cupboard when you are not using it for cooking: if the
oven is turned on accidentally it could cause damage
and accidents.
• Do not place ammable materials inside warming
drawer.
• If you are using an electrical socket near the appliance,
make sure that the cables are not touching the oven
and are far enough away from all hot parts.
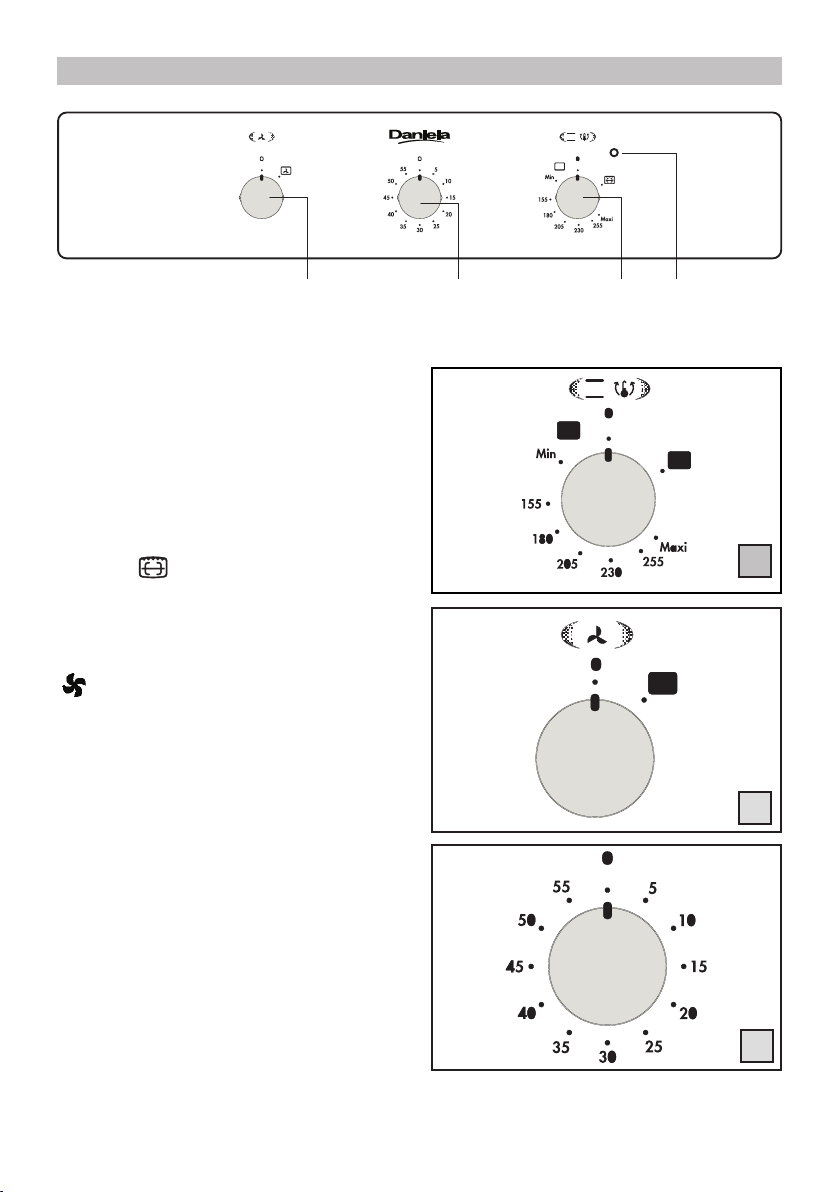
• When you have nished using the appliance check
that all the controls are in the off or closed position,
checking that the “0” of the knob corresponds to the “•”
symbol serigraphed on the front panel.
• In the case of a failure or malfunction, turn the oven
off and switch off the electrical supply; do not tamper
with it. All repairs or settings must be carried out with
maximum care and the proper attention of a qualied
person. For this reason we recommend you contact
the nearest Service, to report the problem explaining
the trouble and giving the name of the model.
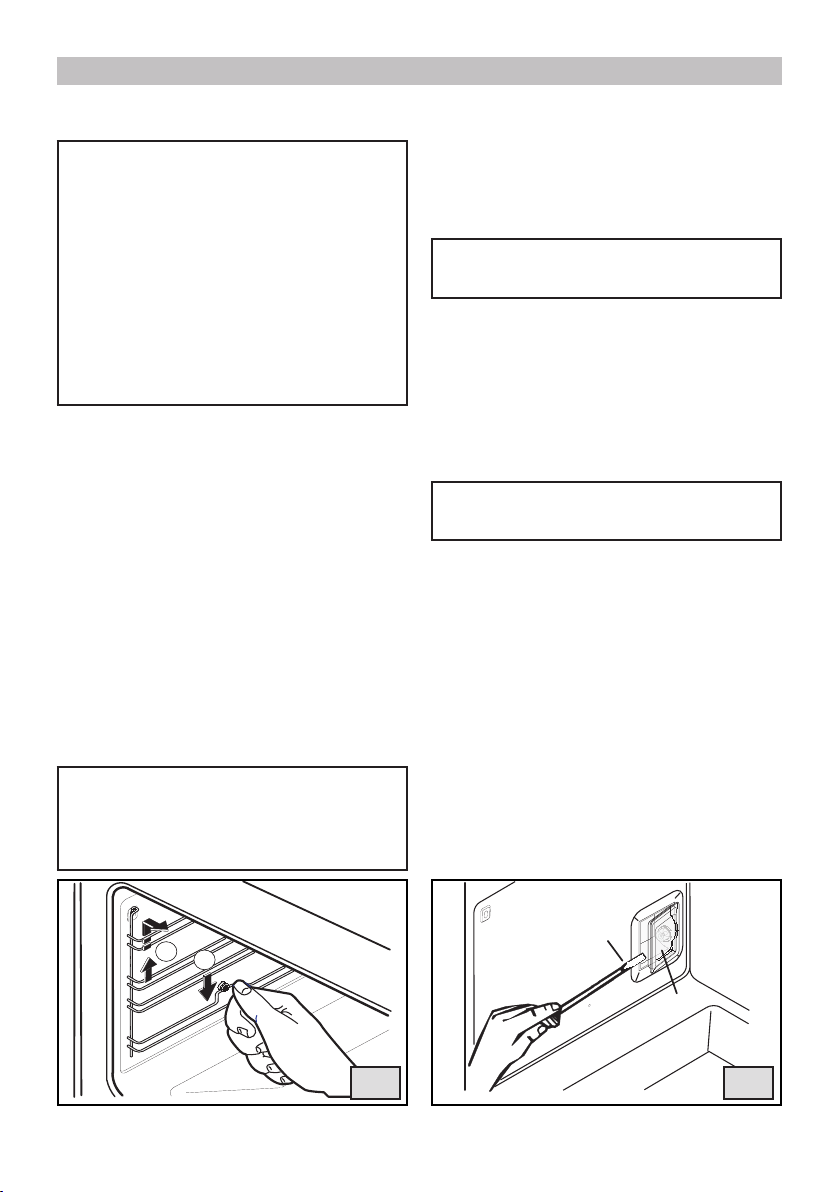
• If an appliance is out of order or is not going to be
used any more it must be rendered safe by eliminating
those parts that could be a source of hazard to children
when playing, for example: the power cable, any
systems for locking the oven door and spits.

461308061 (001) 05/2012
4
1
2
GENERAL DESCRIPTION
Below is a summary of the appliance’s main features
and its safety devices which will guarantee the user a
good, safe use:
Automatic electric lighting of the burners.• When
you press the oven knob there will be sparks.THE
OVEN MUST ONLY BE TURNED ON WITH ITS
DOOR OPEN.
Tangential cooling fan• . This fan cools the front
control panel, the knobs, the handle of the oven
door and electrical components. It starts working
automatically when the oven or the electric grill is
being used . It starts a few minutes after turning on
the oven while it stops after 15-20 minutes after tur-
ning off the oven itself A red warning light comes
on when the fan is working. DO NOT USE THE
APPLIANCE IF THERE IS A POWER CUT.
Automatic electric thermostat for the electric•grill. It controls grill temperature. It controls cooking
and grilling with the door closed.
•
N.B.: Do not attempt any repairs yourself if there
is a malfunction: turn the appliance off and con-
tact your nearest Assistance Centre.
The oven has wire shelf supports (g. 1) that are used
for tting the accessories (g.2) listed below:
oven shelf (Gf)•grill pan (V),•food support grid (E)•handle (D)•
DESCRIPTION OF THE APPLIANCE

5
461308061 (001) 05/2012
CONTROLS
OVEN / GRILL THERMOSTAT KNOB (A)
By rotating the knob in an anticlockwise direction, the
following functions appear:
0= Closed position
from Min. to Maxi =The different oven temperature values
Turn the knob clockwise if you want to use the gas or
electric grill
N.B.: In the version without the oven light switch
knob, the oven light will come on and stay on when
any of the cooking functions are being used.
FAN SWITCH KNOB (B)
If present, fan is selected by turning the knob
clockwise.
The fan must be actived after the ignition of the
oven
TIMER KNOB (C)
To set cooking time, rst wind the timer up by turning it
completely once from left to right and then back to the
number of minutes you want. The timer will ring when
the set time has elapsed.
RED WARNING LIGHT(D) If present, this light comes
on when the tangential cooling fan or electric grill is
working.
C
B
DESCRIPTION OF THE APPLIANCE
A

461308061 (001) 05/2012
6
INSTRUCTIONS FOR THE USER
GENERAL NOTES ON SAFETY
DO NOT USE THE APPLIANCE IF THERE IS A
POWER CUT OR IF THE FAN IS BROKEN.
CONTACT YOUR NEAREST ASSISTANCE
CENTRE.
• Never leave the oven unsupervised when
cooking. Make sure that children do not play
with the appliance.
• To open the oven door, grab the door handle at
its middle. Avoid forcing the oven door when it
is open.
• Do not worry if steam condensation accumulates
on the door and on the inside walls of the oven
during use. This does not affect its working
order.
• Mind hot steam when opening the oven door.
• The appliance becomes very hot during use. Do
not touch the heating elements inside the oven.
Wear oven gloves when placing or removing
pans from the oven.
• In placing foods into or removing them from the
oven, make sure sauces do not drip onto the hot
plate of the oven (overheated oils and fats can
easily ignite).
• Use only ovenware resistant to the temperature
range indicated on the thermostat knob.
• During baking, avoid covering the bottom plate
of the oven or its grid with tin foil or other
material. Saucepans, oven trays and all other
ovenware must always be placed on the oven
grid.
• When you use the grill, do not forget to place the
drip pan beneath it to collect any sauce dripping,
as suggested in the “USEFUL COOKING TIPS “
section.
• After use of the appliance, make sure that all the
controls are set to the off or closed positions.
• IMPORTANT WARNING: During and after use
the oven crystal door and all surfaces may be
very hot. Keep children away from the oven!
IMPORTANT!!!
ALWAYS KEEP THE OVEN DOOR CLOSED
DURING BAKING OR GRILLING.
When a gas oven is being used it produces heat
and humidity in the room where it is installed.
For this reason the room must be well ventilated,
keeping the natural ventilation openings free
(g. 9) and switching on the mechanical aeration
system (extractor or electric fan gs. 10 and 11).
If the oven is used for a long time additional aeration
may be necessary, for instance, by opening a window
or a more effective aeration by increasing the power of
the mechanical system if there is one.
WHAT TO DO THE FIRST TIME YOU USE THE
OVEN
Before cooking for the rst time, ensure the oven is
empty and its door closed, heat the oven at maximum
temperature for 2 hours. This will allow the protective
coating on the interior of the oven to be burnt off and
dissipate the associated smells. During this time do
not stay in the same room and keep it aerated.
After the hour or so has elapsed leave the oven to cool
down and then clean its interior with hot water and a
mild detergent. Also wash the accessories (shelves,
trays, drip pan, spit..) prior to use.
Prior to any cleaning, disconnect the appliance
from the electricity mains.
WARNING - During and after use, the oven door
glass and the accessible parts will become hot
when in use. To avoid burns and scalds children
should be kept away.

7
461308061 (001) 05/2012
�
3
INSTRUCTIONS FOR THE USER
HOW TO USE THE FANNED GAS OVEN AND
FANNED ELECTRIC GRILL
The oven burner is tted with a safety
thermocouple (g. 14 ref. TC), so, once it is lit,
keep the knob pressed for about 15 seconds.
If, at the end of this time, the burner fails to
light, release the knob and wait at least 1
minute before trying again. Should the burner
go out accidentally, turn the knob round to
the closed position and wait at least 1 minute
before lighting it again. Should you nd that
the thermostat is difcult to turn, contact your
nearest Assistance Centre who will replace it.
N.B.: THE AUTOMATIC ELECTRIC IGNITION
SHALL BE ONLY WITH THE OVEN DOOR OPEN.
AUTOMATIC ELECTRIC IGNITION OF THE FANNED
OVEN BURNER (g. 14 - ref. AC)
Open the oven door and turn the oven knob (A)
round counterclockwise to the maximum temperature
and press the knob. Automatically the ignition sparks
and the fan turns on.
After the oven burner has been lit (look through
slit (B) (g. 3) to check that the burner is lit) ,
leave the oven door open for 2 - 3 minutes. Close
it softly to avoid blowing the ame out and wait 15
minutes before putting food in to cook then set the
temperature with the knob.(ref. A).
Our oven can cook all kinds of food (meat, sh,
bread, pizza, cakes …).
SWITCHING THE ELECTRIC GRILL
Turn the oven knob (A) clockwise round to the grill
position .
By selecting this function the heating element is
switched on that distributes heat directly on the
food (g. 4). Besides grilling it can also be used to
brown cooked food. Consult page 12, the “USEFUL
COOKING TIPS” paragraph.
4
An automatic thermostat regulates the inner
temperature, therefore, do not use the grill
immediately after a cooking in the oven. Always
keep the oven door closed during the use of the
electric grill.
COOKING WITH THE AID OF THE FAN
The oven is equipped with a fan installed in the rear
part of the oven compartment. This can be activated
by pressing switch .
The fan must be actived after the ignition of the
oven
After the fan has been activated, the heat will be
quickly and regularly distributed throughout the oven,
thus allowing different foods to be evenly cooked on
several shelves at the same time, also reducing the
cooking times.
NOTE: THE FAN CAN BE ACTIVATED DURING ALL
OVEN COOKING FUNCTIONS.

461308061 (001) 05/2012
8
INSTRUCTIONS FOR THE USER
USEFUL COOKING TIPS
Cakes and bread:
• Heat the oven for at least 15 minutes before you
start cooking bread or cakes.
• Do not open the door during baking because the
cold air would stop the yeast from rising.
• When the cake is cooked turn the oven off and
leave it in for about 10 minutes.
• Do not use the enamelled oven tray or drip pan,
supplied with the oven, to cook cakes in.
• How do you know when the cake is cooked? About
5 minutes before the end of cooking time, put a cake
tester or skewer in the highest part of the cake. If it
comes out clean the cake is cooked.
• And if the cake sinks? The next time use less liquids
or lower the temperature 10°C.
• If the cake is too dry: Make some tiny holes with a
toothpick and pour some drops of fruit juice or spirits
on it. The next time, increase the temperature 10°C
and set a shorter cooking time.
• If the cake is too dark on top: the next time put the
cake on a lower shelf, cook it at a lower temperature
and longer.
• If the top of the cake is burnt: cut off the burnt layer
and cover with sugar or decorate it with cream, jam,
confectioner’s cream, etc..
• If the cake is too dark underneath: the next time
place it on a higher shelf and cook it at a lower
temperature.
• If the cake or bread is cooked nicely outside but is
still uncooked inside: the next time use less liquids,
cook at a lower temperature and longer.
• If the cake will not come out of the tin: slide a knife
around the edges, place a damp cloth over the
cake and turn the tin upside down. The next time
grease the tin well and sprinkle it with our or bread
crumbs.
• If the biscuits will not come away from the baking
tray: put the tray back in the oven for a while and
lift the biscuits up before they cool. The next time
use a sheet of baking parchment to prevent this
happening again.
Meat:
• If, when cooking meat, the time needed is more
than 40 minutes, turn the oven off 10 minutes before
the end of cooking time to exploit the residual heat
(energy saving).
• Your roast will be juicier if cooked in a closed pan; it
will be crispier if cooked without a lid.
• Normally white meat, poultry and sh need medium
temperatures (less than 200°C).
• To cook “rare” red meats, high temperatures (over
200°C) and short cooking times are needed.
• For a tasty roast, lard and spice the meat.
• If your roast is tough: the next time leave the meat
to ripen longer.
• If your roast is too dark on top or underneath: the
next time put it on a higher or lower shelf, lower the
temperature and cook longer.
• Your roast is underdone? Cut it in slices, arrange
the slices on a baking tray with the gravy and nish
cooking it.
Grilling:
• Sparingly grease and avour the food before grilling it.
• Always use the drip pan to catch any dripping from
the meat during grilling. Always pour a little water
in the drip pan. It will prevent grease and sauces
from burning avoiding burnt smells and smoke.
Add more water during cooking to compensate for
evaporation.
• Turn the food upside-down when half way through
cooking.
The aluminium can be easily corroded if it
comes into contact with organic acids present
in the foods or added during baking (vinegar,
lemon juice). Therefore it is advised not to put
directly the foods on aluminium or enamelled
trays, but ALWAYS use the proper oven paper.

9
461308061 (001) 05/2012
INSTRUCTIONS FOR THE USER
COOKING / BAKING TIMETABLE
FOODS
Weight
kg
Position of the
oven shelf from
the bottom
TRADITIONAL OVEN COMBINED OVEN (fan ventilated)
Temperature
in °C
Cooking/Baking
Time (in minutes)
Temperature
in °C
Cooking/Baking
Time (in minutes)
MEAT
Roast veal
Roast beef
Roast pork
Roast lamb
1
1
1
1
2
1
2
1
200-225
200-225
200-225
200-225
100-120
40-50
100-120
100-120
190
190
190
190
100-120
40-50
100-120
100-120
GAME
Roast hare
Roast pheasant
Roast partridge
1
1
1
2
2
2
200-Max
200-Max
200-Max
50-60
60-70
50-60
200-Max
200-Max
200-Max
50
60
50
POULTRY
Roast chicken
Roast turkey
Roast duck
1
1
1
2
2
2
200-225
200-225
200-225
80-90
100-120
90-110
190
190
190
70-80
90-110
80-100
FISH
Roast sh
Casseroled sh 1
12
2200
175 30-35
20-25 170-190
160-170 25-30
15-20
BAKED PASTA
Lasagne
Cannelloni 2,5
2,5 1
1210-225
210-225 60-75
60-75 225-Max
225-Max 30-40
30-40
PIZZA 1 2 225-Max 25-30 225-Max 20-25
BREAD 1 2 225-Max 20-25 220 20
PASTRIES
Biscuits in general
Shortcrust pastry
Victoria sponge 0,8
2
2
2
190
200
200
15
20
40-45
170-190
190-200
190-200
15
20
40-45
CAKES
Angel cake
Fruit cake
Chocolate cake
0,8
0,8
0,8
2
2
2
190
200
200
52
65
45
170-190
190-200
190-200
45
65
45
Values indicated in the tables (temperatures and cooking times) are approximate and may vary according to each person’s
cooking habits. THIS TABLE GIVES COOKING TIMES ON ONLY ONE SHELF. Using two shelves, cooking time will be about
5 to 10 minutes longer. The shelves must be placed on the 1st and 3rd position.
N.B.: Using two shelves, for a best distribution of the heat, position a baking-pan in aluminum in the lower position
and an enameled baking-pan in the upper position.
GRILLING TIMETABLE
FOODS
Weight
kg
Position of the
oven shelf from
the bottom
TRADITIONAL OVEN COMBINED OVEN (fan ventilated)
Cooking/Baking Time (in minutes) Cooking/Baking Time (in minutes)
1st side 2nd side 1st side 2nd side
MEAT
T-bone steak
Steak
Chicken (cut in half)
0,50
0,15
1
2-3
2-3
2-3
12-15
5
20-25
12-15
5
20-25
10
5
18
10
5
18
FISH
Trout
Sole
0.42
0.20 2-3
2-3 18
10 18
10 10
710
7
BREAD
Toast 3 2-3 2-3 2-3 2-3
Values indicated in the tables (temperatures and cooking times) are approximate and may vary according to each person’s
cooking habits. More specically, when grilling meat cuts the values are subject to the thickness of the slice or loaf and to
personal taste as well.

461308061 (001) 05/2012
10
5 6
INSTRUCTIONS FOR THE USER
CLEANING AND MAINTENANCE
• Prior to any maintenance work or cleaning,
disconnect the appliance from the electricity
mains.
• Do not use a steam cleaner to clean this
appliance.
• Do not wash the parts if they are still hot
• Never use abrasive powders, pads or corrosive
spray products.
• Do not leave vinegar, coffee, milk, salty water
or the juice of lemon or tomato on the surface
for any length of time.
• Switch off the oven before removing the fan guard
for cleaning. Replace the guard after cleaning
EXTERIOR PARTS
All the parts of the oven exterior (stainless steel, side
panels, door glass) must be cleaned frequently with a
mild detergent and a little water and then dried with a
soft cloth.
Do not use rough or abrasive materials or sharp metal
scrapers to clean the oven glass doors as they could
scratch and cause the glass to break. On painted
or stainless steel surfaces, do not use aromatic or
aliphatic solvents to remove spots or label adhesive.
INTERIOR PARTS
The oven should be cleaned after each use to
remove cooking residuals like fats or sugar which,
burnt afterwards, can encrust or form permanent
stains and unpleasant smells.
The oven should always be cleaned when it is still
warm with soapy water, rinsed and dry properly on all
surfaces. Also wash any accessory used.
Do not spray or wash the electric heating
elements nor the thermostat with acid-based
detergents (check the information label on the
product you are using). The manufacturer cannot
be held responsible for any damages caused by
incorrect cleaning.
OVEN SEAL
The condition of the oven seal is vital for the correct
functioning and performance of the oven.
We recommend you:
• Clean it, avoiding abrasive tools or products.
• Check its condition occasionally.
In case the seal has stiffened or presents
damages, contact your nearest Service centre and
avoid using the oven until it has been repaired.
OVEN SIDEWALL GRIDS (g. 5)
To allow for a better cleaning of the side grids, you can
extract them this way:
• Push with a nger on the support bar to release the
grid from its hold (A).
• Lift it towards the top and extract the grid.
To put them back into place, reverse the order of this
operation.
REPLACING THE OVEN LAMP (g. 6)
Ensure the appliance is switched off before
replacing the lamp to avoid the possibility of
electric shock..
In the event the oven lamp need replacing, the lamp
must comply with the following requisites:
15 W - 230 V~ - 50 Hz - E 14 - and must be resistant
to high temperature (300°C).
Lampholder (g. 6):
• Extract the side grids as indicated in the previous
paragraph.
• Unscrew glass protection cap (V) from bulb holder
by lifting it with a screwdriver (C) against the inside
wall of the oven.
• Substitute the bulb and reposition all elements back
by following the operation in reverse order.

11
461308061 (001) 05/2012
E
F
INSTRUCTIONS FOR THE USER
OVEN DOOR REMOVAL
The oven door can be removed to give easier access
to the oven when cleaning.
To remove, proceed as follows:
• Open the oven door and insert rivet or nail (R) in the
hole (F) of the hinge (g. E).
• Partially close the door, forcing it upwards at the
same time to free stop tooth and hinge sector.
• Once the hinge is free, pull the door forwards tilting
it slightly upwards to free sector.
• To reassemble proceed in the reverse order, paying
attention to the correct position of sectors.
INTERNAL OVEN DOOR GLASS
One of the features of our ovens is that the internal
oven door glass can be easily removed for cleaning
without the aid of specialized personnel.
Just open the oven door and extract the support to
which is attached the glass (g. F).
ATTENTION!! This operation can also be carried
out while the door is assembled on the appliance,
however in this case, with the door horizontally
hinged take the utmost care when extracting
the glass upwards, the force of the hinges can
suddenly snap the door shut.
TROUBLESHOOTING
Some problems can be caused either as the results of simple maintenance operations or by incorrect selection
of settings. Prior to contacting a Service Engineer please check the following chart.
PROBLEM occurring SOLUTION envisaged
The oven does not work • Make sure the gas cock is open
• Check that the plug is connected.
• Check the electrical system (fuse electricity board). If there is failure
in the system call an electrician.
The thermostat is not working • Contact Service Centre..
The oven light does not switch on • Check that the oven bulb is properly tted
• If it has blown, buy a bulb specically for high temperatures at a
Service Centre and t it following the instructions given on page 12.
In case the appliance fails to operate correctly, contact our Service Centre.
Warning: Servicing should be carried out only by authorised personnel.

461308061 (001) 05/2012
12
7
BURNER TECHNICAL DATA TABLE
BURNERS OPERATING PRESSURE DIAMETER
INJECTOR HEAT INPUT W AIR REGULATING
SLEEVE OPENING
OR ROTATION
N. DESIGNATION kPa 1/100 mm (MJ/h) “X” mm
7Oven Propane
Natural
2.75
1.0
0.82
1.35
8.8
9.1
Full open
Full open
TECHNICAL FEATURES
ELECTRICAL COMPONENTS
Description Nominal data
Grill heating element
Oven lamp
Tangential or cooling fan
Rear fan
Supply cable
1800 W
15 W - E 14 - T 300
18..22 W
25..29 W
H05 RR-F 3x 1 mm2
Minimum dimensions of the unit inside
which the oven is going to be tted (g.7)
Height /mm Width /m Depth /m Volume
580 560 560 50 dm3

13
461308061 (001) 05/2012
��
8
INSTRUCTION FOR THE INSTALLER
TECHNICAL INFORMATION
• The installation of all-gas and combi appliances
must comply with the standards code AS 5601-
2004.
• The Manufacturer declines all responsability for
improper installation, which may harm persons and
animals and damage property.
• Only qualied personnel can carry out the
installation operations, all adjustments, conversions
and servicing jobs listed in this section.
• The safety and automatic adjustment devices of the
appliance may, during their life, only be modied by
the manufacturer or duly authorised supplier.
• The appliances can be installed as “class 3” (tted)
in compliance with gas standards.
• The rear wall and adjacent surfaces and those
surrounding the appliance must be able to withstand
a temperature of 90°C in compliance with electricity
standards. Any side walls should not project further
out than the front of the tted appliance.
• All-gas and combi appliances must be installed and
be used only in permanently ventilated rooms in
accordance with the standards in force.
• This appliance is not connected to a ue for discharge
of the combustion products; it must, therefore, be
connected in compliance with the above mentioned
installation rules. Particular attention must be paid
to the instructions given below for ventilation and
aeration.
• When you have removed the packaging, check
that the appliance is not damaged. If you have any
doubts, do not use the appliance, call in a qualied
technician.
• Never leave the packaging components (plastic
bags, nails, foamed polystyrene etc...) within
the reach of the children as they are a source of
potential danger.
• Before connecting the appliance, check that the
values on the data label correspond to those of gas
and electricity mains. A duplicate data label and
wiring diagram are contained in this booklet. Please
attach these labels to an accessible surface near by
the appliance for easy reference.
UNPACKING THE APPLIANCE
• Once the packaging has been removed, thoroughly
check that the appliance is in perfect condition. If you
have any doubts do not use the appliance and call our
Service Centre.
• Do not move the appliance by the handles.
• Some parts mounted on the appliance are protected
by a plastic lm. This protection must be removed
before using the appliance. We recommend slitting the
plastic lm along the edges with a sharp knife or pin.
All packaging materials used (cardboard boxes,
bags, polystyrene foam, nails, etc.) must be
kept out of the reach of children, as they are a
potential hazard source. All packaging materials
usedareenvironmentally-friendlyandrecyclable
(wooden bits are free from chemicals, cardboard
is 80-100% recycled, protective bags are made
in polyethylene (PE), bands in polypropylene
(PP) and padding in polystyrene foam (PS)
without chloro-uoro-carbides. Waste materials
can undergo treatment and be recycled saving
on new raw materials and on the amount wasted
volumes. For this purpose we suggest you take
the packaging material back to the shop you
bought the appliance or to a collecting service.
Ask your local service for the nearest service.
INSTALLING AND FIXING THE OVEN
This oven is designed for tting inside a full height unit
or base module, on wood furniture, laminated plastic
or brickwork, following the instructions given below:
• The adhesive used to join the laminated plastic to
the piece of furniture must be able to withstand a
temperature of at least 150°C so the laminated
plastic will not come unstuck.
• Make the holes in the unit to take the oven and
for aeration, as indicated in g. 8. If the oven is
tted in a full height unit, in compliance with safety
standards, protection must be guaranteed to avoid
accidental contact with the bottom of the oven which
gets very hot when in use. This protection must not
be removed without the aid of a tool.
• Secure the oven to the unit with the screws (V)
(g. 8).

461308061 (001) 05/2012
14
9
9A
INSTRUCTION FOR THE INSTALLER
GAS CONNECTION
The installation must be in accordance with local
gas and electricity authority regulations and
these instructions.
A duplicate data label and wiring diagram are
contained in this booklet. Please attach these
labels to an accessible surface near by the
appliance for easy reference.
GAS CONNECTION
The appliance is adjusted to work at gas indicated
on the label which is applied on the back of the
appliance.
This appliance is supplied with a replacement set
for use with another gas, but conversion must
only be undertaken by qualied person.
Installation for Natural gas
Connected regulator (B) to tting (A) which is then
tted to elbow (F). Ensure arrow on regulator point
in the direction shown.
Fitting (D) to be supplied by installer (g. 9). Adjust
regulator to give test-point pressure given on data
label with one large or one medium burner alight
at maximum.
Installation for Propane Gas
Connect by using a copper pipe starting, from the
threaded tting of elbow (F) (g. 9A).
Installation using exible connection
As an option, the oven may be installed with a exible
hose assembly ABEY AS 1869, Class D, Nominal
Bore size 10 mm (AGA 5516).
1) The hose is connected to the appliance at the rear
to the right hand corner and faces downwards.
2) An isolating tap and pressure regulator must be
xed to the rear wall and the exible pipe attached
by means of a union connector.
3) The gas connection and isolating tap must be
accessible to a service person or inspector.
ELECTRICAL CONNECTION
The connection of the cooker to mains is effected via a
cable located underneath the appliance.
Whenever the socket or the installation does not
have available an earthing connection, such
connection must be provided according to the
local Standards. The Manufacturer declines
every responsability if these standards are not
used.
In case you have to substitute the supply cable, the
installer must keep the earth wire must be longer
than the phase wires:
The operation of the appliance must be tested
before leaving

15
461308061 (001) 05/2012
10 11
INSTRUCTION FOR THE INSTALLER
ADJUSTMENTS
• Before any adjustment is attempted, which
may be necessary when installing for the rst
time or when converting gas type, take the
plug out of the mains socket.
• When the adjustment or preadjustment has
been made, a technician must do any re-
sealing.
• Adjust “Minimum” only when the burners
are working on natural gas while in the case
of burners working butane and propane gas,
the screw must be screwed right down (by
screwing the by-pass clockwise).
OVEN THERMOSTAT (g. 10)
To adjust Minimum proceed as follows:
• Light the oven burner by turning the knob round
to the Maximum position and then wait about 10
minutes.
• Turn the knob slowly round to the Minimum
position, take the knob off, unscrew the right-hand
screw securing the thermostat and, putting a small
screwdriver (C) in hole (F), turn the (V) screw
clockwise to lower the ame or counterclockwise
for a taller ame.
• The ames must be short for an effective Minimum,
they should be stable to avoid going out accidentally
and to resist the normal opening and shutting of the
oven door.
OVEN BURNER (g. 11)
The burner is at the bottom of the oven and covered
by the base tray that must stay in position all the time
the oven is being used.
CONVERSION
CHANGING THE INJECTORS
The burners can be adapted to different types of gas
by simply installing the injectors suitable for the gas
you want to use.
To change the injector of the (BF) oven burner you rst
have to remove it, unscrewing screws (V) (g. 11).
To help the installer there is a table on page 12 giving
burner power, nominal heat input, injector diameter
and working pressure of the different gas types.
After the injectors have been changed, the
technician must adjust the burners as described
in the previous paragraphs, seal any adjustment
or preadjustment parts and afx the label on the
appliance, in place of the old one, relative to
the new gas adjustment. This label is inside the
spare injector bag.

461308061 (001) 05/2012
16
INSTRUCTION FOR THE INSTALLER
MAINTENANCE
Before replacing any spare parts it is vital to
disconnect the appliance from the electricity
mains.
REPLACNG THE THERMOSTAT (g. 12)
To change the thermostat proceed as follows:
• Take the oven out of its housing by unscrewing the
screws (V) (g. 12).
• Pull the knobs off.
• Remove the front panel by unscrewing the screws
(V) (g. 13).
• Disassemble the protection box (S) (g. 14).
12
�
13
REPLACING ELECTRICAL COMPONENTS
•To replace the oven lamp please refer to instructions
on page 10.
• To access the other electrical components you will
have to take the oven out of its housing by unscrewing
the screws (V) (g. 13).
By simply pulling the oven out you will be able to work
directly on the terminal board and on the power cable
(g. 14)
• If the power cable needs changing, connect a
cable with a suitable cross section (see the table
on page 12) keeping the earth wire longer than the
phase wires. In addition, follow the instructions
giving in the “ELECTRICAL CONNECTION”
paragraph.
• To change the lamp holder g.6, remove the
superior protection (A) and the side panel, then use a
screwdriver to push the two locking tabs (g. 15) and
remove the lamp holder from the inside of the oven.
• To replace other electrical components (igniter,
temperature limiting device, tangential fan, gear
motor, warning light, electronic clock and switch) you
will have to take the rear guard off (Q) and the box (S)
as well as the protective shell (A) (g. 14).
• To take the control panel off, remove the knobs and
unscrew the screws (V) (g. 13).
14
�
15
• Unscrew the check nuts (D) from the supply rails
and safety thermocouples.
• Unscrew screw (V) to free the thermostat (T).
• Change the seal (G) each time you change the
thermostat. This is to guarantee a perfect seal
between thermostat and rail.

17
461308061 (001) 05/2012
SPACE FOR DATA LABEL
INSTRUCTION FOR THE INSTALLER

18
ITALNOVAPtyLtd
8/10HUMEROADSMITHFIELDNSW2164
Ph:(02)96041226Fax:(02)96041225Email:[email protected]
PRODUCT WARRANTY
“Daniela”ByITALNOVAPtyLtdthepurchaseofthisapplianceisanimportantinvestmentinyou
homeandsotoprotectyourinvestmentweurgetocompletetheregistrationpartattached,pleasereturnit
immediately.
Thebenetsconferredbythiswarrantyareinadditiontoallotherconditionsandwarrantiesinrespectof
thisproductwhichthe
ConsumermayhaveundertheTradePracticesAct1874oftheCommonwealthofAustraliaand/orsimilar
StateorTerritorylaws.
ITALNOVAPtyLtdwarrants,
thisappliancetobefreefromdefectsinworkmanshipandmaterialsforaperiodof:-
a)Wheretheapplianceisintendedtobeusedfor1. DOMESTICUSE-12MONTHSFROMDATE
OFDELIVERYTOTHEORIGINALPURCHASER.
b)WheretheapplianceisintendedtobeusedforCOMMERCIALUSE-30DAYSFROMDATE
OFDELIVERYTOTHEORIGINALPURCHASER
ITALNOVAPtyLtd duringthe periodof warrantywill atit’s optionand subjectto theterms and
conditionsstatedbelow,
Repairor Replace free of chargethis appliance or any component part, whichupon examination by
ITALNOVAPtyLtdisfoundtobedetective.
2.ThisWarrantyshallnotapply
a)Iftheratingplatehasbeenremovedortheserialnumberorotherdetailsonithaveremovedor
renderedillegible.
b)Iftheapplianceisconnectedtoanygastypeorvoltageothertheshownonratingplate
c)Iftheappliancehasbeensubjectedtomisuse,abuseaccidentorwantofcare.
d)Iftheappliancehasbeeninstalled,operatedormaintainedcontrarytotheinstructionssupplied
byITALNOVAPtyLtd
e)Ifanydefectorfailureisduetoconnectiontoaninadequateorfaultygasorpowersupply.
f)Ifdamageiscausedbyforeignobjectinortheapplianceorbyreasonofitsuseforpurposesother
thanthatforwhichitwasdelivered.
g)Ifarepairhasbeenmadeorattemptedbythepurchaser.
h)Wheretheapplianceisinstalledoutsidean80km.radiustheG.P.O.ofanyAustralianCapital
City,tofreighttravelcostsbeyondthatradius.
3.Thiswarrantydoesnotcoveranyglassdamageorreplacementoflightbulbs.
4.ITALNOVAPtyLtdacceptsnoliabilitypursuanttothisWarrantyforanycostorconsequential
damage or economic loss whether direct or indirect, to-any person or property, arising from
breakdownorfailureofthisappliancesoranypartthereof,andnoresponsibilityistobeimpliedor
acceptedoverandoverandabovethereplacementvalueoftheproduct.
5.Partscoveredunderwarrantythatneedreplacingi.e.:seal,knobsandburnercaps.Therecanbe
postedtocustomertoputattheirdiscretion.
ThisWarrantyisgivenbyITALNOVAPtyLtdandnootherpersonororganisationisauthorised
tovaryitsprovisionsandconditions.

461308061 (001) 05/2012
19
Complete this section and keep for you own record
ApplianceType:…………………………………………………………………………
ModeNo:………………………………SerialNo:...............……………………………
PurchasedFrom:……………………………………DateofPurchase:……/……./……
SERVICE Call B.A.C 1800 886 010
Please complete this section below and return to:
Daniela Appliances by ITALNOVA Pty Ltd 8/10 Hume Road Smitheld NSW 2164
ApplianceType:…………………………………………………………………………..
ModeNo:………………………………SerialNo:………………...……………………
PurchasedFrom:………………………………....…DateofPurchase:……/……./……
CustomerName:………………..............................………………………………………
Address:…………………………………...…PostCode………………………………
InstallerSignature.......................................InstallerSignatureNumber..............................................
InstallerComplianceNumber…...........................................................................................................

Table of contents
Other Daniela Oven manuals

Daniela
Daniela DAN5TFS User manual

Daniela
Daniela DAN90AFS User manual

Daniela
Daniela DAN10MTP User manual

Daniela
Daniela DAN90ASS User manual

Daniela
Daniela DAN90ASO User manual

Daniela
Daniela DAN9MTB User manual

Daniela
Daniela DAN10MPB User manual

Daniela
Daniela DAN5AFS User manual

Daniela
Daniela DAN90ABO User manual