DARKLAB HOVER User manual

USER MANUAL
Power Supply
2019

INDEX
Safety Notice
Device Overview
Basic Operation
Default Screen
Menu Screens
Additional Information
3
4
5
6
7
10
3
USER MANUAL
CLASS III SYMBOL
A Class III appliance is designed to be supplied from a separated/safety
extra-low voltage (SELV) power source. The voltage from a SELV supply is
low enough that under normal conditions a person can safely come into
contact with it without risk of electrical shock. The extra safety features
built into Class I and Class II appliances are therefore not required. For
medical devices, compliance with Class III is not considered sufcient
protection, and furthermore, stringent regulations apply to such equipment.
TECHNICAL DATA
SAFETY NOTICE
“This machine is not to be used by persons (including children) with reduced physical, sensory or mental capabilities,
or lack of experience and knowledge”
BARRIER PROTECTING YOUR HOVER
For a visual demonstration of many barrier protection methods, please visit our FK Irons YouTube channel.
Input Voltage: 19 V
Operating Voltage: 2-17 V
Current: 1.5 A
Connection:
(2) 3.5mm RCA connection
Operating Mode: Continious operation
Ambient Temperature: +10 to +35 °C
Relative Humidity: 30 to 75%
Dimensions (W x H): 84.8 mm x 33.6 mm
Weight: Approx. 224 g
4
USER MANUAL
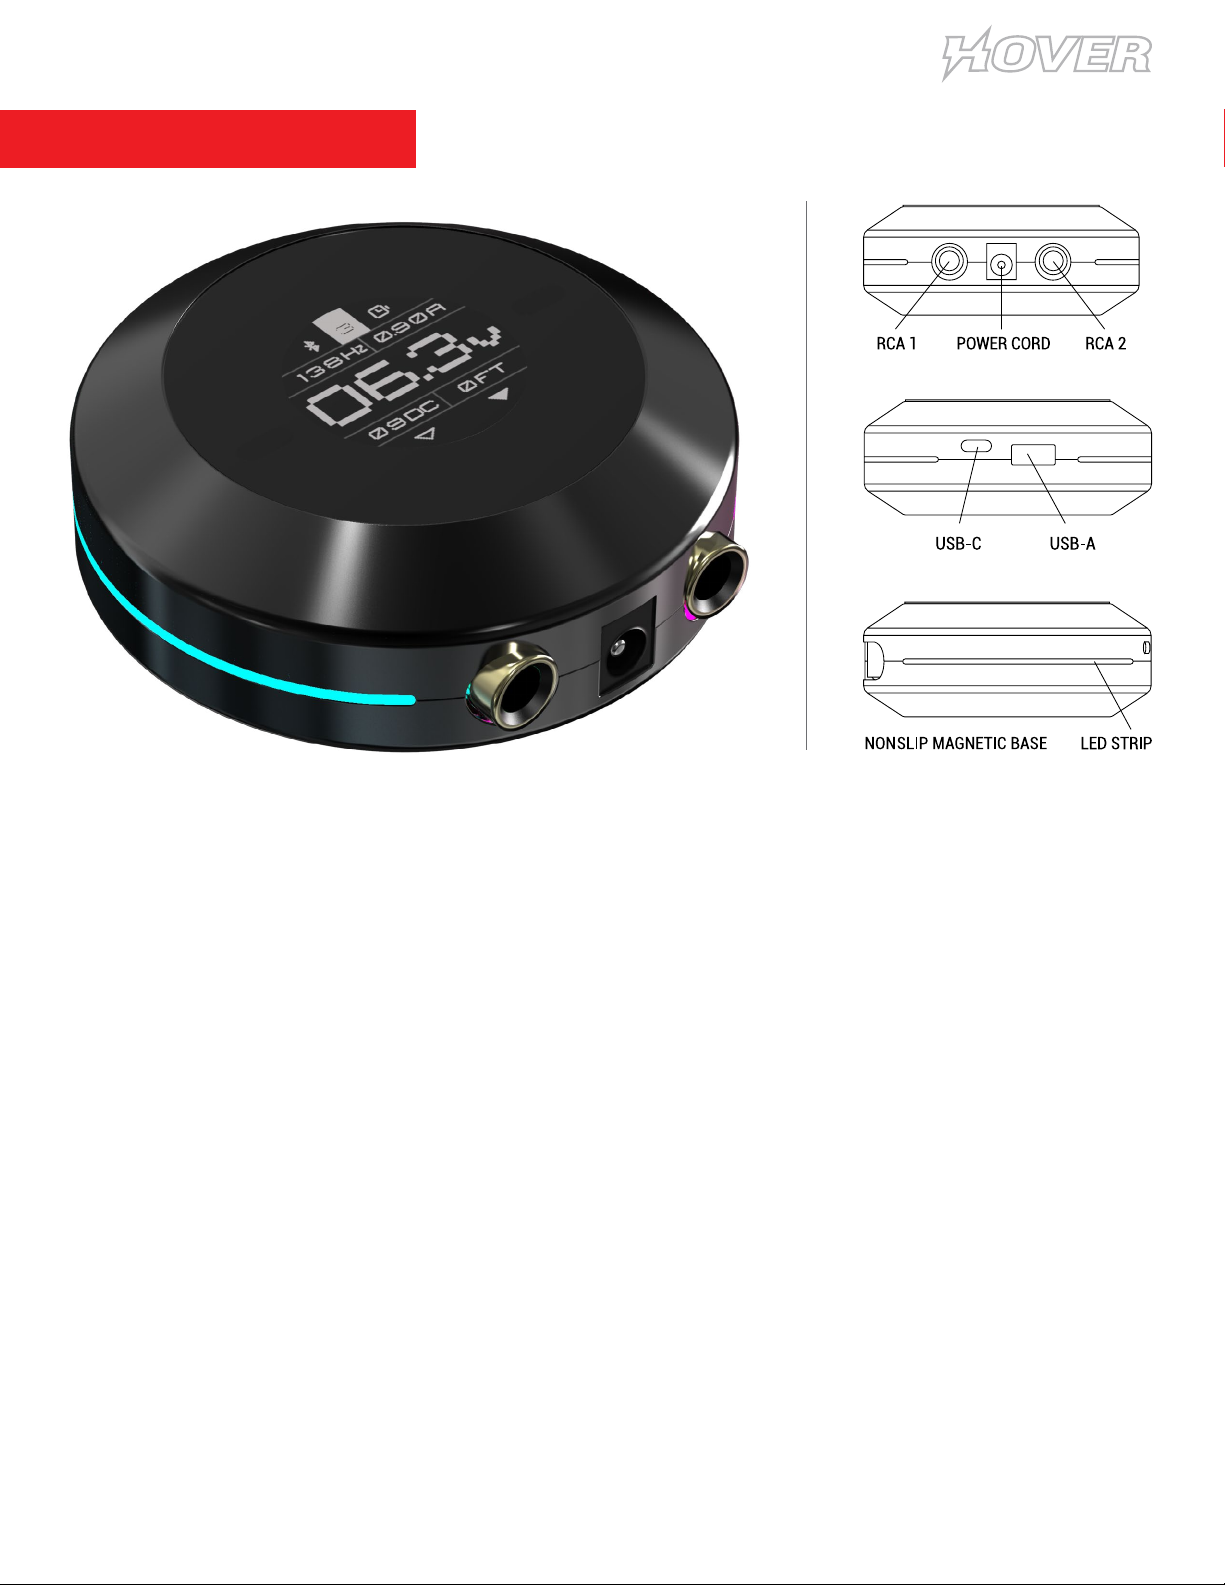
DEVICE OVERVIEW
THE HOVER
Key Features
• Touchless, gesture controlled operation for
maximum hygiene.
• Bluetooth enabled. Pair with Darklab app
for rmware updates.
• Touchless air gestures to increase
or decrease voltage & navigate menus
and settings.
• AirSwitch. Hold over center to turn on/off.
• Full rotary & coil readouts.
• Dual timer: Track session & machine
run-time simultaneously.
• USB-A & USB-C ports to charge mobile devices
& Darklab battery packs.
• Display modes:
Pro: All readouts at a glance.
Hertz: Speed priority + volts.
Volts: Voltage priority + speed.
Timer: Timer priority + volts, run and
session time.
• Rotate display feature to re-route your cables
up or down.
• Connect up to 2 machines.
• Footswitch compatible.
• Maximum current output: 1.5 A.
• Input voltage: 19V Output voltage: 2-17.0 V
• Nonslip magnetic base.
5
USER MANUAL
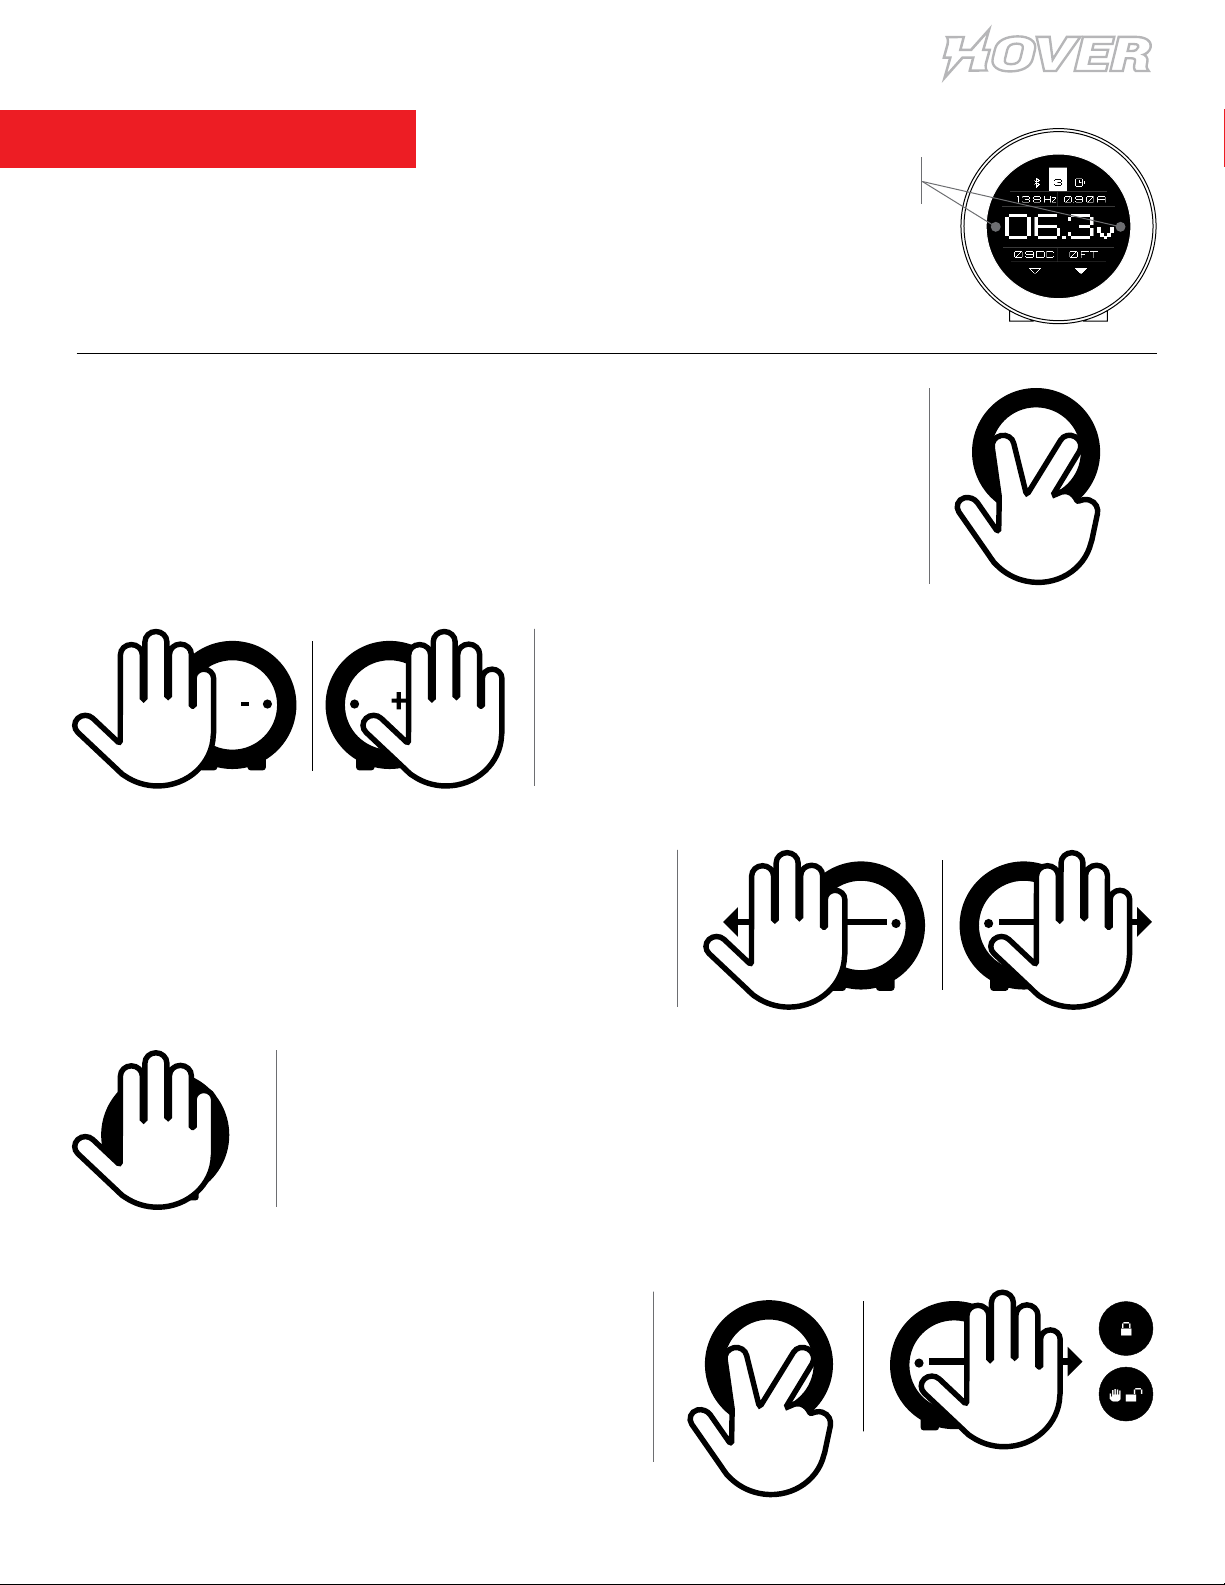
BASIC OPERATION
Cycle Through Menu Screens
Covering both sensors on the default screen for a few seconds will cycle through
the function screens. It’s recommended that you use two ngers so screen is
visible. Note: Connected machine will pulse when initiating cycle.
Touchless Operating Gestures
The device has 2 control sensors on either side of the screeen. It is important
to use smooth and complete (left to right, right to left) swiping motions.
Both sensors must be swiped across to ensure proper operation.
Machine Toggle
Swiping left or right across the sensors will toggle
between connected machines. (Only functions when
2 machines are connected.)
V
V
Increase / Decrease Voltage
Covering left or right sensor will increase (R)
or decrease (L) voltage setting.
Start/Stop Attached Machine
Covering both sensors on the default screen for a few seconds will activate or
deactivate connected machine.
MOTION
SENSORS
Lock / Unlock Settings
To lock device settings, cycle through functions
to lock screen. Once lock icon is displayed, swipe
across both sensors to lock. To unlock, cover either
sensor until locked icon appears, swipe across both
sensors to unlock.

6
USER MANUAL
DEFAULT SCREEN
TIMER ON/OFF
AMP
FOLLOW THROUGH
MACHINE INDICATOR
BANK INDICATOR
BLUETOOTH ON/OFF
HERTZ
CURRENT VOLTAGE
DUTY CYCLE
Insert Power Cord to Turn on Device
NOTE: Insert power cord to Hover prior to connecting to outlet.
When device is turned on, logo will flash momentarily and screen will
refresh to default. This is the default operating screen when the device is on.
There are four basic operations that can be done from this screen:
Increase/decrease voltage, toggle between machines, start/stop attached machine
and lock/unlock setting.
Cycle Through Menu Screens
Covering both sensors on the default screen for a few seconds will cycle through the
function screens. It’s recommended that you use two ngers so screen is visible.
Note: Connected machine will pulse when initiating cycle.
7
USER MANUAL
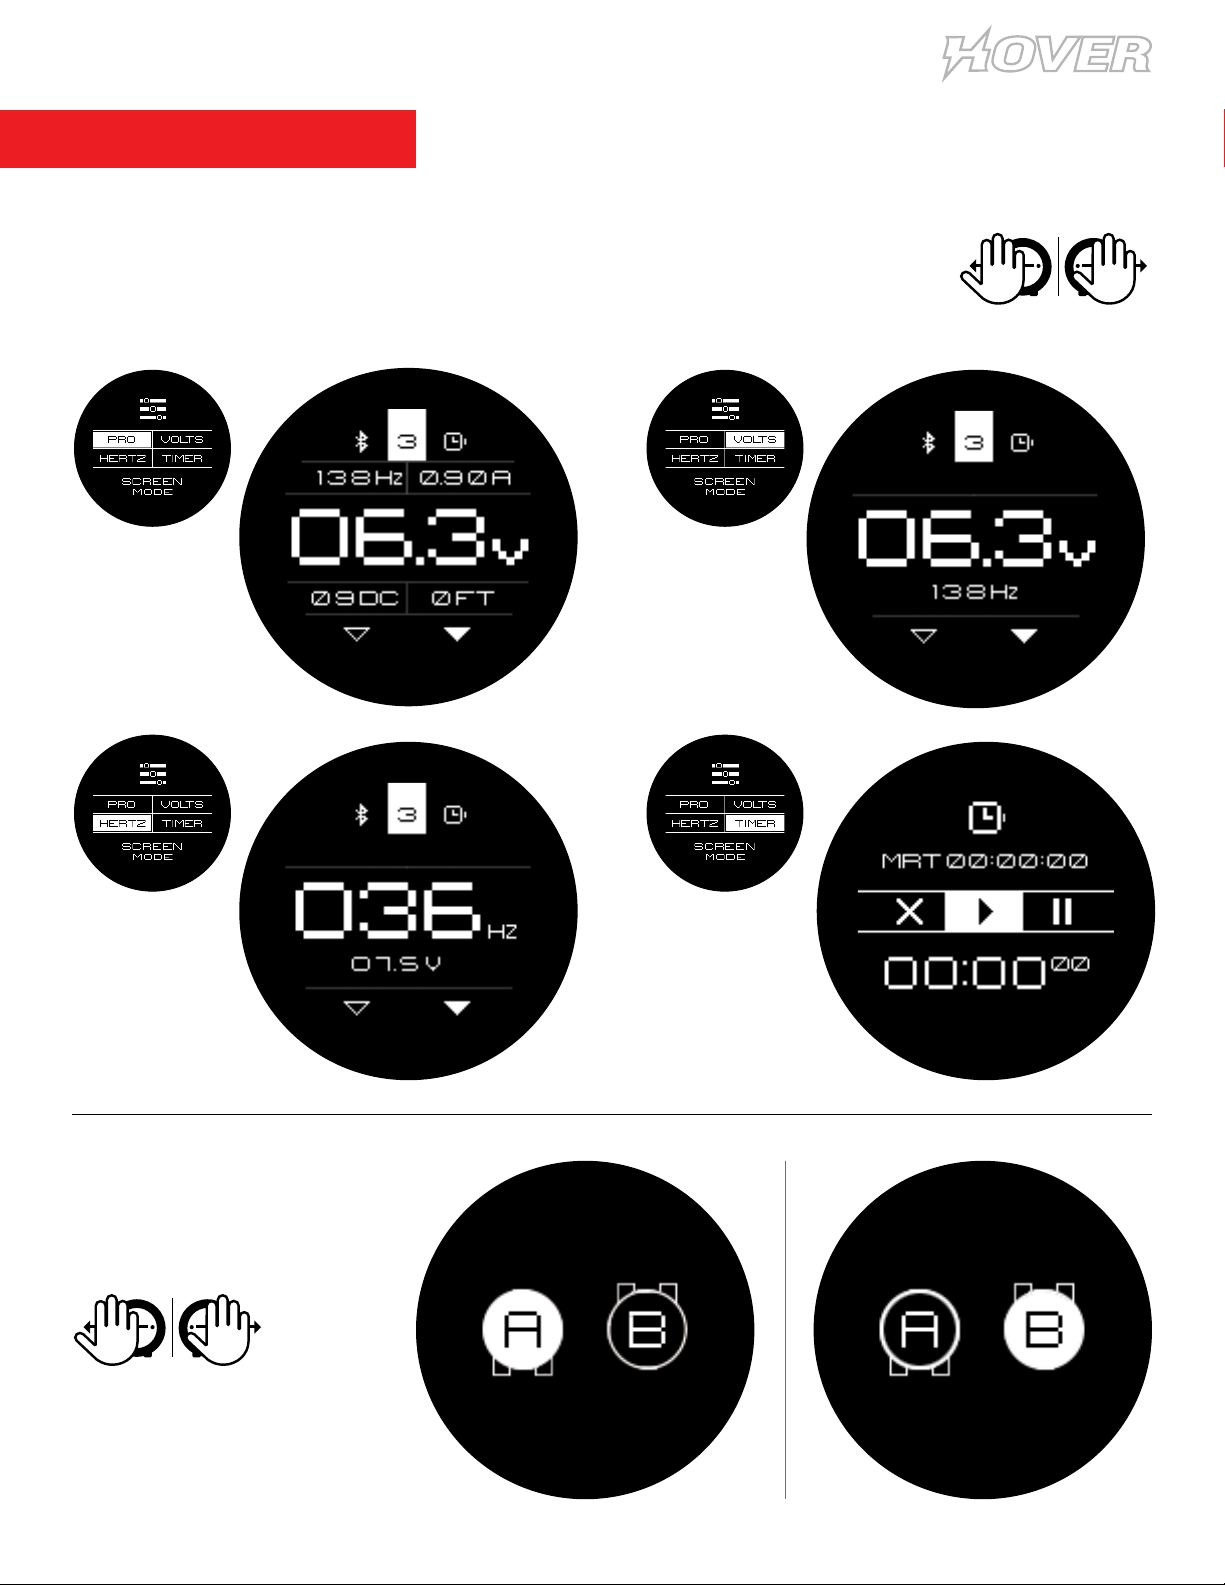
MENU SCREENS
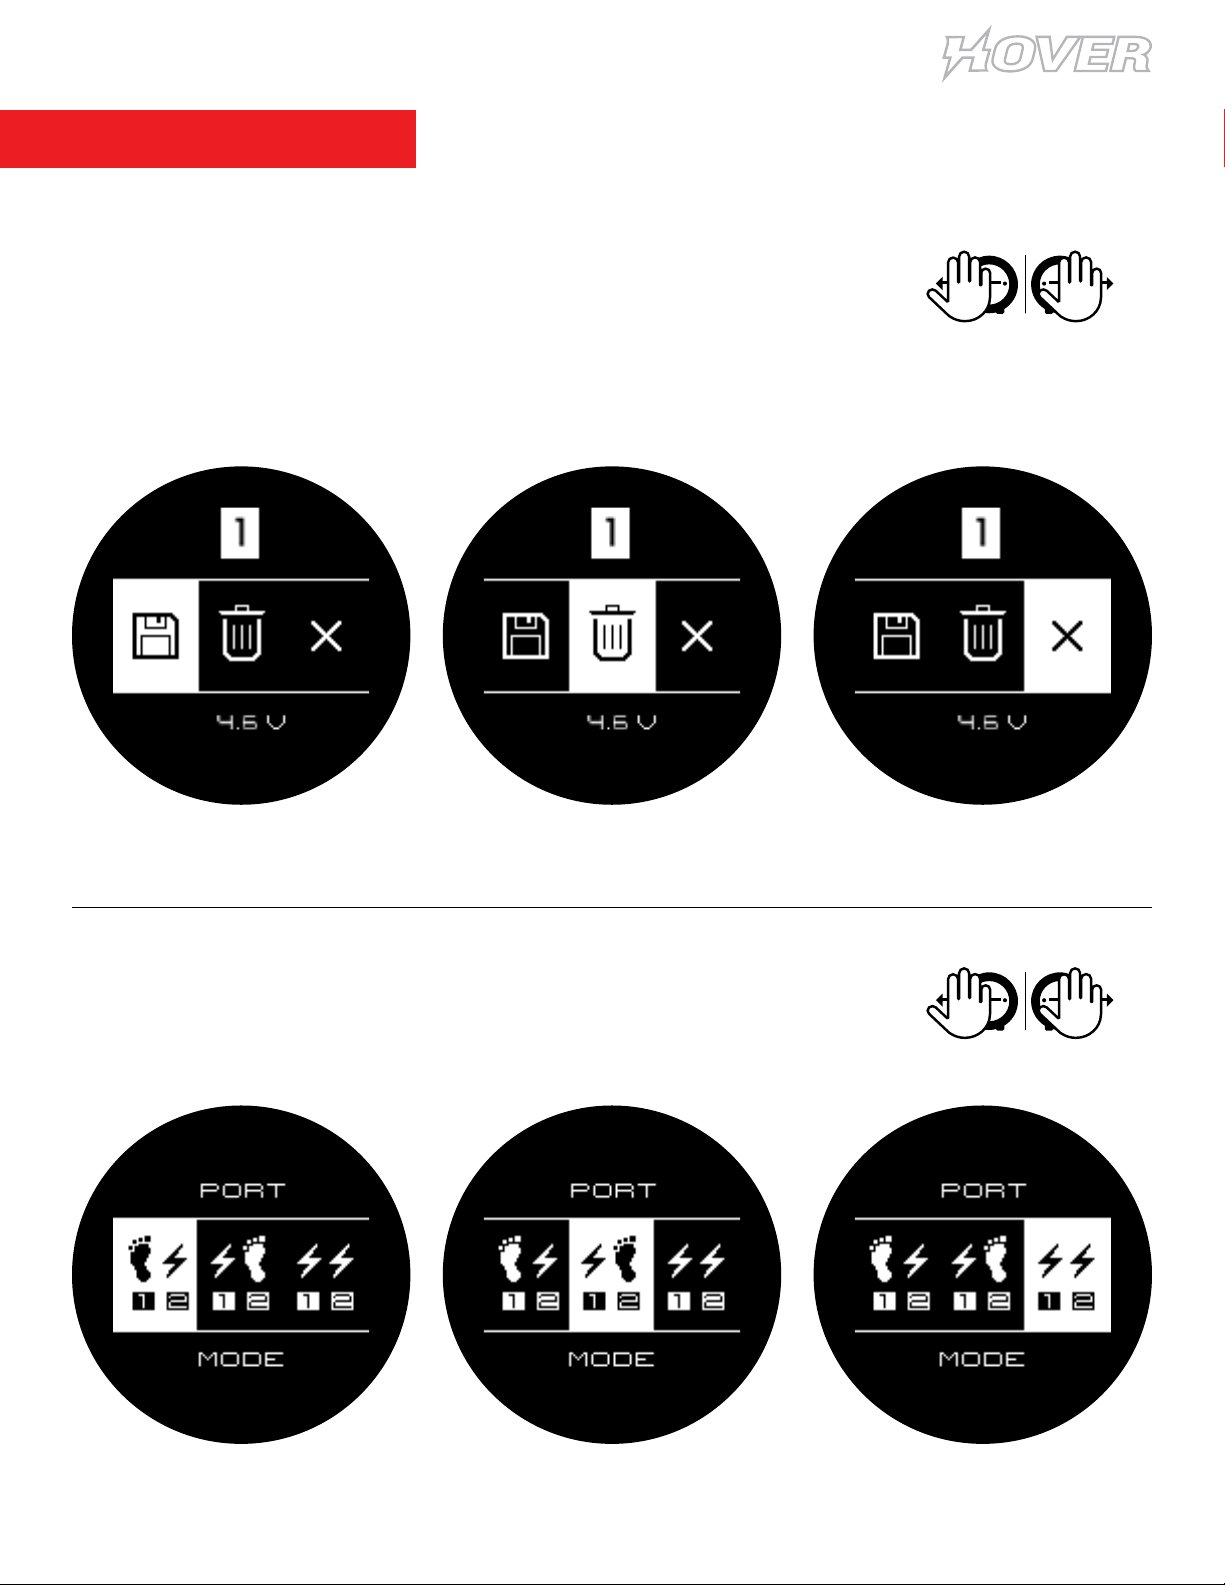
Bank Management Screen
Manage, save and delete the preset banks. Device has 9 programmable banks.
Bank selection is done in default screen. Select the desired voltage before cycling
to the Bank Management Screen. Once you have selected an option, wait for 3
seconds, device will automatically accept selection and switch back to default
screen. New selection will default to highest bank available.
RCA Port Conguration Screen
Select RCA port conguration by swiping left to right or vice versa. Congure the
RCA ports to control machine(s) using right/left footswitch combination or
connect up to 2 machines.
( SAVE )
( MACHINE RIGHT - PEDAL LEFT ) ( PEDAL RIGHT - MACHINE LEFT ) ( MACHINE BOTH PORTS )
( DELETE ) ( CANCEL )
8
USER MANUAL
MENU SCREENS
Screen Conguration Screen
Select the default screen conguration, swipe right or left to cycle through 4 options.
Pro - Default Screen | Volts - Priority V + Hertz
Hertz - Priority Hertz + V | Timer - Session/Machine run time
Screen Orientation
Select the orientation of the screen:
Cables towards bottom or top.
Swipe left or right to select.
PRO SCREEN
HERTZ
V O LT S
TIMER

9
USER MANUAL
MENU SCREENS
Timer Operation
This screens controls the timer: Reset / Start / Pause. Swipe left or right to cycle
through controls. Displays session time as well as machine run time.
PEDAL CONFIGURATION
Select pedal/machine function. Swipe right or left to select.
On/Off Toggle: Tap for on, tap for off / or press and hold for on, release for off.
F Power: Press and hold to increase volts. Tap + Press and hold to decrease volts.
Tap to toggle on/off.
RESET
RESET TO 00:00:00
START
INITIATE TIMER
PAUSE
PAUSE TIMER
ON/OFF TOGGLE F POWER

10
USER MANUAL
VOLTAGE PARAMETERS
While voltage is a parameter that will vary from artist to artist, the Hover has been tested
to operate at a minimum voltage of around 2 Volts with a maximum voltage of 17 Volts.
Depending on the type of needle conguration or brand you use, feel free to adjust the voltage to
obtain the desired performance. NOTE: Some machines require a minimum voltage to operate
correctly, please check your machine manufacturers requirements.
WARRANTY
Darklab warrants that the device will perform efciently when used as intended. Should this product
prove to be defective due to manufacturing issues, Darklab will repair/replace the device - free of
charge. This warranty will be void if the device shows signs of having been tampered, disassembled,
handled roughly, dropped, overexposed to moisture or damage to sensors/screen resulting in
compromised functionality. Avoid scratches to screen. Always use clear barrier lm while in operation.
HANDY TIPS
The following tips will help you get the most out of your Hover and avoid potential issues:
• Do not exceed the suggested voltage.
• Only use approved power adapters, failure to do so can void your warranty.
• Use only quality cables. A good connection will ensure consistent performance.
• Keep screen safe using Hover approved barrier lm. Typical adhesive could interfere with sensors.
• Use only FDA-approved cold sterilization solutions for disinfection. Avoid scratching sensor windows.
• NOT AUTOCLAVABLE.
ADITIONAL INFORMATION
Table of contents


