DARLEY PuriFIRE VERSA SEA PAK 200 User manual

1
VERSA SEA PAK 200
OWNER’S MANUAL
W.S. Darley & Company
325 Spring Lake Drive, Itasca IL 60143
Phone 630-735-3538 Fax 708-345-8993
E-mail: [email protected]
Www.purifiresystems.com
Technology Partner

2
Table of Contents
Installation
Operation
Getting Started .................................................................................................................... 5
Introduction......................................................................................................................... 6
Feed Side Piping Schematic................................................................................................ 7
Product Piping Schematic ................................................................................................... 8
Setting Up the Versa Sea Pak ............................................................................................ 9
Plastic Tube Fitting Instructions ....................................................................................... 10
Page Number
New Systems Start Up and Testing .................................................................................. 11
Normal Operation ............................................................................................................ 12
Maintenance...................................................................................................................... 18
Service & Maintenance
Short Term Storage Procedures ........................................................................................ 15
Long Term Storage ........................................................................................................... 16
Winterizing ....................................................................................................................... 17
Membrane Cleaning.......................................................................................................... 19
Suggested Spares .............................................................................................................. 22
Service Bulletins ............................................................................................................... 24
Parts breakdown for Versa Sea Pak systems .................................................................... 31

3
Unpack the system and inspect it to make sure that it has not been damaged in shipment.
Refer to the shipping list for your system to make sure you have received all of the compo-
nents listed. Do not discard any packaging until you have found and identified all of the
parts. The small installation parts are listed on the kit list.
Warning! W.S. Darley & Company will not be held responsible for shortages and or
freight damage that are not reported within thirty days of the ship date.
Study the system layout diagram, component photos and descriptions before beginning your
installation. This will assist you in understanding the function of each component.
Getting Started
Versa Sea Pak Shipping List
Versa Sea Pak water system
Submersible pump with flotation and 150 micron bag filter
Salinity monitor
Brine discharge hose (15”)
1/4 product tubing (15’)
Service/Spares Kit

4
Introduction to the Versa Sea Pak 200
Originally developed for ocean voyaging yachts, the Versa Sea Pak 200 Portable Water sys-
tems is both a desalinator and a water purifier developed specifically for the U.S. Military. It is
capable of producing High Quality, Good Tasting drinking water from a variety of water sources
including sea water, river water, lake water, or water from a brackish or contaminated well. It
will effectively separate out salts, organic chemicals, insecticides and pesticides, parasites and
their cysts, bacteria, and viruses from the product water. It does not remove non-ionized
heavy metals.
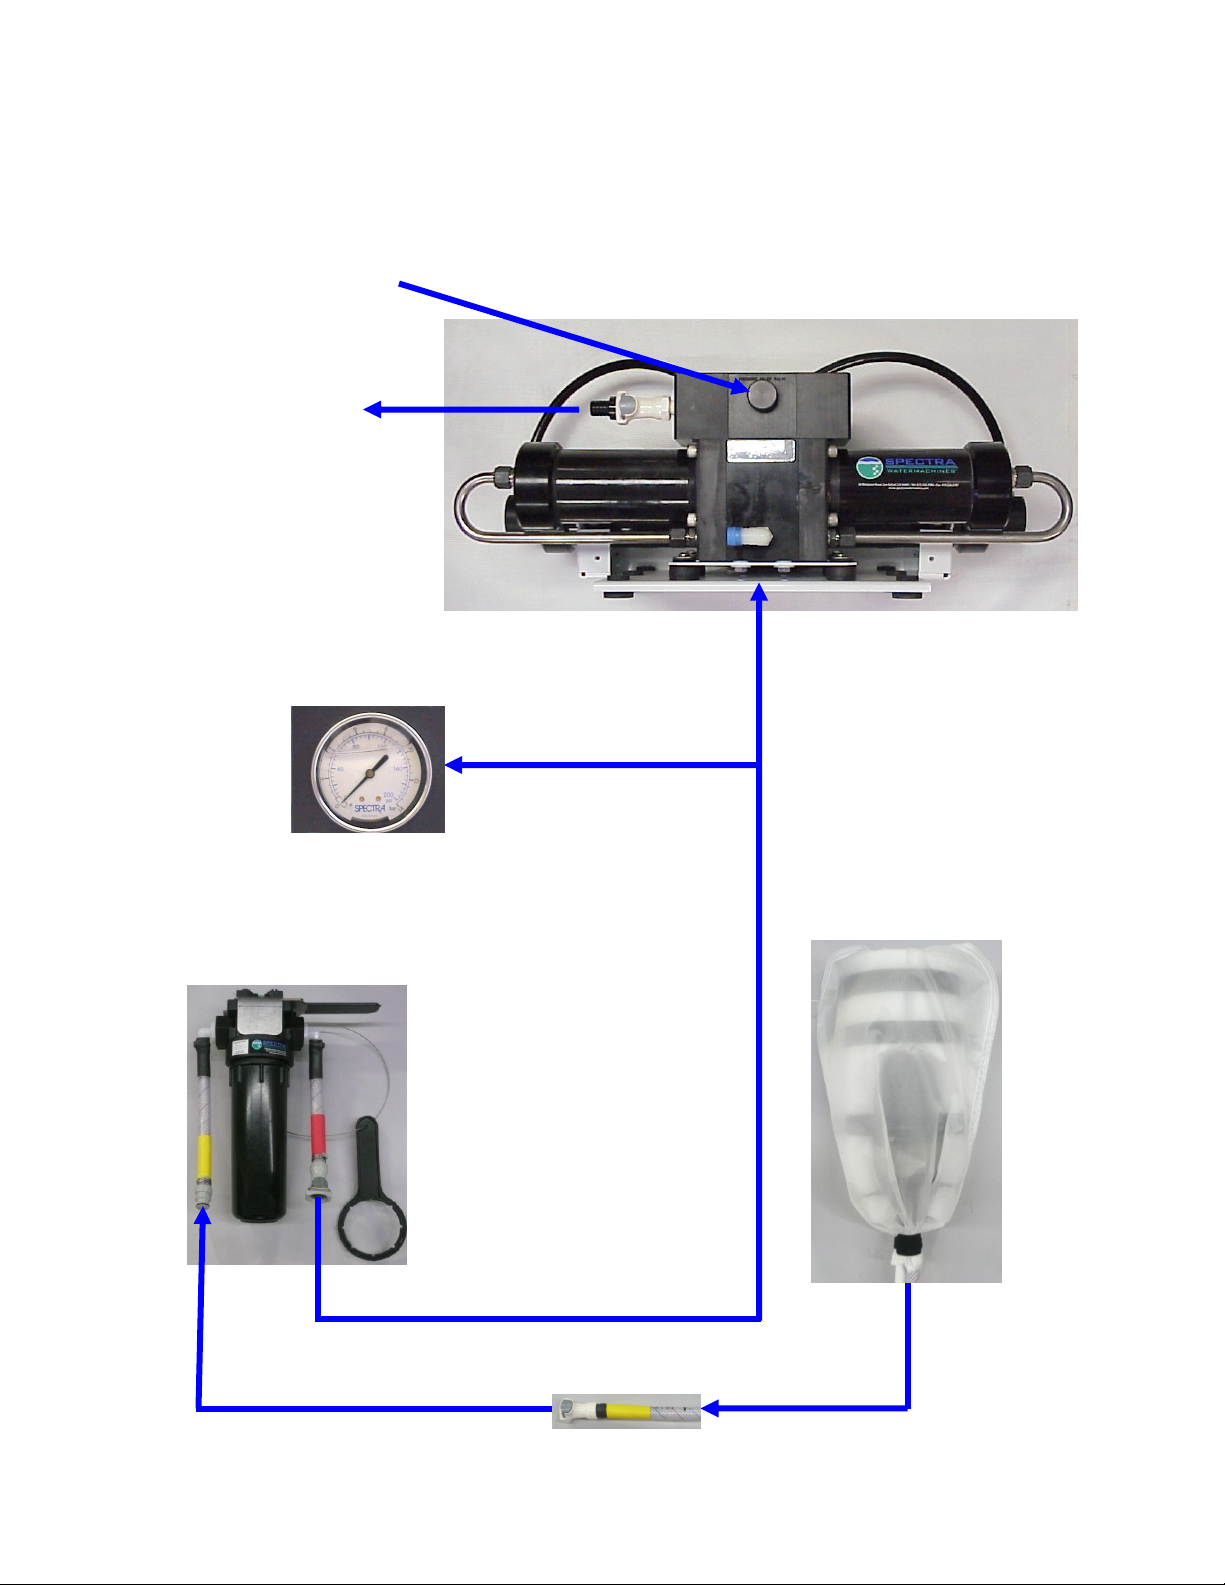
The system pumps approximately 1.5 gallons (6 liters) of feed water per minute to the Re-
verse Osmosis membrane, 10% of this water passes through the membrane as purified prod-
uct water and the remaining 90% is returned to the feed water source as concentrated brine.
The brine contains whatever was separated from the product water by the membrane and
nothing is retained inside the machine.
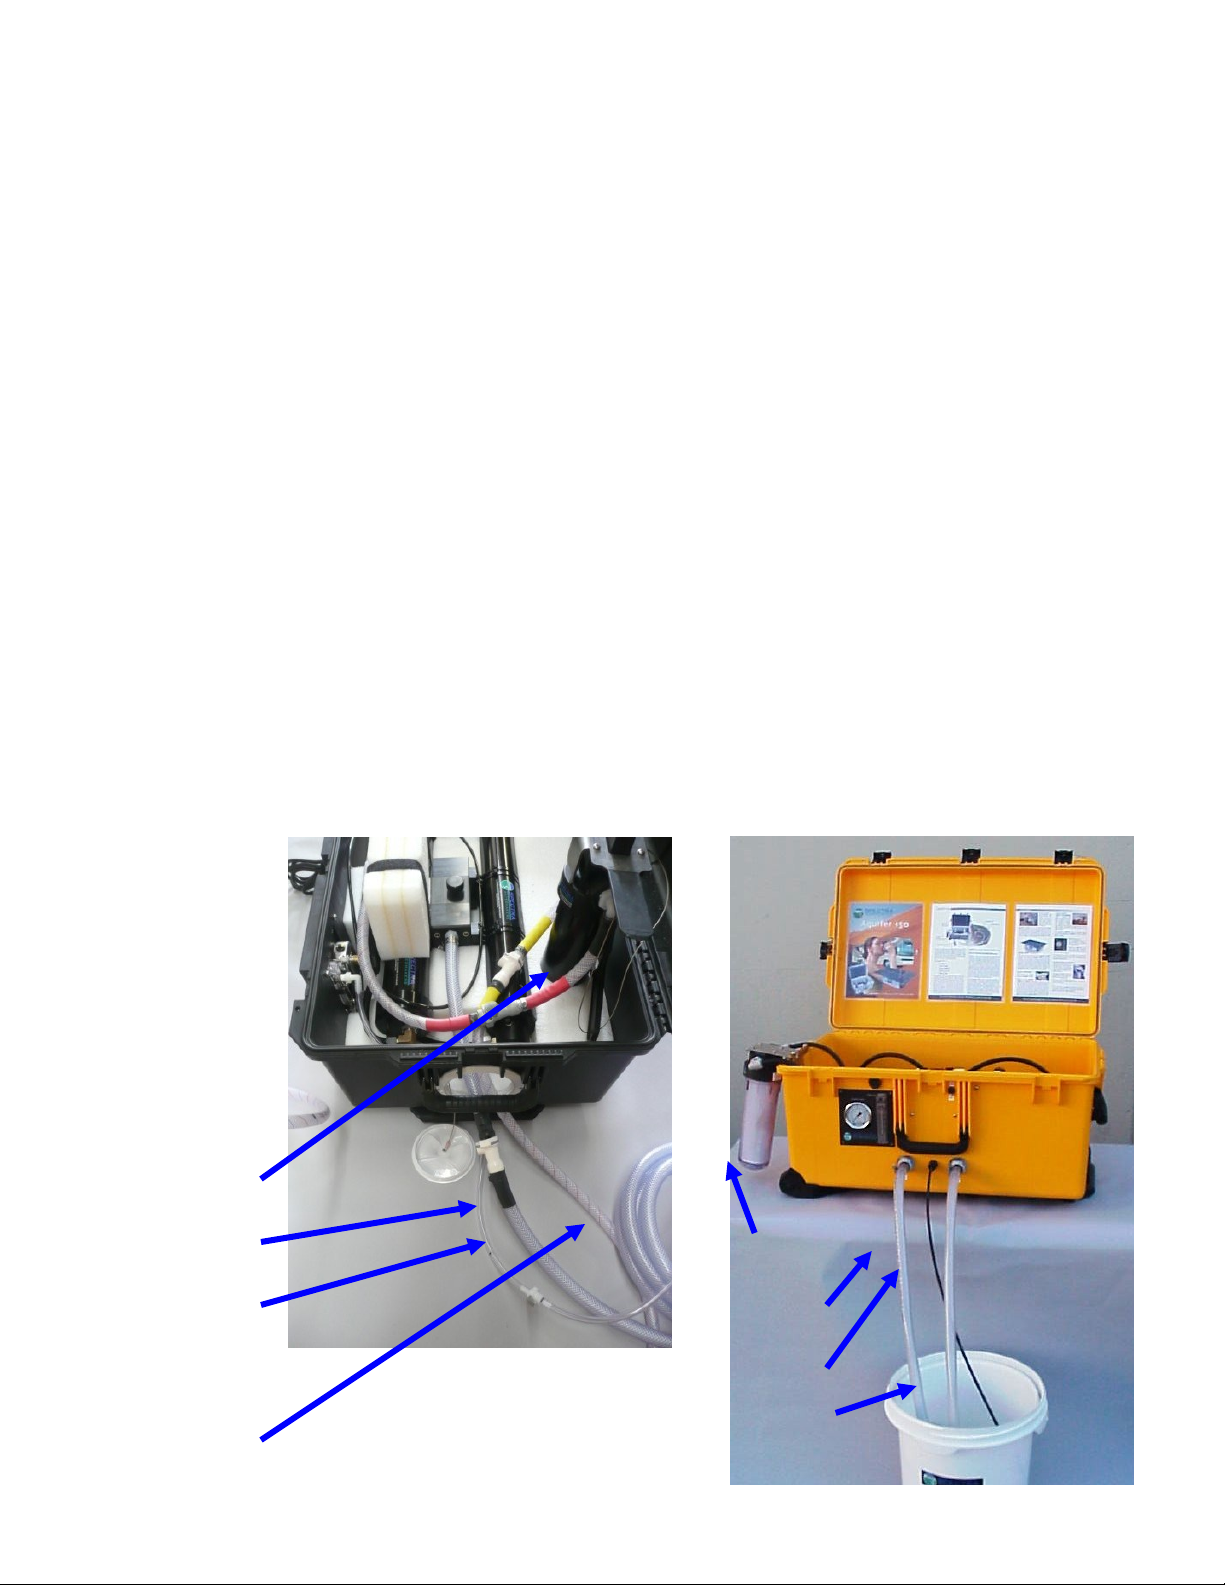
Feed water is filtered using a two stage process; a bag filter is provided to protect the feed
pump from sand and debris and then the water passes through a 5 micron pre-filter to protect
the hydraulic intensifier and membrane from silt, algae and abrasive particles.
The unit may equipped with a battery and a battery charger or configured to run directly from
AC or DC power sources. If the battery is fresh and fully charged the system can be operated
directly from the battery for two or more hours without an external power source. For longer
run times, an AC extension cord can be connected from any 110 volt power source to charge
the battery while the system is in operation.
In order to prevent damage to the system, the feed water should never contain Chlorine,
Bleach, or any other strong oxidizer, which will damage the membrane. Oil in the feed water
will also damage the membrane.
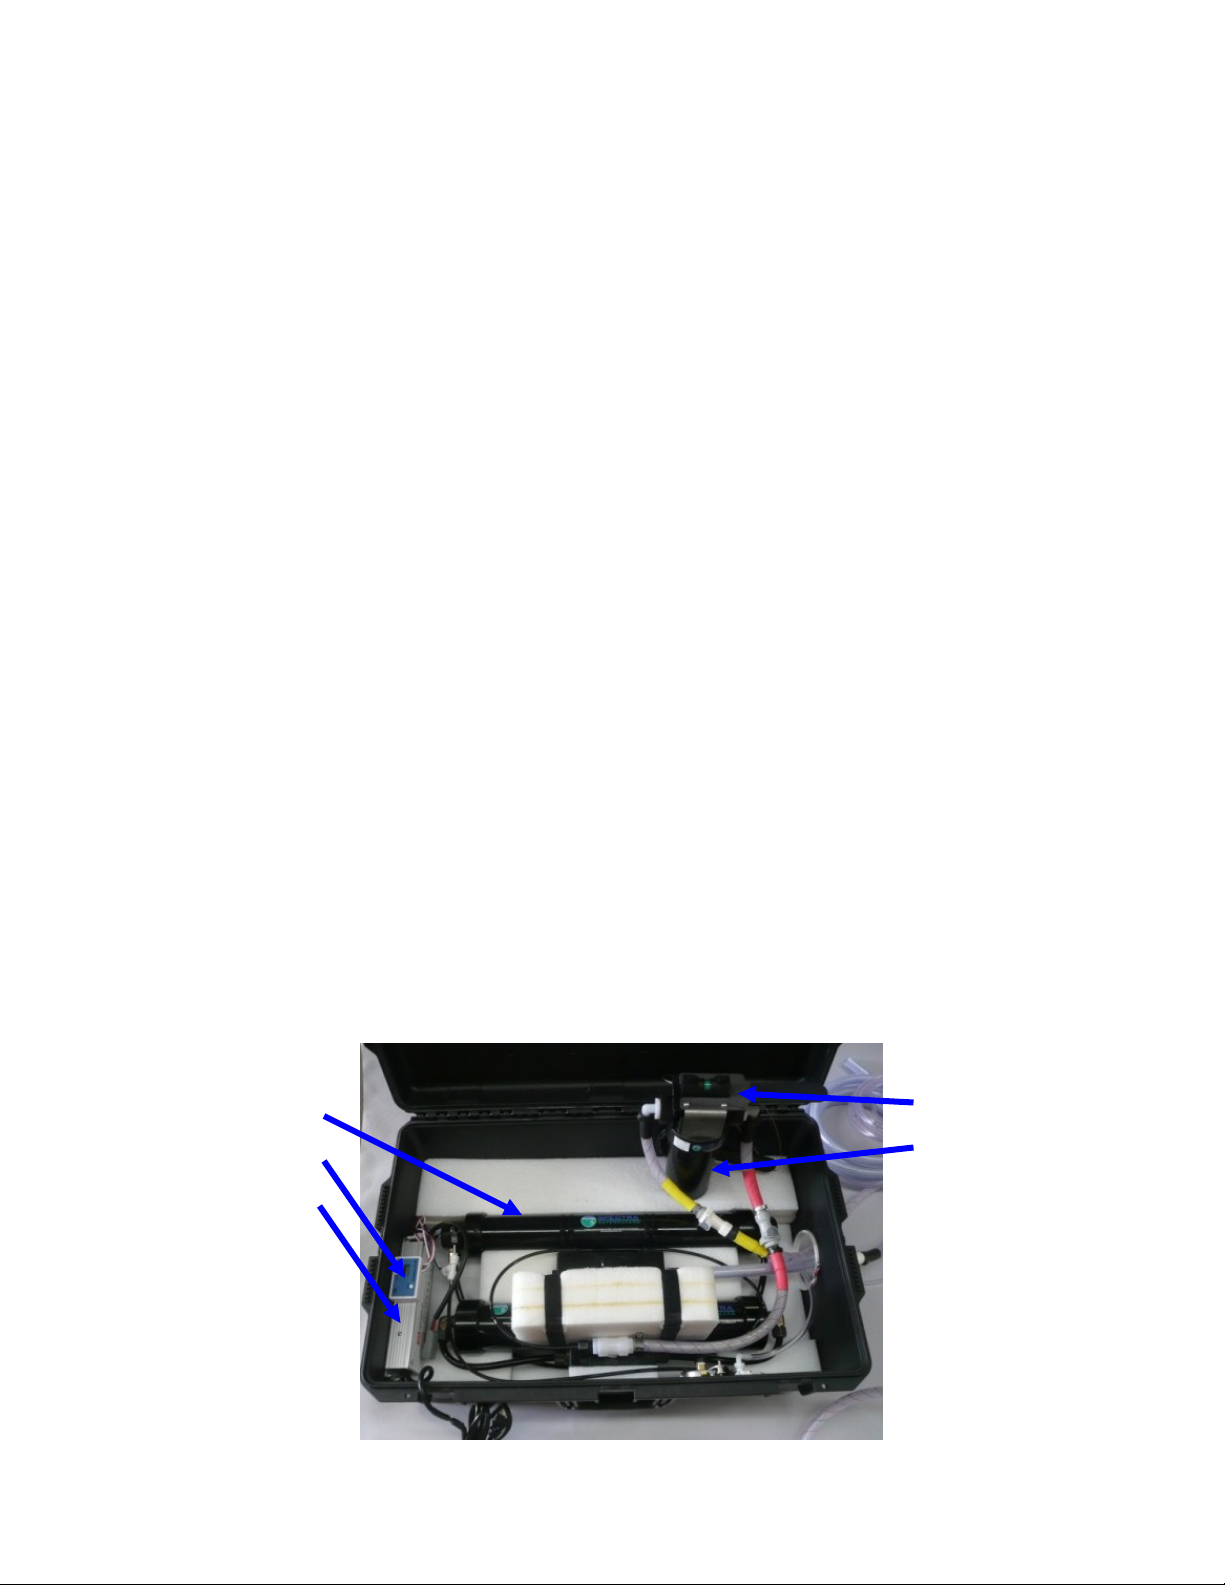
Filter indicator
Pre-Filter
Membrane Housing
Salinity Monitor
AC Power supply

5
5 micron filter
Hydraulic Intensifier and
Membrane assembly
Pressure Relief Valve
Brine Outlet
Versa Sea Pak Feed Plumbing Schematic
Quick Disconnect
Pressure Gauge
Submersible pump
with Float and 150
micron bag filter

6
Front of
Product Flow meter
Product Water Schematic
Product Water Outlet
Make sure that there is no restriction in this piping. Pressure in the product tubing
must never exceed 5psi (0.3bar) at any time, (running or stopped) or the membrane
will be permanently damaged.
The product water exits the membrane, goes through the Salinity Monitor, the Product
Flow Meter and then out the Product Water Tube.
Back of
Product Flow meter
Product Water tube

7
SETTING UP THE VERSA SEA PAK 200
CHOOSING A SITE
Your water source should be as free of suspended sand, silt, algae etc., as possible for longer
prefilter life. If making water from a bay, lake, or stream choose a location as deep as possi-
ble. Avoid areas with surf or chop. The Versa Sea Pak Feed Pump is capable of lifting the
feed water not more than 10 vertical feet. When setting up the system choose a spot as near
the water as possible, but do not place the case in the water. It is better to run a long exten-
sion cord from your power source than to run long hoses to the feed water source. When
making water on a sand beach a small pit can often be dug in the sand which will fill with clean
water. The water flowing into the pit can be used as feed water and the water will be quite
clean after the system has been running for a short time.
SETTING UP
Note: When connecting the suction hose fittings be sure they are clean and free of
sand or debris so the seals on the fittings are not damaged!
Using the quick connect fittings attach the three hoses; Suction hose with strainer and filter
basket, Brine discharge and product hose.
You can run the system as shown below into a bucket to check operation.
5 micron
Filter
Feed Suction
(Inlet) Hose
Product Hose
Brine (Outlet)
Hose
5 micron
Filter
Brine (Outlet)
Hose
Product Hose
Feed Hose
from
Submersible
Pump
Versa Sea Pak with hoses and access port Unit with connectors built into case

8
Gentlyfitthetubeintothebodyandlooselythreadonthenut.
Pushthetubeintothebodyuntilitbottomsoutthenhandtightenthenut.
DONOTOVERTIGHTEN!
1/4"TubeFittingAssembly
InstalltheNutfirstthenusethebevelledsideoftheSpacertopushthe
GrabRingontothetubenomorethan1/2".SliptheO-ringoverthetube
toholdtheSpacerinplace.IftheGrabRingispushedtoofar,trimback
thetubesoabout1/4"oftubeextendspasttheO-ring.
Step4:
Step3:
Step2:
Step1:Dissemblefittingcomponents
Body
O-ring
Spacer
1/2"max
GrabRing
Nut
Tubing

9
Avoid running the system if the source water is excessively polluted or contaminated.
The system should be fully run tested before being placed into service. If the location
or weather prevents proper testing contact the factory for information on setting up an
artificial ocean .
Warning! Damage may occur if the purge sequence is bypassed and the
membrane is pressurized with storage chemical in it.
The Submersible Well Pump is completely submerged in the source water
All of your hose connections are tight.
The “WARNING” tag and spacer from under the pressure relief valve has been
removed.
The pressure relief valve is open 1/2 turn.
The sampling valve, if installed, is set to the sample position.
1. First check that:
2. Turn on the feed water pump. Check that it is primed by inspecting the brine dis-
charge. About 1.5 gpm (6 lpm) of water should be flowing with a pulsation every few
seconds.
3. Run the system with the pressure relief valve open for 20 minutes to purge the stor-
age chemicals. The system should have an open flow pressure on the gauge of about
20 PSI (1.2 bar).
4. After 20 minutes close the pressure relief valve. The pressure should rise to about
100psi (7 bar). After several minutes, water should begin to flow out of the Product
tube. If using brackish or fresh water the pressure will be lower.
5. Allow the system to run for 5-10 minutes to purge the product water of storage
chemical, and then test the product with your hand held salinity tester. When the prod-
uct is below 750 PPM it is considered potable and may be diverted to the water con-
tainer.
New System Start-Up and Testing
Open 1/2 Turn to Purge Chemicals!
Remove Tag and Washer!

10
Versa Sea Pak Operation
Normal Operation from a Large Body of Water
If the system has been pickled or stored or contains cleaning compounds, use the “New
System Startup” procedure.
1. Any source of oil free feed water not saltier than sea water may be used. Do not use water
containing large amounts of heavy metals, such as mine tailing runoff.
2. Set up the product tubing so that the product can be sampled.
3. Start the feed pump and check for flow by inspecting the brine discharge or checking for
pressure on your pressure gauge. If there is no flow, open the pressure relief valve one
turn to bleed the air out of the feed pump, when there is good flow close valve
4. Check the product water with the salinity monitor. When it is below 750 ppm, you may di-
vert it into your container, the water quality will improve as the system runs.
5. Run the system until you have filled your container or have made enough to meet your re-
quirements for several days.
6. Monitor the feed water pressure. Make a note of the feed pressure with a clean filter ele-
ment and change the filter if the pressure rises more than 5 psi (0.3 bar).
Shutting Down
1. You will need 3 gallons of water in a container which will be used to flush the salt water out
of the system. Use only unchlorinated water for flushing
2. Put the Pump in the bucket of fresh water and start it .
3. Flush for 2 1/2 minutes or until the pressure drops on the gauge indicating that the mem-
brane is flooded with fresh water. Stop the feed pump.
4. Disconnect drain and stow the hoses. Put the plugs in the hose connections.
You may now leave the system unattended for up to five days without further attention.
We recommend operating the system for longer periods as you need to run the system almost
a half an hour to make enough water to flush the system and the system should be flushed af-
ter every use.
To turn the pump on simply connect the pump into the power supply

11
Versa Sea Pak Operation
Purifying Fresh or Brackish Water From a Tank or Well
If the system has been pickled or stored or contains cleaning compounds, use the “New
System Startup” procedure.
1. Fill the tank if necessary. Extremely hard water may cause scale buildup, requiring more
frequent cleaning. Do not use water containing large amounts of heavy metals, such as
mine tailing runoff.
2. Set up the product tubing so that the product is being discarded and it can be sampled.
3. Place the feed and brine hoses into the tank or well with the feed strainer near the bottom
and the brine discharging near the top.
4. Start the feed pump and check for flow by inspecting the brine discharge or checking for
pressure on your pressure gauge. If there is no flow open the pressure relief valve on the
hydraulic intensifier and bleed the air out of the feed pump.
5. Check the product water with your hand held salinity tester. When it is below 750 ppm,
you may divert it into your fresh water container.
6. Watch the feed water level and the pressure gauge carefully. If the water level drops too
far add more water. If the pressure gauge reading rises above 80 psi the dissolved solids
concentration in the remaining feed water has risen too high. Discard this concentrated
brine and refill the tank or well. The remaining concentrated feed can be pumped out by
removing the brine hose from the water source and allowing the brine to be discharged
into a drain.
Shutting Down
1. Make about 3 gallons of water into a bucket. This water will be used to flush the salt wa-
ter out of the system. Use only unchlorinated water for flushing
2. Install the intake service hose and place it in the bucket. Start the feed pump.
3. Flush for 2 1/2 minutes or until the pressure drops on the gauge indicating that the mem-
brane is flooded with fresh water. Stop the feed pump.
4. Disconnect and stow the hoses. Replace the plugs in the hose connections.
You may now leave the system unattended for up to five days without further attention.
We recommend operating the system for longer periods and effecting a fresh water flush ra-
ther than running the machine every day and not flushing the system. Remember that you
need to run the system almost a half an hour to make the flushing water. You may notice that
the system output is higher while charging your batteries as the machine is voltage sensitive.
Always ensure that the battery is fully charged after the system is shut down to extend bat-
tery life.

12
Versa Sea Pak Operation
Purifying Salt Water From a Container
If the system has been pickled or stored or contains cleaning compounds, use the “New
System Startup” procedure.
1. Set up a system to supply feed water to the container
2. Set up the product tubing so that the product is being discarded and it can be sampled.
3. Place the feed and brine hoses into the container with the feed strainer near the bottom
and the brine discharging near the top.
4. Start the feed pump and check for flow by inspecting the brine discharge or checking for
pressure on your pressure gauge. If there is no flow open the pressure relief valve on the
hydraulic intensifier and bleed the air out of the feed pump.
5. Check the product water with your hand held salinity tester. When it is below 750 ppm,
you may divert it into your container.
6. Watch the feed water level and the pressure gauge carefully.
7. When the pressure gauge reading rises above 80 psi the dissolved solids concentration in
the container’s water has risen to high. Discard some of this concentrated water by re-
moving the brine hose from the container and allowing the brine to be discharged into a
drain. Refill the container.
Shutting Down
1. Make about 3 gallons of water into a bucket. This water will be used to flush the salt wa-
ter out of the system. Use only unchlorinated water for flushing
2. Install the intake service hose and place it in the bucket. Start the feed pump.
3. Flush for 2 1/2 minutes or until the pressure drops on the gauge indicating that the mem-
brane is flooded with fresh water. Stop the feed pump.
4. Disconnect and stow the hoses. Replace the Plugs in the hose connections.
You may now leave the system unattended for up to five days without further attention
We recommend operating the system for longer periods and effecting a fresh water flush ra-
ther than running the machine every day and not flushing the system. Remember that you
need to run the system almost a half an hour to make the flushing water. You may notice that
the system output is higher while charging your batteries as the machine is voltage sensitive.
Always ensure that the battery is fully charged after the system is shut down to extend bat-
tery life.

13
Short Term Storage
Fresh Water Flush
The purpose of the fresh water flush is to replace the sea water in the system with fresh water
whenever the system is not operating. The system will last longer and operate better if it is al-
ways kept filled with fresh water between uses. If the system is not used for more than five
days it should be flushed again to ensure that the water inside stays fresh and oxygenated. In
this way, the water maker can be kept ready for immediate use indefinitely.
To make the system ready for periodic fresh water flushing, put a Charcoal Filter in the filter
housing. The Charcoal filter will remove any damaging chlorine that might be present in the
flush water.
After every five days, the system has not been used, put three gallons of fresh water in a bucket.
Install the service hoses and the product tube. Put the feed service hose in the bucket and the
brine and product hoses to drain.
Turn on the feed pump and run the system until all the water has been pumped out of the buck-
et.
Charge the battery.
Remove the hoses, drain them, and stow them away in the case. Insert the hose connection
plugs in the hose fittings.
Leave the charcoal filter in the housing for next time. Charcoal filter elements are only good
for six months after they are installed. After six months the charcoal filter element will lose
its ability to remove chlorine.

14
Long Term Storage Procedures
The Versa Sea Pak is best run continuously. When not in use, biological growth in the mem-
brane is the leading cause of membrane fouling. A warm environment will cause more growth
than a cold environment. If the system is to be left unused for more than five days, perform the
following storage procedure. The procedure introduces a chemical compound into the system
that prevents biological growth. This procedure requires de-chlorinated water.
Storage-1 a special storage compound used by the US Navy. It is formulated to be
compatible with the modern engineering plastics and composites in the Versa Sea
Pak. Do not use any substitute except propylene glycol. If you wish to use glycol
for storage, follow the winterizing instructions. Storage-1 Compound must be
mixed at a ratio of 1 container to 3 gallons (12L) of fresh water to have the proper
solution for up to six months storage.
Caution! Avoid contact with skin, eyes, or lungs with the storage chemical.
Versa Sea Pak Storage Procedure
The system can be stored for periods up to six months using this procedure.
1. Make or buy 4 gallons of Chlorine free water and put it in a bucket.
2. Install the Feed & Brine service hoses. Place the end of the Feed hose in the bucket and the
brine hose to drain.
3. Start and run the feed pump until you have one gallon of fresh water left in the bucket.
4. Mix 1 container of Storage-1 compound with
the water in the bucket and place the end of
the brine service hose in the bucket.
5. Make sure the pressure relief valve on the
hydraulic intensifier is OPEN
(unpressurized)
by turning 1/2 turn counterclockwise
6. Turn on the feed pump. Circulate the storage
chemical in the system for approximately 10
minutes. Turn off the feed pump when fin-
ished.
Clean Up
1. Remove the 5 micron filter element from its housing and put in a dry one.
2. Rinse and dry the inside of the case, being careful not to get water inside the pump motor.
3. Charge the battery.
4. Remove the hoses, drain them, and stow them away in the case. Insert the hose connection plugs
in the hose fittings.

15
Storage and Winterizing with Antifreeze
The system can be stored for periods up to one year in any climate using this procedure.
1. Make 3 gallons of chlorine free fresh water into a bucket. Perform a fresh water flush as
described in the normal operation section. Run the feed pump until the bucket is empty.
2. Pour 2 gallons of Low Temperature Propylene Glycol Potable Water System Antifreeze
into the bucket.
3. Make sure the pressure relief valve on
the hydraulic intensifier is OPEN
(unpressurized)
by turning it 1/2 turn counterclockwise.
4. Start and run the feed pump until anti-
freeze begins to come out of the brine dis-
charge hose.
5. Stop the feed pump. Connect the brine
service hose to the brine outlet on the Versa
Sea Pak case and place it in the bucket.
6. Start the Feed pump and circulate the
remaining antifreeze for a few minutes until well mixed.
7. Stop the feed pump and discard any antifreeze remaining in the bucket.
8. Blow out or drain the product tubing, as it will not contain antifreeze.
9. Leave the pressure relief valve open.
Clean Up
Remove the prefilter from its housing and replace with a clean dry filter element.
Rinse and dry the inside of the Versa Sea Pak case to prevent corrosion. Do not get the Feed
pump motor wet.
Remove and drain the service hoses and stow them away in the case. Insert the hose connec-
tion plugs in the hose fittings.
Charge or remove the battery for storage.

16
Maintenance
The Seawater Strainer
The sea water strainer’s stainless steel element should be inspected, opened, and cleaned as
needed. Check frequently during operation.
The Prefilter
Service the prefilter on a regular basis. The pressure will rise on the pressure gauge when
the filter becomes dirty. Extremely dirty filters will harm system performance and may
cause the feed pump to cycle on the high pressure cut-out switch. Do not leave dirty filters
in the machine during long idle periods, as biological contamination will result.
To service the filter, swing it out of the case, open the housing, and discard the old filter.
Clean out the housing bowl, reassemble the housing with a new 5 micron filter element.
Leave dry until next startup.
Use only Darley approved filters or you may void your warranty. The filter may be cleaned
several times by soaking it in water in a bucket. Occasionally, lightly lube the filter housing
O-ring with silicone grease.
General
Periodically inspect the entire system for leakage and chafe on the tubing and hoses. Repair
any leaks you find as soon as practical. Some crystal formation around the hydraulic intensi-
fier blocks is normal. Wipe down any salt encrusted areas with a damp cloth. If any rust ap-
pears at the Stainless Steel fittings, clean them up promptly. Keep the inside of the case dry
and salt free to protect the electrical components inside.
The Feed Pump and Hydraulic Intensifier
The feed water pump and the hydraulic intensifier require no routine maintenance except in-
spection for leaks. Tighten any hose clamps or fittings that show signs of leakage. The high
pressure fittings threaded into the hydraulic intensifier have O-ring seals with a straight thread.
These should never leak and should never be over tightened. If one of the tube nuts starts to
leak, it can be un-threaded, sealed with a bit of silicone grease or silicone seal, and tightened
with two wrenches very tightly.

17
Membrane Cleaning
For normal cleaning, the Storage-3 Acid Cleaning Compound is used first, then the Storage-2
Alkaline Cleaning Compound. If known bio-fouling is present, the Storage-2 may be used first.
Using hot water if possible, up to 120° (45C) is recommended as it greatly enhances the ability
of the cleaners to do their jobs.
If the history of the system is unknown or it has been left “unpickled” for an extended length of
time and biological growth is present, it is recommended that the system is cleaned with Stor-
age-2, using an alternate source of unchlorinated fresh water before the system is run under
pressure. A simple test can be performed to see if biological growth has occurred. Before run-
ning the system, remove the prefilter and examine its condition. If the housing is full of smelly
discolored water, the system was not properly stored. Install a clean prefilter if it was bad. Next
check the membrane. Attach the feed and brine service hoses and lead them to a bucket of clean
de-chlorinated water. Open the pressure relief valve one turn, and manually run the system for
30 seconds. Examine the brine water: if it’s discolored and smells bad, perform an Storage-2
cleaning with an alternate source of unchlorinated water before running the system pressurized.
If the brine is fairly clean, the system can be purged, run normally, and checked for perfor-
mance. Clean the membranes only if performance is reduced.
Heating the water is preferable. One way to do this is to find a camp stove and use a large stain-
less steel pot to heat the solution in. The cleaning solution throughout the system will heat as it
circulates in and out of the pot. An alternative is to heat the one or two gallons of initial water to
120° on the main stove before mixing in the cleaner and circulating it into the system. Periodi-
cally stop and reheat the solution.
There are two types of cleaners: acid and alkaline. The acid cleaner (Storage-3) will remove
mineral scaling. The alkaline cleaner (Storage-2) is used to remove biological by-products,
oil, and dirt particles that get past the prefilters. If membrane performance is reduced and it
has not been “pickled” recently, cleaning with both chemicals is recommended. The acid
cleaner should be used first. Colloidal Metals and Metal Oxides are very difficult to re-
move. If the membrane fails to respond to both cleanings, this is an indication of another
problem with the system, or that it is time to replace the membrane. Contact W.S. Darley &
Company before removing a membrane.
The membranes need to be cleaned only when feed pressure begins to rise due to fouling or
the product quality degrades. The primary causes of fouling are biological growth and scal-
ing. Biological growth occurs when the system is left unused without flushing or pickling.
Fouling from mineral scaling will form when the feed water is high “hard” or high in car-
bonates. Very small “colloidal metal” and metal oxide particles can also plug the pores in
the membrane. Monitor the product salinity and feed pressure for higher than normal read-
ings for the existing conditions. Other conditions can cause high pressure such as cold feed
water or clogged filters. Low product flow is usually due to low voltage, damaged feed
pump or hydraulic intensifier. Look for all other causes before cleaning the membrane.
Membrane life can be shortened by excessive cleaning.
The Membranes

18
Cleaning compound (Storage-2 or Storage-3) must be mixed with fresh water at a ratio of 1 con-
tainer of compound to 3 gallons (12L) of unchlorinated water to have the proper solution. About
two gallons (8L) of water is already present inside an Versa Sea Pak system. This water has to be
figured into the mixture. A Versa Sea Pak system will use one container of compound.
Note: Procedures are the same for the Storage-2 and Storage-3 cleaners
Cleaning Procedure:
1. Make 4 gallons of water into a bucket or obtain 4 gallons of Chlorine free fresh water.
2. Flush the system as shown in the Normal Operation Section. Leave one Gallon of water in
the bucket.
3. Connect your inlet service hose, brine discharge service hose, and product hose and place
them in the bucket.
4. Make sure that the pressure relief valve is OPEN (un-pressurized).
5. Mix the cleaning chemical in the bucket.
6. Start the system and circulate the chemical through the system for 20 minutes.
7. Allow the system to soak for an hour, or more if the chemicals are cold.
8. Run the pump for another 20 minutes.
9. Stop the pump, replace the brine discharge hose and start the pump until the bucket is
empty.
10. Flush the system using the instructions for “New System Startup”
Heating the water is preferable. One way to do this is to find a camp stove and use a large
stainless steel pot to heat the solution in. The cleaning solution throughout the system will
heat as it circulates in and out of the pot. An alternative is to heat the one or two gallons of
initial water to 120° on the main stove before mixing in the cleaner and circulating it into the
system. Periodically stop and reheat the solution.
.

19
Suggested Spares
Short term use, weekends etc.
We suggest a basic cruise kit A. This kit consists of six 5 micron filters, and 2 Storage-1
chemicals.
Use for 2 to 6 months at a time.
Two basic cruise kits, one replacement feed pump head.
Longer than 6 months
Additional filters, Offshore Cruising Kit consisting of hydraulic intensifier seals, O-rings,
tools and membrane cleaning chemicals. One replacement strainer.
Versa Sea Pak parts list:
Storage-1 CHEMICAL KIT-CHEM-STORAGE-1
Storage-2 CLEANER KIT-CHEM-STORAGE-2
Storage-3 CLEANER KIT-CHEM-STORAGE-3
BASIC CRUISE A KIT-BCK-A
5 MIC FILTER FT-FTC-5
CHARCOAL FILTER FT-FTC-CC
FEED PUMP HEAD PL-PMP-SFPH
FILTER HOUSING O-RING SO-FHS-10H
OFF SHORE KIT KIT-OFFSH
20” MEMBRANE FT-MB-20
SUCTION STRAINER KIT-AQ-ATNASSEM
Part Number

20
Troubleshooting Versa Sea Pak 200
Symptom Cause Remedy
Feed pump runs but no pressure Feed pump air locked
Pressure relief valve open
Open pressure relief valve to bleed
the air then close to start
Close valve
Feed pump starts but shuts down on
high pressure
Prefilter excessively clogged
Closed valve or blockage in flow
Change filter
Check flow path for closed valve or
kink in hose
Low water production
High amperage
High feed pressure
Strainer or prefilter clogged Service prefilter and strainer
Low water production,
Low pressure
Pressure relief valve partially open
Worn pump head
Close valve
Check flow should be 1.4 GPM
Replace pump head.
Water production normal
High feed pressure high amperage
Cold seawater temperature
Fouled membrane
Normal condition
Clean membrane
Water production normal
Lower pressure
Lower amperage
Warm sea water or brackish water. Normal condition
Asymmetrical pressure and flow
readings between pump shifts
Check valve leaking
Failed annular ring
Shaft seal leaking
Contact dealer or see the hydraulic
intensifier repair manual.
Table of contents
Other DARLEY Water Filtration System manuals
Popular Water Filtration System manuals by other brands

Metro Modular
Metro Modular Steel Falcon VCF Sidewinder Edition Instructions and operating manual

Davey
Davey ChloroMatic MCS16C Installation & operating instructions

Streamline
Streamline Filterplus 600GPD-F instruction manual

Bio-Logic
Bio-Logic PURE WATER PACK BIO 1.5 PWP owner's manual

MPFiltri
MPFiltri UFM181 user manual

Bio-Tek
Bio-Tek Biolux HOS Series owner's manual

Pro-Aqua
Pro-Aqua PRO-WELL-1E installation guide

Alfalaval
Alfalaval MOPX 205 TGT-24 manual

ThePondguy
ThePondguy clearspring mini 110572 instruction manual

Pureit
Pureit Advanced Plus RO+MF+MP instruction manual

Alfalaval
Alfalaval ALF-R Installation, Operating & Safety Manual

Pure-Pro
Pure-Pro AlphaAqua RO105 user manual