Dashmate DSH-592IR User manual


1
CONTENTS
1.0 CAUTION .................................................................................. 3
2.0 BATTERY WARNING ............................................................... 3
3.0 SD CARD WARNING ............................................................... 4
3.1 Product Information .........................................................5
4.0 INTRODUCTION ...................................................................... 5
4.1 Package Contents.............................................................6
4.2 Product Overview..............................................................7
5.0 BUTTON FUNCTIONS AND INDICATORS............................8
6.0 GETTING STARTED.................................................................9
6.1 Inserting A Micro SD Card...............................................9
6.2 Removing A Micro SD Card.............................................9
6.3 Installing The DSH-592IR.................................................9
7.0 CONNECTING TO POWER................................................... 10
8.0 LED INDICATOR ..................................................................... 11
9.0 POWERING THE DSH592IR ONOFF................................. 11
9.1 Auto Power ON/OFF.......................................................11
9.2 Manual Power ON............................................................11
9.3 Manual Power OFF ..........................................................11
9.4 Reset The Car DVR...........................................................11
10.0 INITIAL SETTINGS..................................................................12
10.1 Formatting a Micro SD Card........................................ 12
10.2 Setting The Time And Date........................................... 12
11.0 INTERFACE .............................................................................13
11.1 Video Mode ....................................................................... 13
11.2 Video Menu ....................................................................... 14
11.3 Setup Menu ...................................................................... 17
11.4 Photo Mode ...................................................................... 19

2
12.0 GPS..........................................................................................20
13.0 VIDEOPHOTO PLAYBACK...................................................21
14.0 SOFTWARE PLAYBACK ....................................................... 22
15.0 INSTALLING APP ON SMART PHONE................................ 22
16.0 WARRANTY TERMS & CONDITIONS ................................. 23
17.0 NOTES ....................................................................................24

3
1.0 CAUTION
• Ensure you are using your Dash Camera within your
countries’ road laws. Please make sure you are familiar
with your local road legislation before use.
• Please set time and date before you use this device
to record.
• The notiications given by the Dash Camera are
suggestions only, please drive to the actual conditions.
• The system is to be used only for non-commercial use,
within the limits permitted by the relevant laws
• The results of GPS positioning are only for reference.
The Car Dash Cam will lose GPS positioning abilities
when signal is blocked (e.g. driving through tunnels,
enclosed car parks).
• GPS positioning accuracy may vary depending on
weather and surroundings such as dense cities,
tunnels, or forests. GPS satellite signals cannot pass
through most solid materials. Tinted windows may
also affect the GPS signal.
• The values displayed in this system, such as speed,
position, and the distance warning, may be affected
by the surrounding environment.
• Avoid using the Dash Camera in the vicinity of any
devices that emit radio interference (eg. Microwave
Ovens).
• It is considered normal operation for the Dash Camera
to get warm during use.
2.0 BATTERY WARNING
• Always charge the Dash Camera using the provided
charger. Improper charging of the Dash Camera may
result in failure of the internal battery.
• Never dismantle the Dash Camera or expose the
internal battery.
• Do not dispose of the Dash Camera in ire.
• Dispose of the Dash Camera observing local
regulations being mindful of the internal battery.


5
3.1 PRODUCT INFORMATION
For latest manual and product updates please visit our
website at www.dashmate.com.au
4.0 INTRODUCTION
Thank you for purchasing a Dashmate Dash Cam. Please
read through instructions before attempting to install or
use this product.
This User guide is designed to assist with the day to day
operation of the DSH-592IR.
Before attempting to use or install your Dashmate
DSH-592IR, please ensure you have read and understood
all of the safety notes below.
• Do not expose your DSH-592IR to liquids, excessive
dusty conditions or temperatures exceeding 60°C.
• Only use the included cables to power and charge the
DSH-592IR.
• Please do not attempt to adjust the DSH-592IR
position or settings whilst you are operating your
vehicle.
• Please clean the windshield thoroughly removing all
dust and dirt particles before ixing the adhesive
mount.
• Since the mount sticks onto the windshield using a
3M adhesive, please ensure that the position of the
camera is best located to capture the maximum
viewing area.
• We suggest you to power-on the dash camera and
test the playback image on screen irst prior to
removing the 3M tape for installation.
• Only remove the 3M tape when you are satisied with
the dash camera placement and image position are
delivering the best possible image and view of the
road ahead.
• Ensure you are using your DSH-592IR within your
countries’ road laws. Please make sure you are familiar
with your local road legislation before use.

6
4.1 PACKAGE CONTENTS
1 x DSH-592
IR Dash Camera
2 x 3M Adhesive Plates
2 x Electrostatic ilms 1 x 12/24V Power Cable
1 x External GPS 5 x Cable Clamps
1 x User Manual

8
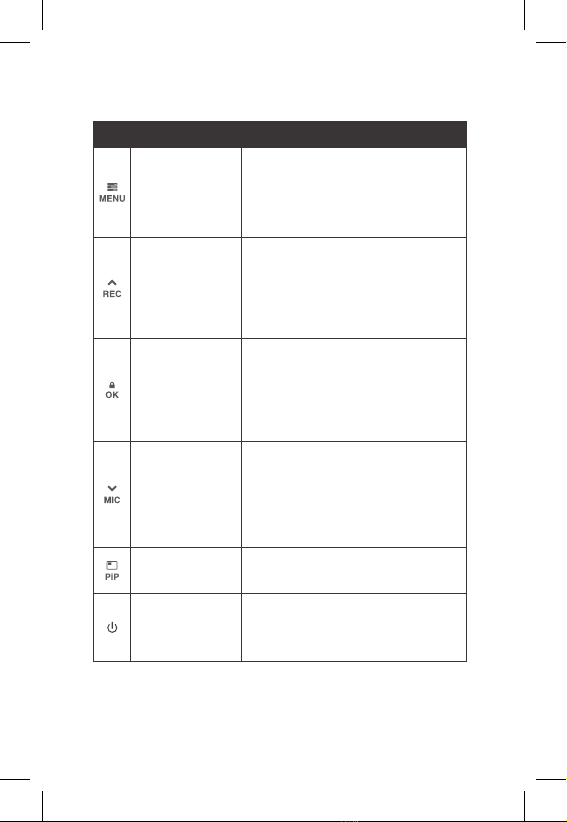
5.0 BUTTON FUNCTIONS AND INDICATORS
No. Key Instruction
Menu / Mode
Button
Press to open the Video Mode
Settings, Press again to open
General Settings Menu.
Press and hold to switch between
Record, Photo and Playback mode.
Up Button
In the Settings menu use the Up
Button to toggle between the
settings.
Press to Start/Stop Recording.
Long Press to Switch ON/OFF built
in WIFI.
Lock Recording
Button
When DVR is recording, Press OK
Button to lock the current ile.
Locked ile won't be over recorded
during loop recording. In Setting
Menu press the OK button to
conirm settings.
Down Button
In Settings menu use the down key
to toggle between the settings.
In Video Mode Short Press to Zoom
out.
When DVR is recording, short press
to turn inbuilt Microphone ON/OFF.
PiP Mode Press PIP button to interchange the
camera displays on screen .
ON / OFF
Power Button
Press and hold the Power Button to
Power OFF the Device. Press once
to switch LCD Screen OFF however
DVR will continue recording.


14
14. G-Sensor: The highlighted bar indicated the sensitivity
of G-Sensor with 1 Bar indicates Low Sensitivity
15. EV: Shows Exposure set level
16. Motion Detection: Shows Motion Sensor is ON or OFF
17. WDR On
11.2 VIDEO MENU
To enter the Video Menu
1. Press the OK Button to STOP Recording
2. Press the Menu Button
3. Press UP and DOWN key to navigate and press OK to
enter into selected setting
Menu Select Settings Description
Resolution FHD P30 +
FHD P30
HDP60 +
HDP60
Higher resolution gives
your footage more detail
but uses more storage
space.
Lower resolution saves
storage space.
Default: FHDP30+FHDP30
Loop
Recording
OFF / 1, 3
Minutes
Loop Recording deines
the length of time the
DSH-592IR records before
creating a new ile. Using
the off setting will record
the longest possible loops
under the ile size of 1 GB
(around 5 minutes).
Default: 3 Mins

15
VIDEO MENU CONT'
Menu Select Settings Description
Exposure -2.0/-1.7/-1.3/-
1.0/-0.7/-0.3
/0.0/
+0.3/+0.7/+1.0/
+1.3/+1.7/+2.0
Exposure compensation
allows you to adjust
and control the level of
exposure, when in driving
in low light, the exposure
value (such as + 1EV, +
2EV) can be increased to
highlight the clarity of the
picture.
Default: 0.0
Motion
Detection
ON/OFF DVR will stop recording if it
doesn’t detect any motion
and will immediately start
recording if it detects
motion.
Default: Off
Microphone ON/OFF Turning this setting
off mutes the built in
microphone.
Default: On
Date
Stamp
ON/OFF Turning this setting off will
lead to no date stamp on
the recorded video.
Default: On
GPS Stamp Speed OFF/
Speed ON
Turning this setting off will
lead to no speed stamp on
the recorded video.
Default: On

16
VIDEO MENU CONT'
Menu Select Settings Description
G Sensor OFF/High/
Medium/Low
To adjust the sensitivity of
the G-sensor.
High is the highest
sensitivity and low is the
lowest.
Default: Low
License
Plate
Input License
Plate
Input your car number
plate and it will be
watermarked on the
recorded footage.
Up and Down Keys to
change input. M Key to
select next. OK Key to exit.
Infrared
light
OFF / ON /
Auto
OFF: Will disable IR, in
cabin recording will be dark
in low light conditions.
ON: IR will be permanently
ON, recording will always
be in Black and White i.e
without colour.
Auto: IR will only switch on
when camera detects low
light conditions. Recording
in day light or light
conditions will have some
false colour.
Default: ON
Applies only for in cabin
camera.

17
11.3 SETUP MENU
To enter the Setup Menu
1. Press the OK Button to STOP Recording
2. Press the MENU Button twice
3. Press UP and DOWN key to navigate and press OK to
enter into selected settings
Menu Select Settings Description
WIFI ON/OFF To Switch ON/OFF WIFI.
Default: On
Date/ Time Set Date and
Time
Using the UP/DOWN and
MENU buttons to enter
the date and time (24hr
clock) to stamp onto
your footage. Once you
have inished use the OK
button to save and return
to the Settings Menu.
Keypad
Tone
ON/OFF Mutes keypad button
beeps.
Default: On
Language Select language Select menu language.
Default: English
Auto LCD
Off
OFF/1/3/5
Minutes
Auto Screen Saver setting
determines the amount
of time before the display
screen turns off.
(DSH-592IR will keep on
recording even the display
is off).
Default: 1 Min

18
SETUP MENU CONT'
Menu Select Settings Description
Speed Unit KMH
MPH
To adjust the speed unit
in DVR.
Default : KM/H
Flicker 50Hz / 60 Hz Screen Hz setting.
Default: 50 Hz
Storage Displays the
storage space
on SD card in
different default
folders.
Displays the storage
space on SD card.
Format Cancel/OK Format the inserted
Micro SD Card, deleting
all photos, videos and
data.
Default
Setting
Cancel/OK Restore factory settings.
Version Displays the
installed
irmware version
Displays the installed
irmware version.
Table of contents
Other Dashmate Dashcam manuals


