Dashmate DSH-410 User manual

HD Dash Camera
With 2.4” LCD Screen
DSH-410 | USER MANUAL
TECHNOLOGY DRIVEN™
720p
Resolution
120° Field
of View
Motion
Detection
Auto
Record

3
2

3
2
CONTENTS
CAUTION������������������������������������������������������������������������������� 5
BATTERY WARNING ������������������������������������������������������������ 5
NOTES AND INSTALLATION ���������������������������������������������� 6
NOTE�������������������������������������������������������������������������������������� 6
PRODUCT INFORMATION ��������������������������������������������������8
INTRODUCTION �������������������������������������������������������������������8
FEATURES�����������������������������������������������������������������������������8
PACKAGE CONTENTS���������������������������������������������������������8
PRODUCT DIAGRAM����������������������������������������������������������� 9
GENERAL ���������������������������������������������������������������������������� 10
INSTALLATION������������������������������������������������������������������� 10
OPERATION ������������������������������������������������������������������������� 11
COMPUTER CONNECTION �����������������������������������������������12
INTERFACE ��������������������������������������������������������������������������12
SET TIME AND DATE ����������������������������������������������������������13
SET LOOP RECORDING �����������������������������������������������������14
SET G-SENSOR �������������������������������������������������������������������15
SET MOTION DETECTION �������������������������������������������������16
VIDEO �����������������������������������������������������������������������������������17

5
4
VIDEO MENU���������������������������������������������������������������������� 18
STILL������������������������������������������������������������������������������������20
PLAYBACK MENU�������������������������������������������������������������� 23
SETTINGS MENU ��������������������������������������������������������������� 24
SETTINGS MENU CONTINUED���������������������������������������� 25
SPECIFICATIONS��������������������������������������������������������������� 26
WARRANTY TERMS & CONDITIONS ������������������������������ 27

5
4
CAUTION
• Ensure you are using your Dash Cam within your
countries’ road laws. Please make sure you are familiar
with your local road legislation before use.
• Please set time and date before you use this device
to record.
• The notiications given by the Dash Cam are
suggestions only, please drive to the actual conditions.
• The system is to be used only for non-commercial use,
within the limits permitted by the relevant laws.
• Avoid using the Dash Cam near any devices that emit
radio interference (e.g. Microwave Ovens).
• It is considered normal operation for the Dash Cam to
get warm during use.
BATTERY WARNING
• Always charge the Dash Cam using the provided
charger. Improper charging of the Dash Cam may
result in failure of the internal battery.
• Never dismantle the Dash Cam or expose the internal
battery.
• Do not dispose of the Dash Cam in ire.
• Dispose of the Dash Cam observing local regulations
being mindful of the internal battery.

7
6
• Do not attempt to replace or expose the internal
battery.
NOTES AND INSTALLATION
• It is advised that the Dash Cam is installed near the
rear view mirror, at the top centre of the windshield for
optimal operation.
• Make sure that the lens is within the range of the
windscreen wiper to ensure a clear view when it rains.
• Do not touch the lens with your ingers. Finger prints
left on the lens will result in unclear videos or photos.
If photos or videos are blurred, please clean the lens
gently with a microibre cloth.
• Only use the included charging cable to power the
Dash Cam.
• The DSH -410 is designed to be constantly connected
to the included power supply , and is NOT designed to
be used solely with the camera’s built in battery.
NOTE
1. Please abide by the relevant laws in your local area;
please do not use this product for illegal purposes.
2. Please insert your Micro SD memory card before
recording video, taking care to insert it the right way to

7
6
avoid damage.
3. Battery charge will diminish over time. If the dash cam
is not used for a long period of time, please ensure the
dash cam is charged fully before use.
4. Please do not leave the dash cam in an excessively
humid environment as it is not water resistant.
5. Please avoid using the dash cam in an excessively dusty
environment so as to not obstruct the camera lens.
6. This dash cam is a precision electronic product; please
do not expose it to strong shock, vibration, magnetic
ields or heavy current ields.
7. Please do not attempt to disassemble or repair this
product, doing so will void the warranty.
8. Please do not operate and set this product while
driving. If interaction with the product is required,
please do so before driving or stop driving.
9. Please charge the battery fully before irst use.
10.To clean, please use a soft and dry cloth to get rid of
dust. Do not use solvents to clean the product.
PRODUCT INFORMATION
For latest manual and product updates please visit our
website www�dashmate�com�au or www�dashmate�co�nz.

9
8
INTRODUCTION
Thank you for purchasing a DSH-410 Dash Cam. Please
read through instructions before attempting to install or
use this product.
FEATURES
• Recording Full HD 720P footage
• 120° Field Of View
• Motion Detection
• Auto Start Up and Shut Down
PACKAGE CONTENTS
DSH-410
3M Mount
12/24V Power Adaptor
User Guide
9
8
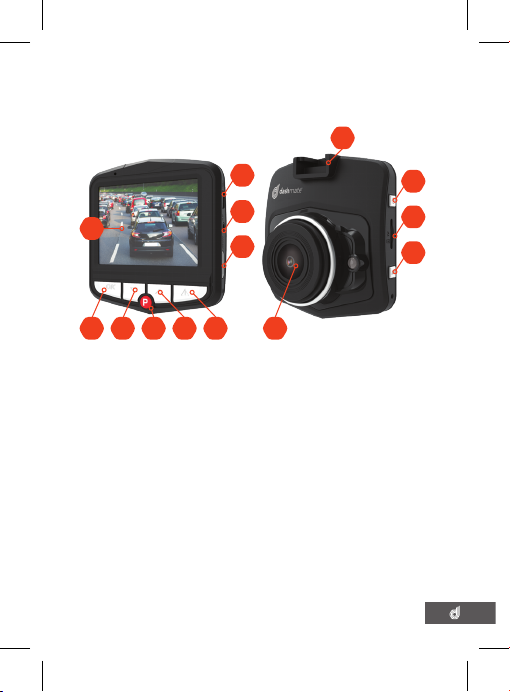
PRODUCT DIAGRAM
1. 2.4” Screen
2. OK Button
3. Down Button
4. Park Mode Button
5. Up Button
6. Menu Button
7. Power in (Mini USB)
8. HDMI Mini
9. Lens
10. Mode Button
11. Micro SD Slot
12. Power Button
13. Mounting Socket
N/A. Not Used
13
12
07
11
10
08
09
01
0402 03 05 06
N/A

11
10
GENERAL
• With the screen of the camera facing towards you
insert your Micro SD Card (not included) into the
Micro SD Card slot on the left side of the camera. The
micro SD card should be inserted with the text facing
towards you
• The Auto On/Off feature will power the DSH-410 up
and begin recording as soon as it receives power from
the USB Mini connection (eg. When you start your car)
INSTALLATION
• Clean the interior of your windscreen ensuring that the
desired point of installation is free of dust and is not
obstructing the drivers’ view.
• Since the mount sticks on the wind shield with 3M
mount, please ensure that the position of the camera
is best located to capture maximum area.
• We suggest you to power-on the dash camera and
test the playback image on screen irst prior to
removing the 3M tape for installation.
• Only remove the 3M tape when you are satisied with
the dash camera placement and image position is
delivering the best possible view of the road ahead.
Table of contents
Other Dashmate Dashcam manuals


