Daum electronic 8008 TRS3 User manual

8008 TRS
3
3
3
User Manual

Table of contents
Please Note
Setting Up
Dashboard
Dashboard windows
Using the Menu and Language Selection
Choosing the User
Stand by - mode
System Settings
Monitoring the Heart Rate
Training
Conconi Test
Coaching
Team Award
The Relaxation function
Transport and storage
Accessories (sold separately)
Specifications
Glossary
What to do, if...?
Warranty conditions
Menu Diagram
Sample Diagrams, supplement to the Individual Program
Assembling
Maintenance
User's data
Device data
Programs
Programs overview
Gear Shift
How to create your own personal programs
Training data
Fitness mark
Description
Test programs
Test protocols
Description
What is Coaching?
Entering Personal Data
Training with the Coaching program
Loading scheme of the Coaching program
1
2
2
3
4
4
5
5
6
7
8
9
15
16
17
17
18
19
20
21
23
23
25
31
33
34
35
35
36
38
39
41
42
44
46
53

1
Read this user manual thoroughly before using the device.
Please follow the recommendations about your health.
You should undergo a general medical examination before you start a training program.
You should interrupt immediately the training session if you fill uncomfortable, dizzy or in any way ill during a
training session.
Always start training with a low load and then increase the load gradually. At the end of the training reduce the
load. After the training you should execute a few stretching and gymnastics exercises to relax your muscles.
II
II
Recommendations about the training location
Install your training device on a level ground. The device may damage wooden floors. We therefore recommend
the installation of a protective underlay on wooden floors. We also recommend not to install the device on white or
light-coloured carpets or mats because they could be stained by the black colour of the device's feet.
We recommend that the training location be properly aerated to provide enough fresh air, but nevertheless avoid draught.
You can use this device in a temperature range from +10 C to +35 C.° °
II
II
Safety notes
Children should only use this device under supervision and they must be provided with a proper explanation of its
operating principles.
This device is not a toy.
Please make sure the device is in working order. You should never train on a defective device.
The device may only be used by one person at a time.
You should wear appropriate clothing and shoes while training.
The device may only be used if all the parts are firmly attached and no part is loose.
You may only execute the repair operations described in this user manual. Other repair and service operations may
only be carried out by qualified specialists.
Do not press the buttons with the fingernails; always use the fingertips to avoid scratching the button.
Avoid wetting the dashboard. If during a training session your dashboard is wetted by sweat you should wipe it with
a soft cloth after training.
The device surface should not come into contact with corrosive or strong chemicals.
The maximum allowable user weight is 120kg.
Daum electronic gmbh provides a 24 months warranty for the device for private use, and a three (3) months warranty
for commercial use.
The warranty is voided in the case of improper utilisation.
II
II
II
II
II
II
II
II
II
II
Please Note
This ergometer is specially designed for health and endurance training. High quality
manufacturing, a user friendly dashboard, ease of use and maintenance all contribute
to make this appliance an ideal training device for sport and fitness purposes. Also note
that the complete equipment and the wide performance range should appeal to sport or
fitness conscious persons of every age group.
8008 TRS
3
3
3

1. Heart rate
2. Dissipated energy and time
3. RPM
4. Speed and distance
5. Load in watt
6. Graphic screen
7. Control button
8. Pulse sensor connector
9. Relax sensor connector
10. Menu key
11. Info key
12. Fitness key
13. Function key
14. Reset key (recessed)
15. PC connector
16. User
17. Memory card reader/writer
18. Slider switch: 1. Card reader operation
2. ErgoWin & Dashboard Update operation
3. Card reader update operation
19. Dashboard cable connection
20. Dashboard battery
6.
5.
2.
16.
1.
17.
4.
3.
9. 8.
7.
10. 11. 12. 13.
menu fitne ss
info
The Dashboard
2
The switch is located
on the rear of the device.
On/Off
Setting Up
When the device is switched ON, the
LCD screen displays a big “d” and the
system plays a start-up melody.
After this the system displays the program
last used. The manual program is
displayed on the first start-up.
watt
18.
15.
14.
19.
20.

Dashboard windows
watt
The heart rate displays the heart rate. When only the upward pointing arrow is
displayed in the middle, then this means that the heart rate is too low to ensure
an effective training. Inversely, when only the downward pointing arrow is
displayed then the heart rate is too high. If the arrow starts blinking then the
load is too high and the user should moderate the training.
Speed and distance window: this window shows the actual speed or the
corresponding distance covered. Pressing the control button switches back
and forth between these two values. See page 5.
The RPM display indicates the velocity in revolutions per minute.
(+ = pedal faster, - = pedal slower)
The watt window shows the load in watt. The displayed watt value will blink to
indicate reaching either the watt load limit of the device or the watt load limit of
the user. It also shows the relax value with relaxation exercises.
You can individually set up which data you whish to view: clock, training time,
speed, distance or dissipated energy (in kJoule). You can switch back and forth
with a second display by pressing the control button. See page 5
The user specifies the user number (1 to 4 or guest 0)
The graphic screen displays the programs. The load (in watt) is shown on the
scale on the left side of the screen. The training time is shown on the lower axis.
In heart rate controlled programs the system displays e.g. 100 beats per minute
at the 200 watt position on the screen scale.
In the height profile programs the time axis indicates the distance in km while
the watt axis indicates the height profile.
Note: the illustrations may be changed without notice!
13
:
08
3
250
0.0
+
0
128
OK
3

Using the Menu and Language Selection
menu
fitne ss
info
4
1. Press the menu key
2. Turn the control button to select “User”
3. Press the control button
4. Turn and press the control button to select a
user from 1 to 4 or Guest.
5. The selected user is then indicated in display
window 16.
6. Press the menu key to return to the start.
watt watt watt watt
watt
Device data
Date
Time
Contrast
RPM-Adaptation
Language
watt
Language
Deutsch
Français
Italiano
Portuguese
English
Choosing the User
The device will store the training data
of four users. It is therefore important
that each user selects his own “number”
when training. Guest data are not stored.
watt
Menu
watt
Menu
watt
Settings
User data
Device data
1. Press the menu key
2. Turn the control button to select “Settings”
3. Press the control button
4. Turn and press the control button to select
“Device Data”.
5. Turn and press the control
button to select “Language”.
6. Turn and press the control button to
select required language.
7. Press the Menu key to
return to your training
program, Press the
function key to return to
“Device Data”
Back
Training
Training data
Settings
Information
User
Training
Training data
Information
User
Settings
Mum
User 1 User 2
Dad Daughter
User 3User 4
Son
The following is an example of a possible user's number attribution scheme in a family:
User
16.
Note: 2 languages are available for each software version
Turn the control button to move up or down in the menu. Press the control button to open the selected option,
e.g. language selection.
Use the Menu key to call and leave the menu. Use the
function key to move back one step in the menu.
Press the info key to display information about the
use of the menu.
If you press the info key during a training (workout) session the system will display actual training and program data.
Back Back
Back
Menu
Back
Training
Training data
Settings
Information
User
Menu
Back
User
Guest
User 1
User 2
User 3
User 4
Training
Training data
Settings
Information
User
Back
User
Guest
User 1
User 2
User 4
User 3
Back

User's data
System Settings
If you want to change the user's data you should always note the
presently selected user. This information will always be shown in
the user window (16). (See Choosing the User p. 4)
You can also enter your own limit values. You would then be informed if one of these
values is exceeded.
Watt
Heart rate
Training time
Distance
Phys. kJoule
You can select here the maximal load (between 25 and 800 watts). If
you choose e.g. 180W the load will not exceed this value, and the watt
display will blink.
When the actual heart rate exceeds the entered limit value the system reduces
automatically the applied load, and an audible alarm sounds. “OFF” means no heart
rate limit active, “Auto” means heart rate corresponding to the age of the user applied.
A signal melody plays when the time limit is exceeded.
A signal melody plays when the distance limit is exceeded.
A signal melody plays when the dissipated kJoule values reaches the limit value.
5
watt
User data
Back
Body data
Limit values
Coaching
Delete
Miscellaneous
watt
watt
Turn and press the control button to enter and store your physical data.
Evaluation
Start point
Enter your birth date
choose M (male) or F (female) to enter your gender.
enter you height in cm.
enter your weight in kg.
enter your body fat content (if known).
Enter your actual performance capacity.
Choose point “One” at which the training with the program starts if you want to start the
program at the point of your choice.
Frequency
Training type
Min. heart rate
Max. heart rate
Max. Perfo-
rmance
Cool down
Start-up
Window 2
Window 4
Watt increase
Watt decrease
enter the number of times you want to train per week.
Choose your target.
The minimum heart rate achieved during the last Coaching performance test.
The maximum heart rate achieved during the last Coaching performance test.
The performance achieved during the last Coaching performance test.
Choose a program to run at the end of a training session (see page 13)
Choose the program that you wish to run after switching the device on.
Choose the data to display in Window 2.
Choose the data to display in Window 4.
Set the watt increase rate (in seconds) for heart rate controlled programs.
Set the watt decrease rate (in seconds) for heart rate controlled programs.
Adapt the fixed heart rate programs to your own heart rate range.
menu
menu
Press the
menu key
Turn to select
“User's data”
Press the
control button
Turn to select
“Settings”
watt
You can also enter and save the Coaching data by turning and pressing the control button.
The delete function will reset all the data of the selected user to the initial state
watt
User
16.
Press the
control button
Birth date
Gender
Height
Weight
Fat content %
Heart rate adapting
User data
Back
Body data
Coaching
Delete
Miscellaneous
Limit values
User data
Back
Body data
Limit values
Delete
Miscellaneous
Coaching
User data
Back
Body data
Limit values
Coaching
Miscellaneous
Delete
User data
Back
Body data
Limit values
Coaching
Delete
ous
Miscellane

6
System Settings
6
Device data
Date entry
1. Turn and press the control button to set the day.
2. Turn and press the control button to set the month.
3. Turn and press the control button to set the year.
(DD/MM/YYYY)
watt
Device data
Date
Time
Contrast
Language
Adjusting the RPM
Back
watt
watt
watt
watt
watt
RPM Adjusting
100.0 %
Back
Setting the time
1. Turn and press the control button to set the hour.
2. Turn and press the control button to set the minute.
3. Turn and press the control button to set the seconds.
(HH:MM:SS)
Contrast
You can choose a value for the contrast for the graphic screen from 10 to 25.
The optimal value lies normally around 16.
Language
Choose the appropriate language:
German, English, French, Italian, Portuguese, Finnish, Danish, Dutch.
Note: Only 2 languages are available for any software edition.
Adjusting the RPM (for the high performance sport domain)
Material wear and deviations of mechanical settings may result in a discrepancy between
the displayed RPM value and real pedalling speed achieved. We have therefore provided
the software with a “RPM adjusting” function, which you can use to check the displayed
RPM values and adjust it if needed.
Pedal at constant speed (e.g. 60 RPM) for 1 minute (the clock in window No. 2 will show
time progress) and count the pedal revolutions (measured value). The following formula
gives the setting value:
Displayed value (Window No. 3)
Measured value x 100%
menu
menu
Press
control button
Set
value
(turn)
= Setting value (%)
Press the
menu key
Turn to select
“Device data”
Press the
control button
Turn to select
“Settings”
Press the
control button
Device data
Date
Contrast
Language
Adjusting the RPM
Time
Back
Device data
Date
Time
Contrast
Adjusting the RPM
Language
Back
Device data
Date
Time
Language
Adjusting the RPM
Contrast
Back
Device data
Date
Time
Contrast
Language
Adjusting the RPM
Back

7
Monitoring the Heart Rate
Please take serious care to watch your heart rate while training and not to exceed the limits.
70
80
90
100
110
120
130
140
150
160
170
180
190
200
20 25 30 35 40 45 50 55 60 65 70
100%
85%
85%
60%
OK
75%
Example
for a person 50 years
old or heart rate limit
of 170
Heart rate 40 to 101
Heart rate 128 to 144
Danger Zone
Heart rate 145 to 169
Alarm Zone
Heart rate above 170
Aerobic Zone
Heart rate 102 to 127
Health
Hazard!
Alarm zone
Danger zone
Aerobic zone
Heart pulse rate
Age
Beep
signal
A very high heart
rate can be very
dangerous!
Training in the aerobic zone will always be healthy and safe. This zone is located
at 60% to 75% of the maximum heart rate or of the heart rate limit.
For beginner: the widely accepted recommendation is to train at
55% to 65% of the maximum heart rate. This zone is very well
suited for weight loss or for returning users after an extended
interruption due to illness.
Heart rate measure using the ear clip
Heart rate measure using the chest band (optional accessory)
Warning! If you have a heart pacemaker you should consult your physician to find out if you can safely use
the chest band transmitter!
Plug the connector on the right side of the dashboard,
attach the clip on the other end of the cable to your ear.
The heart rate window will then display your heart rate
after a short delay.
Apply some water on the inner side of the band to the left and right side of the serration and then fasten it to your
chest firmly to prevent it from sliding off and insuring the electrodes are in direct contact with the skin.
If you have in the room many devices that may interfere with the signals of a wireless heart rate measuring device,
then these devices must be located at a distance of at least 1.5m from the heart rate measuring device.
If more than one wireless heart rate measuring systems are used in the same room then only one of these systems
may be located close to the training device.
Whenever the actual heart rate exceeds that of the alarm zone and the heart rate limit for age / limit heart
rate is set to active (see page 5) the system will give a beep signal and the load will be automatically reduced.
Window displays
Heart pulse rate
Please take serious care to watch your heart rate while training and not to exceed the limits.
OK
Beep
signal
Window displays
Heart pulse rate
OK
Training in the aerobic heart rate zone
“OK” indicates that the user
is training within the aerobic
heart rate zone.
The “ ” indicates training above
the aerobic heart rate zone. If the arrow will
blink to indicate reaching the alarm zone.
The “ ” indicates training under
the aerobic heart rate zone.
You will always achieve your training target optimally if you train in the appropriate
zone, whether your target is the improvement of your fitness level, the reduction of
your body fat content or the development of muscular mass.

watt
Watt
Standard
Cool-down
Capacity test
Manual
Back
Training
8
Programs
Watt
Heart rate
Height profiles:
Special programs:
Personal programs:
controlled programs: the applied load in independent of the speed.
controlled programs: when the heart rate exceeds the set value the load is decreased
and vice versa.
the load is determined according to a predefined landscape profile.
strength and RPM programs.
you can create your own programs.
watt
Programs
Watt
Heart rate
Height profiles
Special
Personal prog.
Back
Standard programs:
Cool-down:
Capacity test:
Manual:
you can choose from 28 programs already stored in the machine.
short programs for cool down after the actual training.
use it to test how long you can go under an increasing load.
you can here increase or decrease the load by turning the control button.
Built-in programs:
Manual heart rate program:
with the built-in programs the heart rate is directly controlled. The set heart rate
varies in the course of the program and thus the corresponding load. If the heart rate increases
above the set value the load drops automatically; if the heart rate drops below the set value the
load increases.
you decide at what heart rate in pulses per minute you want to train,
and the device will adjust the load so that this value is maintained.
watt
Heat rate
Built-in programs
Manual
Back
Watt:
Heart rate programs:
Speed:
you can create your own program for a load independent of the speed.
you can here develop your own program that will individually control your heart
rate during the course of the program.
create a program controlled by the pedalling speed. When your speed drops below the set
value, the load will decrease, when your speed exceeds the set value the load will increase.
watt
Personal prog.
Watt
Heart rate
Speed
Back
Zurück
Height profile programs: These programs are designed to reproduce real routes/competition tracks.
You will pedal uphill and downhill in the same way you would do on an outside road. For instance, you
will find a simulation of all the 21 legs of the Tour de France of 1997.
A gear shift system is active with the height profile programs (1 to 28), which you can control by
turning the control button. When you shift a gear it is shown on the window No 2. With the height
profile programs the horizontal axis in the graphic window shows kilometres instead of minutes.
watt
Strength programs:
Constant RPM programs:
these programs are based on 15 braking levels (1 to 15), and the effort there
is a function of the pedalling speed. The load in watt corresponding to the braking level and speed is
displayed in window No. 5. The load in watt corresponding to the braking level is determined from
the actual speed multiplied by a factor specific to the program and rounded to 5 watt units.
this program was specially developed for racing bikers, as they want to
pedal at their own personal speed regardless of the road condition, ascending or descending.
watt
Special
Strength programs
RPM
Back
menu
menu
Note: Training with the ergo_memo-card1 is described in the user manual on the companion CD.
Choose
(turn)
“Starting point”
press
control button
press
control button
When the starting point setting is set to “ON” (see also p. 5)
you can choose the point at which the training will start with
the built in programs.
Select a starting point
Please
choose
start point
watt watt
display sample display sample
Press the
menu key
Press the
control button
Select
(turn button)
“Training” Press the
control button
Select
(turn button)
“programs”
Programs
Watt
Heart rate
Special
Personal prog.
Height profiles
Back

Programs overview
Training
You will find below a presentation of the available programs.
9
100
200
300
400
010 20 30 40 50 min
1
WATT
100
200
300
400
010 20 30 40 50 min
2
WATT
100
200
300
400
010 20 30 40 50 min
3
WATT
100
200
300
400
010 20 30 40 50 min
4
WATT
100
200
300
400
010 20 30 40 50 min
5
WATT
100
200
300
400
010 20 30 40 50 min
6
WATT
100
200
300
400
010 20 30 40 50 min
7
WATT
100
200
300
400
010 20 30 40 50 min
8
WATT
100
200
300
400
010 20 30 40 50 min
9
WATT
Watt controlled
WATT
WATT
WATT
WATT
Test programs
Standard Programs
32 Min. / max 400 Watt
Program 1
Capacity test 25 Watt / WHO-Standard
Program 0
manual program (Watt)
33 Min. / max. 110 watts
Light load training for women and men
with little training experience
Program 3
Interval training “Low”
35 Min. / max. 160 watts
for women and men
with little training experience
Program 4
Interval training “Medium”
38 Min. / max. 210 watts
for women and men
with a good training experience
Program 5
Interval training “High”
24 Min. / max 400 Watt
for trained users
Program 2
BAL-Standard 50 Watts performance test
19 Min. / max. 115 watts
for untrained women and men
age up to 35 years
Program 6
Pyramid “Low”
43 Min. / max. 175 watts
for trained users
Program 7
Pyramid “Medium”
45 Min. / max. 225 watts
for trained users
Program 8
Pyramid “High”
23 Min. / max. 180 watts
for trained users
Program 9
The Alps

Training
10
100
200
300
400
010 20 30 40 50 min
11
WATT
100
200
300
400
010 20 30 40 50 min
12
WATT
100
200
300
400
010 20 30 40 50 min
13
WATT
100
200
300
400
010 20 30 40 50 min
14
WATT
100
200
300
400
010 20 30 40 50 min
15
WATT
100
200
300
400
010 20 30 40 50 min
17
WATT
100
200
300
400
010 20 30 40 50 min
16
WATT
100
200
300
400
010 20 30 40 50 min
18
100
200
300
400
010 20 30 40 50 min
10
WATT
30 Min. / max. 270 watts
for trained users
Program 10
Matterhorn
40 Min. / max. 300 watts
for trained users
Program 11
Mount Everest
25 Min. / max. 110 watts
for untrained women
up to 40 years of age
Program 12
Active Profi Lady
22 Min. / max. 90 watts
for untrained women
up to 60 years of age
Program 13
Active Sport Lady
18 Min. / max. 125 watts
For young users up to 14 years of age
Program 14
Beginners Training 1
23 Min. / max. 130 watts
for untrained men up to 70 years of age
Program 15
Beginners Training 2
34 Min. / max 125 watts
for trained women up to 30 years of age
Program 16
Body Watching 1
20 Min. / max. 100 watts
suitable for squeezing a training
session between two appointments.
Program 18
Short 1
53 Min. / max 100 watts
for trained women up to 50 years of age
The duration of this training of almost one hour
requires strong will and will make you sweat!
Program 17
Body Watching 2

30 Min. / max. 180 watts
for trained users, who want
to check out their performance.
Program 19
Short 2
Training
134 min. / max. 420 watts
Program 24
Medium speed training
134 min. / max. 360 watts
Program 23
Easy speed training
134 min. / max. 500 watts
Program 25
Heavy speed training
200
400
600
020 40 60 80 100 120 140min
23
WATT
200
400
600
020 40 60 80 100 120 140min
24
WATT
200
400
600
020 40 60 80 100 120 140min
25
WATT
80 min. / max. 450 watts
Program 26
Easy endurance load I
80 min. / max. 500 watts
Program 27
Medium endurance load II
80 min. / max. 550 watts
Program 28
Heavy endurance load III
200
400
600
020 40 60 80 100 120 140min
27
WATT
200
400
600
020 40 60 80 100 120 140min
26
WATT
200
400
600
020 40 60 80 100 120 140min
28
WATT
100
200
300
400
010 20 30 40 50 min
19
11
endurance programs
Demanding training for performance sport activity
This excursion is suited to improve your endurance,
to train for strength and endurance strength and to improve
your tolerance to lactic acid.
Program 20
Easy excursion, 70 min up to 400 watts
Very demanding training for high performance sport
Excursion with high loads with continually varying loading up
to 500 watts. The loading conditions correspond to what is
encountered in competitions (either road or mountain circuits)
Program 21
Medium excursion, 84 min up to 500 watts
Very demanding training for high performance sport
This program has extreme loading conditions. Please do not
develop any exaggerated ambitions and do not overwork!
Program 22
Heavy excursion, 100 min up to 600 watts
200
400
600
020 40 60 80 100 120 140min
20
WATT
200
400
600
020 40 60 80 100 120 140min
21
WATT
200
400
600
020 40 60 80 100 120 140min
22
WATT
Speed training

12
Program 31
long basic endurance prog.
(low heart rate level)
60 Min. / max. 140 pulses / min.
Endurance training for women and men with training
experience
50
100
150
200
010 20 30 40 50 60 70 min
31
PULS
Program 32
Basic endurance program with peak loads
50 Min. / max. 160 pulses / min.
Demanding endurance training for women and men with
training experience
50
100
150
200
010 20 30 40 50 60 70 min
32
PULS
Program 36
Step test with 10 min load duration
60 Min. / max. 150 pulses / min.
Load test for the leisure and sport zone
50
100
150
200
010 20 30 40 50 60 70 min
36
PULS
Program 37
Senior I, low heart pulse rate
25 Min. / max. 120 pulses / min.
This program is suited for pulse rate characteristics of
senior users
50
100
150
200
010 20 30 40 50 60 70 min
37
PULS
Program 38
Senior II, low heart rate
40 Min. / max. 130 pulses / min.
Demanding endurance training in the lower heart rate zone
for active senior users
50
100
150
200
010 20 30 40 50 60 70 min
38
PULS
Training
Program 34
Interval program
(average load level)
60 Min. / max. 160 pulses / min.
Interval training in the basic zone for women and men with
little training experience
50
100
150
200
010 20 30 40 50 60 70 min
34
PULS
Program 35
Interval program
(average load level)
70 Min. / max. 170 pulses / min.
very demanding interval training in the higher heart pulse
rate zone
50
100
150
200
010 20 30 40 50 60 70 min
35
PULS
50
100
150
200
010 20 30 40 50 60 70 min
33 Program 33
Interval program basic endurance
35 Min. / max. 140 pulses / min.
Endurance training for women and men with little training
experience
PULS
50
100
150
200
010 20 30 40 50 60 70 min
29
PULS Program 29
preventive, easy short program
20 Min. / max. 130 pulses / min.
light load training for women and men
with little training experience
50
100
150
200
010 20 30 40 50 60 70 min
30
PULS Program 30
Average Optimal Program
30 Min. / max. 130 pulses / min.
light loading training for women and men
with little training experience
Heart rate programs

HMreal = realistic height in meters
Program 40
Roth international circuit
Total distance of 180 km / HMreal 350 to 570 meters
Demanding biking circuit characterised by a particularly variable profile.
Program 39
Hawaii international circuit
Total distance of 180 km / HMreal 0 to 1500 meters
World championship and first Ironman biking circuit
300
600
900
1200
1500
04020 60 80 100 120 140 160 180
39
HMreal
Distanz
200
400
600
04020 60 80 100 120 140 160 180
40
HMreal
Distanz
Program 41
Lanzarote international circuit
Total distance of 180 km / HMreal 20 to 580 meters
Most demanding circuit of the Ironman international series
200
400
600
04020 60 80 100 120 140 160 180
41
HMreal
Distanz
Course run time (benchmark)
Dr. Rainer Müller = 4 hours & 24 minutes
Training
200
300
400
100
040 80 120 160 200 240 280
2.
HMreal Tour de France Etappe
Distanz
200
300
400
100
040 80 120 160 200 240 280
3.
HMreal Tour de France Etappe
Distanz
Tour de France 97 Legs 1 to 4
13
50
100
150
0105 15 20 25 min
42
50
100
150
0105 15 20 25 min
43
50
100
150
0105 15 20 25 min
44
Cool-Down Programs are the perfect way to end a training.
Program 42
Easy cool-down
10 Min. / max. 100 watts
For women and men with little training experience
and following a very light training load
Program 43
Medium cool-down
15 Min. / max. 100 watts
For women and men with training experience and
following an medium to heavy training load
Program 44
Heavy cool-down
20 Min. / max. 150 watts
For athletes with high performance training. The program allows
an accelerated regeneration after the most heavy training loads.
WATT
WATT
WATT
200
300
400
100
0
40 80 120 160 200 240 280
1.
HMreal
Tour de France Etappe
Distanz
Height profile programs
200
300
400
100
040 80 120 160 200 240 280
4.
HMreal Tour de France Etappe
Distanz
(programs no. 52 to 55)
52 53
54 55
Program 45 Conconi 1 and program 46 Conconi 2 (see figure page 19),
Program 47 Cardio program
Program 48 RPM program
Program 50 strength program

Training
14
200
300
400
100
040 80 120 160 200 240 280
21.
HMreal Tour de France Etappe
Distanz
200
300
400
100
040 80 120 160 200 240 280
20.
HMreal Tour de France Etappe
Distanz
1000
1500
2500
2000
500
040 80 120 160 200 240 280
16.
HMreal Tour de France Etappe
Distanz
200
300
400
100
040 80 120 160 200 240 280
19.
HMreal Tour de France Etappe
Distanz
1000
1500
2500
2000
500
040 80 120 160 200 240 280
15.
HMreal Tour de France Etappe
Distanz
1000
1500
2500
2000
500
040 80 120 160 200 240 280
18.
HMreal Tour de France Etappe
Distanz
1000
1500
2500
2000
500
040 80 120 160 200 240 280
14.
HMreal Tour de France Etappe
Distanz
1000
1500
2500
2000
500
040 80 120 160 200 240 280
17.
HMreal Tour de France Etappe
Distanz
1000
1500
2500
2000
500
040 80 120 160 200 240 280
13.
HMreal Tour de France Etappe
Distanz
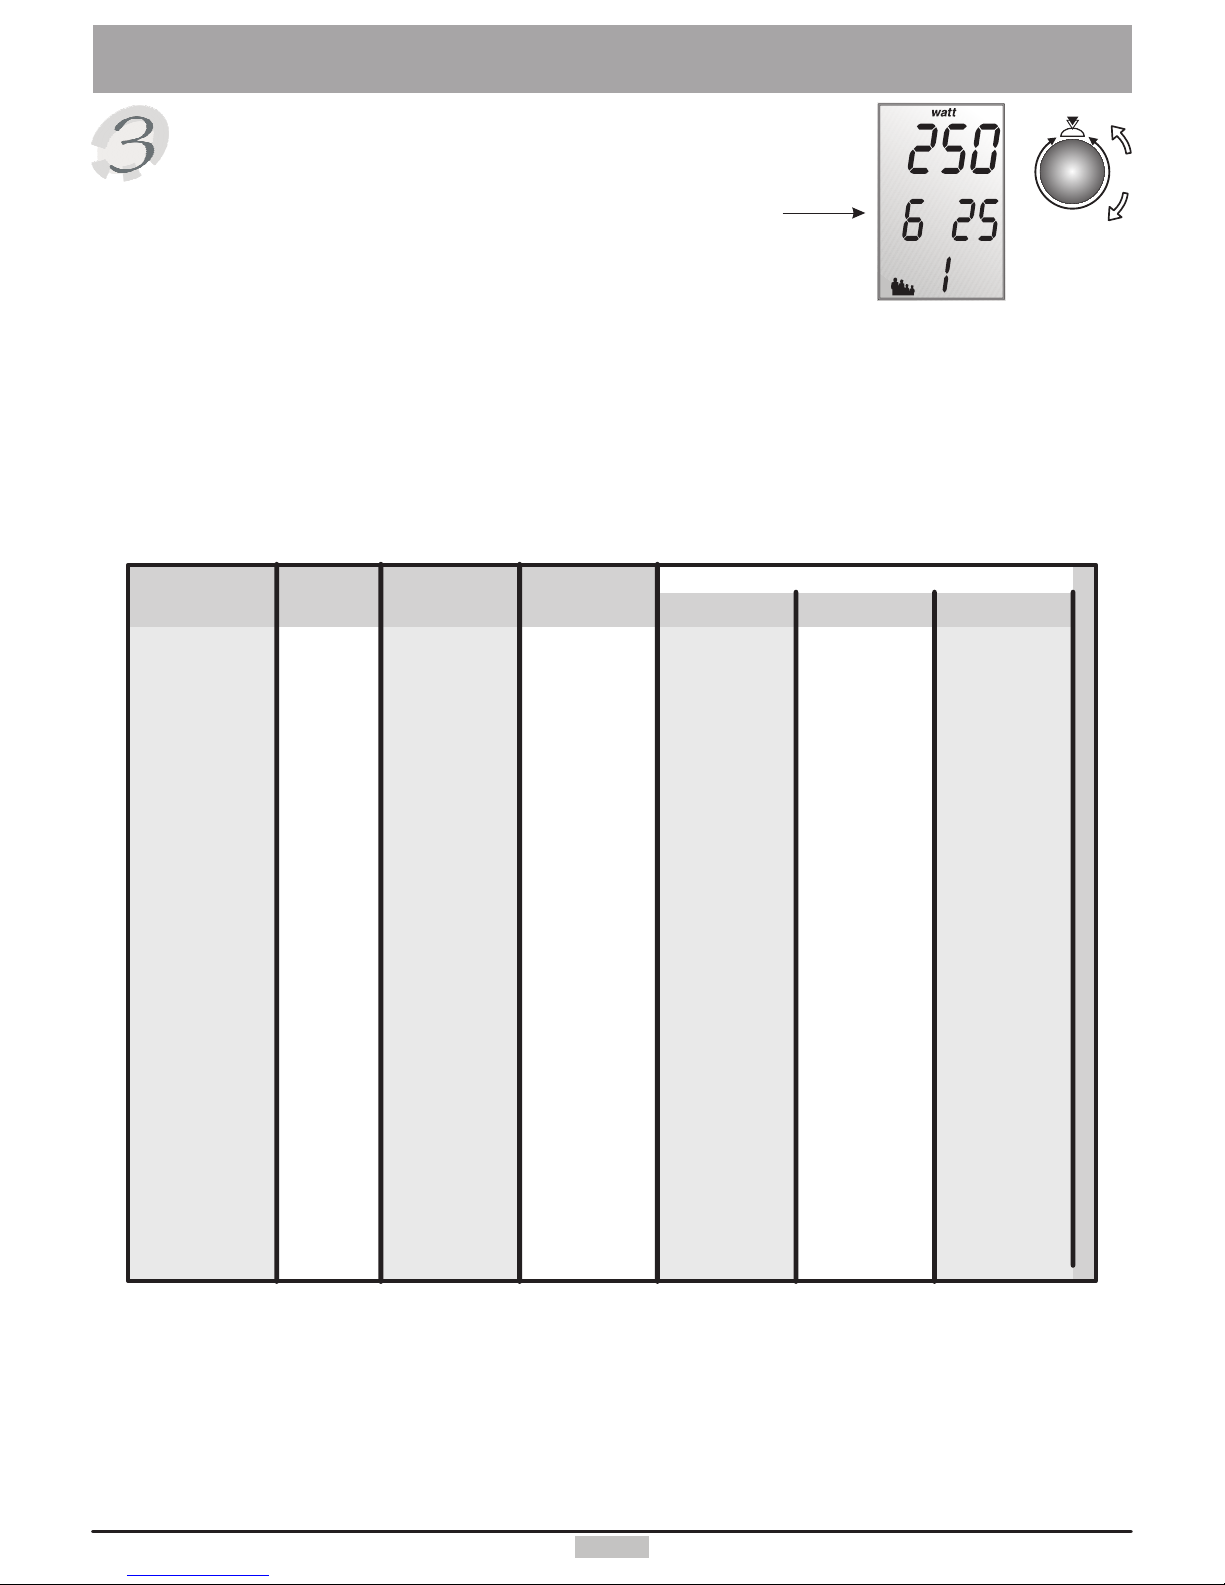
Do not exceed your personal load limits! The loading requirements
correspond to competition conditions and should be considered as
absolute maximum training values. The load in watt can be manually
reduced, by mean of the gear shift, to a value suited to the user's
individual capacity whenever the load or effort gets too intense. Liquids
intake in sufficient quantities while training is absolutely necessary. The
training must immediately be interrupted in case of overload, discomfort
or pain! When in doubt, you should consult a physician.
1000
1500
2500
2000
500
040 80 120 160 200 240 280
9.
HMreal Tour de France Etappe
Distanz
200
300
400
100
040 80 120 160 200 240 280
5.
HMreal Tour de France Etappe
Distanz
1000
1500
2500
2000
500
040 80 120 160 200 240 280
10.
HMreal Tour de France Etappe
Distanz
200
300
400
100
040 80 120 160 200 240 280
6.
HMreal Tour de France Etappe
Distanz
200
300
400
100
040 80 120 160 200 240 280
8.
HMreal Tour de France Etappe
Distanz
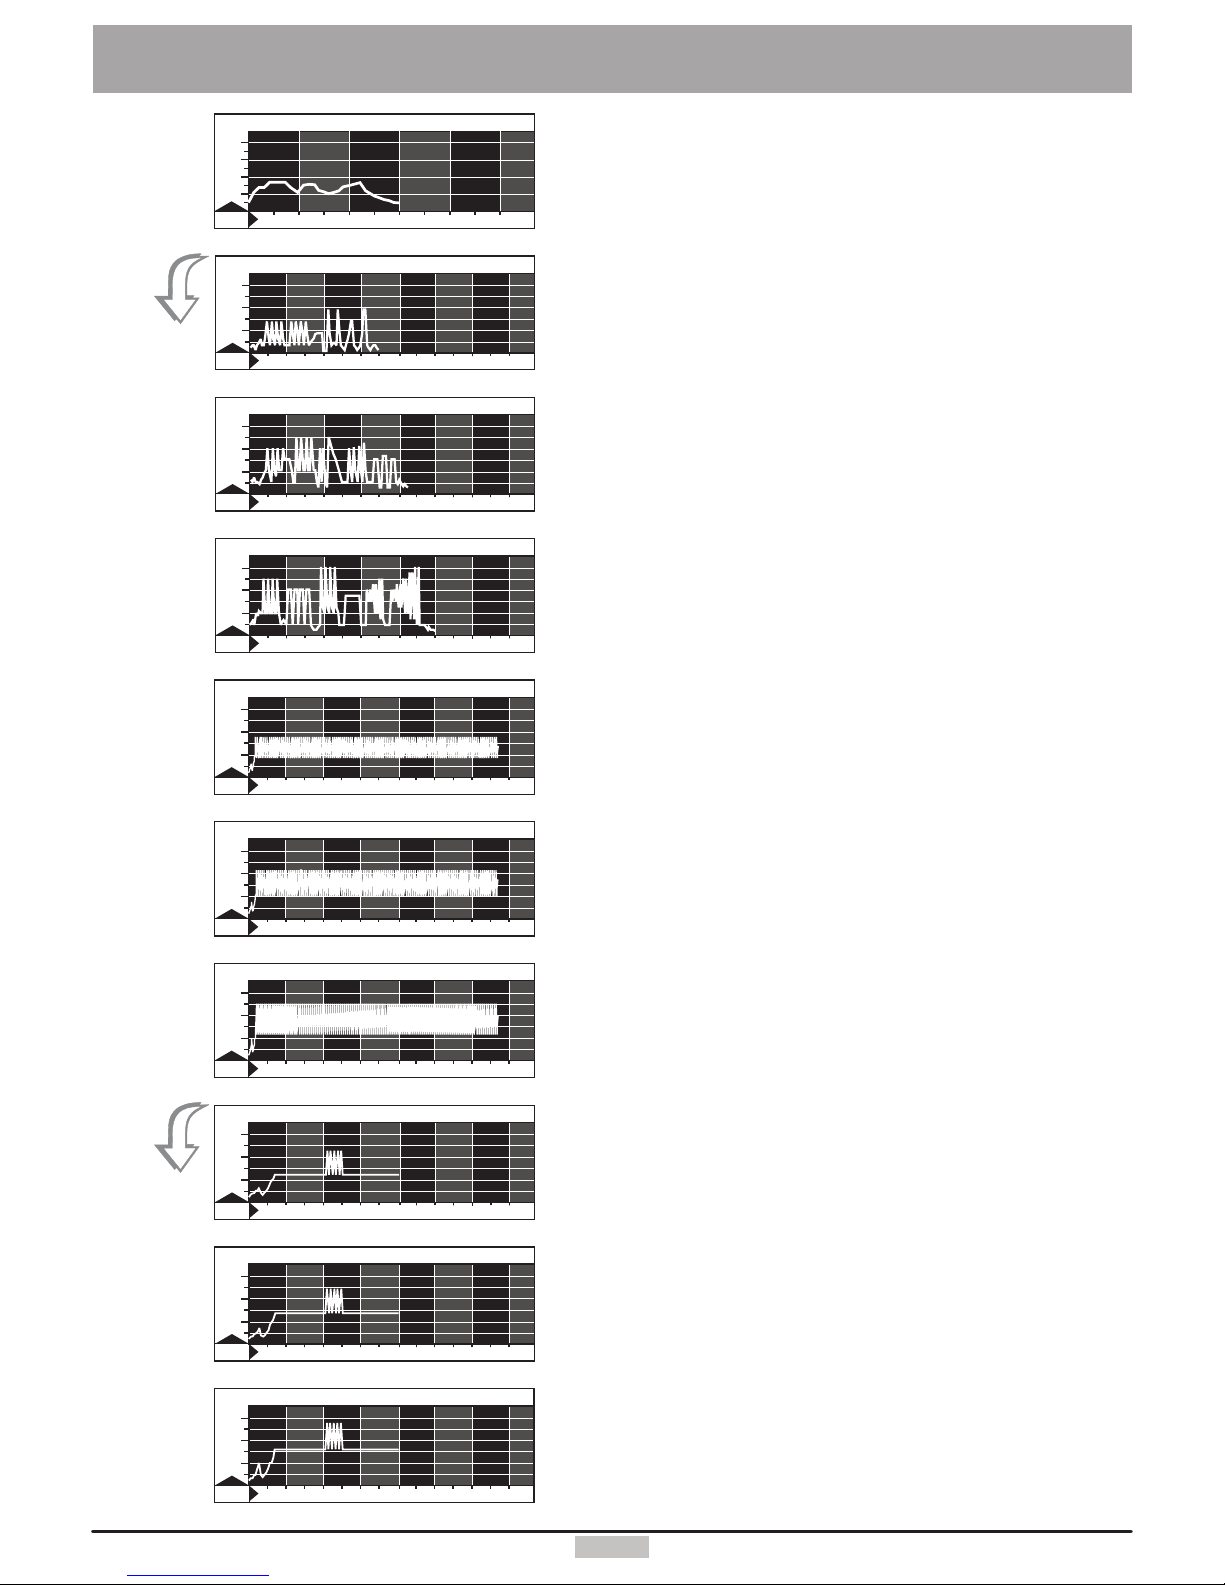
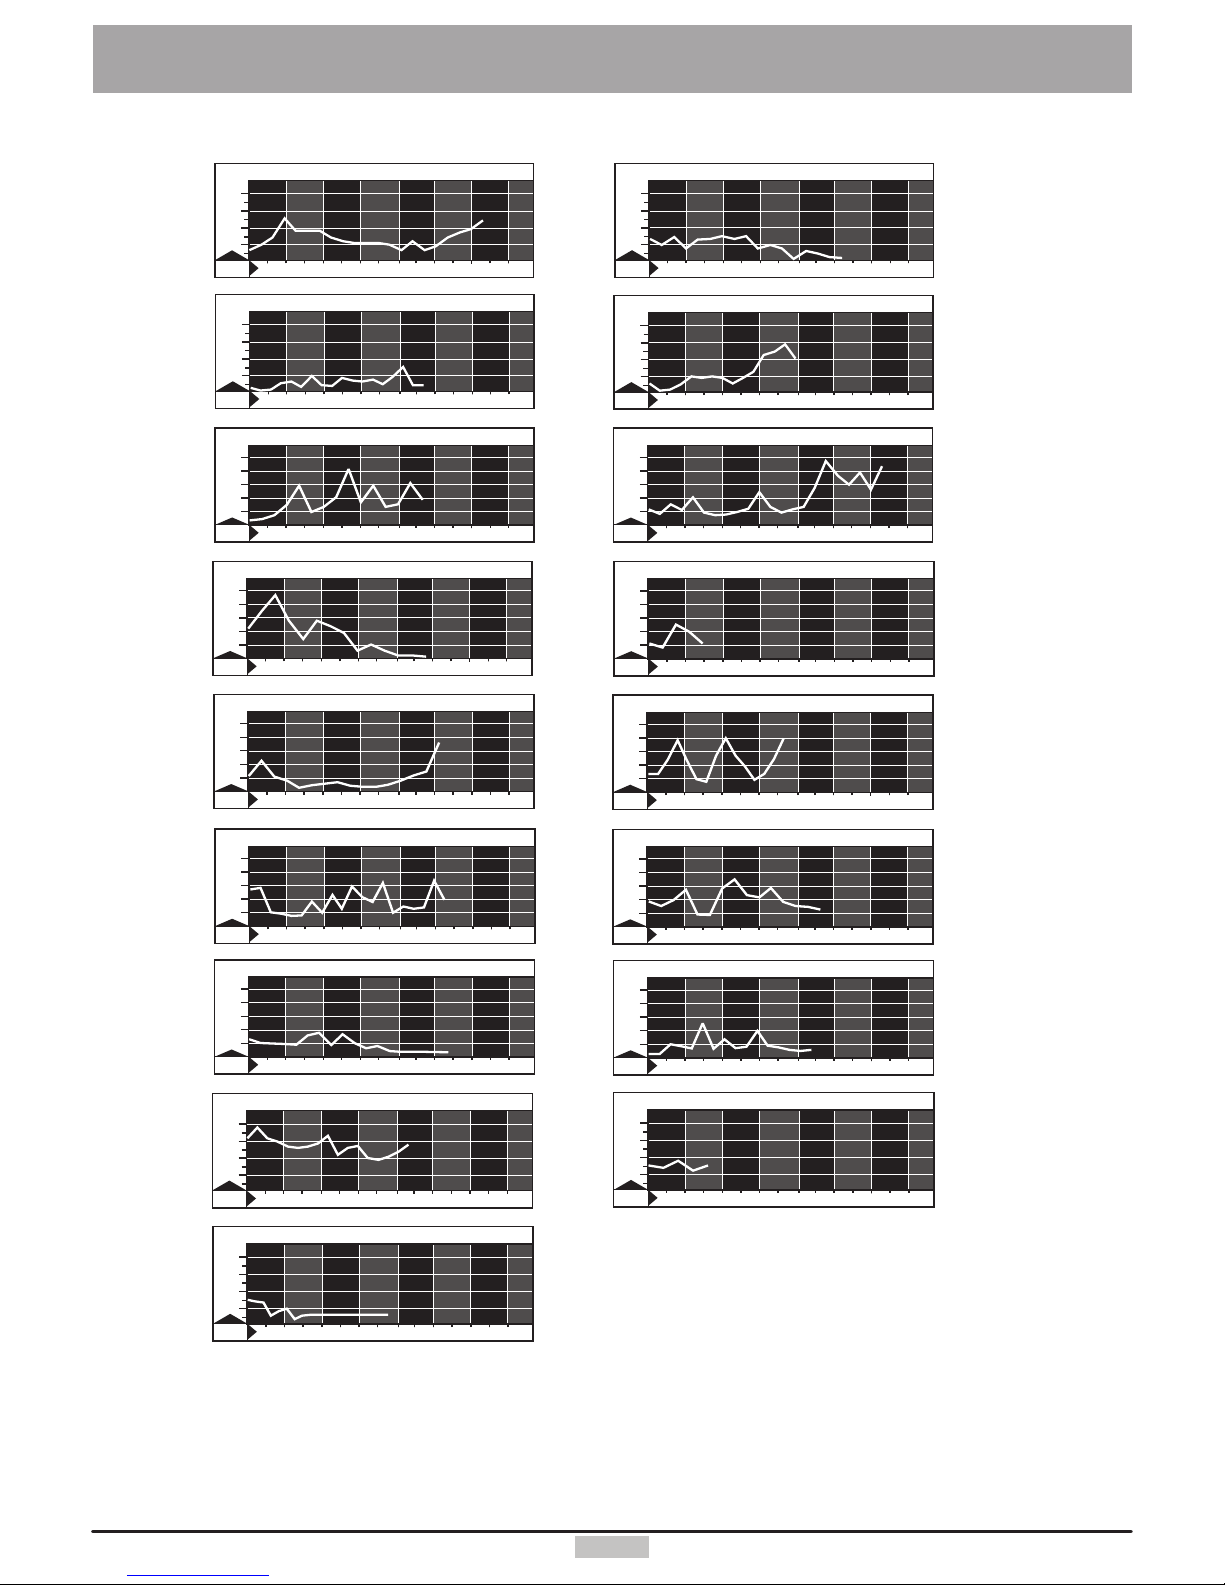
Tour de France 97 Legs 5 to 21
200
300
400
100
040 80 120 160 200 240 280
7.
HMreal Tour de France Etappe
Distanz
(programs no. 56 to 72)
Program 77 personal watt controlled program
Program 78 personal heart rate controlled program
Program 79 personal speed program
56 57
58 59
60 61
62
1000
1500
2500
2000
500
040 80 120 160 200 240 280
12.
Distanz
HMreal Tour de France Etappe
1000
1500
2500
2000
500
040 80 120 160 200 240 280
11.
HMreal Tour de France Etappe
Distanz
63
64 65
66 67
68 69
70 71
72

The device is equipped with an electronic gear shift that provides committed athletes
with a more realistic biking experience on the pre-programmed circuits. The 28 available
speeds enable a linear shifting over the whole performance domain of the bike in road, off-road and triathlon biking.
The distance travelled per pedal revolution in the highest gear is . This corresponds to a gear ratio of
with a .
The distance travelled per pedal revolution in the lowest gear is . This corresponds to a gear ratio of
with a .
The table below gives the exact transmission ratios of the machine.
9.27 meters
53 to 12 28 inches wheel
3.57 meters
42 to 24 28 inches wheel
1
2
3
4
5
6
7
8
9
10
11
12
13
14
15
16
17
18
19
20
21
22
23
24
25
26
27
28
1.75
1.85
1.95
2.05
2.15
2.24
2.34
2.44
2.54
2.64
2.74
2.84
2.94
3.03
3.13
3.23
3.33
3.43
3.53
3.63
3.73
3.82
3.92
4.02
4.12
4.22
4.32
4.42
357.5
388.2
409.0
429.7
450.5
471.2
491.9
512.7
533.4
554.2
574.9
595.6
616.4
637.1
657.9
678.6
699.3
720.1
740.8
761.6
782.3
803.1
823.8
844.5
865.3
886.0
906.8
927.6
11
11.6
12.3
12.9
13.5
14.1
14.8
15.4
16
16.6
17.2
17.9
18.5
19,1
19.7
20.4
21
21.6
22.2
22.8
23.5
24.1
24.7
25.3
26
26.6
27.2
27.8
22
23.3
24.5
25.8
27
28.3
29.5
30.8
32
33.2
34.5
35.7
37
38.2
39.5
40.7
42
43.2
44.4
45.7
46.9
48.2
49.4
50.7
51.9
53.2
54.4
55.7
33.1
34.9
36.8
38.7
40.5
42.4
44.3
46.1
48
49.9
51.7
53.6
55.5
57.3
59.2
61.1
62.9
64.8
66.7
68.5
70.4
72.3
74.1
76
77.9
79.7
81.6
83.5
42 / 24
53 / 12
Gear Ratio cm/revolution 50 RPM
Speed in km/h for
100 RPM 150 RPM
Ratio front
gear to rear gear
Transmission ratio: 1.75 + (gear -1 )* 0.098767
Distance in cm: Transmission ration * 210
(per pedal revolution)
Velocity in km/h: RPM * distance in cm per pedal revolution * 0.0006
Gear Shift
15
Training
Choose
(turn)
“Speed”
display sample for the
gear shift
e.g. S 25

watt
Personal prog.
Back
Watt
Heart rate
Speed
Every user can create one program of each of the following: watt, heart rate and speed controlled
program. Users number 1 to 3 can create programs with a duration of up to 60 minutes, user
number 4 can create programs with a duration of up to 240 minutes. Start by choosing the type of
program you want to create. Make copies of the blank diagrams provided at the end of this user
m a n u a l ( p a g e 4 4 ) a n d u s e t h e m t o d e s i g n y o u r p r o g r a m s .
Here is, for instance, the procedure to create a watt controlled program:
Select Watt.
Select Modify and start “drawing”.
Turn the control button to the left/right to increase/decrease the height
of the bar on the display until you set the bar to the proper height.
Every drawn bar corresponds
to a training duration of one
minute.
Display window No. 2 will
show the minute at which you
are now located.
When you set up this step
(bar) to the required watt
value press the control button.
Repeat the same procedure
with the following bars.
Repeat this procedure until
you finish creating your program.
When your program is finished press the function key and answer the question:
“Erase the bars starting here?” Answer “Yes” or “No” (meaning: program ends either after
the last value/bar entered or, if present, after the last existing value/bar) and select Training.
The same procedure applies also for the modification of an existing personal program.
For heart rate controlled programs you design a heart rate curve instead of a watt curve.
If the heart rate measured during the actual training is below the curve the load will be raised and vice versa.
For speed controlled programs you design a speed curve. When the actual speed during the training is
below the curve the load is reduced and vice versa.
II
II
How to create your own personal programs
watt
Watt
Training
Modify
16
Training
watt
watt
1 min.
watt
A program designed on the blank diagram
to look like the illustration to the left will
appear on the screen as illustrated to the
right.
100
200
300
400
010 20 30 40 50 min
WATT
Back
watt
…
Display example
for entry step 1

Training
17
Training data
watt watt
Training data Actual
Back Back
Actual
Total
Weight
Fat content
Coaching
Ø-kmh 23,0
Max-kmh 31,0
Time 56,4
Distance 18,0
You review the training data of the selected user:
Actual: the training values of the last training
Total: the values of all the training units together
Weight: the distribution over a period of 60 days and of 1 year
Fat content: the distribution over a period of 60 days and of 1 year
Coaching: the values of the last capacity test and the actual coaching stand
Fitness mark
The device can carry out an evaluation your .
The measurement principle is based on the fact that the pulse rate falls faster within the first minute following a
load period for healthy, well-trained users than for healthy, less trained users.
If the user presses the Fitness key during a training session, the present training will be interrupted and the load
will be lowered to The graphical screen will display the message “Fitness mark
determination”. The drop in pulse rate will be measured (see window no. 2) and the mark computed
according to the following scheme and displayed:
fitness
25 watts within a few seconds.
within 60sec
The mark of “F 0” is awarded if no usable result can be measured.
After the evaluation process the training program resumes at the same position at which the fitness test was started.
The load in Watt is raised within a few seconds to its value just before the evaluation and the training can be continued.
A fitness evaluation is not possible after the training session is finished.
II
(see also the menu diagram pages 42/43)
The measuring process takes one minute and its progress is displayed.
1.
A pulse measuring device (pulse sensor ear clip or the cardio sensor chest belt)
must be connected and functional during the whole fitness evaluation process.
After one minute window no 2 F markdisplays the
and the system plays a short melody.
Window No. 2 “F”
1 to 60 seconds
displays an , and a timer from
during the measurement process.
4.
Fitness
Press the fitness key.
5.
Fitness evaluation process
2.
3.
Continue pedalling “loosely” at the load of 25 Watt during
the measurement process.
Graphic window
The fitness mark F1 is awarded for a pulse rate drop of more than 25.0% within 60 sec
The fitness mark F2 is awarded for a pulse rate drop of 20.0% to 24.9% within 60 sec
The fitness mark F3 is awarded for a pulse rate drop of 16.0% to 19.9% within 60 sec
The fitness mark F4 is awarded for a pulse rate drop of 12.0% to 15.9% within 60 sec
The fitness mark F5 is awarded for a pulse rate drop of 8.0% to 11.9% within 60 sec
The fitness mark F6 is awarded when the pulse rate drop is less than 8% within 60 sec
Train at least in the .15 minutes OK-area
fitne ss
Note: if you don't run a program to its end you should press the menu key before switching
the device off in order to save the training data
Display example for
actual training data
Other
Training
Data
(turn)
Evaluating
the fitness
mark
Cancel
Example for fitness mark 2

Description
The Conconi test was originally developed for running to control the training intensity and to determine the
performance ability. This test uses the fact that the heart pulse rate increases linearly with the load. This is
true only up to a certain pulse rate and load. The pulse rate curve deviates from the linear if the load is further
increased above this point (see fig. 1 page 21). This deviation point indicates the so-called anaerobic threshold
according to researches by Conconi (for the Conconi test also known as the Conconi threshold).
The anaerobic threshold is the point where the organism produces more lactic acid than it can eliminate. This
means that, from this point, lactic acid starts to accumulate in the body and eventually leads to a load collapse.
The threshold is used to determine the training domains and to evaluate the performance ability (you will find
some practical hints about determining the training domains below)
The main advantage of the Conconi test, as compared to e. g. the lactate performance test, is the smallness of
the necessary financial, technical and personal investment. At this point we should also mention that the Conconi
test is controversial among many training professionals. It is widely used in Italy and Switzerland. Others have a
critical approach toward the Conconi test for the following reasons:
A maximum loading is necessary when undergoing the test. For this reason it is recommended to pass a medical
examination before taking the test. The Conconi test should only be taken by healthy individuals.
About 20% of all the tests do not show a deviation point. Sometimes the pulse rate increases linearly up to more
than 190 pulses per minute.
Nevertheless, the Conconi test permits an easy and accurate control of the training for many athletes, and an
evaluation of their performance ability.
The Conconi test should in principle starts with an easy start-up program. One of the easier and shorter warm-up
programs should be used here. The pulse rate should not exceed 130 pulses per minute during warm-up. Since
the performance ability of users is widely spread, two special programs are provided for taking the Conconi test.
begins with a load of 60 watts and is intended for users with lesser training experience, while
is intended for the more capable users. The load is increased by 20 watts every program step for
both programs.
You will find a test protocol on page 19. Write down the pulse rate values achieved and the corresponding load
levels (in watt). You can then fill in the values for for the Conconi test (program 45, from 60 to 400
watts)in the upper part of the protocol.
For the higher Conconi test corresponding to (program 46) fill in the heart rate values for load values of
120 to 700 watts maximum.
The test should be terminated whenever the user feels he reached his maximum load capacity. An overload should
absolutely be avoided!
Taking the Conconi test with the :
Program 45
program 46
protocol 1
protocol 2
ergo_bike
The Conconi Test / E
18
Conconi-Test
Table of contents
Other Daum electronic Exercise Bike manuals

Daum electronic
Daum electronic ergo bike Premium 8i Series User manual

Daum electronic
Daum electronic Fitness 3 User manual

Daum electronic
Daum electronic ergo_bike medical8 User manual

Daum electronic
Daum electronic 8008 TRS User manual

Daum electronic
Daum electronic Cardio pro User manual

Daum electronic
Daum electronic Cardio 2002 PC User manual

Daum electronic
Daum electronic Premium 8 User manual

Daum electronic
Daum electronic Vita 2002 PC de luxe User manual