Daval Technologies TELE-RECORDER DVTR-680 User manual
1
TELE-RECORDER®
MODEL DVTR-680
VOICE ACTIVATED DIGITAL
TELEPHONE RECORDER
OWNER'S GUIDE
Please read this instruction manual carefully.
Repeat Playback E
Intro Playback E
Index Marks E
Erasing Recordings E
Erasing Sections of Recordings E
Erasing All Recordings in Folder E
Erasing All Recordings E
Moving Recordings between Folders E
Using an Earphone E
Using the Docking Station F
Software Installation G
File Manager Information G
File Manager Installation G
USB Driver Installation G
Using the File Manager Program G
Recorder Settings G
Using the DVTR-680 Manager G
Using the PC Disk G
Downloading Files from Recorder G
Using the PC Disk Explorer G
Using the DVTR-680 File Player G
Using the File Format Converter G
Using the File Editor G
Uploading from PC to Recorder G
Care and Maintenance H
Questions and Answers I
FCC Information J
Specifications K
Limited Warranty L
Getting Started A
Features B
Control and Display Information C
Installation Information D
Battery Installation D
Docking Station Installation D
Operating Information E
Hold/Normal Switch E
Idle Mode Display Information E
Selecting Record Folders E
Setting Year/Date/Time E
Setting Recording Mode E
Setting Microphone Sensitivity E
Setting Playback Mode E
Setting VOX Record Mode E
Setting Timer Record Mode E
Setting Alarm Playback Mode E
Locking a File E
Setting Key Tone Mode E
Setting Display Contrast E
Resetting to Factory Default E
Manual Recording E
Automatic Recording E
Overwriting Recordings E
Inserting Recording E
Appending Recording E
Telephone Line Recording E
Manual Telephone Recording E
Automatic Telephone Recording E
Playing Back Recordings E
Table of Contents
INDEX
ONE
HQ
VOX
IMPORTANT SAFETY INSTRUCTIONS
When using your telephone equipment, basic safety precautions should
always be followed to reduce the risk of fire, electrical shock, and injury
to persons including the following:
1. Do not use this product near water, for example, near a bath tub,
wash bowl, kitchen sink, or laundry tub, in a wet basement, or near a
swimming pool.
2. Avoid using a telephone (other than a cordless type) during an
electrical storm. There may be a remote risk of electrical shock from
lightning.
3. Do not use the telephone to report a gas leak in the vicinity of the
leak.
4. Use only the power cord and batteries indicated in this manual. Do
not dispose of the battery in a fire. They may explode. Check with
local codes for possible special disposal instructions.
5. Plug the adapter to the socket outlet that is near the equipment and
shall be easily accessible.
6. This equipment is to be supplied from an identified USB port comply-
ing with the requirements of Limited Power Source.
SAVE THESE INSTRUCTIONS
IMPORTANTES MESURES DE SÉCURITÉ
Certaines mesures de sécurité doivent être prises pendant l’utilisation de
matérial téléphonique afin de réduire les risques d’incendie, de choc
électrique et de blessures. En voici quelquesunes:
1. Ne pas utiliser l’appareil près de l’eau, p.ex., près d’une baignoire,
d’un lavabo, d’un évier de cuisine, d’un bac à laver, dans un sous-sol
humide ou près d’une piscine.
2. Éviter d’utiliser le téléphone (sauf s’il s’agit d’un appareil sans fil)
pendant un orage électrique. Ceci peut présenter un risque de choc
électrique causé par la foudre.
3. Ne pas utiliser l’appareil téléphonique pour signaler une fuite de gaz
s’il est situé près de la fuite.
4. Utiliser seulement le cordon d’alimentation et le type de piles in-
diqués dans ce manuel. Ne pas jeter les piles dans le feu: elles peu-
vent exploser. Se conformer aux règlements pertinents quant à l’é-
limination des piles.
5. la socklet-sortie sera installée près de l’équipement et serafacilement
accessible6. L’équipement doit être fourni à partir d’un acquiesce-
ment gauche identifié d’USB aux conditions de la source d’énergie
limitée.
6. L’équipement doit être fourni à partir d’un acquiescement gauche
identifié d’USB aux conditions de la source d’énergie limitée.
CONSERVER CES INSTRUCTIONS

2
BATTERY INSTALLATION
For best performance, the use alkaline batteries is recommended.
1. Press down lightly on arrow and slide battery compartment cover open.
2. Observing the correct polarity, insert two fresh AAA size batteries.
Close the battery compartment cover completely.
3. The BATTERY icon in the display will indicate three
boxes when fresh batteries are used.
4. Replace batteries if ”CHANGE BAT” icon appears in the display.
5. Power shuts off automatically when recorder is idle for 30 seconds.
6. Remove batteries if recorder will not be used for a few weeks or more.
Battery leakage can damage your recorder.
Installation InformationD
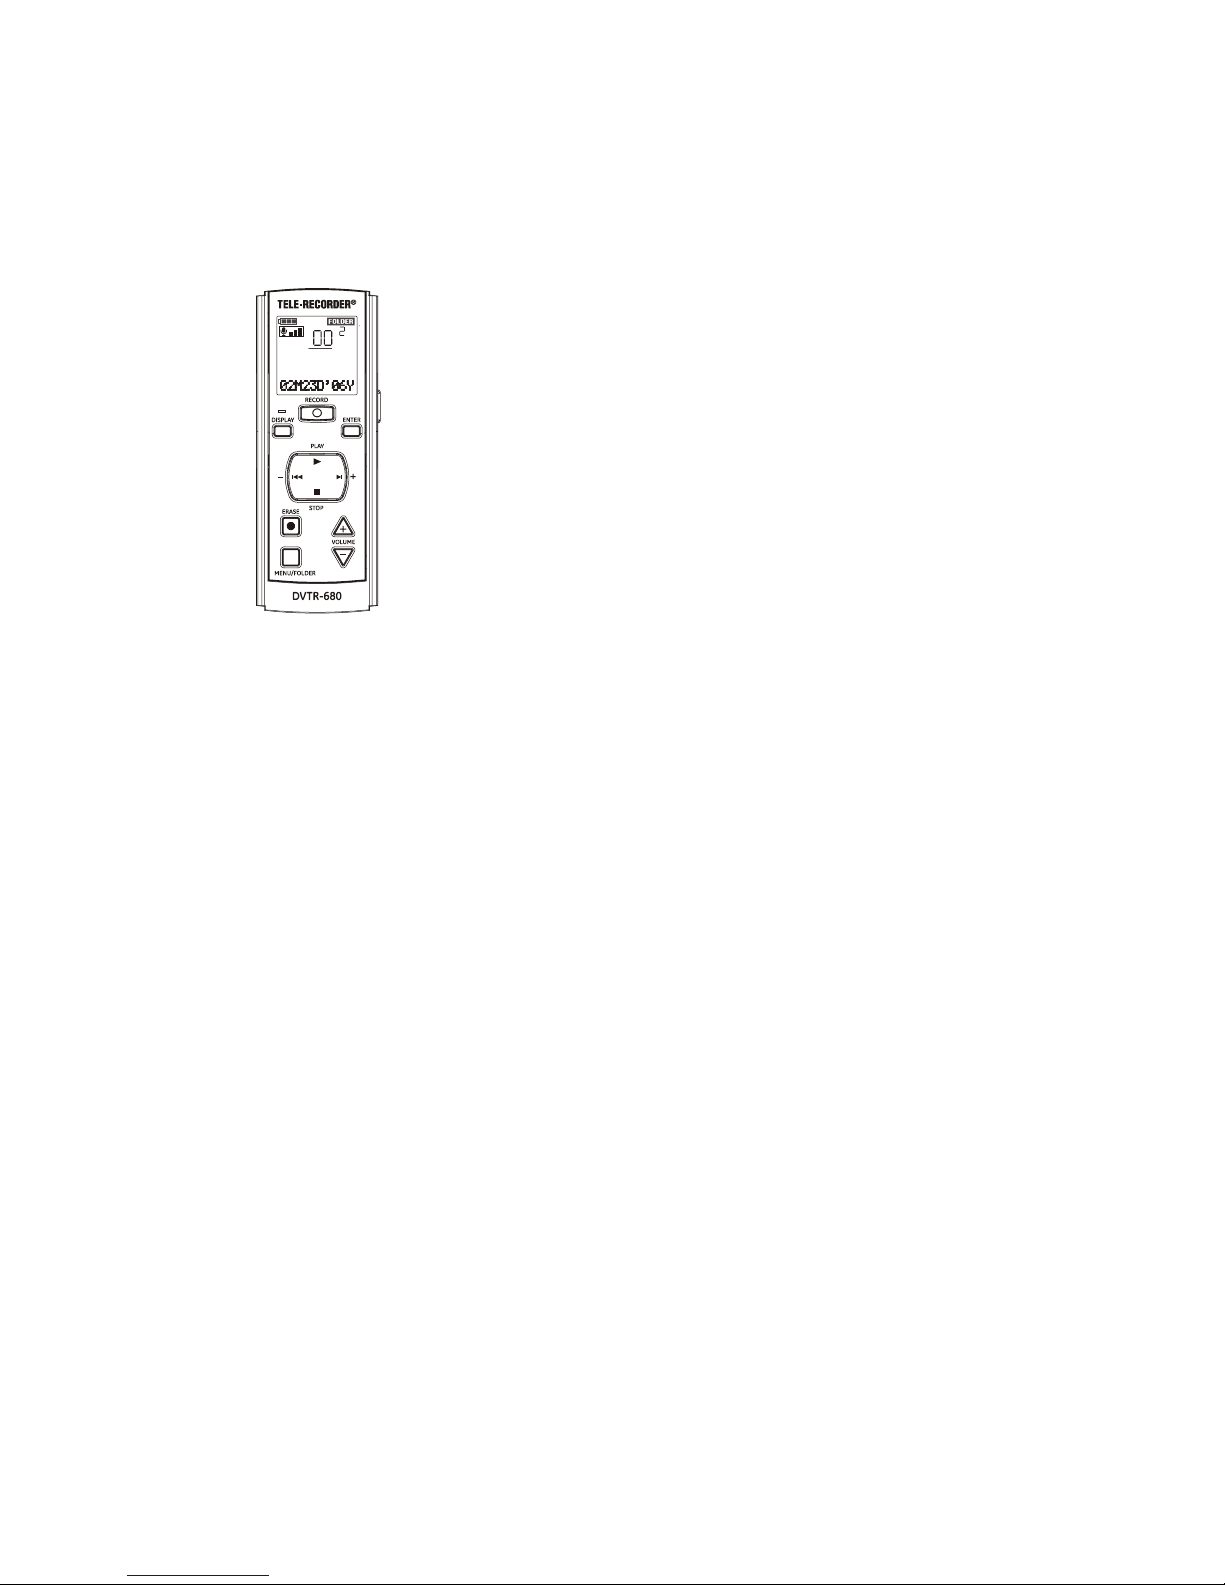
Battery status Record file number
Mic sensitivity Folder Number
In Docking Station
Playback speed
Record quality Alarm on
File Lock on Repeat on
Index on VOX on
Timer on Pause on
Recording Playback All or One playback
Hold/Normal switch Icon
The DVTR-680 Voice Activated Digital Tele-Recorder® is ideal for recording
memos, lectures, interviews, meetings, and telephone conversations.
Recorder Features:
A. Lightweight, compact, and easy to operate.
B. Multifunction display indicates recorder status, date and time, recording
and folder number, battery condition, remaining recording time.
C. Voice activated recording conserves battery life and recording memory.
D. Built in 32 MB Flash memory.
E. Three recording modes (HQ, SP and LP) provide up to 880 minutes of
recording time.
F. Five folders can store up to 99 recordings per folder.
G. Fast Forward or Rewind of recordings during playback.
H. Index mark to quickly find selected parts of recordings.
I. Features include moving, inserting, cutting and appending recordings.
J. External Mic jack allows use of an external microphone (not included).
K. Earphone jack allows private listening (ear bud included).
L. Requires 2 AAA Batteries (not included).
Docking Station Features:
A. Connects recorder to your telephone and PC using supplied cables.
B. Supplies power from PC to recorder when inserted in docking station.
C. Allows use of an optional AC power adapter (not included).
File Manager Software Features:
A. Use File Manager software to transfer data between recorder and PC.
B. Upload the date and time to the recorder as well as setting changes.
C. Playback, convert, and edit voice data files using PC.
Congratulations on your purchase of the Voice Activated, DVTR-680
Digital Voice Tele-Recorder®. This package contains the following items:
1. DVTR-680 recorder.
2. Docking Station.
3. USB cable.
4. Short modular handset cord.
5. Ear bud type earphone.
6. DVTR-680 Owner’s Guide.
7. DVTR-680 File Manager Software installation CD.
MIC jack Microphone
LCD display Earphone jack
REC LED USB mini-port
REC button ENTER/INDEX button
DISPLAY button F.F. button
PLAY button STOP button
NORMAL/HOLD switch + VOLUME button
REWIND button - VOLUME button
ERASE button
MENU/FOLDER button
Control Location and Display InformationC
FeaturesA
Getting Started
B
Docking Station Installation
Connect the docking station to your telephone via the handset jack located in
the base of most telephones.
1. Remove coiled handset cord from HANDSET jack in telephone base.
2. Plug loose end of coiled handset cord into docking station IN jack.
3. Plug end of supplied short handset cord into docking station OUT jack.
4. Plug remaining end into HANDSET jack in telephone base.
The USB cable included in this package must be used with this equip-
ment to ensure compliance with the Class B FCC limits.
5. Insert large connector end of USB cable into a available PC USB port. Insert
small connector end of USB cable into DOCKING STATION mini-USB port.
6. The docking station receives power from the PC via USB cable when PC
is turned on. Recorder batteries are automatically disconnected when
recorder is inserted in docking station.

3
2. Press F.F. or REWIND button as required until “REC MODE” flashes.
3. Press ENTER/INDEX button, “REC MOD:” will appear and the present
record mode, HQ, SP, or LP will flash.
4. Press F.F. or REWIND button as required to select desired record mode.
Press ENTER/INDEX button to confirm.
5. “MIC SEN” will flash, press the ENTER/INDEX button to enter menu or
press STOP button to return to idle mode.
Setting Microphone Sensitivity
Your recorder has three preset microphone sensitivity set-
tings. Medium (MI) setting works well for most recording
situations.
1. If sound source is loud or located near recorder, use low (LO) setting.
2. If sound source is low or located away from recorder, use high (HI) setting.
3. Press and hold MENU/FOLDER button until “DATE/TIME flashes.
4. Press F.F. or REWIND button as required until “MIC SEN” flashes.
5. Press ENTER/INDEX button, “MIC SEN:” will appear and present record
mode (LO, MI, or HI) will flash.
6. Press F.F. or REWIND button as required to select desired microphone
sensitivity.
7. Press ENTER/INDEX button to confirm, “PLAY MODE” will flash. Press
ENTER/INDEX button to enter menu or press STOP button to return to
idle mode.
Setting Playback Mode
Set recorder to playback either one recording or all recordings in folder.
1. Press and hold MENU/FOLDER button until “DATE/TIME” flashes.
Normal/Hold Switch
The NORMAL/HOLD switch is located on left side of the recorder. It prevents
the recorder control buttons from being accidentally pressed when it is in
your pocket or brief case.
1. Set NORMAL/HOLD switch located on left
side of recorder to HOLD position.
2. The HOLD icon will be displayed. When PLAY button is pressed,
“LOCK: ON” will be displayed briefly.
3. Return NORMAL/HOLD switch to NORMAL position to resume normal
recorder operation.
Idle Mode Display Information
Your recorder will display battery status, folder number and number of re-
cordings, recording mode, MIC sensitivity, playback mode, VOX status, and
current time when recorder is in idle mode.
1. Press DISPLAY button to display year and date.
2. Press and hold STOP button to display the total number of files in the
present folder and the remaining recording time.
3. The idle mode information is displayed for approximately thirty (30) sec-
onds after the last button is pushed.
Selecting Record Folders
The recorder has five recording folders, each capable of storing 99 re-
cordings.
1. Press MENU/FOLDER button as required to select desired folder prior to
making or playing back recordings.
Operating InformationE
Setting Year/Date/Time
When batteries are first installed or replaced, the current year, date and time
must be entered into the recorders memory. Start entering within 15 seconds
or the display will return to idle mode.
1. Press and hold MENU/FOLDER button until “DATE/TIME” flashes.
Press ENTER/INDEX button, “01M01D’06Y”, will appear.
2. The last three digits “06Y” (year digits) will flash. Press F.F. or REWIND
button as required to enter current year.
3. Press ENTER/INDEX button to confirm,
“01M” (month digits) will flash. Press F.F. or RE-
WIND button as required to enter current month.
4. Press ENTER/INDEX button to confirm, “01D” (day
digits) will flash. Press F.F. or REWIND button as
required to enter current day.
5. Press ENTER/INDEX button to confirm, the
“12:00 AM” (hour digits) will flash. Press F.F. or REWIND button as re-
quired to enter current hour.
6. Press ENTER/INDEX button to confirm, the “01” (minute digits) will
flash. Press F.F. or REWIND button as required to enter current minute.
7. Press ENTER/INDEX button to confirm, “RECORD MODE” will flash.
Press ENTER/INDEX button to enter menu or press STOP button to
return to idle mode.
Setting Recording Mode
Depending on your recording requirements, select one of three record
modes.
HQ: provides best sound quality with about 120 minutes of recording time.
SP: provides average sound quality with about 340 minutes of recording time.
LP: provides less sound quality with about 880 minutes of recording time.
1. Press and hold MENU/FOLDER button until “DATE/TIME” flashes.
IMPORTANT SAFETY INFOR-
MATION You can use a Listed
Direct Plug-In AC Power Unit (not
supplied) marked “Class 2 (Classe) 2”
that must be rated at 6VDC
@300mA with positive center tip
output plug. Plug dimensions are
10 mm plug length, 5 mm OD, and
2 mm ID. Using an AC power unit
that does not meet these specifi-
cations could seriously damage
the recorder. The correct orienta-
tion for the ac power unit is in a
vertical or floor mount position.
FOR USA
CAUTION: Use only with Class 2 power source listed to UL1310 that sup-
plies 6 VDC 300 mA - +
For Canada
CAUTION: Use only with Class 2 power source, listed to CAN/CSA C22.2
No.223, that supplies 6VDC 300mA - +
Utiliser uniquement une alimentation de classe II, listée dans CAN/CSA
C22.2 No.223, qui fournie 6V, C.C. et 300 mA.
You can purchase a DC adaptor through service center or retailer shop. For
servicing or replacement please contact us for suitable DC adaptor.
Vous pouvez acheter un transformateur C.C. par le service central ou le
magasin du distributeur. Contacter nous S.V.P. pour entretenir ou remplacer
votre transformateur C.C. de façon convenable.
Daval Technologies LLC
PO Box 27
Chappaqua, New York 10514
Tel: 914-251-9220
USB(PC)
DC 6V
TELEPHONE HANDSET
IN OUT
DAVALTECHNOLOGIES
MADE IN CHINA
BATTERY/BATTERIE
DC 1.5Vx2ANSI AAA
IEC/JISLR03(R03)

4
6. Press ENTER/INDEX button, “KEY TONE” will flash. Press ENTER/INDEX
button to enter menu or press STOP button to return to idle mode.
Setting Key Tone Mode
If the KEY TONE is on, a beep will be heard when a button is pressed except
during recording and playback modes.
1. Press and hold MENU/FOLDER button until “DATE/TIME” flashes.
2. Press F.F. button as required until “KEY TONE” flashes.
3. Press ENTER/INDEX button, “TONE” will appear in display and “ON” or
“OFF” will flash.
4. Press F.F. or REWIND button as required to set key tone ON or OFF.
5. Press ENTER/INDEX button, “CONTRAST” will flash. Press ENTER/INDEX
button to enter menu or press STOP button to return to idle mode.
Setting Display Contrast
The display contrast can be adjusted to suit your personal viewing needs.
1. Press and hold MENU/FOLDER button until “DATE/TIME” flashes.
2. Press F.F. button as required until “CONTRAST” flashes. Press ENTER/
INDEX button, “LCD = 03” will flash.
3. Press F.F. or REWIND button as required to select desired contrast level
between 01 and 05.
4. Depending on lighting conditions 03 is usually a good choice.
5. Press ENTER/INDEX button, “RESET ALL” will flash. Press ENTER/INDEX
button to enter menu or press STOP button to return to idle mode.
2. Press F.F. or REWIND button as required until “PLAY MODE” flashes.
3. Press ENTER/INDEX button, either “PLAY “ONE” or “PLAY ALL” will
flash. Press F.F. or REWIND button to select desired playback mode.
4. Press ENTER/INDEX button to confirm, “VOX SET” will flash. Press
MENU/FOLDER button to enter menu or press the STOP button to re-
turn to idle mode.
Setting VOX Record Mode
When using VOX record mode, recording starts only when the sound level at
the microphone or the telephone line reaches the preset level.
1. Press and hold MENU/FOLDER button until “DATE/TIME” flashes.
2. Press MENU/FOLDER button as required until “VOX SET” flashes.
3. Press ENTER/INDEX button, either “VOX ON” or “VOX OFF” will flash.
4. Press F.F. or REWIND button to set the VOX function ON or OFF.
5. Press ENTER/INDEX button to confirm, “TIMER REC” will flash. Press
ENTER/INDEX button to enter menu or press STOP button to return to
idle mode.
Setting Timer Record Mode
The recorder can be set to automatically schedule a recording session at a
preset time.
1. Press and hold MENU/FOLDER button until “DATE/TIME” flashes.
2. Press F.F. button as required until “TIMER REC” flashes.
3. Press ENTER/INDEX button, “TIMER” will appear and “ON” or “OFF”
will flash. Press F.F. button as required to select ON or OFF.
4. Press ENTER/INDEX button to confirm. If timer record mode is ON, the
timer record icon and “01M01D’06Y” will appear in display.
5. The start recording month digits “01M” will flash. Press F. F. or REWIND
button as required to enter desired month.
6. Press ENTER/INDEX button, the start recording day digits “01D” will
flash. Press F.F. or REWIND button as required to enter desired day.
7. Press ENTER/INDEX button, (S) for start will be displayed. The start
recording hour digits “12” as well as “AM” or “PM” will flash. Press F.F.
or REWIND button as required to enter desired hour.
8. Press ENTER/INDEX button, the start recording minute digits “00” will
flash. Press F.F. or REWIND button as required to enter desired minute.
9. Press ENTER/INDEX button, (E) for end will be displayed. The end re-
cording hour digits “12” as well as “AM” or “PM” will flash. Press F.F. or
REWIND button as required to enter desired hour.
10. Press ENTER/INDEX button to confirm, the end recording minute digits
“00” will flash. Press F.F. or REWIND button as required to enter the
desired minute.
11. Press ENTER/INDEX button to confirm, “ALARM PLAY” will flash.
Press MENU/FOLDER button to enter menu or press STOP button to
return to idle mode.
12. If timer record mode is set to ON, the timer icon will appear in
idle mode.
Setting Alarm Playback Mode
The recorder can automatically playback a selected recording at a preset time.
1. Press and hold MENU/FOLDER button until “DATE/TIME” flashes.
2. Press F.F. or REWIND button as required, until “ALARM PLAY” flashes.
3. Press the ENTER/INDEX button, “ALARM” will appear in display and
“ON” or “OFF” will flash. Press F.F. or REWIND button as required to
select ON or OFF.
4. If you do not want to activate this feature, select “OFF” and advance to
next menu.
5. If you selected “ON”, the alarm playback icon will appear in display.
Press ENTER/INDEX button, “DATE:” will appear in display and “YES”
will flash.
6. Press ENTER/INDEX button, “01M01D’05Y” will appear in display. The
alarm playback year digits will flash. Press F.F. or REWIND button as
required to enter desired year.
7. Press ENTER/INDEX button to confirm, the alarm month digits will flash.
Press F.F. or REWIND button as required to enter desired month.
8. Press ENTER/INDEX button to confirm, the alarm hour digits as well as
either AM or PM will flash. Press F.F. or REWIND button as required to
enter desired hour.
9. Press ENTER/INDEX button to confirm, the alarm minute digits will flash.
Press F.F. or REWIND button as required to enter desired minute.
10. Press ENTER/INDEX button to confirm, “FILE LOCK” will flash.
11. Press ENTER/INDEX button to enter this menu or press STOP button to
return to idle mode.
12. If alarm playback mode is set to ON, the alarm icon will
appear in the display during idle mode.
Locking a File
The file lock feature is used to prevent important recordings from being acci-
dentally erased. If a file is locked, the file locked icon will appear in the dis-
play during idle mode.
1. Press MENU/FOLDER button as required to select folder containing
recording to be locked. Press F.F. or REWIND button as required to se-
lect recording.
2. Press and hold MENU/FOLDER button until “DATE/TIME” flashes.
3. Press F.F. or REWIND button as required until “FILE LOCK” flashes.
4. Press ENTER/INDEX button, “LOCK:” will appear in display and “ON”
or “OFF” will flash.
5. Press F.F. or REWIND button to set FILE LOCK to ON or
OFF.

5
Automatic Recording
When using the VOX feature, the recorder will start and stop automati-
cally.
1. Prior to recording, select desired recording mode HQ, SP, or LP.
2. Select desired microphone sensitivity LO, MI, or HI setting.
3. Confirm that the VOX function is set to ON mode.
4. Press RECORD button to start recording, the red LED will light during
recording and flash when recording is automatically stopped. Reduce
the Mic Sensitivity if recording continues after three seconds of si-
lence.
5. The elapsed time of the recording will be continuously displayed.
Press DISPLAY button to see how much recording time is available.
6. The elapsed recording time will pause and recording will stop when
the sound being recorded is less than the microphone sensitivity
level. Reduce the Mic Sensitivity as necessary to allow recording to
stop when there is no sound to record.
7. Press + VOLUME or -VOLUME button during recording to fine adjust
microphone sensitivity. Five (5) is ideal for most recording situations.
8. While recording, alternately press RECORD button to pause or re-
sume recording. During pause, the amount of recording time used is
displayed.
9. Press STOP button to stop recording. The remaining recording time
will be displayed briefly before returning to idle mode.
10. While recording, you can chose to press PLAY button to playback
your recording immediately without pressing STOP button first.
Overwriting Recordings
Any recording can be over written instead of erasing it.
1. Press MENU/FOLDER button as required to select the folder contain-
ing recording you are going to overwrite.
2. Press F.F. or REWIND button as required to select recording to over
write. Press PLAY button, then press RECORD button to start re-
cording. The red LED will light.
appear in display while recording.
6. Press STOP button when you have finished recording. The remaining
recording time will be briefly displayed.
7. When recordings are played back, “WAIT...” will appear momentarily in
the display.
Telephone Line Recording
The recorder must be inserted into Docking Station to record from the tele-
phone line. The internal microphone is disabled while in docking station.
NOTE: Do not engage the File Manager software when recording from the
telephone line. While recorder is in USB MODE, all buttons are disabled and
will not record.
IMPORTANT: Do not use this recorder on a party line, since it will record the
conversation of all parties. This would be unlawful. Federal law requires the
consent of all parties in a conversation before the conversation can be re-
corded. Check your state and local regulations for further guidelines.
Manual Telephone Recording
If the VOX feature is turned off, the recorder must be manually started and
stopped when recording telephone conversations.
1. Insert recorder into the docking station. The recorder will automatically
detect the docking station.
2. Please refer to directions for manual recording found in a previous sec-
tion of this manual.
Automatic Telephone Recording
If the VOX feature is turned on, the recorder will automatically record all tele-
phone conversations.
1. Insert recorder into docking station. The recorder will automatically detect
Resetting to Factory Default
The recorder can be reset to its original factory default settings.
1. Press and hold MENU/FOLDER button until “DATE/TIME flashes.
2. Press F.F. or REWIND button as required until “RESET ALL” flashes.
Press ENTER/INDEX button, “RESET ALL?” will flash.
3. Press ENTER/INDEX button, “SURE?” will flash. Press STOP button to
cancel, or press ENTER/INDEX button to confirm.
4. “DEFAULT..” will appear briefly confirming all settings have been reset
to the original factory settings. “ABOUT …” will flash briefly. Press
STOP button to return to idle mode.
Manual Recording
When manual recording, the user must start and stop the recorder.
1. Prior to recording, select desired recording mode HQ, SP, or LP.
2. Select desired preset microphone sensitivity LO, MI, or HI.
3. Confirm the VOX function is set to OFF.
4. Press RECORD button to start recording. The red LED will light during
recording.
5. The elapsed time of the recording will appear in display. Press DISPLAY
button to see how much recording time is available.
6. Press + VOLUME or -VOLUME button during recording to fine adjust
microphone sensitivity. Five (5) is ideal for most recording situations.
7. While recording, alternately press RECORD button to pause or resume
recording. During pause, the amount of recording time used is displayed.
8. Press STOP button to stop recording. The remaining recording time will
be displayed briefly before returning to idle mode.
9. While recording, you can chose to press PLAY button to playback your
recording immediately without pressing the STOP button first.
3. The previous recording will be erased and overwritten with the new
recording.
Inserting Recording
A new recording can be inserted anywhere into an existing recording.
1. Press MENU/FOLDER button as required to select folder containing
recording to insert a recording.
2. Press F.F. or REWIND button as required to select desired recording. Press
“PLAY” button and decide where you want to insert the recording.
3. Press MENU/FOLDER button as required until “INSERT ?” appears in
the display.
4. If the file is too large to insert a recording, LARGE FILE appears in the
display. Large files cannot be edited in the recorder; please use the FMS
software.
5. Press ENTER/INDEX button to confirm and begin making recording.
6. The red LED will light and the remaining recording time as well as
“INSERT REC” will alternately flash in display.
7. Press STOP button when you have finished making recording. “WAIT...”
will appear momentarily prior to returning to idle mode.
Appending Recording
A new recording can be inserted at the end of an existing recording.
1. Press MENU/FOLDER button as required to select folder containing
recording to be appended.
2. Press F.F. or REWIND button as required to select desired recording.
Press “PLAY” button to start playback.
3. Press MENU/FOLDER button as required until “APPEND ?” appears in
display.
4. Press ENTER/INDEX button to confirm. The red LED will light, and you
can start recording.
5. The remaining recording time as well as “APPEND REC” will alternately

6
display the index mark.
11. During playback, press and hold REWIND button to fast rewind. Playback
will stop and fast rewind to previous recordings.
12. Release REWIND button to return to play mode. Steps 6 through 9 above
are the same except are based on using the REWIND button.
Repeat Playback
During playback, a recording can be played back continuously.
1. Press PLAY button to start play back. Press MENU/FOLDER button,
“REPEAT ?” will appear in display.
2. Press ENTER/INDEX button to select the beginning of repeat playback.
3. Press MENU/INDEX button to select the ending of repeat playback.
4. Press ENTER/INDEX button to start repeat playback.
5. The repeat playback icon will appear in display. Press
STOP button when desired to cancel repeat playback.
Intro Playback
Introductory playback is used to review the first three seconds of each recording
within the same folder.
1. Press and hold PLAY button to start introductory playback. “INTRO PLAY”
will appear. Recorder will playback first three seconds of recording.
2. Press PLAY button to quit introductory playback and listen to recording.
3. If a recording is not selected, introductory playback mode will automatically
cancel after last recording.
Index Marks
Index marks provide quick access to selected parts of recordings during play-
back. A maximum of sixteen (16) index marks can be set for each message.
4. Press ERASE button again to select end of erasure. “CE” short for (cut
end) will flash in display and playback will pause.
5. Press ERASE button to confirm erasure or STOP button to cancel. “CUT
DONE” will appear in display and playback will continue.
Erasing All Recordings within Folder
All recordings within a selected folder can be erased simultaneously.
1. Select folder containing recordings to be erased. Press and hold ERASE
button (about 3 seconds) until “DEL-FOLD ?” appears in display.
2. To cancel erasure, press STOP button until “CANCEL” is displayed.
Press ERASE button to continue erasing all recordings within folder.
3. “WAIT . . .” will appear in momentarily indicating erasure is in process.
“ERASE DONE” will appear confirming erasure.
Erasing All Recordings
All recordings within all folders can be erased simultaneously.
1. Press and hold ERASE button for at least 7 seconds until “DEL-ALL ?” is
displayed. To cancel, press STOP button until. “CANCEL” is displayed.
2. Press ERASE button to continue. “WAIT . . .” will appear briefly in dis-
play during erasure.
3. “ERASE DONE” will appear confirming all recordings in all folders have
been erased.
Moving Recordings between Folders
Recordings can be moved from one folder to another folder.
1. Select recording to be moved, then press PLAY button. Press MENU/
FOLDER button as required until “MOVING?” appears in the display.
2. Press ENTER/INDEX button to confirm, press F.F. or REWIND button as
required to select target folder.
the docking station.
2. The recorder will start recording only when the signal level from tele-
phone line is large enough to activate the VOX function.
3. The current recording is considered to be ended when the VOX is not
activated for fifteen (15) seconds or more. The record counter will in-
crease by one and is ready to record the next telephone conversation.
4. Please refer to the directions for Automatic Recording found in a previ-
ous section of this manual.
Playing Back Recordings
Please see directions regarding setting playback mode in a previous section of
this manual. Set playback mode to play back one or all recordings.
1. Press MENU/FOLDER button as required to select desired folder. Press
PLAY button to start playback of recordings. If nothing happens, there are no
recordings to play back.
2. During playback, press F.F. button to play next recording or press REWIND
button to play previous recording.
3. Press +VOLUME or - VOLUME button as required to adjust speaker sound
level.
4. Press and hold PLAY button for at least two seconds to pause playback.
Press PLAY button again to resume playback.
5. During playback, the recording playback speed can be increased or de-
greased by alternately pressing PLAY button.
6. Press DISPLAY button as required to display recording time, remaining
recording time, or date and time of recording.
7. During playback, press and hold F.F. button. Playback will stop and fast for-
ward towards end of recording.
8. The recording time counter display will advance rapidly. Playback is not
heard during fast forward. Release F.F. button to continue playback.
9. If F.F. button is not released by end of recording, two beeps will be heard and
recorder will fast forward to next recording.
10. If recording contains an index mark, playback will pause one (1) second to
1. During record or playback, press ENTER/INDEX button to insert an index
mark at the desired location.
2. The “INDEX” icon will flash. “MK” and the recording time location will
display for two (2) seconds.
3. During playback, press F.F. or REWIND button to locate next or previous
index mark.
4. When “INDEX” icon is displayed, press ERASE button to delete an index
mark. “ERASE MARK” will appear briefly in display.
5. During playback, press and hold F. F. button. Playback will pause for one
(1) second when next or previous index mark is located.
6. Release F.F. button to resume playback.
Erasing Recordings
Any recording within a folder can selected for erasure.
1. While in idle mode, select the folder containing the recording to be
erased. Select the recording to be erased.
2. Press and hold ERASE button until “ERASE IT ?” is displayed. To
cancel, press STOP button, “CANCEL” will appear.
3. Press ERASE button to confirm. “ERASE DONE” will appear in dis-
play confirming erasure.
Erasing Sections of Recordings
Sections of recordings can be selected during playback and erased.
1. Select recording for partial erasure, then press PLAY button to play-
back.
2. Press ERASE button to select start of erasure. “CS” short for (cut
start) will be displayed.
3. If the file is too large to erase recorded sections, LARGE FILE will be
displayed. Large files cannot be edited in the recorder; please use the
FMS software.

7
drive, or click on “browse” to locate the requested file.
6. Once the file path has been entered in the box, click on “Next” to con-
tinue the installation.
7. Windows may display a message “Building driver database”, while
locating the file.
8. Click on “Next” to install the device. Windows should display a message
indicating the installation was successful.
File Manager Information
The File Manager is used to exchange files, information between the re-
corder and PC as well as perform various editing functions.
1. Download voice data files from the recorder to PC.
2. Upload voice data files to the recorder from PC.
3. Upload date/time and settings to the recorder from PC.
4. Voice data file player allows playback of recordings using a PC.
5. Integrated recording editor with waveform display.
6. Copy recordings as well as cut and paste parts of recordings.
7. Convert voice data file format files to WAV file format.
8. Convert WAV file format files to voice data file format.
Software InstallationG
Using the Docking StationF
Minimum Computer Hardware Requirements Minimum
Computer: IBM PC/AT compatible PC
OS: Microsoft Windows 98SE/Me/2000 Professional/
XP Professional, Home Edition
CPU: Intel Pentium 166 MHZ processor or higher
RAM: 64MB or more
Free hard disk space: 10MB or more
Drive: CD‑ROM drive
Sound card: Installed
Audio output: Speakers connected
Display: 1024 x 768 pixels, 256 colors or more
USB port: One free port
File Manager Installation
1. Insert File Manager CD into PC CD-ROM drive. In a few seconds, the
installation wizard will appear and guide you through the installation.
2. If the installation wizard does not start, click on the setup.exe file found
on the CD to start installing USB driver and program files.
3. A DVTR-680 File Manager Software directory will be created in your
Program Files directory. All installed files are in this directory.
4. Click on “Finish” to complete installation. Refer to the “Help File” in-
cluded on the DVTR-680 installation CD for additional information.
USB Driver Installation
1. Connect the recorder (directly or via the docking station) to an available
USB port on PC. The “add new hardware wizard” should start.
2. The PC should detect the recorder as a USB device when connected for
the first time.
3. If your PC has sound capability, a double beep will be heard each time
the recorder is connected or disconnected from the computer.
4. Click “Next” on PC screen to proceed with installation. Select “Search
for the best driver for your device. (Recommended)”.
5. Click “Next” to specify a location. Enter the drive letter of the CD ROM
3. If the file is too large to insert a recording, LARGE FILE will appear in
display. Large files cannot be edited in the recorder; please use the FMS
software.
4. Press STOP button to cancel or press ENTER/INDEX button to confirm.
5. “WAIT . . .” will appear in display while file is being moved.
Using an Earphone
For private listening, use the supplied ear bud type earphone.
IMPORTANT: To protect your hearing, follow these guidelines when you use
earphones.
1. Plug the ear bud into recorder EAR jack. The internal speaker will be
automatically muted.
2. Set -VOLUME button to lowest setting before beginning to listen. Then
adjust volume to a comfortable level.
3. Do not listen at extremely high volume levels. Extended high-volume
listening can lead to permanent hearing loss.
The recorder must be inserted in the docking station to record from the tele-
phone line or communicate with your PC.
1. Take care when inserting the recorder into the docking station.
2. Notice that there are guide slots in the docking station. The guides mate
with groves on both sides of the recorder.
3. Align the recorder grooves with the docking station slots to provide the
correct starting angle when inserting the recorder.
4. Do not try to force the recorder into docking station. Improper insertion
can cause damage to the connector pins located in the docking station.
5. When the recorder is properly inserted, the docking icon
will appear in the display during idle mode.
8
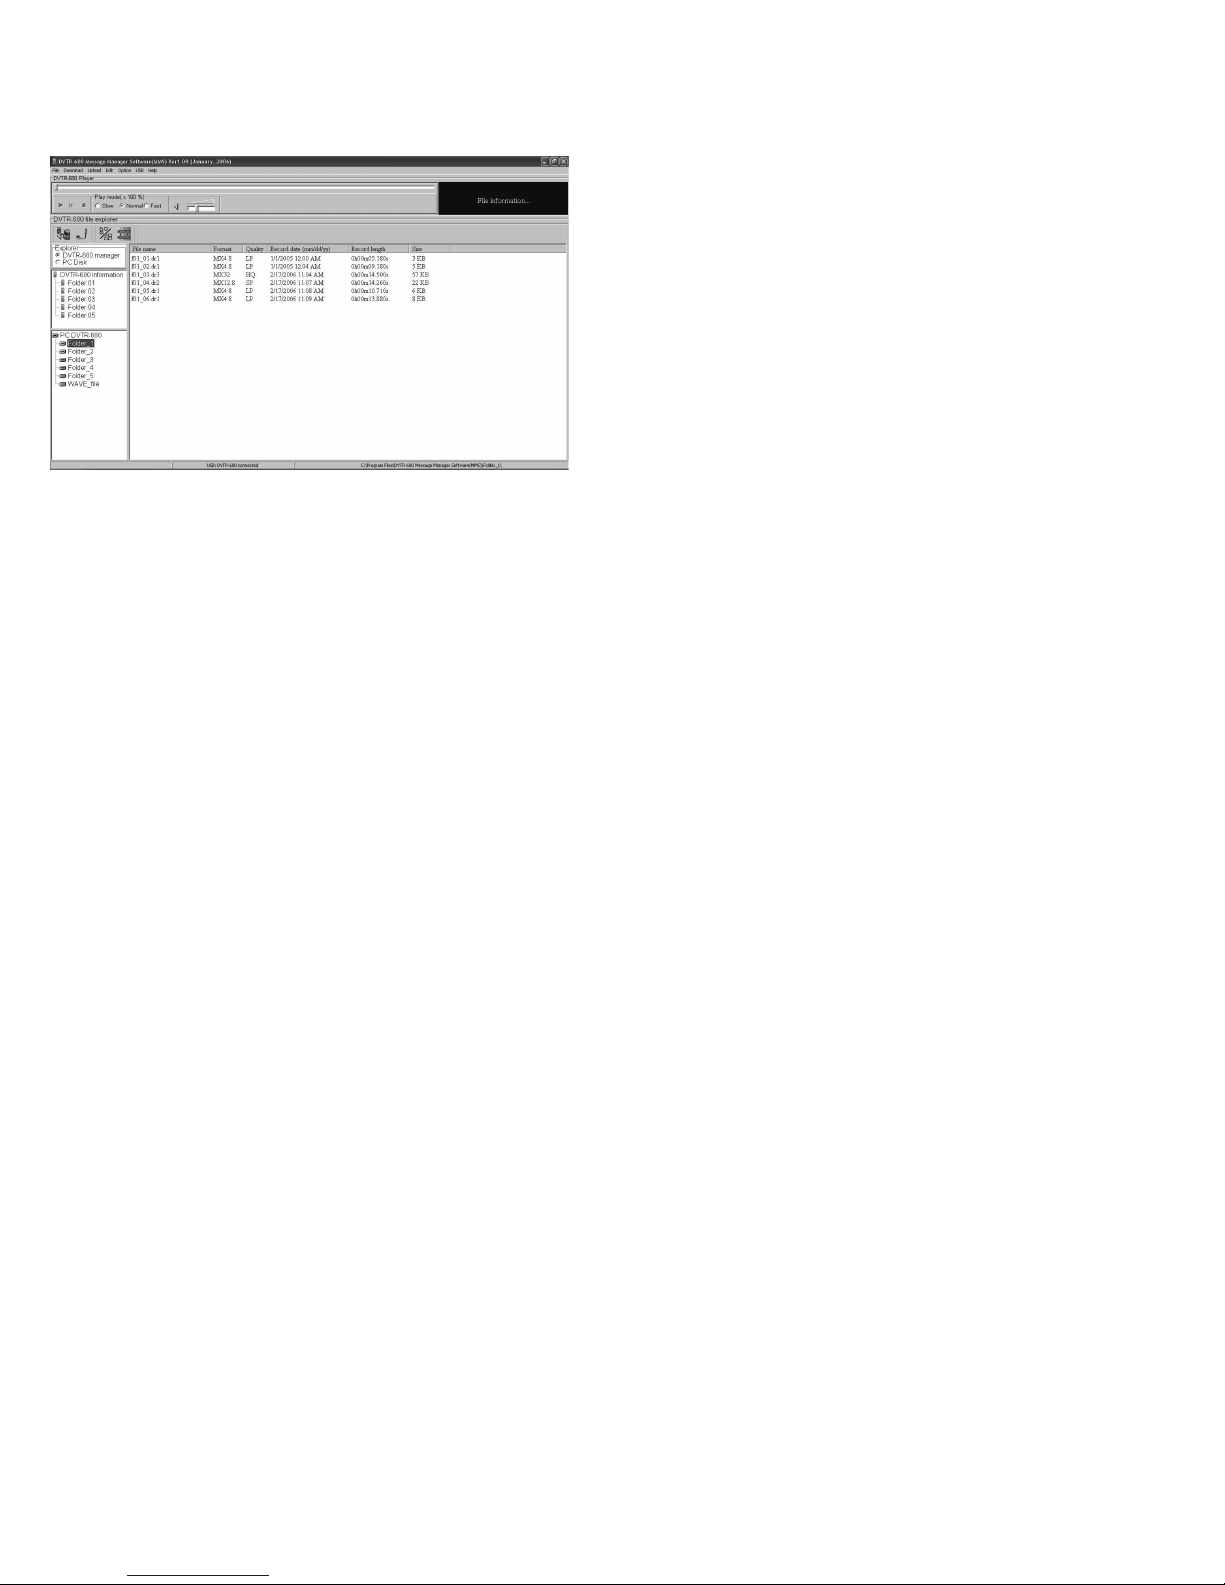
Using the File Manager Program
The recorder communicates with your PC using supplied USB cable and File
Manager software. Start the File Manager program by clicking on the DVTR-680
Icon located in Windows Start/All Programs or Desk Top.
1. Press F11 key on PC keyboard to activate “Auto Detect and Connect
DVTR-680” option.
2. Insert recorder into Docking Station or connect directly to PC via Mini-USB
connector on right side of recorder.
3. “USB MODE” will appear in recorder display and “Connect to DVTR-680”
will appear in PC display. Press ENTER key on PC keyboard to connect.
4. When finished using File Manager software, disconnect recorder by pressing
F6 key on PC keyboard.
5. “Disconnect to DVTR-680” will appear in PC display. Press ENTER key on
PC keyboard.
6. The Auto Detect and Connect feature allows the recorder to be removed
from Docking Station or Mini-USB plug to be removed without completing
steps 4 and 5 above.
7. If you are not using Auto Detect and Connect feature, do remove the re-
corder from Docking Station or remove Mini-USB port cable prior to complet-
ing steps 4 and 5 above.
Recorder Settings
When the recorder is connected to the PC, the current date and time can be
easily uploaded instead of using the recorder setup menu.
1. VOX set, Play and Record mode, MIC sensitivity, LCD contrast can be
viewed, changed, and updated without using recorder setup menu.
2. Information is obtained from recorder by clicking on USB-DVTR680 informa-
tion directories using a mouse or by pressing F7 key on PC keyboard.
3. Click on Explorer box to choose DVTR-680 File Manager or PC Disk.
Using the DVTR-680 File Manager
Files stored in the recorder cannot be edited or modified. All editing and conver-
sion of files is done to duplicate files downloaded to your PC.
1. Select the DVTR-680 manager to view the five folders and the files con-
tained within them in the DVTR-680 recorder. Click on the desired DVTR-
680 folder or files to download to PC.
Using the PC Disk
Five sub directory folders were created within the PC during software installation
to store files downloaded from the recorder.
6. Use left mouse button to click and hold the Speaker Volume slider. Move
slider left or right as required to adjust the playback sound level.
7. The Seek Bar visually indicates current playback percentage and location.
Right click on Seek Bar as required to change playback location.
Using the File Format Converter
The file format converter is useful to convert 8 kHz 16 bit WAV files to DVTR-680
file format, or to convert DVTR-680 file format to WAV file format.
1. Larger size WAV format files can be converted to the smaller size DVTR-
680 file format to save hard disk space.
Using the File Editor
The advanced file editor can be used to edit DVTR-680 format files that have
been downloaded from the recorder as well as standard WAV files.
1. Use left mouse button to select and open the advanced file editor from the
top task bar.
2. Select desired function from the editor task bar. Choices include cutting,
deleting, copying, pasting, or saving selected recordings.
3. Recordings can be played back while their waveform displayed.
Uploading from PC to Recorder
Only DVTR-680 format files can be uploaded from the PC to the recorder. Three
upload options are available.
1. Select ALL FOLDERS option to upload all files in all folders. Select
FOLDER option to upload all files in the selected folder. Select FILE option
to download a selected file.
1. Files can be deleted, copied, cut and renamed. Select desired file then
right click on the desired function on the pull down menu.
2. Selected files can be copied, or deleted within folders. Select desired file,
then right click on the desired function on the pull down menu.
3. Files can be moved from the present folder to a selected folder by dragging
the selected file to the desired folder.
Downloading Files from Recorder
Click on any folder within the DVTR-680 group to download files from the re-
corder to the PC. Three download options are available.
1. Select ALL FOLDERS option to download all files in all folders. Select
FOLDER option to download all files in selected folder. Select FILE option to
download the selected file.
Using the PC Disk Explorer
Use the PC Disk Explorer to browse PC file folders. Four icons, Download,
Upload, File Converter, or File Editor provide quick access these functions.
Using the DVTR-680 File Player
Use the DVTR-680 file player to playback files downloaded from the recorder or
compatible files located elsewhere in your computer.
1. Three recorder file formats (LP, SP, and HQ) including standard WAV file
format can be played back.
2. When a file is selected for playback, the file name, format, record quality,
record date and recording length will be displayed in the file list box.
3. Start playback by clicking on the PLAY icon. Playback can be paused or
stopped by clicking on the Pause or Stop icon.
4. Select Slow, Normal or Fast during playback using option setting window.
5. During playback, click on speaker icon to mute and un-mute playback.

9
Questions and AnswersI
The recorder display is blank or faint.
1. Check that the two batteries are installed correctly.
2. Check if batteries require replacement.
3. Check if display contrast adjusted is adjusted too low.
The recorder does not respond when the buttons are pressed.
1. The Normal/Hold switch maybe in Hold position. Move to Normal position.
Unable to make a recording.
1. The recorders memory is full or folder message counter is full.
The recorder does not stop recording in automatic record mode when
there is silence.
1. The Mic Sensitivity is set too high, or the background noise level may be
equal to the sound source being recorded. Try decreasing the Mic Sensi-
tivity until recording stops.
2. Manual record mode may have to be used instead of automatic record mode.
The recorder does not start recording in automatic record mode when
there is sound.
1. The microphone sensitivity level is set too low, try increasing the level.
2. The level of the sound source is low. Get closer to the sound source.
3. Try recording in manual record mode.
vance notice in order for you to make necessary modifications to
maintain uninterrupted service.
g) Should you experience trouble with this equipment, please contact
Daval Technologies LLC, PO Box 27, Chappaqua, New York, 10514,
Tel: 914-251-9220 for repair or warranty information. If the equipment
is causing harm to the telephone network, the telephone company
may request that you disconnect the equipment until the problem is
resolved.
WARNING: Changes or modifications to this equipment not expressly
approved by the party responsible for compliance could void the
user's authority to operate the equipment.
h) Please follow instructions for repairing if any (e.g. battery replace-
ment section); otherwise do not alternate or repair any parts of device
except specified.
i) Connection to party line service is subject to state tariffs. Contact
the state public utility commission, public service commission or cor-
poration commission for information.
j) NOTICE: If your home has specially wired alarm equipment con-
nected to the telephone line, ensure the installation of this
US:RNAKXNANDDVTR-680 equipment does not disable your alarm
equipment. If you have questions about what will disable alarm equip-
ment, consult your telephone company or a qualified installer.
NOTICE: According to telephone company reports, AC electrical
surges, typically resulting from lightning strikes, are very destructive
to telephone equipment connected to AC power sources. To minimize
damage from these types of surges, a surge arrestor is recommended.
Applicable for Coin or Pay Phone Only
To comply with state tariffs, the telephone company must be given
notification prior to connection for customer-owned coin or credit card
phone. In some states, the state public utility commission, public ser-
vice commission or corporation commission must give prior approval
of connection.
This equipment complies with Part 68 of the FCC Rules and the re-
quirements adopted by the ACTA. On the bottom of this equipment
is a label that contains, among other information, a product identifier
in the format US:AAAEQ##TXXXX.If requested, this number must
be provided to the telephone company.
b) An applicable certification jacks Universal Service Order Codes
(USOC) for the equipment is provided (i.e., RJ11C) in the packaging
with each piece of approved terminal equipment.
c) A plug and jack used to connect this equipment to the premises
wiring and telephone network must comply with the applicable FCC
Part 68 rules and requirements adopted by the ACTA. A compliant
telephone cord and modular plug is provided with this product. It is
designed to be connected to a compatible modular jack that is also
compliant. See installation instructions for details.
d) The REN is used to determine the number of devices that may be
connected to a telephone line. Excessive RENs on a telephone line
may result in the devices not ringing in response to an incoming call.
In most but not all areas, the sum of RENs should not exceed five
(5.0). To be certain of the number of devices that may be connected
to a line, as determined by the total RENs, contact the local tele-
phone company. For products approved after July 23, 2001, the REN
for this product is part of the product identifier that has the format
US:AAAEQ##TXXXX. The digits represented by ## are the REN
without a decimal point (e.g., 03 is a REN of 0.3). For earlier prod-
ucts, the REN is separately shown on the label.
e) If this DVTR-680 equipment cause’s harm to the telephone net-
work, the telephone company will notify you in advance that tempo-
rary discontinuance of service may be required. But if advance no-
tice isn't practical, the telephone company will notify the customer as
soon as possible. Also, you will be advised of your right to file a
complaint with the FCC if you believe it is necessary.
f) The telephone company may make changes in its facilities, equip-
ment, operations or procedures that could affect the operation of the
equipment. If this happens the telephone company will provide ad-
FCC StatementJ
Care and MaintenanceH
Your DVTR-680 Digital Voice Tele-Recorder®is designed to give years of
trouble free service. Please read the following maintenance instructions.
1. Keep the recorder dry. If it gets wet, wipe it dry immediately. Liquids can
contain minerals that can corrode the electronic circuits.
2. Handle the recorder gently and carefully. Dropping it can damage the
circuit boards which can cause it to malfunction
3. Store recorder in normal temperatures. Temperature extremes can
shorten the life of electronic devices and distort or melt plastic parts.
4. Wipe the recorder with a damp cloth to keep it looking new.
5. Do not use harsh chemicals, cleaning solvents, or strong detergents to
clean the recorder.
6. Use fresh batteries, old or weak batteries can leak chemicals that can
destroy electronic circuits.

10
Power Requirements Two AAA 1.5V batteries or; optional docking station
AC power adapter rated at: 120VAC to 6VDC
300mA, center positive, 10 mm LONG x 5 mm OD
x 2 mm ID plug
Battery Life Approximately 14 hours in playback mode set at
medium volume level using alkaline batteries
Microphone jack Φ3.5mm, mono, impedance 2KΩ
Earphone jack Φ3.5mm, mono, impedance 8 Ωor more
Built-in speaker Φ28mm, 8Ωdynamic speaker
Microphone Built-in electret condenser microphone
Maximum output power 110mW, THD = <10%
Frequency Response 300~3150Hz
Recording time HQ mode about 120 minutes
SP mode about 340 minutes
LP mode about 880 minutes
VOX Cut Off Time 3 Seconds, ± 1 Second
USB Miniature USB connector
Docking connector 10 pin
Dimensions 3.87 x 1.5 x .875 inches
Weight (with batteries) 2.6 oz
Specifications and product designs are subject to change without notice.
012207
SpecificationsK
This device complies with Part 15 of the FCC Rules. Operation is
subject to the following two conditions:
1. This device may not cause harmful interference, and
2. This device must accept any interference received, including inter-
ference that may cause undesired operation.
NOTE: This equipment has been tested and found to comply with
the limits for a Class B digital device, pursuant to Part 15 of the FCC
Rules. These limits are designed to provide reasonable protection
against harmful interference in a residential installation. This equip-
ment generates, uses and can radiate radio frequency energy and, if
not installed and used in accordance with the instructions, may
cause harmful interference to radio communications.
However, there is no guarantee that interference will not occur in a
particular installation. If this equipment does cause harmful interfer-
ence to radio or television reception, which can be determined by
turning the equipment off and on, the user is encouraged to try to
correct the interference by one or more of the following measures:
Reorient or relocate the receiving antenna.
Increase the separation between the equipment and receiver.
Connect the equipment into an outlet on a circuit different from that
to which the receiver is needed.
Consult the dealer or an experienced radio/TV technician for help.
This Class B digital apparatus complies with Canadian ICES-003.
This product meets the applicable Industry Canada technical specifi-
cations.
Cet appareil numérique de la classe B est conforme à la norme
NMB-003 du Canada.
E. Some states do not allow limitations on how long an implied warranty lasts
and or do not allow the exclusions or limitations of incidental or
consequential damages, so the above limitations or exclusions may not
apply to you.
F. This warranty gives you specific legal rights, and you may also have other
rights which vary from state to state.
G. This warranty does not extend to any DVTR-680 sold by Daval Technolo-
gies LLC which has been subjected to misuse, neglect, accident, improper
application, improper installation or to use in violation of the instructions
furnished by Daval Technologies LLC. This warranty does not extend to or
apply to any DVTR-680 which has been repaired or altered by any
persons who have not been expressly approved by Daval Technologies
LLC.
H. Daval Technologies LLC shall not be liable for any special or
consequential damages or for loss or expense directly or indirectly arising
from use of the products or any inability to use them either separately or in
combination with other equipment or product accessories or from any
other cause.
I. Daval Technologies reserves the right to make changes in the design of
the DVTR-680 and to make additions or improvements to the DVTR-680
without incurring any obligation to modify any DVTR-680 previously sold.
A. Daval Technologies warrants that the DVTR-680 sold by Daval Technolo-
gies LLC within the continental limits of the United States, Hawaii and
Alaska, are free from defects in materials and workmanship under normal
use and service for one (1) year.
B. This warranty is applicable only to the original purchaser of the DVTR-
680, when accompanied by a sales receipt stating the date of purchase
and name of the company from which purchased. This warranty is in lieu
of and excludes all other warranties, expressed or implied, including any
implied warranty of merchantability or fitness, and of any other obligation
on the part of Daval Technologies LLC.
C. If the DVTR-680 shall prove to be defective, then Daval Technologies LLC
shall either replace or repair the DVTR-680 at its discretion as follows:
1. At no cost to the original purchaser except shipping charges, within 90
days of the date of purchase.
2. Warranty service for your DVTR-680 is provided by Daval Technologies
LLC. From 91 days to 365 days, you may return the DVTR-680 to Da-
val Technologies LLC at the following address:
Daval Technologies LLC
PO Box 27
Chappaqua, New York 10514
Tel: 914-251-9220
C. Shipping charges are at the customer's expense. Please include a copy of
your sales receipt and a check or money order made out to Daval Tech-
nologies LLC for the amount of $7.50 to cover shipping and handling.
D. There is no informal dispute settlement mechanism available.
Limited WarrantyL
Table of contents
Popular Telephone Accessories manuals by other brands

Leviton
Leviton 47603-TSV Instructions for use

Nortel
Nortel Nortel IP Phone 1120E user guide

Lucent Technologies
Lucent Technologies SPIRIT 1224 Controller Customer installation instructions

Inseego
Inseego BPC100 quick start guide

Swisscom
Swisscom classic s124 user manual

Gigaset
Gigaset C530 IP user manual


