Daymakers Alpine touring adapters User manual

$/3,1(7285,1*$'$37(56
2:1(560$18$/

Table of Contents
Introduction
Box Contents
Step 1. Determine the Boot Sole Length
Step 2. Remove the Heel Plate
Step 3. Determine the Heel Plate Position
Step 4. Assemble the Heel Plate
Step 5. Position the Wire Bails
Step 6. Test Fit and Final Assembly
How To: Step In to the Daymakers
How To: Use the Elevators
How To: Step Out of the Daymakers
Things Not to Do
Troubleshooting
Maintenance
Warranty and Returns
Contact Info
∤∤∤∤∤∤∤∤∤∤∤∤∤∤∤∤∤∤∤∤∤∤∤∤∤∤∤∤∤∤∤∤∤∤∤∤∤∤∤∤∤∤∤∤∤∤∤∤∤∤∤∤∤∤∤∤∤∤∤∤∤∤∤∤∤∤∤3
∤∤∤∤∤∤∤∤∤∤∤∤∤∤∤∤∤∤∤∤∤∤∤∤∤∤∤∤∤∤∤∤∤∤∤∤∤∤∤∤∤∤∤∤∤∤∤∤∤∤∤∤∤∤∤∤∤∤∤∤∤∤∤∤∤∤∤∤∤∤∤∤4-5
∤∤∤∤∤∤∤∤∤∤∤∤∤∤∤∤∤∤∤∤∤∤∤∤∤∤∤∤∤∤∤∤∤∤∤∤∤∤∤∤∤∤∤∤∤∤∤∤∤∤∤∤∤∤∤∤∤∤∤∤∤∤∤∤∤∤∤∤∤∤6-7
∤∤∤∤∤∤∤∤∤∤∤∤∤∤∤∤∤∤∤∤∤∤∤∤∤∤∤8-9
∤∤∤∤∤∤∤∤∤∤∤∤∤∤∤∤∤∤∤∤∤∤∤∤∤∤∤∤∤∤∤∤∤∤∤∤∤∤10-11
∤∤∤∤∤∤∤∤∤∤∤∤∤∤∤∤∤∤∤∤12-13
∤∤∤∤∤∤∤∤∤∤∤∤∤∤∤∤∤∤∤∤∤∤∤∤∤∤∤∤∤∤∤∤∤∤∤14-15
∤∤∤∤∤∤∤∤∤∤∤∤∤∤∤∤∤∤∤∤∤∤∤∤∤∤∤∤∤∤∤∤∤∤∤∤∤∤16-17
∤∤∤∤∤∤∤∤∤∤∤∤∤∤∤∤∤∤∤∤∤∤∤∤∤∤∤∤∤∤∤18-19
∤∤∤∤∤∤∤∤∤∤∤∤∤∤∤∤∤∤∤∤∤∤∤∤∤∤∤∤∤∤∤∤∤20-21
∤∤∤∤∤∤∤∤∤∤∤∤∤∤∤∤∤∤∤∤∤∤∤∤∤∤∤∤∤∤∤∤∤∤∤∤∤∤∤∤∤∤∤∤∤22-23
∤∤∤∤∤∤∤∤∤∤∤∤∤∤∤∤∤∤∤∤∤∤∤∤∤∤∤∤∤∤24-25
∤∤∤∤∤∤∤∤∤∤∤∤∤∤∤∤∤∤∤∤∤∤∤∤∤∤∤∤∤∤∤∤∤∤∤∤∤∤∤∤∤∤∤∤∤∤∤∤∤∤∤∤∤∤∤∤∤∤∤∤∤26-27
∤∤∤∤∤∤∤∤∤∤∤∤∤∤∤∤∤∤∤∤∤∤∤∤∤∤∤∤∤∤∤∤∤∤∤∤∤∤∤∤∤∤∤∤∤∤∤∤∤∤∤∤∤∤∤∤∤∤∤∤∤28-29
∤∤∤∤∤∤∤∤∤∤∤∤∤∤∤∤∤∤∤∤∤∤∤∤∤∤∤∤∤∤∤∤∤∤∤∤∤∤∤∤∤∤∤∤∤∤∤∤∤∤∤∤∤∤∤∤∤∤∤∤∤∤∤∤∤∤∤∤∤∤∤∤∤30
∤∤∤∤∤∤∤∤∤∤∤∤∤∤∤∤∤∤∤∤∤∤∤∤∤∤∤∤∤∤∤∤∤∤∤∤∤∤∤∤∤∤∤∤∤∤∤∤∤∤∤∤∤∤∤∤∤31
∤∤∤∤∤∤∤∤∤∤∤∤∤∤∤∤∤∤∤∤∤∤∤∤∤∤∤∤∤∤∤∤∤∤∤∤∤∤∤∤∤∤∤∤∤∤∤∤∤∤∤∤∤∤∤∤∤∤∤∤∤∤∤∤∤∤∤∤∤∤∤∤∤∤32
3
7$%/(2)&217(176
2
All Rights Reserved. © 2017, Daymaker Touring LLC. Print Version V4

-
-
-
Always ski with a trusted and prepared partner and carry
an avalanche beacon, shovel, and probe when traveling in
avalanche terrain. Know how to use your equipment.
Backcountry skiing is inherently dangerous and requires
an acceptance of the risks involved, and implies a willing-
ness to take responsibility for educating oneself about
these dangers and ways to mitigate them.
We recommend that backcountry travelers take an AIARE
Level One class or the equivalent, and practice the skills
they learn regularly with their partner.
5
BE SAFE IN THE BACKCOUNTRY!
The Daymakers Alpine Touring Adapters allow for any stand-
ard boot and binding to be used in conjunction with climbing
skins to create an extremely capable alpine touring setup.
Like any high-performance lightweight equipment, Day-
makers rely on proper setup, usage, and maintenance to
deliver optimum results.
Failure to follow these instructions may result in pre-
mature wear, failure of product, user injury or even death!
These are all things that will NOT make your day, so please
take the time to read these instructions in full before using
or assembling the product. If you are not comfortable setting
up the Daymakers, please take them to your favorite ski shop
or contact us directly for assistance. We are happy to help!
-
-
-
,1752'8&7,21
4

7
A
B
C
D
E
F
G
H
I
J
K
L
M
N
Two heel clamp assemblies
One Daymaker assembly, left
One Daymaker assembly, right
Two heel plates
Two heel lugs
Owners manual
Two 7mm wrenches
Two M3 x 25mm screws (spares)
Nine M3 x 10mm screws (3 spares)
Nine M3 lock nuts (3 spares)
Four pivot bolts (pre-installed)
Six large washers (2 spares) , (4 pre-installed)
Six small washers (2 spares) , (4 pre-installed)
Six M4 lock nuts (2 spares) , (4 pre-installed)
6
%2;&217(176
E
D
CBA F
H
G
I
J
K
MLN
$/3,1(7285,1*$'$37(56
2:1(560$18$/

9
315 mm
315 mm
BSL Measurement
-
-
-
-
-
The “Boot Sole Length”, also commonly abbreviated as BSL,
is the exact length of the boot at the boot lugs in millimeters.
This can be found via a number of ways.
The BSL is typically molded into the boot near the heel lug.
If the number is illegible, check the other boot.
If the BSL cannot be found on either boot, accurately mea-
sure the distance between the lugs with a metric ruler.
Alternatively, you can usually web-search the BSL online by
searching for the make, model, and size of your boot.
You can note your boot’s BSL here: _____________________
8
67(3DETERMINE THE BOOT SOLE LENGTH
-
-
-
-
-
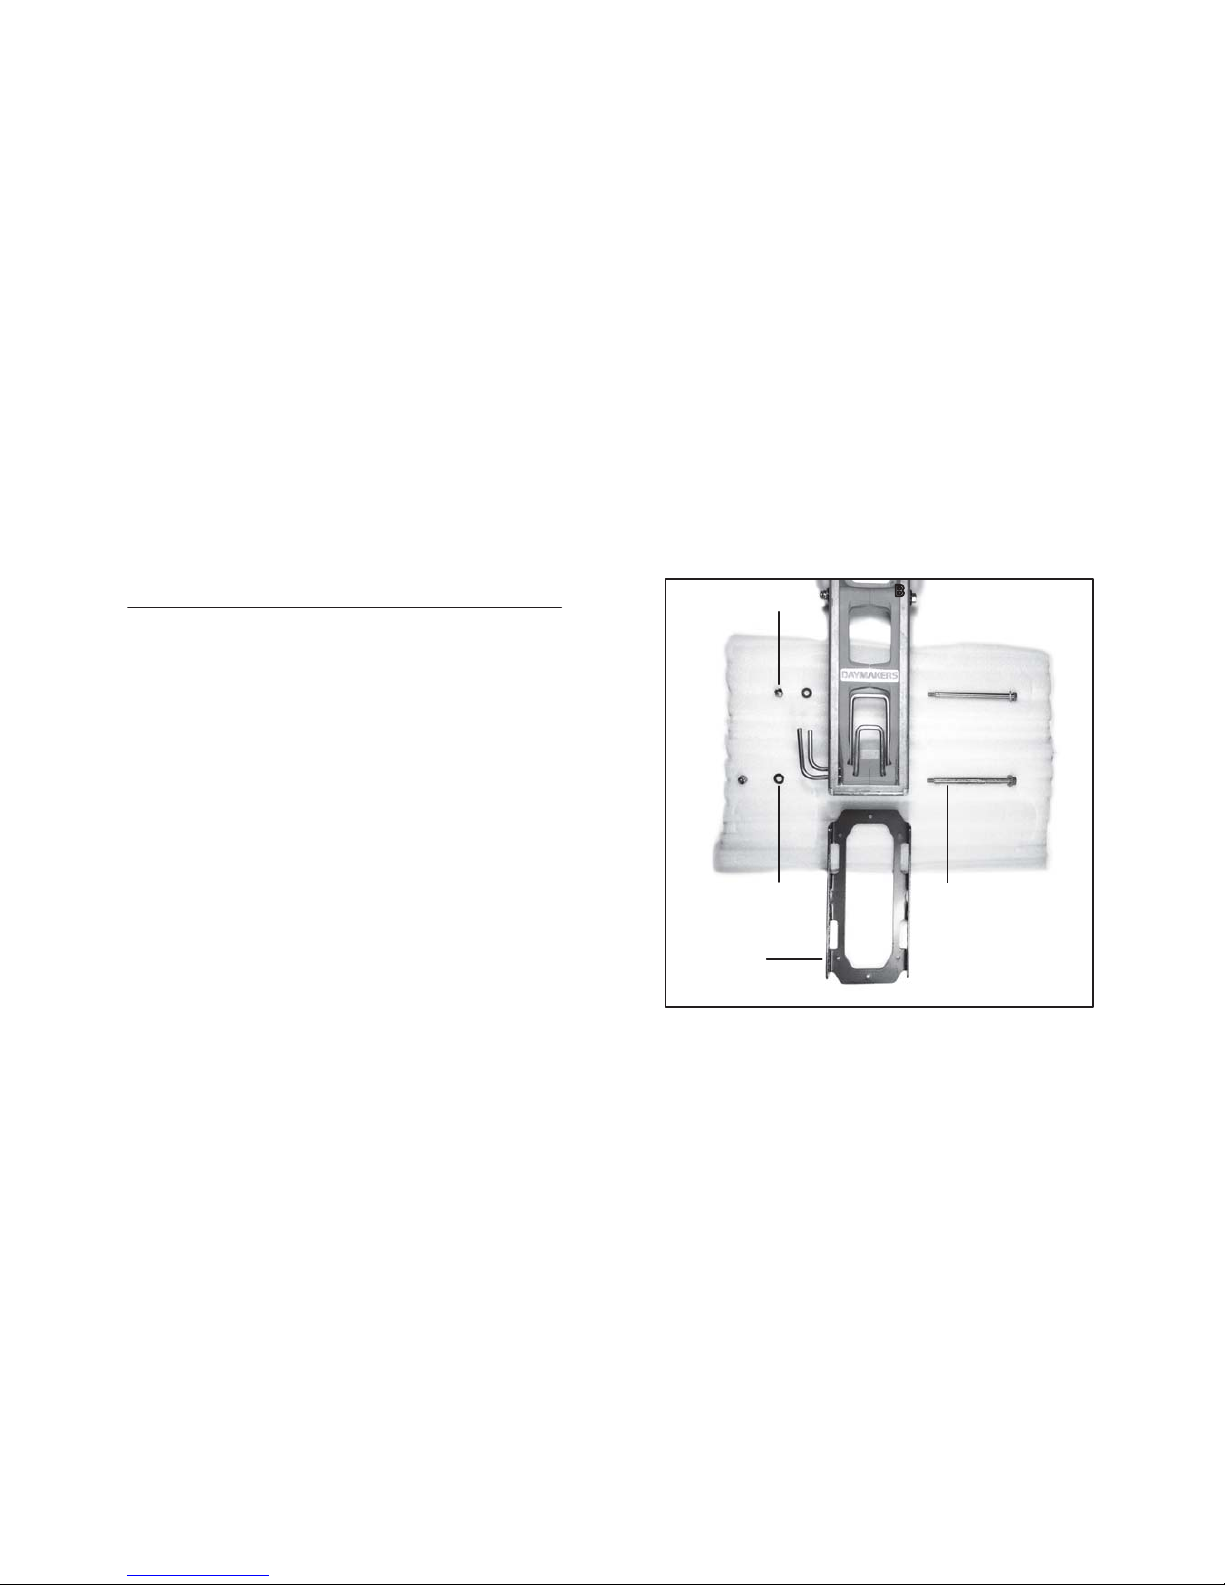
The blue heel plate comes pre-installed with the nuts finger-
tight. Remove the two sets of nuts, washers, and bolts.
The bolt that passes through the long orange link is greased.
Remove it carefully and set it on the foam divider or another
clean surface.
Avoid hinging the Daymaker without the rear bolt through
the link as this will cause it to unseat and move out of
position.
Do not remove the grease from the bolt and take care to
avoid contaminating it or other parts with debris.
It is recommended to set up one Daymaker completely and
then build the second to match.
10
67(3 REMOVE THE HEEL PLATE
Greased
Ungreased
Foam Divider
Bolt /
Large Washer
x2
Small Washer
x2
Heel Plate
M4 Locknut
x2
11

-
-
-
-
-
-
-
With the heel plate removed, find the stamped number on
the bottom of the Daymakers that is the closest to your BSL.
If you are between sizes round down to the lower value.
If the number is on the left rail, align the heel plate so that
points to that number. This is POSITION A.
If the number is on the right rail, align the heel plate so that
points to that number. This is POSITION B.
It is not necessary to install the bolts at this time.
You can note your configuration here:
For BSL__________in Position______ pointed at size______
12
67(3
DETERMINE THE HEEL PLATE POSITION
13

*
-
-
-
-
-
YOU WILL NEED A PHILLIPS SCREWDRIVER FOR THIS STEP *
If you will be using assembly POSITION A, you will install the
heel lug on the side.
If you will be using assembly POSITION B, you will install the
heel lug on the side.
With assembly position determined, place M3 nuts into the
heel lug and attach to the heel plate with M3 x 10mm screws.
With the heel lug installed, position the heel in the position
determined in Step 3, and install the bolts and washers.
Ensure the greased bolt is placed through the long link.
Install the small washers and M4 nuts finger tight. Do not
tighten all the way until sizing is confirmed.
14
67(3 ASSEMBLE THE HEEL PLATE
15
-
-
-
-
-
-
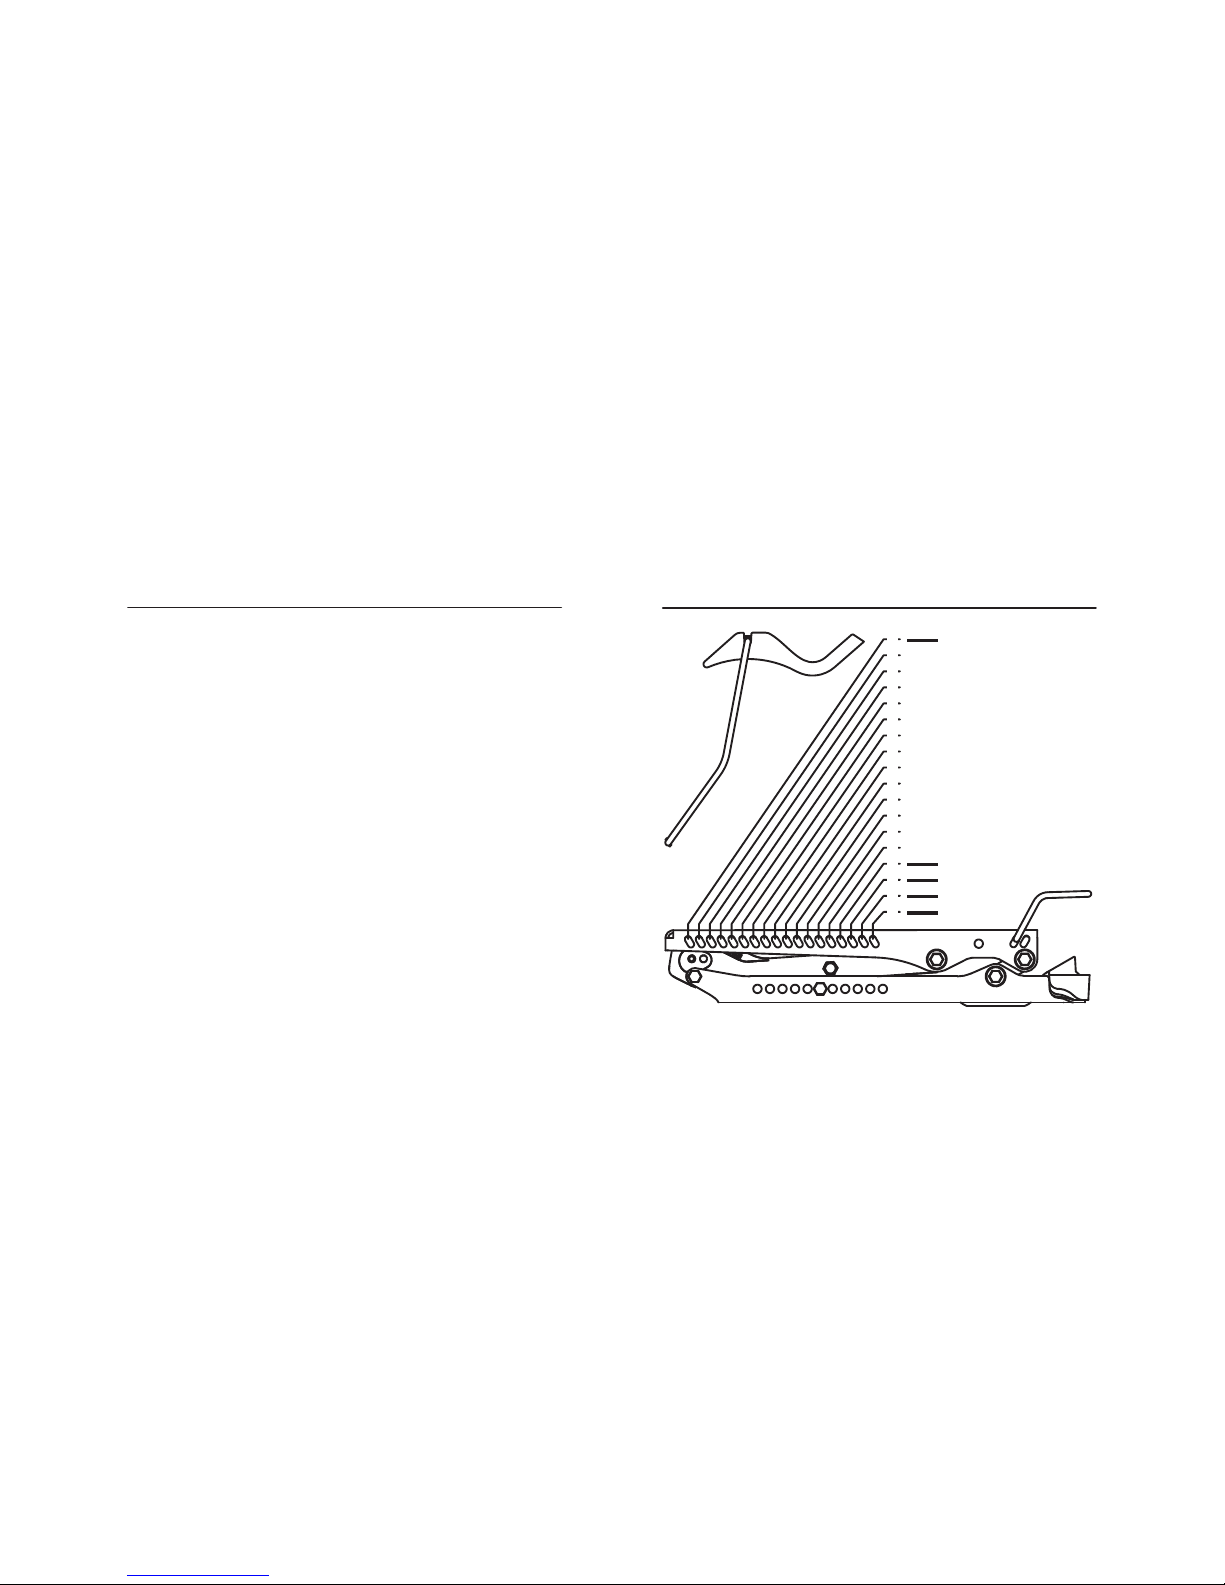
The toe bail is installed in the rear-most of two mounting
slots. This position is ideal for most applications.
The front slot can be used to move the boot forward and
improve clearance at the heel in certain applications and
should only be used if heel clearance is inadequate.
Use the chart to the right to determine the correct slot to
install the heel bail.
Install the heel bail by positioning it as shown so that the
keyed end will pass through the slot. Align both sides.
If the fit is too loose, move the heel bail one slot forward.
If the clamp cannot be closed, move the heel bail one slot
rearward.
16
67(3 POSITION THE WIRE BAILS
360
354
347
340
334
327
320
314
307
300
294
287
280
274
270
264
257
250
___
___
___
___
___
ROUND DOWN IF
BETWEEN SIZES
SHIFT HEEL BAIL
ONE SLOT FOR-
WARD IF FRONT
SLOT IS USED TO
MOUNT TOE BAIL
17
INSTALL BAIL IN SLOT NEAREST TO YOUR BSL
1
2
3
4
5
6
7
8
9
10
11
12
13
14
15
16
17
18

-
-
-
-
Test fit the Daymakers with the ski and boot on the work
bench.Cycle the boot through its full range of motion, and
ensure contact is not occurring at the toe piece or the heel
piece.
Ensure the heel clamp is tight enough. you should not see
lift between the boot and the top deck. The boot should not
slide side to side. Move the wire bail one slot forward if these
symptoms are identified.
If contact or other fit issue is occurring, please refer to the
troubleshooting section on pages 28-29 to correct fit issues.
If boot clears binding through full range of motion tighten
the M4 lock nuts that attach the heel plate completely.
18
67(3 TEST FIT AND FINAL ASSEMBLY
19
-
-
-
-
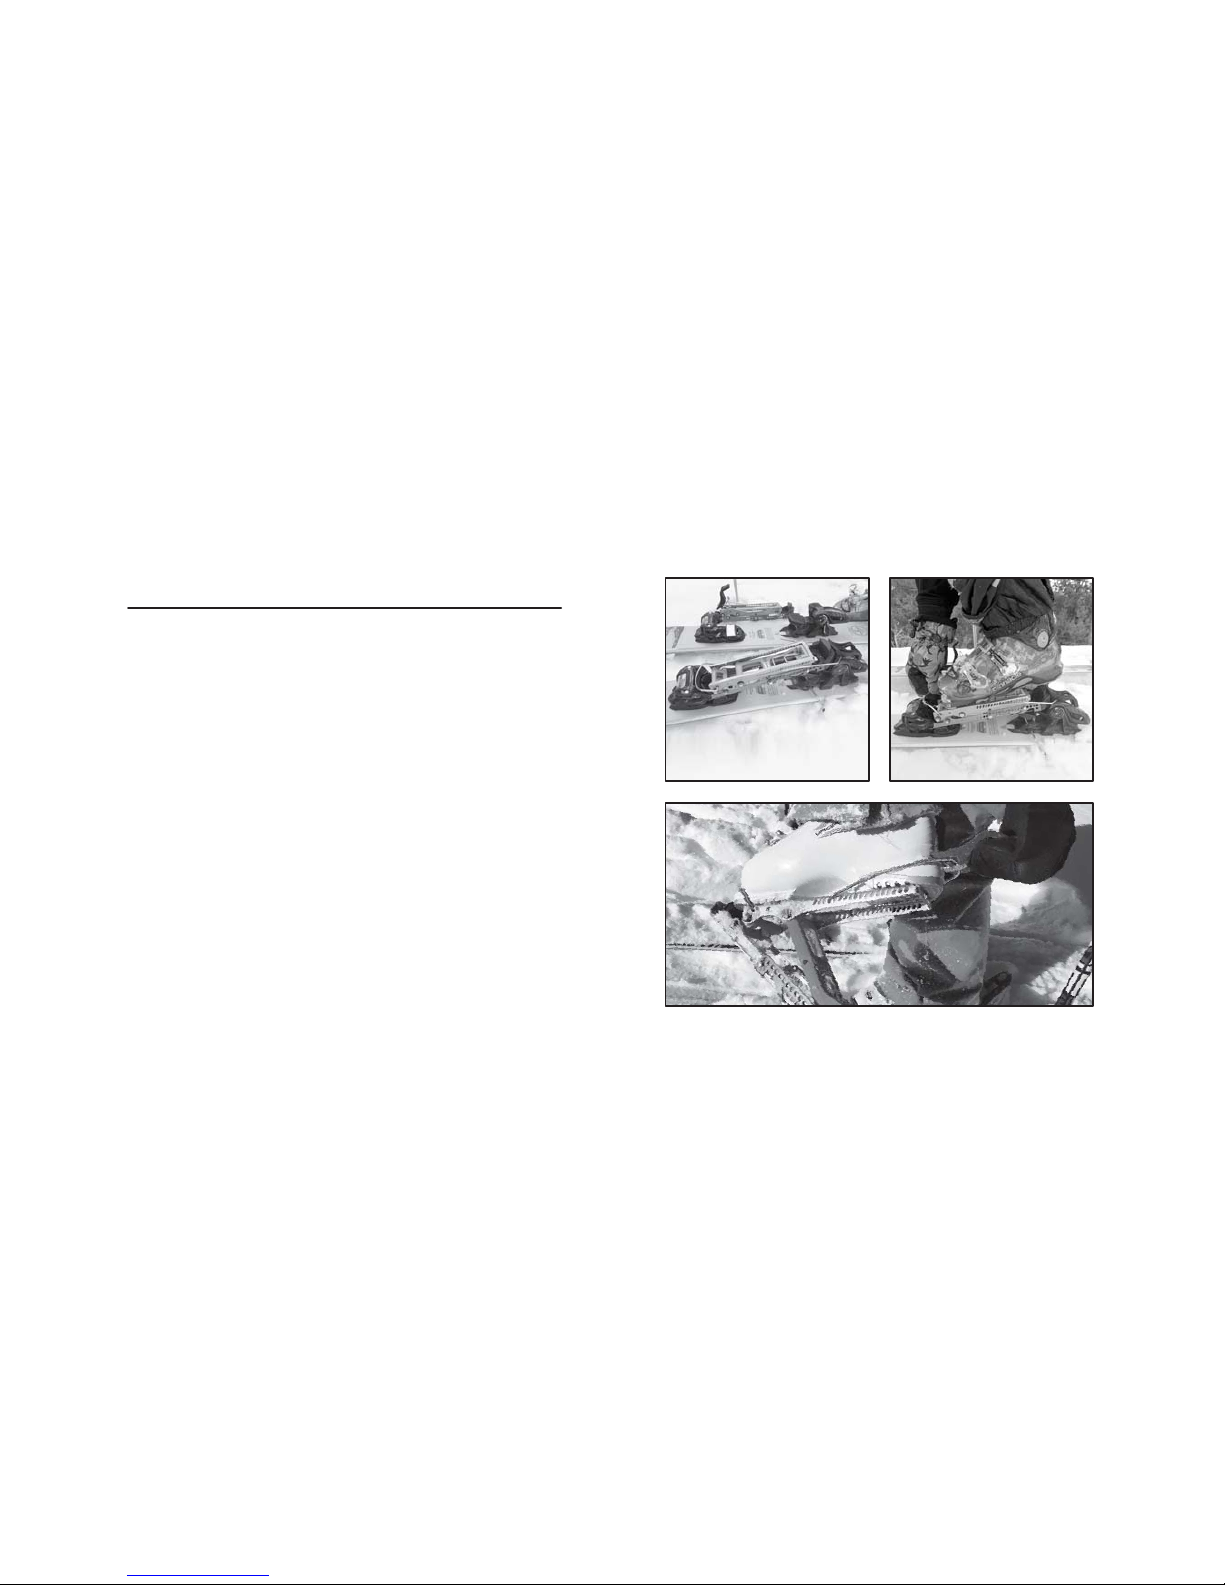
The Daymakers should be attached to the boot first, and
then stepped into the skis. There are two ways to do this.
The first method is to set the Daymaker in the ski‘s binding
with the heel bail and clamp flipped back. Lift and hold the
toe bail and slide your boot lug in. Grab the heel clamp and
clamp the boot into the Daymaker. Step down firmly to step
into the ski’s bindings.
The second method is to stand, using a ski pole for balance,
and lift one leg up in front of the other leg. Holding the
toe bail up, slide the toe bail over your boot lug and hold the
Daymaker against your boot. Slide your hand back to the heel
clamp and close. Step into your ski binding as normal.
Ensure clamp is centered in bails when closing the clamp.
20 21
+2:72 STEP IN TO THE DAYMAKERS

-
-
-
-
-
The Daymakers have three walking positions, neutral, med-
ium, and high. Use the neutral position for flat terrain and
downhills. Use the medium and high positions for uphills.
The Daymakers should be put on so that the elevators are on
the inside, facing each other.
To raise the elevators, take a staggered stance and hinge
your front foot. Reach down and across to flip the desired
elevator lever up. The outer lever raises the medium elevator,
the inner lever raises the big elevator.
To lower the elevators, use the same technique and push the
lever down.
Never reach into the hinge to lift or lower the elevators.
22 23
+2:72 USE THE ELEVATORS

-
-
To take the Daymakers off, reach down and flip the heel clamp
of the Daymaker down to eject your boot. You can also use
your ski pole basket to do this. Repeat on the other side.
Once your boots are free, eject the Daymakers out of your
ski’s bindings.
24 25
+2:72 STEP OUT OF THE DAYMAKERS

-
-
-
-
Do not step down on the Daymaker’s top deck to install them;
this could result in damage.
Do not reach into the hinge to raise the elevators.
If you feel snow building up in the Daymaker, stop and clear it
from the hinge with your ski pole to avoid damage.
When closing the heel clamp, ensure the clamp is centered in
the bail. It will not close if it is off-center.
26
7+,1*612772'2
27

BOOT CONTACTS TOE PIECE OF BINDING
BOOT CONTACTS HEEL PIECE OF BINDING
HEEL CLAMP IS TOO LOOSE
HEEL CLAMP CANNOT CLOSE
PLAY IN LINKAGE
28
7528%/(6+227,1*
Ensure toe bail is installed in rear slots.
Ensure boot is snug in bails; a loose fit will not pull the boot
forward enough. Try moving the heel bail one slot forward.
Move toe bail to forward mounting position and retry.
Reassemble heel plate flipping into the other position and
in the next largest size.
Move the heel bail one slot forward.
Ensure the clamp is centered in the bail.
Ensure the clamping edge is resting on the boot lug before
rotating it up
Move heel bail one slot backward
Inspect all pivot hardware for tightness. Replace any lost hard-
ware with included spares. Thread-lock is recommended.
29

Always visually inspect your Daymakers before using them to
ensure assembly hardware is tight, they are set to the correct
size for your boot and that no parts are damaged or missing.
If pivots become loose they should be tightened immediately.
The heel clamps have molded in 7mm wrenches.
If a nut becomes loose consistently, it should be removed and
discarded. Clean the male thread of any grease, apply red
permanent thread-lock and install a new M4 nylon lock nut.
The pivot nuts should be tight.
If you suspect a bushing is worn, check it by wiggling the two
connecting parts. If any motion other than rotation is present
the bushing is worn. Please visit Daymakertouring.com and
contact us for assistance.
-
-
-
-
0$,17(1$1&(
30
Daymaker Touring will replace broken parts subject to normal operating
conditions and usage of said adapters, for up to 6 months after the pur-
chase of the product. Daymaker Touring is unbounded to pay for the
shipping cost, this is assumed to be the responsibility of the customer. If
you believe that there has been a manufacturing defect in your product,
please notify Daymaker Touring before use. Under the circumstance that
there is a manufacturing defect, Daymaker Touring will assume respons-
ibility of the shipping cost. Customer must follow “How To Return An
Item” protocols located on the FAQ section of the website to receive their
replacement.
Satisfaction Guarantee:
If you do not believe this product is right for you, or are not satisfied with
its performance, you are eligible for a full value refund. To be eligible, the
product must be returned within 30 calendar days of receipt from the
manufacturer, regardless of communications with Daymaker Touring.
Customer is fully responsible for shipping the product to be returned to
Daymaker Touring.
Daymaker Touring warranties may not be transferred and are reserved
for the original purchaser only. All warranty returns must be supported
by a copy of the original Proof of Purchase or Daymaker Touring order #.
:$55$17<$1'5(78516
31


