DaytonAudio TT-1BTB User manual

Model: TT-1BTB / TT-1BTW
User Manual
HIGH FIDELITY BELT
DRIVE TURNTABLE
WITH UNIVERSAL
TONEARM/HEADSHELL

2
Safety Information
To reduce the risk of electric shock, do not remove cover.
No user serviceable parts inside. Refer servicing to qualied
personnel. To reduce the risk of re and shock do not expose
unit to rain or moisture. The unit should be connected to an
earth grounded AC electrical socket. The unit should be oper-
ated in a well ventilated area. Minimum clearance is 2 inches
from the ventilation openings.
FCC STATEMENT
1. This device complies with Part 15 of the FCC Rules. Operation is subject to the following two conditions:
(a) This device may not cause harmful interference.
(b)This device must accept any interference received, including interference that may cause
undesired operation.
IMPORTANT SAFETY INSTRUCTIONS
NOTE: This equipment has been tested and found to comply with the limits for a Class B digital device,
pursuant to part 15 of the FCC Rules. These limits are designed to provide reasonable protection
against harmful interference in a residential installation. This equipment generates, uses and can
radiate radio frequency energy and, if not installed and used in accordance with the instructions, may
cause harmful interference to radio communications. However, there is no guarantee that interference
will not occur in a particular installation. If this equipment does cause harmful interference to radio
or television reception, which can be determined by turning the equipment off and on, the user is
encouraged to try to correct the interference by one or more of the following measures:
- Reorient or relocate the receiving antenna.
- Increase the separation between the equipment and receiver.
- Connect the equipment into an outlet on a circuit different from that to which the receiver is connected.
- Consult the dealer or an experienced radio/TV technician for help.
Changes or modications not expressly approved by the party responsible for compliance could void
the user's authority to operate the equipment.

3
Welcome
Thank you for purchasing The Dayton Audio TT-1BT Turntable. This belt drive turntable can play 33-1/3RPM and
45RPM records and can connect to any audio system with a variety of outputs. Before using this product, read
through the entire user manual to ensure proper setup and operation. Please keep this manual for future reference.
Contents
Controls and Functions.............................................................................................................................................. 4-5
Top Panel ....................................................................................................................................................................4
Rear Panel ..................................................................................................................................................................4
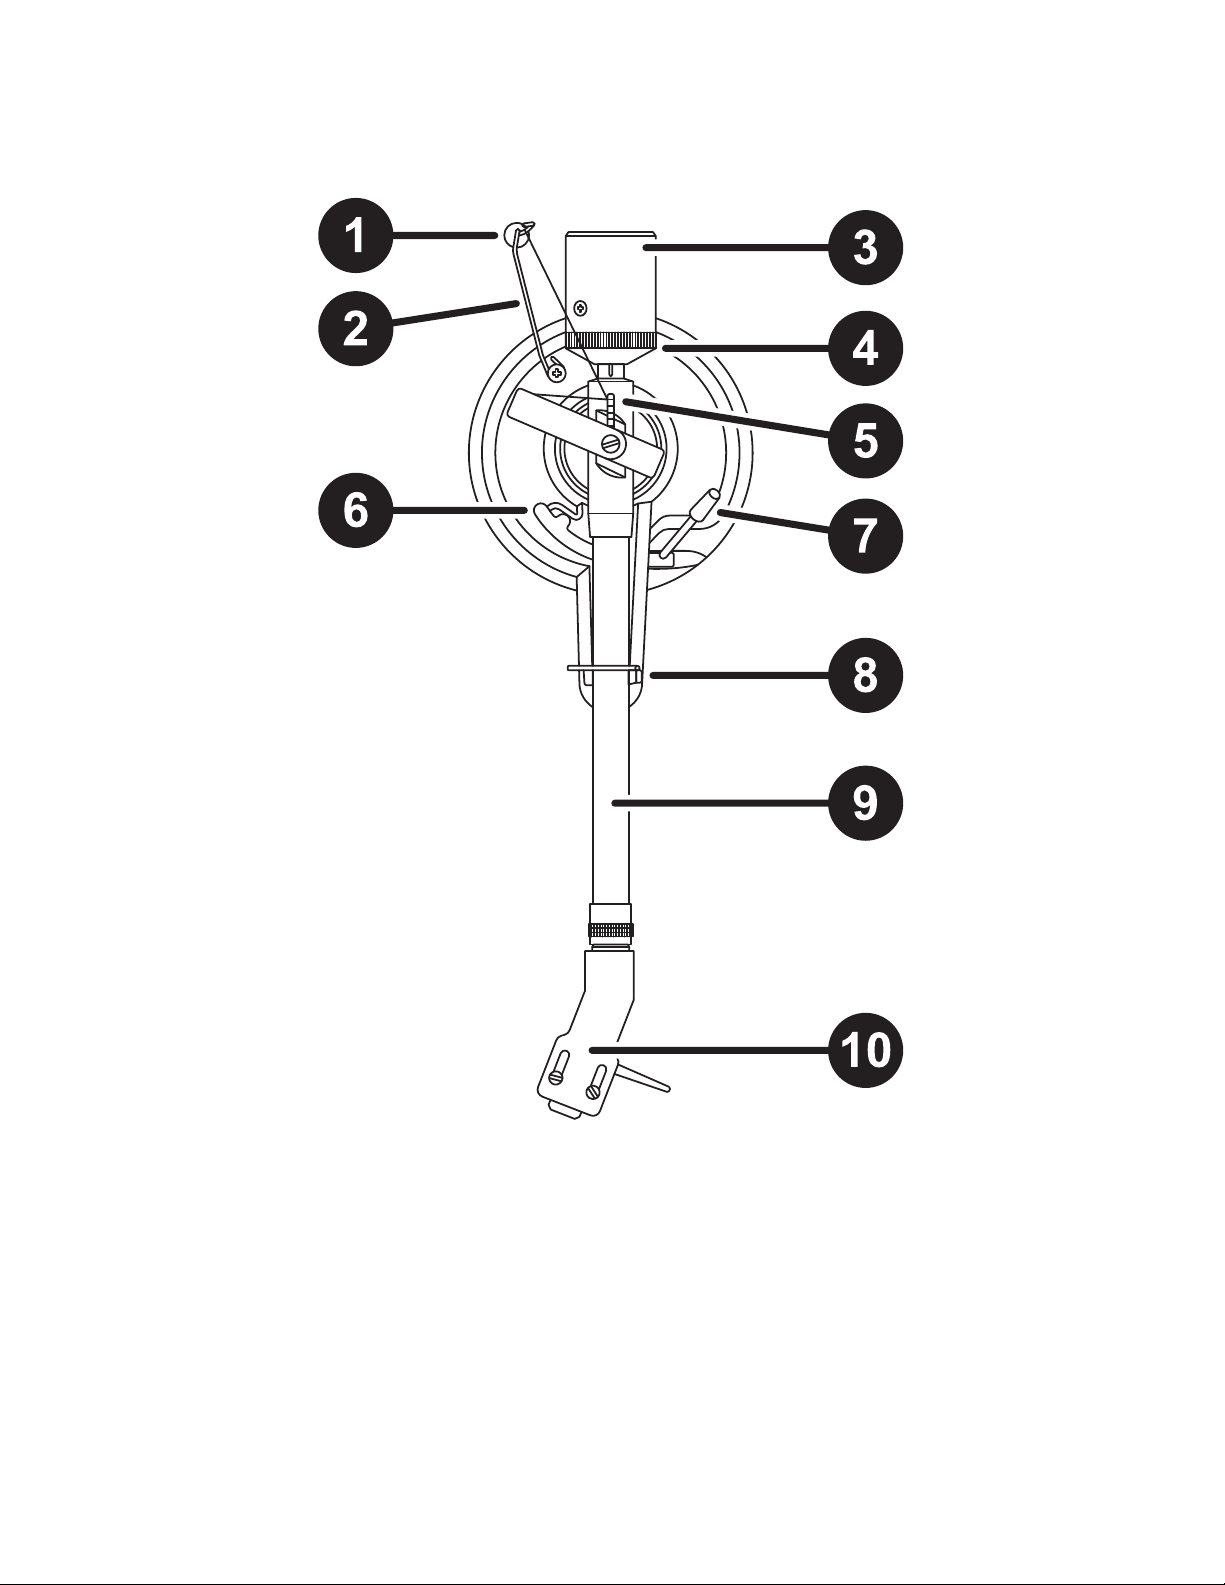
Tonearm Assembly .....................................................................................................................................................5
Setup ............................................................................................................................................................................. 6-9
Installing the Dust Cover.............................................................................................................................................6
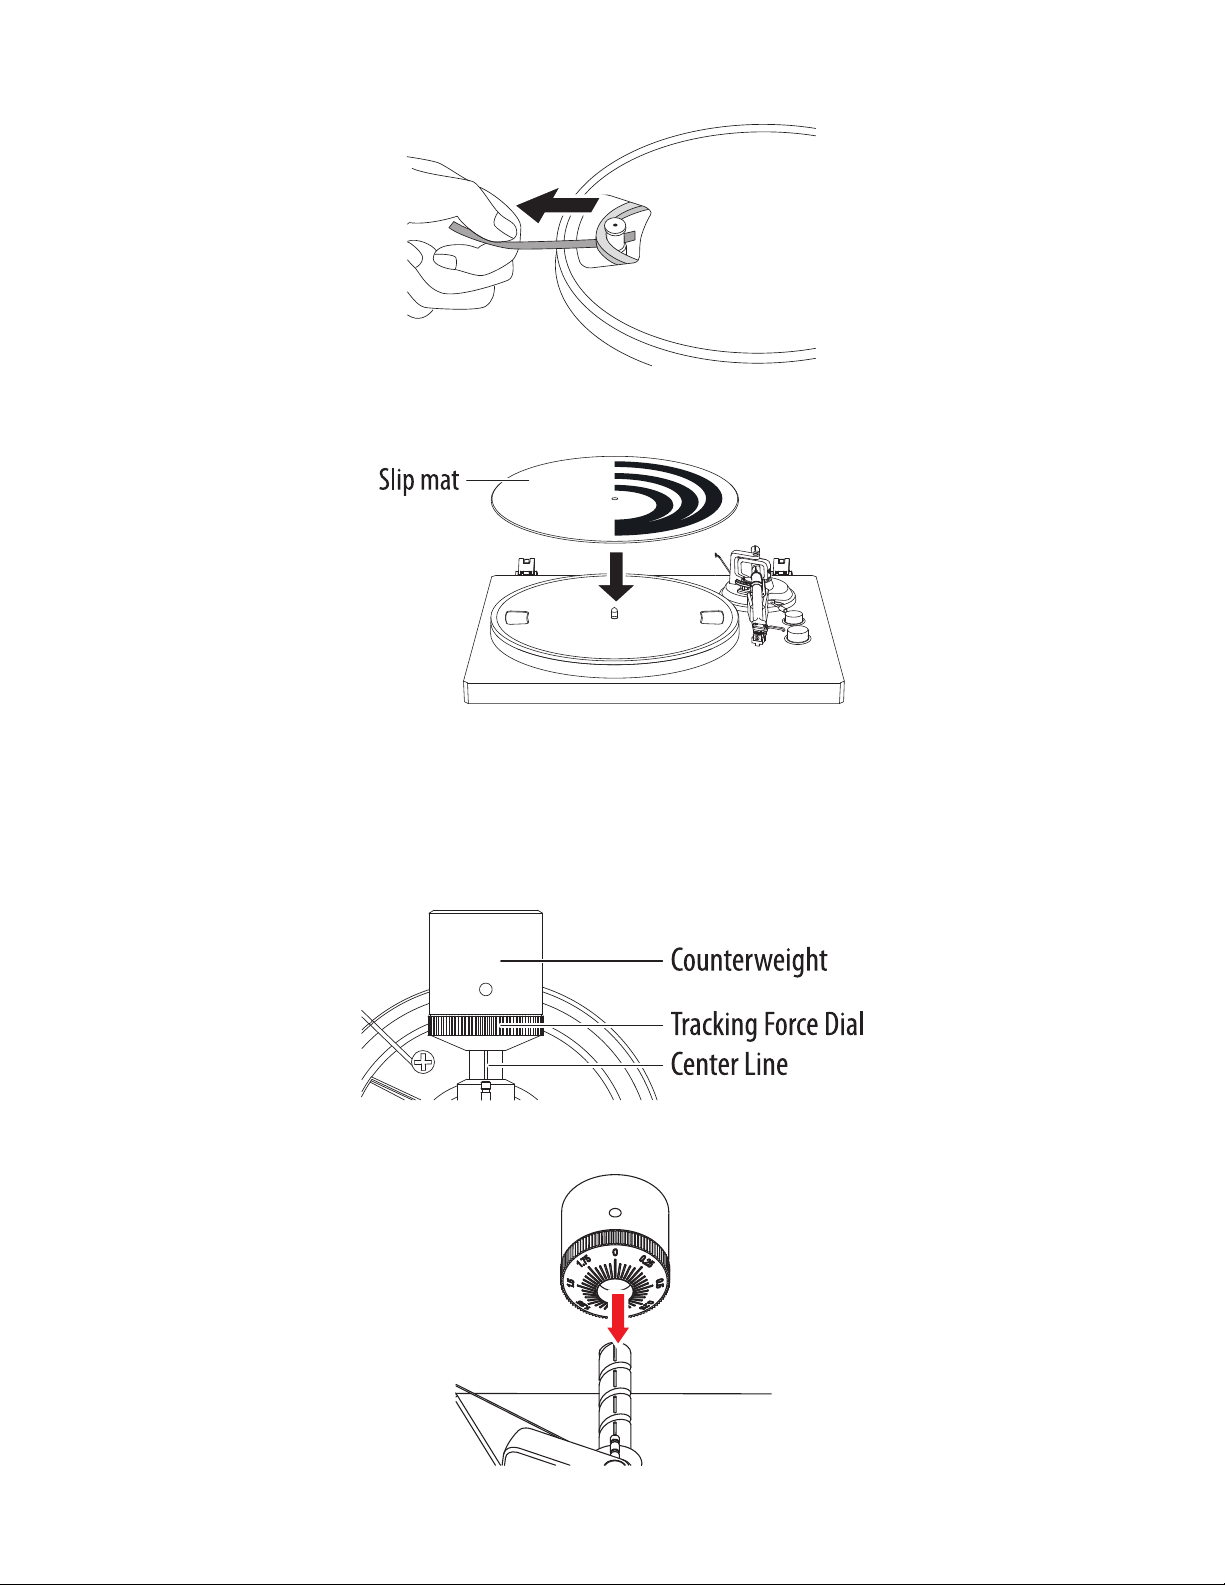
Platter and Belt Setup............................................................................................................................................. 6-7
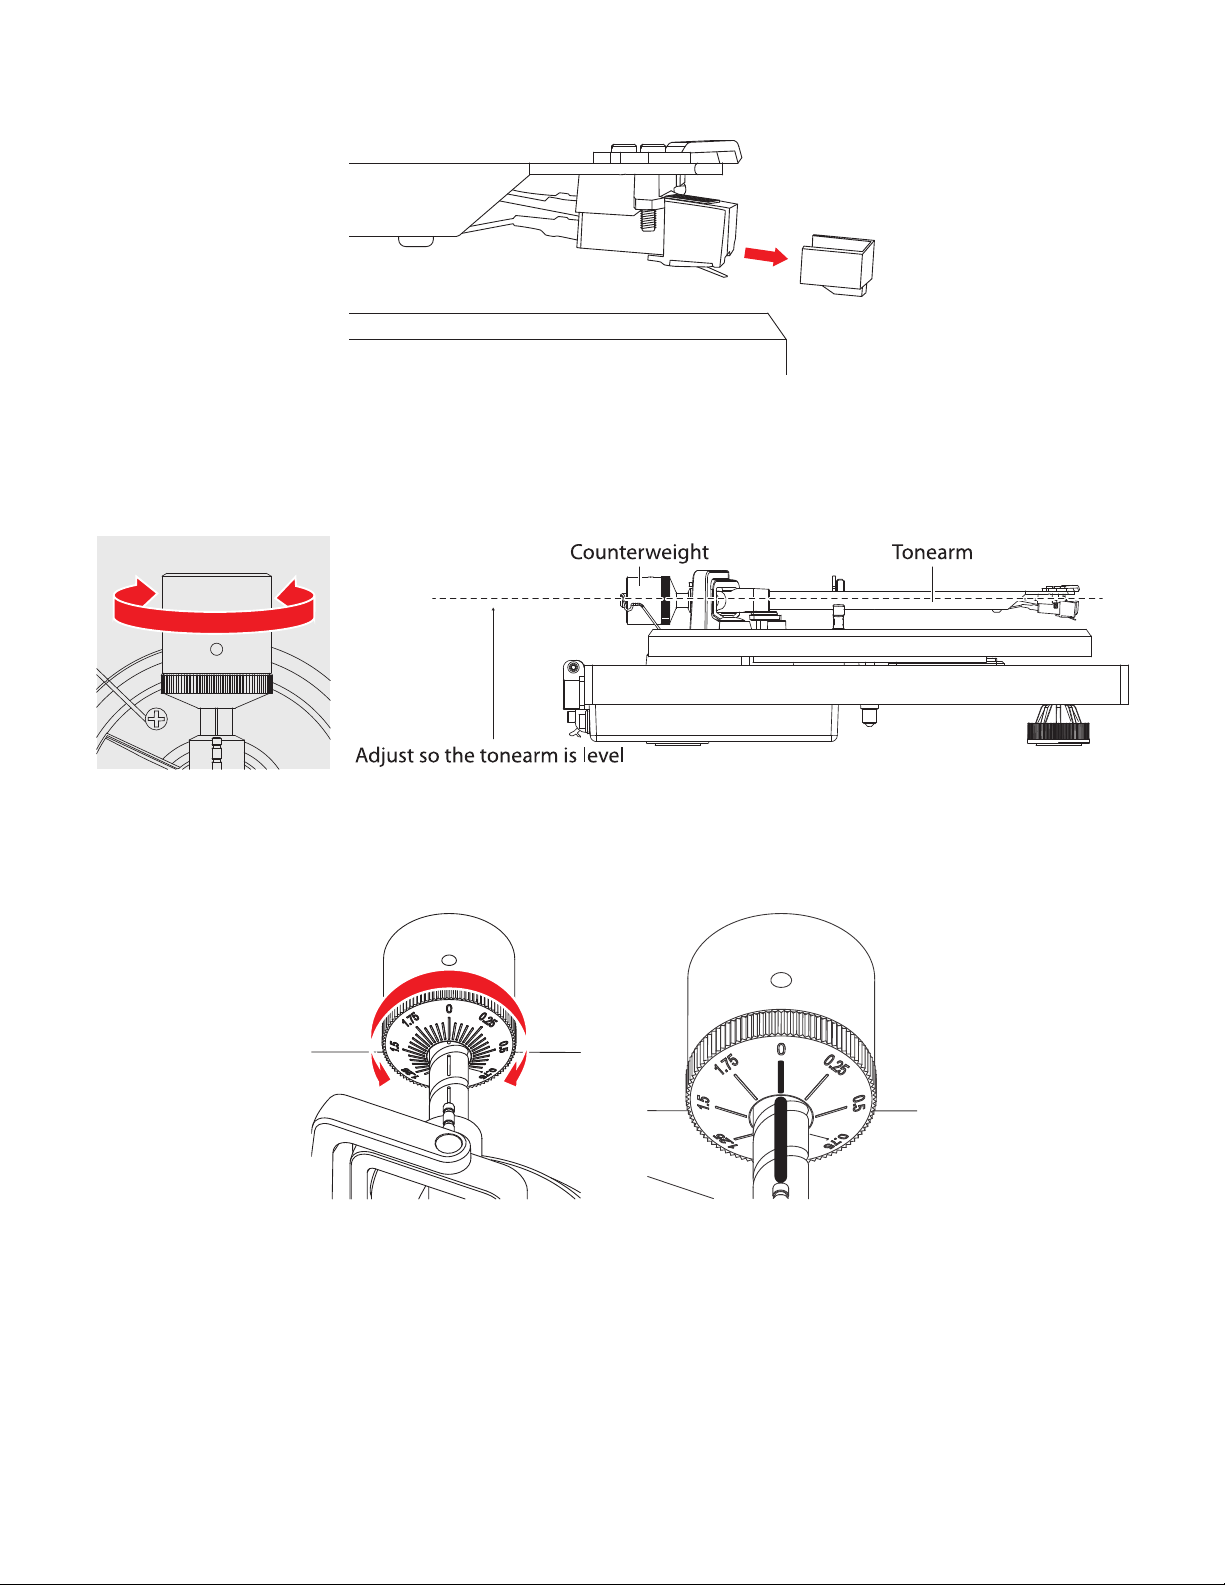
Cartridge Downforce Adjustment ........................................................................................................................... 7-8
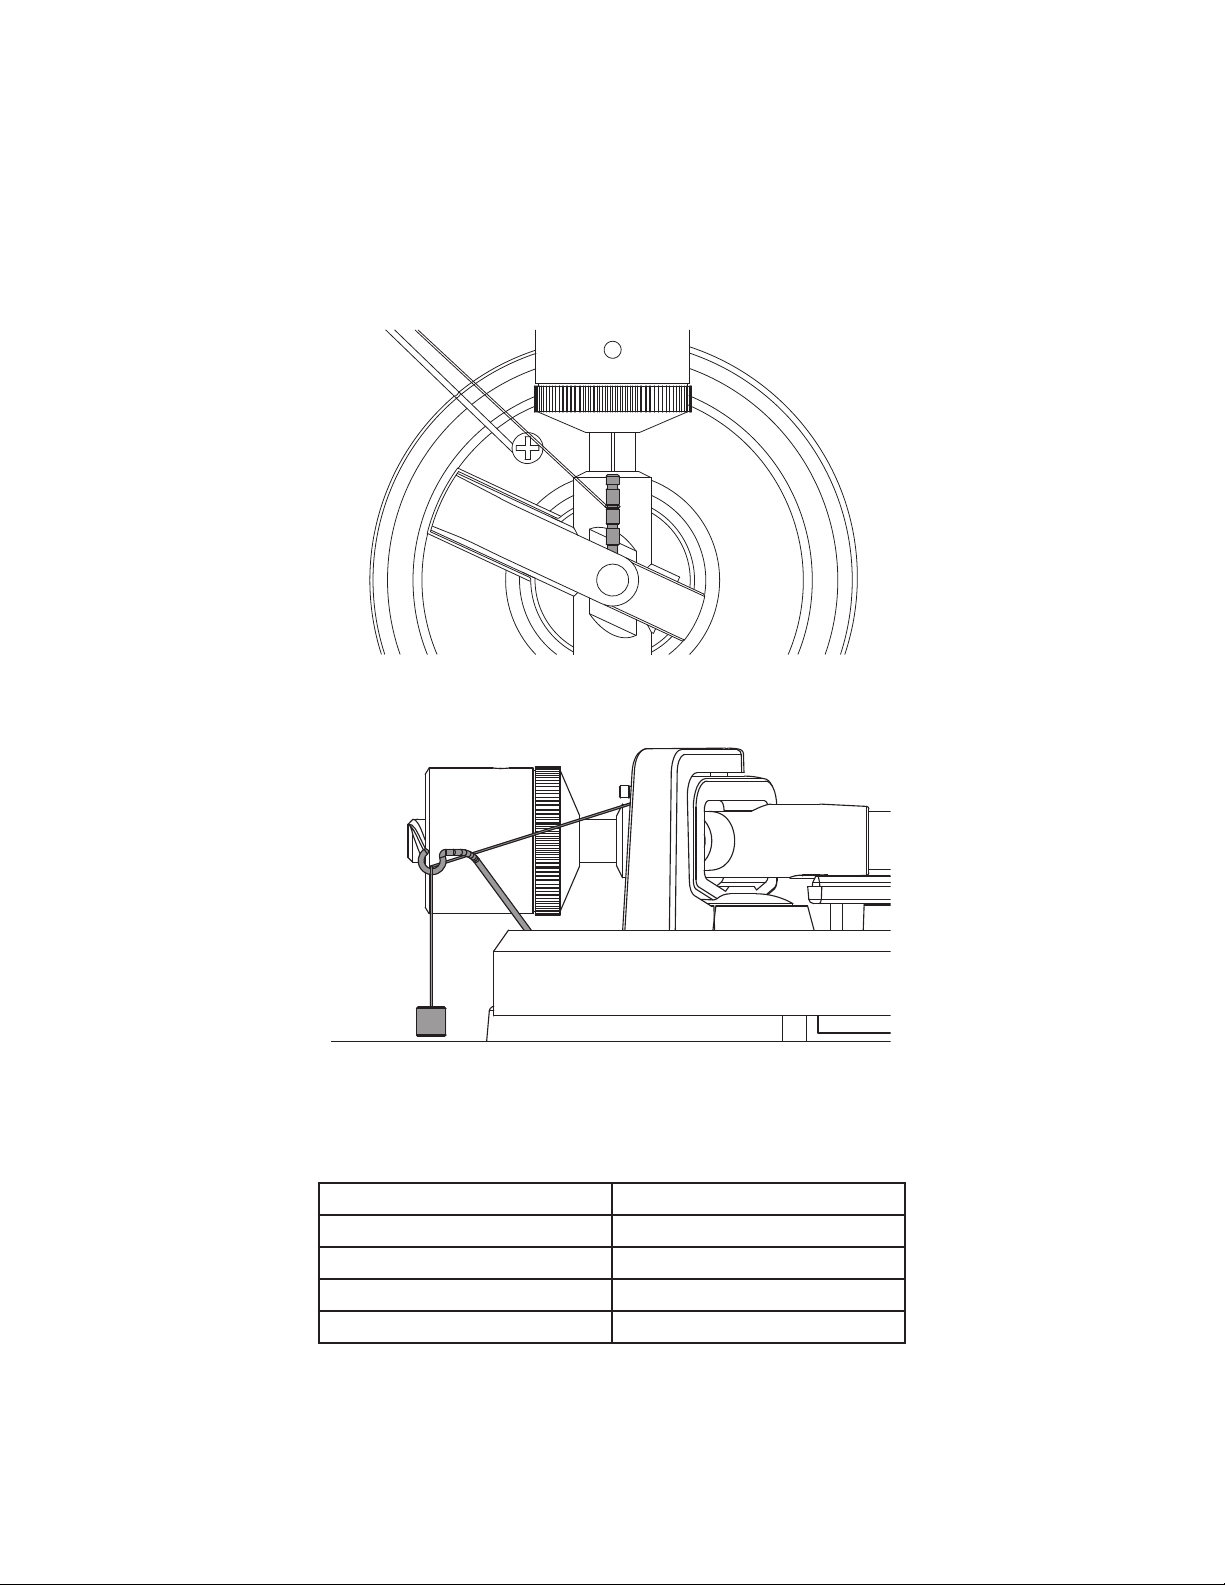
Anti-Skating Force Adjustment...................................................................................................................................9
Output Connections................................................................................................................................................ 10-11
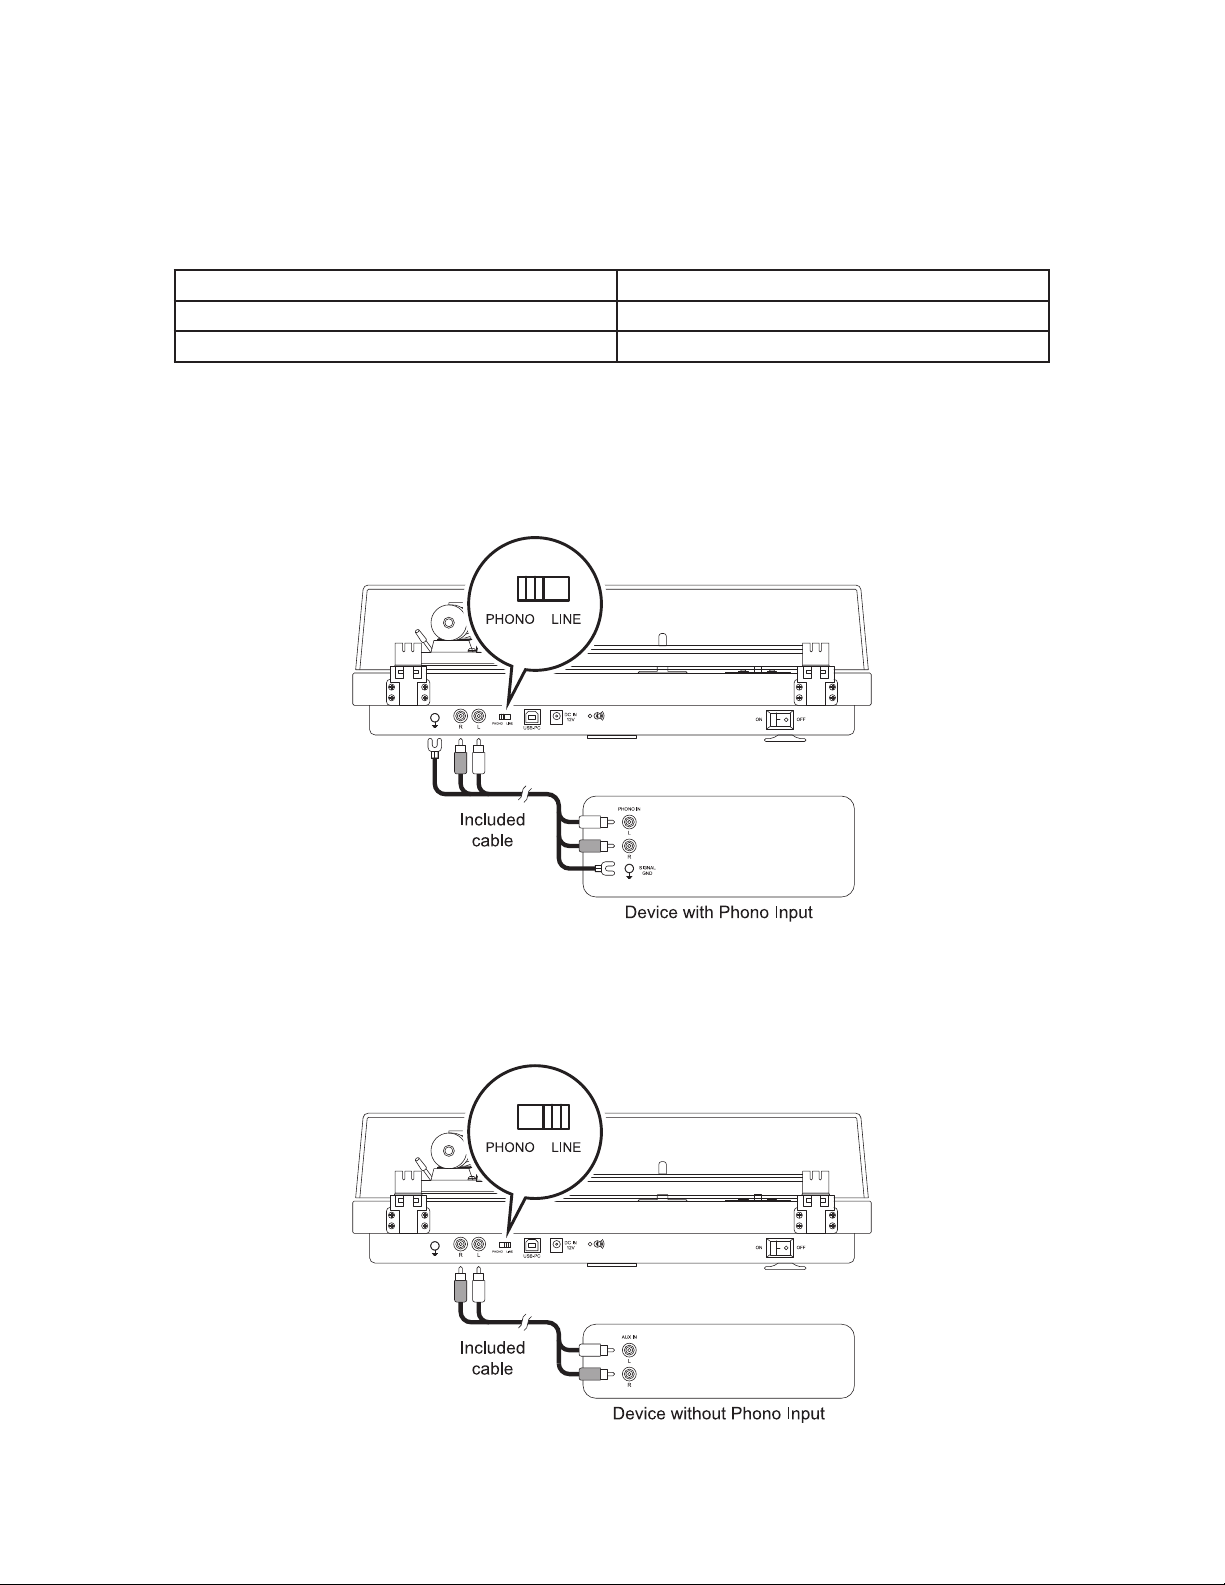
Phono and Line Outputs...........................................................................................................................................10
Bluetooth Connection ...............................................................................................................................................11
USB Connection .......................................................................................................................................................11
Operation........................................................................................................................................................................12
Maintenance and Cleaning ..........................................................................................................................................13
Troubleshooting ............................................................................................................................................................14
Specications ................................................................................................................................................................15
What’s In The Box
• TT-1BT Turntable
• Dust Cover
• Platter With Belt
• Reversable Slipmat
• Counterweight
• Anti-skate Weight
• 45 RPM Adaptor
• Cartridge Alignment Protractor
• USB-PC Cable
• Phono Out Cable
• 2pcs Lid Spare Rubber
• AC Adaptor
• User Manual (This document)
•
This turntable is supplied with a factory tted and adjusted cartridge.
**The following instructions for adjusting the cartridge are provided in case the cartridge is replaced by a
different model at a later date.

4
Controls and Functions
Top Panel
Rear Panel
45 •
33•
STOP•
START•
DC IN
12V
USB-PC
ON OFF
R L
PHONO LINE
5. Speed Selection Dial
6. Start/Stop Dial
1. Turntable Plinth
2. Motor Pulley
3. Turntable Platter
4. Tonearm Assembly (p.5)
7. DC Power Port
8. Bluetooth Indicator
9. Power Switch
1. Dust Cover
2. Dust Cover Hinge
3. Ground Connector
4. Phono / Line Out RCA Jacks
5. Phono / Line Out Switch
6. USB Output

5
Tonearm Assembly
1. Antiskating Weight
2. Antiskating Weight Wire Support
3. Counterweight
4. Tracking Forge Gauge Ring
5. Antiskate Stub
6. Tonearm Lift
7. Tonearm Lift Control Lever
8. Tonearm Locking Ring
9. Tonearm
10.Headshell and Cartridge

6
Setup
The initial setup of your new turntable should take about ve minutes. Follow the instructions in
this manual or you can view our handy how-to video at daytonaudio.com/topic/turntablesetup
Useful Tip
The turntable should be positioned on a low-resonance surface such as wood or multiple-layer
plywood board to avoid structural vibrations disturbing playback.
Installing the Dust Cover
Install the lid carefully over the hinge prongs. The hinge prongs will snap into the slots on the dust cover.
Platter and Belt Setup
1. Place the platter on the turntable spindle, making sure that is fully seated and does not wobble. Rotate the
platter until the drive motor pulley is visible through one of the windows in the platter.
2. While pulling both ends of the red ribbon that come attached to the belt and place it around the slot of the motor
pulley. Be careful not to twist the belt when placing it on the motor pulley.

7
3. Remove the red ribbon from the belt.
4. Place the felt slipmat on top of the platter. Placing records directly on the aluminum platter is not recommended.
The felt slipmat is reversible and can be used with the Dayton Audio logo facing up or down.
Cartridge Downforce Adjustment
The counterweight needs to be adjusted to ensure that the cartridge applies the proper force to the record. Too much
force will result in distorted audio and can lead to potential damage to records and decrease the life of the cartridge.
Too little force will result in thin-sounding music and can cause the cartridge to skip and slide across the record.
The counterweight supplied is suitable for cartridges weighing between 3.0-6.0g.
1. Gently push and turn the counterweight onto the rear of the tonearm with the downforce scale facing toward the
front of the turntable.

8
2. Remove the cartridge protection cap, tie-wrap, and unlock the tonearm.
3. Lower the tonearm lift and position the cartridge in the space between the tonearm rest and the platter.
4. Carefully rotate the counterweight until the tonearm achieves a neutral, level balance. The tonearm should
return to the balanced position if it is moved up or down. Perform this adjustment carefully.
5. Once the tonearm is correctly balanced return it to the tonearm rest. “Zero” the tonearm by holding the
counterweight still, and gently rotating only the tracking forge gauge ring until the zero is in line with the black
line on the top of the tonearm. Unlock the tonearm and verify that it still maintains a level balance.
6. Rotate the counterweight counterclockwise (seen from the front) to adjust the downforce according to the
cartridge manufacturer’s recommendations. One mark on the scale represents 0.05g of downforce.
NOTE: The recommended downforce for the supplied AT-VM95E cartridge is 2.0±0.5g.

9
Anti-Skating Force Adjustment
The anti-skating weight is designed to keep a properly balanced tonearm and counterweight from drifting to the
center of the record improperly. Properly setting the anti-skate mechanism will provide a clear and balanced stereo
image from your records. The directions here are designed for use with the supplied AT-VM95E cartridge.
1. Slip the looped end of the line over the anti-skating weight adjustment stub and into Groove 3 (the correct anti-
skating force for the factory-tted AT-VM95E cartridge). Pull the anti-skating weight slightly to let the tie of the
line move to the stub.
2. Lift the anti-skating weight over the anti-skating weight wire support. The anti-skating weight should now be
dangling in free space to the left of support.
Anti-Skating Weight Settings
Downforce Groove in the stub
5 - 10mN 1st from bearing rings
10 – 15mN 2nd from bearing rings
15 – 20mN 3rd from bearing rings
20mN and bigger 4th from bearing rings

10
Output Connections
Phono and Line Outputs
This product has a built-in phono equalizer function. The turntable can be used with any amplier regardless of
whether it was a phono input or not.
Use The Phono-Line Out Switch as follows
Connected Device being Used Position of Phono-Line Out Switch
Device with phono Input Phono
Device without phono input Line
Phono Connection
When connecting to a device that has a built-in phono input, set the phono-line out switch to “PHONO”. Use the
included RCA cable with ground wire to connect the turntable to the device. If the device has a ground terminal,
connect the included ground wire to reduce potential noise during playback. If the phono-line out switch is set
incorrectly the audio will be extremely distorted.
Line Connection
When connecting to a device that does not have a phono input, set the phono-line out switch to “LINE” to use the
turntable’s built-in phono equalizer. Use the included cable to connect the turntable to the device. If the phono-line
out switch is set incorrectly the audio will be extremely quiet and lack bass.
Note: RCA jack is not designed to be connected directly to the passive/unpowered speakers and if it does, the
volume will be very low.

11
Bluetooth Connection
The TT-1BT has a built-in Bluetooth transmitter for connecting to any Bluetooth headphones, speakers, or other
receivers.
1. To pair the TT-1BT to your Bluetooth device, rst make sure that the device is turned on and in pairing mode
and that the TT-1BT is powered off.
2. Power on the TT-1BT. The Bluetooth indicator light will ash to indicate that it is in search mode.
3. When pairing, the light will ash and will become solid when paired successfully.
4. To disconnect pairing, power off the TT-1BT or turn off Bluetooth pairing on your device.
The TT-1BT will connect to the closest Bluetooth receiver. If no connection is made within 2 minutes the TT-1BT will
stop searching and the Bluetooth indicator light will turn off. To connect to a Bluetooth device again, power off the
turntable off and back on again.
Note: The Bluetooth transmitter is unable to receive audio and will only work to transmit audio to other devices.
USB Connection
The turntable can also be connected to a computer for archiving or recording audio from records. The USB
connection can be used regardless of the position of the phono-line switch. Use the included USB cable to connect
the turntable to any computer and will not require special drivers. There are many third-party audio recording
software packages available that can be used.

12
Operation
Before Playing a Record
1. Remove the cartridge’s protector.
2. Turn the power switch to the ON position.
3. Place the record on the platter so that the center hole aligns with the spindle.
• Some records will require the use of the included 45RPM adaptor
4. Set the speed selection dial to match the required speed of the record (33-1/3 RPM, 45 RPM). This is usually
printed on the center label of each record.
Playing a Record
1. Turn the Start/Stop selector to the “Start” position. The platter will begin to rotate.
2. Release the tonearm lock and raise the tonearm lift control lever.
3. Position the tonearm over the desired location or groove on the record.
4. Lower the tonearm lift control lever. The tonearm will slowly lower to the record surface.
Pausing a record
Raise the tonearm lift control lever to lift the tonearm off the record. The platter will continue to spin and the tonearm
can be lowered again to continue playback.
Stopping a Record
Once the record has played to the end of the side the tonearm will not return to the tonearm rest. The tonearm
should be raised and the needle removed from the record surface promptly to avoid unnecessary wear on the
cartridge stylus.
1. Lower the volume of the amplier, speakers, or any connected equipment
2. Raise the tonearm lift control lever
3. Return the tonearm back to the tonearm locking ring
4. Turn the Start/Stop selector to the “Stop” position

13
Maintenance and Cleaning
The TT-1BT turntable requires little regular maintenance. Remove dust with a slightly damp antistatic cloth. Never
use a dry cloth, this will create static electricity and attract more dust. Antistatic cleaning agents are available at
specialist stores but must be applied sparingly to avoid damage to rubber parts. It is recommended to install the
needle cover or remove the headshell assembly before cleaning or maintenance is carried out to avoid damage.
If the turntable is not used over a long period of time, the drive belt should be removed from the motor pully to
prevent unequal stretching.
Cartridge Replacement
The supplied cartridge can be replaced with another cartridge based on user preference.
1. Before replacement, put the stylus protector back on the stylus to prevent damage to the stylus during the
replacement process.
2. Carefully remove the wire leads from the original cartridge.
3. Loosen the two screws on the head shell that are securing the cartridge and then remove the original cartridge.
4.
Mount the new cartridge to the headshell and tighten it lightly. Do not completely tighten the screws at this moment.
5. Connect the wire leads to the new cartridge’s terminals. The wire lead color codes are as below:
White Left channel positive (L+)
Blue Left channel negative (L–)
Red Right channel positive (R+)
Green Right channel negative (R-)
6. Adjust the cartridge’s position to make sure it is precisely aligned on the headshell so that the stylus will be
tracking the grooves in parallel perfectly.
To achieve this, place the included paper cartridge alignment protractor over the turntable spindle, carefully lift
the tone arm and place the tip of the stylus on the points marked 130mm and 250mm respectively. Fine-tune the
cartridge’s position on the head shell until the cartridge is perfectly in parallel with the reference lines at both points.
7. Tighten the screws completely once the perfect alignment is achieved.

14
Troubleshooting
Problem Cause Soluon
The unit fails to
turn on
The power cable is not
connected properly
Check to make sure both ends of the power cable are
connected properly.
The main power switch
is turned o
Check that the power switch on the rear of the turntable is
turned on.
The plaer does
not spin
The turntable does not
have power
Verify that the power adaptor is connected to a working outlet
and that the main power switch in the rear panel is turned on.
The Drive belt has been
damaged
Contact your Dayton Audio dealer for a replacement belt.
The Drive belt is not
installed or has slipped
o
Correctly place the belt back on the plaer and motor pulley
(pg.6).
There is no sound The tonearm support
arm is not lowered
Lower the tonearm li control lever. The tonearm will lower to
the record surface (pg.12).
The stylus skips The record is warped or
scratched
Check the record for damage. Damaged records can cause the
stylus to become worn and damaged.
There tonearm is
balanced incorrectly
Rotang the counterbalance weight counterclockwise will increase
the pressure that the stylus applies to the record. Ensure the
proper tracking force is applied by properly seng the cartridge
downforce adjustment (pg.7).
There is a
“humming sound”
No ground connecon
from the turntable to
the amplier
Make sure that the GND connecon is made between the
turntable and the amplier or preamplier (pg.10).
The sound is
distorted or
inconsistent
The turntable is set
to line output but is
connected to the
PHONO input
Verify that if your turntable is using a line out signal that it is
connected to the AUX input on the amplier. If the turntable
is outpung a phono signal verify that it is connected to the
PHONO input (pg.10).
The phono connecon
is imporperly grounded
Make sure that there is a connecon between the grounding
terminals on the amplier and the turntable (pg.10).
Drive belt is
overstretched or dirty
Contact your Dayton Audio dealer for a replacement belt.
There is dust on the
stylus or record
Keeping the record and stylus clear of any dust or debris is
important. There are many products available for cleaning
records and turntable styli. Choose one that is mild and
non-abrasive for connued long-term performance.
The Line/ Phono switch
is set incorrectly
Verify that the Line/Phono switch is set properly for the current
setup (pg.10).

15
Specications
Motor
Drive Type ........................................................... Belt Drive
Nominal Speeds .................................................. 33-1/3 RPM, 45 RPM
Speed Variance ................................................... ±1.0%
Wow and Flutter .................................................. ≤0.15%
Signal-to-noise Ratio ........................................... 55 dB
Tonearm
Type..................................................................... Static Balance
Tonearm Effective Length.................................... 8.6” (218.5 mm)
Overhang............................................................. 0.73” (18.5 mm)
Headshell Terminal .............................................. Ø1.2mm 4-pin terminal
Digital Output
Bluetooth Version ...............................................5.0
Supported Bluetooth Codecs...............................Qualcomm aptX
USB Output Samples Rates................................ 44.1 and 48 kHz
General
Power Consumption ............................................ 6W
AC Adaptor .......................................................... 12V, 500mA DC
Dimensions (W x D x H) ...................................... 16.34” x 10.2” x 4.44” (415 x 340 x 148 mm)
Weight ................................................................. 13.67 lbs. (6.2 kg)
MM Cartridge – Audio Technica AT-VM95E
Type..................................................................... Moving Magnet (MM)
Output Voltage..................................................... 4.0 mV (@1 kHz, 5 cm/sec.)
Channel Balance ................................................. <2.0 dB
Channel Separation............................................. >20 dB
Recommended Load Resistance ........................ 47kΩ
Mass.................................................................... 6.1g (0.22 oz)
Recommended Vertical Tracking Force............... 1.8-2.2 g (2.0g standard)

Dayton Audio®Last Revised: 7/17/2023
daytonaudio.com
tel + 937.743.8248
info@daytonaudio.com
705 Pleasant Valley Dr.
Springboro, OH 45066
USA
5-Year Limited Warranty
See daytonaudio.com for details
This manual suits for next models
1
Table of contents