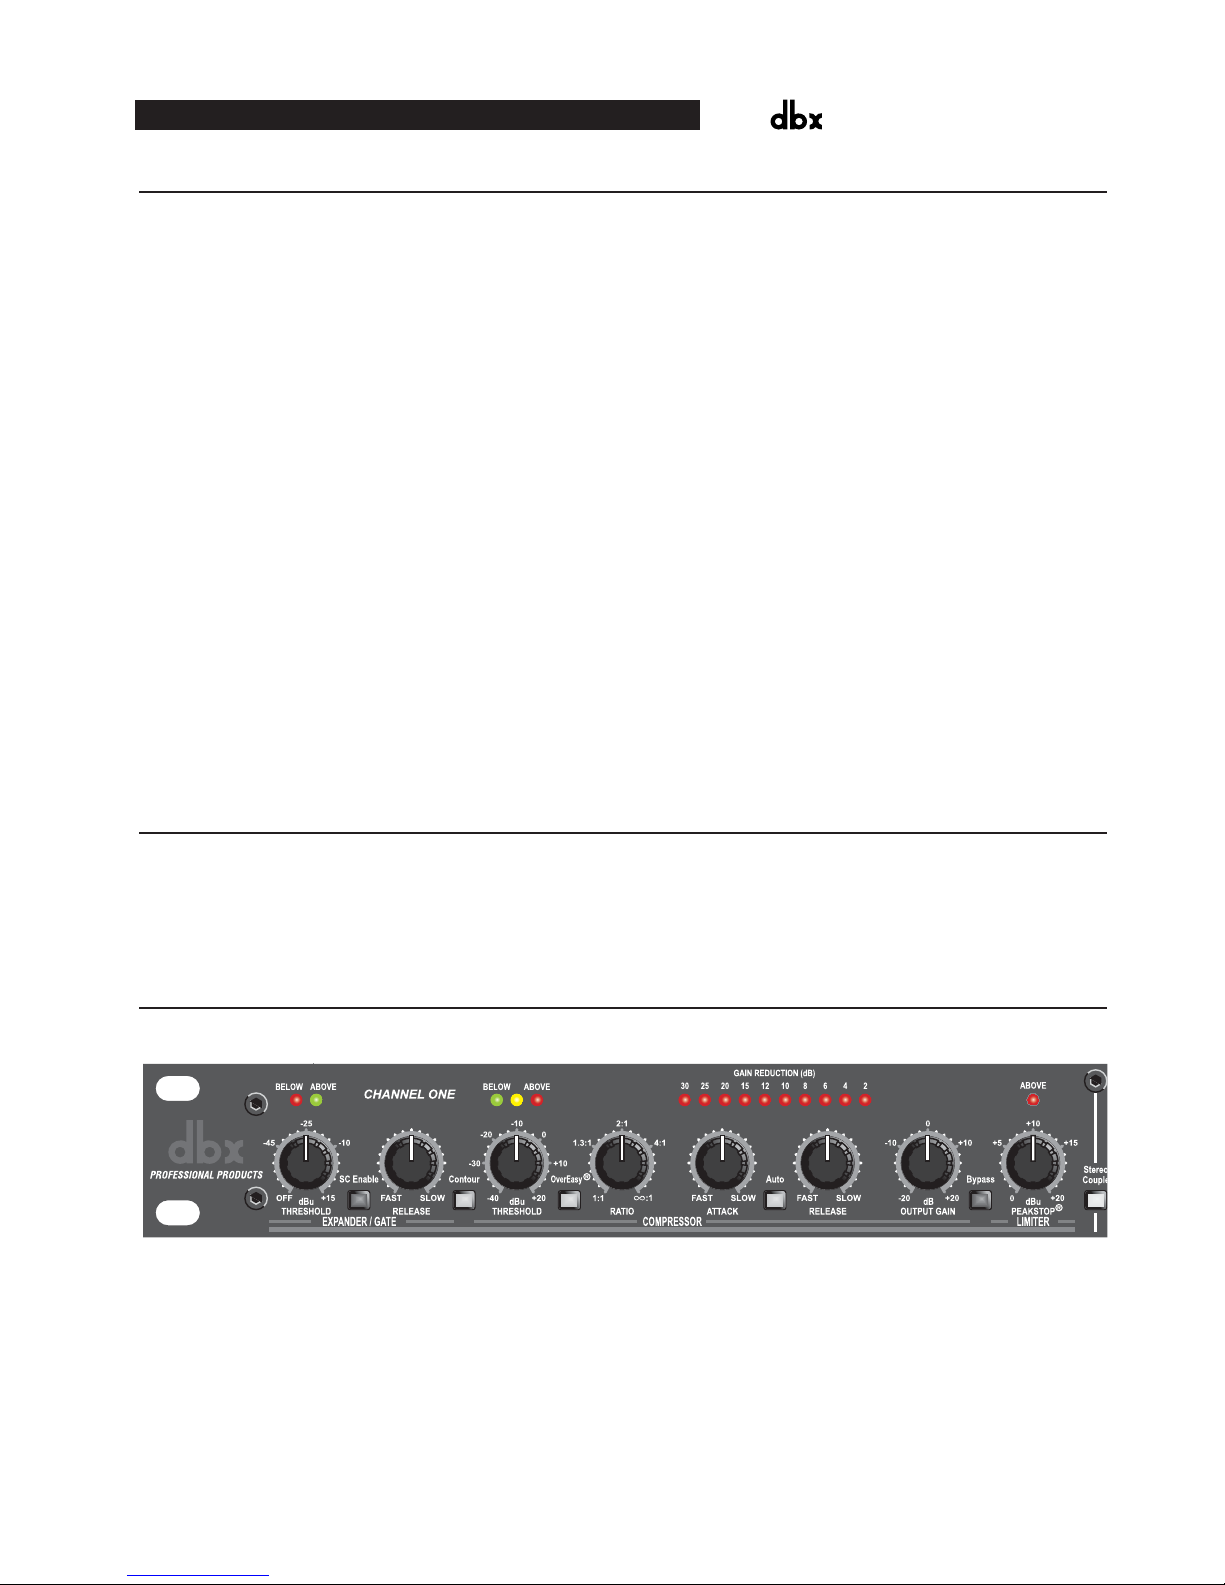
dbx 166XL User manual

®
A Harman International Company
MODEL 166XL
COMPRESSOR
G AT E

WARNING
FOR YOUR PROTECTION, READ THESE INSTRUCTIONS:
WATER AND MOISTURE: Appliance should not be used near water (e.g. near a bath-
tub, washbowl, kitchen sink, laundry tub, in a wet basement, or near a swimming pool,
etc). Care should be taken so that objects do not fall and liquids are not spilled into the
enclosure through openings.
POWER SOURCES: The appliance should be connected to a power supply only of the
type described in the operating instructions or as marked on the appliance.
GROUNDING OR POLARIZATION: Precautions should be taken so that the grounding
or polarization means of an appliance is not defeated.
POWER CORD PROTECTION: Power supply cords should be routed so that they are
not likely to be walked on or pinched by items placed upon or against them, paying par-
ticular attention to cords at plugs, convenience receptacles, and the point where they
exit from the appliance.
SERVICING: To reduce the risk of fire or electric shock, the user should not attempt to
service the appliance beyond that described in the operating instructions. All other ser-
vicing should be referred to qualified service personnel.
FOR UNITS EQUIPPED WITH EXTERNALLY ACCESSIBLE FUSE RECEPTACLE:
Replace fuse with same type and rating only.
MULTIPLE-INPUT VOLTAGE: This equipment may require the use of a different line
cord, attachment plug, or both, depending on the available power source at installation.
Connect this equipment only to the power source indicated on the equipment rear
panel. To reduce the risk of fire or electric shock, refer servicing to qualified service
personnel or equivalent.
SAFETY INSTRUCTIONS
NOTICE FOR CUSTOMERS IF YOUR UNIT IS EQUIPPED WITH A POWER
CORD.
WARNING: THIS APPLIANCE MUST BE EARTHED.
The cores in the mains lead are coloured in accordance with the following code:
GREEN and YELLOW - Earth BLUE - Neutral BROWN - Live
As colours of the cores in the mains lead of this appliance may not correspond
with the coloured markings identifying the terminals in your plug, proceed as fol-
lows:
• The core which is coloured green and yellow must be connected to the
terminal in the plug marked with the letter E, or with the earth symbol, or
coloured green, or green and yellow.
• The core which is coloured blue must be connected to the terminal
marked N or coloured black.
• The core which is coloured brown must be connected to the terminal
marked L or coloured red.
This equipment may require the use of a different line cord, attachment plug, or
both, depending on the available power source at installation. If the attachment
plug needs to be changed, refer servicing to qualified service personnel who
should refer to the table below. The green/yellow wire shall be connected direct-
ly to the unit's chassis.
WARNING: If the ground is defeated, certain fault conditions in the unit or in the
system to which it is connected can result in full line voltage between chassis
and earth ground. Severe injury or death can then result if the chassis and earth
ground are touched simultaneously.
LIVE
E
NEUTRAL
EARTH GND
CONDUCTOR
L
N
BROWN
BLUE
GREEN/YEL
BLACK
Normal Alt
WIRE COLOR
WHITE
GREEN
U.K. MAINS PLUG WARNING
A moulded mains plug that has been cut off from the cord is unsafe. Discard the
mains plug at a suitable disposal facility. NEVER UNDER ANY CIRCUM-
STANCES SHOULD YOU INSERT A DAMAGED OR CUT MAINS PLUG INTO
A 13 AMP POWER SOCKET. Do not use the mains plug without the fuse cover
in place. Replacement fuse covers can be obtained from your local retailer.
Replacement fuses are 13 amps and MUST be ASTA approved to BS1362.
The symbols shown above are internationally accepted symbols that warn of
potential hazards with electrical products. The lightning flash with arrowpoint in
an equilateral triangle means that there are dangerous voltages present within
the unit. The exclamation point in an equilateral triangle indicates that it is nec-
essary for the user to refer to the owner’s manual.
These symbols warn that there are no user serviceable parts inside the unit. Do
not open the unit. Do not attempt to service the unit yourself. Refer all servicing
to qualified personnel. Opening the chassis for any reason will void the manu-
facturer’s warranty. Do not get the unit wet. If liquid is spilled on the unit, shut it
off immediately and take it to a dealer for service. Disconnect the unit during
storms to prevent damage.
CAUT I O N
A T T E NT I O N :RISQUE DE CHOC ELECTRIQUE - NE PAS OUVRIR
WARNIN G :TO REDUCE THE RISK OF FIRE OR ELECTRIC
SHOCK DO NOT EXPOSE THIS EQUIPMENT TO RAIN OR MOISTURE
RISK OF ELECTRIC SHOCK
DO NOT OPEN
ELECTROMAGNETIC COMPATIBILITY
This unit conforms to the Product Specifications noted on the Declaration of
Conformity. Operation is subject to the following two conditions:
• this device may not cause harmful interference, and
• this device must accept any interference received, including interference
that may cause undesired operation.
Operation of this unit within significant electromagnetic fields should be avoided.
• use only shielded interconnecting cables.
DECLARATION OF CONFORMITY
Manufacturer’s Name: dbx Professional Products
Manufacturer’s Address: 8760 S. Sandy Parkway
Sandy, Utah 84070, USA
declares that the product:
dbx 166XL
conforms to the following Product Specifications:
Safety: EN 60065 (1993)
IEC65 (1985) with Amendments 1, 2, 3
EMC: EN 55013 (1990)
EN 55020 (1991)
Supplementary Information:
The product herewith complies with the requirements of the Low Voltage
Directive 73/23/EEC and the EMC Directive 89/336/EEC as amended by
Directive 93/68/EEC.
dbx Professional Products
Vice-President of Engineering
8760 S. Sandy Parkway
Sandy, Utah 84070, USA
6/23/03
European Contact: Your Local dbx Sales and Service Office
or International Sales Office

MANUAL CONTENTS
English
INTRODUCTION . . . . . . . . . . . . . . . . . . . . . . . . . . . . . . . . . . . . . . . . . . . . . . . . . . . . . . 2
INSPECTION . . . . . . . . . . . . . . . . . . . . . . . . . . . . . . . . . . . . . . . . . . . . . . . . . . . . . . . . . 2
OPERATING CONTROLS . . . . . . . . . . . . . . . . . . . . . . . . . . . . . . . . . . . . . . . . . . . . . . . . 2
OPERATING NOTES . . . . . . . . . . . . . . . . . . . . . . . . . . . . . . . . . . . . . . . . . . . . . . . . . . . 6
CONNECTING THE 166XL TO YOUR SYSTEM . . . . . . . . . . . . . . . . . . . . . . . . . . . . . . . . 10
INSTALLATION CONSIDERATIONS . . . . . . . . . . . . . . . . . . . . . . . . . . . . . . . . . . . . . . . . . 12
TECHNICAL SUPPORT / FACTORY SERVICE . . . . . . . . . . . . . . . . . . . . . . . . . . . . . . . . . . 12
Français
INTRODUCTION . . . . . . . . . . . . . . . . . . . . . . . . . . . . . . . . . . . . . . . . . . . . . . . . . . . . . . 13
VÉRIFICATION . . . . . . . . . . . . . . . . . . . . . . . . . . . . . . . . . . . . . . . . . . . . . . . . . . . . . . . 14
COMMANDES . . . . . . . . . . . . . . . . . . . . . . . . . . . . . . . . . . . . . . . . . . . . . . . . . . . . . . . 14
NOTES D'UTILISATION . . . . . . . . . . . . . . . . . . . . . . . . . . . . . . . . . . . . . . . . . . . . . . . . 18
RACCORDEMENT DU 166XL AU SYSTEME DE SONORISATION . . . . . . . . . . . . . . . . . . . 22
NOTES SUR L'INSTALLATION . . . . . . . . . . . . . . . . . . . . . . . . . . . . . . . . . . . . . . . . . . . . 24
ASSISTANCE TECHNIQUE ET SERVICE USINE . . . . . . . . . . . . . . . . . . . . . . . . . . . . . . . . 25
Deutsch
EINLEITUNG . . . . . . . . . . . . . . . . . . . . . . . . . . . . . . . . . . . . . . . . . . . . . . . . . . . . . . . . 26
KONTROLLE . . . . . . . . . . . . . . . . . . . . . . . . . . . . . . . . . . . . . . . . . . . . . . . . . . . . . . . . 26
BEDIENUNGSELEMENTE . . . . . . . . . . . . . . . . . . . . . . . . . . . . . . . . . . . . . . . . . . . . . . . . 27
BEDIENUNGSHINWEISE . . . . . . . . . . . . . . . . . . . . . . . . . . . . . . . . . . . . . . . . . . . . . . . . 30
ANSCHLIEßEN DES DBX 166XL AN IHRE ANLAGE . . . . . . . . . . . . . . . . . . . . . . . . . . . . 35
ANSCHLUßHINWEISE . . . . . . . . . . . . . . . . . . . . . . . . . . . . . . . . . . . . . . . . . . . . . . . . . . 37
SERVICE UND KUNDENDIENST . . . . . . . . . . . . . . . . . . . . . . . . . . . . . . . . . . . . . . . . . . . 38
Español
INTRODUCCION . . . . . . . . . . . . . . . . . . . . . . . . . . . . . . . . . . . . . . . . . . . . . . . . . . . . . . 39
INSPECCION . . . . . . . . . . . . . . . . . . . . . . . . . . . . . . . . . . . . . . . . . . . . . . . . . . . . . . . . . 39
CONTROLES OPERATIVOS . . . . . . . . . . . . . . . . . . . . . . . . . . . . . . . . . . . . . . . . . . . . . . 40
NOTAS PARA EL OPERADOR . . . . . . . . . . . . . . . . . . . . . . . . . . . . . . . . . . . . . . . . . . . . 44
CONEXION DEL 166XL AL SISTEMA DE SONIDO . . . . . . . . . . . . . . . . . . . . . . . . . . . . . 49
CONSIDERACIONES PARA LA INSTALACION . . . . . . . . . . . . . . . . . . . . . . . . . . . . . . . . . 51
ASISTENCIA TÉCNICA / SERVICIO DE FABRICA . . . . . . . . . . . . . . . . . . . . . . . . . . . . . . . 52
Specifications . . . . . . . . . . . . . . . . . . . . . . . . . . . . . . . . . . . . . . . . . . . . . . . . . . . . . . . 54
dbx166XLCOMPRESSOR/GATE
1

INTRODUCTION
Congratulations on choosing the dbx 166XL Compressor / Gate. The 166XL provides two channels of noise gating,
OverEasy® or classic hard knee compression and PeakStop® limiting to give complete control of signal dynamics to stu-
dios, sound reinforcement companies, musicians, or anyone who needs quality processing quickly and easily. We recom-
mend that you take a moment and read through the manual as it provides information that will assist you in using your unit
to its fullest potential. Features Include:
•Stereo or Dual Mono operation of gating, compression and peak limiting.
•OverEasy®/Hard Knee Selection - allows selection between our famous OverEasy compression curve and the classic
“Hard Knee” curve popularized by the original dbx 160, 161 and 162.
•Expander/Gate Circuit - with variable release time and +15dBu maximum threshold.
•Selectable Low Frequency Shelf (via Contour button) in the Sidechain Path - recommended when compressing mixed
program material to prevent low frequency energy from “punching holes” in the sound.
•PeakStop® Limiting - provides control of maximum peak levels at the output of the 166XL regardless of any other
control. PeakStop comes after the compression, gating and other circuitry including the output gain, so it sets an
absolute limit for peak excursions before they reach the output.
•True RMS Level Detection - senses the power in the program in a musical manner, much as human hearing does, giv-
ing results superior to peak or average detection.
•Hardwire System Bypass Buttons on both channels - allow the audio to pass even if the unit is unplugged, and are
also useful for comparing the processed and unprocessed signals.
•10-Segment LED Display for GAIN REDUCTION (up to 30dB).
•Electronically Balanced XLR and 1/4” TRS Input and Output Jacks
•Separate Sidechain Inserts - enables an outboard processor or signal to control compression or gating.
•DC-Controlled Parameters - the signal does not pass thru any of the parameter controls. Instead a DC voltage controls
all functions; this eliminates any possibility of potentiometer noise developing over time.
INSPECTION
Verify that the 166XL package contains the following:
•166XL Unit
•AC Power Cord
•Operation Manual
•Registration Card
OPERATING CONTROLS
Front Panel
EXPANDER/GATE Section
Expander/Gate THRESHOLD Control and LEDs (BELOW/ABOVE):
Adjusting this control sets the level at which the gate will open and allow the signal at the input to pass through to the
output. Turning the knob fully counterclockwise (to OFF) allows the gate to pass signals unattenuated, effectively bypass-
ing the gate. Turning the knob fully clockwise causes the gate to attenuate input signals below +15dBu.
The two Expander/Gate LEDs indicate the relationship of the input signal level to the threshold setting. The red LED
lights when the signal is BELOW threshold, the green LED lights when the signal is ABOVE threshold.
Note: The 166XL’s expander/gate attack rate (which controls how fast the signal is restored after being attenuated) is internally set to be very fast - fast
enough to allow all of the transient at the beginning of a note, vocal or spoken word to come through.
2
®
PROFESSIONAL PRODUCTS
dbx166XLCOMPRESSOR/GATE

Note: The 166XL’s expansion ratio is internally fixed, at approximately 10:1. This ratio helps to eliminate the artifacts normally associated with common
switch gates. Attenuation is >50dB.
SIDECHAIN (SC) ENABLE Switch and LED:
This switch enables the 1/4” TRS connector of the sidechain, allowing external processing of the detector signal. It
has no effect if there is nothing plugged into the sidechain loop; however the switch will still light indicating the
sidechain is enabled.
Expander/Gate RELEASE Control:
This control determines the rate at which the gate closes once the signal at the INPUT or SIDECHAIN INSERT falls
below the threshold. SLOW settings are useful for gating out noise present behind vocals and acoustic instruments.
FAST settings are useful for tightening up the sound of percussion (e.g., kick or snare drum) and drying up leakage from
other instruments into percussion tracks.
Note: The gate release rate is “accelerating” in that the dB/Sec rate continually increases as the gate closes.
CONTOUR Button and LED:
Depress this button to make the 166XL’s detection circuitry less sensitive to low frequency energy, preventing this
energy from “punching holes” in the sound, especially with mixed program. With the CONTOUR button Out, the
166XL’s detector is frequency-independent. The CONTOUR LED turns On when the CONTOUR button is depressed.
COMPRESSOR Section
GAIN REDUCTION Meter:
This meter displays how much the signal is being attenuated by the compressor and the gate.
Compressor THRESHOLD LEDs:
These three LEDs indicate the relationship of the input signal level to the threshold of compression. The green
BELOW LED is On when the signal is below threshold and the red ABOVE LED is On when the signal is above
threshold. When the 166XL is switched to OverEasy mode, the yellow LED is On when the signal is in the OverEasy
region (See Figure 2).
Note: Even though no input signal is being applied, it is normal for the LEDs to flicker when the power is applied or removed.
Compressor THRESHOLD Control:
Adjust this knob to set the threshold of compression from -40dBu (7.8mVrms) to +20dBu (7.8Vrms). Setting the
Compressor THRESHOLD control to +20dB will prevent all but the highest level peaks from being compressed.
(Setting the Compressor RATIO to 1:1 will turn the Compressor off, regardless of the setting of the Compressor
THRESHOLD control.)
In Hard Knee mode (OVEREASY button out), the THRESHOLD sets a reference level above which input signals
will be processed by the 166XL’s gain change circuitry in the manner defined by the setting of the RATIO control.
Input signals which fall below this level will pass through the 166XL unprocessed (except for fixed gain changes direct-
ed by the OUTPUT GAIN control). See Figure 1.
In OverEasy mode (OVEREASY button depressed), signals begin to gradually activate the 166XL’s gain change cir-
cuitry as they approach the THRESHOLD reference level and they do not get fully processed in the manner defined by
the RATIO control until they have passed somewhat above the THRESHOLD reference level. In OverEasy mode there
is no distinct point at which processing begins, and the THRESHOLD setting corresponds to a point on the input/output
transfer curve midway between the onset of processing and that point at which the transfer curve corresponds to the set-
ting of the RATIO control. Figure 2 shows the OverEasy compression curves and how they correlate with the THRESH-
OLD LEDs.
OVEREASY Button and LED:
Depress this button to select the OverEasy® compression characteristic. The yellow THRESHOLD LED turns On
when the signal is in the OverEasy region. When this button is in the Out position, the 166XL operates as a hard knee
compressor/limiter. (Yellow OverEasy LED is active only in OverEasy Mode.)
In Hard Knee mode, the threshold of compression is defined as that point above which the output level no longer
changes on a 1:1 basis with changes in the input level. See Figure 1.
In OverEasy mode, the threshold of compression is defined as the middle of the OverEasy threshold region, that is,
“half-way” into compression, as shown in Figure 2.
dbx166XLCOMPRESSOR/GATE
3
Table of contents
Languages:
Other dbx Music Equipment manuals