DCA AQW5.5/10 User manual

Edition 2 Aug., 2019
Read through carefully and understand these instructions
before use.

GENERAL POWER TOOL SAFETY WARNINGS
Please read and comply with these original instructions prior to the initial operation.
Danger! The high pressure produced by the appliance is very hazardous if
connected with power source.
Warning! This appliance must not be operated by children or untrained
personnel.
Before starting the appliance, carefully check whether there is some possible
failure. The cable insulation layer must be intact.
The operator and people near the appliance must take protection to avoid the
splash during the operation.
Pull out the power plug when clean, maintain the appliance or replace the spare
parts.
Follow all safety rules during the operation.
a) Accessories and Spare Parts
CAUTION: To ensure appliance safety, use only original spare parts from the
manufacturer or approved by the manufacturer.
High pressure pipes, fittings and couplings are important for the safety of the
appliance.
b) Physical, Sensory or Mental Capacities
This appliance is not intended for use by persons(including children) with reduced
physical, sensory or mental capacities.
C) Application
Use this high-pressure washer for private households only and the intended use of
this product covers the cleaning of vehicles, buildings, terraces, garden equipment
and hay mowers.
All other uses are improper, and our company will take no responsibilities for the
damage caused by those improper uses.
Proper use also includes correct operation, maintenance, and repair.
d) Clothing and Equipment
Be careful to protect your body during the operation.
Wear antiskid shoes. Wear goggles, earmuffs and protective clothing during the
operation.
e) Cleaning Agent
The appliance has been designed for use with the cleaning agent supplied or
recommended by the manufacturer.
f) Checking the Appliance Before Operation
Do not use the machine if a supply cord or important parts of the machine are damaged,
e.g. safety devices, high pressure pipes, trigger gun.
Always check to see that the trigger on the spray handle actuates easily and returns to
the original position when released.
Always keep the high-pressure pipe and gun barrel accessories in good condition, and
are mounted properly.
g) Electrical Connection
Warning! The voltage and frequency of the appliance must accord with those of the
power source.
The appliance may only be connected to an electric supply by a professional electrician.
For safety reasons, we recommend that you operate the appliance only via a residual
current device (max. 30mA or 30ms).
The extension cable must be watertight and must never lie in water. The specification of
the extension cable must apply to the power of this appliance.
h) Water Connection
According to applicable regulations , the appliance must never be used on the drinking
water net without a backflow preventer.
Caution: use only water without any impurities. Install an external strainer if there is
quicksand in inlet water.
i) Working Period
Warning!
The appliance may not be operate in explosive atmospheres.
Do not clean asbestos-containing surface under high-pressure mode.
Never draw in fluids containing solvents or undiluted acids and solvents! This includes
petrol, paint thinner and heating oil.
Do not direct the jet against yourself or others in order to clean clothes or foot-wear.
The jet must not be directed at persons, live electrical equipment or the machine itself.
-1- -2-
The water jet that is emitted from the high pressure nozzle results in a repulsion
power acting on the hand spray gun. Make sure that you have a firm footing and are
also holding the hand spray gun and spray lance firmly.
Do not operate the appliance at temperatures below 0ºC.
Do not start the appliance when it is frozen.
Make sure the basic fastness and security.
The washer must be used on a secure and stable surface in a standing, upright
position
Do not cover up the appliance and use it in a room with poor ventilation.
j) After Work
Warning! Disconnect the mains plug from the socket when there is no
pressure in the system.
Disconnect the water inlet pipe between the machine and waterhead.
After work, completely drain appliance and accessories before storage.
k) Protection and Maintenance
Warning! Disconnect the mains plug from the socket before maintaining or
cleaning this appliance.
Repair work can only be performed by an authorized customer service and with
original spare parts of our company.
Turn off the appliance and read the troubleshooting table in the manual or contact
the local franchiser when some malfunctions occur, for example, the machine
refuses to start, stops, pulsates, or the motor makes noise.
Do not repair the machine, change the original structure of this product or change
the cord connection way.
l) Recycle
Stop using the old washer immediately.
Pull off the plug from power source.
Cut off the cable.
Do not throw the electrical equipment with household garbage.
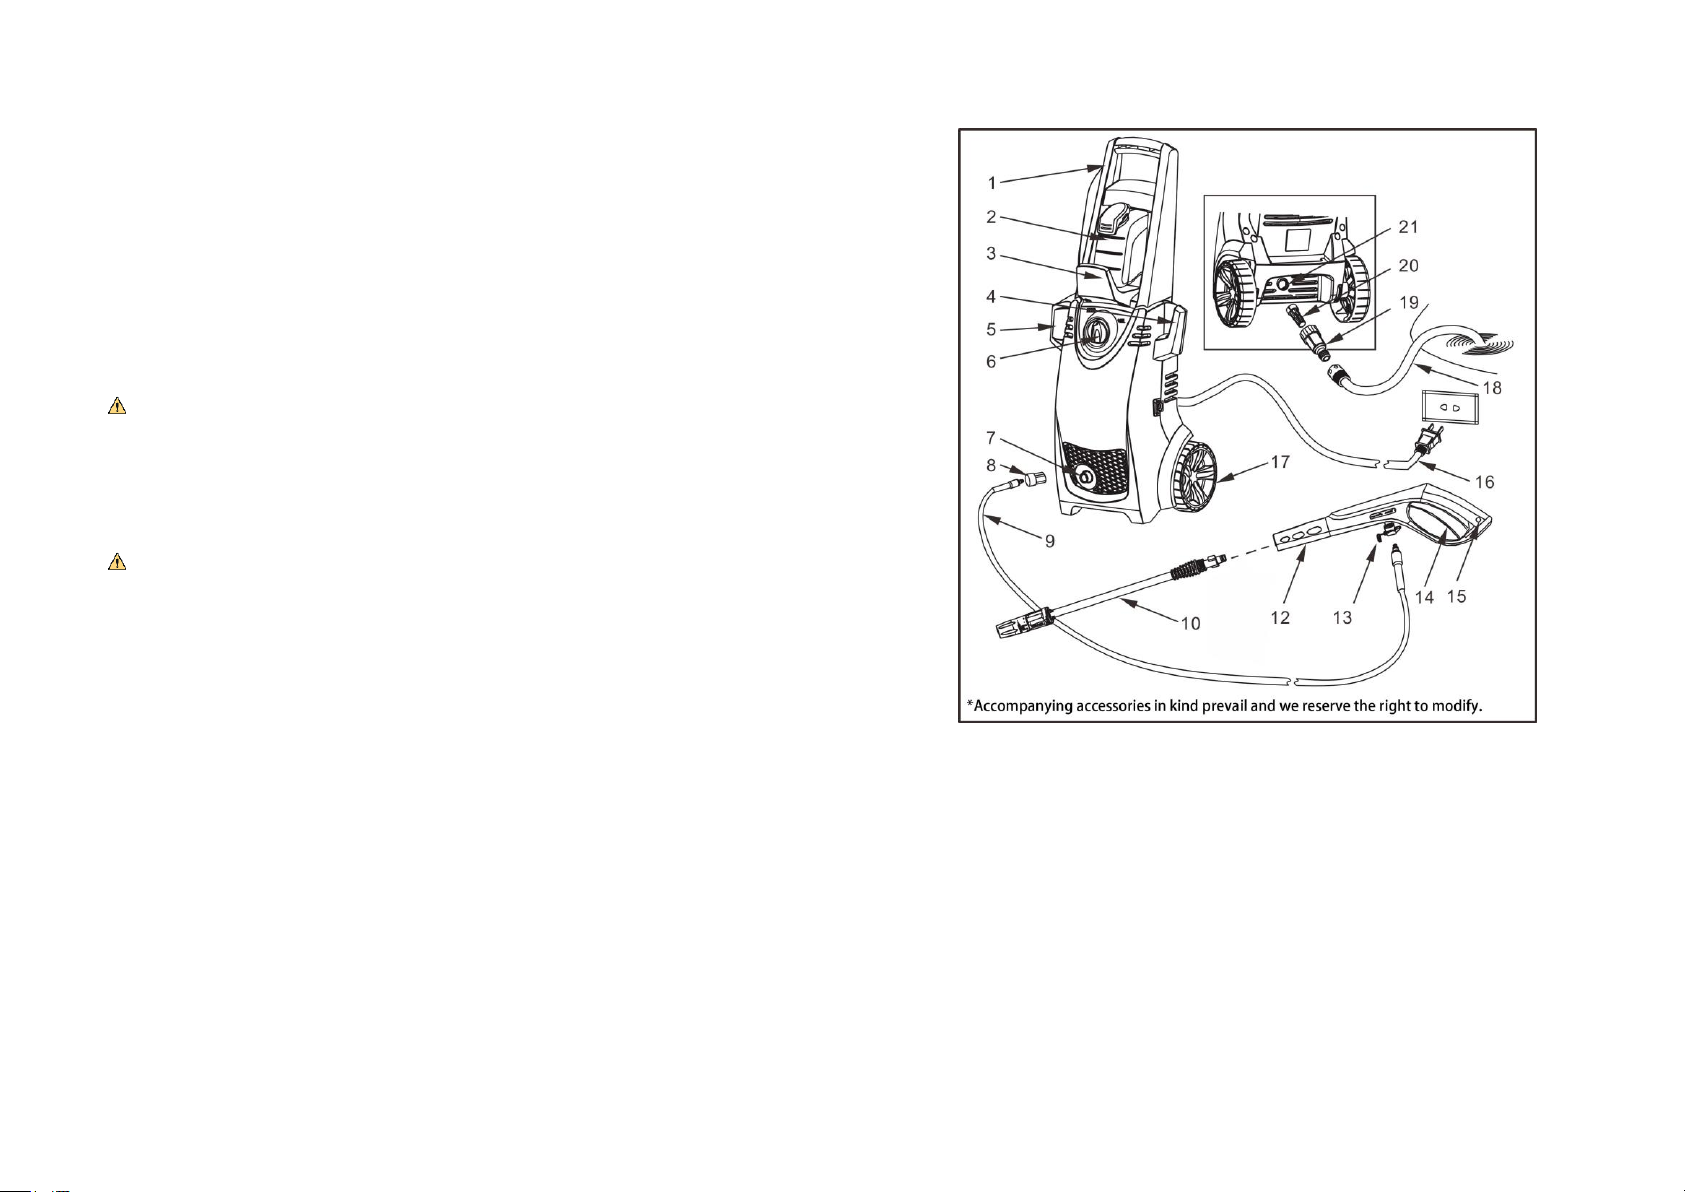
GENERAL DESCRIPTIONS
1.
Handle
12.
Pikestaff
2.
Cleaning Pot
13.
Gun Valve Bush
3.
Pressure Pipe Hook
14.
Switch Trigger
4.
Wire Rack
15.
Latch
5.
Gun Rack
16.
Cord
6.
Adjust Switch OFF/ON
17.
Wheel
7.
Water Outlet
18.
Water Inlet
8.
Quick Connector
19.
Inlet Nut
9.
High-pressure Pipe
20.
Inlet Strainer
10.
Gun Barrel
21.
Water Inlet
-3- -4-

SPECIFICATIONS
Rated Flow
5.5 L/min
Rated Temperature
0~40 ℃
Rated Power Input
1600 W
Max. Inlet Pressure
7 Bar
Insulation Level
Ⅱ
Sound Power Level
LPA=77dB(A)
Protection Grade
IPX5
Rated Pressure
100 Bar
Allowable Pressure
140 Bar
※Due to the continuing program of research and development, the specifications
herein are subject to change without prior notice.
INSTRUCTIONS FOR OPERATION
Installation of Accessories
Inlet strainer must always be installed to
filter out sand, lime and other impurities
which will damage the pump valve.
1) Insert the handle into the slide cone on
top and fix it onto the body with two
pieces of 4.8 x20 cross screw. (Fig. 1)
2) Place pressure pipe hook in correct position
according to drawing and fix it onto the body
with two pieces of 3.5 X20 cross screw stud.
(Fig. 2)
3) Propel the cleaning pot into the frame in the
middle of handle according to drawing until
clamped, then plug the suction tube of cleaning
pot in to joint on the body, and make it clamped
in the groove at back of handle. (Fig. 3)
4) For initial installation of inlet nut, you should
check whether the filter is mounted into the
machine inlet by the factory or not before
tightening it into the inlet. (Fig. 4)
Connection of High Pressure Water Pipe
1) Aim the high-pressure water pipe at pikestaff valve bush and push inward to complete
the connection. Otherwise press the button and you can dismantle the high pressure water
pipe.
2) Aim the high-pressure water pipe at the machine outlet and rotate clockwise to the
-5- -6-

bottom. (Fig. 5)
Installation of Gun Barrel
1) Push gun barrel into pikestaff, which needs to be pressed down to the ground and
rotate 90 degrees to the left until the parts are completely geared and don't fall off. The
gun barrel of this machine can regulate the shape of water spray by rotating the
nozzle to the left and right.
2) When using the cleaning liquid, put it
into the cleaning pot and set the gun
nozzle to low pressure, and then start the
machine to press the trigger, it can spray
the cleaning liquid on the surface to be
cleaned. (Built-in cleaning pot) (Fig. 6)
Water Connection
•Connect to Pressurized Waterhead
The maximum inlet pressure is 0.7MPa/7bar and the highest temperature is 40℃,
refer to nameplate.
1) Ensure inlet strainer is put into inlet nut and not blocked.
2) Mount to inlet pipe with quick connector and the other end connects with
Waterhead.
•Note: according to the national and local regulations, for connection to drinking water
mains, water must flow through the pipe to prevent ingression of dirt and sand into
machine before connecting water pipe to the machine.
3) Turn off water supply, connect water intake to water inlet nut with quick connector.
•Connect to the water supply with lower pressure
The machine can also operate in self-suction mode, which means the machine can be
connected to water containers, rivers, lakes and pools, no backflow preventer is needed
when diverse from non-portable water mains. External filter must be used when connecting
the machine from water source of lower pressure to prevent suction of impurities; water
inlet pipe should be 3m in length. We recommend using original inlet pipe kit in order to
meet these requirements, and the machine is designed to pump at the maximum distance
to water level at 50cm.
1) The machine will be placed above water
level at maximum height of 0.5 meters and
separate high-pressure pipe from water outlet.
(Fig. 7)
2)Ensure the filter is in place, connected to
water inlet pipe and ensure it is tightly
connected to water inlet.
3) Turn on the machine and press the switch to
ON position.
4) Wait until steady flow from water outlet.
5) Turn off the machine and connect high
pressure water pipe and gun assembly. (Fig. 8)
Start the Pressure Washer
Warning! Before starting the cleaning operation, check whether the machine is in upright
position and placed on flat surface, do not put it in grass. The voltage and frequency of
machine (refer to nameplate) must be consistent with that of power supply.
-7- -8-
This manual suits for next models
1
Table of contents


