ddtop LGP User manual

1/ 13
WWW.DDTOP.COM
LGP
BALANCED FLOW METER (MULTI-HOLE
ORIFICE FLOW METER)
Operation Manual
LGP-DT-JS-1020-2018(A)

2/ 13
WWW.DDTOP.COM
Preface
Thank you for choosing the products of Dandong Top Electronics Instrument (Group) Co., Ltd.
This operation manual provides you with important information about installation, connection and
commissioning as well as maintenance, troubleshooting and storage. Please read it carefully before
installation and commissioning and save it as an integral part of the product near the instrument for
reading at any time.
This manual can be downloaded from www.ddtop.com.
If you do not follow this manual, the protection provided by this instrument may be damaged.
Trademarks, Copyrights and Restrictions Instructions
Dandong Top Electronics Instrument (Group) Co., Ltd.®, Dandong Top Pump Co., Ltd.®, DDTOP®
are registered trademarks of the company.
The performance specifications of this instrument are effective from the date of release, and are
subject to change without notice. Dandong Top Electronics Instrument (Group) Co., Ltd reserves the
right to modify the products described in this manual at any time without prior notice.
Quality Assurance
Dandong Top Electronics Instrument (Group) Co., Ltd guarantees that all products will be free from
defects in materials and manufacturing processes within one year from the date of leaving the
factory.
During the warranty period, if the product is returned due to quality problems, and the claim is
determined to fall within the scope of the warranty after inspection by the manufacturer, Dandong
Top Electronics Instrument (Group) Co., Ltd is responsible for repairing or replacing it for the buyer
(or owner) free of charge.
Dandong Top Electronics Instrument (Group) Co., Ltd is not responsible for the costs caused by
improper use of equipment, labor claims, direct or subsequent damage, and installation and use of
equipment. Except for the special written warranty certificate for certain products, Dandong Top
Electronics Instrument (Group) Co., Ltd does not provide any express or implied quality guarantee.
Quality
Dandong Top Electronics Instrument (Group) Co., Ltd has passed the ISO9001 quality system
certification. The entire production process is strictly implemented in accordance with the scope of
the quality system, providing the strongest guarantee for the quality of products and services.

3/ 13
WWW.DDTOP.COM
CONTENTS
1 Safety Tips.................................................................................................................................................4
1.1 An explosion may cause death or serious injury...............................................................................4
1.2 Process leaks can cause serious injury or death................................................................................4
1.3 Failure to follow the safety installation guidelines may result in death or serious injury. ...4
2 Product Description..................................................................................................................................4
2.1 Product Structure-Figure 1 ......................................................................................................................4
2.2 Operating Principle-Figure 2...................................................................................................................5
2.3 ackage .............................................................................................................................................................6
2.4 Lifting Transportation.................................................................................................................................6
2.5 Storage............................................................................................................................................................6
3 Product Application..................................................................................................................................6
3.1 Product Features..........................................................................................................................................6
3.2 Main Parameters..........................................................................................................................................7
3.3 Application Scope........................................................................................................................................7
4 Schematic Diagram of Pipeline Size-Figure 2........................................................................................8
5 Unpacking and Inspection .......................................................................................................................8
5. Precautions for Unpacking Inspection ....................................................................................................8
5.2 Check Content ..............................................................................................................................................9
6 Installation.................................................................................................................................................9
6.1 Installation Tools ..........................................................................................................................................9
6.2 Installation Technical Requirements...................................................................................................... 9
7 Fault Analysis and Troubleshooting......................................................................................................11
8 Maintenance ...........................................................................................................................................12
9 Disassemble ............................................................................................................................................12
9.1 Warning ........................................................................................................................................................12
9.2 Waste Disposal ...........................................................................................................................................12
10 Product Certificate................................................................................................................................13

4/ 13
WWW.DDTOP.COM
1 Safety Tips
For safety reasons, it is expressly prohibited to modify or change the product without authorization.
Repair or replacement is only allowed to use the accessories specified by the manufacturer.
1.1 An explosion may cause death or serious injury.
When installing the device in an explosive environment, be sure to comply with applicable local,
national, and international standards, codes, and regulations. Ensure that the equipment is installed
in accordance with intrinsically safe or non-flammable site operating procedures.
1.2 Process leaks can cause serious injury or death.
If the process seal is damaged, the medium may leak at the connection.
1.3 Failure to follow the safety installation guidelines may result in death or serious injury.
The operations described in this manual need to be completed by professionals who have received
professional training and obtained corresponding qualifications or special end-users.
2 Product Description
2.1 Product Structure-Figure 1
Figure 1-Structure F

5/ 13
WWW.DDTOP.COM
1.Upstream Tapping Flange
2.Nameplate, Rivet
3.Metal Graphite Wound Gasket
4.Balanced Orifice Plate Components
5.Downstream Tapping Flange
6.Bolt Nut Gasket Fastener
2.2 Operating Principle-Figure 2
The working principle of the LGP balanced flow meter is the same as that of the orifice plate. It is
also based on the energy conservation law of Bernoulli equation. When the fluid passes through the
function hole of the disc, the fluid will be balanced and adjusted, the vortex will be minimized, and
an ideal flow field will be formed. The device obtains a stable differential pressure signal.
Basic Calculation Formula:
1
2
42
4
1
pd
C
qm
In this formula:
m
q
—Actual measured flow,kg/s;
C —(BFM)Outflow coefficient;
ε—BFM Gas expansion coefficient;
△p —Measured differential pressure value,Pa;
ρ1——Fluid density kg/m3
d —BFM Equivalent orifice diameter, m;
β—BFM Equivalent diameter ratio, it is the ratio of the equivalent orifice diameter to
the pipe inner diameter.
The volume flow is calculated as follows:
m
Vq
q

6/ 13
WWW.DDTOP.COM
In this formula:
ρ—Fluid density under temperature and pressure when measuring volume flow,kg/m3
qv—Volume flow, m3/s π
2.3 ackage
Please send packaging waste to a special recycling agency.
2.4 Lifting Transportation
Please use qualified lifting equipment and lifting straps, and pay attention to safety.
2.5 Storage
Storage temperature -20℃~40℃; storage humidity ≤20%.
3 Product Application
3.1 Product Features
3.1.1 High Measurement Accuracy
Because the LGP balanced flow meter has a symmetrical porous structure, it can balance the flow
field, reduce eddy current, vibration and signal noise, and greatly improve the stability of the flow
field.
3.1.2 Low Requirements for Straight Pipe Sections
The LGP balanced flow meter can balance the flow field, stabilize the adjustment, and restore the
pressure twice faster than the traditional orifice flow element, which greatly reduces the
requirements for straight pipe sections. In most cases, straight pipe sections can be as small as
0.5D~2D, and a large number of straight pipe sections can be saved by using LGP balanced flow
meter.
3.1.3 Low Permanent Pressure Loss
LGP balanced flow meter's porous and symmetrical balance design reduces the formation of vortex
and turbulent friction, and reduces the loss of kinetic energy. Under the same measurement
conditions without reducing the differential pressure, it can be reduced to 1/2 compared to the
traditional flow element. , 1/3 permanent pressure loss.
3.1.4 Wide Range Ratio
Compared with the traditional flow element, the LGP balanced flow meter greatly improves the
measurement range ratio.
3.1.5 Wide Range of Applications

7/ 13
WWW.DDTOP.COM
The working temperature and pressure of LGP balanced flow meter depend on the material and
grade of the pipe and flange, and it is suitable for high temperature and high pressure working
conditions. LGP balanced flow meter can measure gas-liquid two-phase, slurry, and even solid
particles. The balanced flow meter is completely symmetrical, so it can measure bidirectional flow.
3.2 Main Parameters
Accuracy: ±0.5
Repeatability: ±0.2
Range Ratio: 10:1
Operating Pressure: 0~ 42MPa
Temperature: -196℃≤T≤650℃
Straight Pipe Section Requirements: Front 3~4D Back 2D
Instrument Caliber: DN25~DN600
Reynolds Number Range: 500~1×10⁷
3.3 Application Scope
3.3.1 Conditions Requiring High Flow Measurement Accuracy and Range
The porous LGP balanced flow meter is calibrated with real flow to make the sensor accuracy reach
0.50%. At the same time, its conventional measurement range ratio is 10:1.
3.3.2 Vapor Flow Measurement
For the condensed water in the vapor flow, it will condense in front of the standard orifice, which will
affect the accuracy of measurement. When the machine is turned on and off, the pressure of vapor
will produce water hammer on the condensed water, which will seriously impact the standard orifice
deformed. Because the LGP balanced flow meter has holes around it, the condensed water will flow
through the lower hole to avoid condensate, water hammer, and bending deformation.
3.3.3 Flow Rate of Low Temperature Fluid
Under this condition, when the medium flows through the orifice, the gasification phenomenon is
so serious that it cannot be measured normally. The LGP balanced flow meter ensures stability and
measurement accuracy due to its low pressure loss.
3.3.4 Working Condition of Gas Volume Liquid
Large-diameter orifice flow meters used to measure the flow of compressed air and other gases,
the orifice often has water, which affects the accuracy of the measurement. The common method to
solve the water accumulation in front of the throttling part is to install the flow element on the
vertical process pipe, or use a round orifice plate or an eccentric orifice plate. The LGP balanced flow
meter can fundamentally solve the problem of water accumulation in front of the throttle because
of its porous structure, and because this is its inherent feature, it does not need to be specially

8/ 13
WWW.DDTOP.COM
made.
3.3.5 Liquid Impurity Conditions
When the impurity content in the fluid is high, the standard flow element is easy to be inaccurate
due to solid deposits and wear on sharp edges, and the porous LGP balanced flow meter can
eliminate the deposition of circular objects due to its porous characteristics; because of its balance
(without sharp edge) can solve the phenomenon of sharp edge wear. The problem of impurities in
the liquid is better solved.
3.3.6 Two-way Measurement Conditions
The upstream and downstream of the LGP balanced flow meter are completely symmetrical, and
there is no downstream oblique angle of the standard orifice, so it can be used as a bidirectional
fluid measurement, which completely solves the problem of bidirectional fluid measurement under
special working conditions.
4 Schematic Diagram of Pipeline Size-Figure 2
Pipeline Type (Nozzle Tap) G Pipeline Type (Double Flange Tap) S
Figure 2
Note: D\L size is subject to our design standard
If special size is required when ordering, the actual size shall prevail.
5 Unpacking and Inspection
5. Precautions for Unpacking Inspection
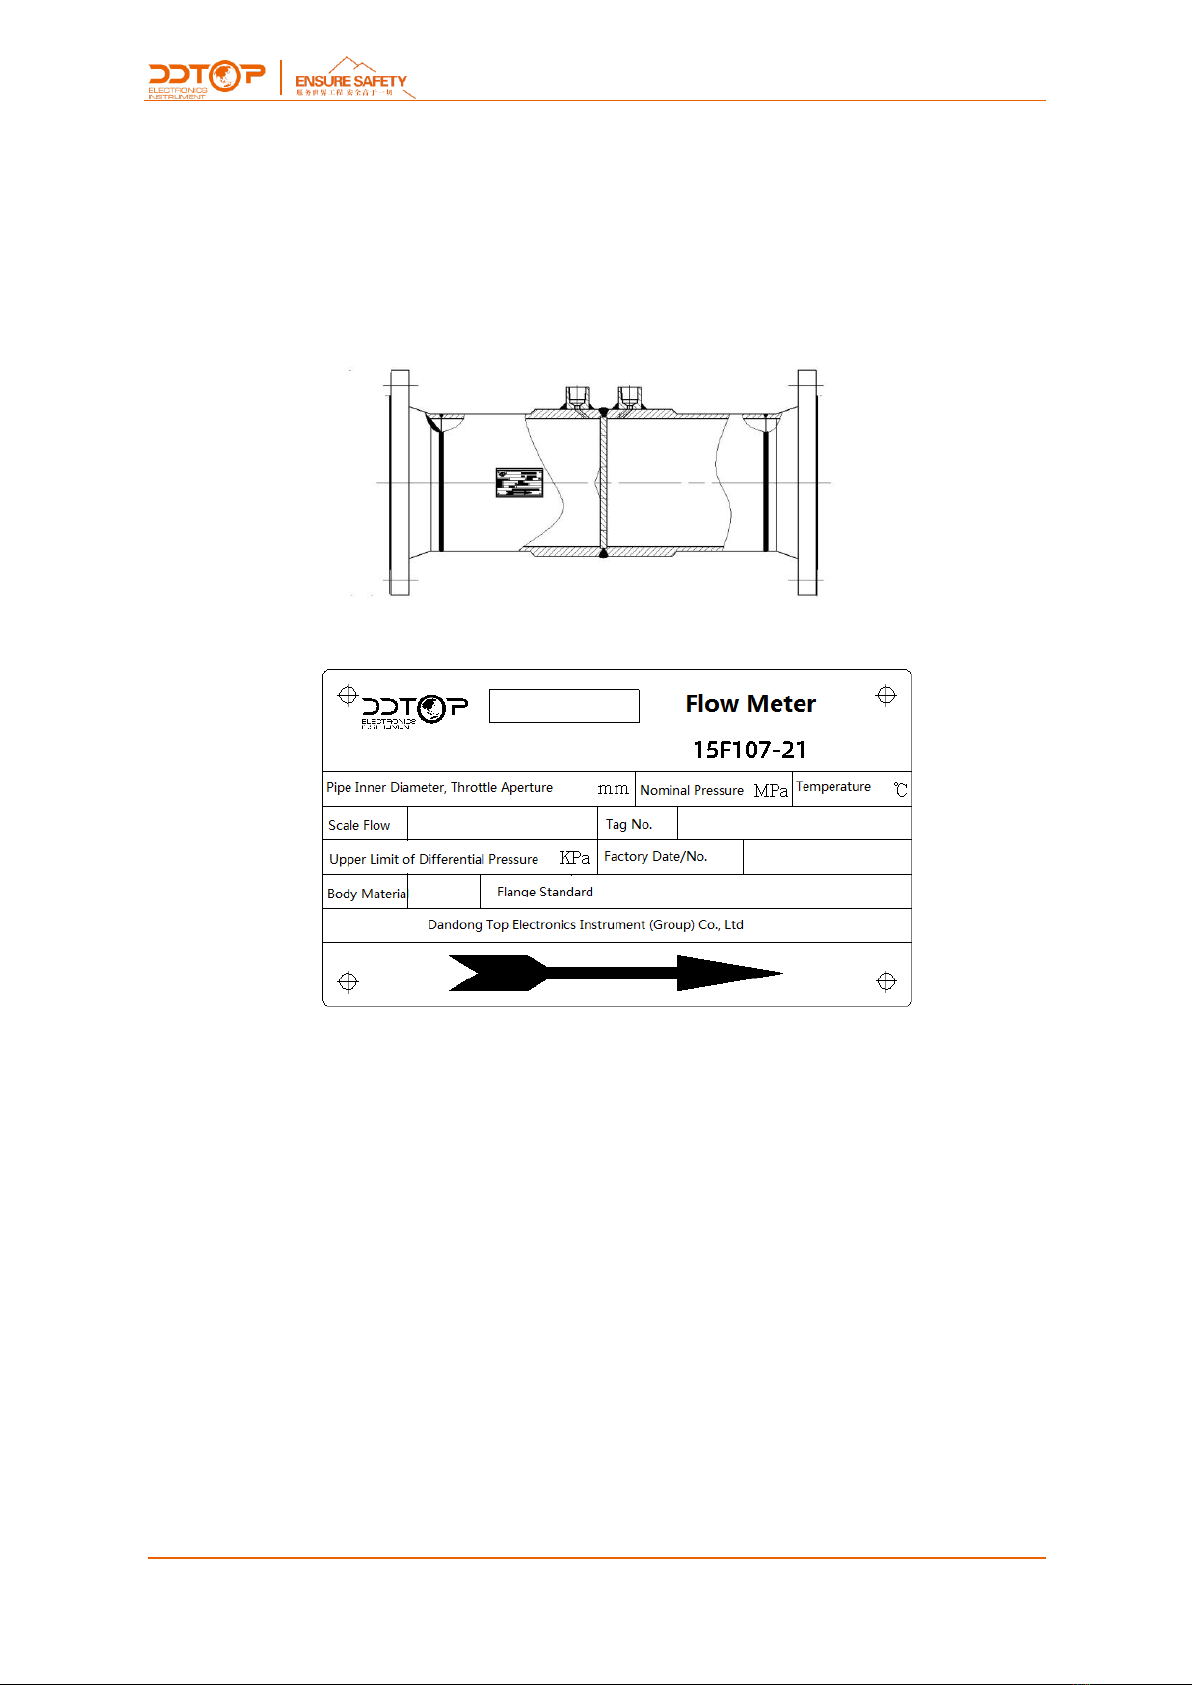
5.1.1 Check whether the product nameplate (Figure 3) is consistent with the supply list information.

9/ 13
WWW.DDTOP.COM
Figure 3
5.1. Check the quantity and material of each part against the packing list.
5.2 Check Content
5.2.1 Check whether the appearance of the instrument is defective or damaged.
5.2.2 If the LGP balanced flow meter and its accessories are packaged separately, please confirm
that the quantity and specifications are correct before unpacking.
6 Installation
6.1 Installation Tools
6.1.1 Suitable for wrenches, flange gaskets and flange bolts of process connections.
6.1.2 Welding equipment
6.2 Installation Technical Requirements
6.2.1 The basic structure of LGP balanced flow meter F considers the flow direction of the medium
when installing-Figure 4.
Figure 4 Basic Structure F

10 / 13
WWW.DDTOP.COM
* For adjusting the flow meter, the tapered head is the upstream side.
* If it is a balanced flow meter, there is no direction requirement, and the handle is usually the upper
side.
6.2.2 Consider the flow direction of the medium when installing the LGP balanced flow meter in
pipeline-Figure 5
Figure 5 Pipeline Structure G/S
* For adjusting the flow meter, the tapered head is the upstream side.
* If it is a balanced flow meter , and there is no direction requirement, assemble according to the
arrow information on the nameplate.
6.2.3 When the LGP balanced flow meter is installed on a horizontal pipeline, the pressure tap
should be within 45° of the horizontal centerline of the pipeline. When installed on a vertical
pipeline, the different elevations of the pressure tap will produce additional pressure heads, which
should change after the transmitter is installed, it can be solved by resetting the zero.
6.2.4 When the LGP balanced flow meter measures fluids with high viscosity, easy to crystallize,
coking or containing solid particles, the tapping place should be self-tracing or additional heating

11 / 13
WWW.DDTOP.COM
and an isolation container should be provided.
6.2.5 The upstream and downstream of the LGP balanced flow meter should have a certain length
of straight pipe section without resistance.
6.2.6 Requirements of Front and Back Straight Pipe Section:
Choke
Upstream
Downstream
1 Elbow
3D
2D
2 Elbows
4D
2D
Tee Joint Head
3D
2D
Full Open Gate Valve
4D
2D
Full Open Ball Valve
3D
2D
Reducer
3D
2D
Divergent Tube
3D
2D
7 Fault Analysis and Troubleshooting
Failure
Phenomenon
Reason
Method
1. Differential
pressure transmitter
indicates no change
1. Stop valve is not opened
Open the stop valve
2. Differential pressure pipeline is blocked
Unblock the differential
pressure pipeline
3. Differential pressure transmitter failure
Check differential pressure
transmitter
2. The indication
value of the
differential pressure
transmitter obviously
deviates from the
indication value of
gauge
1. The installation direction of flow element
is wrong
Reinstall the flow element
2. Differential pressure transmitter failure
Check differential pressure
transmitter
3. The working condition parameters of the
measured medium are inconsistent with
those used when designing the flow
element
Correct according to the
relevant formula, it is
necessary to recalculate the
differential pressure value
4. The length of the straight pipe before
and after the flow element is not enough
Adjust the length of straight
pipe
5. The inner diameter of the straight pipe
section is out of tolerance
Measure the inner diameter
of straight pipe section and
recalculate the maximum
flow
6.Throttle aperture tolerance
Measure the orifice aperture,
recalculate the maximum
flow

12 / 13
WWW.DDTOP.COM
7. Flow element is deformed
Replace flow element
8. There are attachments on flow element
Clean and replace flow
element
9. Tap location is incorrect
Reinstall in the correct way
10. Condensate liquid level in the
condenser is inconsistent
Adjust the condensate level
to make the height
consistent
3. Differential
pressure transmitter
has no indication
1. Power is not turned on
Turn on the power
2. The stop valve is not open
Open the stop valve
3. Differential pressure transmitter failure
Check differential pressure
transmitter
4. Medium leakage at
the flow element
1. Insufficient clamping force of connector
Refasten the connection
2. Sealing gasket failure
Replace sealing gasket
3. Material is corroded
Replace corroded parts
8 Maintenance
After the flow element is put into use, in order to ensure its measurement accuracy and reliability, it
must be maintained.
8.1Regularly clean the tapping signal pipeline and the differential pressure transmitter to remove all
debris, and check and adjust the zero point of the differential pressure transmitter at the same time.
8.2If the indicated value of the differential pressure transmitter is found to be significantly different
from the measured value, a comprehensive inspection and adjustment should be carried out, and
the metrological verification should be carried out if necessary.
8.3The differential pressure transmitter shall be subject to periodic measurement verification
according to the measurement verification period.
9 Disassemble
9.1 Warning
Before disassembling, pay attention to dangerous process conditions, such as pressure, high
temperature, corrosive or toxic media in the container, etc.
9.2 Waste Disposal
Please follow the current regulations in each region for waste disposal.

13 / 13
WWW.DDTOP.COM
10 Product Certificate
Product Certificate
Certificate Certification No. Scope and Description
Approval of Measuring Instrument Form 15F207-21
Approval Certification
Table of contents
Other ddtop Measuring Instrument manuals
Popular Measuring Instrument manuals by other brands

Trans instruments
Trans instruments WalkLAB HP 9010 Operation manual

Koso
Koso DB-01R instructions

ELGO Electronic
ELGO Electronic EMAX-HI Series operating manual

Met One
Met One 831 Quick setup guide

EIJKELKAMP
EIJKELKAMP Scuba Blue Green Algae Buoy user manual

Siemens
Siemens SENTRON 3NJ69 operating instructions