manuals.online logo
Brands
  1. Home
  2. •
  3. Brands
  4. •
  5. DecaLED
  6. •
  7. Lighting Equipment
  8. •
  9. DecaLED Pro Flex Neon Series User manual

DecaLED Pro Flex Neon Series User manual

DecaLED®
Pro Flex Neon Range
Product code(s)
95205600, 95205605, 95205709
ErP
COMPLIANT
RoHS IP65 24
VDC
www.decaled.com
Technische specicaties | Technical specications
Neon Flex 2700K
95205600
Neon Flex 4000K
95205605
Neon Flex RGB
95205609
Wattage | Power 12 W p/m
Voltage driver 24 VDC
Dimbaar | Dimmable Yes
Leds per meter 60
Kleur | Colour Warm white Neutral white RGB
Kleurtemperatuur | Color temperature 2700 °K 4000 °K -
Stralingshoek | Beam angle 160°
Lumenstroom | Luminous ux 320 Lm p/m 320 Lm p/m 100 Lm p/m
Gemid. levensduur | Expected life time 25000-40000 hours
Afmetingen | Dimensions W1/ H221 / 11,5 mm
Kniplengte| Cutting length L3100 mm (6 leds)
Max. lengte | Max. length 20 m
Bescherming | Protection IP65
Veiligheidsinstructies
• Laat dit product installeren en onderhouden door een geschoolde technicus.
• De beschikbare netspanning mag niet hoger zijn dan de spanning in de specicaties
van deze handleiding.
• Houd dit product buiten het bereik van kinderen en onbevoegden.
• Dit verlichtingsproduct heeft geen ingebouwde voorziening om het los te koppelen
van het stroomnet. Isoleer het product elektrisch voor de installatie of onderhoud.
Zorg ervoor dat het stroomsnoer niet gekneld of geplooid is en bescherm het tegen
beschadigingen. Waarschuwing! Indien de voedingskabel beschadigd is, dan moet
deze door de fabrikant, diens servicedienst, of een gelijkwaardig bekwaam persoon
vervangen worden om gevaar te voorkomen.
• Attentie: mogelijk gevaarlijke optische straling uitgezonden door dit product. Kijk nooit
rechtstreeks in de lichtbron. Dit kan leiden tot oogletsel.
• Attentie: dit product wordt warm tijdens het gebruik. Gebruikt u het product niet in de
verpakking of in opgewikkelde toestand, want door zelfverwarming kan het product
vernield worden.
• Attentie: gedurende de gehele installatie moet de aansluitingsleiding zonder
spanning zijn! Een aansluiting onder spanning vernielt de LEDs!
• Gebruik het product conform IP65 beschermingsklasse. Product slechts gebruiken
met contacten die op adequate wijze afgedicht zijn. Voor het afdichten van
verbindingen en open einden slechts geschikte krimpmoffen gebruiken.
• Alle elektrotechnische installaties dienen te worden uitgevoerd volgens de IEE
bedradingsrichtlijnen.
• Het product mag niet mechanisch worden belast.
Safety instructions
• A qualied technician shall install and service this device.
• Make sure that the available voltage does not exceed the voltage stated in the
specications of this manual.
• Keep this device away from children and unauthorized users.
• This product does not have a built-in device to disconnect it from the electric mains.
Make sure to electrically isolate the product before installation or maintenance
activities are performed. Do not crimp the power cord and protect it against
damage. Warning! If the power cord is damaged, it must be replaced by the
manufacturer, its service agent, or similarly qualied persons in order to avoid any
hazard.
• Caution: possibly hazardous optical radiation emitted from this product. Do not look
at operating lamp. Eye injury may result.
• Caution: device heats up during use. Do not operate the product rolled-up or in its
package. The product may be destroyed by its self-generated heat.
• Caution: keep the whole installation off power until the work is completely nished. A
connection with the power on will damages the LEDs.
• Utilize the product according to IP65 protection class. Operate the product only when
all contacts are sealed. Use only appropriate shrinking sleeves and caps for sealing of
contacts and open ends.
• All electrical installations must be carried out according to IEE wiring regulations.
• The product must not be mechanically stressed.
Reiniging en onderhoud
• Dit verlichtingsproduct heeft geen ingebouwde voorziening om het los te koppelen
van het stroomnet. Isoleer het product elektrisch voor de installatie of onderhoud.
• De voedingskabels mogen niet beschadigd zijn.
• Laat het product onderhouden door een geschoolde technicus.
• Indien het PVC omhulsel beschadigd is, moet u de strip onmiddellijk loskoppelen
van het stroomnet. Gebruik de strip niet indien het PVC omhulsel gebarsten of
beschadigd. Het omhulsel is niet vervangbaar.
• De gebruiker mag geen onderdelen vervangen.
• Bestel eventuele reserveonderdelen bij uw plaatselijke verdeler.
• Maak het product geregeld schoon met een vochtige, niet pluizende doek.
• Gebruik geen alcohol of oplosmiddelen voor de reiniging.
• Controleer of het PVC omhulsel nog intact en niet broos is. Bij beschadigingen
is het product niet meer IP65 beschermd en mag dit niet meer onder vochtige
omstandigheden worden toegepast.
Cleaning and maintenance
• This product does not have a built-in device to disconnect it from the electric mains.
Make sure to electrically isolate the product before installation or maintenance
activities are performed.
• The electric power supply cables must not show any damage.
• Have a qualied technician maintain the device.
• If the PVC shell is damaged, immediately disconnect the strip from the mains. Do not
use the strip if the PVC shell shows cracks or damage. The shell is not replaceable.
• There are no user-serviceable parts.
• Contact your dealer for spare parts if necessary.
• Wipe the device regularly with a moist, lint-free cloth.
• Do not use alcohol or solvents for cleaning.
• Check that the PVC shell is intact and not brittle. In case of damage, the product is
no longer IP65 protected and this should not be used in humid conditions.
Versie 2016.06
W1
H2
L3
LED
Installatie
• Respecteer altijd de veiligheidsinstructies! Neem deze door voordat u met de
installatie begint.
• Niet installeren bij een omgevingstemperatuur lager dan 5°C of hoger dan 45°C.
• Schakel de stroom uit / los, voordat u begint aan de installatie of de bedrading.
• Gebruik uitsluitend een geschikte voeding met 24 V/DC constante uitgangsspanning.
• Om IP65 bescherming te waarborgen, dienen connectoren en open einden met
geschikte krimpmoffen en lijm te worden afgesloten.
• De juiste elektrische polariteit moet in acht worden genomen. Verkeerde polariteit
kan de strip permanent beschadigen.
• Zorg ervoor dat de secundaire zijde van de voeding is aangesloten aan het product,
voordat u de primaire zijde van stroom voorziet.
• Sluit de primaire zijde van de driver aan op de stroomvoorziening, conform IEE
regelgeving.
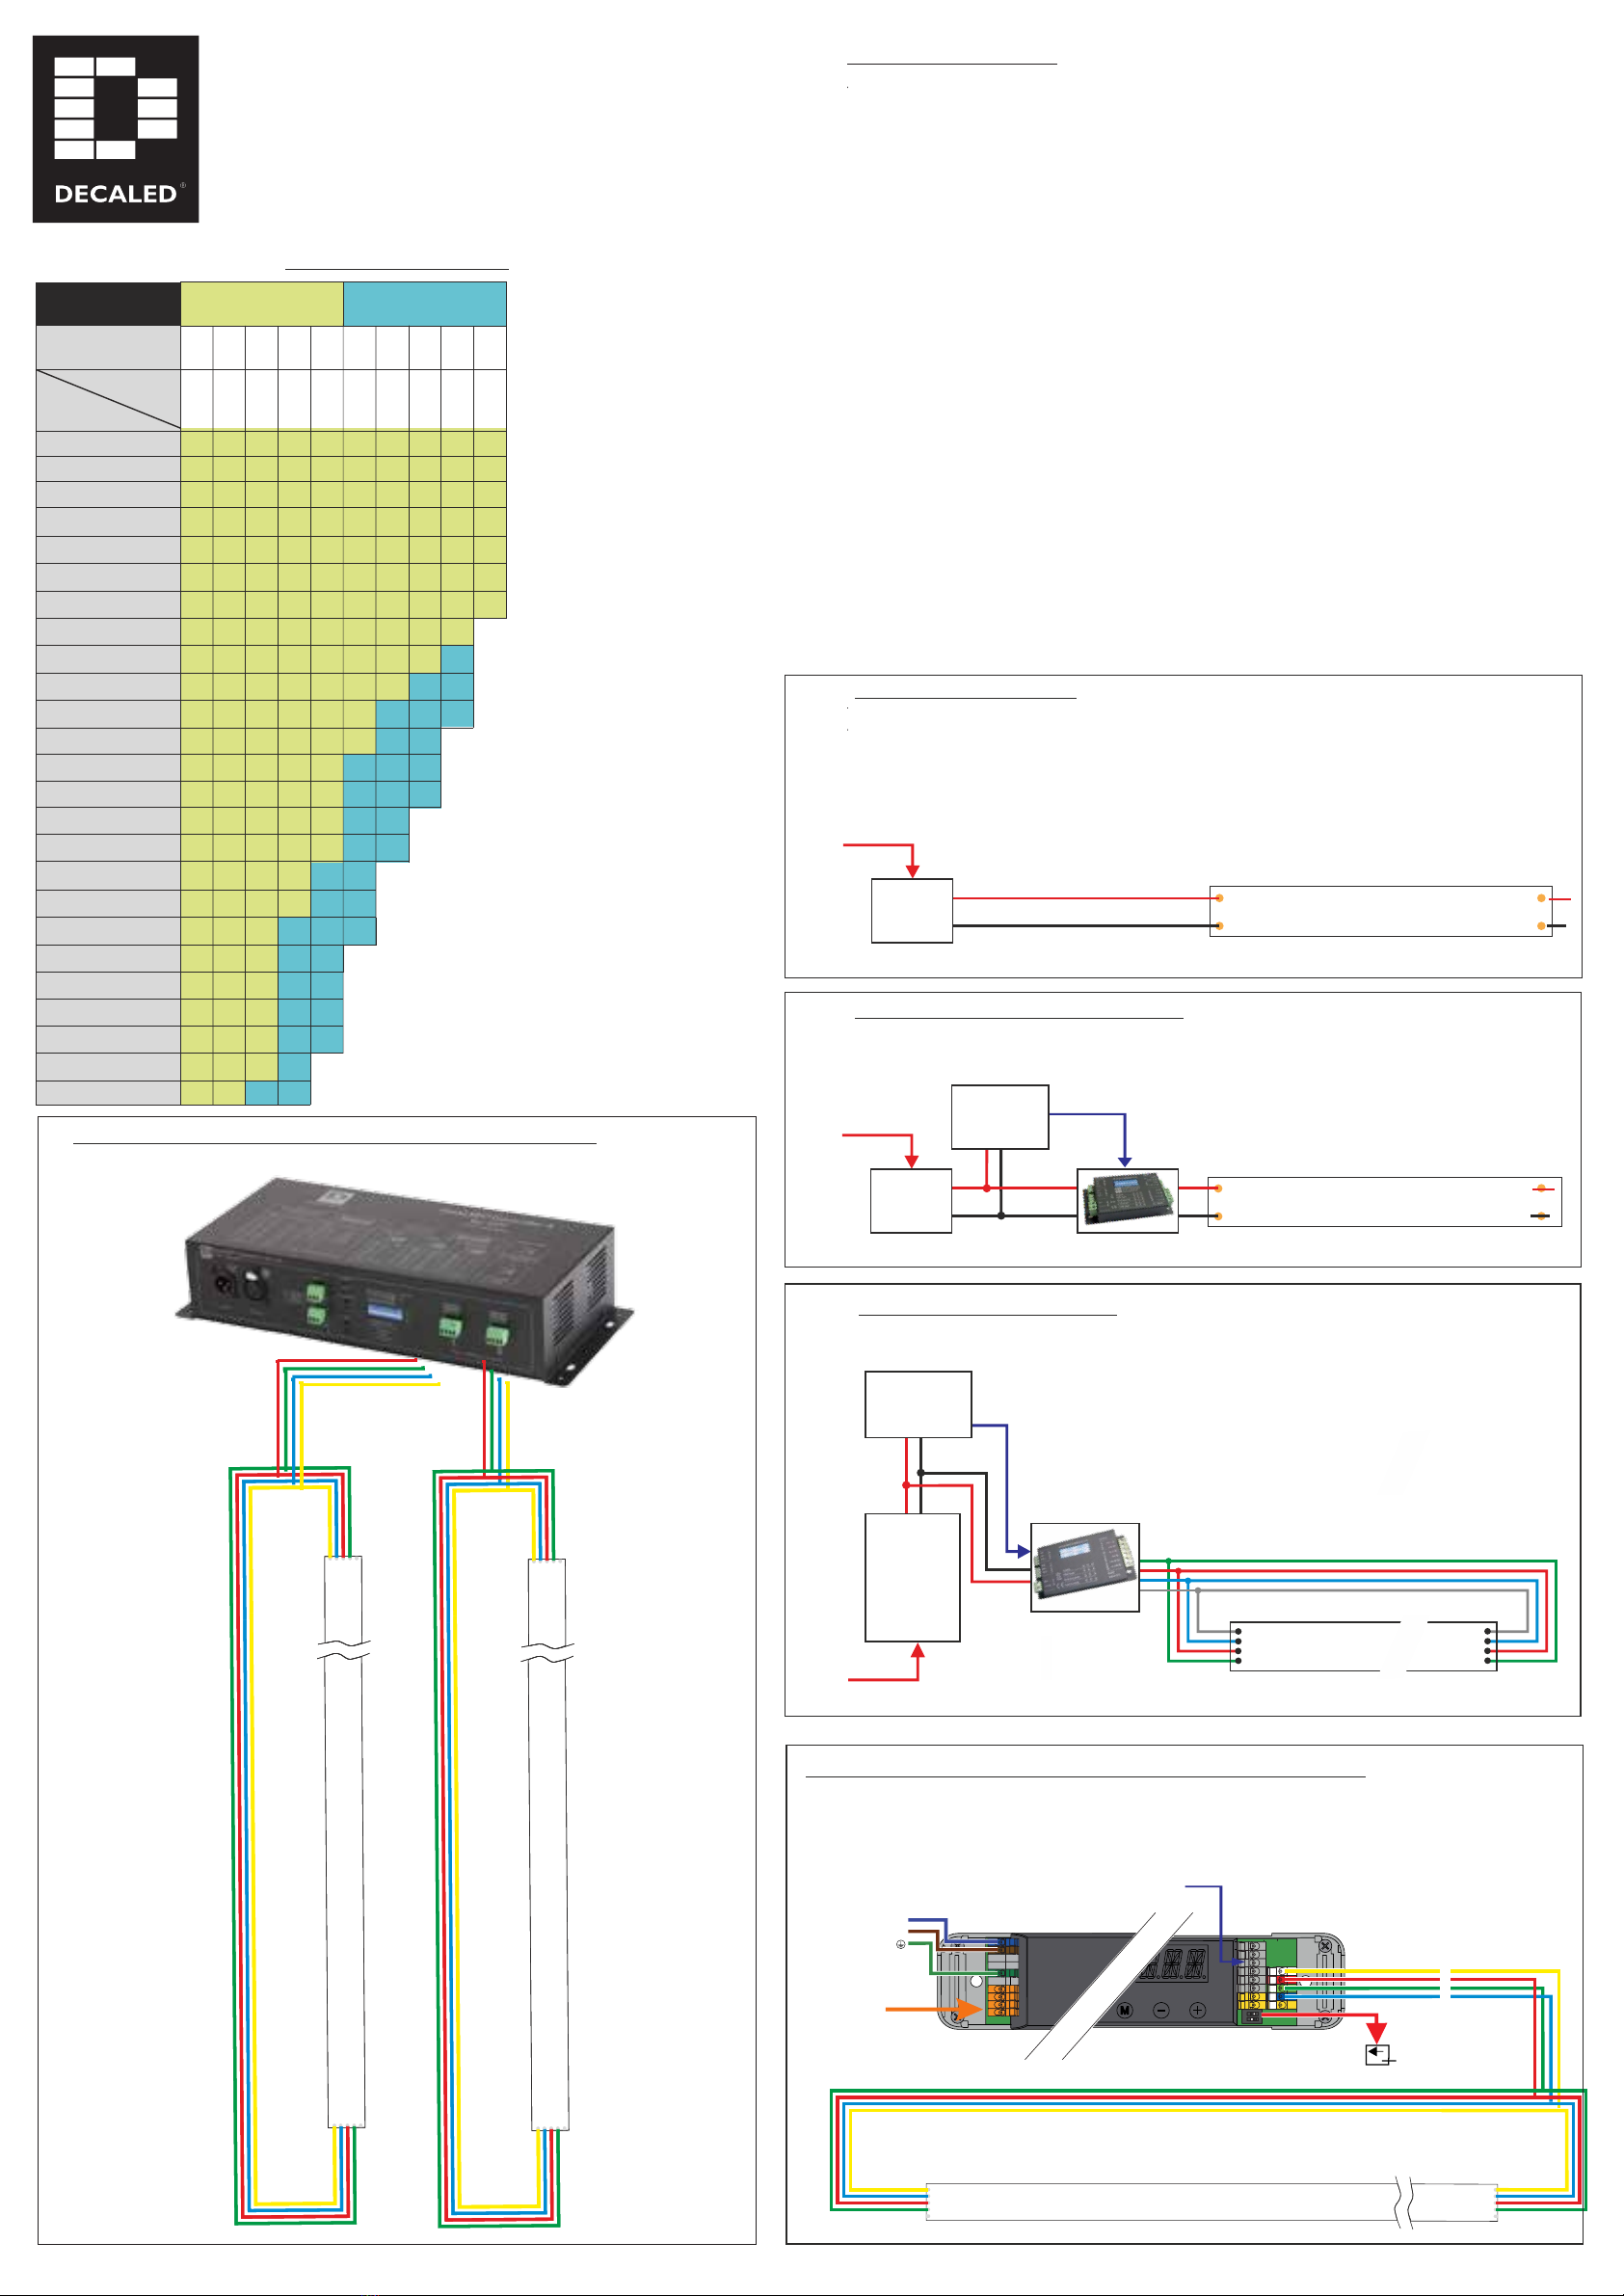
• Zie tekeningen voor de aansluitinstructie.
• Montage in proelen of clips. Schroef het proel / de clips vast op de ondergrond,
druk de strip zachtjes in het proel. Druk niet op componenten om beschadiging te
voorkomen.
• Er mag maximaal 10m strip aaneengesloten worden.
• De strip kan in secties worden ingekort; zie markeringen op het product. Knip exact
haaks op de strip, met een scherpe schaar of kniptang.
• De minimale buigdiameter is 12 cm.
• Strip niet torderen of los in de lucht hangen.
Installation
• Always respect the safety instructions! Check them out before you begin the
installation.
• Do not install in an ambient temperature below 5°C or above 45°C.
• Turn the power off / disconnect, before starting the installation or wiring.
• Use only a suitable power supply unit, output: 24V/DC constant.
• To ensure IP65 protection, all connectors and open ends should be sealed with
suitable shrink sleeves and glue.
• Correct electrical polarity needs to be observed. Wrong polarity may damage the
strip permanently.
• Make sure the secondary side of the power supply is connected to the product
before connecting the primary side with power.
• Connect the primary side of the driver to the power supply in accordance with IEE
regulations.
• See drawings for connection instruction.
• Mounting in prole or clips. Screw the prole / clips onto the surface, gently press the
strip in the prole. Do not press components to prevent damage.
• There may be up to 10m strip contiguous.
• The strip can be cut into sections; see markings on the product. Cut exactly at right
angles to the strip, with a sharp scissors or cutters.
• Minimum bending diameter 12 cm.
• Not twist or hang loose strip in the air.
Algemeen gebruik
DecaLED® Pro Flex Neon wordt bij uitstek toegepast voor contourlijnen en het aanbrengen
van verlichte accenten in façades van gebouwen, trappen en de openbare ruimte. Het
resultaat is vergelijkbaar met “ouderwetse” neonverlichting, maar dan exibel, duurzaam,
laag in energieverbruik en gemakkelijk te installeren. Dit 24V product is waterdicht (IP65)
en bevat 60 leds per meter. Beschikbaar in warm wit, neutraal wit en RGB, voor vrijwel
onbeperkte mogelijkheden.
• Bescherm dit product tegen extreme temperaturen.
• Bescherm het product tegen schokken. Vermijd brute kracht tijdens de bediening.
• Bestudeer eerst de functies van het product voordat u het gaat gebruiken.
• Om veiligheidsredenen mag u geen wijzigingen aanbrengen aan het product.
Schade door wijzigingen die de gebruiker heeft aangebracht aan het product, valt
niet onder de garantie.
• Gebruik het product enkel waarvoor het gemaakt is. Andere toepassingen kunnen
leiden tot kortsluitingen, brandwonden, elektrische schokken, enz.
• De garantie vervalt automatisch bij ongeoorloofd gebruik.
• De garantie geldt niet voor schade door het negeren van bepaalde richtlijnen in
deze handleiding. Uw dealer zal de verantwoordelijkheid afwijzen voor defecten of
problemen die hier rechtstreeks verband mee houden.
• Gebruik de oorspronkelijke verpakking wanneer u het product vervoert.
• Bewaar deze handleiding voor verdere raadpleging.
General usage
DecaLED® Pro Flex Neon is especially suited for contour lines and the installation of
illuminated accents on facades of buildings, staircases and public spaces. The result is
similar to “old fashioned” neon lights, but exible, durable, low in power consumption
and easy to install. This 24V product is waterproof (IP65) and contains 60 LEDs per meter .
Available in warm white, neutral white and RGB, for almost unlimited possibilities.
• Keep this device away from extreme temperatures.
• Protect this device from shocks and abuse. Avoid brute force when operating the
device.
• Familiarise yourself with the functions of the device before actually using it.
• All modications of the device are forbidden for safety reasons. Damage caused by
user modications to the device is not covered by the warranty.
• Only use the device for its intended purpose. All other uses may lead to short circuits,
burns, electroshocks, lamp explosion, crash, etc.
• Using the device in an unauthorised way will void the warranty.
• Damage caused by disregard of certain guidelines in this manual is not covered by
the warranty and the dealer will not accept responsibility for any ensuing defects or
problems.
• Use the original packaging if the device is to be transported.
• Keep this manual for future reference.
Afvoeren van het product (WEEE)
Dit symbool op het toestel of de verpakking geeft aan dat, als het na zijn
levenscyclus wordt weggeworpen, dit toestel schade kan toebrengen aan
het milieu. Gooi dit toestel (en eventuele batterijen) niet bij het gewone
huishoudelijke afval; het moet bij een gespecialiseerd bedrijf terechtkomen
voor recyclage. U moet dit toestel naar uw verdeler of naar een lokaal
recyclagepunt brengen. Respecteer de plaatselijke milieuwetgeving.
Disposal of the product (WEEE)
This symbol on the device or the package indicates that disposal of the
device after its lifecycle could harm the environment. Do not dispose of
the unit (or batteries) as unsorted municipal waste; it should be taken to a
specialized company for recycling. This device should be returned to your
distributor or to a local recycling service. Respect the local environmental
rules.
Light Surface
Light Surface
√
Light Surface
√
Light SurfaceLight Surface
×× ×
Cover
Fron t Connecto r
Anti-skidding Clip
1
2
3
4
5
6
HEAT HEAT
Glue
End Ca p
Glu e
HST HS T
HST
10mm 7.5mm
7
8
9
10
11
Pay attention to
wide open side
12
Shading Sheet
Pins on th e back of
PCB is correct .
Refe r to Fig. 6 .
Glue s on the edges.
With 1/3 glues
Connecto r Pin sConnecto r Pin s
Fron t Connector Anti-skiddin g Clip
Cove r
Ligh t Surface
End Ca p
HST
HST
Shadin g Sheet
Fron t Connecto r Anti-skiddin g Clip
×
×
Strip
Installation surface
Screw
Aluminium profile
Screw
Aluminium profile
Installation surface
Strip
Aluminium Self-Lock profile
Connecto r P in s
Connecto r P in s
LED LED
Connecto r P in s
√×
Connecto r P in s
√×
Connecto r P in sConnecto r P in s
LED LED
PCB PC B
PCB PC B
Connecto r Pin s
Connecto r Pin s
LED LE D
Connecto r Pin s
Connecto r Pin s
√×
LED LE D
PCB PC B
PCB PC B
√×
√×√×
×
PCBPCB
PCB
Product Number List:
95205600 DecaLED Pro Flex Neon 2700K 60 leds/m 24V per mtr
95205605 DecaLED Pro Flex Neon 4000K 60 leds/m 24V per mtr
95205651 DecaLED Pro Flex Neon Feed-in Right Side 1mtr Single Color
95205652 DecaLED Pro Flex Neon Feed-in Left Side 1mtr Single Color
95205653 DecaLED Pro Flex Neon Feed-in Right Side 3mtr Single Color
95205654 DecaLED Pro Flex Neon Feed-in Left Side 3mtr Single Color
95205671 DecaLED Pro Flex Neon Middle Connector Single Color
95205672 DecaLED Pro Flex Neon Link Cable Single Color
95205673 DecaLED Pro Flex Neon Split Cable Single Color
95205709 DecaLED Pro Flex Neon RGB 60 leds/m 24V per mtr
95205751 DecaLED Pro Flex Neon Feed-in Right Side 1mtr RGB
95205752 DecaLED Pro Flex Neon Feed-in Left Side 1mtr RGB
95205753 DecaLED Pro Flex Neon Feed-in Right Side 3mtr RGB
95205754 DecaLED Pro Flex Neon Feed-in Left Side 3mtr RGB
95205771 DecaLED Pro Flex Neon Middle Connector RGB
95205772 DecaLED Pro Flex Neon Link Cable RGB
95205773 DecaLED Pro Flex Neon Split Cable RGB
95205881 DecaLED Pro Flex Neon End Cap RGB & SC
95205891 DecaLED Pro Flex Neon Aluminum Profile 5cm
95205892 DecaLED Pro Flex Neon Aluminum profile 2 mtr
95205894 DecaLED Pro Flex Neon Aluminum Lock Profile 2m
95205895 DecaLED Pro Flex Neon Aluminum Lock Profile 5cm
95791403 DecaLED 24Vdc 30Watt Power Supply ( 2mtr Pro Flex Neon )
95791406 DecaLED 24Vdc 60Watt Power Supply ( 4mtr Pro Flex Neon )
95791410 DecaLED 24Vdc 100Watt Power Supply ( 5mtr Pro Flex Neon )
95791420 DecaLED 24Vdc 200Watt Power Supply ( 10mtr Pro Flex Neon )
Power / Watt
Cable conductor
1.5mm°
Cable conductor
2.5mm°
1
1
24 48 72 96 120 144 168 192 216 240
2 3 4 5 6 7 8 9 10
2
3
4
5
6
7
8
9
10
11
12
13
14
15
16
17
18
19
20
21
22
23
24
25
Ampere
24 Vdc
230V AC
24Vdc
Power-
supply
24Vdc
Power-
supply
Maximum Continuous Length 20 mtr!
Energize from both ends!
230V AC
Cable Lenghth
DecaLED ® Pro Flex Neon Single Color
95342136 DecaLED 1-Channel DMX / 1-10V Dimmer Single Color Solution
95342139 DecaLED 1-4-Channel DMX Dimmer RGB Solution
Advised Single Color PWM Dimmer:
230V AC
DMX signal
24Vdc
Power-
supply
DecaLED Pro Flex Neon RGB
®
B
R
G
W
B
R
G
W
+
+
N
L
230Vac
{
M
24V 12V
Non functional
Common anode
set operating DIP switch to 24Vdc!
+
R
B
G
DecaLED ® Pro Flex Neon RGB
DMX / 1-10V
Controller
DMX
Controller
95801100 EldoLED 24Vdc 100Watt 1-4 Channel DMX / Dali
Advised Powersupplies:
Advised RGB PWM Dimmer:
Advised RGB (W) PWM Dimmer with integrated powersupply:
DMX / 1-10V signal
DMX signal
Dali signal
B
R
G
W
B
R
G
W
+
+
DecaLED
®
Pro Flex Neon RGB
B
R
G
W
B
R
G
W
+
+
DecaLED
®
Pro Flex Neon RGB
B
R
G
W
B
R
G
W
+
+
DecaLED
®
Pro Flex Neon RGB
B
R
G
W
B
R
G
W
+
+
DecaLED
®
Pro Flex Neon RGB
Advised RGB PWM Dimmer with integrated powersupply:
95350245 DecaLED 24Vdc 300Watt 2x3 Channel DMX
Maximum Continuous Length 20 mtr!
Energize from both ends!
Maximum Continuous Length 15 mtr RGB!
Energize from both ends!
Maximum Continuous Length 8 mtr RGB!
Maximum Continuous Length 10 mtr!
Energize from both ends!
Maximum Continuous Length 10 mtr!
Cable Length Indication:
Energize from both ends!

This manual suits for next models

4

Other DecaLED Lighting Equipment manuals

DecaLED Flex 120 leds/m 24V 5mtr 4000K IP65 CRI 90 User manual

DecaLED

DecaLED Flex 120 leds/m 24V 5mtr 4000K IP65 CRI 90 User manual

DecaLED Flex 4000K User manual

DecaLED

DecaLED Flex 4000K User manual

DecaLED 95168180 User manual

DecaLED

DecaLED 95168180 User manual

DecaLED Flex RGB 60 leds/m User manual

DecaLED

DecaLED Flex RGB 60 leds/m User manual

DecaLED 94000172 User manual

DecaLED

DecaLED 94000172 User manual

DecaLED Flex 2200K User manual

DecaLED

DecaLED Flex 2200K User manual

DecaLED Flex 3000K User manual

DecaLED

DecaLED Flex 3000K User manual

Popular Lighting Equipment manuals by other brands

EcoxGear SOUNDEXTREME SEI-SEUGLW1236 user guide

EcoxGear

EcoxGear SOUNDEXTREME SEI-SEUGLW1236 user guide

UNILITE CRI-2300 manual

UNILITE

UNILITE CRI-2300 manual

Avlite AV-72-RF Installation & service manual

Avlite

Avlite AV-72-RF Installation & service manual

ProLights Halurock user manual

ProLights

ProLights Halurock user manual

Eye Hortilux LED 700-ESib quick start guide

Eye Hortilux

Eye Hortilux LED 700-ESib quick start guide

Raptor 1265861 quick start guide

Raptor

Raptor 1265861 quick start guide

Lightolier MD4GPSVA2SB4SB specification

Lightolier

Lightolier MD4GPSVA2SB4SB specification

Federal Signal Corporation Cuda TriOptic 351012F Series instruction sheet

Federal Signal Corporation

Federal Signal Corporation Cuda TriOptic 351012F Series instruction sheet

EuroLite Pinspot PAR36 user manual

EuroLite

EuroLite Pinspot PAR36 user manual

Triton Blue RGB3256-480 user manual

Triton Blue

Triton Blue RGB3256-480 user manual

Chauvet COLORrail user manual

Chauvet

Chauvet COLORrail user manual

BEGA 99 072 Instructions for use

BEGA

BEGA 99 072 Instructions for use

Tridonic EM powerLED ST FX manual

Tridonic

Tridonic EM powerLED ST FX manual

Clas Ohlson LS9A123-1-01 quick start guide

Clas Ohlson

Clas Ohlson LS9A123-1-01 quick start guide

National Specialty Lighting LED Brick Star Gen I installation instructions

National Specialty Lighting

National Specialty Lighting LED Brick Star Gen I installation instructions

Ametrix ADY071478 installation instructions

Ametrix

Ametrix ADY071478 installation instructions

Humanscale Nova Assembly instructions

Humanscale

Humanscale Nova Assembly instructions

Tridonic Excite Series manual

Tridonic

Tridonic Excite Series manual

manuals.online logo
manuals.online logoBrands
  • About & Mission
  • Contact us
  • Privacy Policy
  • Terms and Conditions

Copyright 2025 Manuals.Online. All Rights Reserved.