Newfeellight NF-260 User manual
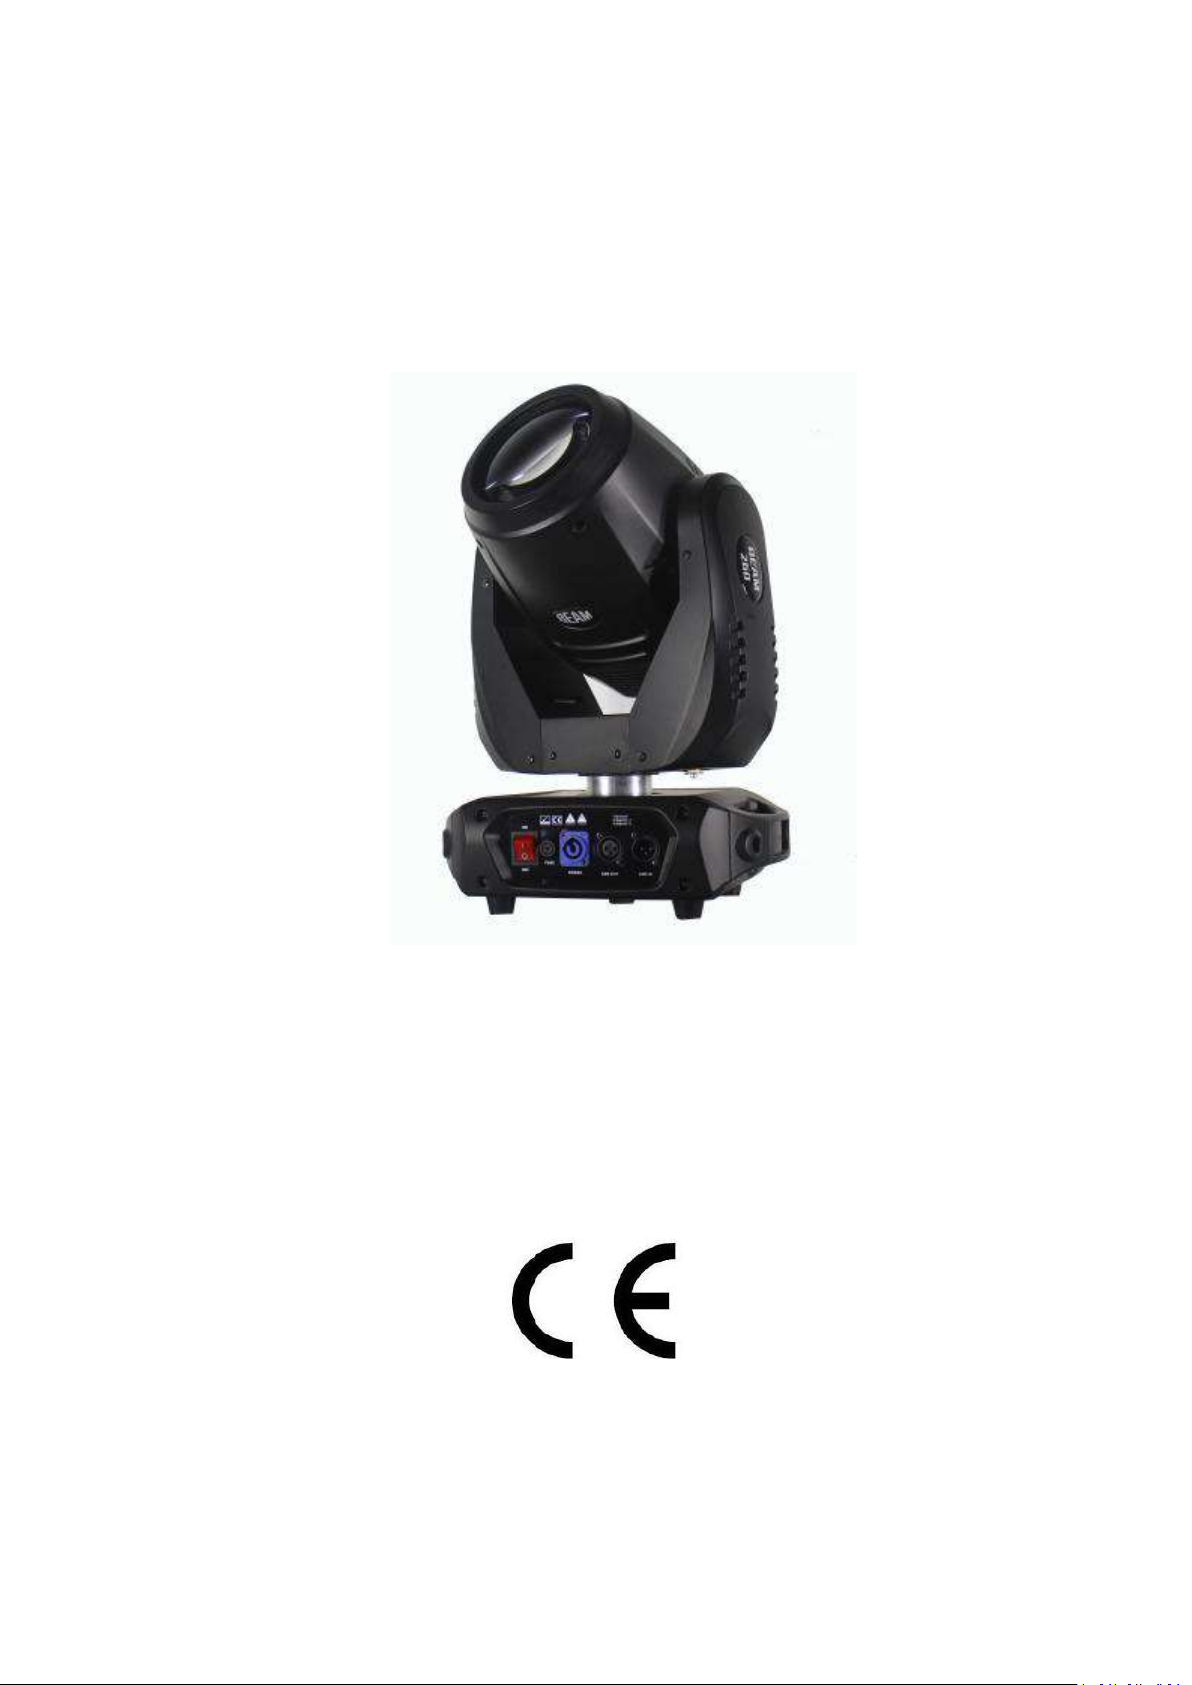
260W Moving Head Beam
USER MANUAL
KEEP THIS MANUAL FOR FUTURE NEEDS

Thank you for your patronage. We are confident that our excellent
products and service can satisfy you. For your own safety, please read
this user manual carefully before installing the device.
In order to install, operate, and maintain the lighting safety correctly. We
suggest that the installation and operation should be done by the
verified technician and follow the instruction strictly.
ACAUTION! Keep this device away from
rain and moisture!
CAUTION!
Unplug mains lead before opening the housing.
Every person involved with the installation, operation and maintenance
of this device has to:
-be qualified
-follow carefully the instructions of this manual
1. INTRODUCTION
Thank you for having chosen this professional moving head.
You will see you have acquired a powerful and versatile device.
Unpack the device. Inside the carton box you should find:
1. One XLR power cable
2. One user manual
3. Two pcs omega

Please check carefully that there is no damage caused by transportation.
Should there be any, please consult your dealer and don’t install this
device.
2 Mounting and installation
2.1 Cautions: for added protection mount the fixtures in areas outside
walking paths ,seating areas,or in areas were the fixture might be
reached by unauthorized personnel.
Before mounting the fixture to any surface ,make sure that the
installation area can hold a minimum point load of 10 times the device’s
weight.
Fixture installation must always be secured with a secondary safety
attachment ,such as an appropriate safety cable.
Never stand directly below the device when mounting ,removing ,or
servicing the fixture, from a ceiling,or set on a flat level surface (see
illustration below).Be sure this fixture is kept at least 0.5m (1.5ft) away
from any flammable (decoration etc.)
Always use and install the supplied safety cable as a safe cable as safety
measure to prevent accidental damage and /or injury in the event the
clamp fails.
2.2 Mounting points:
Overhead mounting requires extensive experience , including others
calculating working load limits, a fine knowledge of the installation

material being used ,and periodic safety inspection of all installation
material and the fixture. If you lack these qualifications ,
Do not attempt the installation yourself ,improper installation can result
in bodily injury.
Be sure to complete all rigging and installation procedures before
connecting the main power cord to the appropriate wall outlet.
2.3 Clamp mounting :
The LED moving head provides a unique mounting bracket assembly that
integrates the bottom of the base, the included ‘omega bracket’and the
safety cable rigging point in one unit (see the illustration below).When
mounting this fixture to truss be sure to sere to secure an rated clamp to
the included omega bracket using a M10 screw fitted through the center
hole of the ‘omega bracket’.As an added safety measure be sure to
attached at least one properly rated safety cable to the fixture using on
of the safety cable rigging point integrated in the base assembly.
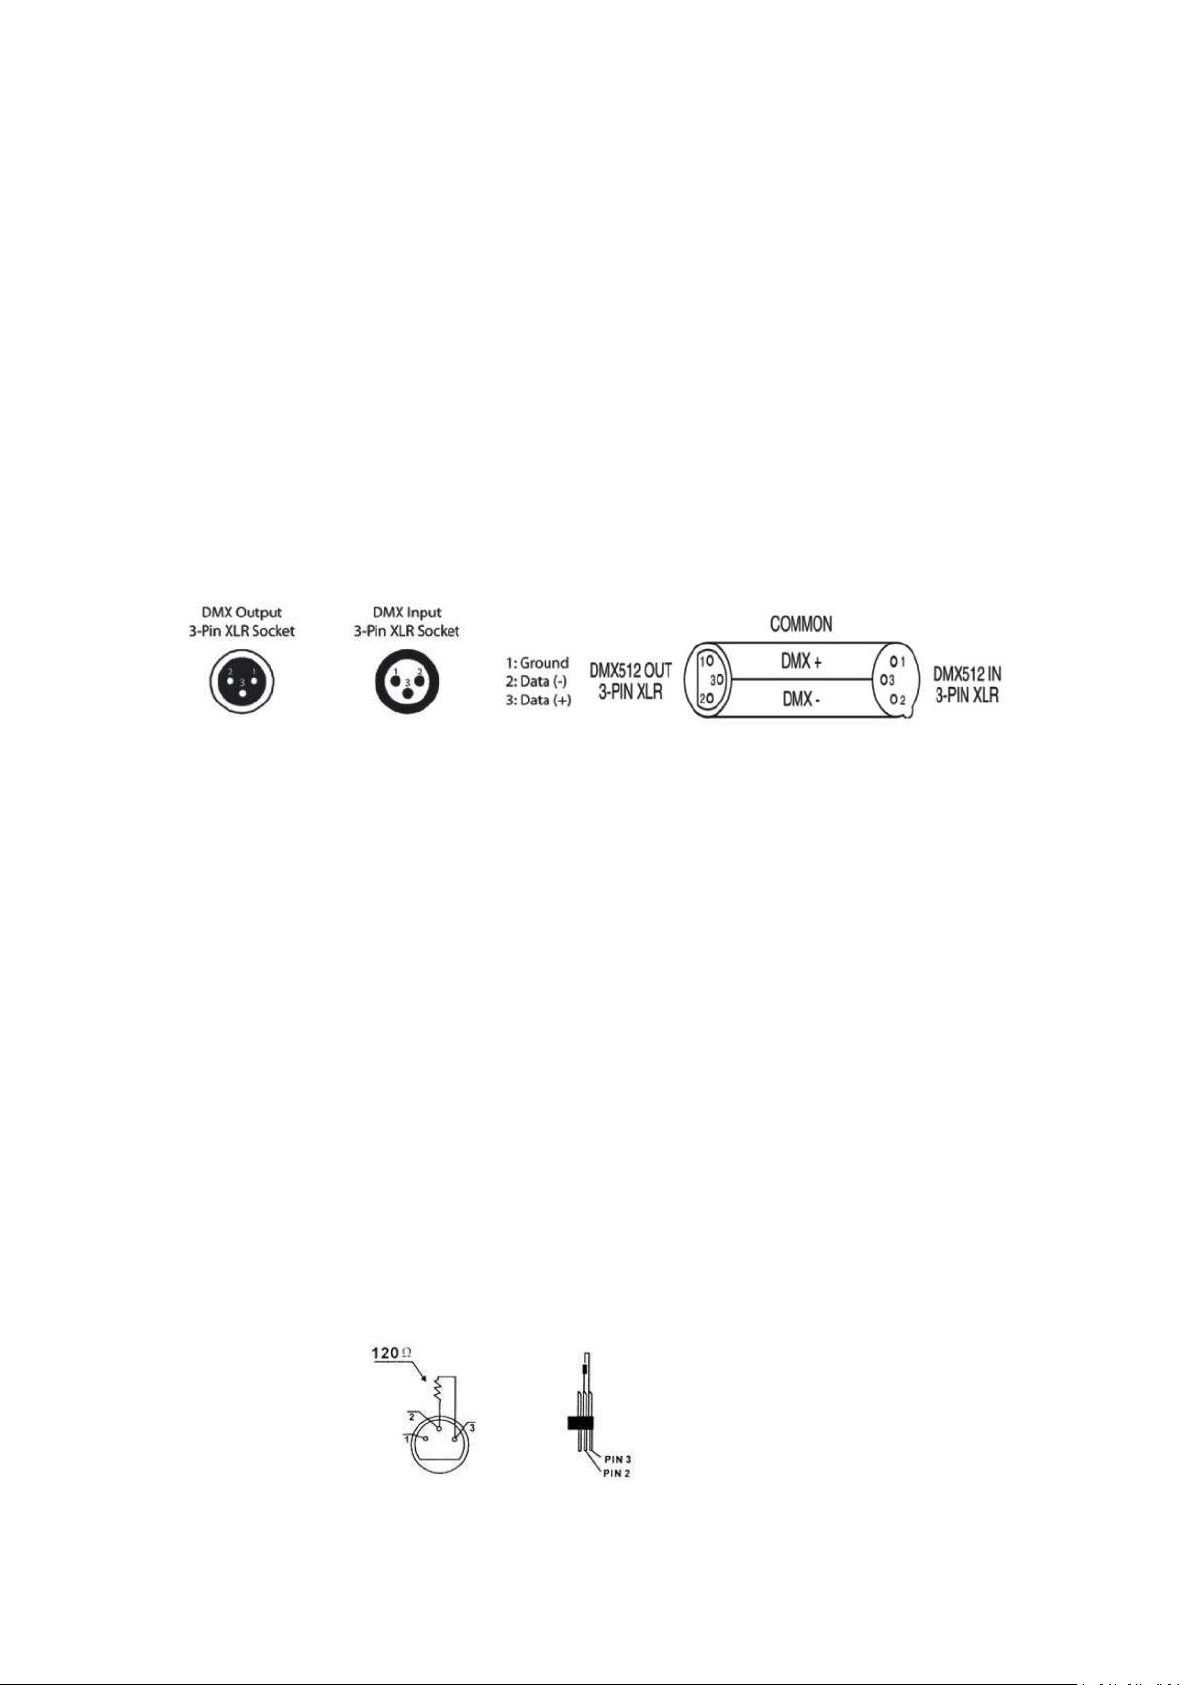
2.4 DMX-512 control connection
Connect the provided XLR cable to the female 3-pin XLR output of your
controller and the other side to the male 3-pin XLR input of the moving
head. You can chain multiple Moving head together through serial
linking. The cable needed should be two core, screened cable with XLR
input and output connectors. Please refer to the diagram below.
2.4 DMX-512 connection with DMX terminator
For installations where the DMX cable has to run a long distance or is in
an electrically noisy environment, such as in a discotheque, it is
recommended to use a DMX terminator. This helps in preventing
corruption of the digital control signal by electrical noise. The DMX
terminator is simply an XLR plug with a 120 resistor connected between
pins 2 and 3,which is then plugged into the output XLR socket of the last
fixture in the chain. Please see illustrations below.

3 TECHNICAL PARAMETERS
POWER SUPPLIE
Input power:AC100-240V 50/60 Hz
Power consumption :330W
Lamp:260W bulb
DMX channel:18 channels
Color temperature :6700K
Pan scan:540°(16bit) Electric correction
Tilt scan:270°(16bit) Electric correction
Color wheel: one color wheel, 13 kinds of color chips in one color wheel
Static Gobo: 13gobos+open
Effect Wheel: two Effect prism,one Rotation 16- prism,one Rotation 48-
prism effect move ,Bi-directional rotation
Color chips:1 colorful chip
Control mode:DMX512/Master-Slave/Auto run
Dimmer : 0- 100 %
Strobe:0-20 HZ
Display:LCD display
WEIGHT&SIZE
N.W: 12.8 KG
G.W: 14.5KG
Packing size: 49*40*59cm
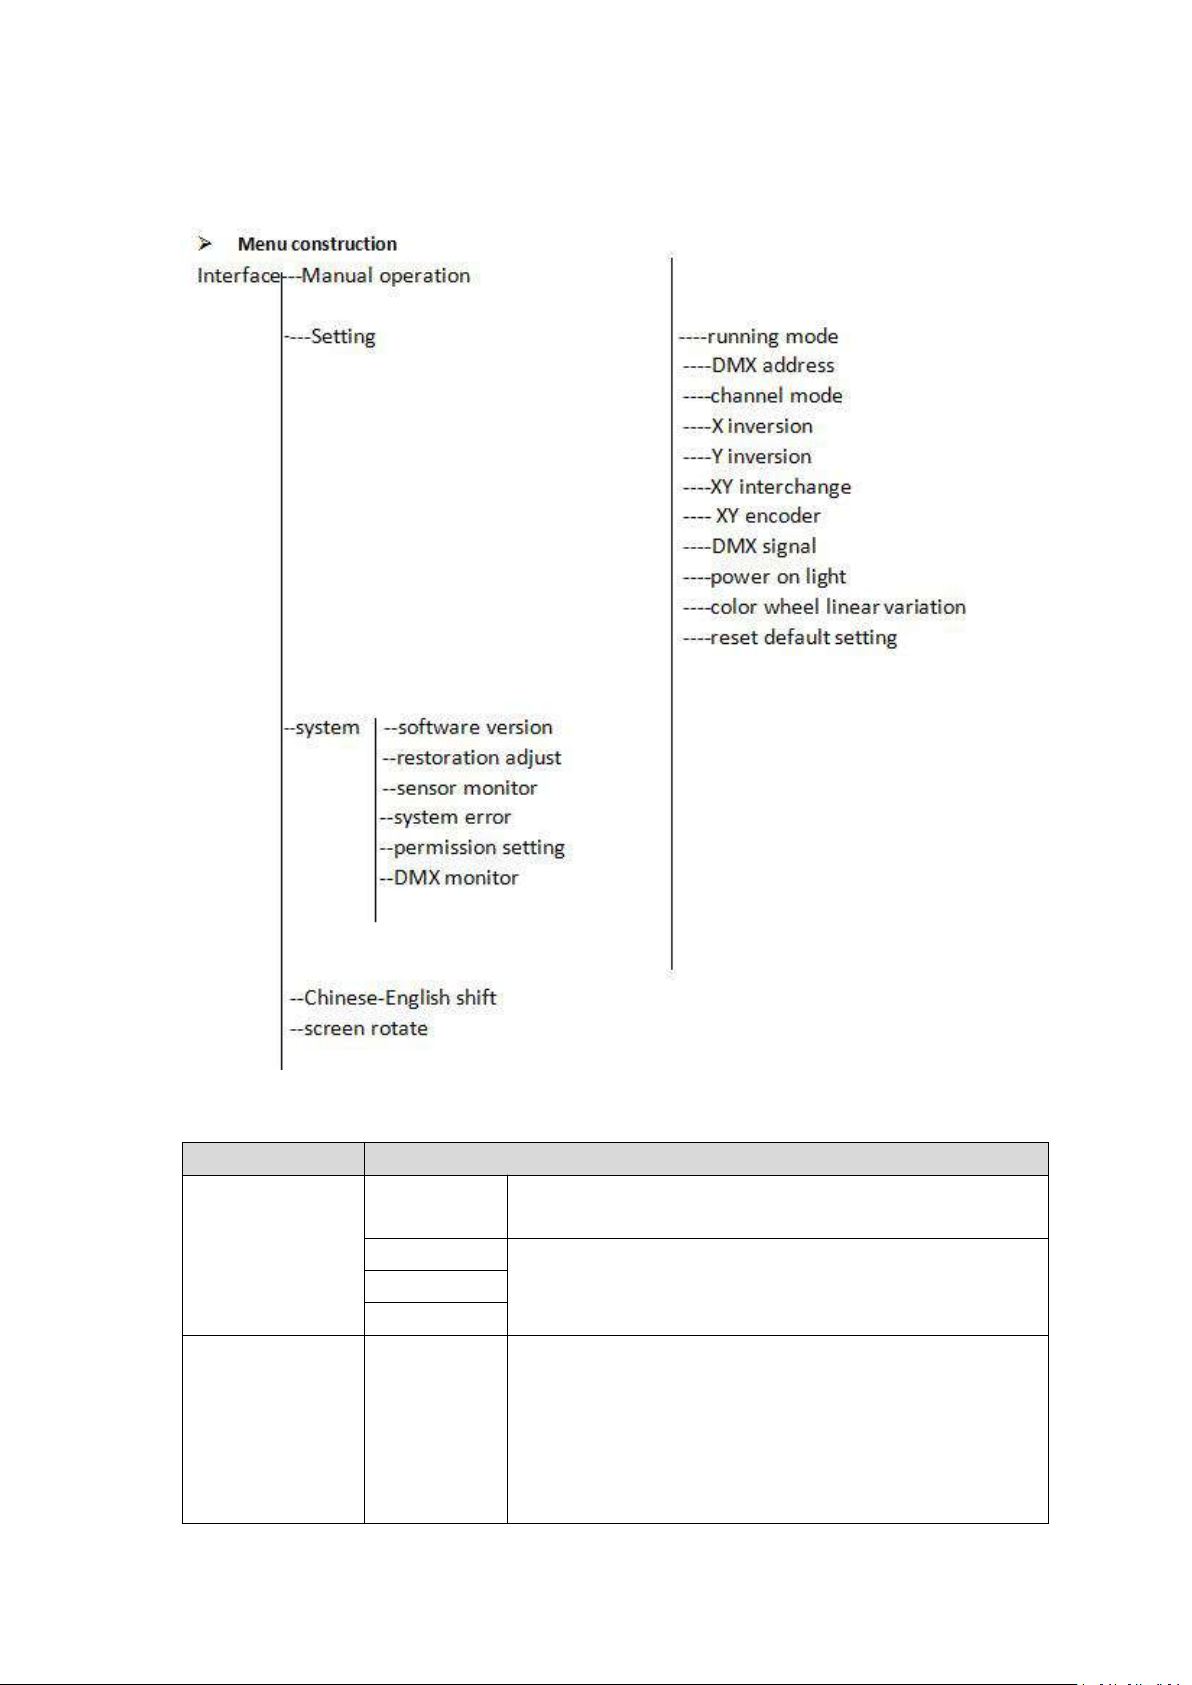
4 :MENU FUNCTION
Option
Illustrate
Operation mode
DMX
Slave condition :receive DMX signal from controller or main
engine
Auto run
random
Voice control
DMX address
1~512
press“confirm”key to enter redact condition。
press“confirm”key
to enter redact status。This moment pitch on hundreds place,
press“up”“down”key to change the channels 。
Press“confirm”key again to choose decade redact 。
Press“confirm”again to choose the unit redact。Press again and
exit the redact.
Channel mode
Norm 18CH
Norm 18 channel mode
X inversion
close
open
Y inversion
close
open
XY exchange
close
open
Exchange XY axial channel(including fine tuning)
XY encoder
open
use encoder to judge step out and self-correcting the setting
close
Do not use encoder to correct the setting
DMX signal
keep
Running as virgin state
reset
Electrical return,stop running
Screen saver
open
Free 30 seconds and close backlight
close
Backlight keep lighting
Open and light bulb
close
Restoration after power on ,bulb not working (use menu or
controller to light the bulb)
open
Bulb light after on power,and wait for the bulb successful light
then restoration
Screen auto
rotation
close
Close Screen auto rotation
open
Open Screen auto rotation
Reset to default
setting
Press“confirm”key and see the confirm dialog box ,
press“confirm”key again and reset to default setting
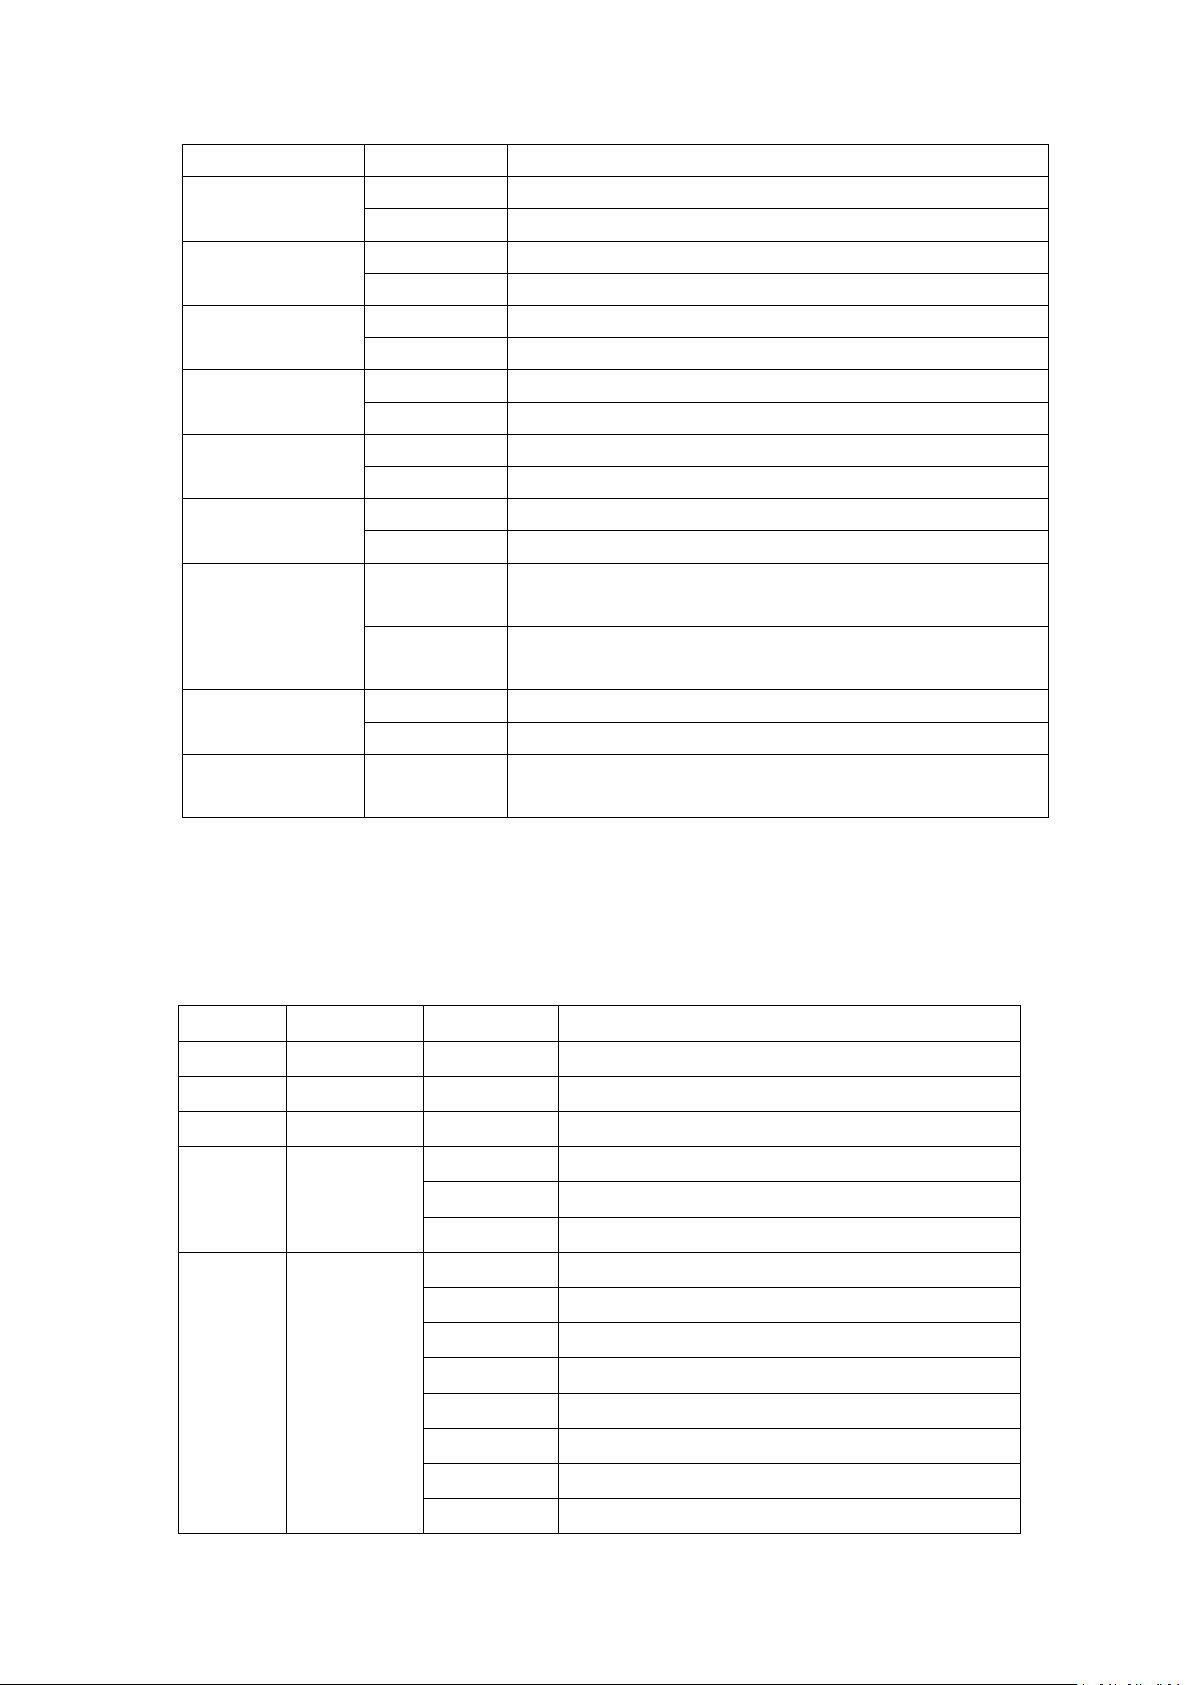
6: DMX CHANNELS
18channel definition table
Channel
Function
Value
Illustration
1
PAN
0-255
PAN
2
TILT
0-255
TILT
3
DIMMER
0-255
DIMMER(0-100%)
4
STROBE
0-3
CLOSED
4-251
STROBE SLOW to FAST
252-255
OPEN
5
COLOUR
0-4
WHITE
5-9
COLOUR1
10-14
COLOUR2
15-19
COLOUR3
20-24
COLOUR4
25-29
COLOUR5
30-34
COLOUR6
35-39
COLOUR7

40-44
COLOUR8
45-49
COLOUR9
50-54
COLOUR10
55-59
COLOUR11
60-64
COLOUR12
65-69
COLOUR13
70-74
WHITE+COLOUR1
75-79
COLOUR1 + COLOUR2
80-84
COLOUR2 + COLOUR3
85-89
COLOUR3 + COLOUR4
90-94
COLOUR4+ COLOUR5
95-99
COLOUR5+ COLOUR6
100-104
COLOUR6 + COLOUR7
105-109
COLOUR7+ COLOUR8
110-114
COLOUR8 + COLOUR9
115-119
COLOUR9 + COLOUR10
120-124
COLOUR10 + COLOUR11
125-129
COLOUR11 + COLOUR12
130-134
COLOUR12 + COLOUR13
135-139
COLOUR13 +WHITE
140-255
ROTATION SLOW to FAST
6
GOBO
0-4
WHITE
5-9
GOBO 1
10-14
GOBO 2
15-19
GOBO 3
20-24
GOBO 4
25-29
GOBO 5
30-34
GOBO 6
35-39
GOBO 7
40-44
GOBO 8
45-49
GOBO 9
50-54
GOBO 10
55-59
GOBO 11
60-64
GOBO 12
65-69
GOBO 13
70-129
ROTATION FAST to SLOW
130-134
STOP
135-190
ROTATION SLOW to FAST
191-195
GOBO 1 SHAKE, SLOW to FAST
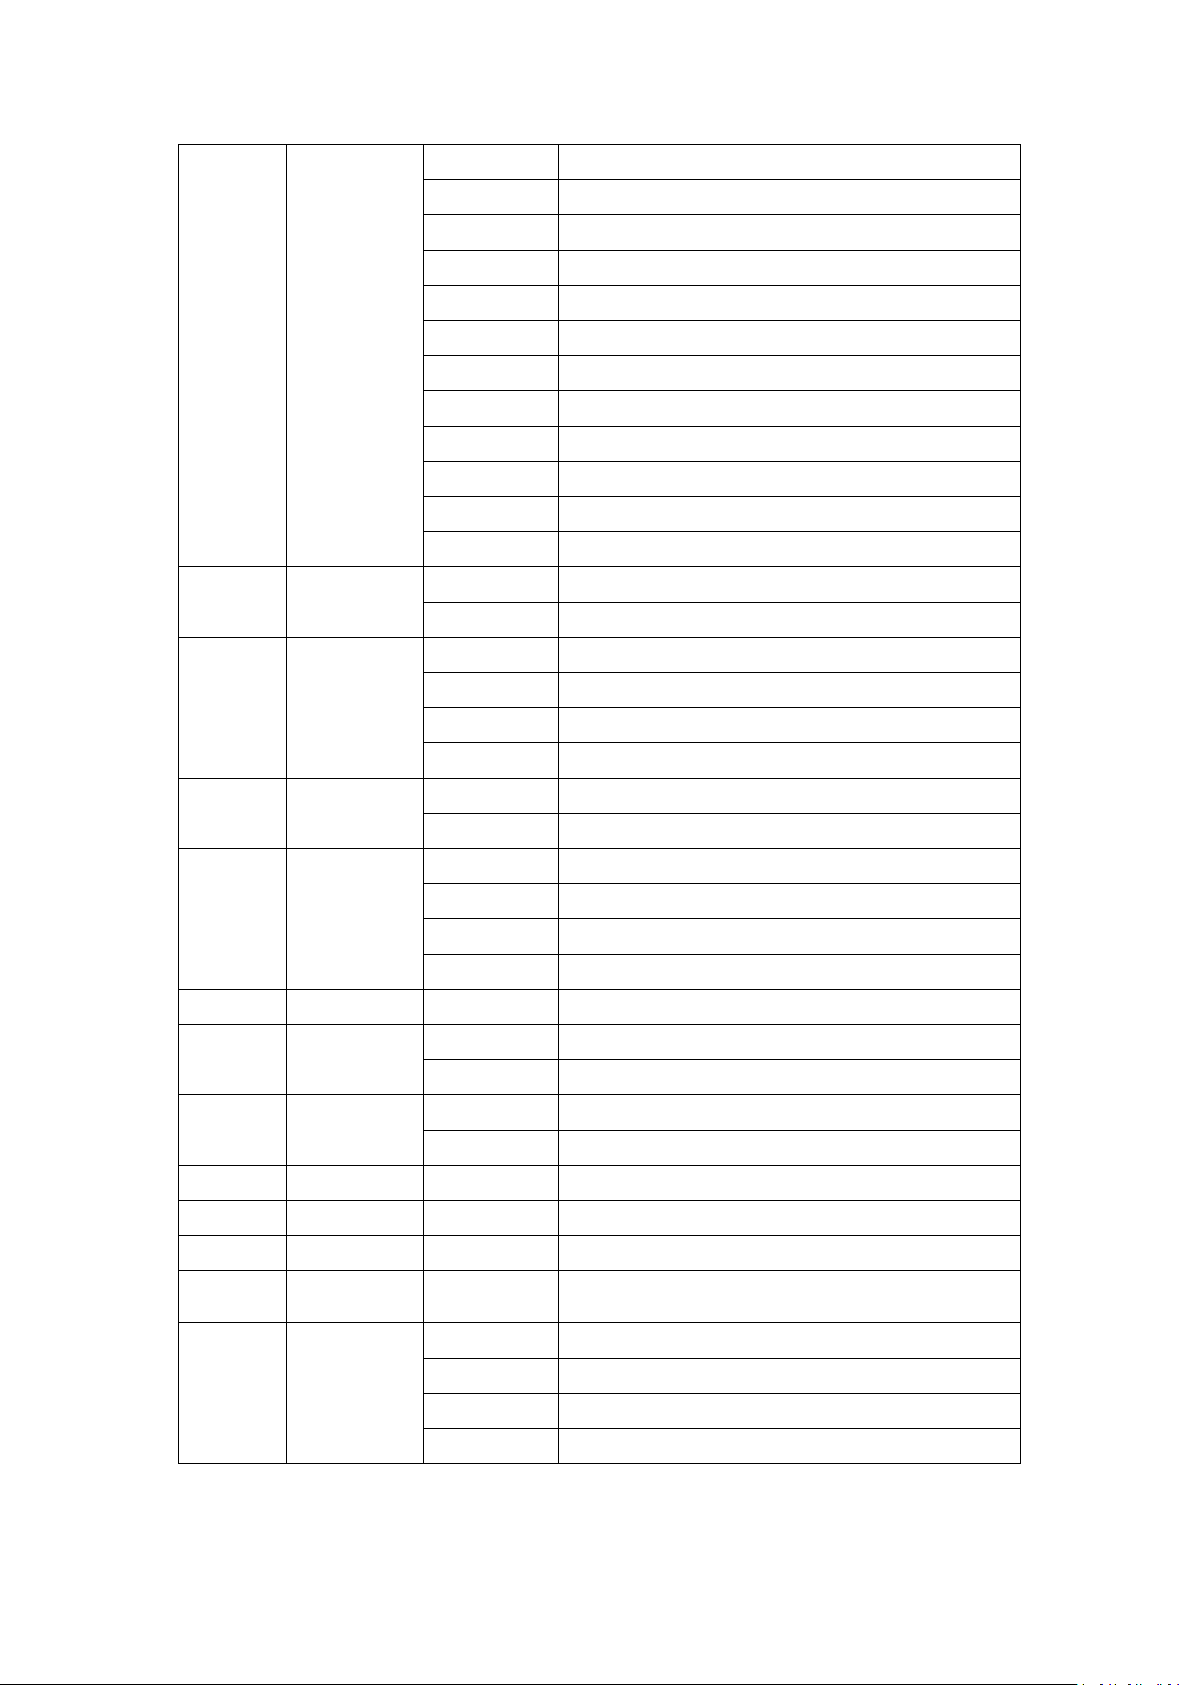
196-200
GOBO 2 SHAKE, SLOW to FAST
201-205
GOBO 3 SHAKE, SLOW to FAST
206-210
GOBO 4 SHAKE, SLOW to FAST
211-215
GOBO 5 SHAKE, SLOW to FAST
216-220
GOBO 6 SHAKE, SLOW to FAST
221-225
GOBO 7 SHAKE, SLOW to FAST
226-230
GOBO 8 SHAKE, SLOW to FAST
231-235
GOBO 9 SHAKE, SLOW to FAST
236-240
GOBO 10 SHAKE, SLOW to FAST
241-245
GOBO 11 SHAKE, SLOW to FAST
246-250
GOBO 12 SHAKE, SLOW to FAST
251-255
GOBO 13 SHAKE, SLOW to FAST
7
PRISM1
0-127
PRISM EXCLUDED
128-255
PRISM INSERTED
8
PRISM1 RT
0-127
POSITION
128-190
ROTATION FAST to SLOW
191-192
STOP
193-255
ROTATION SLOW to FAST
9
PRISM2
0-127
PRISM1 EXCLUDED
128-255
PRISM1 INSERTED
10
PRISM2 RT
0-127
POSITION
128-190
ROTATION FAST to SLOW
191-192
STOP
193-255
ROTATION SLOW to FAST
11
FOCUS
0-255
FOCUS(0-100%)
12
FROST
0-127
FROST EXCLUDED
128-255
FROST INSERTED
13
7-color wheel
0-127
7-color wheel EXCLUDED
128-255
7-color wheel INSERTED
14
RFU
0-255
RFU
15
PAN FINE
0-255
PAN FINE
16
TILT FINE
0-255
TILT FINE
17
PAN-TILT speed
0-255
Pan-Tilt-speed
18
LAMP
CONTROL&
RESET
0-99
UNUSED RANGE
100-105
LAMP ON
200-205
LAMP OFF
255-255
COMPLETE RESET
Table of contents
Other Newfeellight Lighting Equipment manuals


