Deco Lighting Small Gladetino User manual
Small
Gladetino
Mounting Options
Deco Lighting practices a program of continuous product improvement, and as a result product specications change frequently. We reserve the right to change
product specications without notice. Contact Deco for the latest product information.
SAFETY PRECAUTION
Before starting the installation and servicing, disconnect the power by turning off the circuit breaker. Turning the power off by using the light switch is not
sufcient to prevent electrical shock. All work should be done by a qualied electrician. This product must be installed in accordance with the applicable
installation code by a person familiar with the construction and operation of the product and the hazards involved.
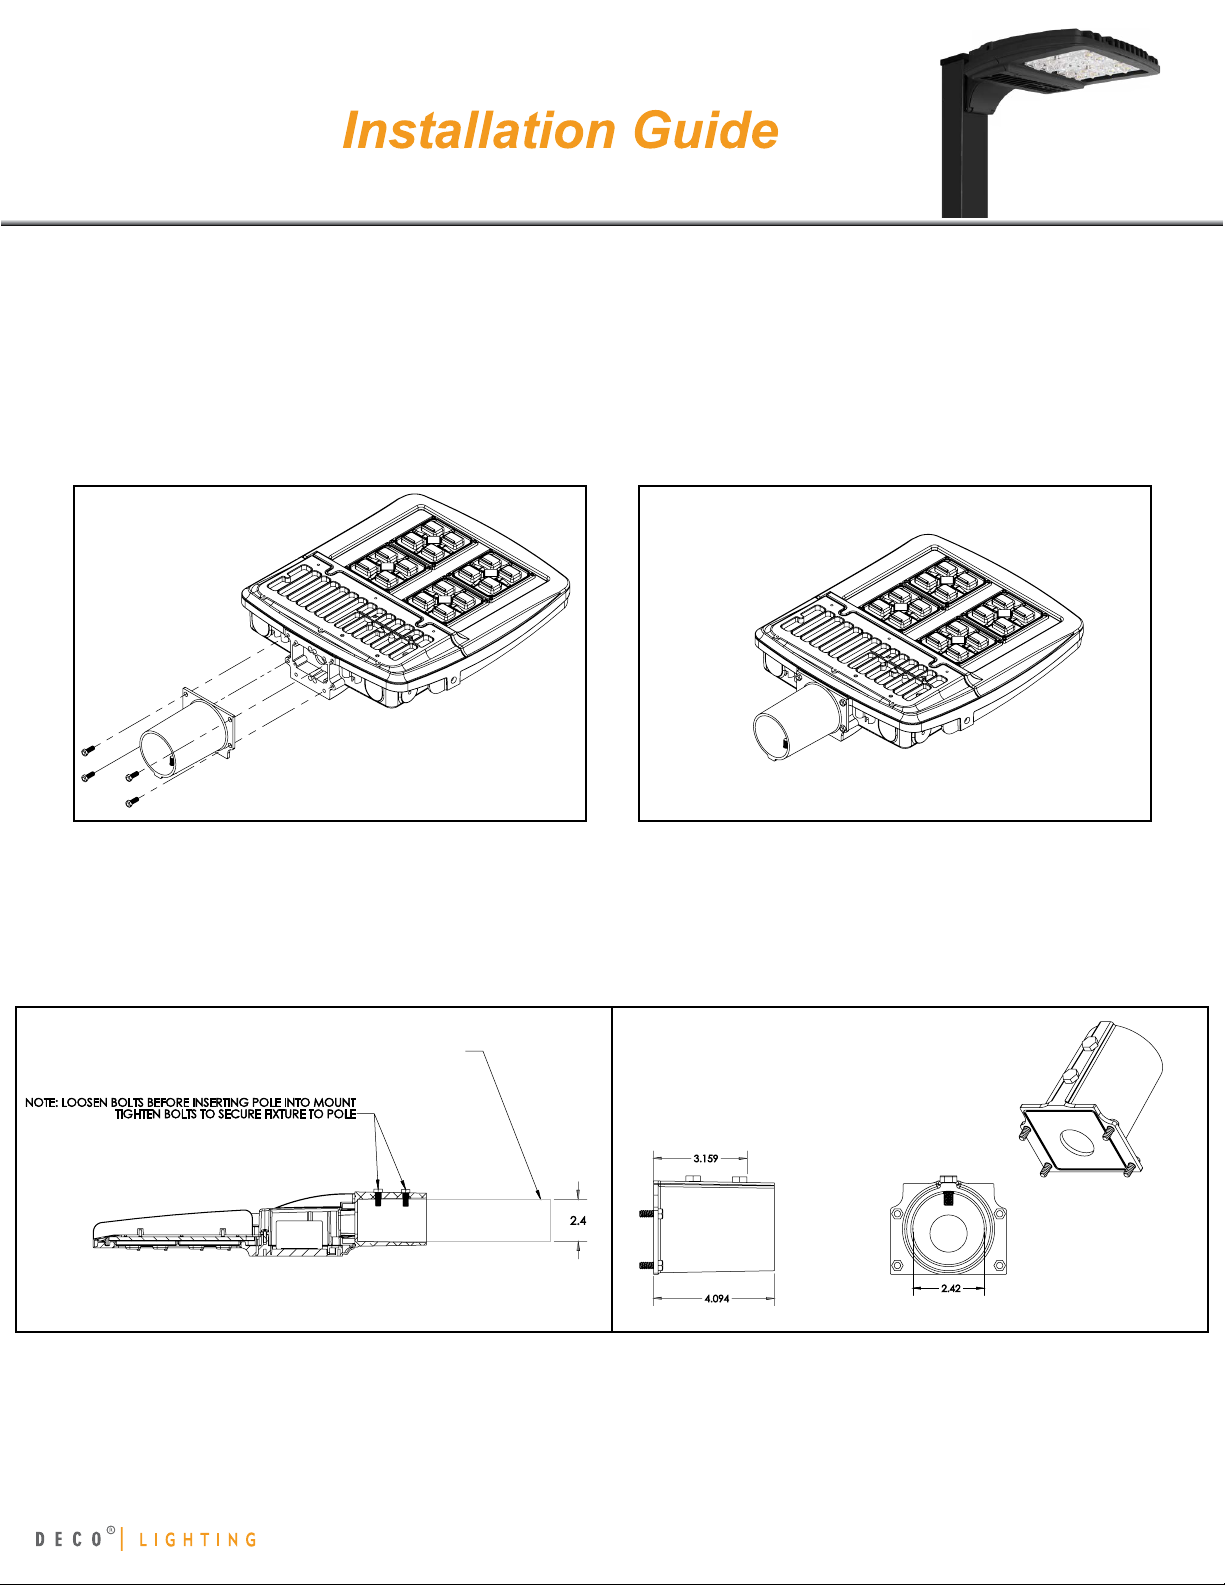
Pole Mount Arm (Mast Arm):
1. Align the Pole Mount Arm mounting holes with the (4) mounting holes on the rear side of the luminaire housing. (Fig. 1)
2. Place the Pole Mount Arm against the housing, and route the Line, Neutral, and Ground wires through the small hole in the arm.
3. Fasten the arm to the housing using (4) included 1/4-20 bolts and the appropriate washers.(Fig. 2)
4. Loosen the (2) retaining bolts on the top of the arm so that the pole will not interfere with the bolts.
5. Connect the Line, Neutral, and Ground wires from the pole to the luminaire using the appropriate connectors.
6. Slide the pole completely into the arm and ensure that the luminaire is horizontal with the ground.
7. Tighten the (2) retaining bolts to fasten the luminaire to the pole. (Fig. 3)
Fig. 1 Fig. 2
Fig. 3 Dimensional Drawings
Designed for 2-3/8” OD Pole

Small
Gladetino
Mounting Options
Deco Lighting practices a program of continuous product improvement, and as a result product specications change frequently. We reserve the right to change
product specications without notice. Contact Deco for the latest product information.
Fig. 4 Fig. 5
Sliptter:
1. Align the Sliptter mounting holes with the (2) mounting holes on the rear side of the luminaire housing. (Fig. 4)
Pole Mount:
1. Drill (1) wire hole and (2) mount holes into the pole, at the dimensions shown in the diagram.
2. Align the Pole-Mount mounting holes with the (2) mounting holes on the top of the rear side of the luminaire housing. (Fig. 6)
2. Place the Sliptter against the housing, and route the Line, Neutral, and Ground wires through the arm.
3. Fasten the arm to the housing using (2) included 1/4-20 bolts. (Fig. 5)
4. Loosen the (4) set screws on the sides of the arm so that the pole will not interfere with the bolts.
5. Connect the Line, Neutral, and Ground wires from the pole to the luminaire using the appropriate connectors.
6. Slide the pole completely into the arm and ensure that the luminaire is at the desired angle.
7. Tighten the (4) set screws to fasten the luminaire to the pole.
Dimensional Drawings
Designed for 2-3/8” OD Pole

Small
Gladetino
Mounting Options
Deco Lighting practices a program of continuous product improvement, and as a result product specications change frequently. We reserve the right to change
product specications without notice. Contact Deco for the latest product information.
Fig. 6 Fig. 7
Fig. 8 Dimensional Drawings
3. Place the Pole Mount against the housing, and route the Line, Neutral, and Ground wires through the mount.
4. Fasten the arm to the housing using (2) included 1/4-20 bolts through the rear of the mount to the rear of the housing, and (2) additional included
1⁄4-20 bolts through the top side of the mount into the housing, as shown in the diagram. (Fig. 7)
5. Loosen, but do not discard the (2) #8-32 screws on the underside of the arm, and open the access door.
6. Place the luminaire and Pole Mount on the pole, and bolt the pole mount to the pole using (2) 3/8-16 Bolts along with the appropriate washers, lock
washers, and nuts.
7. Connect the Line, Neutral, and Ground wires from the pole to the luminaire using the appropriate connectors.
8. Close the access door and secure the door with the (2) #8-32 screws from step 5. (Fig. 8)
Yoke Mount:
1. Drill (1) wire hole and (2) mounting holes using the dimensions in the attached diagram.
2. Connect the luminaire to the mounting surface using two included retaining bolts.
3. Feed the cable into an appropriate tting to maintain a watertight seal.
Large Yoke Mount:
1. Drill (1) wire hole and (2) mounting holes using the dimensions in the attached diagram.
2. Connect the luminaire to the mounting surface using two included retaining bolts.
3. Feed the cable into an appropriate tting to maintain a watertight seal.

Small
Gladetino
Mounting Options
Deco Lighting practices a program of continuous product improvement, and as a result product specications change frequently. We reserve the right to change
product specications without notice. Contact Deco for the latest product information.
Wall Mount:
1. Loosen, but do not discard the retaining bolts on the underside of the luminaire-side wall mount.
2. Remove the wall-side bracket from the luminaire-side, and mount to the junction box using (4) screws (not included).
3. Ensure that the wall-side bracket is horizontal using the bubble level attached to the wall-side bracket.
4. Align the xture-side wall-mount mounting holes with the (4) mounting holes on the rear side of the luminaire housing.
5. Place the wall mount against the housing, and route the Line, Neutral, and Ground wires through the small hole in the mount.
6. Fasten the arm to the housing using (4) included 1/4-20 bolts and the appropriate washers.
7. Connect the Line, Neutral, and Ground wires from the pole to the luminaire using the appropriate connectors.
8. Fit the xture-side wall mount bracket over the wall-side bracket so that the luminaire is resting on the wall-side bracket.
9. Tighten the (2) retaining bolts to fasten the luminaire to the wall-side bracket.
Fig. 9 Fig. 10
Fig. 11 Dimensional Drawings
Table of contents
Other Deco Lighting Outdoor Light manuals

Popular Outdoor Light manuals by other brands

NewGarden
NewGarden PEPITA SOBREMURO quick start guide

HAMPTON BAY
HAMPTON BAY 155-194 instruction manual

ledscom
ledscom LC-L-344 Assembly instructions

HAMPTON BAY
HAMPTON BAY NXT-3149B Use and care guide

LIVARNO LUX
LIVARNO LUX 279054 Assembly, operating and safety instructions

HAMPTON BAY
HAMPTON BAY 857-394 instruction manual

HAMPTON BAY
HAMPTON BAY 213-532 instruction manual

HAMPTON BAY
HAMPTON BAY WELLINGWAY HDP06597BR Use and care guide

SACKit
SACKit Light 300 user manual

ThePondguy
ThePondguy LEDPro Series product manual

LIVARNO LUX
LIVARNO LUX 310325 Assembly, operating and safety instructions

FormaLighting
FormaLighting GIRASOLED 3418 Installation instruction


