DEDON SWINGME User manual

®
SWINGME / SWINGUS
Assembly, Care and Safety
Instalación, Mantenimiento y Seguridad
EN
ES
2
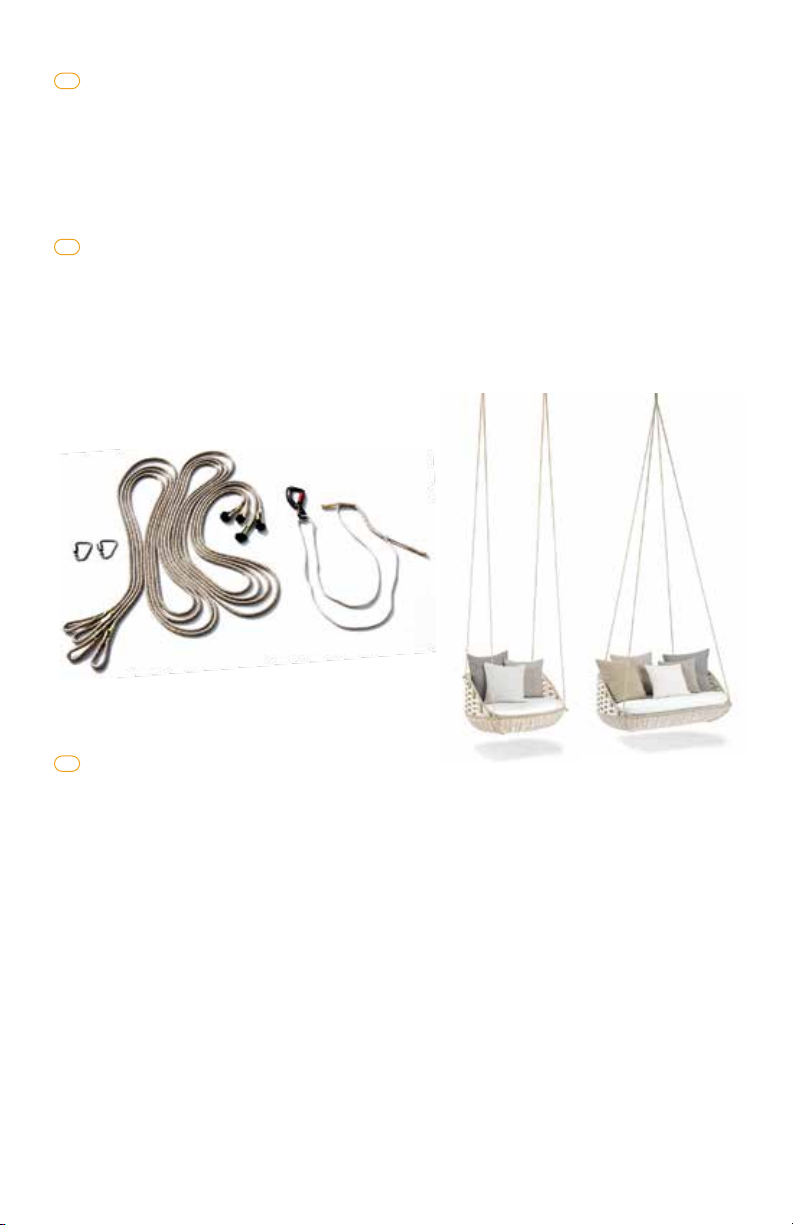
SWINGME | SWINGUS MATERIALS SUPPLIED
SAFETY WARNINGS:
• Use a professional contractor for installation.
• Mounting point of the SWINGME must have a minimum capacity of 880 lbs.
• SWINGME will hold a maximum capacity of 265 lbs.
• Mounting point of the SWINGUS must have a minimum capacity of 1760 lbs.
• SWINGUS will hold a maximum capacity of 530 lbs.
• Clearance of 22 ft. of height and up to 59 inches around the swing.
• Recommended hanging height is 24 inches from front edge of the seat to the ground.
• Distance between the bottom of the swing and the ground is a minimum of 12 inches.
• Do not exceed a swinging angle of 30 degrees.
• Do not jump onto or inside the swings.
• Regularly check all connections and ropes in the event repairs are needed.
DEDON waives any responsibility for the misuse and inadequate installation of any
products sold or distributed through any affiliate. The user assumes full responsibility for
any injuries that may occur due to use, misuse, mishandling or improper installation of the
product(s) and waives any responsibilities of DEDON. DEDON will not be held liable for
any damages resulting from the use or installation of the product(s).
EN
EN
ES
MATERIALS SUPPLIED:
• SWINGME or SWINGUS
• 1 infinite loop system with triple lock carabiner
• 4 ropes (15ft.)*
• 2 Delta Links
*Custom length ropes are available upon request for additional cost
MATERIALES SUMINISTRADOS:
• SWINGME or SWINGUS
• 1 lazo con mosquetón cerradura triple
• 4 cuerdas (15ft.)*
• 2 Links Delta
*Cuerdas de longitud de encargo están disponibles bajo petición por un costo adicional

3
SWINGME | SWINGUS SAFETY WARNINGS
ADVERTENCIA DE SEGURIDAD: INSTALACIÓN:
• Usar un contratista profesional para la instalación.
• El punto de montaje para el SWINGME debe tener una capacidad minima de 880 lbs.
• SWINGME sostendrá una capacidad máxima de 265 lbs.
• El punto de montaje para el SWINGUS debe tener una capacidad minima de 1760 lbs.
• SWINGUS sostendriá una capacidad máxima de 530 lbs.
• Despeje de 22 pies de altura y hasta 59 pulgadas alrededor del columpio.
• Altura recomendada para colgarlo es 24 pulgadas desde la orilla de enprente del asien-
to hacia el piso.
• La distancia entre la base del asiento al piso debe ser minimo de 12 pulgadas.
• No exceder un angulo de columpia se de mas de 30 grados.
• No brincar hacia o dentro del columpio.
• Revisar regularmente los amarres, conexiones y cuerdas para hacer reparaciones si
es necesarÍo.
DEDON declina cualquier responsabilidad derivada de la instalación inadecuada o
indebida de cualquier producto vendido o distribuido por él mismo o cualquiera de sus
afiliados. El usuario asume toda la responsabilidad por cualquier daño o lesión que
pudieran producirse durante el uso, uso indebido, manipulación inadecuada o instalación
incorrecta del producto(s) y renuncia a cualquier responsabilidad por parte de DEDON.
DEDON queda exento de toda responsabilidad por los daños y perjuicios ocasionados a
consecuencia del uso de este producto.
HANGING OPTIONS:
There are two options for hanging the SWINGME or SWINGUS:
OPTION 1— Hang from a single point using triple lock carabiner. This option allows
back-and-forth swinging and also enables the swing to rotate 360 degrees.
OPTION 2— Hang from two points using the delta links. This option allows back-and-forth
swinging only.
OPCIONES PARA COLGAR:
Existen dos opciones para colgar el columpio SWINGME o SWINGUS:
OPCIONES 1— Cuélguese de un solo punto usando el mosquetón con triple candado
de seguridad. Esta opción permite el balanceo hacia adelante – atrás y
también permite que tenga un giro de 360 grados.
OPCIONES 2— Cuélguese de dos puntos usando los enlaces delta. Esta opción permite
el balanceo hacia adelante – atrás solamente.
ES
EN
ES
4
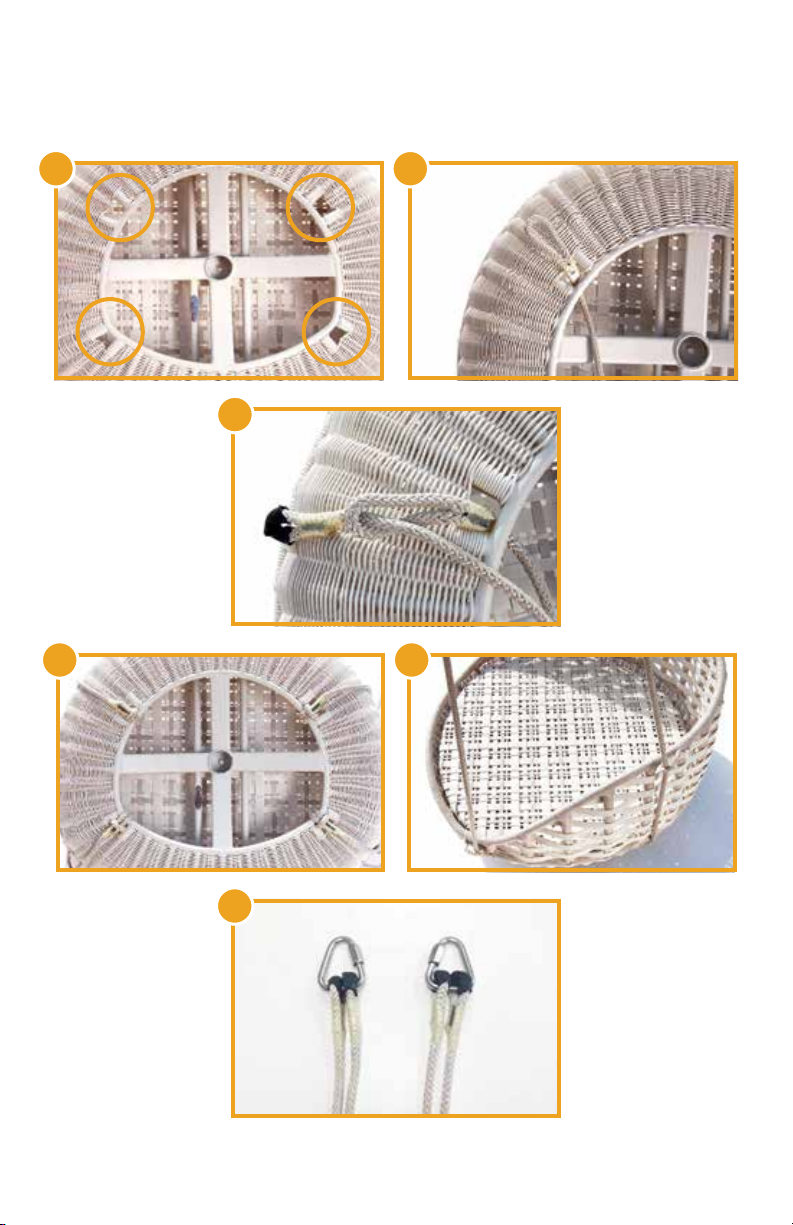
SWINGME | SWINGUS ATTACHMENT OF THE INFINITE LOOP SYSTEM
ATTACHMENT OF THE INFINITE LOOP SYSTEM
STEP 1 : Position the swing upside down on a soft surface (e.g. carpet) or use an
A-stand to prevent damage. Once the swing is upside down, the four
openings are face-up, as shown. NOTE: Do not use the ropes on the swing’s
outer edge as a carrying device.
STEP 2 : Take one of the four sections of the untangled swing rope and attach the first
rope to the left or right side of the swing.
STEP 3 : Place the 1-inch black end with protective sleeve through the loop and pull
tight, as shown. NOTE: Ensure all four ropes are approximately the same
length when pulled through the loop.
STEP 4 : Continue until all four ropes are attached then carefully turn the swing right
side up onto a soft surface. NOTE: Do not carry the swing by the rope guides.
STEP 5 : Once the swing is right side up, feed each spliced loop through its respective
rope guide, as shown.
STEP 6 : If you are hanging the swing using the two points hanging option, follow the
instructions below:
• Facing the front of the swing, connect the delta links to the two ropes on the
left and right sides of the swing.
• Connect the delta links to the designated structure or hanging points.
• Tighten delta links, place cushions and you are ready to swing.
FIJACION DEL SISTEMA DE LAZO INFINITO
PASO 1 : Posicione el columpio de cabeza on una superficie suave (ejemplo: alfombra)
o use un soporte tipo “A” para prevenir daño. Una vez que esta volteado las
cuatro aberturas estan hacia arriba como se muestra. Nota: No use las
cuerdas en el borde exterior del columpio como un dispositivo de transporte.
PASO 2 : Tome una de las cuatro secciones de la cuerda desenredada y fije la primera
cuerda al lado izquierdo o derecho del columpio.
PASO 3 : Posicione la punta final negra con manga protectora de 1” de ancho atravez
del lazo y jale firmemente como se muestra. Nota: Asegúrese que las cuatro
cuerdas estén aproximadamente de la misma medida cuando jale la cuerda.
PASO 4 : Continue hasta que las cuatro cuerdas queden fijadas correctamente y
cuidadosamente voltee el columpio hacia arriba sobre una superficie suave.
Nota: No use las cuerdas como un dispositivo de transporte.
PASO 5 : Una vez que el columpio esta boca arriba alimente cada lazo atravezando con
su respectiva cuerda como se muestra.
PASO 6 : Si va a colgar el columpio usando la opción de dos puntos siga las
siguientes instrucciones:
• Viendo el frente del columpio, conecte los enlaces delta a las dos
cuerdas del lado izquierdo y derecho del columpio.
• Conecte los enlaces delta a la estructura designada o punto colgante.
• Apriete los enlaces delta, posicione los cojines y esta listo para usarse.
EN
ES
5
SWINGME | SWINGUS ATTACHMENT OF THE INFINITE LOOP SYSTEM
3
21
4
6
5

6
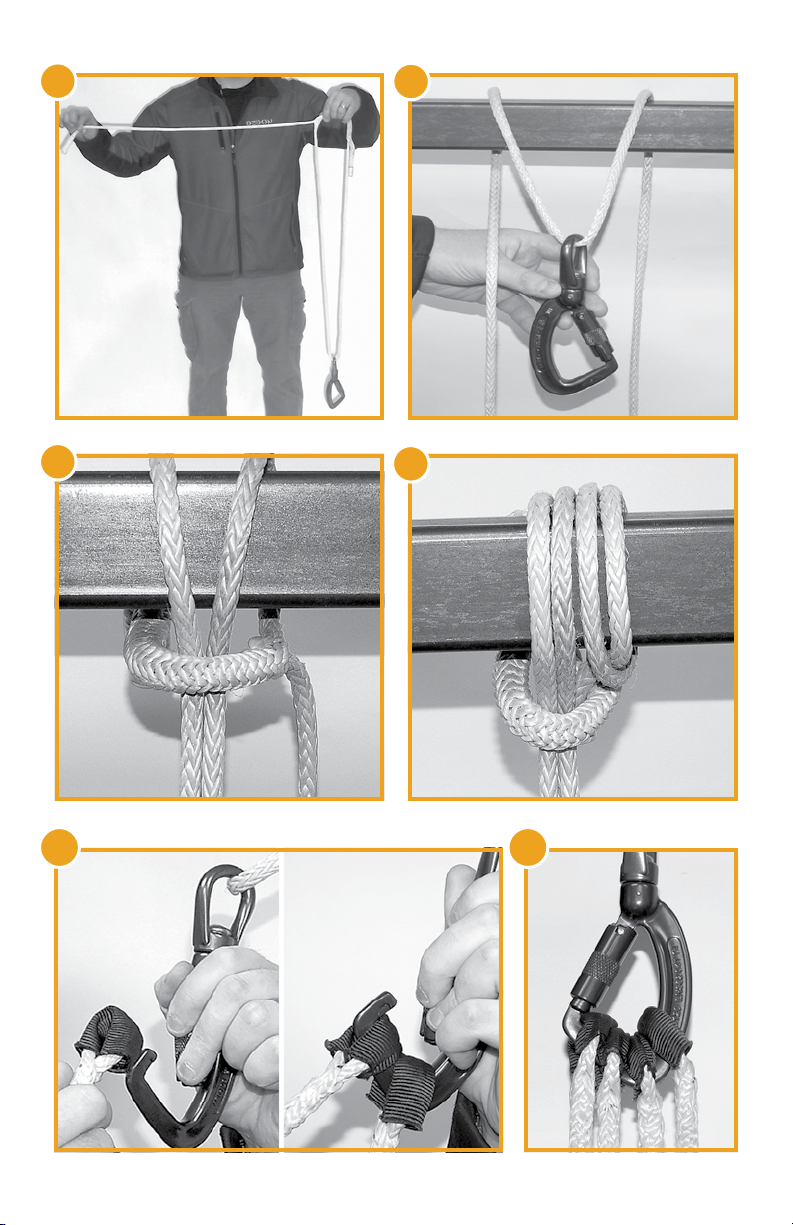
SWINGME | SWINGUS HANGING THE SWINGME/SWINGUS
HANGING THE SWINGME/SWINGUS
NOTE: Only proceed with steps 7–13 if hanging the swing from a single hanging point.
STEP 7 : Adjust the diameter of the loop by pulling the rope on one end while gripping
the splice. Adjust until the desired length is achieved as shown below.
NOTE: Before attaching the swing to a structure, please review all warnings
and safety information.
STEP 8 : Attach the swing to a structure using the rope. Form an adjustable loop by
placing the carabiner through the infinite loop, and around the structure as
shown below.
STEP 9 : Once the adjustable loop is pulled tight, there will be excess rope left over.
NOTE: Do not cut the ropes because it will decrease the strength of the loop.
STEP 10 : Wrap the excess rope around the structure and into the adjustable loop in
order to secure the loop after installation, as shown. NOTE: Place the swing
on a stand that is high enough for the ropes to remain slack before attaching
them to the structure.
STEP 11 : Place each rope end into the triple lock carabiner, as shown.
STEP 12 : Securely attach all four ropes from the swing to the triple lock carabiner, as
shown. Close and lock the gate of the carabiner prior to hanging the swing.
STEP 13 : Release the swing carefully from the stand and allow it to hang.
COLGANDO EL SWINGME/SWINGUS
NOTA: Proceda solamente con los pasos 7–13 si estará colgando el columpio
de un solo punto.
PASO 7 : Ajuste el diámetro de el lazo jalando la cuerda de una punta mientras sostiene
el empalme. Ajuste hasta que logre la longitud deseada como se muestra
abajo:
Nota: Antes de conectar el columpio a alguna estructura, porfavor revise las
advertencias e información de seguridad.
PASO 8 : Anexe el columpio a la estructura utilizando la cuerda. Forme un lazo ajustable
colocando el mosquetón atravez del lazo infinito y alrededor de la estructura
como se muestra abajo.
PASO 9 : Una vez que el lazo ajustable sea jalado fuertemente quedará exceso
de cuerda. Nota: No corte las cuerdas porque disminuirá la fuerza del lazo.
PASO 10 : Envuelva el exceso de cuerda alrededor de la estructura y dentro del lazo
ajustable para asegurar el lazo después de instalado como se muestra.
Nota: Posicione el columpio sobre alguna base lo suficientemente alta para
que las cuerdas tengan la holgura necesaria antes de colgarlas directamente
a la estructura.
PASO 11 : Coloque cada punta de la cuerda en el mosquetón de triple seguridad como
se muestra.
PASO 12 : Sujete firmemente las cuatro cuerdas del columpio hacia el mosquetón de
triple seguridad como se muestra. Cierre y asegure que el mosquetón este
bien cerrado antes de colgar el columpio.
PASO 13 : Quite la base cuidadosamente y permita que el columpio quede colgando.
EN
ES
7
SWINGME | SWINGUS HANGING THE SWINGME/SWINGUS
9 10
7 8
11 12

8
SWINGME | SWINGUS CARE REQUIREMENTS
CARE REQUIREMENTS FOR DEDON FIBER
DEDON Fiber is a perfect synthesis of nature and technology. To clean the surface of the
woven furniture with DEDON Fiber, use a soft cloth or soft brush, warm water and a gentle
cleanser. We recommend not using alcohol or other solvents to clean the DEDON Fiber.
If these solvents are used, they can damage or discolor the surface.
ADVERTENCIAS DE MANTENIMIENTO DE LA FIBRA DEDON
La fibra DEDON es la síntesis perfecta entre naturaleza y técnica. Para limpiar la superficie
del mueble tejido con fibra DEDON solo necesita utilizar un paño o cepillo suave, agua
caliente y, en caso de ser necesario, un detergente delicado. El alcohol y otros disolventes
no son aptos para la limpieza, ya que atacan las superficies limpiadas e incluso podrían
decolorarlas. Para limpiar las cuerdas suspendidas y las cuerdas alrededor del diámetro
exterior del.
CARE REQUIREMENTS FOR DEDON PROTECTIVE COVERS
DEDON protective covers are not recommended as a permanent cover for cushions,
as moisture may collect and lead to damage. Furniture and cushions should thoroughly
dry before using the protective covers.
Never pack or fold protective covers that have become wet; instead, let them dry in a
well-ventilated place. To clean the protective covers, use a soft cloth and warm water.
A gentle upholstery cleaning agent can be used if needed. Heavy soiling can be removed
by rubbing lightly with petroleum ether, followed by rinsing with clear water. Solvents are
not suitable for cleaning as these are aggressive to the surface being treated and cause
damage and discoloring.
ADVERTENCIAS DE MANTENIMIENTO DE LAS FUNDAS DEDON
No se aconseja utilizar las fundas DEDON de forma permanente como fundas para
cojines, ya que se puede acumular humedad y producir la formación de manchas de
moho. Deje que tanto el mueble como los cojines se sequen por completo antes de
utilizar las fundas.
Nunca guarde ni doble fundas que estén húmedas; déjelas secar siempre en un lugar
seco y bien ventilado. Las fundas del parasol DEDON son resistentes al agua, al aceite
y a la suciedad. Para limpiar las fundas utilice un paño suave y agua caliente. En caso
necesario, se puede utilizar también un producto suave para limpieza de tapizados.
La suciedad resistente se puede retirar frotando suavemente con éter de petróleo y
enjuagando con agua limpia. No se recomienda el uso de disolventes para la limpieza, ya
que son agresivos con la superficie y pueden causar daños y la decoloración de la fibra.
ES
EN
ES
EN

9
SWINGME | SWINGUS


This manual suits for next models
1
Table of contents


