VEIKOUS PG0210-10WRD User manual

3-PERSON 2-IN-1 CONVERTING
PATIO SWING WITH CANOPY

STOP
MISSING A PART?
CALL US BEFORE GOING
BACK TO THE STORE
The store where you made your purchase
Does not stock parts for this item.
If you have assembly questions or you are missing or
have damaged parts,please call
The store where you made your purchase
Does not stock parts for this item.
If you have assembly questions or you are missing or
have damaged parts,please call
The store where you made your purchase
Does not stock parts for this item.
If you have assembly questions or you are missing or
have damaged parts,please call
Please prefer email contact. Due to busy lines,
there may be a wait for calls to be answered.
1-858-324-1911
(Mon - Fri, 10:00 am to 7:00 pm EST)
you can also e-mail [email protected]
or visit www.veikous.com
Please have the following information ready when you make your call:
Read entire assembly manual,paying special attention to the important tips and safety information .
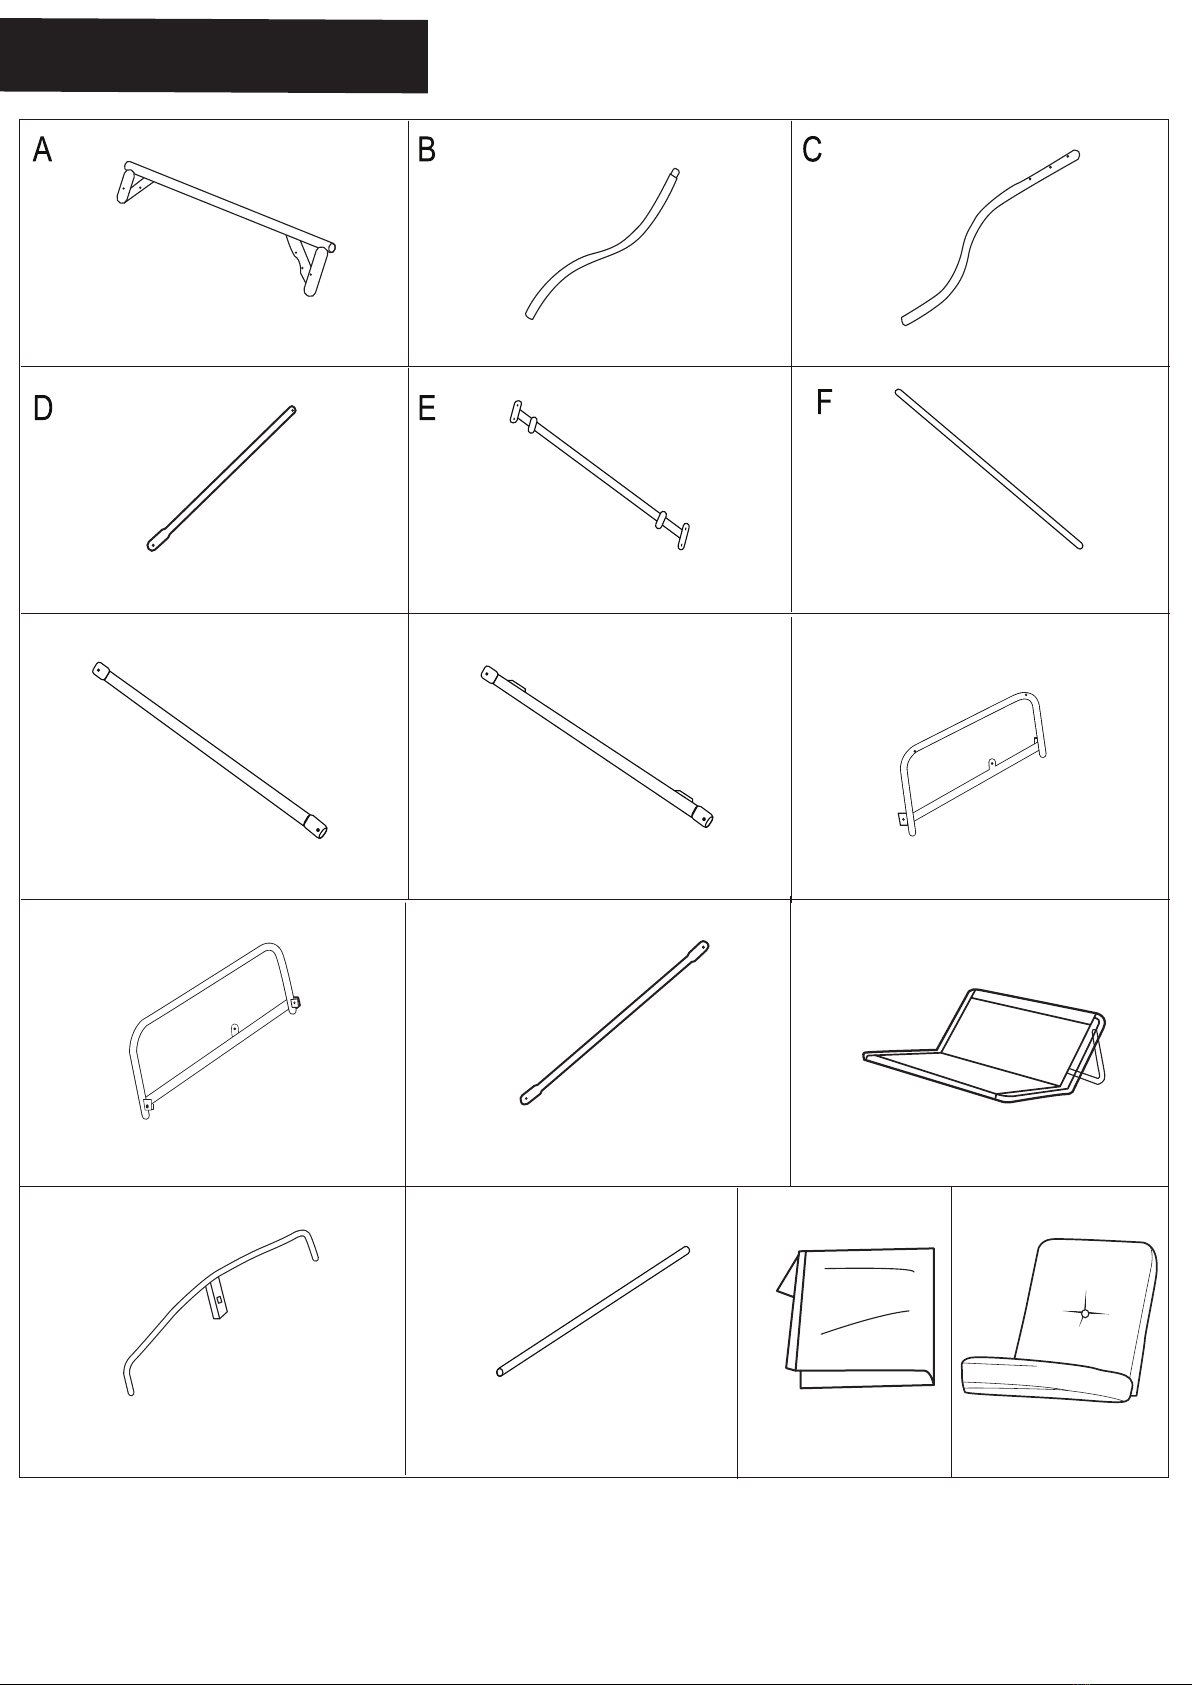
Ensure there are no missing pieces by first separating and identifying all parts.
Make sure to check packing material for small parts that may have fallen out during shipment.
Structures are not intended for public use.The Company does not warranty any of its residential
structures subjected to commercial use such as:Daycare,Preschool,Nursery School,Recreational
Park,or any similar Commercial Application.
This manual contains helpful information concerning assembly preparation,installation procedure
and required maintenance.
Always keep safety in mind as your structure is being built.
Keep these instructions for future reference.
Model Number of the product located on the frond of the assembly manual
Description of the part from the parts list

HARDWARE LIST
12
11
13 14
M8X100 Bolt
2PCS
M6X60 Bolt
6PCS
M6X40 Bolt
4PCS
M6X35 Bolt
4PCS
M6X32 Bolt
6PCS
M6X30 Bolt
2PCS
Nut cover
24PCS
2PCS
1PC 1PC
2PCS 2PCS
M8X98 Bolt
4PCS
M8X75 Bolt
2PCS

PARTS LIST
GHI
J
M N
K L
OP
X1 X2 X2
X2
X1
X1
X2
X1 X1
X1 X1
X4 X1
X2 X1 X3
C
x3

B
B
C
A
C
C
1
1
9x3
2
2
1
2
9
9x3
Step1 Assembling the swing frame
1. Attach the shorter leg(B) and the longer leg(C) on one side as shown below,
and put one bolt(1)on the first top hole, two bolts(2) on the bottom two holes
and then fasten all of them by using three nuts(9) at back.
2. Repeat the step to make sure you have the entire swing frame assembled
ready on both sides.
A
x3
B
A

Step2 Assembling the swing frame support
1.Attach the support bar(E) in between to the legs(C) (the back of the swing),
and then fasten it by using one bolt(4) and one nut(9) ONLY at the bottom
hole on each side.(DO NOT do with the top hole now)
2.Attach two side bars(D) in between the leg(B) and leg(C) on both sides with
four bolts(4) and four nuts(9). Now you can fasten the top holes of
bar(E) by putting the bolt(4) across side bar(D) as shown below.
EC
Front
Back
C
B

Step3 Assembling the swing frame support
Attach the bottom supporting bar(F) in between to the two side bars(D) with
two bolts(8)and two nuts(9).
8
F
Front
Back
F
8
8
Back
8
F

Step4 Assembling the seat frame
1.Insert the front bar(G) and rear bar(H) into the arm(J) and the arm(I), and
then connect them with four bolts(6) and four nuts(9).
2.Attach the four swing pipes(K) to the arm(J) and the arm(I) using four bolts(5)
and four nuts(9).
3.Connect the top of the two swing pipes using the spring hooks (10).
Install bar(H) on the back
side where is shorter
between the holes.
Front
Back

Step5 Assembling the seat
Connect the seat(L) to the arm(I) and arm(J) on both sides with two bolts(3),
two nuts(9) and two plastic gaskets(11) as shown below.
The seat(L) support rod is stuck in the rear bar(H)
buckle to hold the seat in place.

N
Step6 Assembling the canopy 1
Place the two supporting bars(N) across the canopy(O) as shown below.
9
O
NN

M
Step7 Assembling the canopy 2
1.Connect the bar(N) to the curved bar(M) with three bolts(7).
2.Repeat the step twice to make sure you get the whole canopy frame
assembled.
7X6
M
M
N
N

Another side is also assembled in the same way
Step8 Assembling the canopy 3
1.Place the canopy(O) on the assembled top frame.Attach the top frame to the
top bar using the screw knobs(12) on both sides.
8
O

12
Step9 Attaching the seat to the swing frame
1.Attach the assembled seat to the swing frame using the two spring hooks(10).
2.Place the three seat cushions(P) on the seat.
9

The product can be used in 2 ways
1
2
Patio swing as normal
with upright backrest.
Laying down as a swing bed with the
back fixed to the rear supporting bar.
13
10

1.For best results, clean the swing with a damp cloth and dry
thoroughly. This will help prevent mildew by removing dirt particles
that may accumulate.
1. Adjust the angle of the top frame and fully tighten the screw knobs
for everytime you adjust the canopy.
2. Make sure to fix all cushions to the seat using ties in case they are
blew away by wind.
2.Do not clean with abrasive materials, bleach, or solvents.
3.Store the swing in a dry, sheltered place when not in use.
4.Keep the swing away from fire, extreme heat, freezing conditions,
and inclement weather such as rain, hail, sleet, snow, or wind.
Care and Cleaning
Note
Enjoy your product!
Table of contents