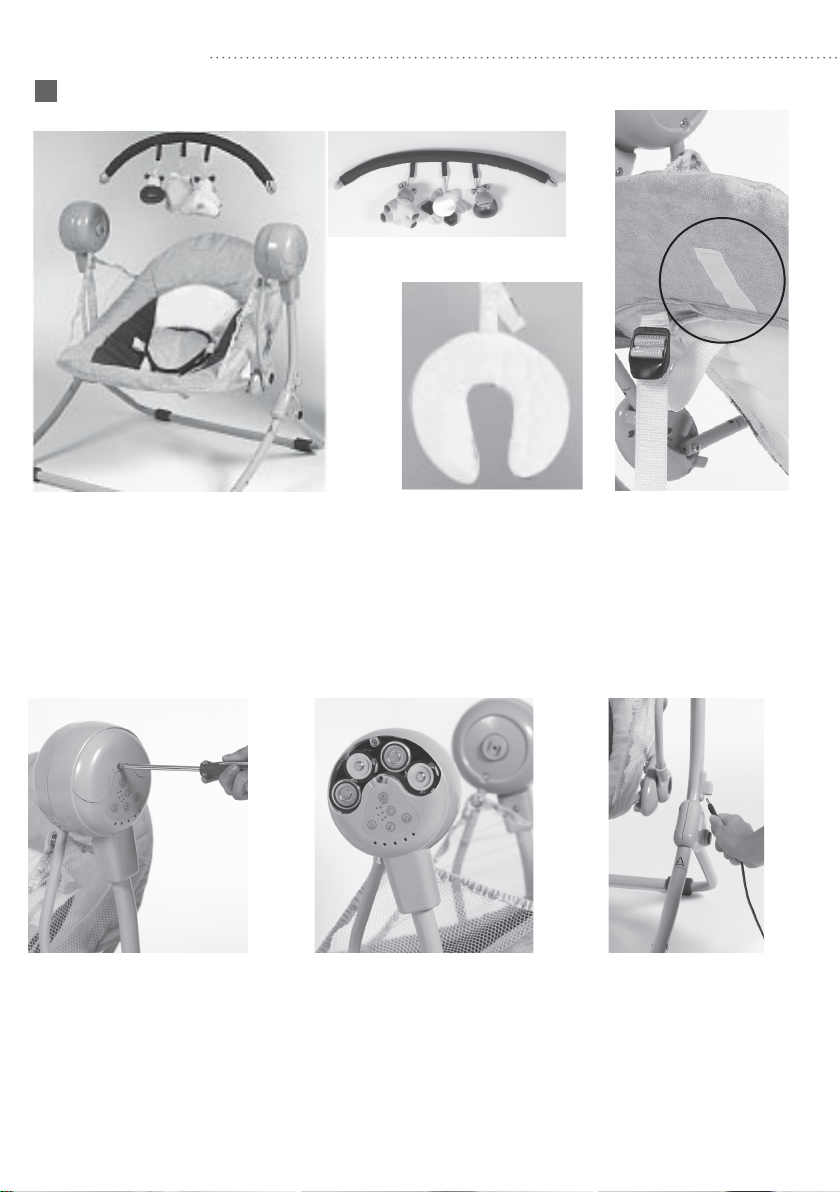
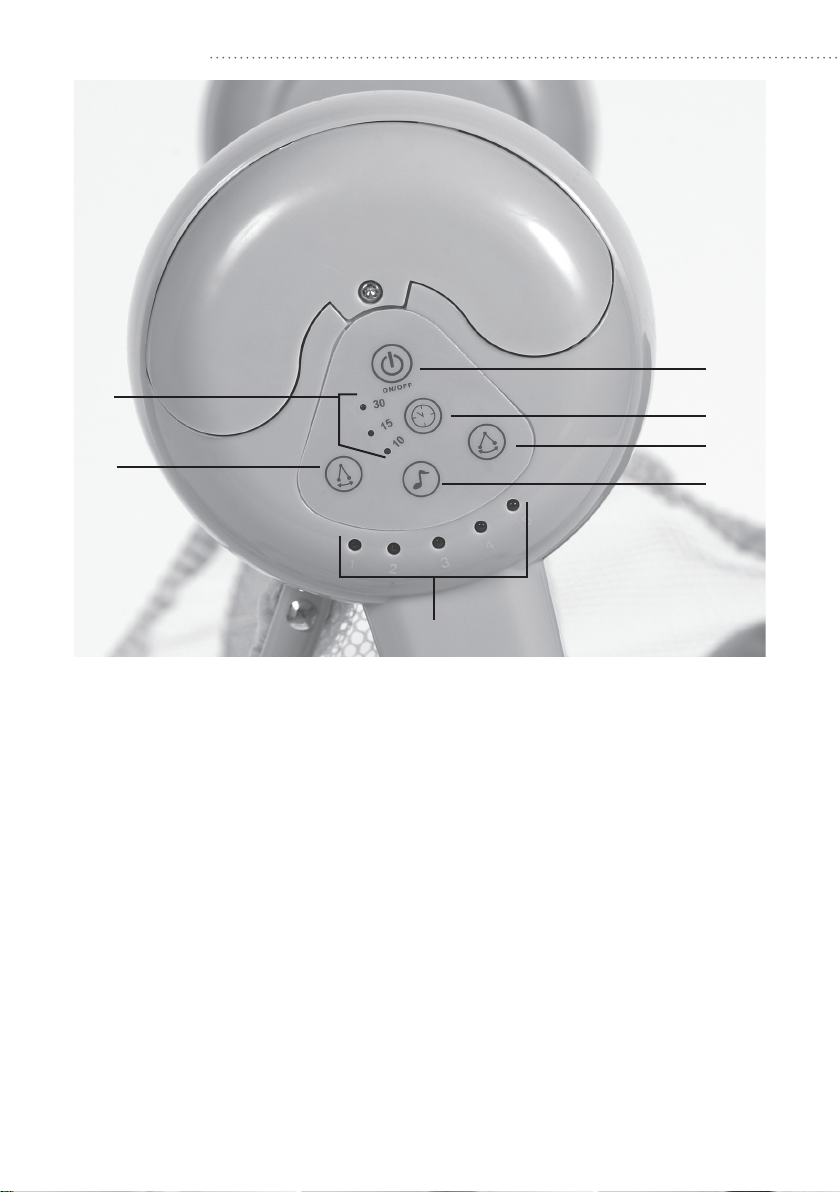
Baninni STELLINO BNBS003 User manual

HANDLEIDING
MODE D’EMPLOI
MANUAL
GEBRAUCHSHANTLEITUNG
Home
“THE FIRST STEPS TO KNOWLEDGE”
BABYSWING
STELLINO BNBS003

HANDLEIDING
NL
BABYSWING STELLINO
MONTAGE RICHTLIJNEN
Lees deze instructies aandachtig voor de montage en het gebruik
van de babyswing
Bewaar de instructies voor toekomstig gebruik. De veiligheid
van uw kind kan in het gedrang komen als u deze instructies niet
volgt.
BELANGRIJK! BEWAAR DE HANDLEIDING VOOR TOEKOMSTIG
GEBRUIK.
WAARSCHUWING! Montage door een volwassene!
LAAT JE KIND NOOIT ZONDER TOEZICHT

ONDERDELEN
A
B
CD
E
F
G H
I
J
L
M
K
N
O
A. Framebuis vooraan
B. Framebuis achteraan
C. Rechter framebuis
D. Linker framebuis
E. Frame zitje vooraan
F. Frame zitje achteraan
G. 4x schroeven (30 mm)
H. 2x schroeven (35 mm)
I. Zitje met 5punts-veiligheidsharnas
J. Drukknoppen voor veiligheidsnetje
K. Speelboog
L. Kussen
M. Besturingselement
N. Drukknoppen
O. Adapter 6 V / 500 mA

HANDLEIDING
MONTAGE INSTRUCTIES
Stap 1: Plaats het rechterdeel van de framebuis
achteraan (B) in de rechter framebuis (C). Zorg er
voor dat de drukknop van de framebuis achteraan
(B) goed is vastgeklikt in de opening van de
rechter framebuis (C). Wanneer je een klik hoort, is
dit correct vastgeklikt.
Stap 2: Bevestig de twee onderdelen met een
35mm schroef (H). Plaats het linker deel van de
framebuis achteraan (B) in de linker framebuis.
Zorg ervoor dat de drukknop van de framebuis
achteraan (B) in de opening van de linker
framebuis (D) klikt. Bevestig de onderdelen met
een 35mm schroef (H).
Stap 3: Plaats de framebuis vooraan (A) in de
rechter framebuis (C), en de framebuis vooraan (A)
in de linker framebuis (D). Duw op de drukknop
end schuif gelijdelijk de framebuis vooraan (A) in
de onderste framebuizen (C en D) tot u een klik
hoort.
STAP 2
STAP 1
STAP 3
A
B
CD

EF
MONTAGE INSTRUCTIES
Stap 4: Plaats het rechterdeel van het voorste frame van het zitje (E) in de rechter
framebuis (C) en het linkerdeel van het frame (E) in de linker framebuis. (D)
Stap 5: Bevestig de onderdelen met 2 x 30mm schroeven (G).
Stap 6: Plaats het rechterdeel van het achterste frame van het zitje (F) in de
rechter framebuis (C) en het linkerdeel van het frame van het zitje (F) in de linker
framebuis (D).
Stap 7: Bevestig de onderdelen met 2 x 30mm schroeven (G).
STAP 4 STAP 5
STAP 6 STAP 7
G H
CD

HANDLEIDING
Stap 8: Plooi de buizen (E) en (F) naar boven tot deze samenkomen.
Stap 9: Trek de bekleding (I) over de buizen (E en F).
De bekleding is correct aangebracht, wanneer het logo bovenaan
zichtbaar is. Plooi de buizen (E en F) uit elkaar, zodat de bekleding over
de buizen schuift.
Stap 10: Om de bekleding goed vast te maken, gebruik de velcro aan de
onderzijde van het zitje (I)
Wanneer de buizen bedekt zijn, bevestig dan de veiligheidsnetten door
middel van de drukknoppen (J).
STAP 8 STAP 9 STAP 10
E F IJ

STAP 10
Stap 11: Draai de rug van het zitje naar binnen zodat u bij de lussen van het
tuigje kunt. Bevestig de gordels in de lussen van het tuigje.
Stap 12: Steek de gordel
door de bovenste gleuf
en vervolgens door de
onderste gleuf. Trek
aan de gordels tot ze
goed vastzitten. Volg de
instructies in de volgende
afbeeldingen om de
gordels goed vast te
zetten.
Duw op de ‘Lock’-knop om de swing
in een vaste positie te zetten.
STAP 11
STAP 12

HANDLEIDING
Stap 13: Schuif de speelgoedboog (K) in de gleuven aan weerszijden van het
zitje, als u dit goed doet, hoort u een ‘klik’. Let er op dat het speelgoed in de
richting van het kind hangt. U kan het kussen (L) eenvoudig verwijderen door
de velcro aan de achterzijde.
Nooit kussens, dekens of vulling gebruiken. Gebruik alleen de hoofdsteun die bij
het product is geleverd
Het elektronische kastje (m) van de babyschommel werkt op 4 batterijen D (LR20)
van 1,5 V (niet meegeleverd). Gebruik alkalinebatterijen voor een optimaal resultaat.
Gebruik een kruisschroevendraaier voor het openen van het elektronische kastje (m)
dat zich aan de rechter schommelpoot (c) bevindt. Doe de 4 batterijen ‘LR20’ (1,5 V-
) erin, let hierbij op de aangegeven poolrichting. Schroef het elektronische kastje (m)
met een schroevendraaier dicht. Niet te strak vastschroeven.
MONTAGE INSTRUCTIES
K
L
STAP 13

MONTAGE INSTRUCTIES
WAARSCHUWING: gebruik altijd het meegeleverde 5-punts
veiligheidstuigje. Zorg dat de riempjes van het tuigje niet verdraaid zijn.
De baby kan in het zitje liggen of zitten. Doe het 5-punts
veiligheidstuigje vast. Stel indien nodig het 5-punts veiligheidstuigje bij
de schouders of de taille goed af.
WAARSCHUWING: verander nooit de afstelling van het zitje als het kind in de
babyschommel zit. Haal het kind uit de schommel voor u hier iets aan verstelt.
Druk de drukknoppen (n) aan weerzijden van de babyschommel gelijktijdig
in en stel het zitje in de gewenste positie. Haal de speelgoedboog (k) van de
babyschommel. Vouw het zitje op. Druk de knoppen aanweerszijden van de
babyschommel in en klap tegelijkertijd de schommelpoten in.

HANDLEIDING
O
S
P
U
Q
T
R
Aan/uit knop (o)
Druk één keer op de aan/uit knop (o) om de babyschommel aan te zetten.
LET OP: de babyschommel begint altijd met het schommelniveau, de muziek en het volume zoals
ingesteld bij het laatste gebruik.
Druk nogmaals op de aan/uit knop o om de babyschommel uit te zetten.
Schommelniveau kiezen
Knop voor het verhogen van de snelheid (p)
LET OP: de schommel niet met de hand laten schommelen, de gewenste snelheid schakelt 20
à 45 seconden nadat u het gewenste schommelniveau hebt ingesteld vanzelf in. Druk op
de knop (p) om de schommelsnelheid te verhogen. De LED-lampjes (r), onder de knop (p),
geven het versnellingsniveau aan (van het laagste naar het hoogste niveau). Hoe hoger de
schommelsnelheid, hoe meer LED lampjes branden.
Knop voor het verlagen van de snelheid (q). Druk op de knop (q) om de schommelsnelheid te
verlagen. De LED indicatorlampjes (r) onder de knop (q) geven het vertragingsniveau aan. Hoe
lager de schommelsnelheid, hoe minder LED lampjes branden.
Knop voor het instellen van de schommelduur (s)
Gebruik deze knop voor het instellen van de schommeltijd.
Druk op de knop (s) voor het kiezen van een schommelduur tussen 10, 15 of 30 minuten. De
drie LED lampjes (t), naast de knop (s), geven de gekozen duur aan. Als geen schommelduur is
gekozen, wordt automatisch een schommelduur van 45 minuten ingeschakeld.
Keuzeknop voor muziek en volume (u)
• Druk op de knop (u) om de muziek aan te zetten.
• Druk een tweede keer op de knop (u) om het volume hoger te zetten.
• Druk een derde keer op de knop (u) om de muziek uit te zetten.
• Druk een vierde keer op de knop (u) om een ander melodietje te kiezen etc.

Onderhoud
WARNING
Controleer de babyschommel geregeld om te kijkenof er schroeven los zitten,
onderdelen versleten zijn, stof gescheurd is of naden los zijn geraakt. Laat indien nodig
onderdelen vervangen of repareren. Gebruik alleen vervangingsonderdelen die door
Baninni worden aanbevolen. Maak het zitje regelmatig schoon. De hoofdsteun en de
hoes van de babyschommel kunnen schoongemaakt worden met een vochtige doek
en zeep. Gebruik voor het schoonmaken van het kader van de babyschommel alleen
huishoudzeep of een schoonmaakmiddel en lauw water. Nooit bleekmiddel gebruiken.
Te veel blootstellen aan zonlicht en warmte kan verkleuring of vervorming veroorzaken.
Laat een kind nooit zonder toezicht.
• Gebruik de babyschommel niet meer als het kind alleen rechtop kan zitten.
• Door de bewegingen van het kind kan het zitje omkiepen. Gebruik het zitje alleen op
de grond.
• Gebruik de babyschommel niet als één van de onderdelen kwijt of kapot is.
• Contoleer voor gebruik of het vergrendelingsysteem goed gemonteerd en afgesteld is.
• Controleer regelmatig het ophangingsysteem van de babyschommel.
• Gebruik altijd een 5-punts veiligheidstuigje.
• Gebruik de schommel niet zonder beschermingshoes.
• Het is gevaarlijk de babyschommel op een verhoogd of onstabiel oppervlak te
gebruiken.
• Gebruik de babyschommel nooit op een zachte ondergrond.
• De babyschommel is niet bedoeld om de baby langere tijd in te laten slapen.
• De babyschommel is geen wieg of autostoel. Gebruik altijd het veiligheidstuigje en stel
dit goed af.
• Plaats de babyschommel niet in de buurt van een vlam, hittebronnen, ...
• De babyschommel nooit optillen aan de speelgoedboog.
• De babyschommel nooit optillen of vervoeren terwijl het kind erin zit.
• Houdt plastic verpakkingszakken uit de buurt van baby’s en kleine kinderen om
verstikkingsgevaar te voorkomen.
• Gebruik nooit kussens,dekens of vulling. Gebruik alleen de hoofdsteun die bij de
babyschommel geleverd is.
• Zorg dat er geen voorwerpen met draden of koorden rond de hals van het kind zitten,
hang geen draden aan de schommel en/of het speelgoed. Dit kan verstikkingsgevaar
opleveren.
• Laat kinderen niet met de opgevouwen babyschommel spelen.
• Bevestig geen andere voorwerpen (speelgoed) aan de schommel dan die voorzien door
Baninni.
• Max. gewicht capaciteit: 9kg.
Aanbevolen Batterijen: 4x D batterijen (exclusief)De batterijen moeten uit de babyschommel worden
gehaald, wanneer je deze opbergt voor lange tijd. Gebruik geen verschillende types batterijen door
elkaar. Gooi gebruikte batterijen niet bij huishoudelijk afval, maar breng ze binnen bij een geselecteerd
punt.

MANUAL
GB
BABYSWING STELLINO
ASSEMBLY INSTRUCTIONS
Read all instructions before assembly and use of the baby
swing.
Keep instructions for future use.
The child may be hurt if you do not follow these
instructions.
IMPORTANT! KEEP FOR FUTURE REFERENCE.
WARNING! TO BE ASSEMBLED BY AN ADULT!
NEVER LEAVE YOUR CHILD UNATTENDED

ASSEMBLY PARTS
A
B
CD
E
F
G H
I
J
L
M
K
N
O
A. Front leg
B. Rear leg
C. Right swing leg
D. Left swing leg
E. Front bar
F. Rear bar
G. 4x screws (30 mm)
H. 2x screws (35 mm)
I. Seat liner cover with 5-point safety harness
J. Press studs for protective net
K. Toy bar
L. Head cushion
M. Electronic box
N. Push buttons
O. Mains adaptor 6 V / 500 mA (Optional)

MANUAL
ASSEMBLY INSTRUCTIONS
STEP 1: Insert the right part of the rear leg
(B) into the right swing leg (c). Make sure the
push button of the rear leg (b) is clipped into
the opening of the right swing leg (c). To do
this correctly, you must hear a ‘click’. To x the
two parts insert a 35mm screw (h).
STEP 2: Insert the left part of the rear leg (b) in
the left swing leg. Make sure the push button
of the rear leg (b) clips into the opening the
opening of the left swing leg (d) until you hear
a ‘click’. To x the two parts, insert a 35mm
screw (h).
STEP 3: Insert the front right leg (a) into the
right swing leg (c) and the front left leg (a)
into the left swing leg (d). Press the push
button and simultaneously push the front leg
(a) into the swing legs (c) and (d) until you
here a ‘click’.
STEP 2
STEP 1
STEP 3
A
B
CD

ASSEMBLY INSTRUCTIONS
EF
STEP 4: Fix the right hand part of the front bar (e) on the right swing leg (c)
and the left part of the front bar (e) on the left swing leg (d).
STEP 5: To x the two parts, insert two 30mm screws (g).
STEP 6: Fix the right part of the rear bar (f) on the right swing leg (c) and
the left part of the rear bar (f) on the left swing leg (d).
STEP 7: To x the two parts, insert two 30mm screws (g).
STEP 4 STEP 5
STEP 6 STEP 7
G H
CD

MANUAL
ASSEMBLY INSTRUCTIONS
STEP 8: Titlt the bars (e) and (f) upwards until they come together.
STEP 9: Cover the bars (e) and (f) with the seat liner (i). Make sure
the Baninni Logo is facing upwards to ensure the liner is put on
correctly. Separate the two bars (e) and (f) sliding the seat liner (i)
along the two bars.
STEP 10: To ensure the liner is held rmly fasten the velcro at
the bottom edge of the seat liner (i). When the tubes have been
covered, fasten the protective nets using the press studs (j).
STEP 8 STEP 9 STEP 10
E F IJ

ASSEMBLY INSTRUCTIONS
STEP 10
STEP 11: Insert the back of the seat so that you reach the loops of the seat
Rig can. Attach the belts to the loops of the rig.
STEP 12: To access
the buckles of the
harness, tilt the seat
inwards. Fit each strap
into the buckle of the
harness. Thread the
strap through the top
slit then the bottom
slit. Pull on the straps
so that they are quite
tight.
Press the ‘Lock’ button to switch to
a xed position.
STEP 11
STEP 12

MANUAL
STEP 13: Never lift the swing using the toy bar. Never add any pilow, blanket or
padding, use the head cushion supplied.
Insert the toy bar (k) into the slots on each side of the seat until you hear a
‘click’. Make sure the toys are facing the child’s head cushion (L). This oers an
additional support to the baby’s head for optimal comfort. This component can
be removed from the swing. To attach or remove the cushion (L) simply use the
velcro strap.
The electronic box (m) of the swing must be supplied as 4xD batteries or can function
by plugging in the main adapter (o) tot the leg (d). For optimal performance use
alkaline batteries. Use a screwdriver to open the electronic box (m) on the right side of
the swing leg (c). Insert the 4 batteries in the direction of the markings. Screw back the
electronic box (m). Do not over-tighten.
ASSEMBLY INSTRUCTIONS
K
L
STEP 13

O
S
P
U
Q
T
R
On/O Button (O): Press the on/o button (o) once to start the swing. The swing
will always start at the swinging speed with music and volume, selected the previous
time. Press the on/o button again to switch o the swing.
Selection of swinging speed: Do not make the swing move by hand, the desired
speed will start up within 20 to 45 seconds after selecting the swinging speed. Press
button (P) tot accelerate the speed. Press button (p) to accelerate the speed. The
LEDs (R) underneath (P) , show the speed. The faster the swinging, the more LEDs will
light up. Press the button (Q) to slow down the swinging speed.
Timer button (S): Use the timer to set a swinging time. Press the button (S) to
choose a swingin time betweend 10, 15 or 30 minutes. The three LEDs (T), show the
swinging time choosen, if the timer option is not chosen. A 45 minute time will start
automatically.
Button for choice of music and volume. (U)
Press U once to start music
Press U twice to increase volumen
Press U three times to switch o the music
Press U four times to change melody.

MANUAL
Care & Maintenance
WARNING
Check the swing regularly for loose screws, worn parts, torn fabrics or stitching that has
come undone.
Change or repair parts if required. Only use spare parts recommended by Baninni.
Clean the swing regularly. The fabric of the cushion and cover can be hand washed
only. Do not immerse the fabric in water. Do not machine wash or dry clean. To clean
the frame, use household soap and warm water, or a damp cloth. Never use bleach.
Excessive exposure to the sun or heat may cause fading of colours or warping of parts.
• Never leave your child unattended!
• Do not use the babyswing once your child can sit up unaided.
• The baby’s movement can make the swing faal over. Only use the swing on a stable
oor.
• Do not use the swing if any part is missing or broken.
• Always use the safety harness.
• Before using, check if all parts are properly locked into position and adjusted
correctly.
• Check the suspension system of the rocker swing regularly.
• Do not use the swing without its seat liner
• It is dangerous to put the swing on an elevated or soft surface.
• Always use the swing on a at and horizontal surface.
• The swing is not designed for the baby to spend long time in it or for long periods
to sleep. Your baby has to sleep in a bed.
• The swing is not a carrycot or a car seat. Always use the safety belt and adjust them
properly.
• Keep the swing away from any heat sources (electric res, cookers, ames,..)
• Never lift the swing using the toy bar.
• Never lift or carry the swing with the baby in it.
• Keep the plastic bags and packaging out of reach for babies and children to avoid
any risk of suocation.
• Never add any pillow, blanket or padding: use only the head cushion supplied.
• Do not put objects with strings around the neck of your baby, do not hang strings
from the swing and do not attach strings to the toys.
• Do not allow the baby to play with the swing when folded up.
• Do not attach other toys then those supplied. Batteries recommended: 4x D
batteries (not included)
• The maximum weight capacity is 9kg.
Keep the batteries out of reach of children. Change the batteries when the swing no longer works
satisfactorily. Batteries must be removed from their housing when they run down. Remove the batteries
before storing the swing for a long period. Do not use dierent types of batteries together.
The power terminals must not be short-circuited. Do not throw electronic equipment away with
unsorted househol waste, but dispose it at a selected collection point.
FR
Table of contents
Languages:
Other Baninni Baby Swing manuals
Popular Baby Swing manuals by other brands

Fisher-Price
Fisher-Price H0640 instructions

TP active fun
TP active fun Quadpod TP900 Instructions for assembly maintenance and use

Ledon
Ledon 1149 Assembly instructions

Playlearn
Playlearn Sensory Therapy Swing instructions

Creative Play
Creative Play S110 installation instructions

Hartman
Hartman Dubai quick start guide