deerma DEM-VX910W User manual
DEM-VX910W
Deerma
Double Roller Wireless
Floor Cleaner
Innovative double brush, double cleaning by dragging front and wiping back.
Read Instruction manual carefully before use
Guangdong Deerma Technology Co., Ltd.
Add: No.4-1 Longhui Road, Malong Village Committee, Beijiao Town,
Shunde District, Foshan City, Guangdong Province, China
Made in China
Safety
1 2
The product is for home use only. Please read this manual carefully and keep it properly before use.
• The product is only used for oor cleaning in the home environment. Do not use it in outdoor, non-oor,
commercial or industrial environment.
• The product should not be used by persons with physical, senso or intellectual disabilities and persons
without relevant experience and knowledge (including children), unless supeised or directed by a guardian
to ensure that they can use the product safely.
• Do not allow children to use the product as a toy. Please supeise children and pets to keep them away
as far as possible.
• Do not touch the plug or any live pa of the product with wet hands to avoid the electric shock.
• Do not ush or submerge pas of the body other than the detachable pas of the product. Do not
expose the product to the sun or burn it.
• The product may be dangerous if used on the power cord.
• The product should be unplugged before cleaning and maintenance.
• The damaged power cord must be replaced with a special cord or a special component purchased from
its manufacturer or maintenance depament.
• Do not use the product to absorb high-temperature substances (such as cigarette butts, matches or hot
ashes that are not extinguished), ultrane substances (such as lime, cement, wood chips, gypsum powder,
ash, carbon powder, etc.), dangerous substances (such as solvents, scale agents, etc.), corrosive chemicals,
foam liquid and other substances with unceain physical propeies.
• Do not use the product to absorb ammable or explosive liquids such as gasoline. Do not inhale toxic
solutions such as chlorine bleach, ammonia, sewage cleaner or other liquids.
• Do not use the product to absorb sharp substances (such as glass fragments, toys, pins, paper clips,
stones, gypsum, large pieces of paper, etc.), which may cause blockage and damage the product.
• Do not use the product to absorb stains with strong grease, viscosity or dyeing, such as shoe polish, paint
and pigment.
• Do not block the ding outlet of the base to avoid failure.
• Do not charge and store the product near heat source or damp area (such as radiator, kitchen and
bathroom).
• In case of any failure of the product, such as overheating, abnormal noise, odor, weak suction, etc., it is
recommended to contact the ocial after-sales seice, and do not repair it by yourself.
• Please pay attention to personal safety when using the product to clean the stairs.
• Do not use the product in an environment that is higher than 40℃ and lower than 5℃.
• Do not disassemble and assemble the pas other than the detachable pas described in the manual,
otherwise it will result in danger.
• Charge the product at the rated voltage on the base.
• Please pay special attention to prevent falling when cleaning the stairs.
• Do not lift and car the operating product up and down, or tilt the product to one side and lay it at, to
prevent liquid reux into the motor.
• Do not use the clean water tank and sewage tank if they are not properly installed.
• Do not place any small objects at the outlet or block the outlet, and promptly remove all small objects that
may hinder the smooth ailow at the outlet to prevent the product from overheating.
• Do not wet the device body to avoid re or electric shock due to sho circuit.
• In order to ensure the product quality, the product will be subject to quality inspection before delive. It
is normal if a small amount of water remains in the water tank, so please feel free to use it.
• Please use the product according to the manual. Any loss caused by improper use shall be borne by the
user.
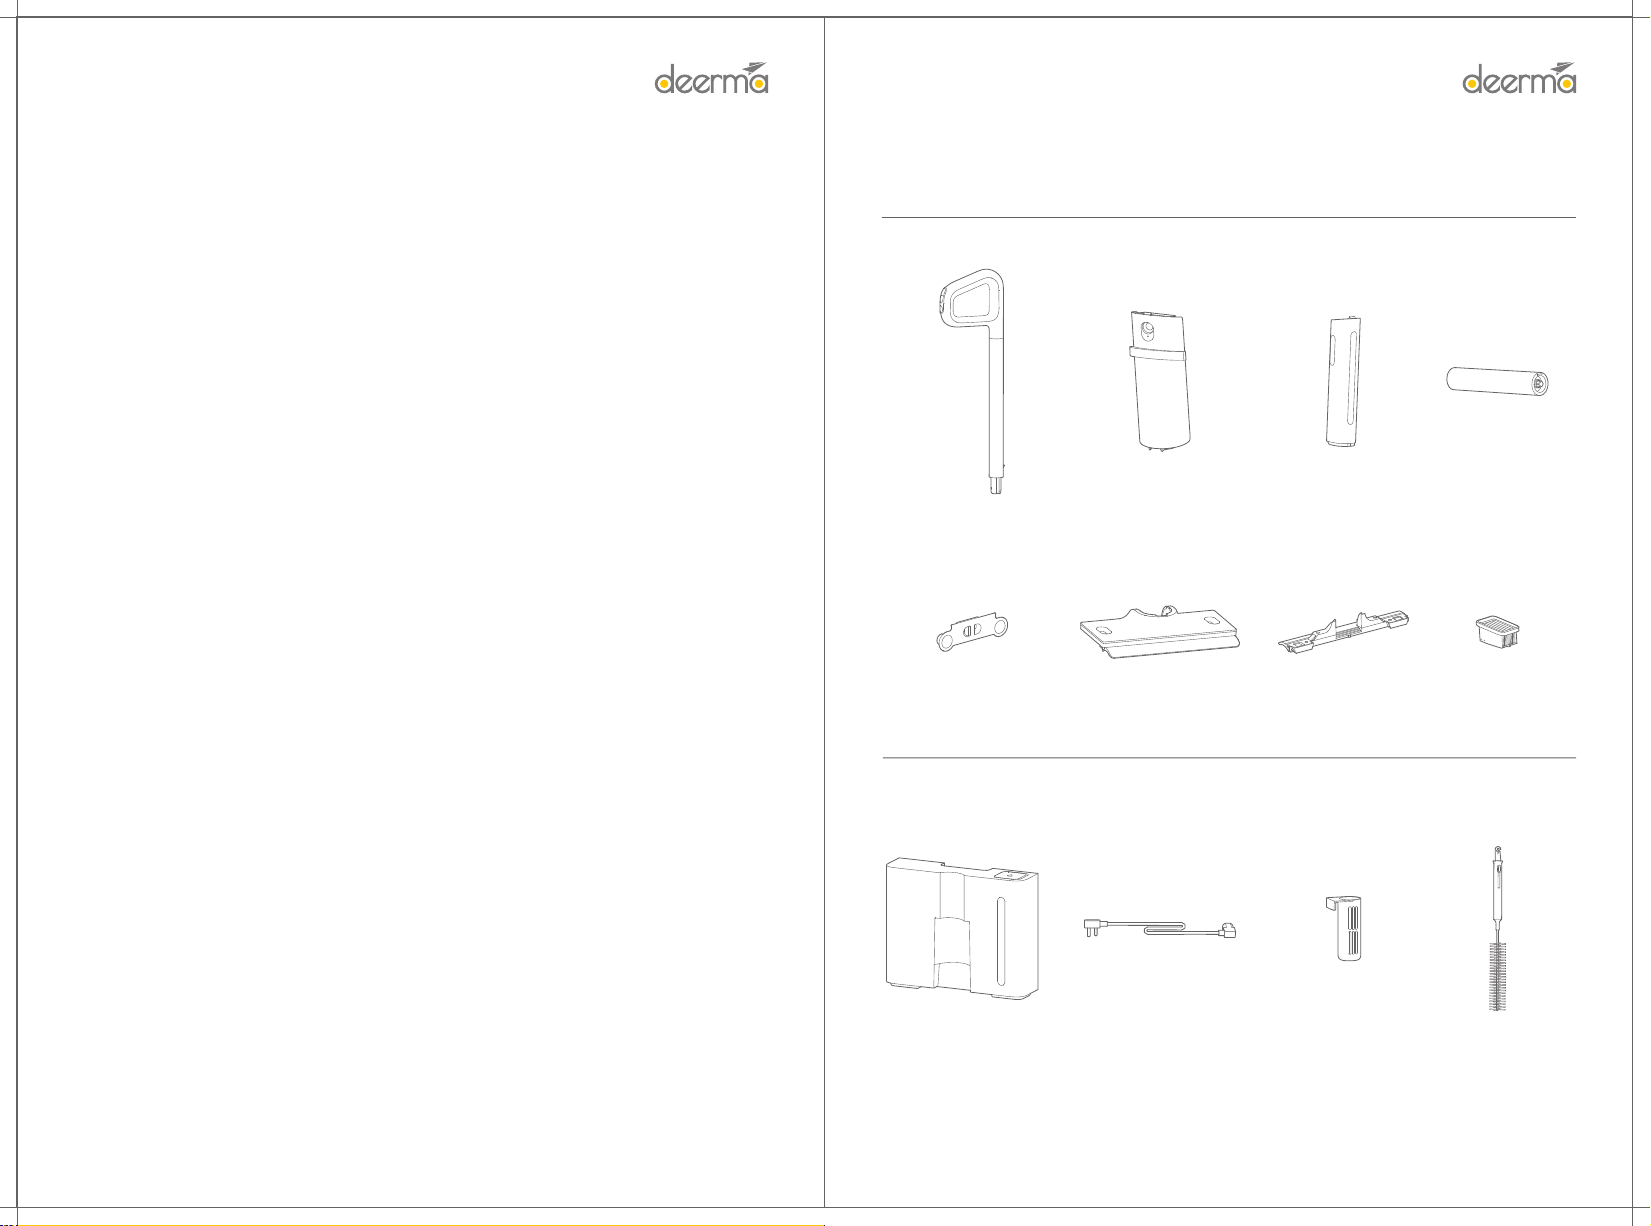
Product
Accessories installed on main unit
Accessories installed on base
Cleaning brush holder Cleaning brushBase tank Power cord
Rolling brush (installed)
Handle assembly Clean water tank
(installed)
Sewage tank
(installed)
Filter element
(installed)
最高水位
Side pressing plate of
oor brush
(installed)
Upper removal cover of
oor brush
(installed)
Rear removal cover of
oor brush
(installed)

3 4
InstallationProduct
Handle assembly
Roller brush
Display
Power key
Sewage tank
removal key
Sewage tank
Press to turn on/o when the
main unit is not on the base.
Press to stop self-cleaning/ding
when the main unit is self cleaning
on the base.
Mode key
Press to change the
modes during cleaning.
Self-cleaning key
Sho press to turn on/o
self-cleaning/ding when
main unit is on the base;
Double-click to open
seperate ding mode.
Voice key
Press to turn on/o
voice prompt
Handle removal hole
Horn mouth
Clean water tank window
Clean water tank
Main unit inlet
Main unit charging po
LED display
Intelligent Charging Base Station
Power cord holder
Power po
Base tank handle
Cleaning Brush
Button
Cutter
Brush
Main Unit
Note: The illustrations of products, accessories and user inteaces in the manual are schematic diagrams for reference only. Due
to the updating and upgrading of the product, there may be slight dierences between the actual product and the schematic
diagram. Please refer to the actual product.
Installation of handle
Veically inse the connecting pipe of the
handle assembly into the corresponding
inteace of the device body in the direction of
arrow as shown in the gure, until there is a
"click". It is recommended to conrm again that
the handle is installed stably without looseness.
Installation of base
1. Inse the power plug into the power
connector on the back of the base, wind the
excess power cord on the power cord
holder, and leave a proper length of power
cord to clip it into the power cord slot.
3. Install the cleaning brush holder on either
side of the base stand, and place the
cleaning brush in the cleaning brush holder.
2. Place the base against the wall, and then
connect the power cord to the reliably
grounded wall socket.
•Do not place it near heat source or damp area (such as radiator, kitchen and bathroom).
•Do not disassemble, repair or ret the base without permission.
•Do not use any third-pay batte or rechargeable base. Only use it with the base model DEM-VX910W-JZ.
Caution:
Power cord holder Power po
Power cord slot
Base tank cover
Cleaning brush holder
Tray
(detachable)
Base tank window
Base charging po
Base outlet
Tray outlet
Base tank
Base stand
最高水位
Side pressing plate of
oor brush
Side pressing plate
of oor brush
removal key
Upper removal cover
Upper removal cover
removal key
Change from green to
orange based on the
condition of di inhaled
Note: When the product fails to work normally, a fault prompt will be shown on the display. For solutions, please refer to
[Troubleshooting].
6
最高水位
Tank cover
Water inlet
Highest water level
最高水位
Water lling in base tank
1. Open the base tank cover in the direction shown in the
gure. It will open completely if there is a "click".
2. Fill the clean tap water from the water inlet of the base tank.
3. Put the base tank lled with clean tap water back to the
base in the direction shown in the gure.
•Do not ll liquids other than tap water and special
detergent to avoid danger.
•Do not exceed the highest water level when lling water.
Caution:
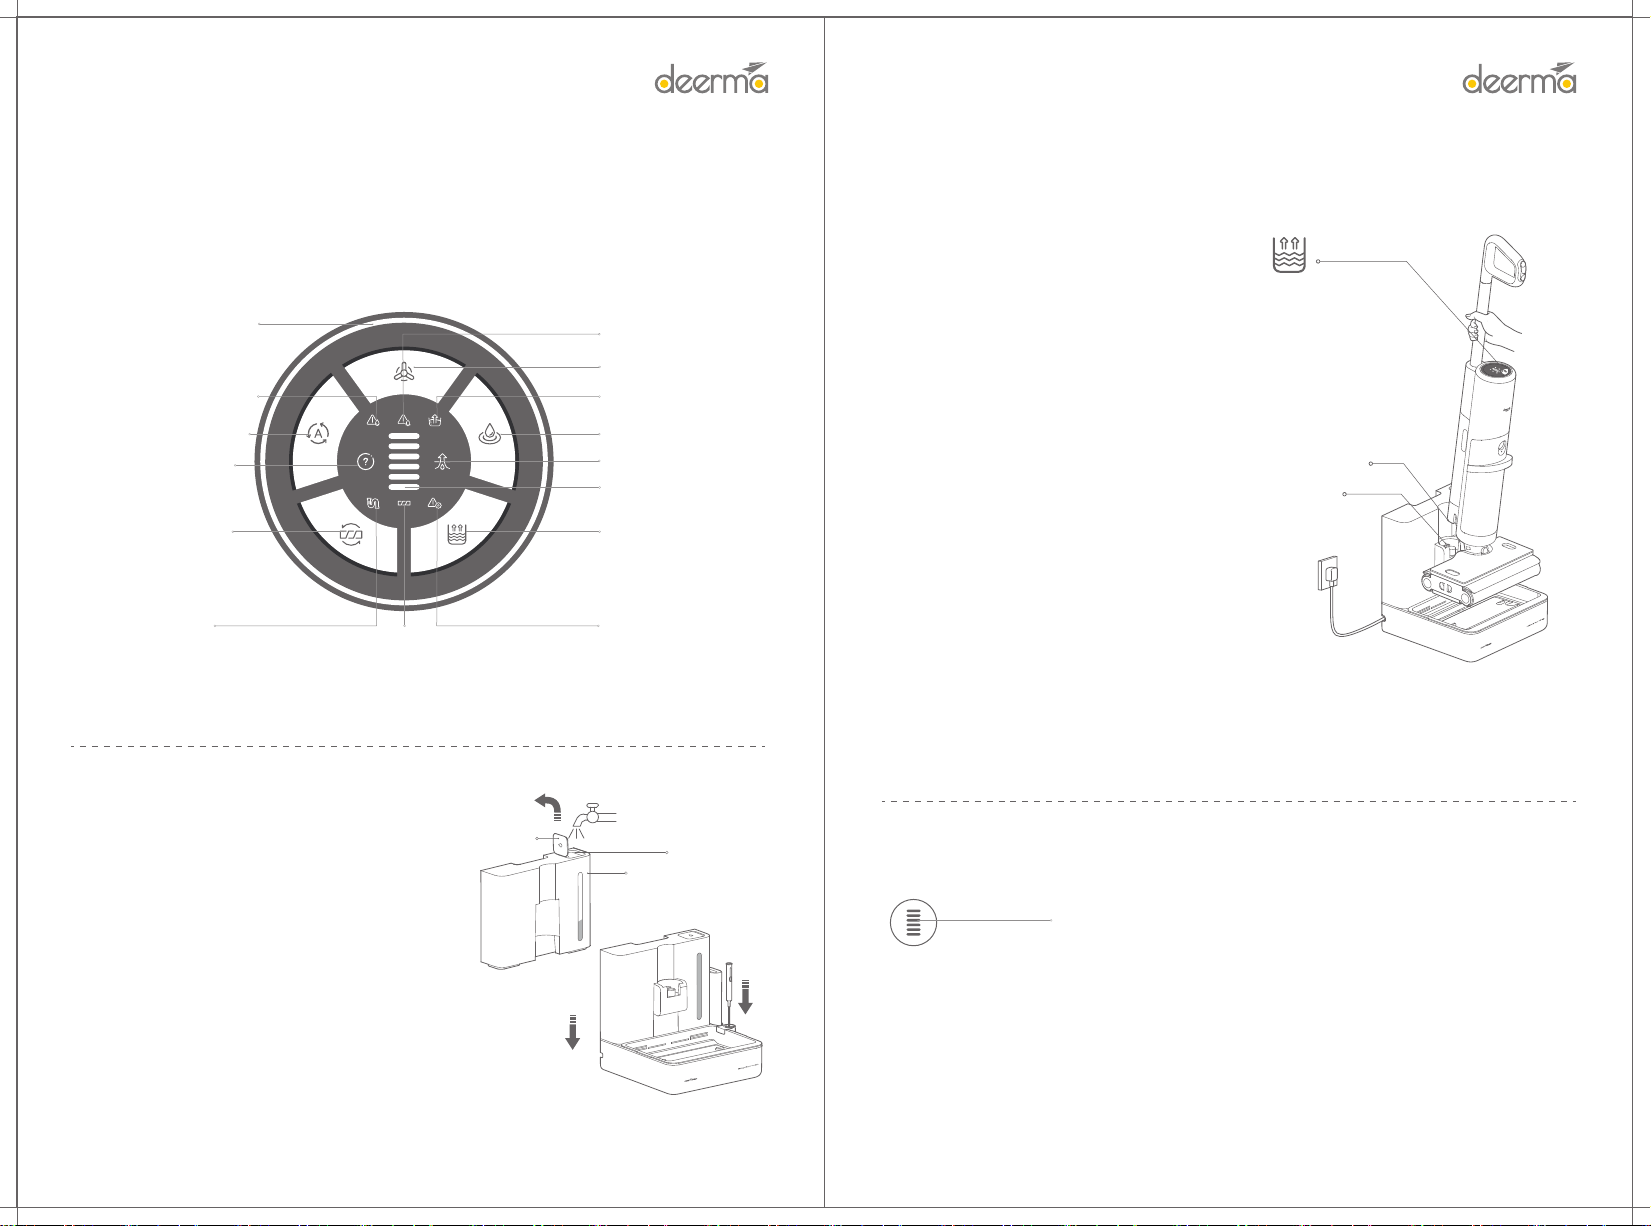
Di indicator ring
Power status indication
5
How to Use
LED Display
Device failure
Strong mode
Water absorption mode
Clean water tank /
sewage tank /
base tank extraction
Automatic water lling
Automatic mode
Clean water tank/
Shoage of water
in the base tank
Water full in sewage tank
Self-cleaning
Pipe di
Neglected installation of rolling brush / winding of rolling brush
Ding
Note:
• It is recommended to use the product after full charge.
• The main unit cannot be charged in case of automatic water lling, self-cleaning and ding.
• It is recommended to charge the product for 12 hours each time for the rst three times. Later, in daily use,
the product can be charged at any time. Self-cleaning, ding and automatic water lling are not allowed
during charging.
• After main unit is used continuously, the batte temperature is high and the charging is slow, which is
normal.
Charging
The main unit will be automatically charged after automatic water lling, until it is fully charged and the display
goes out.
Low batte: One-bar red is ashing
Fully charged: Six-bar green is always on
Power display
Automatic water lling in main unit
After the base is powered on normally and the base
tank is lled with water, the main unit can be placed
on the base as shown in the gure. After main unit is
placed properly, the water will be lled automatically
until the clean water tank is full. There will be
relevant prompts on the display in the process of
lling water.
Note: If water is not replenished automatically,
please check whether main unit is placed properly or
whether there is water in the base tank.
Note:
• Do not remove main unit when water is lled
automatically.
• If main unit is not fully lled with water and there
is water in the base tank, the main unit will activate
the automatic water lling again.
• In case of a fault during the automatic water
lling, the main unit will stop water lling and will be
charged if the fault is not removed within a sho
time.
• When the base tank is sho of water, the
automatic water lling will fail if you open the base
tank cover directly to ll water. You need to take and
place the base tank again or press the Power key to
sta automatic water lling.
Main unit charging po
Base charging po
Automatic water lling
Abnormal
placement of
main unit /
abnormal
power-on of base

87
Cleaning in power-on state
Remove main unit from the base, bend the device body, and
then press the " " key to sta the device.
Caution:
• The product is suitable for hard oors such as oor, ceramic tile
and marble.
• Do not use on the suace of carpets, blankets and other fabrics.
• In case of a fault during use, the main unit will pause for standby
or shut down if the fault is not removed within a ceain period.
After the fault is removed, press " " key to power on again.
Note:
• When the rolling brush is used for the rst time or the
rolling brush is d, it is recommended to rst wet the
rolling brush and then wipe the ground, which can achieve
better cleaning eect.
• Clean the sewage tank in time to avoid odor.
• Do not soak or wash the product.
• To prevent sewage from owing out, do not lay at or
shake the main unit violently! Remove the clean water tank
and sewage tank before cleaning the oor brush.
• Do not suck foam liquid, otherwise it is easy to trigger
the false alarm that sewage tank is full.
Water lling halfway
During the cleaning, when the voice or display screen shows that the water tank is sho of water, you can
manually ll water to the water tank, or you can put the main unit back to the base to automatically ll water.
Manual water filling
1. Hold the two sides of the upper half of the water tank and pull it outward to remove it.
2. Open the cover on the top of the clean water tank, directly fill the clean tap water, and cover the water tank after it
is filled with water.
3. Put the bottom of the clean water tank into the installation slot, and then powerfully press the top of clean water
tank against the body. The tank is installed in place if there is a "click".
During the cleaning, press the " " key to change the cleaning mode: automatic, sterilization and water
absorption.
Change of modes
Automatic mode (daily stain cleaning)
The automatic mode is activated by default in the power-on state. In this mode, the suction
will be adjusted according to the di condition of the ground.
Power mode (stubborn stain cleaning)
In this mode, there is large water output of oor brush and high suction of main unit, which is
suitable for cleaning stubborn stains
Water absorption mode (water stain cleaning)
This mode is suitable for cleaning water stains because the water output of the oor brush is
ve low.
Pause cleaning
During the cleaning, if the device body is upright, the main unit will pause cleaning. Bend the device body
again within 3 minutes to continue the cleaning. Press the " " key again to sta the device after more than 3
minutes.
Di indicator ring
The color of ring will change with the di condition of the substances inhaled
Green: No di
Yellow: Slight di
Orange: Severe di
Table of contents
Other deerma Vacuum Cleaner manuals


