Defiant DF-6026-WH-B User manual

THANK YOU
We appreciate the trust and condence you have placed in Deant through the purchase of this light socket control.
We strive to continually create quality products designed to enhance your home. Visit us online to see our full line of
products available for your home improvement needs. Thank you for choosing Deant!
USE AND CARE GUIDE
WIRELESS MOTION LIGHT SOCKET CONTROL
Questions, problems, missing parts? Before returning to the store,
call Deant Customer Service
8 a.m. - 6 p.m., EST, Monday - Friday
1-866-308-3976
HOMEDEPOT.COM
Item #579760
Model #DF-6026-WH-B

2
Table of Contents
Table of Contents......................................2
Safety Information....................................2
Precautions............................................2
Warranty ...................................................2
2-Year Warranty .....................................2
Specifications...........................................3
Pre-Installation.........................................3
Planning Installation ..............................3
Tools Required .......................................3
Hardware Included.................................3
Package Contents ..................................4
Installation................................................4
Operation...................................................6
Care and Cleaning ....................................7
Troubleshooting........................................8
Code Setting............................................10
Safety Information
PRECAUTIONS
Please read and understand this entire manual before
attempting to assemble, install, or operate this product.
This device complies with Part 15 of the FCC Rules and
RSS-210 of Industry Canada. Operation is subject to the
following two conditions: (1) this device may not cause
harmful interference, and (2) this device must accept any
interference received, including interference that may
cause undesired operation.
The user is cautioned that changes or modications
not expressly approved by the party responsible for
regulatory compliance could void the user’s authority to
operate the equipment.
WARNING: To prevent possible SERIOUS INJURY or
DEATH, never allow small children near batteries. If battery
is swallowed, immediately notify doctor.
WARNING: FOR USE ONLY with 120 volt incandescent
or halogen bulbs.
WARNING: DO NOT USE with uorescent bulbs,
appliances, power supplies, low voltage lighting, or any
other electrical devices.
CAUTION: Do not exceed 150 watt maximum
incandescent load.
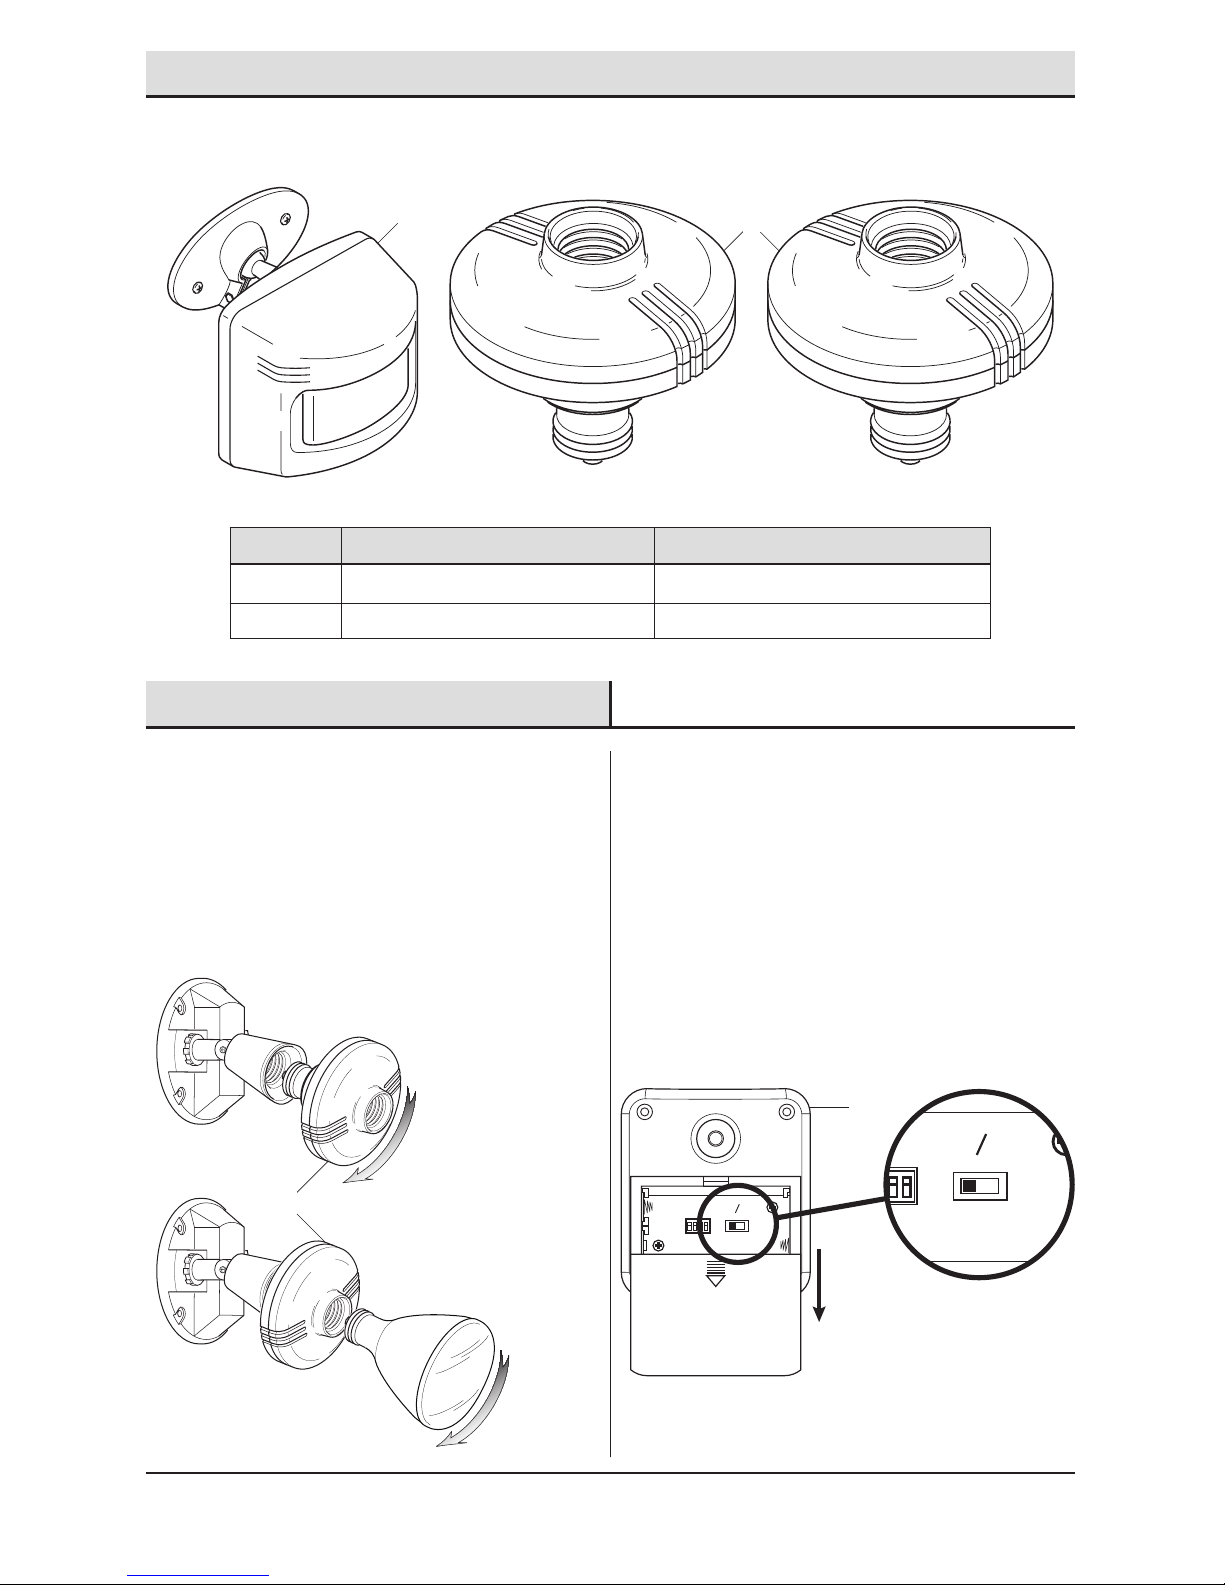
NOTICE: To avoid water damage, the motion sensor controls must
face the ground when the installation is complete.
NOTICE: Avoid aiming the sensor at objects that change
temperature rapidly (i.e. heating vents, fans, air conditioners), areas
where pets or car trafc may trigger the sensor, or large, light-colored
objects that reect light and may trigger the daylight shut-off feature.
Warranty
2-YEAR WARRANTY
Contact the Customer Service Team at 1-866-308-3976 or visit www.homedepot.com.

3 HOMEDEPOT.com
Please contact 1-866-308-3976 for further assistance.
Specications
Motion sensor detection range Up to 70 ft. (21.3 m) - Varies with surrounding temperature
Motion sensor detection angle Up to 180°
Light socket control electrical load -
incandescent
Up to 150 watt maximum each
Power requirements Motion sensor - 2x AA batteries (not included)
Light socket control - 120 VAC, 60 Hz
Wireless transmission range Up to 100 ft. (30 m)
Operating modes Test, Manual, Auto (night only), Auto (day/night)
Motion sensor time delay 1, 5 minutes
Pre-Installation
PLANNING INSTALLATION
Before installing this product, ensure that all parts are present (see Hardware Included). If any part is missing or
damaged, do not attempt to assemble, install, or operate this product.
Estimated installation time: 30 minutes
TOOLS REQUIRED
Phillips
screwdriver
Small,
at blade
screwdriver
2x - AA alkaline
batteries
HARDWARE INCLUDED
NOTE: Hardware shown to actual size.
AA
Part Description Quantity
AA Screw 2

4
Pre-Installation (continued)
PACKAGE CONTENTS
Part Description Quantity
A Motion sensor 1
B Light socket control 2
Installation
1 Installing the Light Socket
Control
ƑScrew the light socket control (B) into the bulb
holder of the existing light xture.
ƑScrew the light bulb (not included) into the
light socket control (B).
2 Installing Batteries into the
Motion Sensor
ƑSlide the battery cover on the motion sensor
(A) down to remove.
ƑSet the DETECT control to the DAY/NIGHT
position.
ƑInstall 2 alkaline AA batteries (not included) in
the motion sensor (A). Make sure the batteries
are oriented properly.
ƑReplace the battery cover.
DE TEC T
CO DES
1 2 3 4
DAY
NI GHT
NI GHT
ON LY
A
A
DETECT
CODES
1 2 3 4
DAY
NIGHT
NIGHT
ONLY
B
B

5 HOMEDEPOT.com
Please contact 1-866-308-3976 for further assistance.
Installation (continued)
3 Setting the Motion Sensor for
Testing
ƑUse a small, at blad screwdriver (not
included) to gently pry open the cover on the
bottom of the motion sensor (A).
ƑSet the ON-TIME control to TEST and wait 30
seconds.
5 1 TEST
ON-TIME
(MINUTES)
RANGE
MAX MIN
5 1 TEST
ON-TIME
(MINUTES)
RANGE
MAX MIN
4 Testing the Wireless
Transmission Range
ƑDetermine the area to be monitored and
temporarily position the motion sensor (A)
where it will be mounted.
ƑWalk in front of the motion sensor (A) to verify
the light socket control (B) is receiving the
signal from the motion sensor (A).
NOTE: A second person may be needed to watch for the
light to be turned ON when motion is detected. Make sure
the light is in the ON position.
5 Mounting the Motion Sensor
ƑAttach the motion sensor (A) mounting bracket
(1) to a sturdy surface using the screws (AA).
Make sure the motion sensor (A) has an
unobstructed view of the area to be monitored.
NOTE: Attach the mounting bracket (1) vertically when
attaching it to a curved surface.
NOTE: If needed, loosen the clamp screw (2) on the
mounting bracket (1) and remove the motion sensor
(A) until the mounting bracket (1) is installed. Once the
mounting bracket (1) is installed, reinsert the motion
sensor (A) and carefully tighten the clamp screw (2).
A
A
1
AA
A
1
2
B
A
5 1 TEST
ON-TIME
(MINUTES)

6
Operation
1 Rotating Sensor Controls
Downward
ƑRotate the motion sensor (A) so the controls
face toward the ground.
NOTICE: To avoid water damage, the motion sensor (A) controls
must face the ground when the installation is complete.
2 Setting the Motion Sensor for
Testing
When the “ON-TIME” switch is set to the “TEST”
position, the light xture will operate during the day
or night. The light will stay on for 5 seconds after all
motion is stopped.
ƑSet the “ON-TIME” switch to the “TEST”
position.
ƑTurn the “RANGE” dial to the “MIN” position.
ƑAim the motion sensor (A) in the general
direction of the area to be covered.
NOTE: The motion sensor will need to completely warm
up (90 seconds) before beginning the setup process.
5 1 TEST
ON-TIME
(MINUTES)
RANGE
MAX MIN
3 Adjusting the Motion Sensor
Detection Zone
ƑPerform a “walk test”. Walk in an arc across
the front of the motion sensor (A).
ƑWatch the light controlled by the light socket
control (B). The light will come on and the red
LED inside the control panel will ash when
motion has been detected.
ƑStop, wait for the light to turn off, and then
begin walking again.
ƑContinue this process until the detection zone
has been established.
ƑAdjust the motion sensor (A) up, down, or side
to side to change the area being monitored.
NOTE: A second person may be needed to watch for the
light to be turned ON when motion is detected. Make sure
the light is in the ON position.
4 Adjusting the RANGE Dial on
the Motion Sensor
ƑTo increase the detection zone, turn the
“RANGE” dial toward the “MAX” position.
ƑTo decrease the detection zone, turn the
“RANGE” dial toward the “MIN” position.
NOTE: The motion sensor (A) is more sensitive to motion
moving across the front of the sensor. The motion sensor
(A) is less sensitive to motion moving directly toward the
front of the sensor.
NOTE: The higher the “RANGE” setting (sensitivity), the
greater the possibility of false triggering. To reduce false
triggering, rotate the “RANGE” control toward the “MIN”
setting.
RANGE
MAX MIN
A
A
A
5 1 TEST
ON-TIME
(MINUTES)
RANGE
MAX MIN
A

7 HOMEDEPOT.com
Please contact 1-866-308-3976 for further assistance.
Operation (continued)
5 Adjusting the ON-TIME Switch
on the Motion Sensor
The “ON-TIME” switch determines the amount of time
the light will stay on full bright after all motion has
stopped.
ƑSet the “ON-TIME” switch to the 1 or 5 minute
position.
5 1 TEST
ON-TIME
(MINUTES)
6 Adjusting the DETECT Switch
on the Motion Sensor
The “DETECT” switch determines what time of the
day the motion sensor (A) will turn the light ON when
motion is detected. The “DETECT” switch is located in
the battery compartment. Remove the batteries to set
this switch.
ƑSet the “DETECT” switch to NIGHT ONLY or
DAY/NIGHT (24 hour operation).
DETECT
DAY
NIGHT
NIGHT
ONLY
Care and Cleaning
ƑTo prolong the original appearance, unplug or remove the batteries and clean with a soft, lightly dampened
cloth only.
ƑDo not use paints, solvents, or other chemicals on these products. They could cause a premature deterioration
of the nish. This is not a defect in the nish and will not be covered by the warranty.
ƑDo not spray with a hose or power washer.
A A

8
Troubleshooting
Problem Possible Cause Solution
The light will not come on. ƑThe bulb is loose or burned out. ƑCheck the bulb and replace
if burned out.
ƑThe switch on the light is turned off. ƑVerify the switch on the
light is turned on.
ƑWeak batteries are in the motion
sensor.
ƑCheck battery charge and
replace if necessary.
ƑThe fuse is blown or the circuit breaker
is turned off.
ƑReplace the fuse or turn the
circuit breaker on.
ƑThe light socket control does not re-
spond immediately after installation.
ƑWait for the 90-second
initialization period after
installing batteries or turn-
ing units on.
ƑSignals from the motion sensor are
being blocked, or the motion sensor is
out of range.
ƑCheck for metal objects
that could block the signal,
or reposition the motion
sensor.
ƑDaylight turn-off (photocell) is in effect. ƑRecheck after dark.
ƑThe motion sensor is aimed in the
wrong direction.
ƑRe-aim the motion sensor
to cover the desired area.
ƑThe outside air temperature is close to
the same as a person’s body heat.
ƑIncrease the “RANGE”
setting.
ƑThe light is defective. ƑTest using a different light.
ƑThe dip switches on the motion sensor
and light socket control do not match.
ƑVerify the code settings on
the motion sensor and light
socket control are set the
same.
ƑThe light socket control is receiving
interference from another transmitter.
ƑChange the code setting on
the motion sensor and the
light socket control. See
Code Setting on page 10.
The light comes on during the
day.
ƑThe motion sensor may be installed in a
relatively dark location.
ƑMove the motion sensor to
a brighter area.
ƑThe “ON-TIME” switch is in the “TEST”
position.
ƑSet the “ON-TIME” switch
to the 1 or 5 minute setting.
ƑThe “DETECT” switch on the motion
sensor is set to “DAY/NIGHT”.
ƑSet the “DETECT” switch to
“NIGHT ONLY”.

9 HOMEDEPOT.com
Please contact 1-866-308-3976 for further assistance.
Problem Possible Cause Solution
The light comes on for no
apparent reason.
ƑThe motion sensor may be sensing
small animals or automobile trafc.
ƑRe-aim the motion sensor.
ƑThe “RANGE” dial is set too high. ƑDecrease the “RANGE”
setting.
ƑThe outside temperature is much
warmer or cooler than a person’s body
heat (summer or winter).
ƑDecrease the “RANGE”
setting.
ƑThere was a short term power outage. ƑThe next transmission from
the motion sensor will reset
the light socket control to
the correct state.
ƑThe light socket control is receiving
interference from another transmitter.
ƑChange the code setting on
the motion sensor and the
light socket control. See
Code Setting on page 10.
The lights stay on continuously. ƑThe motion sensor may be picking up
a heat source like an air vent, dryer
vent, or brightly painted, heat-reective
surface.
ƑDecrease the “RANGE”
setting or reposition the
motion sensor.
ƑWeak batteries are in the motion
sensor.
ƑCheck battery charge and
replace if necessary.
ƑSignals from the motion sensor are
being blocked, or the motion sensor is
out of range.
ƑCheck for metal objects
that could block the signal,
or reposition the motion
sensor.
ƑDip switches on the motion sensor and
light socket control do not match.
ƑVerify the code settings on
motion sensor and light
socket control are set the
same.
The lights ash on and off. Heat is being reected from other objects
and may be turning the motion sensor on
and off.
Reposition the motion sensor.
Troubleshooting (continued)

10
Code Setting
1 Locating the Dip Switches
It is recommended to only change one code position at
a time and then check to see if system is functioning
properly.
ƑOn the motion sensor (A), open the battery
cover and remove the batteries to locate the
dip switches.
ƑUnscrew the light socket control (B). Remove
the cover plate on the rear to locate the dip
switches.
DE TE CT
CO DE S
1 2 3 4
DAY
NI GH T
NI GH T
ON LY
12 3 4
2 Changing the Group Setting
If more than one system of motion sensing controls
is desired, use the 4th dip switch to change the
group setting. This allows multiple systems to work
separately from each other.
ƑChange the 4th dip switch on both the motion
sensor (A) and the light socket control (B) to
change the units to another group setting.
NOTE: The motion sensor (A) and light socket control
(B) must have the same code and group setting to work
together.
ON
1 2 3
4
Group A
Group B
3 Changing the Code Setting
The motion sensor (A) and light socket control (B)
both have four different dip switches. Dip switches 1
through 3 are used for setting the code. Change the
code whenever the light socket control (B) is receiving
interference from another transmitter.
ƑChange the same dip switch setting on both
the motion sensor (A) and the light socket
control (B). Example: Move dip switch 1 to the
“ON” position.
NOTE: Dip switch 4 sets the group (A or B). This dip
switch must match for the two units to communicate.
ON
1 2 3
4
Motion sensor
Light socket
control
A
B

11 HOMEDEPOT.com
Please contact 1-866-308-3976 for further assistance.

Questions, problems, missing parts? Before returning to the store,
call Deant Customer Service
8 a.m.-6 p.m., EST, Monday-Friday
1-866-308-3976
HOMEDEPOT.COM
Retain this manual for future use.
205220-01A

GRACIAS
Agradecemos la conanza que ha depositado en Deant al comprar este control de zócalo de luz. Procuramos crear
continuamente productos de calidad diseñados para mejorar su hogar. Visítenos en internet para ver nuestra línea
completa de productos disponibles que necesita para el mejoramiento de su hogar. ¡Gracias por escoger Deant!
GUÍA PARA EL USO Y CUIDADO
CONTROL INALÁMBRICO DE MOVIMIENTO
PARA ZÓCALO DE LUZ
¿Tiene preguntas, problemas o piezas perdidas? Antes de la devolución al
almacén llame a Servicio al Cliente de Deant
8 a.m.- 6 p.m., Hora del Este, de lunes a viernes
1-866-308-3976
HOMEDEPOT.COM
Articulo #579760
Modelo #DF-6026-WH-B

14
Contenido
Contenido................................................14
Información de seguridad......................14
Precauciones .......................................14
Garantía...................................................14
2 Años de Garantía...............................14
Especificaciones.....................................15
Antes de la instalación...........................15
Planicación de la Instalación .............15
Herramientas Requeridas ....................15
Ferretería Incluida................................15
Contenido del Paquete.........................16
Instalación ..............................................16
Operación................................................18
Cuidado y limpieza .................................20
Análisis de averías .................................20
Code Setting............................................22
Informaci n de seguridad
PRECAUCIONES
Por favor lea y entienda todo este manual antes de tratar
de ensamblar, instalar u operar este producto.
Este dispositivo cumple con la sección 15 de las
normas de la FCC e RSS-210 de la industria de Canadá.
El funcionamiento está sujeto a las siguientes dos
condiciones: (1) este dispositivo no debe causar
interferencia perjudicial y (2) debe aceptar cualquier
interferencia recibida, incluida la interferencia que
pudiese causar un funcionamiento no deseado.
Se le advierte al usuario que los cambios o
modicaciones a esta unidad que no estén expresamente
aprobadas por la parte responsable del cumplimiento
regulatorio podrían anular la autorización del usuario
para utilizar el equipo.
ADVERTENCIA: Para evitar posibles LESIONES GRAVES
o la MUERTE, nunca permita que los niños pequeños estén
cerca de las baterías. Si se ingiere la batería, informe de
inmediato a su médico.
ADVERTENCIA: PARA USAR SOLAMENTE con bombillas
incandescentes o halógenas de 120 voltios.
ADVERTENCIA: NO USE con bombillas uorescentes,
electrodomésticos, fuentes de alimentación, luces de bajo
voltaje u otros dispositivos eléctricos.
PRECAUCIÓN: No exceda la carga incandescente
máxima de 150 vatios.
AVISO: Para evitar daños por el agua, los controles del detector
de movimiento deben estar orientados hacia el suelo cuando la
instalación esté terminada.
AVISO: Evite apuntar el detector de movimiento a objetos cuya
temperatura cambia con rapidez (por ejemplo sopladores de
calefacción, ventiladores, aire acondicionado), a áreas donde las
mascotas o el tráco vehicular pueden activar el detector o a objetos
grandes de colores brillantes que reejan la luz y pueden activar la
característica de apagado diurno.
Garantía
2 AÑOS DE GARANTÍA
Póngase en contacto con el personal de servicio al cliente al 1-866-308-3976 o visite el sitio www.homedepot.com.

15 HOMEDEPOT.com
Por favor, póngase en contacto al 1-866-308-3976 para obtener más ayuda.
Especicaciones
Alcance de detección del detector de
movimiento
Hasta 70 pies (21,3 m) – Varía con la temperatura circundante
Ángulo de detección del detector de
movimiento
Hasta 180°
Carga eléctrica del control para zócalo de luz
- Incandescente
Hasta un máximo de 150 vatios cada uno
Requisitos de la energía eléctrica Detector de movimiento – 2 pilas AA (no incluidas)
Control para zócalo de luz - 120 VCA, 60 Hz
Alcance de la transmisión inalámbrica Hasta 100 pies (30 m)
Fases de operación Prueba, manual, automático (sólo por la noche), automático
(día/ noche)
Retardo de tiempo del detector de movimiento 1, 5 minutos
Antes de la instalación
PLANIFICACIÓN DE LA INSTALACIÓN
Antes de instalar este producto, esté seguro de tener todas las piezas (vea Ferretería Incluida). Si alguna pieza falta
o está dañada, no intente ensamblar, instalar u operar este producto.
Tiempo estimado para la instalación: 30 minutos
HERRAMIENTAS REQUERIDAS
Destornillador
phillips
Destornillador
plano pequeño
2 pilas
alcalinas AA
FERRETERÍA INCLUIDA
NOTA: La ferretería se muestra en su tamaño real
AA
Pieza Descripción Cantidad
AA Tornillo 2

16
Antes de la instalación (continuación)
CONTENIDO DEL PAQUETE
Pieza Descripción Cantidad
A Detector de movimiento 1
B Control para zócalo de luz 2
Instalación
1 Instalación del control para
zócalo de luz
ƑEnrosque el control para zócalo de luz (B) en el
portabombillas del aparato de luz existente.
ƑEnrosque la bombilla (no incluida) en el control
para zócalo de luz (B).
2 Instalación de las pilas en el
detector de movimiento
ƑDeslice hacia abajo la tapa de las pilas en el
detector de movimiento (A) para retirarla.
ƑPonga el control DETECCIÓN en la posición
DAY/NIGHT (DÍA/ NOCHE).
ƑInstale 2 baterías alcalinas AA (no incluidas) en
el detector de movimiento (A). Esté seguro que
las baterías estén orientadas correctamente.
ƑVuelva a colocar la tapa de la batería.
DE TEC T
CO DES
1 2 3 4
DAY
NI GHT
NI GHT
ON LY
A
DETECT
CODES
1 2 3 4
DAY
NIGHT
NIGHT
ONLY
AB
B

17 HOMEDEPOT.com
Por favor, póngase en contacto al 1-866-308-3976 para obtener más ayuda.
Instalación (continuación)
3 Configuración del detector de
movimiento para prueba
ƑUse un destornillador plano pequeño (no
incluido) y haciendo palanca con cuidado abra
la tapa de la parte inferior del detector de
movimiento (A).
ƑPonga el control de DURACIÓN en TEST
(PRUEBA) y espere 30 segundos.
5 1 TEST
ON-TIME
(MINUTES)
RANGE
MAX MIN
5 1 TEST
ON-TIME
(MINUTES)
RANGE
MAX MIN
4 Prueba del alcance de la
transmisión inalámbrica
ƑDetermine el área a ser monitoreada y coloque
temporalmente el detector de movimiento (A)
en el sitio donde será montado.
ƑCamine por la parte frontal del detector de
movimiento (A) para vericar que el control
para zócalo de luz (B) esté recibiendo la señal
de detector de movimiento (A).
NOTA: Una segunda persona puede ser necesaria para
vigilar que la luz esté encendida cuando el movimiento es
detectado. Esté seguro que la luz esté en la posición ON.
5 Montaje del detector de
movimiento
ƑSujete el soporte de montaje (1) al detector
de movimiento (A) a una supercie sólida
usando los tornillos (AA). Esté seguro que el
detector de movimiento (A) tenga una vista sin
obstáculos del área que será monitoreada.
NOTA: Sujete verticalmente el soporte de montaje (1)
cuando lo sujete a una supercie curva.
NOTA: Si es necesario, aoje el tornillo sujetador (2) del
soporte de montaje (1) y retire el detector de movimiento
(A) hasta que el soporte de montaje (1) esté instalado. Una
vez que el soporte de montaje (1) está instalado, vuelva
a colocar el detector de movimiento (A) y apriete con
cuidado el tornillo sujetador (2).
A
1
AA
A
1
2
A
5 1 TEST
ON-TIME
(MINUTES)
A
B

18
Operación
1 Giro hacia abajo de los
controles del detector
ƑGire el detector de movimiento (A) para que los
controles queden orientados hacia el suelo.
AVISO: Para evitar daños por el agua, los controles del detector
de movimiento (A) deben estar orientados hacia el suelo cuando la
instalación esté terminada.
2 Calibración del detector de
movimiento para la prueba
Cuando el interruptor de “DURACIÓN” (“ON-TIME”) se
ja en la posición “PRUEBA” (“TEST”) el aparato de luz
operará durante el día o la noche. La luz permanecerá
encendida 5 segundos después que todo movimiento
se ha detenido.
ƑFije el interruptor de “DURACIÓN” en la
posición “PRUEBA (“TEST”).
ƑGire el cuadrante “ALCANCE” (“RANGE”) a la
posición “MIN”.
ƑEnfoque el detector de movimiento (A) en la
dirección general del área a ser cubierta.
NOTA: El detector de movimiento necesitará calentarse
completamente (90 segundos) antes de empezar el
proceso de puesta a punto.
5 1 TE ST
ON-TI ME
(MINUTES)
RANGE
MAX MIN
3 Regulación de la zona de
detección del detector de
movimiento
ƑHaga una “prueba caminando”. Camine
transversalmente a la parte frontal del detector de
movimiento (A) siguiendo la trayectoria de un arco.
ƑVigile la luz controlada por el control para
zócalo de luz (B). La luz se encenderá y el LED
rojo dentro del panel de control destellará
cuando un movimiento ha sido detectado.
ƑDeténgase, espere que la luz se apague, y
luego empiece a caminar de nuevo.
ƑContinúe este proceso hasta que la zona de
detección haya sido establecida.
ƑRegule el detector de movimiento (A) hacia
arriba, hacia abajo o hacia los lados para
cambiar el área que está siendo monitoreada.
NOTA: Una segunda persona puede ser necesaria para
vigilar que la luz se encienda cuando un movimiento es
detectado. Esté seguro que la luz esté en la posición ON y
que el control enchufable (B) esté puesto en “AUTO”.
4 Regulación del cuadrante
ALCANCE en el detector de
movimiento
ƑPara aumentar la zona de detección, gire el
cuadrante “ALCANCE” (“RANGE”) hacia la
posición “MÁX”.
ƑPara disminuir la zona de detección, gire el
cuadrante “ALCANCE” (“RANGE”) hacia la
posición “MÍN”
NOTA: El detector de movimiento (A) es más sensible al
movimiento transversal a la parte frontal del detector. El
detector de movimiento (A) es menos sensible al movimiento
que se dirige directamente hacia la parte frontal del detector.
NOTA: Mientras mayor sea la calibración del “ALCANCE”
(“RANGE”) (sensibilidad), mayor será la posibilidad de
falsas alarmas. Para reducir las falsas alarmas, gire el
control del “ALCANCE” (“RANGE”) hacia la calibración
“MÍN”.
RANGE
MAX MIN
A
A
A
5 1 TEST
ON-TIME
(MINUTES)
RANGE
MAX MIN
A

19 HOMEDEPOT.com
Por favor, póngase en contacto al 1-866-308-3976 para obtener más ayuda.
Operación (continuación)
5 Regulación del interruptor
DURACIÓN en el detector de
movimiento
El interruptor de DURACIÓN determina el lapso de
tiempo que la luz permanece encendida con todo su
brillo luego que ha cesado el movimiento.
ƑColoque el interruptor de DURACIÓN en la
posición 1 o 5 minutos.
5 1 TEST
ON-TIME
(MINUTES)
6 Regulación del interruptor
DETECCIÓN en el detector de
movimiento
El interruptor “DETECCIÓN” determina la hora del día
a la cual el detector de movimiento (A) encenderá la
luz cuando un movimiento es detectado. El interruptor
“DETECCIÓN” está en el compartimento de las pilas.
Retire las pilas para calibrar este interruptor.
ƑPonga el interruptor “DETECCIÓN” en SÓLO LA
NOCHE o DÍA/ NOCHE (24 horas de operación).
DETECT
DAY
NIGHT
NIGHT
ONLY
Cuidado y limpieza
ƑPara prolongar la apariencia original, desenchufe y retire las pilas y limpie solamente con un paño suave
ligeramente humedecido.
ƑNo use pinturas, solventes u otros químicos en estos productos. Podrían ser la causa de una prematura
deterioración del acabado. Esto no es un defecto del acabado y no será cubierto por la garantía.
ƑNo rocíe con manguera ni con una lavadora eléctrica.
A
A

20
Análisis de averías
Problema Causa Probable Solución
La lámpara no se enciende. ƑLa bombilla está oja o quemada. ƑRevise la bombilla y cámbiela si
está quemada.
ƑEl interruptor de la luz está apagado. ƑVerique que el interruptor de la
luz esté encendido.
ƑPilas agotadas en el detector de
movimiento.
ƑVerique la carga de la batería y
reemplácela si fuera necesario.
ƑEl fusible está quemado o el disyun-
tor está desconectado.
ƑCambie el fusible o conecte el
disyuntor.
ƑEl control para zócalo de luz (B) no
responde inmediatamente luego de
la instalación.
ƑEspere que transcurra el período de
inicialización de 90 segundos luego
de instalar las pilas o de encender
las unidades.
ƑLas señales provenientes del
detector de movimiento están
siendo bloqueadas, o el detector de
movimiento está fuera de alcance.
ƑRevise los objetos metálicos que
podrían bloquear la señal, o vuelva
a colocar el detector de movi-
miento.
ƑEl apagado de la luz diurna (fotocé-
lula) está vigente.
ƑVuelva a revisar al amanecer.
ƑEl detector de movimiento está enfo-
cando a la dirección incorrecta.
ƑVuelva a enfocar el detector de
movimiento para que cubra el área
deseada.
ƑLa temperatura del aire exterior está
cercana al calor corporal de una
persona.
ƑAumente la calibración del alcance
(“RANGE”).
ƑLa luz está defectuosa. ƑPruebe usando una luz diferente.
ƑLos interruptores de disminución
en el detector de movimiento y en
el control para zócalo de luz no
emparejan.
ƑVerique que la calibración del
código tanto en el detector de mo-
vimiento como en el control para
zócalo de luz esté puesta igual.
ƑEl control para zócalo de luz está
recibiendo interferencia proveniente
de otro transmisor.
ƑCambie la calibración del código
en el detector de movimiento y
en el control para zócalo de luz.
Vea Calibración del código en la
página 22.
La luz se enciende durante
el día.
ƑEl detector de movimiento puede estar
instalado en un sitio relativamente
oscuro.
ƑMueva el detector de movimiento a
un sitio más luminoso.
ƑEl interruptor de duración (“ON-
TIME”) está en la posición prueba
(“TEST”).
ƑColoque el interruptor de duración
(“ON-TIME”) en la calibración 1 o
5 minutos.
ƑEl interruptor “DETECCIÓN” en el
detector de movimiento está puesto
en “DAY/NIGHT” (“DÍA/NOCHE”).
ƑPonga el interruptor “DETEC-
CIÓN” en “NIGHT ONLY” (SÓLO LA
NOCHE”).
Table of contents
Languages:
Other Defiant Accessories manuals
Popular Accessories manuals by other brands

Chamberlain
Chamberlain SWG-0500 installation instructions

Andersen
Andersen VeriLock manual

Qimarox
Qimarox PRORUNNER mk1 Assembly instructions

Philips
Philips HF3550/60 quick start guide

Bühler technologies
Bühler technologies ENK 300-15-4-0.75kW-50Hz Installation and operation instruction

Wenglor
Wenglor P1PY0 Series operating instructions