DeLaval MA200 User manual

Preliminary
941322_VMS Instruction Book 2006.pdf2009-09-07
No. Name Range Default Description/optionsNo. Name Range Default Description/options
0 = no acidic cleaning0 = no acidic cleaning
1 = one alkaline, one acidic cleaning1 = one alkaline, one acidic cleaning
2 = two alkaline, one acidic cleaning2 = two alkaline, one acidic cleaning
3 = etc.3 = etc.
Maintenance an calibration
The following points are important to sustain
correct dosing of etergents. Note that
these two tasks should be performed by an
authorised DeLaval service engineer.
•The tubes in the peristaltic pumps should
be replaced at least two times a year.
•The dosing volume (P6-P8) of the
detergent pumps should be checked
every third month. The dosing capacity
(P32-P34) may need to be adjusted.
Starting cleaning or rinsing
from the touch screen
Note: Any ongoing backflush process must
first be finished before cleaning or rinsing
can be started.
1. Ensure that the milking station is in
manual mode.
2. Remove any cow that might be in the
milking station.
After treatment window
Note: Both gates should be closed to
prevent a cow from entering before the
system cleaning has been started. Closing
and opening gates is done in the Stall
control window.
3. Press the tab After Treatment on the
touch screen to display the After treatment
window.
4. In the After treatment window, press the
Cleaning and Rinsing button. This will open
the Cleaning and rinsing window.
DeLaval milking automation
MA200 (Test installation)
Instruction Book
© DeLaval 2019.
2019-05-31, Version 1 Original instruction

Preliminary
941322_VMS Instruction Book 2006.pdf2009-09-07
No. Name Range Default Description/optionsNo. Name Range Default Description/options
0 = no acidic cleaning0 = no acidic cleaning
1 = one alkaline, one acidic cleaning1 = one alkaline, one acidic cleaning
2 = two alkaline, one acidic cleaning2 = two alkaline, one acidic cleaning
3 = etc.3 = etc.
Maintenance an calibration
The following points are important to sustain
correct dosing of etergents. Note that
these two tasks should be performed by an
authorised DeLaval service engineer.
•The tubes in the peristaltic pumps should
be replaced at least two times a year.
•The dosing volume (P6-P8) of the
detergent pumps should be checked
every third month. The dosing capacity
(P32-P34) may need to be adjusted.
Starting cleaning or rinsing
from the touch screen
Note: Any ongoing backflush process must
first be finished before cleaning or rinsing
can be started.
1. Ensure that the milking station is in
manual mode.
2. Remove any cow that might be in the
milking station.
After treatment window
Note: Both gates should be closed to
prevent a cow from entering before the
system cleaning has been started. Closing
and opening gates is done in the Stall
control window.
3. Press the tab After Treatment on the
touch screen to display the After treatment
window.
4. In the After treatment window, press the
Cleaning and Rinsing button. This will open
the Cleaning and rinsing window.
Safety precautions
DeLaval milking automation
MA200 (Test installation)
1 Foreword
The safety and operational instructions must be
observed by any person involved with the use or
operation of this equipment. Under no circum-
stances must the equipment be used if it is dam-
aged or if the operation of the equipment is not
completely understood.
2 Disclaimer
The information, instructions and parts listed are
applicable and current on the date when issued.
DeLaval reserves the right to make changes with-
out notice.
3 Definitions of admonishments
Admonishments are safety related warning mes-
sages.
Admonishments provide important information
intended to prevent incorrect or hazardous use of
equipment, machinery or software, and support
risk assessment.
The following list defines the different types of
admonishments used in DeLaval documentation:
Danger: Refers to imminent and severe risk.
Failure to comply with instruction will result in
serious injury or death.
Warning: Refers to a potential but severe risk.
Failure to comply with instruction could result in
injury or death.
Caution: Refers to a limited risk. Failure to com-
ply with instruction could result in minor injury.
Mandatory: Refers to an action or behaviour
which is essential to safe and successful use of
the equipment.
Prohibited: Refers to an action or behaviour
which is incompatible to safe and successful use
of the equipment.
DeLaval milking automation MA200 (Test installation)
Safety precautions
© DeLaval 2019.
2019-05-31, Version 1 3 (62)

Preliminary
941322_VMS Instruction Book 2006.pdf2009-09-07
No. Name Range Default Description/optionsNo. Name Range Default Description/options
0 = no acidic cleaning0 = no acidic cleaning
1 = one alkaline, one acidic cleaning1 = one alkaline, one acidic cleaning
2 = two alkaline, one acidic cleaning2 = two alkaline, one acidic cleaning
3 = etc.3 = etc.
Maintenance an calibration
The following points are important to sustain
correct dosing of etergents. Note that
these two tasks should be performed by an
authorised DeLaval service engineer.
•The tubes in the peristaltic pumps should
be replaced at least two times a year.
•The dosing volume (P6-P8) of the
detergent pumps should be checked
every third month. The dosing capacity
(P32-P34) may need to be adjusted.
Starting cleaning or rinsing
from the touch screen
Note: Any ongoing backflush process must
first be finished before cleaning or rinsing
can be started.
1. Ensure that the milking station is in
manual mode.
2. Remove any cow that might be in the
milking station.
After treatment window
Note: Both gates should be closed to
prevent a cow from entering before the
system cleaning has been started. Closing
and opening gates is done in the Stall
control window.
3. Press the tab After Treatment on the
touch screen to display the After treatment
window.
4. In the After treatment window, press the
Cleaning and Rinsing button. This will open
the Cleaning and rinsing window.
Note! Is intended to draw attention to specific
points of importance in the text and advice to
prevent equipment damage.
This symbol signals risk of injury.
This symbol signals risk of electric shock.
4 Safety regulations
4.1 Safety regulations - General
Danger!
Electric shock hazard
Disconnect the main power supply
and use appropriate lockout-tagout
procedures before any installation,
inspection, adjustment, or mainte-
nance on the equipment is per-
formed.
Danger!
Electric shock hazard
The electrical installation or any
other work on electrical equipment
must be performed by skilled per-
sonnel. The work must be performed
in accordance with provided wiring
diagrams and must comply with
national electrical safety and EMC
regulations.
Warning!
If the equipment is not properly fas-
tened, it can move and pull the elec-
trical cables loose. This may cause
personal injury and risk of fire.
DeLaval milking automation MA200 (Test installation)
Safety precautions
© DeLaval 2019.
2019-05-31, Version 1 4 (62)

Preliminary
941322_VMS Instruction Book 2006.pdf2009-09-07
No. Name Range Default Description/optionsNo. Name Range Default Description/options
0 = no acidic cleaning0 = no acidic cleaning
1 = one alkaline, one acidic cleaning1 = one alkaline, one acidic cleaning
2 = two alkaline, one acidic cleaning2 = two alkaline, one acidic cleaning
3 = etc.3 = etc.
Maintenance an calibration
The following points are important to sustain
correct dosing of etergents. Note that
these two tasks should be performed by an
authorised DeLaval service engineer.
•The tubes in the peristaltic pumps should
be replaced at least two times a year.
•The dosing volume (P6-P8) of the
detergent pumps should be checked
every third month. The dosing capacity
(P32-P34) may need to be adjusted.
Starting cleaning or rinsing
from the touch screen
Note: Any ongoing backflush process must
first be finished before cleaning or rinsing
can be started.
1. Ensure that the milking station is in
manual mode.
2. Remove any cow that might be in the
milking station.
After treatment window
Note: Both gates should be closed to
prevent a cow from entering before the
system cleaning has been started. Closing
and opening gates is done in the Stall
control window.
3. Press the tab After Treatment on the
touch screen to display the After treatment
window.
4. In the After treatment window, press the
Cleaning and Rinsing button. This will open
the Cleaning and rinsing window.
Warning!
Risk of injury!
The system must only be operated
by trained personnel. Make sure that
children and unauthorised people do
not come into contact with the sys-
tem.
Warning!
Keep safety signs legible!
Read all the safety signs on the
machine and in this manual.
Replace any lost or damaged signs.
Keep safety signs clean and legible
at all times.
Warning!
Intended use
Do not use the equipment for any
other purposes than the intended
use.
Mandatory!
Read the instructions carefully
before using the equipment. Contact
the local DeLaval dealer if there are
parts of these instructions that are
not understood. Compliance with the
instructions ensures a correct and
safe use of the equipment. Save the
instructions for future reference.
Prohibited!
Do not use inadequate parts or
consumables.
Using products which do not meet
specified requirements, for example
spare parts or consumables, or not
appropriately trained personnel for
the DeLaval product may lead to
risks or damage. Consequently it
may also void or limit the warranty.
DeLaval milking automation MA200 (Test installation)
Safety precautions
© DeLaval 2019.
2019-05-31, Version 1 5 (62)

Preliminary
941322_VMS Instruction Book 2006.pdf2009-09-07
No. Name Range Default Description/optionsNo. Name Range Default Description/options
0 = no acidic cleaning0 = no acidic cleaning
1 = one alkaline, one acidic cleaning1 = one alkaline, one acidic cleaning
2 = two alkaline, one acidic cleaning2 = two alkaline, one acidic cleaning
3 = etc.3 = etc.
Maintenance an calibration
The following points are important to sustain
correct dosing of etergents. Note that
these two tasks should be performed by an
authorised DeLaval service engineer.
•The tubes in the peristaltic pumps should
be replaced at least two times a year.
•The dosing volume (P6-P8) of the
detergent pumps should be checked
every third month. The dosing capacity
(P32-P34) may need to be adjusted.
Starting cleaning or rinsing
from the touch screen
Note: Any ongoing backflush process must
first be finished before cleaning or rinsing
can be started.
1. Ensure that the milking station is in
manual mode.
2. Remove any cow that might be in the
milking station.
After treatment window
Note: Both gates should be closed to
prevent a cow from entering before the
system cleaning has been started. Closing
and opening gates is done in the Stall
control window.
3. Press the tab After Treatment on the
touch screen to display the After treatment
window.
4. In the After treatment window, press the
Cleaning and Rinsing button. This will open
the Cleaning and rinsing window.
4.2 Safety regulations - Operating the
equipment
Danger!
Risk of electric shock
Do not spray water on electrical
components even when they are
switched off or disconnected. Water
on electrical components can cause
an electric shock, and could destroy
the equipment.
Warning!
Risk of injury
Never start or operate the equipment
unless all shields, covers and guards
are in place.
Warning!
Risk of electric shock!
Ensure that any cables or wiring is
out of animals’ reach.
Mandatory!
Disconnect the electrical supply
before removing shields, covers or
guards.
Prohibited!
Never use solvents, detergents, sol-
utions or alcohol on any part of the
equipment. Failure to comply can
destroy or harm the equipment.
DeLaval milking automation MA200 (Test installation)
Safety precautions
© DeLaval 2019.
2019-05-31, Version 1 6 (62)

Preliminary
941322_VMS Instruction Book 2006.pdf2009-09-07
No. Name Range Default Description/optionsNo. Name Range Default Description/options
0 = no acidic cleaning0 = no acidic cleaning
1 = one alkaline, one acidic cleaning1 = one alkaline, one acidic cleaning
2 = two alkaline, one acidic cleaning2 = two alkaline, one acidic cleaning
3 = etc.3 = etc.
Maintenance an calibration
The following points are important to sustain
correct dosing of etergents. Note that
these two tasks should be performed by an
authorised DeLaval service engineer.
•The tubes in the peristaltic pumps should
be replaced at least two times a year.
•The dosing volume (P6-P8) of the
detergent pumps should be checked
every third month. The dosing capacity
(P32-P34) may need to be adjusted.
Starting cleaning or rinsing
from the touch screen
Note: Any ongoing backflush process must
first be finished before cleaning or rinsing
can be started.
1. Ensure that the milking station is in
manual mode.
2. Remove any cow that might be in the
milking station.
After treatment window
Note: Both gates should be closed to
prevent a cow from entering before the
system cleaning has been started. Closing
and opening gates is done in the Stall
control window.
3. Press the tab After Treatment on the
touch screen to display the After treatment
window.
4. In the After treatment window, press the
Cleaning and Rinsing button. This will open
the Cleaning and rinsing window.
Caution!
Risk of damage, injury or electric
shock
Never clean the equipment with a
high pressure cleaner or any other
jet of water. The equipment is sensi-
tive and can be destroyed by the
high pressure cleaning.
Caution!
The DeLaval milking automation
MA200 (Test installation) is intended
to be used in the milking stall. Always
allow for the unpredictable nature of
the animals.
Always ask the dairy farmer about
the behaviour of the animals and
milking methods used.
4.3 Safety regulations - Specific equip-
ment risks
5 Safety labels on the equipment
The safety labels must be placed visible on all
locations where a safety hazard exists according
to.
Label Explanation
A
B
C
DeLaval milking automation MA200 (Test installation)
Safety precautions
© DeLaval 2019.
2019-05-31, Version 1 7 (62)

Preliminary
941322_VMS Instruction Book 2006.pdf2009-09-07
No. Name Range Default Description/optionsNo. Name Range Default Description/options
0 = no acidic cleaning0 = no acidic cleaning
1 = one alkaline, one acidic cleaning1 = one alkaline, one acidic cleaning
2 = two alkaline, one acidic cleaning2 = two alkaline, one acidic cleaning
3 = etc.3 = etc.
Maintenance an calibration
The following points are important to sustain
correct dosing of etergents. Note that
these two tasks should be performed by an
authorised DeLaval service engineer.
•The tubes in the peristaltic pumps should
be replaced at least two times a year.
•The dosing volume (P6-P8) of the
detergent pumps should be checked
every third month. The dosing capacity
(P32-P34) may need to be adjusted.
Starting cleaning or rinsing
from the touch screen
Note: Any ongoing backflush process must
first be finished before cleaning or rinsing
can be started.
1. Ensure that the milking station is in
manual mode.
2. Remove any cow that might be in the
milking station.
After treatment window
Note: Both gates should be closed to
prevent a cow from entering before the
system cleaning has been started. Closing
and opening gates is done in the Stall
control window.
3. Press the tab After Treatment on the
touch screen to display the After treatment
window.
4. In the After treatment window, press the
Cleaning and Rinsing button. This will open
the Cleaning and rinsing window.
6 Safety devices
This system is designed to be safe to operate.
The safety devices that are installed are there for
personal safety and must not be modified,
removed, or disconnected.
Any modification to the equipment's original
design may compromise the personal safety.
Consequently it may also void or limit the war-
ranty.
Note! All safety devices in the system must be
checked by a DeLaval representative before the
system is signed over to the customer.
7 Safe and healthy work routines
nEnsure that the area is well lit.
nKeep the floor dry to avoid slipping.
nWear protective clothing and appropriate
shoes or boots.
nKeep a good milking hygiene.
DeLaval milking automation MA200 (Test installation)
Safety precautions
© DeLaval 2019.
2019-05-31, Version 1 8 (62)
Preliminary
941322_VMS Instruction Book 2006.pdf2009-09-07
No. Name Range Default Description/optionsNo. Name Range Default Description/options
0 = no acidic cleaning0 = no acidic cleaning
1 = one alkaline, one acidic cleaning1 = one alkaline, one acidic cleaning
2 = two alkaline, one acidic cleaning2 = two alkaline, one acidic cleaning
3 = etc.3 = etc.
Maintenance an calibration
The following points are important to sustain
correct dosing of etergents. Note that
these two tasks should be performed by an
authorised DeLaval service engineer.
•The tubes in the peristaltic pumps should
be replaced at least two times a year.
•The dosing volume (P6-P8) of the
detergent pumps should be checked
every third month. The dosing capacity
(P32-P34) may need to be adjusted.
Starting cleaning or rinsing
from the touch screen
Note: Any ongoing backflush process must
first be finished before cleaning or rinsing
can be started.
1. Ensure that the milking station is in
manual mode.
2. Remove any cow that might be in the
milking station.
After treatment window
Note: Both gates should be closed to
prevent a cow from entering before the
system cleaning has been started. Closing
and opening gates is done in the Stall
control window.
3. Press the tab After Treatment on the
touch screen to display the After treatment
window.
4. In the After treatment window, press the
Cleaning and Rinsing button. This will open
the Cleaning and rinsing window.
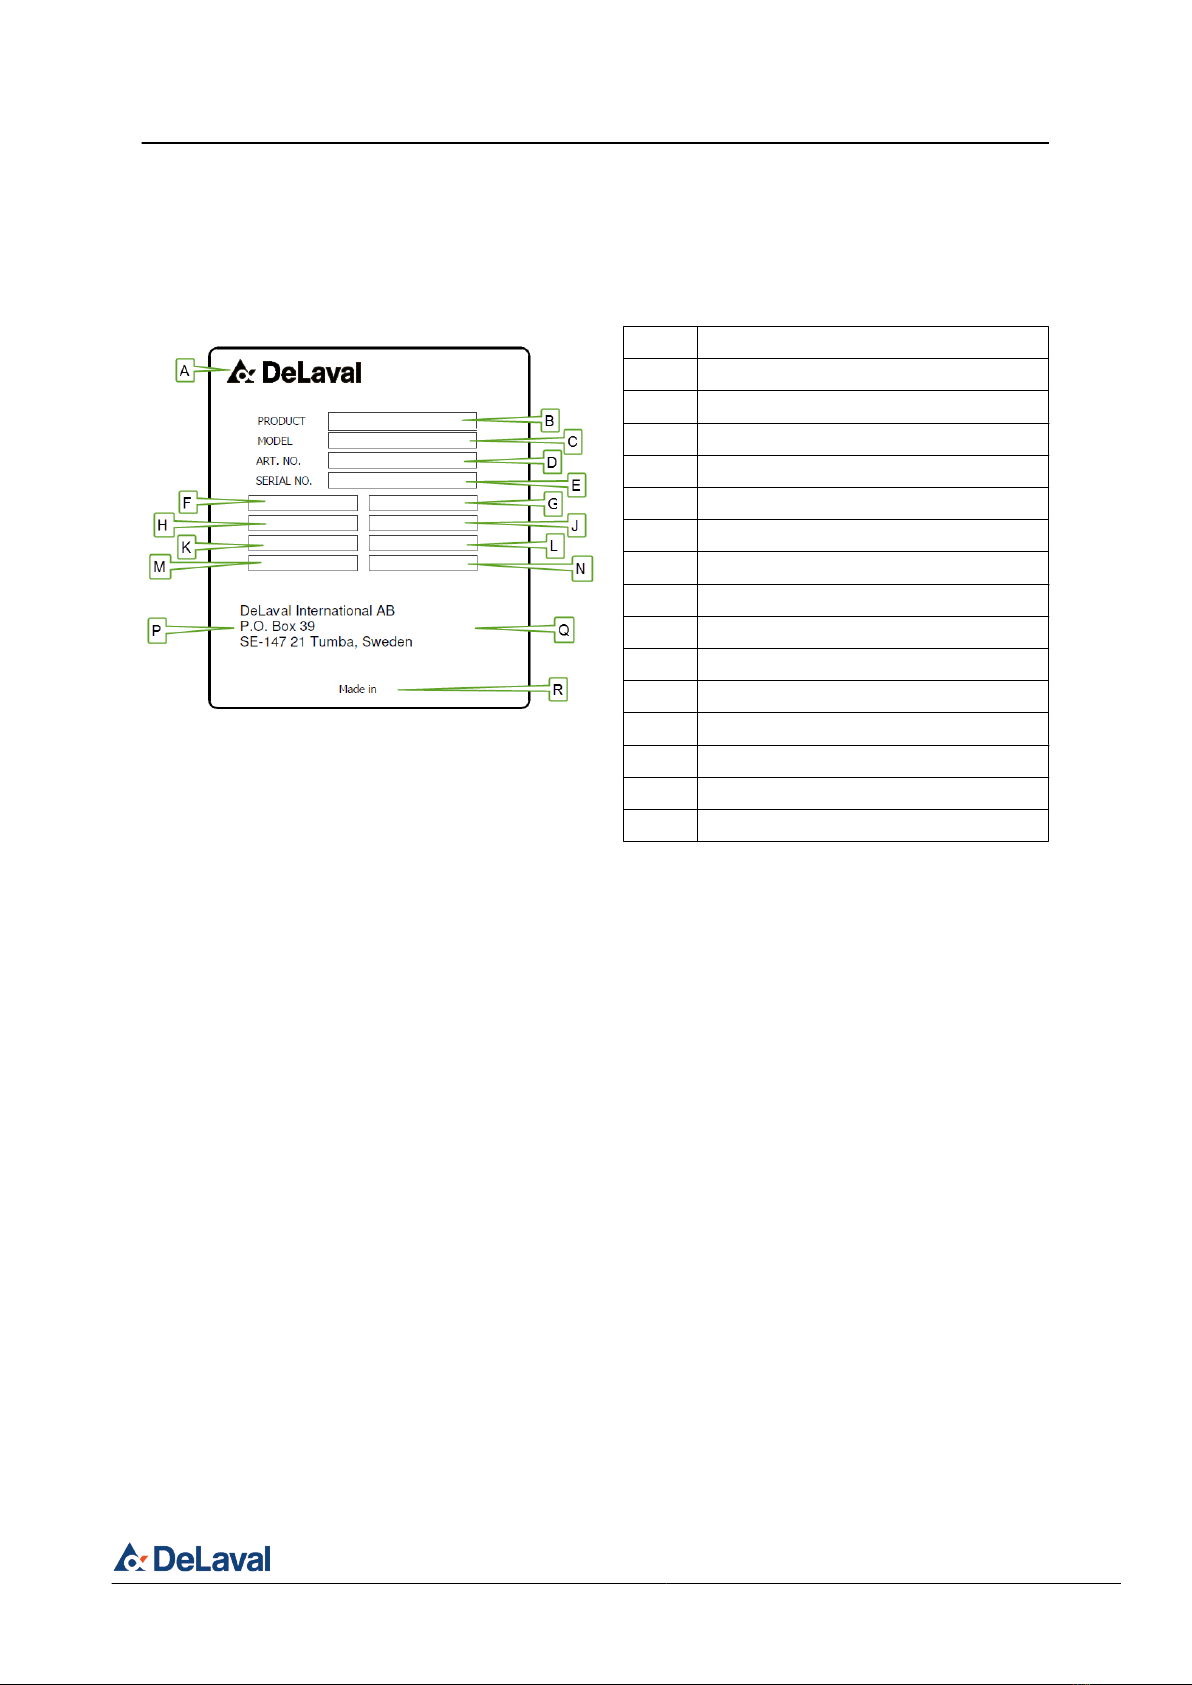
8 Type plates
8.1 Type plate on infrastructure box
A DeLaval logotype
B Product name
C Product model
D Article number
E Serial number
F Voltage rating
G Supply voltage frequency
H Power rating
J Current rating
K Fuse rating
L Equipment class
M Ingress Protection rating
N Empty
P DeLaval address
Q CE and WEEE symbols
R Country of origin
275870
Fig. 1: Infrastructure box type plate.
DeLaval milking automation MA200 (Test installation)
Safety precautions
© DeLaval 2019.
2019-05-31, Version 1 9 (62)

Preliminary
941322_VMS Instruction Book 2006.pdf2009-09-07
No. Name Range Default Description/optionsNo. Name Range Default Description/options
0 = no acidic cleaning0 = no acidic cleaning
1 = one alkaline, one acidic cleaning1 = one alkaline, one acidic cleaning
2 = two alkaline, one acidic cleaning2 = two alkaline, one acidic cleaning
3 = etc.3 = etc.
Maintenance an calibration
The following points are important to sustain
correct dosing of etergents. Note that
these two tasks should be performed by an
authorised DeLaval service engineer.
•The tubes in the peristaltic pumps should
be replaced at least two times a year.
•The dosing volume (P6-P8) of the
detergent pumps should be checked
every third month. The dosing capacity
(P32-P34) may need to be adjusted.
Starting cleaning or rinsing
from the touch screen
Note: Any ongoing backflush process must
first be finished before cleaning or rinsing
can be started.
1. Ensure that the milking station is in
manual mode.
2. Remove any cow that might be in the
milking station.
After treatment window
Note: Both gates should be closed to
prevent a cow from entering before the
system cleaning has been started. Closing
and opening gates is done in the Stall
control window.
3. Press the tab After Treatment on the
touch screen to display the After treatment
window.
4. In the After treatment window, press the
Cleaning and Rinsing button. This will open
the Cleaning and rinsing window.
8.2 Type plate on milking automation
modules
The type plates on the modules are located at the
bottom of the module box and on the potting
compund covering the PCB on the inside of the
module, see . The type plates contains the infor-
mation shown in and a field description is given
in the table below.
DeLaval International AB
P.O. Box 39
SE-147 21 Tumba, Sweden
Made in Sweden
Type: Input/Output Module
Model: IOM 200
Art No: 2150003488
Serial no : HB00005
ID: A48E0A800057
Supply voltage: 24VDC, 5W,
output load excluded
DeLaval International AB
P.O. Box 39
SE-147 21 Tumba, Sweden
Made in Sweden
Type: Control and
communication Module
Model: CCM 215
Art No: 2150005045
Serial no : HB00005
ID: A48E0A800057
Supply voltage: 24VDC, 5W,
output load excluded
11 14
15
18
19
22
23
7
6
3
2
5
4
1
8
9
10
13
16
17
20
21
24
12
11
18
19
22
23
7
6
3
2
5
4
1
8
9
10
17
20
21
24
12
ETH
A B
Model:
Art No:
ID:
www.delaval.com Serial No:
275618
Fig. 2: Type plate locations on the modules. The
Button Module is used as an example.
A: Type plate layout for Button module and Input/
output module
B: Type plate layout for Communication and control
module
C: Small type plate layout for all modules
DeLaval milking automation MA200 (Test installation)
Safety precautions
© DeLaval 2019.
2019-05-31, Version 1 10 (62)

Preliminary
941322_VMS Instruction Book 2006.pdf2009-09-07
No. Name Range Default Description/optionsNo. Name Range Default Description/options
0 = no acidic cleaning0 = no acidic cleaning
1 = one alkaline, one acidic cleaning1 = one alkaline, one acidic cleaning
2 = two alkaline, one acidic cleaning2 = two alkaline, one acidic cleaning
3 = etc.3 = etc.
Maintenance an calibration
The following points are important to sustain
correct dosing of etergents. Note that
these two tasks should be performed by an
authorised DeLaval service engineer.
•The tubes in the peristaltic pumps should
be replaced at least two times a year.
•The dosing volume (P6-P8) of the
detergent pumps should be checked
every third month. The dosing capacity
(P32-P34) may need to be adjusted.
Starting cleaning or rinsing
from the touch screen
Note: Any ongoing backflush process must
first be finished before cleaning or rinsing
can be started.
1. Ensure that the milking station is in
manual mode.
2. Remove any cow that might be in the
milking station.
After treatment window
Note: Both gates should be closed to
prevent a cow from entering before the
system cleaning has been started. Closing
and opening gates is done in the Stall
control window.
3. Press the tab After Treatment on the
touch screen to display the After treatment
window.
4. In the After treatment window, press the
Cleaning and Rinsing button. This will open
the Cleaning and rinsing window.
A DeLaval logotype
B CE-marking
C DeLaval address
D Crossed household waste bin
E Country of origin
F Module type
G Module model
H Bar code
J QR-code
K Article number
L Serial number
M Bluetooth address
N Supply voltage
P DeLaval web page address
9 Warranty
Note! DeLaval will not take any responsibility for
damage resulting from faulty installation, opera-
tion, or for improper or inadequate care and
maintenance.
Note! DeLaval will not take any responsibility for
any damage resulting from frost. The owner/user
must take the necessary measurements to pre-
vent the ambient temperature around the equip-
ment from dropping to or below freezing point.
Note! Modification may create risks not covered
by the original construction. Do not make any
modifications which has not been approved by
DeLaval.
DeLaval International AB
P.O. Box 39
SE-147 21 Tumba, Sweden
Made in Sweden
Type:
Model:
Art No:
Serial no :
ID:
Supply voltage:
11 14
15
18
19
22
23
7
6
3
2
5
4
1
8
9
10
13
16
17
20
21
24
12
Model:
Art No:
ID:
www.delaval.com Serial No:
AB
D
J
G
G
MP
K
L
C
H
EF
KL
MN
275619
Fig. 3: Module type plate.
DeLaval milking automation MA200 (Test installation)
Safety precautions
© DeLaval 2019.
2019-05-31, Version 1 11 (62)

Preliminary
941322_VMS Instruction Book 2006.pdf2009-09-07
No. Name Range Default Description/optionsNo. Name Range Default Description/options
0 = no acidic cleaning0 = no acidic cleaning
1 = one alkaline, one acidic cleaning1 = one alkaline, one acidic cleaning
2 = two alkaline, one acidic cleaning2 = two alkaline, one acidic cleaning
3 = etc.3 = etc.
Maintenance an calibration
The following points are important to sustain
correct dosing of etergents. Note that
these two tasks should be performed by an
authorised DeLaval service engineer.
•The tubes in the peristaltic pumps should
be replaced at least two times a year.
•The dosing volume (P6-P8) of the
detergent pumps should be checked
every third month. The dosing capacity
(P32-P34) may need to be adjusted.
Starting cleaning or rinsing
from the touch screen
Note: Any ongoing backflush process must
first be finished before cleaning or rinsing
can be started.
1. Ensure that the milking station is in
manual mode.
2. Remove any cow that might be in the
milking station.
After treatment window
Note: Both gates should be closed to
prevent a cow from entering before the
system cleaning has been started. Closing
and opening gates is done in the Stall
control window.
3. Press the tab After Treatment on the
touch screen to display the After treatment
window.
4. In the After treatment window, press the
Cleaning and Rinsing button. This will open
the Cleaning and rinsing window.
Quick guide
DeLaval milking automation
MA200 (Test installation)
1 MA200 quick guide
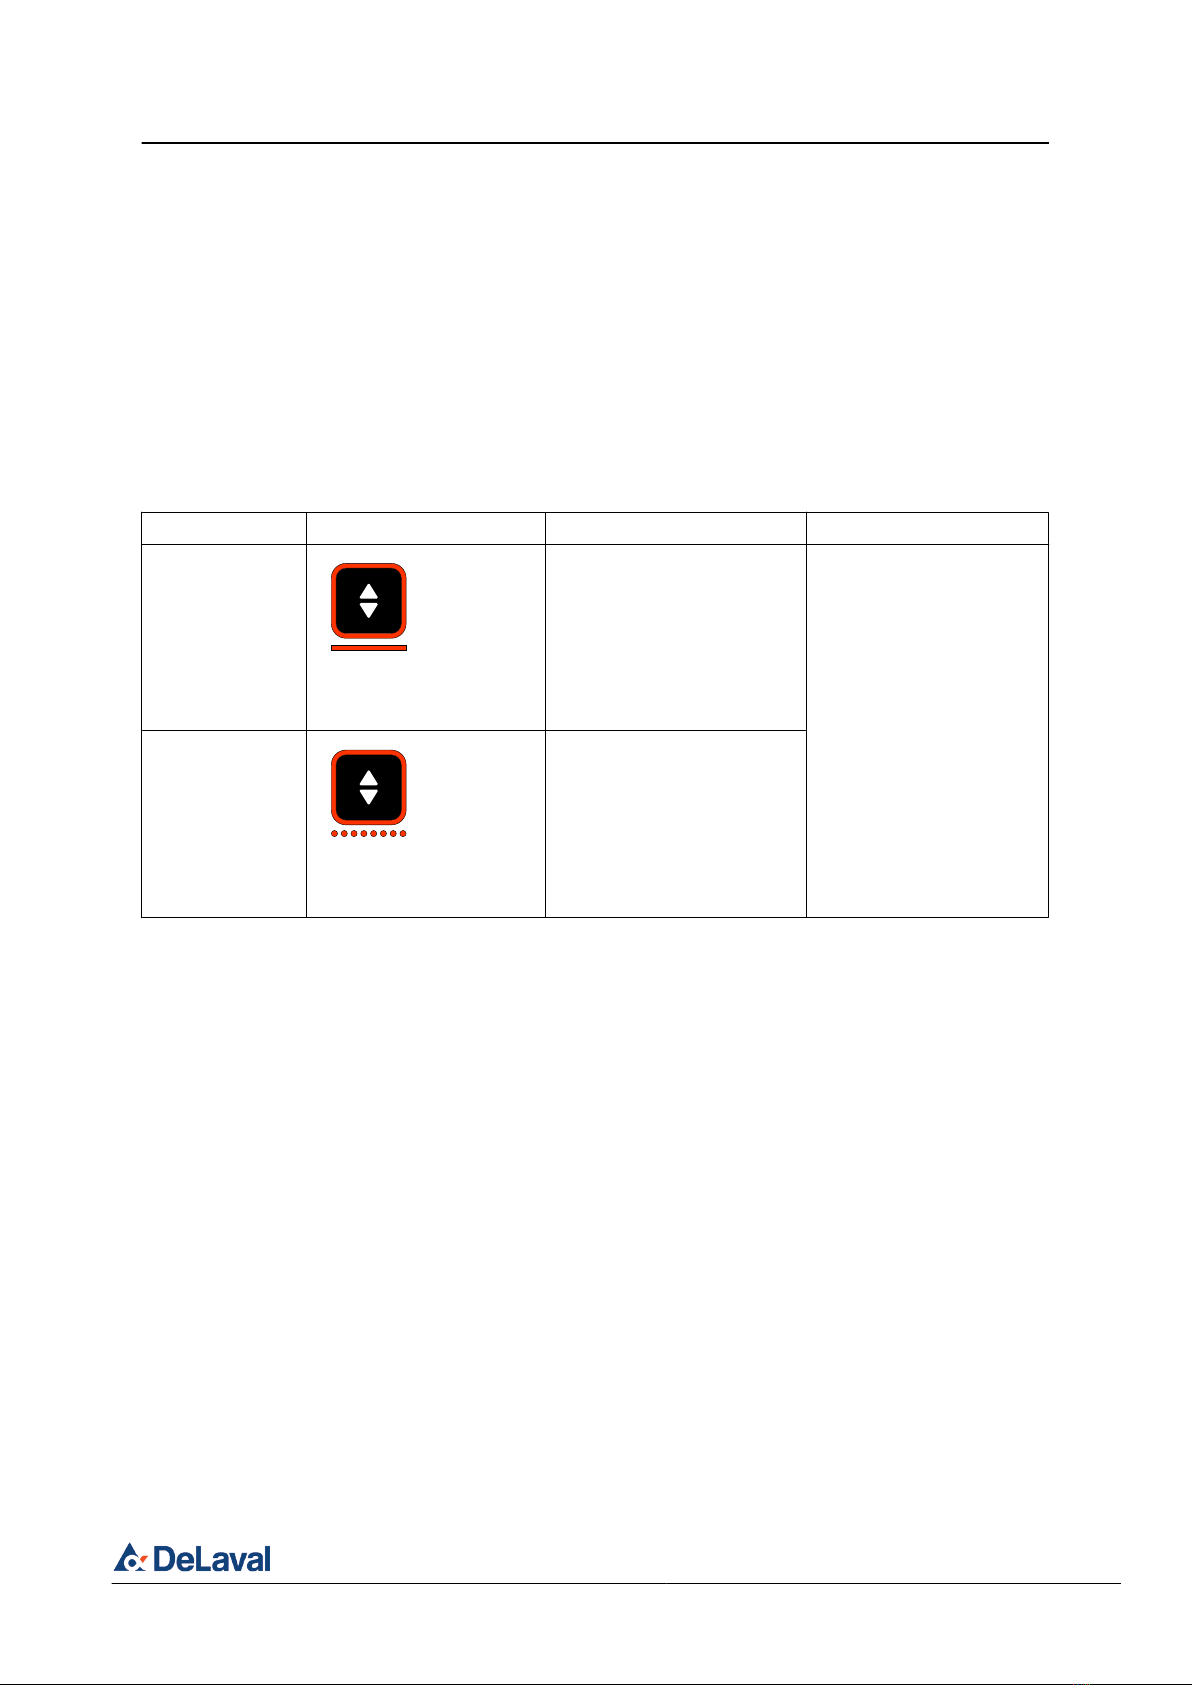
1.1 Automatic milking
1.1.1 Automatic operations
Status Indication Description Possible actions
Ready to operate
The indicator is solid cyan.
The button module is ready
to start milking a new animal.
Press:
Cluster release (Vacuum
and pulsation apply to the
cluster).
Press and hold:
Drop clusters.
Normal take-off
The indicator is solid
green.
On take off, when the animal
has finished milking and
milking alarms have not
been detected, see
Ä
Chapter 1.4 "Milking
alarms" on page 16.
Note! The indication ends
when either cluster releases
or cow exits the rotary.
Press:
Cluster release (reattach).
Press and hold:
Drop clusters.
DeLaval milking automation MA200 (Test installation)
Quick guide
© DeLaval 2019.
2019-05-31, Version 1 12 (62)

Preliminary
941322_VMS Instruction Book 2006.pdf2009-09-07
No. Name Range Default Description/optionsNo. Name Range Default Description/options
0 = no acidic cleaning0 = no acidic cleaning
1 = one alkaline, one acidic cleaning1 = one alkaline, one acidic cleaning
2 = two alkaline, one acidic cleaning2 = two alkaline, one acidic cleaning
3 = etc.3 = etc.
Maintenance an calibration
The following points are important to sustain
correct dosing of etergents. Note that
these two tasks should be performed by an
authorised DeLaval service engineer.
•The tubes in the peristaltic pumps should
be replaced at least two times a year.
•The dosing volume (P6-P8) of the
detergent pumps should be checked
every third month. The dosing capacity
(P32-P34) may need to be adjusted.
Starting cleaning or rinsing
from the touch screen
Note: Any ongoing backflush process must
first be finished before cleaning or rinsing
can be started.
1. Ensure that the milking station is in
manual mode.
2. Remove any cow that might be in the
milking station.
After treatment window
Note: Both gates should be closed to
prevent a cow from entering before the
system cleaning has been started. Closing
and opening gates is done in the Stall
control window.
3. Press the tab After Treatment on the
touch screen to display the After treatment
window.
4. In the After treatment window, press the
Cleaning and Rinsing button. This will open
the Cleaning and rinsing window.
1.1.2 Milk flow phases
Note! The flow limits are set according to the
farm settings.
Status Indication Description Possible actions
Pre milking
phase
The indicator is flashing
white.
The cluster is attached to the
udder, the milk flow is below
low milk flow limit.
Press:
Manual milking
Press and hold:
Cancel Milking
Main milking
phase
The indicator is solid
white.
The milk flow has reached
the low flow limit.
Post milking
phase
The indicator is flashing
rapidly white.
The flow rate is reaching the
take-off limit.
1.2 Manual milking
During manual milking, the milker takes control
of the monitoring of the milking.
The automatic take-off is disabled.
Manual milking can be activated after the start of
the automatic milking and while the button mod-
ule is in any milk flow phase, refer to
Ä
Chapter 1.1.2 "Milk flow phases" on page 13.
DeLaval milking automation MA200 (Test installation)
Quick guide
© DeLaval 2019.
2019-05-31, Version 1 13 (62)

Preliminary
941322_VMS Instruction Book 2006.pdf2009-09-07
No. Name Range Default Description/optionsNo. Name Range Default Description/options
0 = no acidic cleaning0 = no acidic cleaning
1 = one alkaline, one acidic cleaning1 = one alkaline, one acidic cleaning
2 = two alkaline, one acidic cleaning2 = two alkaline, one acidic cleaning
3 = etc.3 = etc.
Maintenance an calibration
The following points are important to sustain
correct dosing of etergents. Note that
these two tasks should be performed by an
authorised DeLaval service engineer.
•The tubes in the peristaltic pumps should
be replaced at least two times a year.
•The dosing volume (P6-P8) of the
detergent pumps should be checked
every third month. The dosing capacity
(P32-P34) may need to be adjusted.
Starting cleaning or rinsing
from the touch screen
Note: Any ongoing backflush process must
first be finished before cleaning or rinsing
can be started.
1. Ensure that the milking station is in
manual mode.
2. Remove any cow that might be in the
milking station.
After treatment window
Note: Both gates should be closed to
prevent a cow from entering before the
system cleaning has been started. Closing
and opening gates is done in the Stall
control window.
3. Press the tab After Treatment on the
touch screen to display the After treatment
window.
4. In the After treatment window, press the
Cleaning and Rinsing button. This will open
the Cleaning and rinsing window.
Press the large button to toggle between auto-
matic and manual milking.
DeLaval milking automation MA200 (Test installation)
Quick guide
© DeLaval 2019.
2019-05-31, Version 1 14 (62)

Preliminary
941322_VMS Instruction Book 2006.pdf2009-09-07
No. Name Range Default Description/optionsNo. Name Range Default Description/options
0 = no acidic cleaning0 = no acidic cleaning
1 = one alkaline, one acidic cleaning1 = one alkaline, one acidic cleaning
2 = two alkaline, one acidic cleaning2 = two alkaline, one acidic cleaning
3 = etc.3 = etc.
Maintenance an calibration
The following points are important to sustain
correct dosing of etergents. Note that
these two tasks should be performed by an
authorised DeLaval service engineer.
•The tubes in the peristaltic pumps should
be replaced at least two times a year.
•The dosing volume (P6-P8) of the
detergent pumps should be checked
every third month. The dosing capacity
(P32-P34) may need to be adjusted.
Starting cleaning or rinsing
from the touch screen
Note: Any ongoing backflush process must
first be finished before cleaning or rinsing
can be started.
1. Ensure that the milking station is in
manual mode.
2. Remove any cow that might be in the
milking station.
After treatment window
Note: Both gates should be closed to
prevent a cow from entering before the
system cleaning has been started. Closing
and opening gates is done in the Stall
control window.
3. Press the tab After Treatment on the
touch screen to display the After treatment
window.
4. In the After treatment window, press the
Cleaning and Rinsing button. This will open
the Cleaning and rinsing window.
Manual milking indications
Status Indication Description Possible actions
Pre milking
phase
The indicator is solid yel-
low on the left and right
segments while the top
and bottom are white slow
flashing
The cluster is attached to the
udder, the milk flow is below
low milking flow limit.
Press:
Automatic milking, refer to
Ä
Chapter 1.1.2 "Milk flow
phases" on page 13.
Press and hold:
Take-off, refer to
Ä
Chapter 4.3 "Taking off
a cluster manually" on
page 44.
Main milking
phase
The indicator is solid yel-
low on the left and right
segments while the top
and bottom are white
solid.
The milk flow has reached
the low flow limit.
Post milking
phase
The indicator is solid yel-
low on the left and right
segments while the top
and bottom are white rapid
flashing.
The flow rate is reaching the
take-off limit.
Overmilking
alarm
The indicator is flashing
rapidly red the left and
right segments synchron-
ised together with rapid
flashing of the top and bot-
tom segment.
The milk flow has reached
the take-off limit.
Press:
Automatic milking, refer to
Ä
Chapter 1.1.2 "Milk flow
phases" on page 13.
Press and hold:
Take-off, refer to
Ä
Chapter 4.3 "Taking off
a cluster manually" on
page 44.
DeLaval milking automation MA200 (Test installation)
Quick guide
© DeLaval 2019.
2019-05-31, Version 1 15 (62)
Preliminary
941322_VMS Instruction Book 2006.pdf2009-09-07
No. Name Range Default Description/optionsNo. Name Range Default Description/options
0 = no acidic cleaning0 = no acidic cleaning
1 = one alkaline, one acidic cleaning1 = one alkaline, one acidic cleaning
2 = two alkaline, one acidic cleaning2 = two alkaline, one acidic cleaning
3 = etc.3 = etc.
Maintenance an calibration
The following points are important to sustain
correct dosing of etergents. Note that
these two tasks should be performed by an
authorised DeLaval service engineer.
•The tubes in the peristaltic pumps should
be replaced at least two times a year.
•The dosing volume (P6-P8) of the
detergent pumps should be checked
every third month. The dosing capacity
(P32-P34) may need to be adjusted.
Starting cleaning or rinsing
from the touch screen
Note: Any ongoing backflush process must
first be finished before cleaning or rinsing
can be started.
1. Ensure that the milking station is in
manual mode.
2. Remove any cow that might be in the
milking station.
After treatment window
Note: Both gates should be closed to
prevent a cow from entering before the
system cleaning has been started. Closing
and opening gates is done in the Stall
control window.
3. Press the tab After Treatment on the
touch screen to display the After treatment
window.
4. In the After treatment window, press the
Cleaning and Rinsing button. This will open
the Cleaning and rinsing window.
1.3 Herd management alarms
Herd Management alarms are pre-set according
to special conditions of the animal.
Note! To set a herd management alarm to an
animal, see DelPro software.
Note! The indications of the herd management
alarms are shown only by the large button indi-
cator.
Status Indication Description Possible actions
Do not Milk
(Large button is
blocked)
The large button indicator
is solid red
This animal is not eligible to
milk extraction.
Press:
N/A
Press and hold:
Override, refer to
Ä
Chapter 1.5 "Over-
ride" on page 20.
Dump milk
(Large button is
blocked)
The large button indicator
is rapid flashing red.
The milk of this animal is not
eligible to be mixed with the
milk for general collection.
Note! Consider milking in a
bucket, refer to linktarget doesn't
exist but @y.link.required='true'.
1.4 Milking alarms
Note! On rotaries using retention bars, when a
milking alarm is detected, the retention bar can
be lowered immediately on detection or at the
confirmed point according to farm settings. See
Ä
Chapter 1.9.3 "Additional rota-
tion" on page 25.
Note! Cluster take-off can be implemented
immediately on detection of a milking alarm
according to farm settings, unless if manual milk-
ing is active.
DeLaval milking automation MA200 (Test installation)
Quick guide
© DeLaval 2019.
2019-05-31, Version 1 16 (62)

Preliminary
941322_VMS Instruction Book 2006.pdf2009-09-07
No. Name Range Default Description/optionsNo. Name Range Default Description/options
0 = no acidic cleaning0 = no acidic cleaning
1 = one alkaline, one acidic cleaning1 = one alkaline, one acidic cleaning
2 = two alkaline, one acidic cleaning2 = two alkaline, one acidic cleaning
3 = etc.3 = etc.
Maintenance an calibration
The following points are important to sustain
correct dosing of etergents. Note that
these two tasks should be performed by an
authorised DeLaval service engineer.
•The tubes in the peristaltic pumps should
be replaced at least two times a year.
•The dosing volume (P6-P8) of the
detergent pumps should be checked
every third month. The dosing capacity
(P32-P34) may need to be adjusted.
Starting cleaning or rinsing
from the touch screen
Note: Any ongoing backflush process must
first be finished before cleaning or rinsing
can be started.
1. Ensure that the milking station is in
manual mode.
2. Remove any cow that might be in the
milking station.
After treatment window
Note: Both gates should be closed to
prevent a cow from entering before the
system cleaning has been started. Closing
and opening gates is done in the Stall
control window.
3. Press the tab After Treatment on the
touch screen to display the After treatment
window.
4. In the After treatment window, press the
Cleaning and Rinsing button. This will open
the Cleaning and rinsing window.
1.4.1 Low milk yield and premature take-off alarm
indication
Status Indication Description Possible actions
Low milk yield
detection
The indicator is rapidly
flashing yellow in all seg-
ments.
Occurs on take off, when the
milk yield has not reached
the expected yield limit.
Note! The yield limit value is
a seven days average,
weighed with milking Inter-
val.
Press:
Cluster release (reattach),
refer to
Ä
Chapter 4.4
"Reattaching a cluster" on
page 45.
Press and hold:
Cluster drop
Premature take-
off
Occurs when, after take-
off, the minimum milking
time limit, according to
farm settings, is not
reached.
Consider reattach.
Note! The alarm clears
when, whichever occurs
first, cluster release (reat-
tachment) or cluster drop or
on the IDD.
1.4.2 General milking alarms
A number of milking alarms share the same indi-
cation, according to farm settings. When one or
more general milking alarms is detected. Further
information regarding the condition of the Milking
alarm is available on the IDD.
DeLaval milking automation MA200 (Test installation)
Quick guide
© DeLaval 2019.
2019-05-31, Version 1 17 (62)

Preliminary
941322_VMS Instruction Book 2006.pdf2009-09-07
No. Name Range Default Description/optionsNo. Name Range Default Description/options
0 = no acidic cleaning0 = no acidic cleaning
1 = one alkaline, one acidic cleaning1 = one alkaline, one acidic cleaning
2 = two alkaline, one acidic cleaning2 = two alkaline, one acidic cleaning
3 = etc.3 = etc.
Maintenance an calibration
The following points are important to sustain
correct dosing of etergents. Note that
these two tasks should be performed by an
authorised DeLaval service engineer.
•The tubes in the peristaltic pumps should
be replaced at least two times a year.
•The dosing volume (P6-P8) of the
detergent pumps should be checked
every third month. The dosing capacity
(P32-P34) may need to be adjusted.
Starting cleaning or rinsing
from the touch screen
Note: Any ongoing backflush process must
first be finished before cleaning or rinsing
can be started.
1. Ensure that the milking station is in
manual mode.
2. Remove any cow that might be in the
milking station.
After treatment window
Note: Both gates should be closed to
prevent a cow from entering before the
system cleaning has been started. Closing
and opening gates is done in the Stall
control window.
3. Press the tab After Treatment on the
touch screen to display the After treatment
window.
4. In the After treatment window, press the
Cleaning and Rinsing button. This will open
the Cleaning and rinsing window.
Note! Cluster attachment can be blocked after
cluster take-off on detection of a General Milking
alarm, according to farm settings. To override,
see
Ä
Chapter 1.5 "Override" on page 20.
DeLaval milking automation MA200 (Test installation)
Quick guide
© DeLaval 2019.
2019-05-31, Version 1 18 (62)

Preliminary
941322_VMS Instruction Book 2006.pdf2009-09-07
No. Name Range Default Description/optionsNo. Name Range Default Description/options
0 = no acidic cleaning0 = no acidic cleaning
1 = one alkaline, one acidic cleaning1 = one alkaline, one acidic cleaning
2 = two alkaline, one acidic cleaning2 = two alkaline, one acidic cleaning
3 = etc.3 = etc.
Maintenance an calibration
The following points are important to sustain
correct dosing of etergents. Note that
these two tasks should be performed by an
authorised DeLaval service engineer.
•The tubes in the peristaltic pumps should
be replaced at least two times a year.
•The dosing volume (P6-P8) of the
detergent pumps should be checked
every third month. The dosing capacity
(P32-P34) may need to be adjusted.
Starting cleaning or rinsing
from the touch screen
Note: Any ongoing backflush process must
first be finished before cleaning or rinsing
can be started.
1. Ensure that the milking station is in
manual mode.
2. Remove any cow that might be in the
milking station.
After treatment window
Note: Both gates should be closed to
prevent a cow from entering before the
system cleaning has been started. Closing
and opening gates is done in the Stall
control window.
3. Press the tab After Treatment on the
touch screen to display the After treatment
window.
4. In the After treatment window, press the
Cleaning and Rinsing button. This will open
the Cleaning and rinsing window.
Status Indication Description Alarm handling Possible
actions
Air leakage
detection
The large button
indicator is flash-
ing yellow slowly
Occurs due to liner slip or
other leakage on teat
cups.
Identify and fix the air leak-
age.
Note! The alarm clears
when, whichever occur first,
the air leakage stops or on
cluster take- off or on the
IDD.
Press:
Cluster
release
(reattach),
refer to
Ä
Chapter
4.4 "Reat-
taching a
cluster" on
page 45.
Press and
hold:
Drop clusters
Note! If clus-
ter attach-
ment is
blocked, see
Ä
Chapter
1.5 "Over-
ride" on
page 20.
Kick-off
detection
Occurs when the animal
has physically kicked-off
and detach the clusters
while milking.
Consider reattachment.
Note! The alarm clears
when, whichever occur first,
cluster release (reattach-
ment) or cluster drop or on
the IDD.
Blocked air
bleed detec-
tion
Occurs when blockage of
the airbleed in the cluster
is detected and the Milk
is not evacuated from the
cluster properly.
Clean the hole to unblock
and consider reattaching.
Note! The alarm clears
when, whichever occur first,
the hole unblocks and the air
levels go back to normal or
on cluster release (reattach-
ment) or on the IDD.
Blood detec-
tion
Occurs when the aver-
age blood concentration
In the milk during this
milking exceeds a
threshold set by the user.
If the cluster is retracted due
to a blood alarm it is not rec-
ommended to reattach the
cluster as the blood detected
is not always visible in the
milk. Consider milking in a
bugget.
Note! The alarm clears
when, whichever occur first,
cluster release (reattach-
ment) or cluster drop or on
the IDD.
Milk conduc-
tivity alarm
Occurs when the relative
deviation between aver-
age conductivity during
ongoing milking and the
expected conductivity for
the cow exceeds a set
threshold (the expected
Conductivity is based on
a 7 days average con-
ductivity).
Follow the farm’s Conductiv-
ity management instruc-
tions.
Note! The alarm clears
when, whichever occur first,
conductivity levels return to
normal, cluster release (reat-
tachment) or cluster drop or
on the IDD.
DeLaval milking automation MA200 (Test installation)
Quick guide
© DeLaval 2019.
2019-05-31, Version 1 19 (62)

Preliminary
941322_VMS Instruction Book 2006.pdf2009-09-07
No. Name Range Default Description/optionsNo. Name Range Default Description/options
0 = no acidic cleaning0 = no acidic cleaning
1 = one alkaline, one acidic cleaning1 = one alkaline, one acidic cleaning
2 = two alkaline, one acidic cleaning2 = two alkaline, one acidic cleaning
3 = etc.3 = etc.
Maintenance an calibration
The following points are important to sustain
correct dosing of etergents. Note that
these two tasks should be performed by an
authorised DeLaval service engineer.
•The tubes in the peristaltic pumps should
be replaced at least two times a year.
•The dosing volume (P6-P8) of the
detergent pumps should be checked
every third month. The dosing capacity
(P32-P34) may need to be adjusted.
Starting cleaning or rinsing
from the touch screen
Note: Any ongoing backflush process must
first be finished before cleaning or rinsing
can be started.
1. Ensure that the milking station is in
manual mode.
2. Remove any cow that might be in the
milking station.
After treatment window
Note: Both gates should be closed to
prevent a cow from entering before the
system cleaning has been started. Closing
and opening gates is done in the Stall
control window.
3. Press the tab After Treatment on the
touch screen to display the After treatment
window.
4. In the After treatment window, press the
Cleaning and Rinsing button. This will open
the Cleaning and rinsing window.
1.4.3 Optional milking alarm indication
The indicator turns to solid yellow.
It can be activated and used for one of the gen-
eral milking alarms according to the farm set-
tings.
1.5 Override
Override unblocks the large button.
nPress and hold the large button to unblock
it and enable cluster attachment until the indi-
cator indicates the override remainder. For
more information, see
Ä
Chapter 1.6 "Over-
ride reminders" on page 20.
Note! When herd management alarm overriden,
override alarm appears, see
Ä
Chapter 1.3 "Herd
management alarms" on page 16.
1.6 Override reminders
After overriding a herd management alarm, a
reminder is indicated on the large button indicator
and remains active until the animal exit the rotary.
The reminder indication is a red top segment on
the large button. The rest segments are indicat-
ing according to the function indications.
DeLaval milking automation MA200 (Test installation)
Quick guide
© DeLaval 2019.
2019-05-31, Version 1 20 (62)


