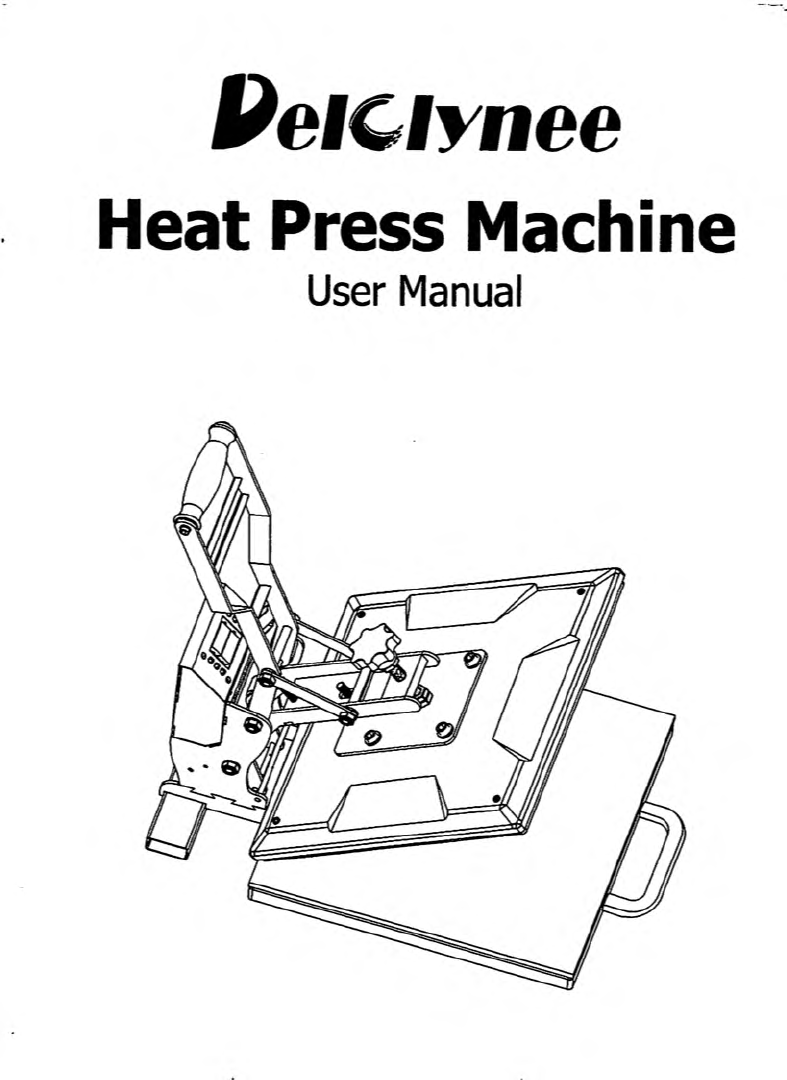
Delclynee DC-1515 User manual
©
•
•
®
PelGlynee
Heat
Press
Machine
User
Manual
PelClynee
-
1
-
Table
of
Contents
..2
..3
..3
..4
..6
..7
...7
....8
..9
.10
.11
12
13
14
.14
.15
.15
.16
.17
.17
18
18
19
19
20
20
.20
.20
21
22
25
26
About
.......................
Intended
use
..................................................
Package
contents
..........................................
Unpacking
.......................................................
Device
overview
............................................
Preparation
Instructions
.............................
Prepare
your
Garment/Cloth
and
Sublimation
Paper..
Prepare
your
Heat
Transfer
Machine
.....................
Operating
Instructions
................................
Precautions
........................................................
Tips
...................................................................
Testing
Instructions
.....................................
Time
and
Temperature
Suggestion
Tab e
Safety
Instructions
........................................
Genera
..............................................................
Persons-use
.....................................................
E ectrics
.............................................................
Cab e
.................................................................
Water
...............................................................
Heat-Rre
.........................................................
C eaning
and
care
..........................................
Maintenance
....................................................
Fuse
rep acement
..........................................
Transporting
and
hand ing
.........................
Storage
.............................................................
Disposa
-
Recyc ing
.....................................
Device
disposal
...................................................
Packa in
material
disposal
.................................
Technica
Data
................................................
FAQ
and
Troub eshooting
............................
Warranty
..........................................................
Notes:
................................................................

We
hope
you
enjoy
your
order!
PefClynee
-2-
About
Thank
you
for
choosin
a
Delclynee
product.
To
ensure
proper
and
safe
use
of
the
product,
please
read
the
user
manual
carefully
before
use.
Always
follow
the
instructions
to
prevent
dama e
or
harm.
If
you
have
any
questions,
remarks,
or
problems
usin
the
product
please
contact
us
by
email:
service@delclynee-us.com
.
Keep
this
manual
for
future
reference.
Make
this
Heat
Press
Machine
only
available
to
third
parties
to ether
with
its
user
manual.
Delclynee
is
not
liable
for
dama e
resultin
from
improper
or
careless
use.
The
Heat
Press
Machine:
1
piece
User
manual:
1
piece
Bottom
Lower
Platen
Cover:
1
piece
PefGfynee
-3-
Intended
use
Packa e
contents
Avoid
the
use
of
this
heat
press
for
other
activities
such
as
food
preparation
or
extraction
of
oils
from
plant
materials
and
other
alternative
uses.
The
use
of
this
heat
press
in
a
manner
other
than
intended
will
void
the
warranty,
will
dama e
the
machine,
and
may
constitute
a
fire
hazard.
This
heat
press
is
desi ned
to
press
heat
transfer
vinyl
(HTV),
sublimation,
and
transfer
papers
onto
soft
arments.

•
Firmly
hold
the
machine
while
unloadin
it
from
the
box.
•
Compare
the
parts
with
the
packa e
contents.
•
Check
the
machine
after
unpackin
to
find
out
if
it
is
in
perfect
condition:
PelCIvnee
-4-
Unpackin
NOTICE
•
The
machine
is
heavy
(41.
8lbs/19.0k ).
Liftin
with
2
people
is
stron ly
advised.
•
Before
unpackin
your
machine,
select
the
location
where
it
should
be
installed:
all
sides
of
the
unit
should
be
readily
accessible,
and
there
should
be
ample
free
space
around
the
unit.
A
rounded
mains
outlet
must
be
located
near
to
the
device
and
be
easily
accessible.
•
Do
not
leave
packa in
material
lyin
around
carelessly.
It
may
become
dan erous
playin
material
for
children.
Do
not
dispose
of
the
packin
materials
until
the
machine
is
installed
and
workin .
Preserve
the
shippin
carton
for
future
use
(see
the
chapter
“
Transportin
and
Handlin ").
-Check
scratches
or
dama e
to
the
LCD
screen.
-Check
if
the
handle
is
workin
properly.
Do
not
take
it
“
out
by
liftin
the
handle.
Please
take
it
out
with
hands
holdin .
J
A
If
you
are
missin
a
part,
or
somethin
is
dama ed,
please
contact
us
at
service@delclynee-us.com
.
*

PelClynee
-5-
•
Ensure
that
all
packa in
materials
and
any
promotional
labels
or
stickers
are
removed
from
the
Heat
Press
Machine
before
the
first
use.
WARNING:
To
avoid
the
dan er
of
suffocation,
keep
plastic
ba s
away
from
babies
and
children!

Hand e
Pressure
Adjuster
Thermostat
&
Timer
Hea ing
P ate
J
e>
Heat-Resistant
Sponge
.
•
®
Hand e
Bottom
Board
Power
Switch
□
Fuse
©
Pedestal
PelClynee
-6-
Device
overview
&
A

oth
and
Sub imation
Paper
•
Prepare
the
arment
and
place
the
ima e
on
the
transfer
tar et
spot.
PelClynee
-7-
Preparation
Instructions
•
Find
the
appropriate
heatin
instructions
for
the
material
you
are
usin
and
set
your
heat
press
time
and
temperature
usin
manufacturer
recommended
settin s.
The
settin s
will
vary
and
ultimately
depend
on
the
make
and
type
of
arments
and
transfers
used.
Those
instructions
are
usually
always
available
online
from
the
material
maker.
•
Prepare
your
transfer
ima e
and,
in
case
of
the
printin
with
sublimation
ink,
please
wait
until
the
ink
is
dry.
Prepare
your
Heat
Transfer
Machine
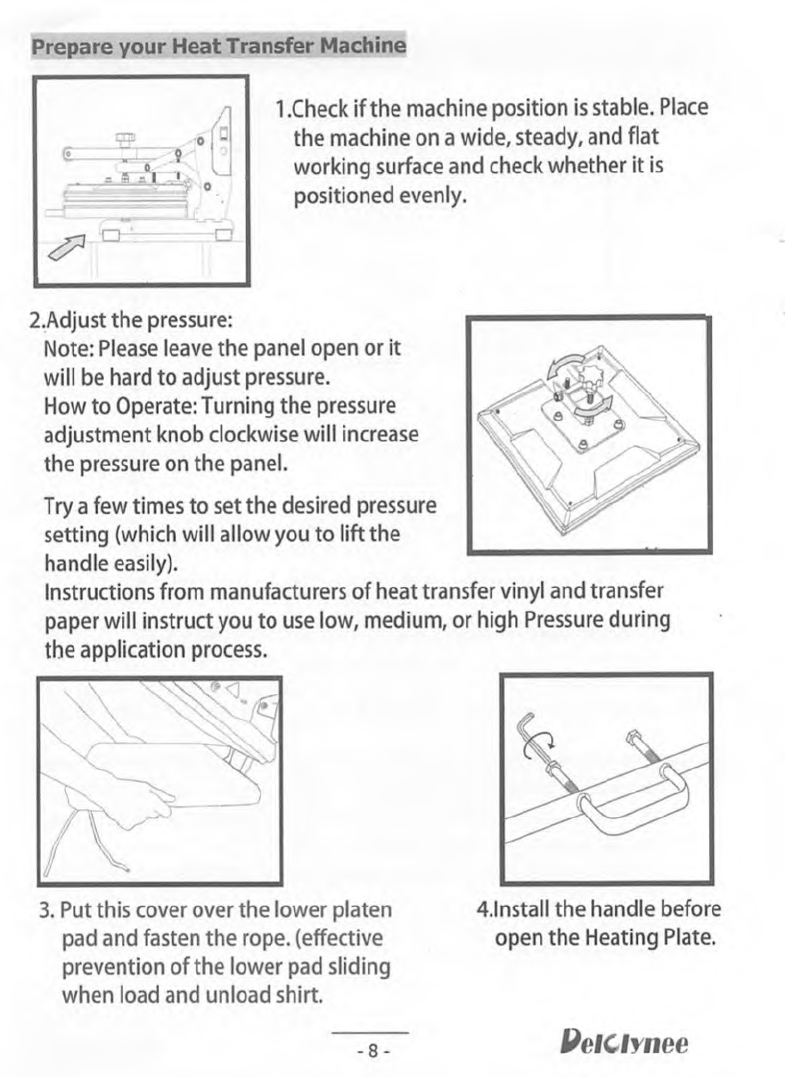
c
(T
o
-
PelClynee
-8-
3.
Put
this
cover
over
the
lower
platen
pad
and
fasten
the
rope,
(effective
prevention
of
the
lower
pad
slidin
when
load
and
unload
shirt.
1
.Check
if
the
machine
position
is
stable.
Place
the
machine
on
a
wide,
steady,
and
flat
workin
surface
and
check
whether
it
is
positioned
evenly.
4.Install
the
handle
before
open
the
Heatin
Plate.
2.Adjust
the
pressure:
Note:
Please
leave
the
panel
open
or
it
will
be
hard
to
adjust
pressure.
How
to
Operate:
Turnin
the
pressure
adjustment
knob
clockwise
will
increase
the
pressure
on
the
panel.
Try
a
few
times
to
set
the
desired
pressure
settin
(which
will
allow
you
to
lift
the
handle
easily).
Instructions
from
manufacturers
of
heat
transfer
vinyl
and
transfer
paper
will
instruct
you
to
use
low,
medium,
or
hi h
Pressure
durin
the
application
process.
0
?
'
0
a
?i
o
7.
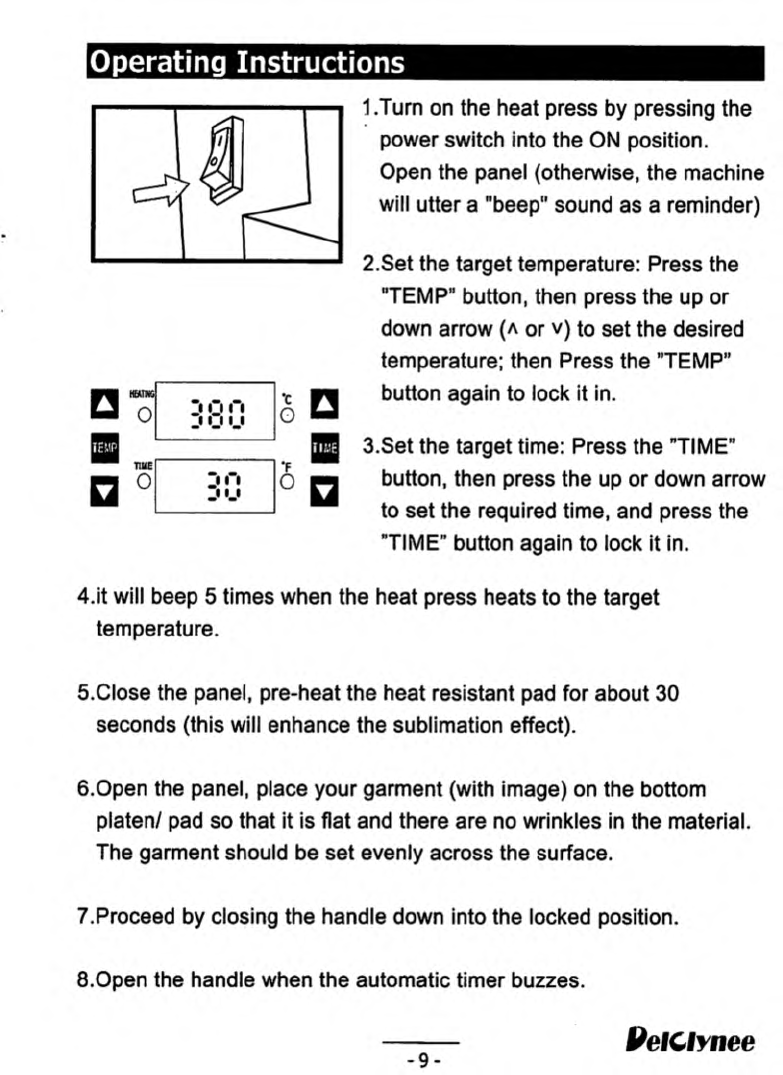
Proceed
by
closin
the
handle
down
into
the
locked
position.
8.
Open
the
handle
when
the
automatic
timer
buzzes.
PelQIynee
-9-
Operatin
Instructions
it
’
.'P
5.Close
the
panel,
pre-heat
the
heat
resistant
pad
for
about
30
seconds
(this
will
enhance
the
sublimation
effect).
6.
Open
the
panel,
place
your
arment
(with
ima e)
on
the
bottom
platen/
pad
so
that
it
is
flat
and
there
are
no
wrinkles
in
the
material.
The
arment
should
be
set
evenly
across
the
surface.
I.Turn
on
the
heat
press
by
pressin
the
power
switch
into
the
ON
position.
Open
the
panel
(otherwise,
the
machine
will
utter
a
"beep"
sound
as
a
reminder)
button,
then
press
the
up
or
down
arrow
to
set
the
required
time,
and
press
the
"TIME"
button
a ain
to
lock
it
in.
2.Set
the
tar et
temperature:
Press
the
"TEMP
”
button,
then
press
the
up
or
down
arrow
(
a
or
v)
to
set
the
desired
temperature;
then
Press
the
"TEMP
”
button
a ain
to
lock
it
in.
4.
it
will
beep
5
times
when
the
heat
press
heats
to
the
tar et
temperature.
""
TIME
□
0
u
□
7
sn
3.Set
the
tar et
time:
Press
the
"TIME"
□
□
°F
□
<
(
('
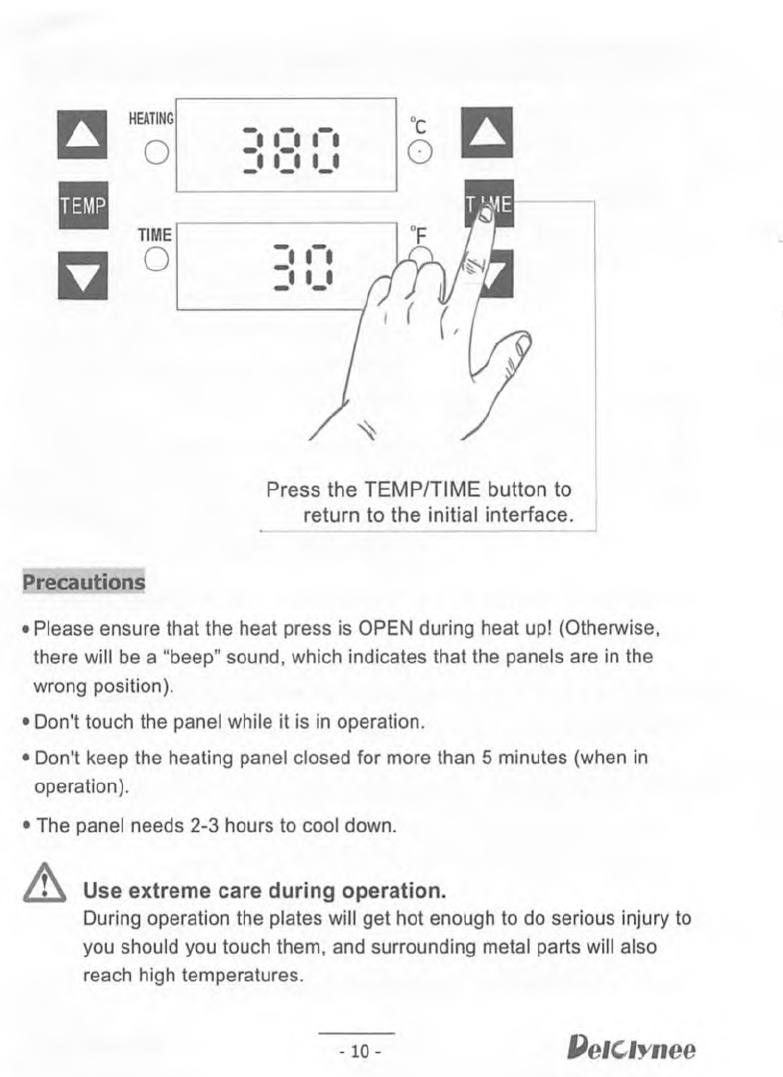
Precautions
•
The
panel
needs
2-3
hours
to
cool
down.
PelClynee
-
10-
TEMP
Use
extreme
care
during
operation.
Durin
operation
the
plates
will
et
hot
enou h
to
do
serious
injury
to
you
should
you
touch
them,
and
surroundin
metal
parts
will
also
reach
hi h
temperatures.
Press
the
TEMP/TIME
button
to
return
to
the
initial
interface.
•
ij
°C
o
HEATING
o
TIME
o
•
Please
ensure
that
the
heat
press
is
OPEN
durin
heat
up!
(Otherwise,
there
will
be
a
“
beep"
sound,
which
indicates
that
the
panels
are
in
the
wron
position).
•
Don't
touch
the
panel
while
it
is
in
operation.
•
Don't
keep
the
heatin
panel
closed
for
more
than
5
minutes
(when
in
operation).
j
O
H
•
i
•
<
•
Tips
PelClynee
-11-
•
Position
the
arment
on
the
lower
plate,
centerin
the
transfer
area
on
the
plate.
•
To
avoid
re-heatin
the
first
transfer
when
printin
double-sided
T-Shirts,
insert
a
sheet
of
cardboard
in
between
the
T-shirt,
adjust
the
hei ht
to
less
pressure,
then
press.
•
TIME
controls
the
amount
of
heat
transferred
to
the
arment.
Much
like
cookin
in
an
oven,
stoppin
early
or
takin
too
lon
will
have
unwanted
effects.
Thick
transfer
products
may
require
a
lon er
press
time.
•
PRESSURE
drives
your
transfer
deep
into
the
arment
fabric
for
a
stron er
and
more
durable
bond.
It
flattens
arments
to
prevent
wrinkles,
creases,
and
seams
from
distortin
the
printed
ima e.
However,
too
much
pressure
can
wear
down
mechanical
parts.
•
For
best
results,
“
thread"
the
arment
around
the
lower
platen
so
a
sin le
layer
of
fabric
is
on
top
of
the
silicone
pad.
•
Some
transfer
products
recommend
a
“
pre-press
”
to
heat
and
flatten
the
arment
before
printin .
•
Always
check
that
the
transfer
ima e
is
face
down
a ainst
the
material,
to
avoid
sealin
the
ima e
a ainst
the
heat
plates
instead
of
the
substrate.
•
TEMPERATURE
must
be
hi h
enou h
to
melt
the
transfer
adhesive
or
cure
the
ink
but
not
so
hi h
that
it
scorches
marks
or
otherwise
dama es
arments.This
settin
has
the
reatest
effect
on
heat
transfer
success.

TEST
BEFORE
YOU
PRESS.
PelCIvnee
-12-
Testin
Instructions
We
encoura e
you
to
always
do
a
test
of
your
fabric
and
HTV
or
transfer
paper
to ether
usin
a
small
sample
of
the
materials
before
you
do
volume
production.
•The
heat
resistant
spon e
pad
on
the
lower
plate
can
de rade
after
much
use
and
over
an
extended
period.
This
pad
is
replaceable.
If
the
pad
becomes
dried
out,
cracked,
or
there
are
chunks
removed
from
the
pad,
this
can
result
in
inconsistent
and
poor-quality
transfers.
If
possible
your
test
should
include
washin
and
dryin
a
pressed
arment
to
assure
that
the
media
has
properly
adhered
to
the
arment
usin
the
heat
and
pressure
settin
you
have
selected.
•
We
aslo
offer
the
lower
pad
cover
for
your
heat
press
machine.
This
cover
can
be
keep
the
bottom
lower
pad
clean,
easy
to
load
and
unload
shirt,
protects
the
ed es
and
corners
from
ettin
worn
down.
It
also
makes
it
easier
to
slide
your
arments
on
and
off.
?
Materia s
25-30
360
~
430
182
~
221
Pure
cotton
Polyester
25
360
~
430
182
~
221
Pearl
Board
10-15
300
~
360
149
~
182
Key
Chain
430
~
450 221
~
232
40
Mouse
pad
25-30
360
~
450
182
~
232
182
PVC
Board
40
360
PelCfrnee
-13-
Time
and
Temperature
Su estion
Table
As
with
all
media,
you
’
ll
use
on
your
Heat
Press,
we
encoura e
you
to
look
for
the
pressin
recommendations
from
the
manufacturer
of
the
transfer
material
online
if
possible.
If
you
can
’
t
find
specific
instructions,
the
followin
are
eneral
uidelines
for
your
consideration.
Note:
The
table
contains
eneral
data.
The
exact
data
depends
on
your
materials.
Temperature
(Fahrenheit
De ree)
Time
(Seconds)
Temperature
(Celsius
De ree)
1
eneral
PelQIynee
-
14-
Safety
Instructions
•
Do
not
use
the
device
for
any
other
purpose
other
than
its
intended
use
(see
the
chapter
“
Intended
Use
”
).
•
The
Heat
Press
Machine
is
desi ned
and
intended
for
private,
non-commercial
use
only.
•
Do
not
leave
the
Heat
Press
Machine
unsupervised
while
the
POWER
switch
is
in
the
ON
position.
Always
put
the
Power
switch
in
the
OFF
position
when
the
machine
is
not
bein
used.
•
The
Heat
Press
Machine
should
remain
in
the
unlocked
OPEN
position
when
not
in
use.
Do
not
leave
the
press
closed
on
the
table
when
not
usin
unless
transportin .
•
Protect
the
device
from
extreme
temperatures,
direct
sunli ht,
stron
jolts,
hi h
humidity,
moisture,
flammable
ases,
vapors,
and
solvents.
•
Please
handle
the
device
carefully.
Jolts,
impacts,
or
a
fall
even
from
a
low
hei ht
can
dama e
the
device.
•
Do
not
place
the
device
under
any
mechanical
stress.
•
Never
drop
or
insert
any
object
into
any
openin .
•
The
machine
may
be
subject
to
interference
from
external
sources
such
as
transformers,
electric
motors,
or
other
electronic
devices.
To
avoid
distortion
from
such
sources,
place
it
as
far
away
from
them
as
possible.
READ
the
user
instructions
carefully
and
especially
observe
the
safety
information.
If
you
do
not
follow
the
safety
instructions
and
information
on
proper
handlin
in
this
manual,
we
assume
no
liability
for
any
resultin
personal
injury
or
dama e
to
property.
Such
cases
will
invalidate
the
warranty.
YOUR
RESPONSIBILITIES:
Electrical
appliances
may
expose
people
to
hazards
that
can
cause
severe
injury
as
well
as
death.
The
use
of
electrical
products
may
create
hazards
that
include,
but
are
not
limited
to,
injury,
fire,
electrical
shock,
and
electrical
system
dama e.
These
safety
instructions
are
intended
to
provide
you
with
the
information
you
need
to
use
the
product
and
to
avoid
such
hazards.

Persons
-
use
E ectrics
PelCJynee
-15-
•
Never
tamper
with
this
machine.
Do
not
reconstruct,
repair
or
disassemble
the
Heat
Press
Machine.
This
can
dama e
the
device.
•
Maintenance,
modifications,
and
repairs
are
to
be
performed
exclusively
by
an
expert
or
at
a
Delclynee
shop.
•
Do
not
use
any
other
plu
or
power
adapter
for
this
device.
This
can
cause
failure
and/or
dama e.
•
Do
not
apply
excessive
force
when
usin
any
of
the
control
buttons
on
the
display.
•
If
it
is
no
lon er
possible
to
operate
the
device
safely,
take
it
out
of
operation
and
protect
it
from
any
accidental
use.
A
safe
operation
can
no
lon er
be
uaranteed
if
the
device:
-
is
visibly
dama ed,
-
is
no
lon er
workin
properly,
-
has
been
stored
for
extended
periods
in
poor
ambient
conditions
or
has
been
subjected
to
any
serious
transport-related
stresses.
•
This
device
is
intended
for
indoor
use
only.
Do
not
use
it
outdoors.
•
Always
place
the
Heat
Press
Machine
on
a
hard,
flat,
horizontal
surface.
•
Be
sure
to
install
the
machine
in
a
well-ventilated
place.
•
Do
not
remove
product
labels
that
contain
warnin s
or
safety
instructions.
•
The
device
is
not
a
toy.
Keep
and
store
it
out
of
the
reach
of
small
children.
•
Small
children
and
non-users
should
not
be
present
durin
the
device
operation.
•
This
device
may
be
used
by
children
under
18
and
by
people
with
reduced
physical,
sensory
or
mental
skills
or
a
lack
of
experience
or
knowled e,
provided
that
they
are
supervised
or
have
been
instructed
on
how
to
use
the
device
safely,
and
are
fully
aware
of
the
consequent
risks
of
use.
•
Do
not
use
the
Heat
Press
Machine
if
you
have
in ested
substances
that
reduce
your
reaction
time
(such
as
painkiller
medications
or
alcohol).

Ca le
PelClynee
-16-
•
Make
sure
your
outlet:
-
supplies
the
correct
power
volta e
to
avoid
dama e
to
the
device.
-
can
support
20A
current.
-
has
a
protective
device.
-
is
rounded.
-
is
located
near
to
the
device
and
it
must
be
easily
accessible.
•
This
heater
draws
15A
durin
operation.
To
prevent
overloadin
a
circuit,
do
not
plu
the
heater
into
a
circuit
that
already
has
other
appliances
workin .
•
It
is
normal
for
the
plu
to
feel
a
little
warm
to
the
touch;
however,
a
loose
fit
between
the
AC
outlet
(receptacle)
and
plu
may
cause
overheatin
and
distortion
of
the
plu .
Contact
a
qualified
electrician
to
replace
the
loose
or
worn
outlet.
•
To
disconnect
the
Heat
Press
Machine,
first
turn
off
the
device,
then
rip
the
plu
body
and
pull
it
from
the
wall
outlet.
Never
pull
the
mains
plu
from
the
socket
by
pullin
at
the
cable.
Always
pull
it
from
the
mains
socket
usin
the
intended
rips.
•
Always
unplu
the
mains
plu
from
the
mains
socket
if
you
do
not
use
the
device
for
an
extended
period.
•
For
safety
reasons,
always
unplu
the
device
in
case
of
a
thunderstorm.
•
If
the
power
fails
durin
the
operation,
turn
off
the
device
immediately
and
pull
the
plu
from
the
socket.
•
Do
not
modify
the
mains
cable.
•
Always
plu
the
machine
directly
into
a
wall
outlet/receptacle.
Never
use
an
extension
cord
or
relocatable
power
tap
(outlet/power
strip).
If
an
extension
cord
is
necessary,
then
a
12- au e,
20-ampera e
rated
cord
should
be
used.
Cords
rated
for
less
ampera e
may
overheat.
•
Make
sure
that
you
do
not
trip
over
the
cable.
The
cable
should
not
be
kinked,
trapped,
or
twisted.
•
Make
sure
that
the
mains
cable
is
not
squeezed,
bent,
dama ed
by
sharp
ed es,
or
put
under
mechanical
stress.
Avoid
excessive
thermal
stress
on
the
mains
cable
from
extreme
heat
or
cold.
•
Do
not
touch
the
mains
cable
if
it
is
dama ed.
A
dama ed
mains
cable
can
cause
a
deadly
electric
shock.
First,
power
down
the
respective

Heat
-
Fire
PefCfynee
-17-
Water
•
Never
plu
in
or
unplu
the
mains
plu
when
your
hands
are
damp
or
wet.
•
Never
operate
the
device
when
your
hands
are
damp
or
wet.
•
Do
not
use
in
wet
environments
or
close
to
water
and
do
not
submer e
in
liquid.
There
is
a
risk
of
electric
shock!
•
Do
not
spill
water
on
the
machine,
the
power
cord,
or
the
mains
outlet.
Never
pour
liquids
above
or
near
the
machine.
If
a
liquid
does
et
inside
the
casin ,
turn
the
Heat
Press
Machine
off
immediately.
•
Let
the
device
cool
down
before
puttin
it
away.
This
can
take
a
while.
•
The
device
heats
up
durin
use.
Do
not
use
the
device
if
you
are
sensitive
to
heat.
Severe
burns
could
occur
from
touchin
hot
parts.
-
Never
put
your
fin ers
on
the
silicone
pad.
-
To
avoid
burns,
do
not
let
bare
skin
touch
any
hot
surface.
•
Never
place
any
objects
on
the
device.
Do
not
cover
the
device
while
it
is
in
operation.
This
poses
a
risk
of
fire,
electric
shock,
or
injury.
•
Keep
combustible
materials,
such
as
pillows,
beddin ,
papers,
clothes,
and
curtains
at
least
3
feet
(0.9
m)
from
the
front
of
the
machine
and
keep
them
away
from
the
sides
and
rear.
•
Keep
the
device
away
from
heat
and
in
or
close
to
areas
where
the
surroundin
temperature
is
relatively
hot
(e. .
stoves
or
other
sources
of
heat).
Never
use
the
device
near
open
flames
or
on
hot
surfaces.
mains
socket
(e. .
via
the
respective
circuit
breaker)
and
then
carefully
pull
the
mains
plu
from
the
mains
socket.
Never
use
the
device
if
the
mains
cable
is
dama ed.
•
To
prevent
risks,
dama ed
power
cables
may
only
be
replaced
by
the
manufacturer,
a
professional
workshop
appointed
by
the
manufacturer,
or
a
similarly
qualified
person.
If
you
have
questions
that
remain
unanswered
by
these
warnin s
&
safety
instructions,
contact
us
at
servise@declynee-us.com
.
PelCfynee
-18-
Cleanin
and
care
Maintenance
•
Clean
the
device
with
a
dry
cloth.
•
Under
no
circumstances
use
a ressive
cleanin s
a ents,
cleanin
alcohol,
or
other
chemical
solutions
since
these
can
penetrate
the
housin
or
impair
functionality.
•
Clean
always
before
use.
Before
cleanin ,
turn
the
machine
’
s
POWER
switch
to
the
OFF
position
and
unplu
the
machine
from
the
electrical
outlet
and
allow
it
to
cool.
•
When
dirty,
clean
immediately
the
surface
of
the
panel
and
the
silicone
pad.
Do
not
continue
to
use
the
machine
while
it
is
dirty.
•
We
recommend
cleanin
the
machine
thorou hly
at
least
once
a
month.
•
Cleanin
must
not
be
performed
by
children.
•
Before
any
maintenance,
turn
the
machine's
POWER
switch
to
the
OFF
position
and
unplu
the
machine
from
the
electrical
outlet
and
allow
it
to
cool.
•
To
prolon
the
machine
service
life,
please
add
hi h-temperature
lubricant
re ularly
on
the
joints.
•
We
recommend
checkin
re ularly
for
dama e
to
the
power
cable.
The
Heat
Press
Machine
has
been
desi ned
to
be
as
maintenance-free
as
possible.
A
Debris
and
plastic
residue
from
vinyl
raphics
can
build
up
on
the
plates,
which
can
cause
stainin
to
affect
whole
production
runs.

PelClynee
-19-
Fuse
replacement
Transportin
and
handlin
How
to
do:
Put
the
Heat
Press
Machine
POWER
switch
in
the
OFF
position.
The
fuse-holder
is
located
near
the
POWER
switch.
Open
the
fuse
holder
and
replace
the
blown
fuse.
If
the
fuse
is
blown,
replace
it
with
a
new
fuse
with
the
same
dimensions
(31x6.
5mm)
and
current
ratin
(15A).
•
Before
transportin
or
handlin ,
turn
the
machine
’
s
POWER
switch
to
the
OFF
position
and
unplu
the
machine
from
the
electrical
outlet
and
allow
it
to
cool.
•
Do
not
use
the
handle
for
liftin
or
movin
the
Heat
Press
Machine.
•
It
is
quite
a
heavy
machine
(49.5lbs/22,45k )
and
once
set
up,
you
won
’
t
want
to
keep
movin
it.
Liftin
with
2
people
is
stron ly
advised.
•
Movin
the
machine
is
easiest
with
the
handle
in
the
lowered
and
locked
position.
•
We
stron ly
advise
preservin
the
shippin
carton
this
heat
press
came
in.
It
was
desi ned
to
hold
the
wei ht
of
this
machine
durin
shippin .
Should
you
need
to
return
the
equipment
due
to
warranty
or
repair,
you
will
need
it.
Do
not
attempt
to
ship
this
equipment
in
a
different
container.
A
For
safety
reasons
it
is
forbidden
to
use
another
fuse
ratin .
Always
use
a
1
1
0V
1
5A
slow
blow
fuse.
Table of contents


