Delfino DLHM-564 User manual
HAND MIXER
Instruction Booklet
Model: DLHM-564
Booklet_DLHM-564_ENG:Salton Booklet 5/15/09 3:21 PM Page 1

IMPORTANT SAFEGUARDS
When using electrical appliances, basic safety precautions should always be
followed including the following:
1. Read all instructions.
2. Do not touch hot surfaces. Use handles or knobs.
3. To protect against electrical hazards, do not immerse cord, plugs, or the
appliance in water or other liquid.
4. Close supervision is necessary when any appliance is used by or near
children.
5. Unplug from outlet when not in use and before cleaning. Allow to cool
before putting on or taking off parts, and before cleaning the appliance.
6. Avoid contacting moving parts.
7. Do not operate any appliance with a damaged cord or plug or after the
appliance malfunctions, or has been damaged in any manner. Return
appliance to Toastess for examination, repair or adjustment. See Warranty.
8. The use of accessories or attachments not recommended by Toastess may
cause fire, electric shock or injury.
9. Do not use outdoors.
10. Do not let cord hang over edge of table or counter, or touch hot surfaces.
11. Do not place on or near a hot gas or electric burner, or in a heated oven.
12. Keep hands, hair, clothing, as well as spatulas and other utensils away from
beaters and dough hooks during operation to reduce the risk of injury to
persons, and/or damage to the mixer.
13. To disconnect, turn the control to OFF, then remove plug from wall outlet.
14. Unplug before inserting or removing parts.
15. Remove beaters and dough hooks from the mixer before washing.
16. Do not use appliance for other than intended use.
17. Do not leave unit unattended while in use.
2
Booklet_DLHM-564_ENG:Salton Booklet 5/15/09 3:21 PM Page 2
3
SAVE THESE INSTRUCTIONS
HOUSEHOLD USE ONLY
POLARIZED PLUG
This appliance has a polarized plug (one blade is wider than the other).
To reduce the risk of electric shock, this plug will fit in a polarized outlet only
one way. If the plug does not fit fully in the outlet, reverse the plug. If it still
does not fit, contact a qualified electrician. Do not modify the plug in any way.
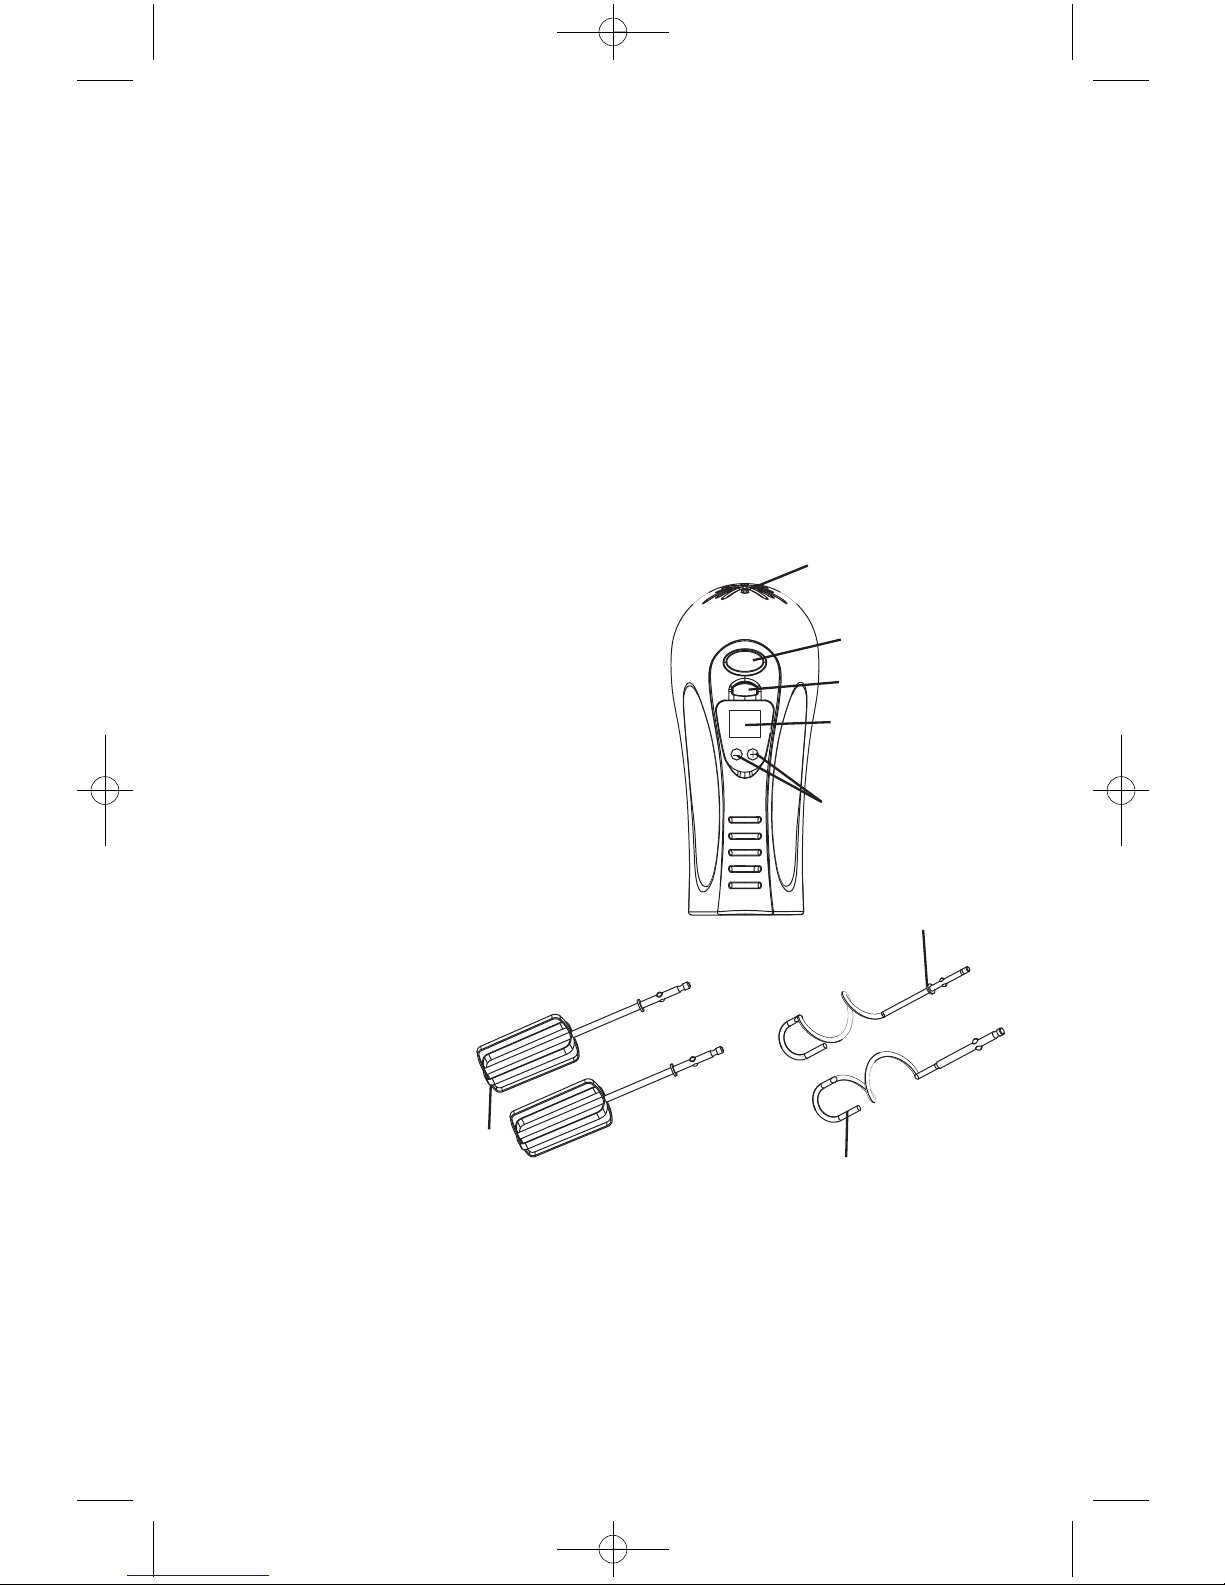
DESCRIPTION OF PARTS
1. Eject Button
2. Ventilating Slots
3. Beaters
4. Dough Hooks
5. Marker Ring
6. On/Off Button
7. Digital Display
8. Speed Setting Controls
Reduce Speed (-)
Increase Speed (+)
1
4
5
8
7
2
3
6
Booklet_DLHM-564_ENG:Salton Booklet 5/15/09 3:21 PM Page 3

BEFORE FIRST USE
1. Unpack and remove all parts and packaging materials from the carton.
2. DO NOT plug the power cord into any outlet before reading these
instructions.
3. Wash the Beaters and Dough Hooks in warm, soapy water. Rinse and dry
thoroughly.
4. Wipe the Hand Mixer with a clean, damp cloth. Dry thoroughly with a soft
cloth.
NOTE:
DO NOT use harsh detergents or abrasive cleansers on any parts of the
appliance.
DO NOT immerse the Hand Mixer or power cord and plug in water or any other
liquid
HOW TO USE
1. IMPORTANT: Unplug the mixer from the wall outlet before inserting or
removing Dough Hooks or Beaters.
2. One of the Beaters/Dough Hooks has a marker ring on the shaft
(see 'Description of Parts'). This Beater/Dough Hook should be inserted into
the large opening. The other Beater/Dough Hook should be inserted into
the smaller opening.
NOTE: The Beater/Dough Hook with the marker ring will not lock into place
if inserted into the smaller opening.
3. Plug into a 120 volt A.C. wall outlet.
4. Press the On/Off Button and the display will start to flash. When the On/Off
Button is pressed, the speed will be at ‘0’.
5. Press the ‘+’ button to adjust the speed and the timer will start to count the
running time. You have a choice of 16 speeds settings. Please see the
suggested settings below.
6. Press the On/Off Button to turn off the Mixer.
7. To remove the Beaters/Dough Hooks, press the Eject button.
NOTE: Never press the Eject Button when the Mixer is running.
4
Booklet_DLHM-564_ENG:Salton Booklet 5/15/09 3:21 PM Page 4

SUGGESTED SETTINGS:
Setting 1: To knead dough or to start beating ingredients
Setting 2 & 3: Low speed - to mix dry ingredients, to fold in or blend
ingredients
Setting 4: To mix liquid ingredients or when adding liquids to dry
ingredients
Setting 5 & 6: Particularly suited for bread dough
Setting 7: For the alternate addition of dry and liquid ingredients
Setting 9 & 10: Medium speed - to mix packaged cake mixes
Setting 11: To whip butter and sugar icings
Setting 12 & 13: To beat to a light fluffy consistency
Setting 14: To whip mashed potatoes
Setting 15: To whip cream
Setting 16: High speed – to whip egg whites
HELPFUL HINTS:
1. Never poke any kitchen utensils such as spoons, knives, etc. into the
rotating Beaters/Dough Hooks.
2. Do not reach into the mixing bowl while Beaters/Dough Hooks are
rotating.
3. The Hand Mixer is designed for short-time operation, a maximum of 10
minutes of continuous mixing. Switch it off after 10 minutes and allow
the motor to cool for 30 minutes.
4. To avoid excessive spattering and flour dusting, lower the Beaters/Dough
Hooks fully into the ingredients that are to be processed before turning
the Mixer on and turn off before removing.
5. Start at the lowest setting to prevent the dry ingredients from dusting
and the liquids from spattering. You can vary the speed settings while
the hand mixer is in use.
6. Use a higher setting for heavier dough
7. After 9 minutes 59 seconds the Timer goes back to ‘00’.
5
Booklet_DLHM-564_ENG:Salton Booklet 5/15/09 3:21 PM Page 5

CARE AND CLEANING
Before cleaning the Hand Mixer, ensure the power cord is unplugged from the
electrical outlet.
1. Remove Beaters or Dough Hooks immediately after use.
2. Wipe the outside area of the Hand Mixer with a damp cloth and dry with
a soft polishing cloth.
3. Wipe excess food particles from the power cord.
4. DO NOT immerse the Hand Mixer or power cord and plug in water or
any other liquid.
5. DO NOT use harsh detergents or abrasive cleansers on any parts of the
appliance.
6. Wash the Beaters and Dough Hooks in warm soapy water or in the
dishwasher.
7. Store the Hand Mixer in a dry accessible place.
8. DO NOT wind the power cord around the Hand Mixer body as the
residual heat from the motor may damage the cord.
6
Booklet_DLHM-564_ENG:Salton Booklet 5/15/09 3:21 PM Page 6

RECIPES
Vanilla Sponge Cake
3 eggs room temperature and separated
¾ cup (175 ml) Icing sugar
1 vanilla bean split and seeds removed
1 cup (250 ml) self raising flour, sifted
3 tbsp. (45 ml) water
1. Grease and flour a 8“ (20 cm) cake tin. Preheat oven to 350°F (180°C).
2. In the mixing bowl, place the egg whites. Using the mixer, beat on high
–speed 16, until soft peaks form.
3. Add icing sugar and beat until the mixture is thick and shiny. Beat in the
egg yolks and vanilla. Continue mixing until the mixture is well
combined.
4. Remove the bowl and use a spatula to fold in the flour and water.
Combine the mixture well but do not over mix.
5. Pour the mixture into the greased cake tin and bake for 20 – 25 minutes
or until a toothpick inserted in the center comes out clean. Remove from
oven and cool at room temperature.
6. Run a knife around the edges of the cake pan. Turn the cake onto a rack
and tap the bottom of the pan lightly to release the cake. Cool before
using.
7. Spread with your favourite frosting or whipped cream and top with fresh
berries.
7
Booklet_DLHM-564_ENG:Salton Booklet 5/15/09 3:21 PM Page 7

Butter Cake
4 ozs. (125g) Butter
4 drops Vanilla
¼ cup (60 ml) Icing sugar
2 Eggs
2 cups (500 ml) Self raising flour
1 cup (250 ml) Milk
1. Preheat the oven to 350° F (180°C) and grease an 8“ (20 cm) round
cake pan.
2. Add the butter to the bowl and break up by using the mixer on low -
speed 1. Add vanilla and sugar. Cream together on speed 9 until light
and creamy. Approximately 2 minutes.
3. Add eggs one at a time beating well between each addition.
4. Reduce to speed 2 and mix in sifted flour and milk alternately. Mix for
3 – 4 minutes. Cake batter should be smooth, thick and creamy.
5. Pour batter into prepared cake bank and bake for 30 – 35 minutes or
until a toothpick inserted in the center comes out clean.
BUTTER CAKE VARIATIONS:
Lemon or Orange Butter Cake:
Add the rind of one lemon or orange into butter, vanilla and sugar mixture.
Continue with # 3 above.
Chocolate Butter Cake
Melt 2oz. (60 g) of unsweetened chocolate and combine with the milk. Mix
into the cake batter as directed above.
Frosting
1/3 cup (75 ml) butter or margarine
4 cups (1 L) icing sugar
pinch of salt
3 – 4 tbsp. (60 ml) milk
1 tsp. (5 ml) vanilla
Place all ingredients in the bowl and mix on low – speed 2 - 3.
Combine until creamy, light and fluffy.
8
Booklet_DLHM-564_ENG:Salton Booklet 5/15/09 3:21 PM Page 8

Crepes
1-1/2 cups (375 ml) flour
pinch salt
2 eggs
1-1/4 cups (310 ml) milk
1 tbsp. (15 ml) oil
1. Combine all ingredients together in the Mixer Bowl. Beat on low – speed
4 for 2 minutes until smooth.
2. Allow to stand for 1 hour.
3. Grease frying pan and preheat.
4. Pour about 1/3 cup ( ml) of batter into the pan.
5. Cook until light brown, turn and brown other side.
Hot crepes can be rolled and sprinkled with icing sugar and served.
Meringues
2 egg whites
3 oz. (85 g) extra-fine sugar
3 oz. (85 g) icing sugar
1. Preheat oven to 250°F (120°C)
2. Line two cookie sheets with parchment paper.
3. Add eggs to mixer bowl and beat on high- speed 14 - 16 until still but
not dry.
4. Add extra-fine sugar gradually, beating well.
5. Reduce speed to low – speed 2 -3 and fold in icing sugar. Mix until stiff
and shiny
6. Place mixture in a large piping bag that has a star tip.
7. Bake for 10 minutes then reduce heat to 200°F (95°C) and bake for
another 20 – 25 minutes.
8. Cool and serve.
9
Booklet_DLHM-564_ENG:Salton Booklet 5/15/09 3:21 PM Page 9
A short supply cord is provided to reduce the hazards of becoming entangled
in or tripping over a long cord. Extension cords may be used if care is exercised
in their use. If an extension cord is used, the marked electrical rating of the
detachable power-supply cord or extension cord should be at least as great as
the electrical rating of the appliance. If the appliance is of the grounded type,
the extension cord should be of a grounded 3-wire cord. The extension cord
should be arranged so that it will not drape over the counter top or table top,
where it can be pulled on by children or tripped over.
LIMITED WARRANTY
Toastess International warrants that this appliance shall be free from defects in
material and workmanship for a period of one year from the date of purchase.
During this ‘in-warranty’ period, defective products will be repaired or replaced
at the discretion of the retailer and/or Toastess International. This warranty covers
normal domestic usage and does not cover damage which occurs in shipment
or failure which results from alteration, accident, misuse, abuse, glass breakage,
neglect, commercial use or improper maintenance.
A defective product should be returned to the original place of purchase within
the retailer’s stipulated return/exchange period*. If you are unable to have
a defective product replaced under warranty by the retailer, please check our
website at “www.toastess.com” for the service centre nearest you or you may
contact us for assistance by mail, e-mail, fax or telephone as listed below.
To ensure prompt ‘in-warranty’ service, securely package and return the product
to us prepaid. Be sure to include the original proof of purchase and a description
of the defect along with your address and zip/postal code.
For repairs not covered by the warranty, please contact us for assistance.
* Return/exchange policies at each retailer vary and may differ from the Toastess International
1 year limited warranty period. 10
TOASTESS INTERNATIONAL
Customer Service Department
81A Brunswick
Dollard-des-Ormeaux
Québec, Canada H9B 2J5
E-mail: info@toastess.com
Fax: 514-685-8300
Tel: 514-685-2820
Booklet_DLHM-564_ENG:Salton Booklet 5/15/09 3:21 PM Page 10
Table of contents


