Dell W2606C User manual

www.dell.com | support.dell.com
Dell™ W2606C LCD TV Display
Owner’s Manual
Model W2606C

Notes, Notices, and Cautions
NOTE: A NOTE indicates important information that helps you make better use of your LCD TV display.
NOTICE: A NOTICE indicates either potential damage to hardware or loss of data and tells you how to avoid the
problem.
CAUTION: A CAUTION indicates a potential for property damage, personal injury, or death.
____________________
Information in this document is subject to change without notice.
© 2005 Dell Inc. All rights reserved.
Reproduction in any manner whatsoever without the written permission of Dell Inc. is strictly forbidden.
Trademarks used in this text: Dell and the DELL logo are trademarks of Dell, Inc.; TruSurround XT, SRS, and symbol are
trademarks of SRS Labs, Inc.
Other trademarks and trade names may be used in this document to refer to either the entities claiming the marks and names or their products.
Dell Inc. disclaims any proprietary interest in trademarks and trade names other than its own.
October 2005 Rev. A01

Contents 3
Contents
1About Your LCD TV Display . . . . . . . . . . . . . . . . . . . . . . . . . . . . . .5
Front View. . . . . . . . . . . . . . . . . . . . . . . . . . . . . . . . . 5
Right Side View . . . . . . . . . . . . . . . . . . . . . . . . . . . . . . 6
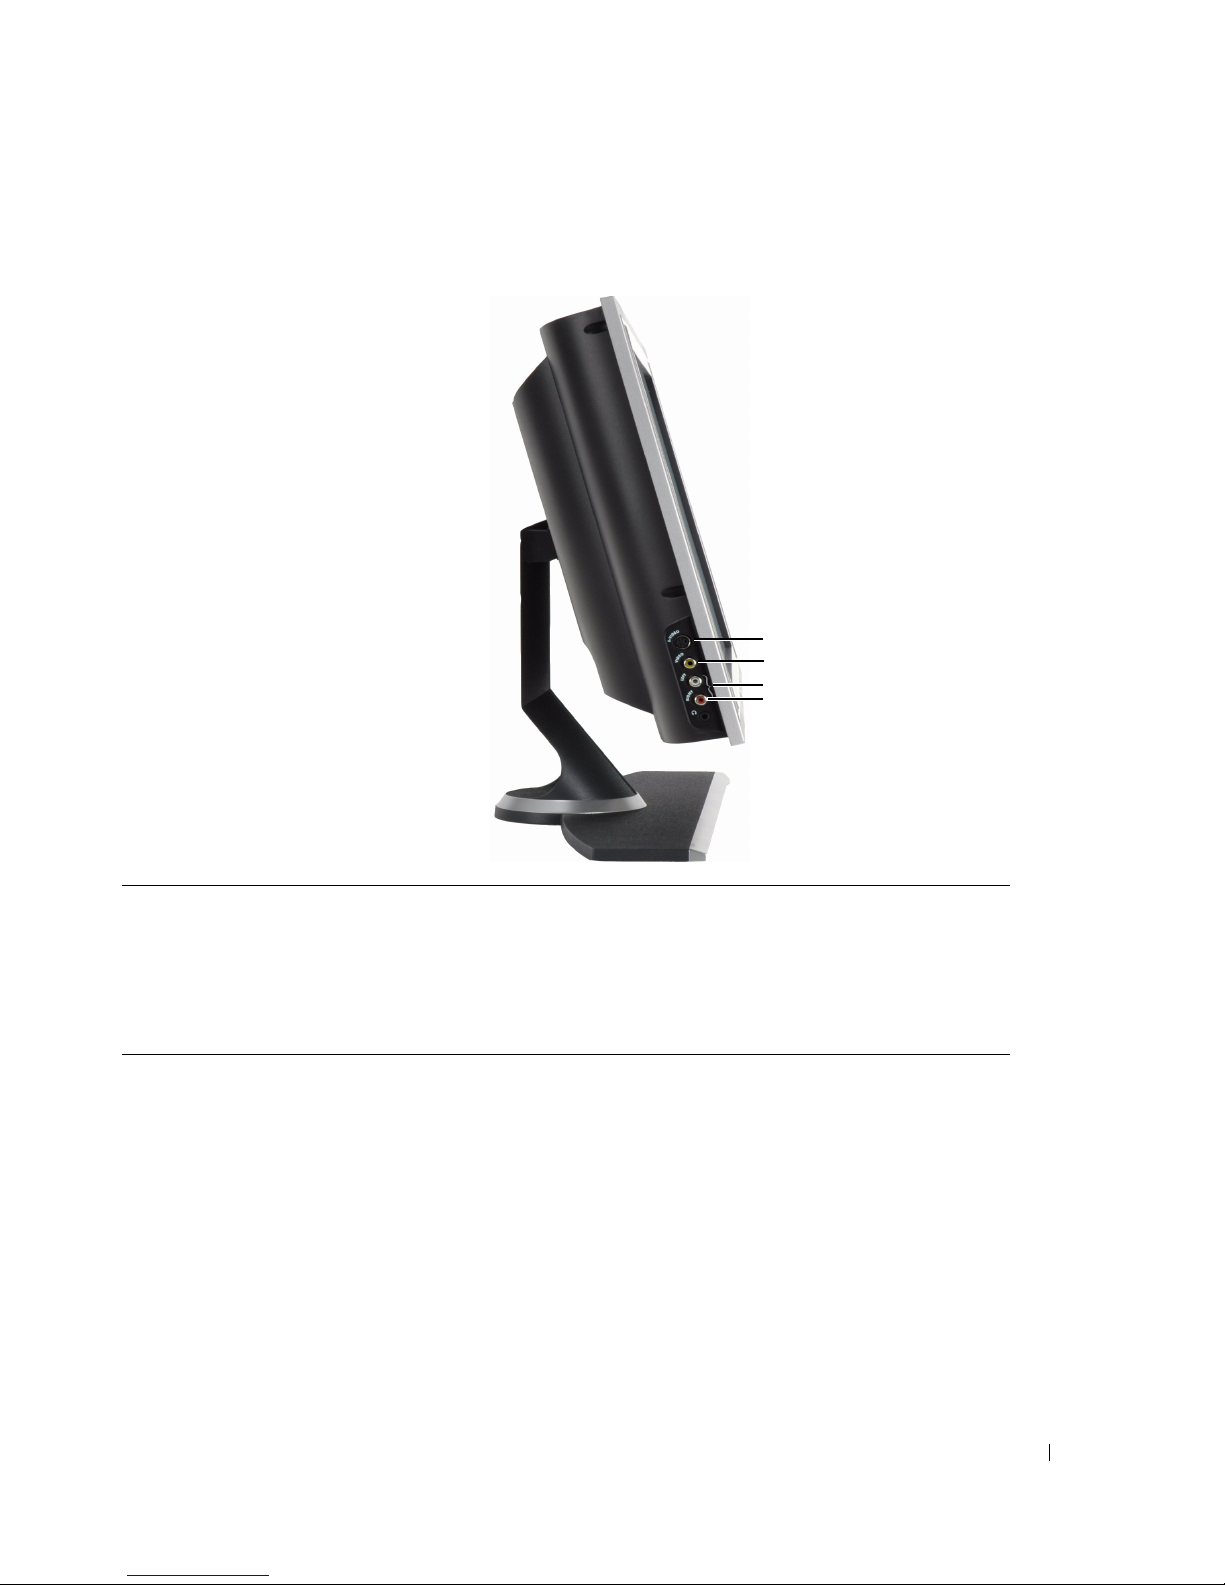
Left Side View . . . . . . . . . . . . . . . . . . . . . . . . . . . . . . . 7
Bottom View. . . . . . . . . . . . . . . . . . . . . . . . . . . . . . . . 8
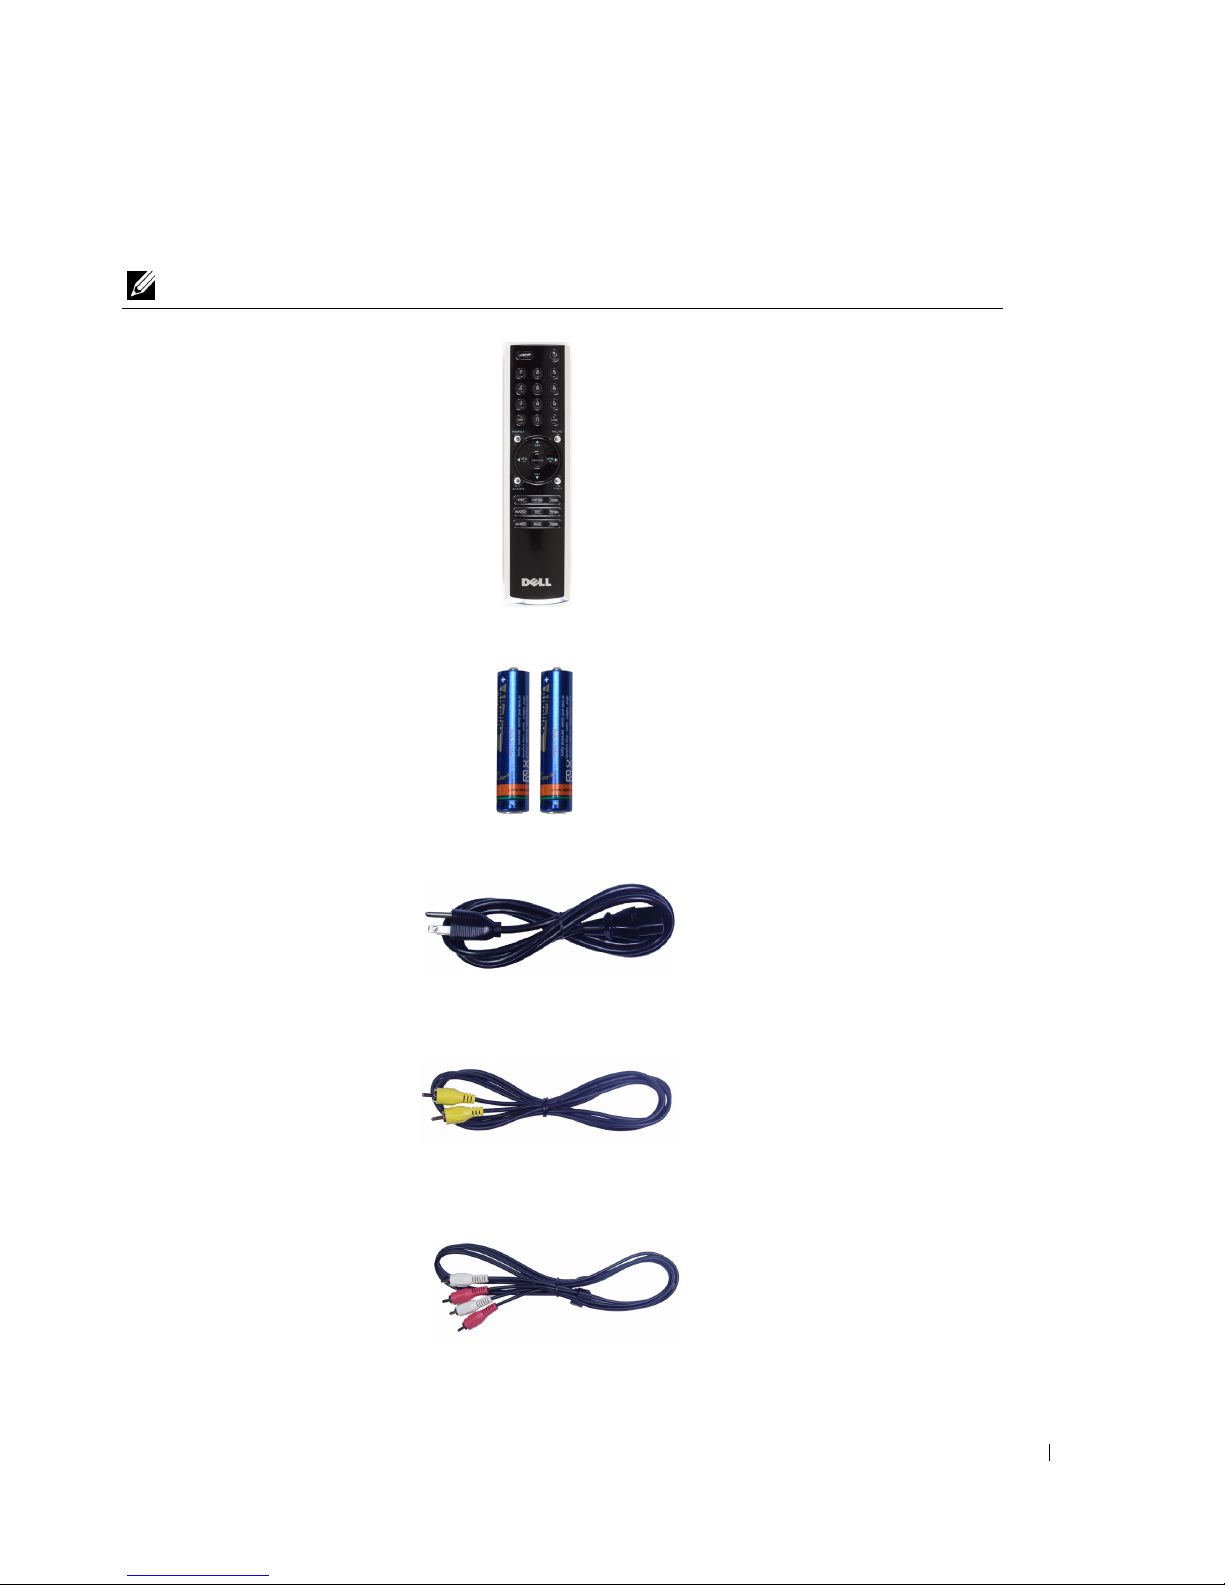
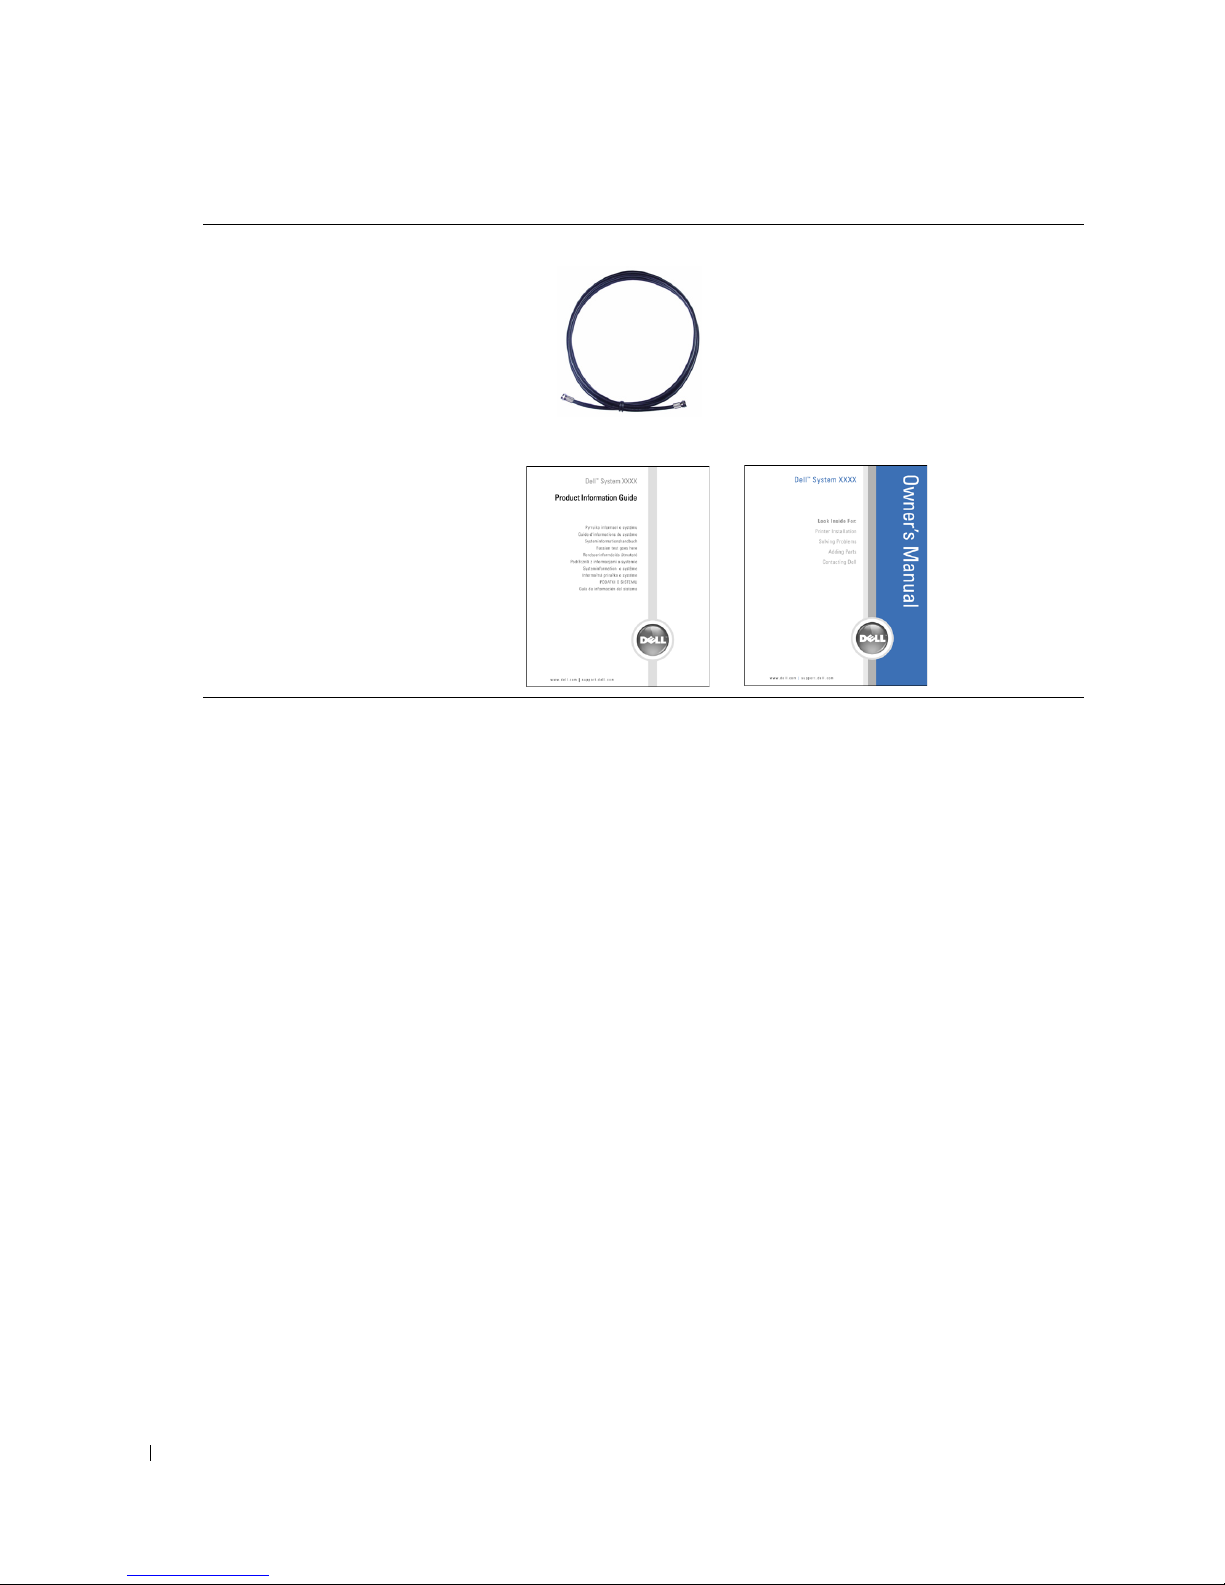
Package Contents . . . . . . . . . . . . . . . . . . . . . . . . . . . . . 9
2Setting Up Your LCD TV Display . . . . . . . . . . . . . . . . . . . . . . . . .11
Proper Location for Your LCD TV Display . . . . . . . . . . . . . . . . . . 11
Connecting Your LCD TV Display . . . . . . . . . . . . . . . . . . . . . . 11
Connecting Your Computer to the LCD TV Display . . . . . . . . . . . . . . 13
3Your Remote Control. . . . . . . . . . . . . . . . . . . . . . . . . . . . . . . . . . .19
Installing Batteries . . . . . . . . . . . . . . . . . . . . . . . . . . . . 19
Using Your Remote Control . . . . . . . . . . . . . . . . . . . . . . . . . 20
Using Your LCD TV Display With a Universal or Learning Remote Control. . . 22
4Using the TV Menu . . . . . . . . . . . . . . . . . . . . . . . . . . . . . . . . . . . .23
Using Your Remote Control With the TV Menu. . . . . . . . . . . . . . . . 23
Selecting Your TV Menu Language . . . . . . . . . . . . . . . . . . . . . 24
Input Select Menu . . . . . . . . . . . . . . . . . . . . . . . . . . . . . 24
Picture Menu . . . . . . . . . . . . . . . . . . . . . . . . . . . . . . . 25
Audio . . . . . . . . . . . . . . . . . . . . . . . . . . . . . . . . . . . 26
Size . . . . . . . . . . . . . . . . . . . . . . . . . . . . . . . . . . . . 26

4Contents
Parental Control . . . . . . . . . . . . . . . . . . . . . . . . . . . . . . 27
TV Menu Setup . . . . . . . . . . . . . . . . . . . . . . . . . . . . . . 28
Sleep Timer . . . . . . . . . . . . . . . . . . . . . . . . . . . . . . . . 29
Closed Caption . . . . . . . . . . . . . . . . . . . . . . . . . . . . . . 29
5Troubleshooting Your LCD TV Display . . . . . . . . . . . . . . . . . . . .30
Troubleshooting Tips. . . . . . . . . . . . . . . . . . . . . . . . . . . . 30
General Problems . . . . . . . . . . . . . . . . . . . . . . . . . . . . . 31
TV Menu Messages . . . . . . . . . . . . . . . . . . . . . . . . . . . . 35
Remote Control Problems . . . . . . . . . . . . . . . . . . . . . . . . . 36
Using the Self-Test Feature When Your LCD TV Display is Connected
to Your Computer . . . . . . . . . . . . . . . . . . . . . . . . . . . . . 36
Problems When Using the LCD TV Display as a Monitor . . . . . . . . . . . 37
6Specifications for Your LCD TV Display. . . . . . . . . . . . . . . . . . .38
7Contacting Dell . . . . . . . . . . . . . . . . . . . . . . . . . . . . . . . . . . . . . . .41
Index . . . . . . . . . . . . . . . . . . . . . . . . . . . . . . . . . . . . 59

About Your LCD TV Display 5
1
About Your LCD TV Display
Front View
1IR receiver Senses the signal from the remote control.
2Power indicator light (LED) The light is blue when the LCD TV display is on and amber
when the LCD TV display is in power save mode.
2
1

6About Your LCD TV Display
www.dell.com | support.dell.com
Right Side View
1Power button
Push to turn the LCD TV display on and off. The power button
is blue when it is on and amber when it is in power saving
mode.
2TV Menu menu button Push to enable the TV Menu.
3Volume button Push to decrease the volume.
4Volume button Push to increase the volume.
5Channel button Push to select the previous channel or navigate through the TV
Menu.
6Channel button Push to select the next channel or navigate through the TV
Menu.
7Input Select button Push to display the Input Select menu.
2
1
3
4
5
6
7

About Your LCD TV Display 7
Left Side View
1AV SIDE (S-Video 1) Connect devices such as a video game system or a VCR.
2AV SIDE (Composite 1) Connect devices such as a VCR or DVD player.
3Composite audio connector Use the audio connector if you have connected a device to
connector.
4Headphone connector Connect headphones.
1
2
3
4

8About Your LCD TV Display
www.dell.com | support.dell.com
Bottom View
1Power connector Connect your power cord.
2Composite out/Audio Out (L/R) Connect a VCR.
3Composite out/Video Out Out Connect a VCR.
4Composite video and audio
connectors (AV1)
Connect devices such as a VCR or DVD player.
5S-Video video and audio connectors
(AV2)
Connect devices such as a video game system or a VCR.
6Component video and audio
connectors (AV3)
Connect devices such as a DVD player or cable TV box.
7Component video and audio
connectors (AV4)
Connect devices such as a DVD player or cable TV box.
8DVI audio connector (L / R) Use the DVI audio connector if you have connected a device
such as a DVD player to the DVI connector.
9VGA Connect your compute.r
10 DVI connector Connect your computer or video devices such as a DVD player.
11 Audio connector for VGA or DVI Connect the audio cable from your computer to the LCD TV
Display.
12 ANT/Cable Connect cable TV box or an antenna.
12
8
612
7
311
9
10
5
4

About Your LCD TV Display 9
Package Contents
NOTE: If you need additional cables, contact Dell.
Remote control
AAA batteries (2)
Power cord
Composite video cable
Audio cable

10 About Your LCD TV Display
www.dell.com | support.dell.com
Coaxial cable
Documentation:
Setup Guide
Product Information Guide
Owner's Manual

Setting Up Your LCD TV Display 11
2
Setting Up Your LCD TV Display
CAUTION: Before you begin any of the procedures in this section, follow the safety instructions
located in the
Product Information Guide
.
Proper Location for Your LCD TV Display
Consider the following environmental factors when you are deciding where to put your LCD TV
display:
• Do not store or use the LCD TV display in locations that are exposed to high heat, direct
sunlight, or extreme cold.
• Avoid moving the LCD TV display between locations with extreme temperature differences.
For more information, see Specifications on
page 38
.
• Do not subject the LCD TV display to severe vibration or high impact conditions. Do not
place the LCD TV display inside a car trunk.
• Do not store or use the LCD TV display in locations where the LCD TV display would be
exposed to high humidity or dusty environment.
• Do not place the LCD TV display in a location where water or other liquids could spill on or
into the LCD TV display.
Connecting Your LCD TV Display
Your LCD TV display has four standard connectors that can be used to connect devices.
NOTE: Before you connect your LCD TV display, ensure you have all the proper cables. Some cables
may come with the device you are connecting. For a list of cables that came with your LCD TV display,
see Package Contents on page 9. To order additional cables, contact Dell.
Quality Cable and Connector When to Use
Good Coaxial (RF) carries the video and audio
from one cable. The coaxial connector is
labeled, ANT/Cable on your LCD TV display.
To locate the connector, see page 8.

12 Setting Up Your LCD TV Display
www.dell.com | support.dell.com
Good Composite carries the video signal through
a single pin. If you are using a composite
video connector you also need to connect
composite audio connectors. To locate the
connector, see page 7.
Better S-Video splits the video signal into two
signals, black-and-white and color. To locate
the connector, see page 7.
Best Component splits the video signal into three
signals, two color and one black-and-white.
To locate the connector, see page 8.
Quality Cable and Connector When to Use

Setting Up Your LCD TV Display 13
Connecting Your Computer to the LCD TV Display
Your LCD TV display has two standard connectors that can be used to connect your computer.
NOTE: The type of connector you use depends on the graphics card your computer supports.
For additional information about graphic cards, see your computer documentation.
Quality Cable and Connector When to Use
Good
A standard graphic display system for
computers that uses an analog signal and
can support resolutions up to 1366 x 768.
Better
A digital signal that can support digital
and convert analog to digital. DVI can be
used for high resolution display and can
support resolutions up to 1366 x 768.
Connect the audio cable from your computer
to the LCD TV Display Audio connector for
VGA or DVI.

14 Setting Up Your LCD TV Display
www.dell.com | support.dell.com
Using the ANT/Cable (Coaxial) Connector
1
Turn off the LCD TV display and unplug the power cord.
2
Connect the coaxial cable to the ANT/Cable connector of the LCD TV display.
3
Plug in the power cord for the LCD TV display and turn on the LCD TV display.
4
Enter the TV Menu and select
TV
. For additional information about the Input Select menu,
see page 24.

Setting Up Your LCD TV Display 15
Using the Composite Connector
1
Turn off the LCD TV display and unplug the power cord.
2
Connect video and audio cables from your device to LCD TV.
3
Plug in the power cords for the LCD TV display and device and turn them on.
4
Enter the TV Menu and select the
AV SIDE (Composite 1)
. For additional information
about the Input Select menu, see page 24.

16 Setting Up Your LCD TV Display
www.dell.com | support.dell.com
Using the S-Video Connector
1
Turn off the LCD TV display and unplug the power cord.
2
Connect video and audio cables from your device to LCD TV.
3
Plug in the power cords for the LCD TV display and device and turn them on.
4
Enter the TV Menu and select the
AV SIDE (S-Video 1)
. For additional information about
the Input Select menu, see page 24.
Using the Component Connectors
1
Turn off the LCD TV display and unplug the power cord.
2
Connect video and audio cables from your device to LCD TV.
3
Plug in the power cords for the LCD TV display and device and turn them on.
4
Enter the TV Menu and select the AV3 (Component 1) or AV4 (Component 2). For
additional information about the Input Select menu, see page 24.

Setting Up Your LCD TV Display 17
Using the DVI Connector
NOTE: Only one connector can be used for a computer, either VGA or DVI.
1
Turn off the LCD TV display and unplug the power cord.
2
Connect the white DVI cable to your LCD display TV and to the video device or your
computer..
3
Connect the audio cables.
If you are connecting a video device, use the audio connectors (red and white) or if you are
connecting a computer use the stereo connector (green).
NOTE: Some cable TV boxes may have DVI connectors, but do not support using a DVI connection. For
more information, contact your cable TV company.
4
Plug in the power cords for the LCD TV display and device and turn them on.
5
Enter the TV Menu and select the
DVI
. For additional information about the Input Select
menu, see page 24.
Connecting a Video Device Connecting a Computer

18 Setting Up Your LCD TV Display
www.dell.com | support.dell.com
Using the VGA Connector
NOTE: Only one connector can be used for a computer, either VGA or DVI.
1
Turn off the LCD TV display and unplug the power cord.
2
Connect the blue VGA cable to your LCD TV display and to your computer.
3
Connect the green audio cable to the connector on the LCD TV display and to your
computer.
4
Plug in the power cords for the LCD TV display and device and turn them on.
5
Enter the TV Menu and select the
VGA
. For additional information about the Input Select
menu, see page 24.

Your Remote Control 19
3
Your Remote Control
Installing Batteries
Before you can use your remote control, install two-AAA batteries.
1
Slide open the battery cover.
2
Install the batteries. Make sure that you match the + and - on the batteries with the + and -
symbols in the battery compartment.
3
Replace the battery cover.

20 Your Remote Control
www.dell.com | support.dell.com
Using Your Remote Control
1
23
4
21
5
6
20
18
19
7
14 11
10
16 9
8
12
13
15
17
2
3
22
Other manuals for W2606C
2
Table of contents
Languages:
Other Dell LCD TV manuals

Dell
Dell W3707C User manual

Dell
Dell W1900 User manual

Dell
Dell W1700 - 17" LCD TV User manual

Dell
Dell W2600 - 26" LCD TV User manual

Dell
Dell W3201C User manual

Dell
Dell W3207C User instructions

Dell
Dell W2300 User manual

Dell
Dell W3207C User manual

Dell
Dell W3706C User instructions

Dell
Dell W3000 User manual

Dell
Dell W2607C User manual

Dell
Dell W2607C Installation and operation manual

Dell
Dell W2600 User manual

Dell
Dell W1900 Installation and operation manual

Dell
Dell W3202MH User manual

Dell
Dell W3201C User instructions

Dell
Dell W3207C User instructions

Dell
Dell W1900 User manual

Dell
Dell W2300 User manual

Dell
Dell W3706C User instructions