DELLA 050-HA-50082 User manual

CABINET INFRARED HEATER
INSTRUCTION MANUAL
Item No: 050-HA-50082
**WARNING: READ THIS INSTRUCTION MANUAL CAREFULLY BEFORE USE.
www.dellaproductsusa.com 909. 344. 2588
2
TABLE OF CONTENT
Thank you for choosing a DELLA Infrared Zone Heating System. This owner’s manual will
provide you with valuable information necessary for the proper care and maintenance
of your new product. Please take a few moments to thoroughly read the instructions and
familiarize yourself with all the operational aspects of your new heater.
IMPORTANT INSTRUCTIONS
SPECIFICATIONS
SAFETY FEATURE
IN THE BOX
PRODUCT DIAGRAM
CONTROL PANEL
REMOTE CONTROL
PREPARATION
OPERATING INSTRUCTIONS
MAINTENANCE
STORAGE
BASIC TROUBLESHOOTING
WARRANTY
PLEASE LIKE, COMMENT AND SUBSCRIBE
03
04
04
05
05
06
06
07
07
09
10
10
11

3
IMPORTANT INSTRUCTIONS
When using this electric unit, basic safety precautions should always be followed to reduce the
risk of re, electric shock, and injury to persons, including the following:
01. Read ALL instructions before using this unit.
02. CAUTION: Risk of Electric Shock. DO NOT open or try to repair the heater yourself.
03. This heater may get hot when in use. To avoid burns, DO NOT let bare skin touch hot
surfaces. If provided, use handles when moving this heater.
04. Keep combustible materials, such as furniture, pillows, bedding, paper, clothes, and cur
tains at least 3 ft from the front of the heater and keep them away from the sides, top,
and rear. DO NOT place towels or other objects on the heater.
05. Extreme caution is necessary when any heater is used by or near children or the disabled,
or when the heater is left operating and unattended.
06. DO NOT operate any heater with a damaged cord or after the heater malfunctions, has
been dropped or damaged in any manner. Return heater to authorized service facility for
examination, electrical or mechanical adjustment, or repair.
07. This heater is not intended for use in bathrooms, laundry areas and similar indoor lo
cations. NEVER locate heater where it may fall into a bathtub or other water container. To
protect against electrical hazards, DO NOT immerse in water or other liquids.
08. DO NOT touch the control panel or plug with a wet hand.
09. DO NOT run cord under carpeting. DO NOT cover cord with throw rugs, runners, or similar
coverings. Arrange cord away from trac area and where it will not be tripped over.
10. DO NOT insert or allow foreign objects to enter any ventilation or exhaust opening as this
may cause an electric shock or re, or damage the heater.
11. To prevent a possible re, DO NOT block the air intakes or exhaust in any manner. DO
NOT use on soft surfaces, like a bed, where openings may become blocked.
12. A heater has hot and arcing or sparking parts inside. DO NOT use in areas where gasoline,
paint, explosive and/or ammable liquids are used or stored. Keep unit away from heated
surfaces and open ames.
13. Always plug heaters directly into a wall outlet/receptacle. Never use with an extension
cord or relocatable power tap (outlet/power strip).
14. To avoid re or shock hazard, plug the unit directly into a 120 V AC electrical outlet.
15. To disconnect heater, turn controls to OFF, then remove plug from outlet. Pull rmly on
the plug, DO NOT unplug by pulling on the cord.
16. Always unplug the unit before moving or cleaning, or whenever the heater is not in use.

4
IMPORTANT INSTRUCTIONS
17. Use only for intended household use as described in this manual. Any other use not
recommended by the manufacturer may cause re, electric shock, or injury to persons. The
use of attachments not recommended or sold by unauthorized dealers may cause hazards.
18. Always use on a dry, level surface. Use on oor only.
19. DO NOT use outdoors.
20. WARNING: To reduce the risk of re or electric shock, DO NOT use this unit with any
solid-state speed control device.
21. DO NOT attempt to repair or adjust any electrical or mechanical functions on this unit. Doing
so will void your warranty. The inside of the unit contains no user serviceable parts. Qualied
personnel should perform all servicing only.
22. Connect to properly grounded outlets only.
23. Save these instructions.
SPECIFICATIONS
SAFETY FEATURE
TIP-OVER SAFETY FEATURE
This heater is equipped with a tip-over safety feature. Once the heater is tipped over, an internal
switch will automatically shut the heater o. Once the heater is restored an upright position, the
heater will reset. To continue operation, turn on the heater using the supplied remote control or
the control panel on the heater.
OVERHEAT SAFETY FEATURE
This heater is equipped with a overheat safety feature. When the heaters internal components
reach a certain temperature that could cause overheat and possible re, the heater will automat-
ically shut o.
Voltage Rating 120 V (60Hz)
Power Consumption 1500W
Unit Size 11.4 in. (W) x 14.5 in. (D) x 15 in. (H)
Unit Weight 13.1 lbs
5
SAFETY FEATURE
WARNING: IT IS NORMAL FOR THE POWER CORD TO FEEL WARM TO THE TOUCH; HOWEVER, A
LOOSE FIT BETWEEN THE OUTLET AND THE PLUG MAY CAUSE OVERHEATING OF THE PLUG. IF THIS
OCCURS, TRY INSERTING THE PLUG INTO A DIFFERENT OUTLET. CONTACT A QUALIFIED ELECTRI-
CIAN TO INSPECT THE ORIGINAL OUTLET FOR DAMAGE.
IN THE BOX
• INFRARED ZONE HEATING SYSTEM
• REMOTE CONTROL(2 AAA BATTERIES NOT INCLUDED)
• INSTRUCTION BOOKLET
PRODUCT DIAGRAM
WARNING: This heater has a voltage rating of 120
volts. The cord has a plug as shown in A. An adapter
as shown in C is available for connecting three-blade
grounding- type plugs to two-slot receptacles. The
grounding lug extending from the adapter must be
connected to a permanent ground such as a properly
grounded outlet box. The adapter should not be used
if a three-slot grounded receptacle is available.
DO NOT DEFEAT THE SAFETY PURPOSE OF THE
GROUNDED PLUG.
4
WARNING: This heater has a voltage
rating of 120 volts. The cord has a plug as
shown in A. An adapter as shown in C is
available for connecting three-blade grounding-
type plugs to two-slot receptacles. The
grounding lug extending from the adapter must
be connected to a permanent ground such as a
properly grounded outlet box. The adapter
should not be used if a three-slot grounded
receptacle is available.
DO NOT DEFEAT THE SAFETY PURPOSE
OF THE GROUNDED PLUG.
WARNING: It is normal for the power cord to feel warm to the touch; however, a loose fit
between the outlet and the plug may cause overheating of the plug. If this occurs, try inserting
the plug into a different outlet. Contact a qualified electrician to inspect the original outlet for
damage.
IN THE BOX
INFRARED ZONE HEATING SYSTEM
REMOTE CONTROL(2 AAA batteries not Included)
INSTRUCTION BOOKLET
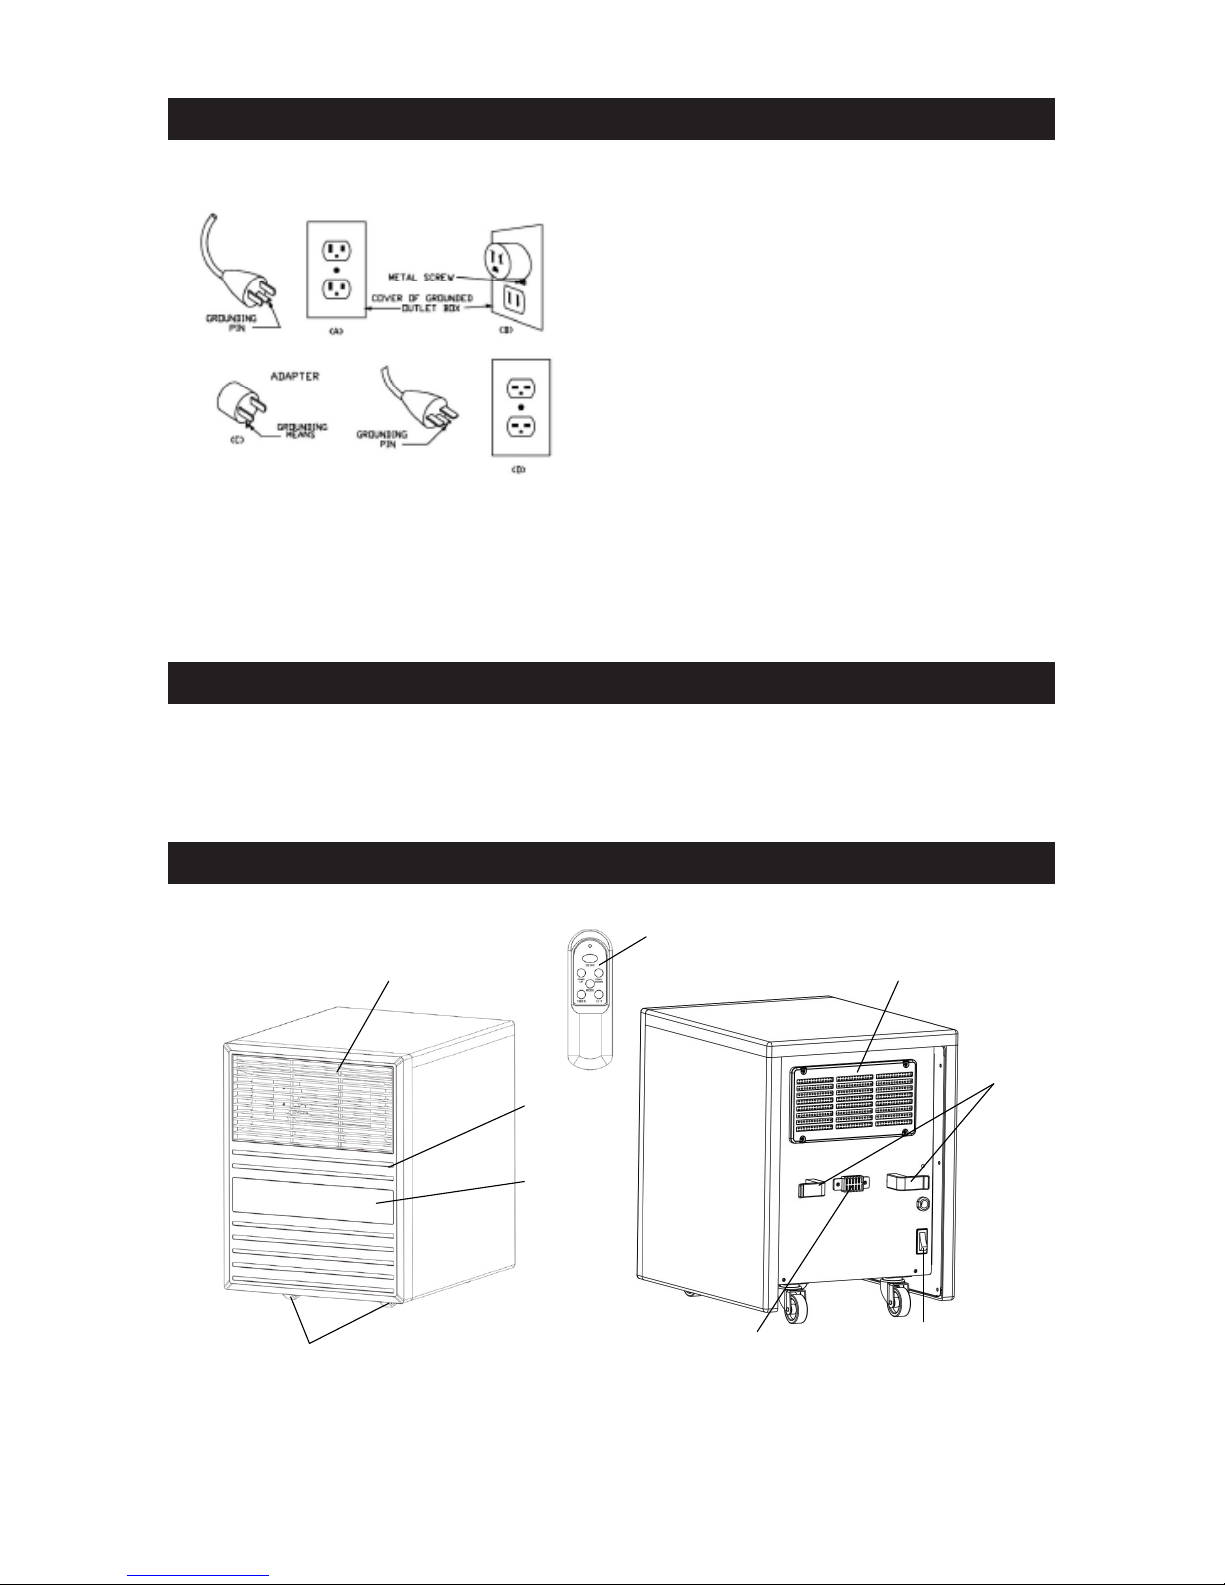
PRODUCT DIAGRAM
Air Outlet
Front Panel
Control Panel
Wheels
Remote Control
Air Intake
Cord Clamp
Power Switch
Temp Sensor
6
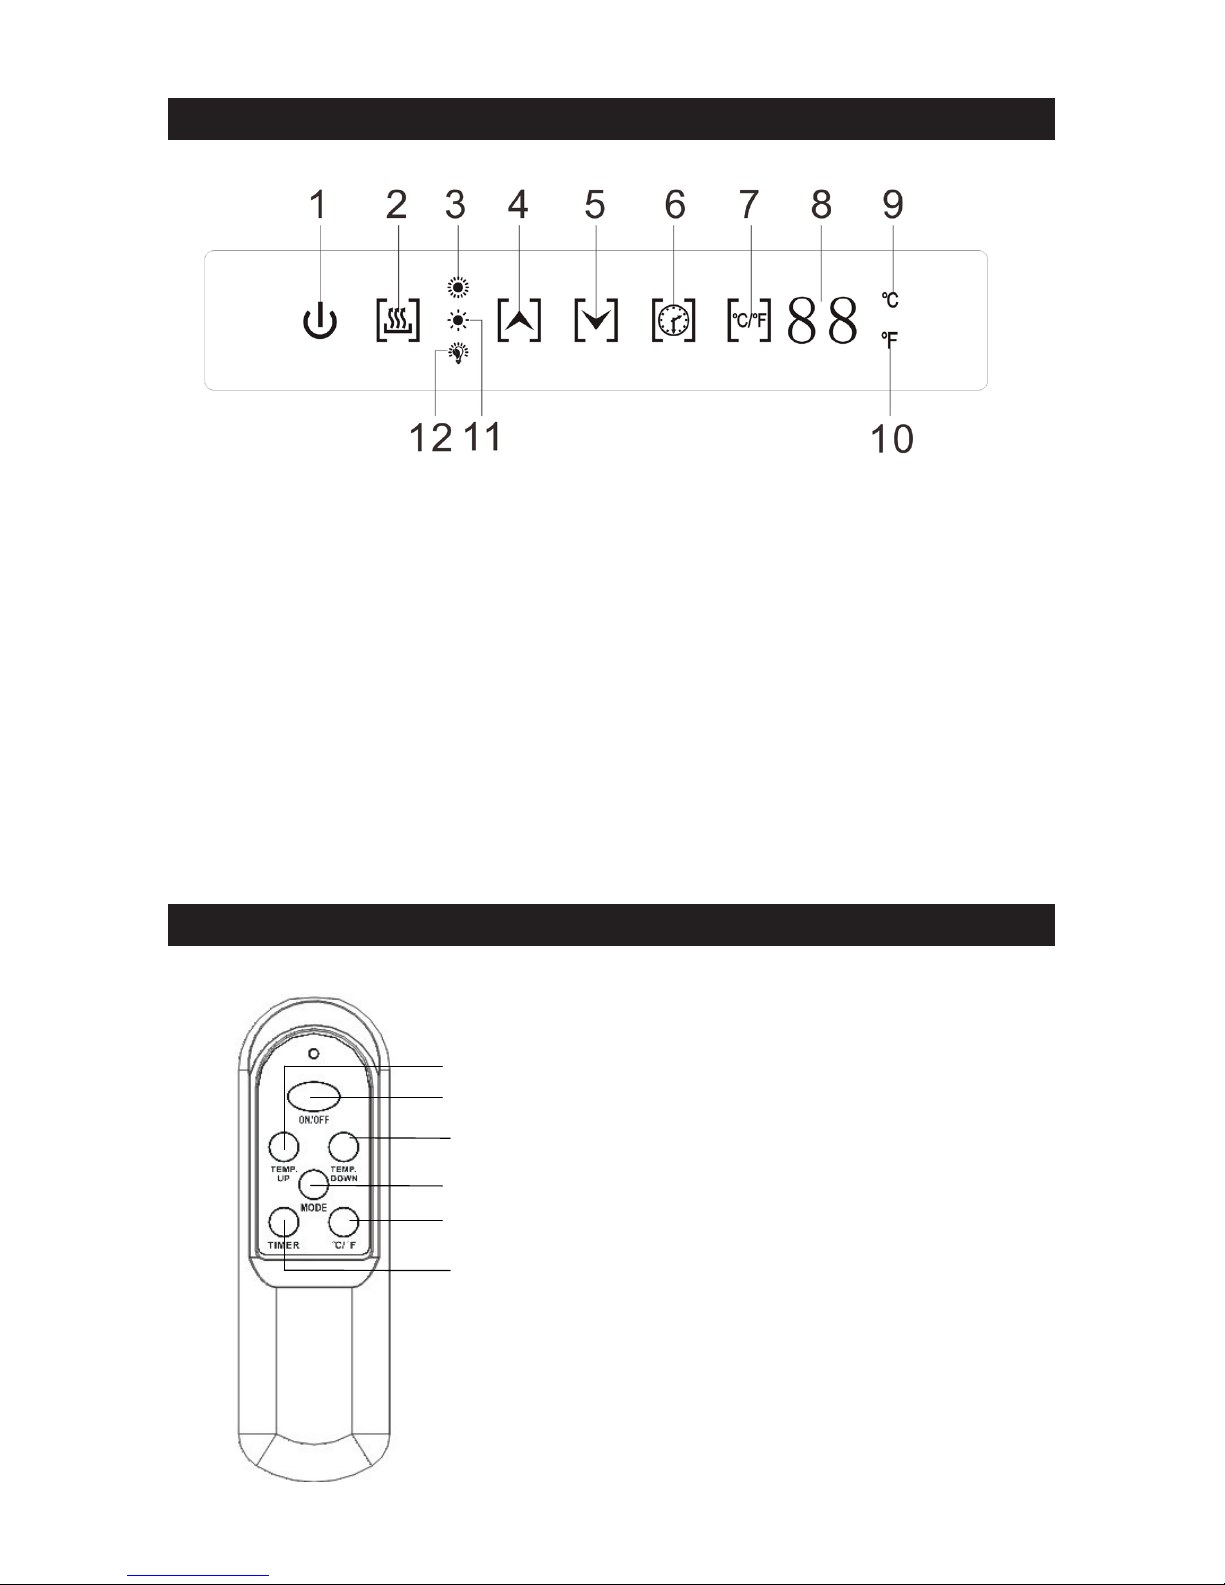
CONTROL PANEL
01. ON/OFF button: Powers the display on and o.
02. Mode button:To select between High:Low and Eco modes.
03. High Mode indicator light: Will be lit when High Heat mode is engaged.
04. Temp up button: To increase desired temperature.
05. Temp down button: To decrease desired temperature.
06. Timer button:Used to engage timer mode and to set hour value for the timer.
07. °C/°F Button : Alternates between Fahrenheit and Celsius.
08. Digital display:Indicate set room temperature or time.
09. Celsius indicator light: Will be lit when temperature displayed is in Celsius.
10. Fahrenheit indicator light: Will be lit when temperature displayed is in Fahrenheit.
11. Low Mode indicator light: Will be lit when Low Heat mode is engaged.
12. Energy-saving mode indicator: Will be lit when energy-saving mode is engaged.
REMOTE CONTROL
5
1ON/OFF button: Powers the display on and off.
2Mode buttonTo select between HighLow and Eco modes.
3High Mode indicator light: Will be lit when High Heat mode is engaged.
4Temp up button: To increase desired temperature.
5Temp down button: To decrease desired temperature.
6Timer buttonUsed to engage timer mode and to set hour value for the timer.
7/Button : Alternates between Fahrenheit and Celsius.
8Digital displayIndicate set room temperature or time.
9Celsius indicator light: Will be lit when temperature displayed is in Celsius.
10Fahrenheit indicator light: Will be lit when temperature displayed is in Fahrenheit.
11Low Mode indicator light: Will be lit when Low Heat mode is engaged.
12Energy-saving mode indicator: Will be lit when energy-saving mode is engaged.
Control Panel
6
PREPARATION
Place the heater on a firm, level surface and plug into a grounded 120V 60Hz power outlet. and
turn on the power switch in the rear of the unit. Only operate heater in upright position with
caster wheels attached.
Insert 2 AAA batteries into the remote control before using (Batteries Not Included)
OPERATING INSTRUCTIONS
1Start and select working mode
Or
Turn the heater on by pressing the ON/OFF button on the
control panel or by pressing the Power button on the
supplied remote control.
Once power is off, heating element will stop working at
first. Fan will prolong working for 3 min to emit plenty of
heat inside. This mark will indicate running during the 3
Remote Control
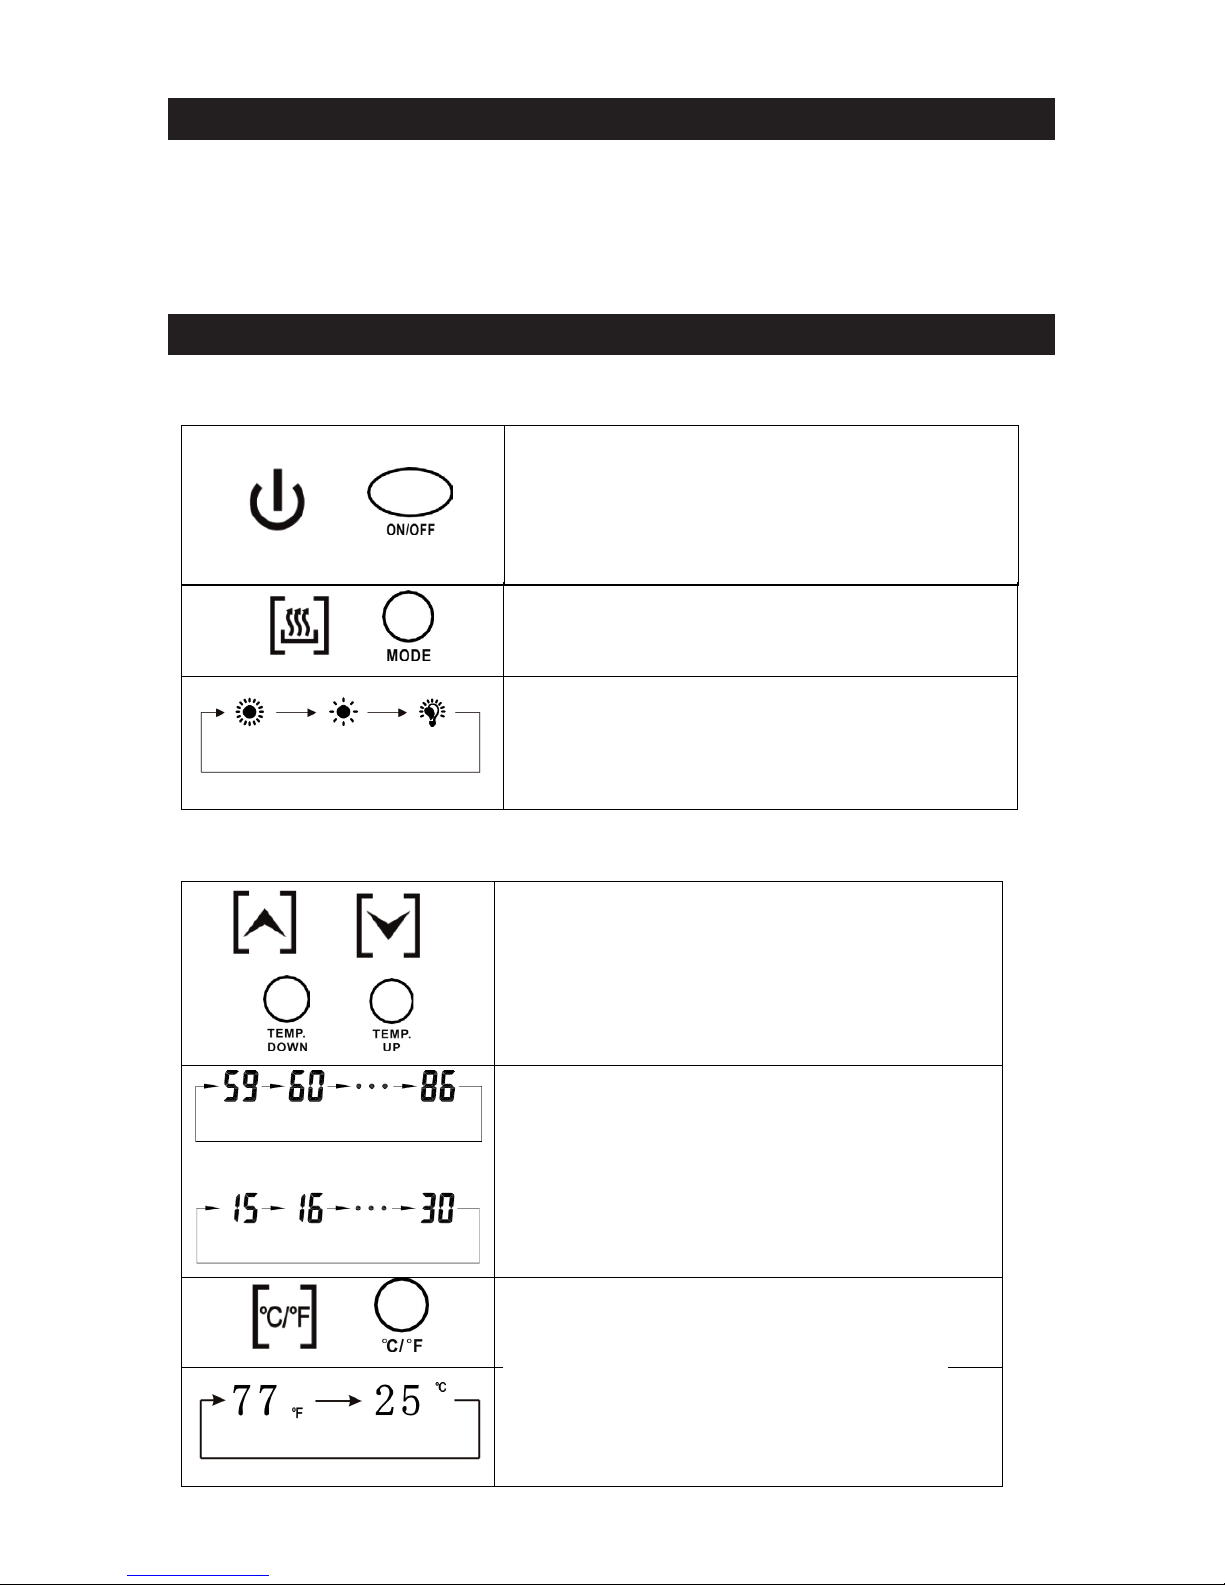
/button: Button for alternating between Fahrenheit and Celsius
ON/OFF button: Used for power-on or power-off
Temp up button: to make set temperature rise
Temp down button: to make set temperature decline
Timer button: Used for setting timer and adjust time value of timing
Mode buttonUsed for mode selection
Temp up button: to make set temperature rise
ON/OFF button: Used for power-on or power-o
Temp down button: to make set temperature decline
Mode button:Used for mode selection
°C/°F button: Button for alternating between Fahrenheit and Celsius
Timer button: Used for setting timer and adjust time value of timing
7
PREPARATION
6
PREPARATION
Place the heater on a firm, level surface and plug into a grounded 120V 60Hz power outlet. and
turn on the power switch in the rear of the unit. Only operate heater in upright position with
caster wheels attached.
Insert 2 AAA batteries into the remote control before using (Batteries Not Included)
OPERATING INSTRUCTIONS
1Start and select working mode
Or
Turn the heater on by pressing the ON/OFF button on the
control panel or by pressing the Power button on the
supplied remote control.
Once power is off, heating element will stop working at
first. Fan will prolong working for 3 min to emit plenty of
heat inside. This mark will indicate running during the 3
Remote Control
/button: Button for alternating between Fahrenheit and Celsius
ON/OFF button: Used for power-on or power-off
Temp up button: to make set temperature rise
Temp down button: to make set temperature decline
Timer button: Used for setting timer and adjust time value of timing
Mode buttonUsed for mode selection
7
min.
Or
Select a heat Mode
Press the MODE button to toggle between the three heat
modes.
High Mode uses 1500W; Low Mode uses 1000W. ECO
mode is an Eco nomic Energy Saving Function. When ECO
mode is chosen, the heater will manage itself from less to
more heating power (watts) in an attempt to maintain a
constant warm 68(20).
2Setting Desired Temperature
Or Or
Or
Adjust the desired temperature by pressing the Up/Down
arrows on the control panel or remote control.
Or
Desired temperature options vary from 59to 86or
from 15to 30. Once you have chosen the desired
temperature, the heater will remain on until the room
temperature increases to the temperature on the digital
display. The heater will cycle on and off to maintain the
desired room temperature.
Or
Press /button to change the display temperature
between Fahrenheit and Celsius.
The Fahrenheit indicator LED will light , when the
temperature is displayed in Fahrenheit.
The Celsius LED will light, when the temperature is
displayed in Celsius.
3Setting the POWER OFF TIMER Function
Place the heater on a rm, level surface and plug into a grounded 120V 60Hz power outlet. and
turn on the power switch in the rear of the unit. Only operate heater in upright position with caster
wheels attached.
Insert 2 AAA batteries into the remote control before using (Batteries Not Included)
OPERATING INSTRUCTIONS
01. START AND SELECT WORKING MODE
02. SETTING DESIRED TEMPERATURE
Turn the heater on by pressing the ON/OFF button on the
control panel or by pressing the Power button on the supplied
remote control.
Once power is o, heating element will stop working at rst. Fan
will prolong working for 3 min to emit plenty of heat inside. This
mark will indicate running during the 3 min.
Select a heat Mode
Press the MODE button to toggle between the three heat
modes.
High Mode uses 1500W; Low Mode uses 1000W. ECO mode is an
Eco nomic Energy Saving Function. When ECO mode is chosen,
the heater will manage itself from less to more heating power
(watts) in an attempt to maintain a constant warm 68°F(20°C).
Adjust the desired temperature by pressing the Up/Down
arrows on the control panel or remote control.
Desired temperature options vary from 59°F to 86°F,or from
15°C to 30°C. Once you have chosen the desired
temperature, the heater will remain on until the room tem-
perature increases to the temperature on the digital display.
The heater will cycle on and o to maintain the desired room
temperature.
Press °C/°F button to change the display temperature
between Fahrenheit and Celsius.
The Fahrenheit indicator LED will light , when the temperature
is displayed in Fahrenheit.)
The Celsius LED will light, when the temperature is displayed
in Celsius.

8
OPERATING INSTRUCTIONS
03. SETTING THE POWER OFF TIMER FUNCTION
Note: The Power-O-Timer Function will allow for the heater to power OFF after a certain set time,
and can only be set while the heater’s display is in the “On” position.
8
Note: The Power-Off-Timer Function will allow for the heater to power OFF after a
certain set time, and can only be set while the heater’s display is in the “On” position.
Or
Turn the heater to the “On” position .Press the Timer
button on the heater’s control panel or the remote.
The digital display changes from the “temperature” to the
“hours” option for the timer. Continue to press the timer
button to change the number of hours you would like the
heater to run before powering itself off .The hour options
for the timer are from 0 to 12 hrs. (in 1 hr increments).
4Setting the POWER-ON-TIMER Function
(Note: The Power-ON-Timer Function will allow for the heater to power ON after a
certain set time, and can only be set while the heater’s display is in the “Off” position.
Or
Turn the heater to the “OFF” position .Press the Timer
button on the heater’s control panel or the remote.
The digital display shows the “hours” option for the timer.
Continue to press the timer button to change the number of
hours you would like the heater’s internal clock to count
down before powering itself on .The hour options for the
timer are from 0 to 12 hrs. (in 1 hr increments).
5Setting electro lock
The Electro Lock can help avoid the heater from being accidentally engaged by children. The
locking mechanism can be set in both the ON and OFF modes.
And
Press Temp Up and Temp Down buttons at the same time
for 3 seconds. Locking is complete when you hear a beep.
When locked, the functions of the control panel and remote
will be locked for use.
And
When you need to unlock it, press Temp Up and Temp
Down buttons at the same time for 3 seconds. You will hear
a beep .The control panel and remote control will become
functional again.
04. SETTING THE POWER-ON-TIMER FUNCTION
(Note: The Power-ON-Timer Function will allow for the heater to power ON after a
certain set time, and can only be set while the heater’s display is in the “O” position.
Turn the heater to the “On” position .Press the Timer button on
the heater’s control panel or the remote.
The digital display changes from the “temperature” to the
“hours” option for the timer. Continue to press the timer button
to change the number of hours you would like the heater to run
before powering itself o .The hour options for the timer are
from 0 to 12 hrs. (in 1 hr increments).
Turn the heater to the “OFF” position .Press the Timer button
on the heater’s control panel or the remote.
The digital display shows the “hours” option for the timer. Con-
tinue to press the timer button to change the number of hours
you would like the heater’s internal clock to count down before
powering itself on .The hour options for the timer are from 0 to 12
hrs. (in 1 hr increments).
05. SETTING ELECTRO LOCK
The Electro Lock can help avoid the heater from being accidentally engaged by children. The
locking mechanism can be set in both the ON and OFF modes.
Press Temp Up and Temp Down buttons at the same time for 3
seconds. Locking is complete when you hear a beep. When locked, the
functions of the control panel and remote will be locked for use.
When you need to unlock it, press Temp Up and Temp Down buttons
at the same time for 3 seconds. You will hear a beep .The control
panel and remote control will become functional again.

9
MAINTENANCE
01. Turn o the power switch in the rear of the unit.
02. Unplug the unit and let it cool completely.
03. To keep the heater clean, the outer shell may be cleaned with a soft, damp cloth. You may use
a mild detergent if necessary. After cleaning, dry the unit with a soft cloth. CAUTION: DO NOT let
liquid enter the heater.
04. DO NOT use alcohol, gasoline, abrasive powders, furniture polish, or rough brushes to clean the
heater. This may cause damage or deterioration to the surface of the heater.
05. DO NOT immerse the heater in water.
06. Wait until the unit is completely dry before use.
07. Air lter needs cleaning after used 3 months of use. Please take o the lter with the 2 steps in
the drawing below. Flush and clean the lter with water, Then, dry it out and re-assemble.
9
MAINTENANCE
1. Turn off the power switch in the rear of the unit.
2. Unplug the unit and let it cool completely.
3. To keep the heater clean, the outer shell may be cleaned with a soft, damp cloth. You
may use a mild detergent if necessary. After cleaning, dry the unit with a soft cloth.
CAUTION: DO NOT let liquid enter the heater.
4. DO NOT use alcohol, gasoline, abrasive powders, furniture polish, or rough brushes to
clean the heater. This may cause damage or deterioration to the surface of the heater.
5. DO NOT immerse the heater in water.
6. Wait until the unit is completely dry before use.
7. Air filter needs cleaning after used 3 months of use. Please take off the filter with the 2
steps in the drawing below. Flush and clean the filter with water, Then, dry it out and re-
assemble.
8. If you do not use the heater for a long time, please take out the remote batteries (to prevent
corrosion ) as shown below. Store the remote in a safe place.
2) Remove Air filter
1) Remove bracket screws (4X)
The unit

10
MAINTENANCE
8. If you do not use the heater for a long time, please take out the remote batteries (to prevent
corrosion ) as shown below. Store the remote in a safe place.
STORAGE
Store the heater in a cool, dry location when not in use. To prevent dust and dirt build-up, use the
original packaging to repack the unit.
BASIC TROUBLESHOOTING
If the heater will not operate, please check the following before seeking repair advice:
01. Check if the power cord is plugged into an electrical outlet, if not, plug in.
02. Check if electricity to the main power switch (in the back) is working.
03. Check to see if the battery on the remote is placed correctly, undamaged.
NOTE: For the heater to function properly, the desired temperature on the heater must be set a
few degrees higher than the temperature in the room. If the seems to not be heating, increase the
desired temperature on the heater to engage the heat elements.
10
STORAGE
Store the heater in a cool, dry location when not in use. To prevent dust and dirt build-up, use the
original packaging to repack the unit.
BASIC TROUBLESHOOTING
If the heater will not operate, please check the following before seeking repair advice:
1. Check if the power cord is plugged into an electrical outlet, if not, plug in.
2. Check if electricity to the main power switch (in the back) is working.
3. Check to see if the battery on the remote is placed correctly, undamaged.
NOTE: For the heater to function properly, the desired temperature on the heater must be
set a few degrees higher than the temperature in the room. If the seems to not be heating,
increase the desired temperature on the heater to engage the heat elements.
PUSH
lid
Battery

11
LIMITED TERM WARRANTY
ONE (1) YEAR FROM DATE OF PURCHASE
WARRANTY TERMS ADDITIONAL CONDITIONS
ADDITIONAL CONDITIONS
DELLA warrants that its merchandise are free from
manufacturing defects (workmanship and/or mate-
rial) and will either give credit or replace defective
parts for a period of up to one (1) year from the
date of purchase in accordance with the conditions
set forth below. If a manufacturing defect is found,
DELLA should be notied promptly of the defect
and supplied a copy of the invoice and delivery
ticket. Inspection by a DELLA employee or repre-
sentative may be necessary to verify that a man-
ufacturing defect exists, or you may be required
to submit samples to DELLA along with a digital
image of the defects. If replacement is required in
accordance with this warranty and the defective
material or merchandise has been discontinued or
unavailable, DELLA reserves the right to select and
supply similar merchandise or offer full credit for
the merchandise; otherwise the same material or
merchandise will be supplied for replacement pur-
poses. This warranty is made solely to the retailer
and is not transferable under any circumstances.
It is the retailer’s responsibility to contact DELLA
with a claim. We will not handle claims from con-
sumers directly; all requests must go through the
retailer who sold the merchandise to the consum-
er. We advise all retailers to retain invoices for a
minimum of one (1) year for warranty purposes.
This warranty supersedes and replaces all implied
warranties of merchantability and use for particular
purpose. No representative, employee, or agent of
DELLA or any other person is authorized to assume
for DELLA any additional liability or responsibility in
connection with DELLAs merchandise except as
described above. Implied warranties or merchant-
ability and tness of the merchandise are limited to
a period of one (1) year from the date of purchase.
In no event shall DELLA be liable for indirect, con-
sequential or incidental damages of any kind.
The following examples are not
manufacturer’s defects:
• Colors may vary slightly from the photo because
of photography and printing tolerances.
• Sizes are stated in U.S. standard measurements
while the actual sizes are manufactured using
the metric system. Therefore the sizes may
vary slightly.
• There are no exchanges or refunds on any
pillows or toppers sold.
• No returns for buyer’s remorse.
* No returns - other than stated above -
will be accepted
Warranty is void for any of the following conditions:
1 Improper maintenance or improper use resulting
in damage.
2 Any product modications by dealer, consumer,
or other parties not authorized by DELLA will
void this warranty.
3 Floor samples sold or products designated “AS
IS” at the time of purchase are not covered by
the warranty.
4 Warranty does not cover minor variations or
differences be tween oor samples or printed
illustrations and your furniture.
5 Cost of packaging and shipping to and from
DELLA is not covered by the warranty unless
expressly arranged by DELLA.
6 This warranty covers only articles of appliances
intended for residential use only, does not cover
any industrial, commercial, institutional, or
rental use.
7 Dissatisfaction due to buyer’s remorse.
8 Normal wear and tear.
9 Damages incurred during transportation.
10 Damages incurred during assembling
or maintenance.
11 Damages incurred by accidents or abuse.
Additional conditions for warranty on upholstery
are listed on the attached addendum.

**WARNING: READ THIS INSTRUCTION MANUAL CAREFULLY BEFORE USE.
www.dellaproductsusa.com 909. 344. 2588
Table of contents
Other DELLA Heater manuals


Popular Heater manuals by other brands

Marley
Marley WD02112A Installation, operation & maintenance instructions

Drayton
Drayton Wiser user guide

Space-Ray
Space-Ray LRU25-HB Supplemental instructions

HTW
HTW HTW-CAL2000BLACK owner's manual

Russell Hobbs
Russell Hobbs RH11C Instructions and warranty

Hanover
Hanover 9711041 Assembly & operating instructions


