dellonda DL7 User manual
www.dellonda.co.uk Issue 1 09/07/2019
True Wireless Stereo Earbuds
Model No. DL7
Thank you for purchasing a Dellonda product. Manufactured to a high standard,
this product will, if used according to these instructions, and properly maintained,
give you years of trouble free performance.

2 www.dellonda.co.uk
Important Information
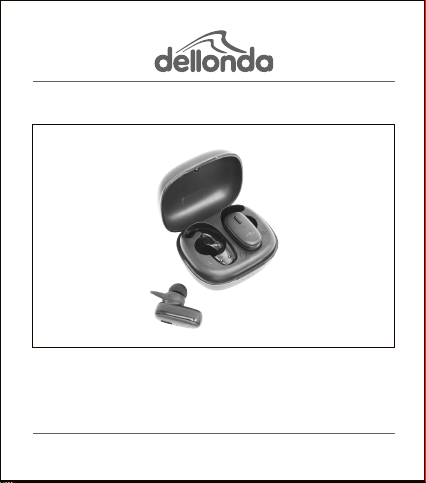
About the Product
Contents
Functions
1Multifunction button
2Indicator light
3Charging contact point
4Charge indicator
5Charging case indicator
Wearing Earphones
Please read these instructions carefully. Note the safe operational requirements,
warnings & cautions. Use the product correctly and with care for the purpose for
which it is intended. Failure to do so may cause damage and/or personal injury and
will invalidate the warranty. Keep these instructions safe for future use.
Fashionable and comfortable design
with true wireless stereo technology.
On-the-go charging case for storage
and protection. On ear control allows
user to adjust volume, skip tracks and
answer calls. Three pairs of silicone
earbuds to fit all ear sizes. Supplied with
a micro USB charging cable. Suitable for
outdoor sports and everyday use.
Wirelss earphones, charging case, 3
pairs silicone eartips (sizes S/M/L), 3
pairs earwings (sizes S/M/L), micro
USB cable.
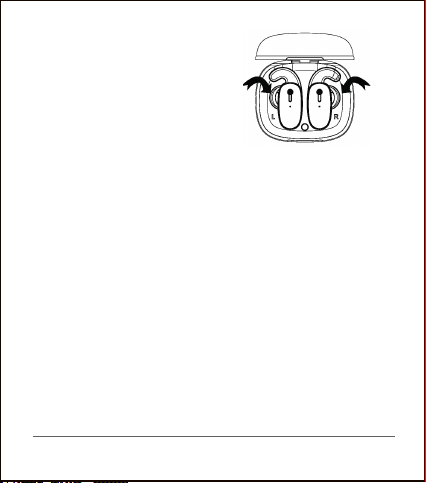
Piace ear bud in ear canal and adjust
for fit and comfort by rotating it back
and forth.
3www.dellonda.co.uk
Charging (case)
Charging (earbuds)
How to turn On
Method 1: Take both earbuds out of
the charging case. They will turn on
other
Method 2: When the earbuds are off,
press and hold the multi-function
How to turn Off
Method 1: Put the earbuds back into
the charging case, they will turn off
automatically.
Method 2: When the earbuds are
powered on, press and hold the multi
-function button on either earbud for
5 seconds. (LED lights on both earbuds
will remain orange for 4 seconds).
To charge the charging box, simply
connect it to the USB power supply
through the micro USB cable. When
charging, the LED lights on front of the
charging box will flash. After charging,
the four LED lights will remain on for 1
minute and then all will be turned off. A
fully charged charging case can
support two earphones recharging
approximately four times. All 4 LEDs lit
indicate capacity is 100%, 3 LEDs
indicate 75%, 2 LEDs indicate 50%, 1
LEDindicates 25% or less.
To charge the earbuds, simply place
them into the charging case (ensure
two earphones are placed in
corresponding slot). The LED lights on
both earbuds turning orange indicate
that on both earbuds turning orange
indicate that earphones are under
charging status and then earphones
are under charging status and then will
turn off when fully charged. Note:
Please charge the earbuds and the
charging case once at least every 3
months if you do not use the earbuds
for a long time. Please disconnect the
charger once fully charged.
and connect with each
automatically .
button on either earbud for 3 seconds.
(LED lights on both earbuds will show
white for 2 seconds)

4www.dellonda.co.uk
Note:If you turn one of the earbuds off
while both earphones are paired with your
wireless enabled device, the other will
turn off at the same time.
How to Pair
Twin Earbud Mode
1. Take both earbuds out of the charging
case, they will power on and connect with
each other automatically. The earbuds
will automatically enter pairing mode
(orange and white LEDs on right earbud
will flash and voice prompt says“Pairing”
2. Enable Bluetooth on your device and
select “DL7” from list to connect. You
will hear voice prompt ”Connected” once
connected.
3.Once the earbuds are paired with your
device manually for the firsh time as
described above they could pair with
this device automatically each time in
the future as soon as you take them out
from charging case.
Mono Earbud Mode
Mono mode for Right earbud:
Take the right earbud out of the charging
case, it will power on and enter pairing
mode automatically. Enable wireless on
your device and choose “DL7” on the list
Mono mode for left earbud:
How to Reset Pairing Mode
1. Place both L and R earbuds in case
when charging. LEDs turn off when
fully charged.
to connect. Next time you use the right
earphone it will be still used as a mono
channel. When the left and right
earphones are taken out together, the
two earphones will automatically be
paired for use as binaural stereo
earphones.
Take the left earbud out of the charging
case, it will power on automatically.
Enable wireless on your device and
search for “DL7 L”, tap to connect it.
Next time you take the left earphone it
will be still used as a mono channel.
When the left and right earphones are
taken out together, the two earphones
will automatically be paired to used as
binaural stereo earphones.
If the left hand earbud can’t connect
with the right side or only one side
works, place both earphones into
charging case for a short time (one
minute approximately). Remove from
case and see if reconnection is made.
If connection is not made please refer
to the following method.
2. With earbuds in charge case press
and hold MFB on both R and L earbuds
until they show white and orange LEDs
flashing.
3. Remove both earbuds from charge
case and earbuds will reconnect. The
right earbud will flash white and orange
and the left earbud will flash white appro
ximately every 6 seconds.
Controls
Play/pause Tap earbud MFB once
Volume up quick double tap MFB
left earbud
Volume down quick triple tap MFB
left earbud
Next track quick double tap MFB
right earbud
Previuos track quick triple tap MFB
right earbud
Answer/End call Tap either MFB once
Reject call Press and hold either
MFB
Activate SIRI Press and hold either
MFB for 2 seconds
until voice prompt.
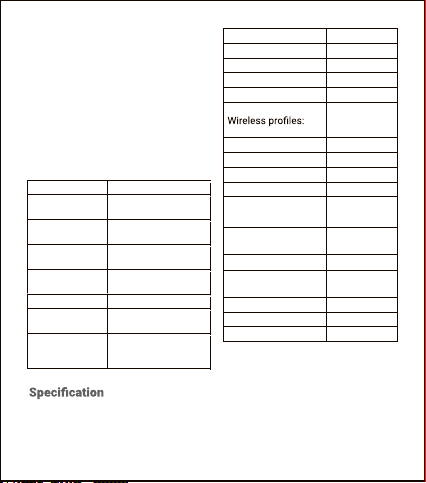
Wireless version: V5.0
Music play time: 3 hours
Talk time: 3 hours
Standby time: 40 hours
Effective distance: up to 10m
HFP1.7
A2DP1.3
AVRCP1.5
Driver: 10mm
Sound pressure level: 98+/- 3 dB
Frequency response: 20Hz - 20kHz
Battery (headset): 50mAH Li-Po
Charging voltage of
headset 5V
Charging time of
headset 1.5 hours
Battery (box) 470mAH Li-Po
Charging voltage
of box 5V
Charging time of box 1.5 hours
Earphone weight 7g x 2 pcs
Charging box weight 50g
NOTE: This equipment has been tested
and found to comply with the limits for
a Class B dig ital device, pursuant to
part 15 of the FCC Rules.
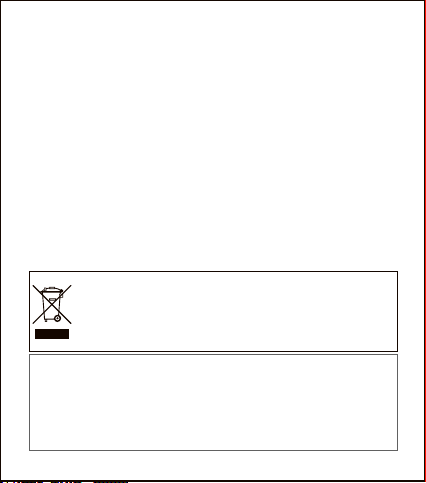
Environment Protection
Recycle unwanted materials instead of disposing of them as waste. All tools,
accessories and
packaging should be sorted, taken to a recycling centre and
disposed of in a manner which is
compatible with the environment. When the
product becomes completely unserviceable and requires disposal, drain any fluids
(if applicable) into approved containers and dispose of the product and fluids
according to local regulations.
WEE Regulations
Dispose of this product at the end of its working life in compliance with
the EU Directive on
Waste Electrical and Electronic Equipment (WEEE).
When the product is no longer required,
it must be disposed of in an
environmentally protective way. Contact your local solid waste authority
for recycling information.
- Reorient or relocate the receiving
antenna.
- Increase the separation between the
equipment and receiver.
-Connect the equipment into an outlet
on a cir cuit different from that to which
the receiver is connected.
-Consult the dealer or an experienced
radio/TV technician for help. changes
(1) this device may not cause harmful
interference.
(2) this device must accept any inter
ference received, including
interference that may cause undesired
operation.
These limits are designed to provide
reasonable protection against harmful
interference in a res idential installation.
This equipment generates, uses and can
radiate radio frequency energy and, if not
installed and used in accordance with
the instructions, may cause harmful
interference to radio communications.
However, there is no guarantee that
interference will not occur in a particular
installation. If this equipment does
cause harmful interference to radio or
television reception, which can be
determined by turning the equipment off
and on, the user is encouraged to try to
correct the interference by one or more
of the following measures:
/modifications not expressly approved
by the party responsible for complian
ce could void the user’s authority to
operate the equip ment. This device
complies with Part 15 of the FCC
Rules. Operation is subject to the
following two conditions:
Table of contents


