DeLOCK 64071 User manual

Product-No:64071
User manual no:64071-a
www.delock.com
User manual
Laser Distance Meter
Bedienungsanleitung

-2-
English
Description
This distance meter by Delock is used for the laser-assisted
measurement of indoor and outdoor distances, areas and angels.
The built-in class 2 laser allows a precise measurement with a
tolerance of ± 2 mm. The 180 mAh rechargeable battery can be
charged via the USB Type Micro-B female port.
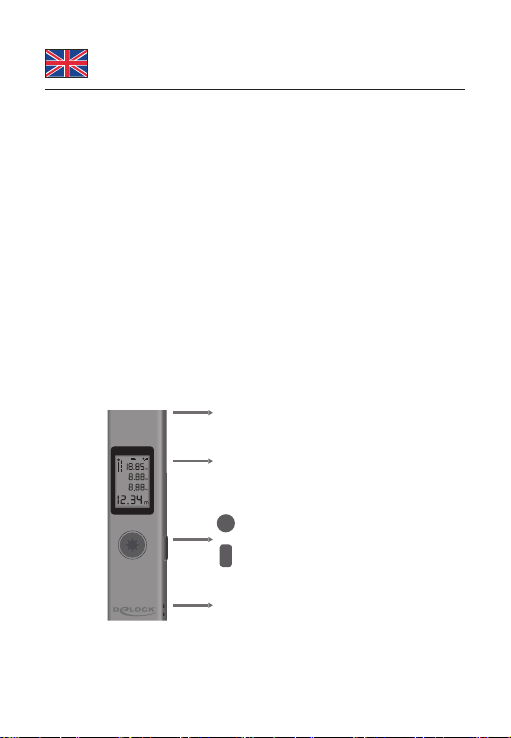
All information at a glance
The easy to read backlight LCD display shows all important
information at a glance. The four latest measurement results,
measurement method and battery charge status can be read o.
Specication
• Connector: 1 x USB Type Micro-B charging port
• Measuring range: 3 cm - 40 m
• Accuracy: ± 2 mm
• Adjustable measuring unit: m / in / ft
• LCD display with backlight
• Charging power: 5 V min. 0.2 A
• Rechargeable battery: Li-Polymer battery 180 mAh
• Light source: laser class 2 620 - 670 nm, <1 mW
• Robust aluminum housing
• Weight: ca. 28 g
• Dimensions (LxWxH): ca. 86.0 x 22.4 x 11.3 mm
Package content
• Laser distance meter
• Charging cable USB 2.0 Type Micro-B > USB 2.0 Type-A male
• Wrist strap
• User manual

-3-
English
Safety instructions
• The device generates visible laser beams.
• The device corresponds to laser class 2 according to:
IEC 60825-1:2015-07
• Ensure that the laser beam is guided in such a way that no
persons are in the projection area and that the reected beam
does not reach the occupied zone of persons.
• Do not look into the laser beam and do not point it at persons or
animals. Laser radiation can cause injuries to the eye.
• If a laser beam hits the eye, close the eye consciously and move
the head out of the beam immediately.
• Do not aim the laser beam at reective surfaces.
• Repair or maintenance work may only be carried out by trained
specialists who are familiar with the respective hazards.
Product Overview
Laser emission /
reception lens
LCD display screen
Operation button
Function button
Lanyard hole

-4-
English
1.5s
3s
switch On / O:
long press for about 1.5
seconds to switch on
long press for about 5
seconds to switch o,
45 seconds without
operation automatic
shutdown
Measurement:
Single short-twist press
starts measuring
again to get
measurement data
Switch starting point:
Long press for 3
seconds in the power
on state
0.5s
1.5s
Continuous
measurement:
Press and hold the
operation button
for 1.5 seconds.
Release the button
to initiate continuous
measurement.
Maximum / minimum:
In continuous
measurement
mode, the system
automatically displays.
Head measurement icon
Tail measurement icon
max
min

-5-
English
Advanced Features
short-circuit switching function
long-term exit advanced function mode
A. Area measurement
Area measurement symbol
Area data measurement
Data / Length "1"
Data / Width "2"
Click the operation button to get the data "1".
Click again the data "2".
The system automatically calculates the area data.
B. Volume measurement
Volume measurement symbol
Volume data measurement
Data / Length "1"
Data / Width "2"
Data / Height "3"
Click the operation button to get the data "1"
Click again get the data "2".
Click again to get the data "3" and the system will calculate
the volume data.

-6-
English
C. Pythagorean measurement (Indirect)
In this mode, the system uses the Pythagorean law a²+b²=c².
Calculate the third side data by measuring data on both sides.
One Pythagorean
One ply symbol
Data "c" automatic calculation
Data / Length "a"
Data / Length "b"
Click the operation button to get the
data "a".
Click again data "b".
The system automatically calculates
the "c" data.
Secondary Pythagorean (adding data)
Data / Width "e"
Two ply symbol
Data "c" automatic calculation
Data / Length "a"
Data / Width "b"
Click to operate data "a"
Click again data "b"
Click again to get the data "e"
System calculates data "c"

-7-
English
Secondary Pythagorean (Data subtraction)
Data / Width "e"
Two ply symbol
Data "c" automatic calculation
Data / Length "a"
Data / Width "b"
Click to operate the data "a"
Click again data "b"
Click again to get the data "e"
system calculates "c" data
One-button height measurement / angle measurement
The system uses the angle sensor to measure the angle, the
shortest distance and the height of the object with one click.
Data / Length "a"
Data / Height "b"
Angle Data "e"
Data "d" automatic measurement
Click to get the data "D"
The system will calculates the shortest
distance "a".
Automatically calculate the actual
height "b".
Automatically calculate the angle "e"
One ply symbol

-8-
English
Screen Description
Measurement reference
Battery indicator
Laser intensity
Secondary display area
Laser work instruction
Maximum / minimum
Main display area
In the setting mode, the meaning of the icon:
Set mode/status
Buzzer on/o
Inch (imperial unit)
Calibration
Meter (metric unit)
Backlight on/o
Feet (imperial unit)
Wall Rangender Laserirradiation Measured object

-9-
English
Enter setting mode
The way to enter the setting mode, turn on and keep pressing for
5 seconds.
single short pressing change setting data/mode
longer short pressing (1 second), save the current settings and go
to the next setting
Setup Page 1:
Calibrating the laser
rangender +- 7mm.
Setup Page 2
Change the unit of measure:
´“, in, /in m, ft
Setup Page 3
Turn the backlight on / o:
BL.ON / OFF
ON / O
-7-0+7

-10-
English
Support Delock
If you have further questions, please contact our customer support
You can nd current product information on our homepage:
www.delock.com
Final clause
Information and data contained in this manual are subject to change
without notice in advance. Errors and misprints excepted.
Copyright
No part of this user manual may be reproduced, or transmitted
for any purpose, regardless in which way or by any means,
electronically or mechanically, without explicit written approval of
Delock.
Edition: 11/2019

-11-
Deutsch
Kurzbeschreibung
Dieser Entfernungsmesser von Delock dient der lasergestützten
Messung von Distanzen, Flächen und Winkeln im Innen- und
Außenbereich. Der verbaute Klasse 2 Laser ermöglicht eine präzise
Messung mit einer Toleranz von ± 2 mm. Der integrierte 180 mAh
Akku kann über eine USB Typ Micro-B Buchse geladen werden.
Alle Informationen auf einen Blick
Die gut ablesbare beleuchtete LCD Anzeige zeigt alle wichtigen
Informationen auf einen Blick. Es können die vier letzten
Messergebnisse, die Messmethode und der Ladezustand des
Akkus abgelesen werden.
Spezikation
• Anschluss: 1 x USB Typ Micro-B Ladebuchse
• Messbereich: 3 cm - 40 m
• Toleranz: ± 2 mm
• Einstellbare Masseinheit: m / in / ft
• LCD Anzeige mit Hintergrundbeleuchtung
• Ladeleistung: 5 V min. 0,2 A
• Akku: Li-Polymer 180 mAh
• Lichtquelle: Laser Klasse 2 620 - 670 nm, <1 mW
• Robustes Aluminiumgehäuse
• Gewicht: ca. 28 g
• Maße (LxBxH): ca. 86,0 x 22,4 x 11,3 mm
Packungsinhalt
• Laser-Entfernungsmesser
• Ladekabel USB 2.0 Typ Micro-B > USB 2.0 Typ-A Stecker
• Handgelenkschlaufe
• Bedienungsanleitung

-12-
Deutsch
Sicherheitshinweise
• Das Gerät erzeugt sichtbare Lasterstrahlen.
• Das Gerät entspricht Laserklasse 2 gemäß: EN 60825-1:2015-07
• Achten Sie darauf, dass der Laserstrahl so geführt wird, dass
sich keine Personen im Projektionsbereich benden und das
reektierte Strahlen nicht in den Aufenthaltsbereich von Personen
gelangen.
• Sehen Sie nicht in den Laserstrahl und richten Sie ihn nicht auf
Personen oder Tiere. Laserstrahlung kann zu Verletzungen am
Auge führen.
• Sollte ein Laserstrahl in Auge treen, ist das Auge bewußt zu
schließen und der Kopf sofort aus dem Strahl zu bewegen.
• Richten Sie den Laserstrahl nicht auf reektierende Flächen.
• Reparatur- oder Wartungsarbeiten dürfen nur vom ausgebildeten
Fachmann, der mit den jeweiligen Gefahren vertraut ist,
durchgeführt werden.
Übersicht
Laser Sende- und
Empfangseinheit
LCD-Display
Bedienknopf
Funktionstaste
Befestigungsönung
Handschlaufe

-13-
Deutsch
1.5s
3s
Ein/Aus schalten:
gedrückt halten für
ca. 1 Sekunde um
anzuschalten;
um auszuschalten ca.
5 Sekunden gedrückt
halten,
nach 45 Sekunden
Inaktivität schaltet das
Gerät automatisch ab
Messung:
kurzes drücken des
Bedienknopfes aktiviert
den Laser, nochmaliges
drücken löst einen
Messvorgang aus
Umstellen des Mess-
Ausgangspunktes:
Halten Sie den
Bedienknopf für 3
Sekunden gedrückt,
während der Laser
aktiviert ist
0.5s
1.5s
kontinuierliche
Messung:
drücken und halten
des Bedienknopfes für
1,5 Sekunden. Den
Bedienknopf loslassen
um die kontinuierliche
Messung zu starten.
Maximum / Minimum
Im Modus der
kontinuierlichen
Messung zeigt das
Display min/max.
Kopf Mess-Ausgangspunkt
Fuß Mess-Ausgangspunkt
max
min

-14-
Deutsch
Erweiterte Funktionen
kurzes Drücken wechselt zwischen den
Funktionen
langes Drücken verlassen der erweiterten
Funktionen
A. Flächen Messung
Fläscheninhalt-Symbol
Flächeninhalt
Distanz / Länge "1"
Distanz / Breite "2"
Drücken Sie den Bedienknopf um das erste Maß "1" zu
erhalten, drücken Sie noch einmal um das zweite Maß
"2" zu erhalten. Das System berechnet automatisch den
Flächeninhalt.
B. Volumen Messung
Volumen-Symbol
Volumen
Distanz / Länge "1"
Distanz / Breite "2"
Distanz / Höhe "3"
Drücken Sie den Bedienknopf um das erste Maß "1" zu
erhalten, drücken Sie noch einmal um das zweite Maß "2"
zu erhalten und noch einmal für das Dritte. Das System
berechnet automatisch das Volumen.

-15-
Deutsch
C. pythagoräische Messung
In diesem Modus nutzt das System den Satz des Pythagoras
a²+b²=c² um die Länge der dritten Seite zu berechnen.
einfaches Dreieck
Ein Dreieck Symbol
Daten / Länge cwird
automatisch berechnet
Distanz / Länge "a"
Distanz / Länge "b"
Drücken Sie den Bedienknopf um das
Maß "a" zu erhalten, drücken Sie noch
einmal um das Maß "b" zu erhalten.
Das System berechnet automatisch
das Maß "c".
doppeltes Dreick
Distanz / Länge "e"
doppeltes Dreieck Symbol
Länge cwird automatisch
berechnet
Distanz / Länge "a"
Distanz / Länge "b"
Drücken Sie den Bedienknopf um das
Maß "a" zu erhalten, drücken Sie noch
einmal um das Maß "a" zu erhalten
und drücken Sie noch einmal um das
Maß "e" zu erhalten. Das System
berechnet automatisch das Maß "c".

-16-
Deutsch
doppeltes Dreieck (Subtraktionsmethode):
Distanz / Breite "e"
doppeltes Dreieck Symbol
Länge cwird automatisch berechnet
Distanz / Länge "a"
Distanz / Breite "b"
Drücken Sie den Bedienknopf um das
Maß "a" zu erhalten, drücken Sie noch
einmal um das Maß "b" zu erhalten
und drücken Sie noch einmal um das
Maß "e" zu erhalten. Das System
berechnet automatisch das Maß "c".
Ein-Knopf Höhenmessung / Winkelmessung:
Das System nutzt einen Winkelsensor um den Winkel, die kürzeste
Distanz und die Höhe des Objekts zu ermitteln.
Distanz / Länge"a"
Distanz / Höhe "b"
Winkel "e"
Länge"d" Messergebnis
Drücken Sie den Bedienknopf um die
Längendaten zu erhalten.
Das System berechnet die kürzeste
Distanz "a", die Höhe "b" und den
Winkel "e".
Dreieck Symbol

-17-
Deutsch
Display Anzeigen
Mess-Ausgangspunkt Anzeige
Batterie Anzeige
Laser intensität Anzeige
vorrangegangene Messergebnisse
Laser Betriebsanzeige
Maximum / minimum
aktuelles Messergebnis
Display Anzeige im Setting Modus - BOOT:
Set Modus / Status
Buzzer An / Aus
Zoll
Kalibrierung
Meter
Hintergrundbeleuchtung An / Aus
Fuß
Wand Laser-Entfernungsmesser Laserstrahl zu messendes Objekt

-18-
Deutsch
Einstellungen aufrufen
Um die Einstellungen aufzurufen, schalten Sie das Gerät ein und
halten den Bedienknopf 5 Sekunden gedrückt.
Kurzes drücken des Bedienknopfes ändert den Wert der
Einstellung.
Zum Speichern und Aufrufen der nächsten Einstellung den
Bedienknopf 1 Sekunde gedrückt halten.
Setup Seite 1:
Kalibrierung des
Entfernungsmessers +- 7mm
Setup Seite 2
Ändern der Maßeinheit des
Entfernungsmessers: ´“, in, /in m, ft
Setup Seite 3
Ein- / Ausschalten der
Hintergrundbeleuchtung: BL.ON / OFF
ON / O
-7-0+7

-19-
Deutsch
Support Delock
Bei weitergehenden Supportanfragen wenden Sie sich bitte an
Aktuelle Produktinformationen und Treiber Downloads nden Sie
auch auf unserer Homepage: www.delock.de
Schlussbestimmung
Die in diesem Handbuch enthaltenen Angaben und Daten können
ohne vorherige Ankündigung geändert werden. Irrtümer und
Druckfehler vorbehalten.
Copyright
Ohne ausdrückliche schriftliche Erlaubnis von Delock darf kein Teil
dieser Bedienungsanleitung für irgendwelche Zwecke vervielfältigt
oder übertragen werden, unabhängig davon, auf welche Art und
Weise oder mit welchen Mitteln, elektronisch oder mechanisch, dies
geschieht.
Stand: 11/2019

Declaration of conformity
Products with a CE symbol fulll the EMC directive (2014/30/EU)
and RoHS directive (2011/65/EU+2015/863), which were released
by the EU-comission.
The declaration of conformity can be downloaded here:
http://www.delock.de/service/conformity
WEEE-notice
The WEEE (Waste Electrical and Electronic Equipment)-directive,
which became eective as European law on February 13th 2003,
resulted in an all out change in the disposal of disused electro
devices. The primarily purpose of this directive is the avoidance
of electrical waste (WEEE) and at the same time the support of
recycling and other forms of recycling in order to reduce waste.
The WEEE-logo on the device and the package indicates that the
device should not be disposed in the normal household garbage.
You are responsible for taking the disused electrical and electronical
devices to a respective collecting point. A separated collection
and reasonable recycling of your electrical waste helps handling
the natural resources more economical. Furthermore recycling
of electrical waste is a contribution to keep the environment and
thus also the health of men. Further information about disposal of
electrical and electronical waste, recycling and the collection points
are available in local organizations, waste management enterprises,
in specialized trade and the producer of the device.
EU Import: Tragant Handels- und Beteiligungs GmbH
Beeskowdamm 13/15, 14167 Berlin, Germany
Table of contents
Languages:
Popular Measuring Instrument manuals by other brands

Keysight Technologies
Keysight Technologies M9391A PXIe Guide

Vega
Vega VEGAFLEX FX-E.80H operating instructions

Linear Technology
Linear Technology LTC2983 manual

Temperature Guard
Temperature Guard Input Guard VM500-6 Manual and installation instructions

Blaze
Blaze ALT-7 operating manual

Bosch
Bosch GAM Professional 220 Original instructions