DeLonghi KG 30 User manual

instructions
GRINDER
KG 30/39

Grinder KG30/KG39 2
Description of Appliance
The following terms are used throughout the instruction manual
Lid
Coffee bean container
Lid Interlock
Indicator for degree of grinding
(only on some models).
Grind Button
Selector switch for the number
of cups (only on some models).
Cord Storage

Thank you for choosing this coffee grinder. To get the best
results it is advisable to read these instructions before
using the appliance. This is the only way to ensure opti-
mum results and maximum safety.
USING THE COFFEE GRINDER
•Place the appliance on a flat surface.
•Turn the lid in a clockwise direction and remove (fig.1). Fill the
container with the desired amount of coffee beans (fig. 2).
(approx. 1tbsp per cup).
•Secure the lid back in place until the arrows on the lid and appli-
ance are lined up (fig. 3).The appliance can only be switched on
when the lid is correctly closed.
•Pull out the length of cord required and plug into the socket.
•Models provided with the selction knob, turn to the number of
cups you wish to grind (fig. 4). However, this is a reference the
amount will change depending on individual taste, the type and
roasting of the coffee beans and the consistency of grinding
selected.
•Press the GRIND button to start the coffee grinder (fig. 5) and
keep it pressed until the right consistency is obtained.
•Models with indicator light showing the consistency of grinding
- coarse, medium, fine - press the GRIND button and release
when the indicator lights up relative to the required consistency
of grind.
Remember that when the GRIND button is released, even for a
second, the appliance zeroes and will start grinding again as if
there were whole beans inside.
RECOMMENDATIONS FOR USE
•Always keep the lid of the coffee bean container tightly closed
to keep in all the flavour and aroma of the coffee beans.
•Only grind the amount of coffee required.
•Do not overfill the coffee bean container.
As an indication, calculate a tablespoon of coffee beans per cup
(e.g. 4 spoonfuls of coffee beans for 4 cups).The ideal amount
depends on individual taste and will be discovered through the
continued use of the machine.
•For models with indicators lights showing the consistency of grind-
ing remember that:
COARSE grinding is ideal for drip coffee makers and percolator;
MEDIUM is ideal for mocha coffeepot;
FINE is ideal for espresso coffee makers.
•Leave at least one minute between one grind and the next, to
avoid the appliance overheating.
1
2
1
2
3
5
4
fig.1
fig.2
fig.3
fig.4
fig.5
Grinder KG30/KG39
3

4
•To ensure you always have fresh coffee, always clean the appli-
ance after each use, especially if coffee is ground after grinding
other products (e.g. sugar). However it is not advisable to grind
oily beans (e.g. peanuts) or products that are too hard (e.g. rice).
CLEANING
•Ta ke the plug out of the socket.
•Do not immerse the appliance in water.
•Wash the lid with mild detergent and water, then rinse it care-
fully and dry.
•Use a soft damp cloth to clean the outside of the coffee bean
container, the blades and the outside of the appliance.
•Use a small brush to remove any coffee grinds left inside the
mechanism.
•Before putting the appliance away, use the automatic cord
rewind to store it away.
IMPORTANT SAFETY MEASURES
•Before plugging in, make sure that the voltage of your electricity
supply is the same as that indicated on the specification plate.
•Clean the appliance only with a dry or slightly dampened cloth.
•Should the appliance break or not function correctly, turn it off
and do not tamper with it. For any repairs, contact a Service
Centre authorised by the manufacturer and request the use of
original parts. Failure to respect the above could compromise
the safety of the appliance.
•This appliance should only be used for its intended purpose.
•The manufacturer cannot be held responsible for any damage
caused through incorrect, wrong or unreasonable use. In these
cases, the guarantee rights are null and void.
•Do not use the appliance if the supply cord is damaged.
•Never remove the plug from the socket by pulling the cord, or
with wet hands.
•Children are not able to recognise the dangers connected with
the use of electrical appliances: never leave children unsuper-
vised near the appliance.
•Do not immerse the appliance in water.
•Attention: before cleaning, remove the plug.
•Do not let the supply cord hang over the edge of the table or
worktop, or touch hot surfaces.
Grinder KG30/KG39

5
Electrical requirements
Before using this appliance ensure that the voltage indicated
on the product corresponds with the main voltage in your
home, if you are in any doubt about your supply contact your
local electricity company.
The flexible mains lead is supplied connected to a B.S. 1363 fused plug
having a fuse of 13 amp capacity. Should this plug not fit the socket out-
lets in your home, it should be cut off and replaced with a suitable plug,
following the procedure outlined below.
Note: Such a plug cannot be used for any other appliance and should
therefore be properly disposed of and not left where children might find
it and plug it into a supply socket - with the obvious consequent danger.
N.B. We recommend the use of good quality plugs and wall sockets that
can be switched off when the machine is not in use.
important: the wires in the mains lead fitted to this appliance are
coloured in accordance with the following code:
As the colours of the wires in the mains lead of this appliance may not
correspond with the coloured markings identifying the terminals in your
plug, proceed as follows:
The wire which is coloured green and yellow must be connected to the
terminal in the plug which is marked with the letter E or by the earth
symbol or coloured green or green and yellow.
The wire which is coloured blue must be connected to the terminal
which is marked with the letter N or coloured black.
The wire which is coloured brown must be connected to the terminal
which is marked with the letter L or coloured red.
When wiring the plug, ensure that all strands of wire are securely
retained in each terminal. Do not forget to tighten the mains lead clamp
on the plug. If your electricity supply point has only two pin socket out-
lets, or if you are in doubt, consult a qualified electrician.
Should the mains lead ever require replacement, it is essential that this
operation be carried out by a qualified electrician and should only be
replaced with a flexible cord of the same size.
After replacement of a fuse in the plug, the fuse cover must be refitted.
If the fuse cover is lost, the plug must not be used until a replacement
cover is obtained.The colour of the correct replacement fuse cover is
that of the coloured insert in the base of the fuse recess or elsewhere
on the plug. Always state this colour when ordering a replacement fuse
cover.
Only 13amp replacement fuses which are asta approved to B.S. 1362
should be fitted.
This appliance conforms to the Norms EN 55014 regarding the sup-
pression of radio interference.
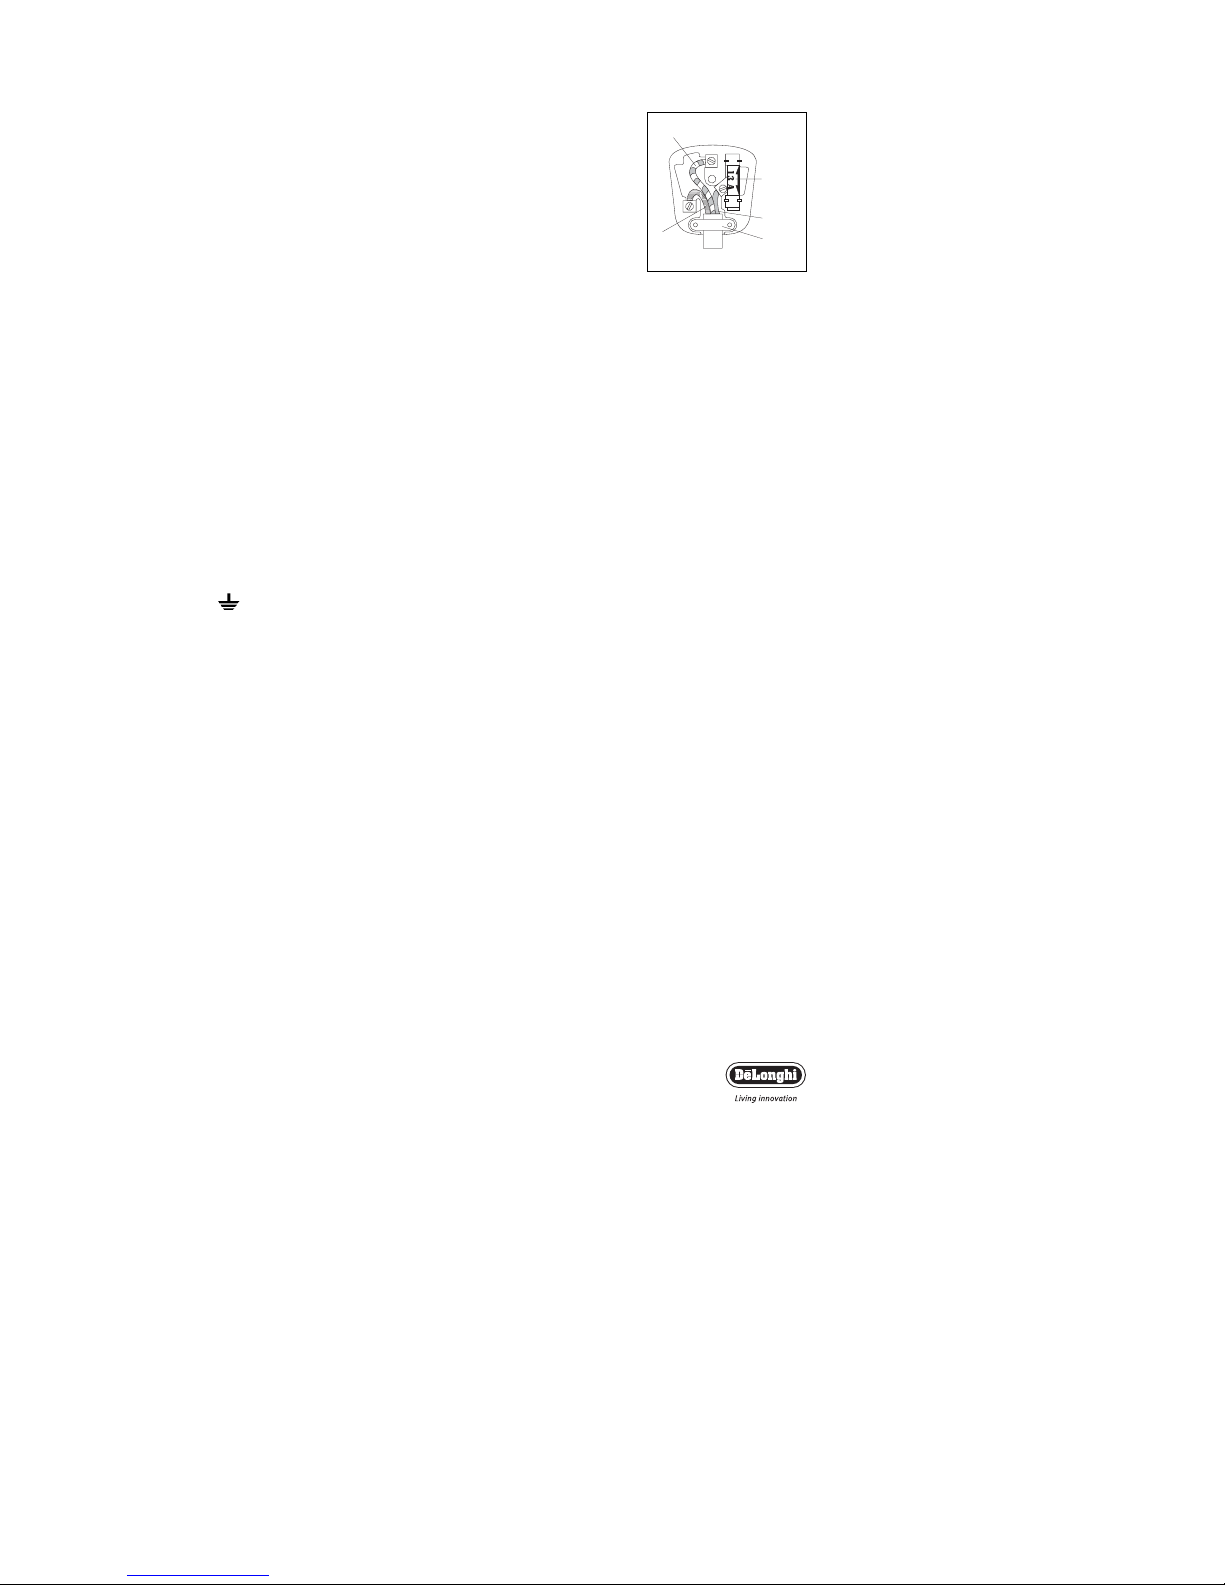
warning - this appliance must be earthed
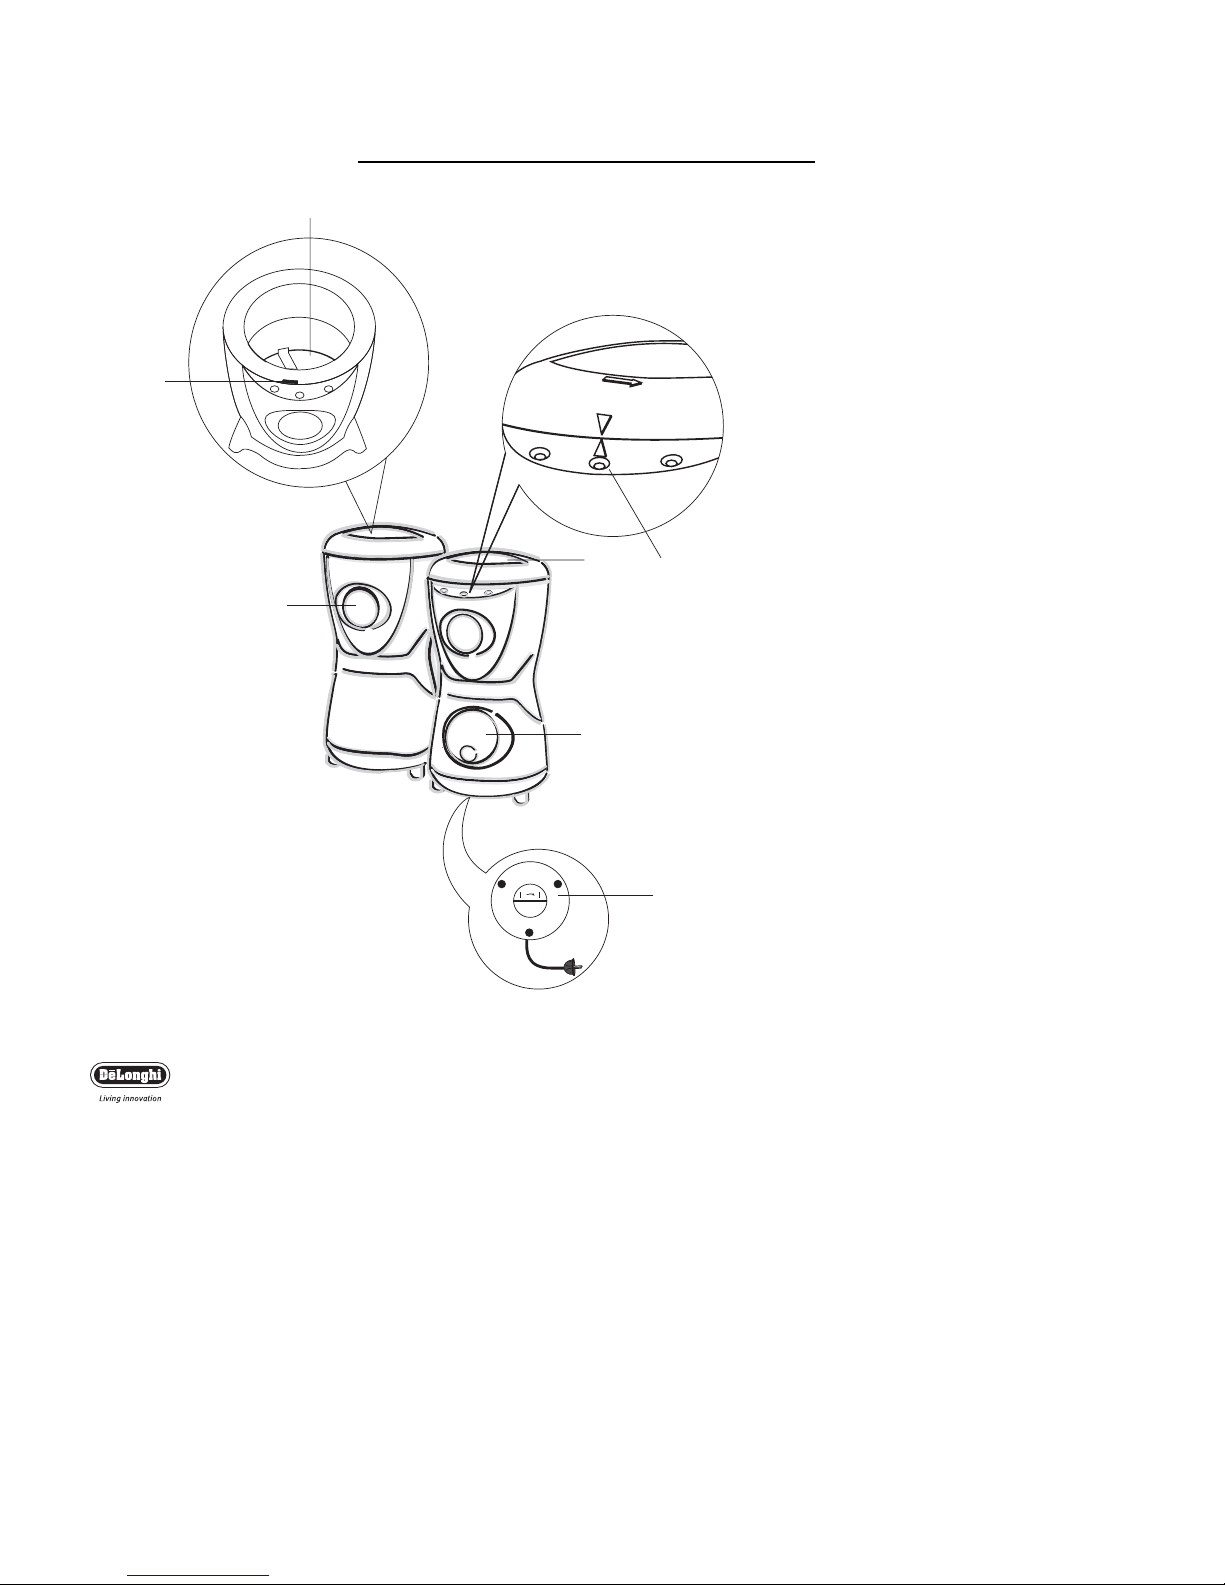
Grinder KG30/KG39
GREEN ANDYELLOW
BLUE
BROWN
EARTH
NEUTRAL
LIVE
Green and Yellow to Earth
Blue to
Neutral
13 amp
Fuse
Brown
to Live
Cord Clamp
Table of contents
Popular Grinder manuals by other brands

Milwaukee
Milwaukee M18 FUEL 2783-20 Operator's manual

Sulzer
Sulzer Muffin Monster Channel 40002 Series Installation and operating instructions

Black & Decker
Black & Decker 6" bench grinder owner's manual

Parkside
Parkside PSBS 240 B2 Translation of the original instructions

Speedaire
Speedaire 5YAR8 Operating instructions & parts manual

Cleco
Cleco 1700 Series Operation & service manual