Deltec MC 501 Guide
MC 501
Bedienungsanleitung
und Ersatzteilliste
Operating instruction and
Spare parts list
Istruzioni di funzionamento e
Parti di ricambio
Instructions d'emploi et
Accessoires et pièces détachées

DE
Wichtige Sicherheitshinweise
Warnung: Zum Schutz vor Verletzungen sollten grundlegende Vorsichtsmaßnahmen und folgende Sicherheitshinweise
beachtet werden.
1) Sicherheitshinweise Lesen und befolgen
2) Gefahr: Zur Vermeidung eines elektrischen Schlages sollten alle Aquarium Geräte mit Vorsicht gehandhabt
werden. In keinem der unten aufgeführten Fälle sollte die Reparatur vom Kunden versucht werden. Das Gerät
muss zu einen autorisierten Kundendienst gebracht werden.
a) Wenn am Gerät ein abnormaler Wasseraustritt beobachtet wird, muss es sofort ausgesteckt werden.
b) Nach der Installation sollte das Gerät sorgfältig überprüft werden. Es darf nicht eingesteckt werden, wenn sich auf
Teilen, die trocken bleiben müssen, Wasser befindet.
c) Ein Gerät mit beschädigtem Kabel oder Stecker darf nicht in Betrieb genommen werden. Das gleiche gilt, wenn
das Gerät nicht richtig funktioniert, fallen gelassen oder anderweitig beschädigt wurde.
d) Um ein Nasswerden des Gerätesteckers oder der Steckdose zu vermeiden, sollten der Aquarium Unterschrank
und das Becken seitlich von der Wandsteckdose aufgestellt werden. Somit können keine Tropfen auf den Stecker
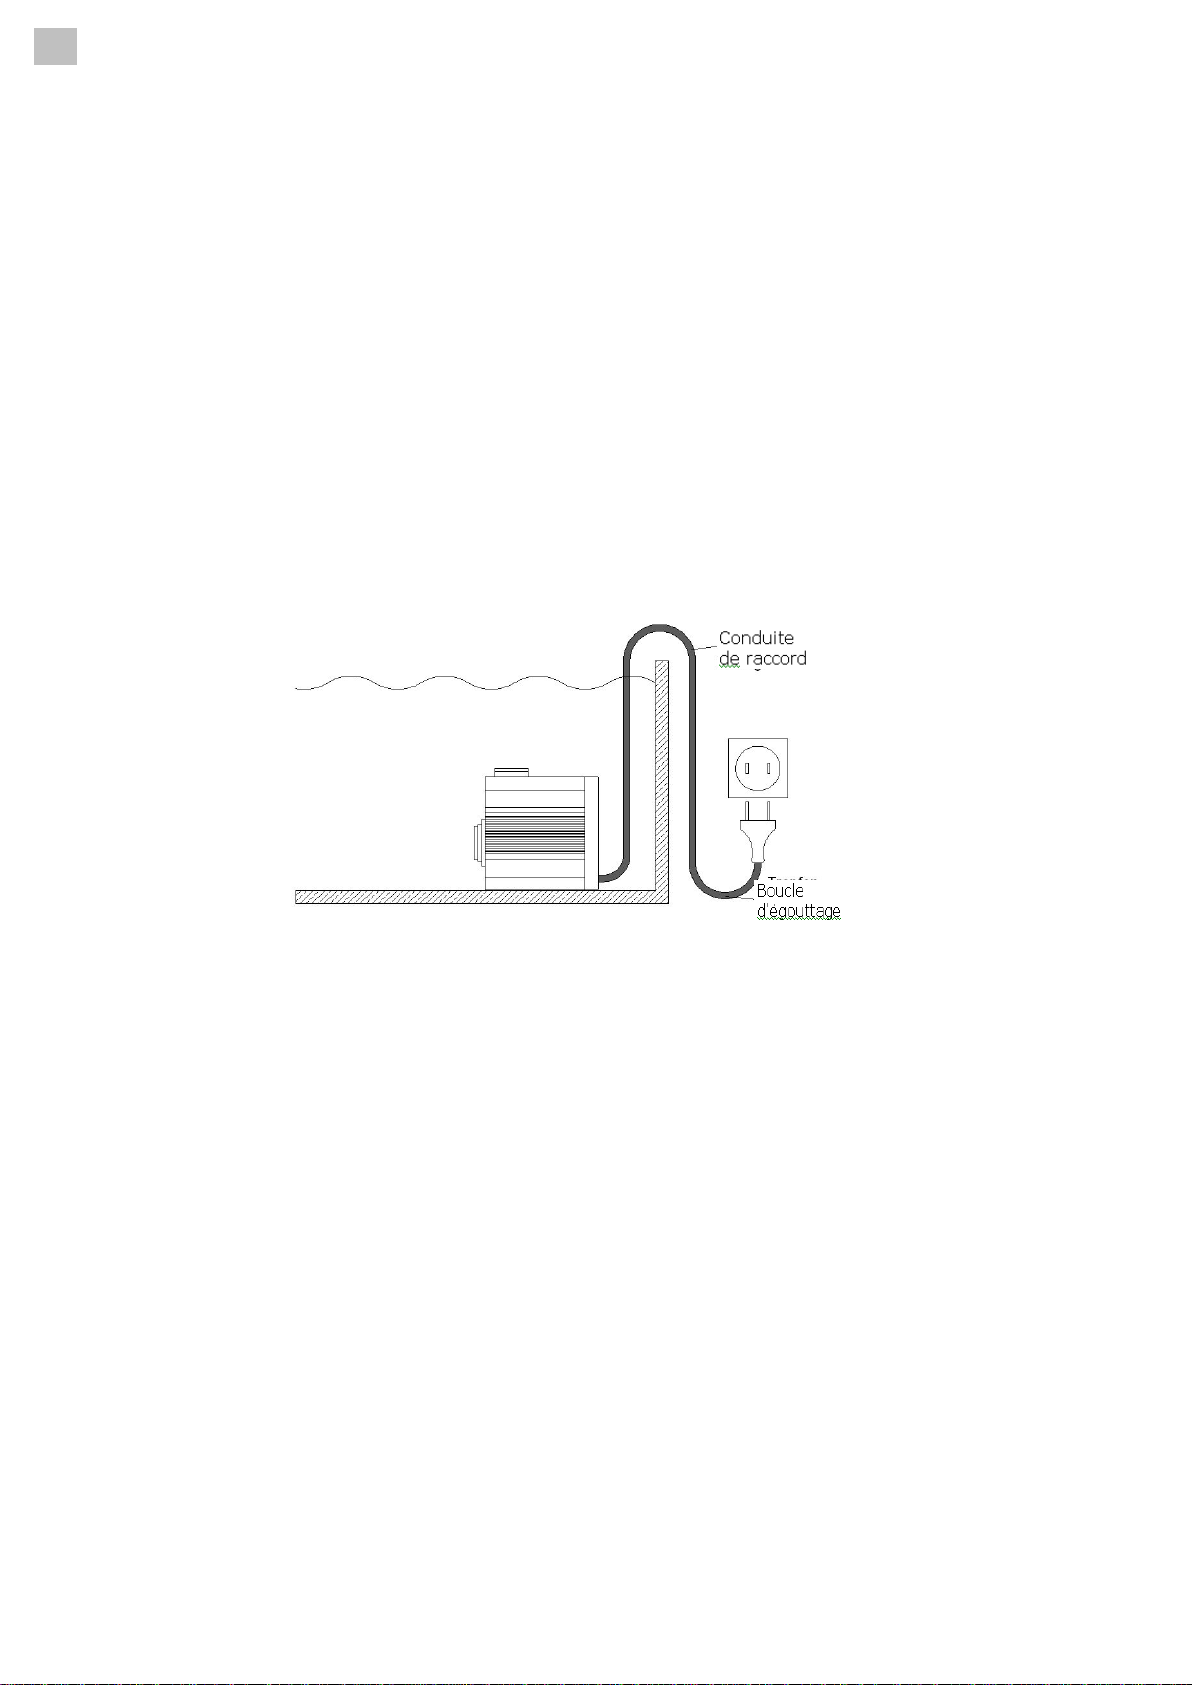
oder die Steckdose fallen. Eine „Tropfenschleife“ sollte in jedem Kabel zwischen Aquarium und Wandsteckdose
vorgesehen werden. Die „Tropfenschleife“
ist der Teil des Kabels, der bei Verwendung eines Verlängerungskabels unter der Steckdose durchhängt (Bild).
Auf diese Weise tropft das Wasser unter der Steckdose vom Kabel ab und kann nicht mit dieser in Berührung
kommen. Wenn der Stecker oder die Steckdose nass wird, NICHT das Kabel herausziehen, sondern die
Stromversorgung an der Sicherung bzw. am Leistungsschalter trennen. Dann erst den Stecker herausziehen und
prüfen, ob sich Wasser in der Steckdose befindet.
3) Kinder müssen beaufsichtigt werden, wenn Sie sich am Aquarium oder in dessen nähe Aufhalten.
4) Zur Vermeidung von Verletzungen keine beweglichen oder heißen Teile, wie z.B. Heizungen, Reflektoren ,
Glühbirnen usw. berühren.
5) Bei Nichtverwendung, vor dem Montieren/Demontieren von Teilen oder vor dem Reinigen müssen die betroffenen
Geräte stets ausgesteckt werden. Nicht am Kabel ziehen. Zum Herausziehen des Kabels immer den Stecker
greifen.
6) Die Geräte dürfen nur für den vorgesehenen Zweck verwendet werden. Die Verwendung von Zubehör, das vom
Hersteller nicht empfohlen oder verkauft wird, kann gefährliche Bedingungen verursachen.
7) Das Gerät nicht an einer Stelle installieren oder lagern, wo es der Witterung oder Temperaturen unter null Grad
ausgesetzt ist.
8) Vor der Inbetriebnahme eines an der Beckenwand montierten Gerätes muss sichergestellt werden, dass dieses
richtig installiert und befestigt ist.
9) Alle Sicherheitshinweise auf dem Gerät müssen gelesen werden.
10) Wenn ein Verlängerungskabel notwendig ist, muss dieses die erforderliche Leistung haben. Ein Kabel, das für
weniger Ampere oder Watt zugelassen ist, kann sich überhitzen. Das Kabel ist so zu verlegen, dass niemand
darüber stolpern oder daran hängen bleiben kann.
11) Das Gerät ist mit einem Schukostecker ausgestattet. Dieser Stecker darf auf keine Weise verändert oder
umgangen werden.
Wird der Stecker entfernt erlischt jeder Garantieanspruch!
Diese Anleitung aufbewahren

DE
Innenabschäumer MC 501
Der MC 501 ist ein kompakter Hochleistungsabschäumer und besonders geeignet für den Einbau in
Standard Systemaquarien, sowie für den Betrieb in Außenfiltern. Die außergewöhnlich hohe Leistung ist
bedingt u. a. durch das Nadelrad System.
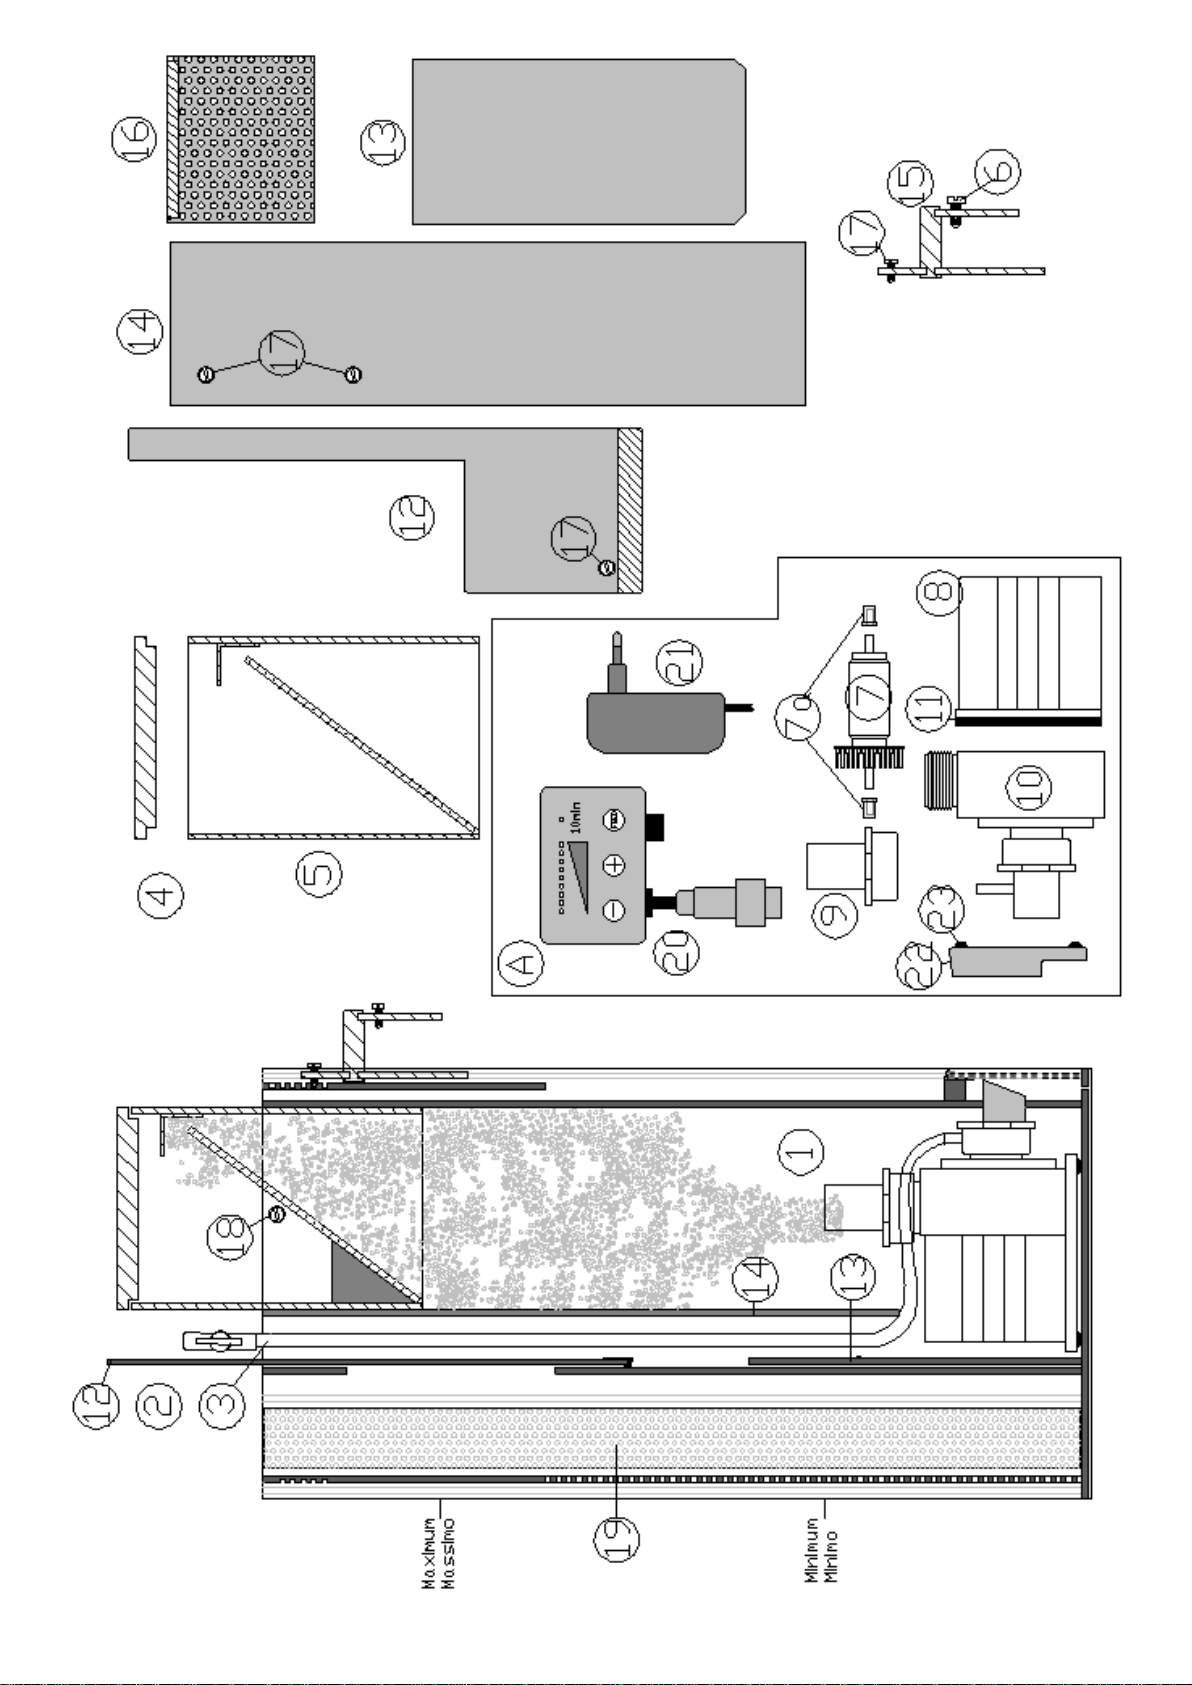
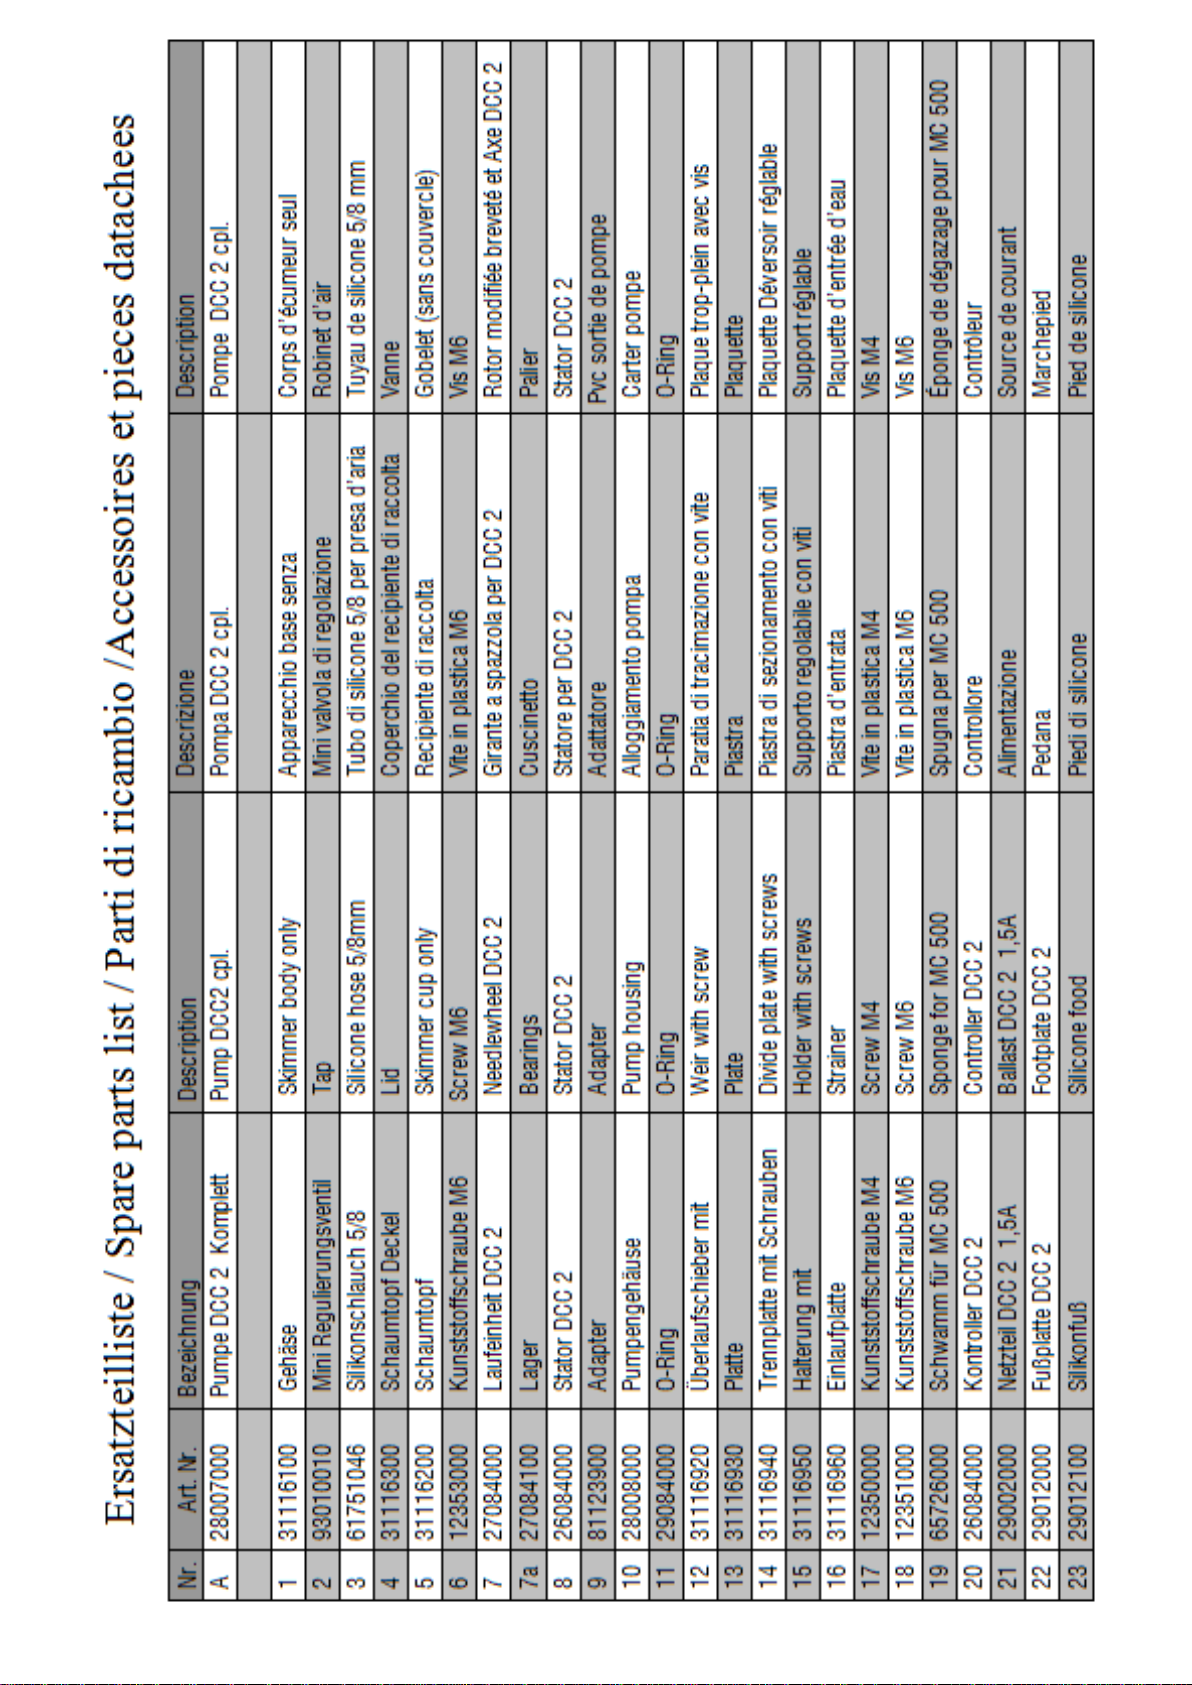
Alle nachfolgenden (Zahlen) beziehen sich auf die Ersatzteilliste.
Einbau in das Aquarium
Der MC 501 hat eine höhenverstellbare Halterung (15) für den Einbau auf der linken oder rechten
Aquariumseite. Befestigen Sie die Halterung auf der gewünschten Seite und stellen die Höhe des
Abschäumers so ein, dass das Gehäuse mindestens 80 mm über der Wasserlinie ist. Stellen Sie die Höhe des
Schaumtopfes (5) so ein, dass ca. 50 mm im Abschäumergehäuse verbleiben. Starten Sie die Pumpe
(Kontroller Stufe 4), stellen Sie sicher, dass das Regulierungsventil (2) geöffnet ist. Der MC 501 ist
nun betriebsbereit.
Einbau in den Außenfilter
Je nach Filtergröße und Wasserstand wird der Abschäumer entweder direkt in die Filterwanne gestellt (darauf
achten, dass Zu- und Ablauf frei sind) oder aber wie oben beschrieben, mit der Halterung an der Filterwanne
befestigt.
Das Schaumbild kann mit dem Überlaufschieber (12) grob eingestellt werden
-höher = trockener Schaum
-tiefer = nasser Schaum
Der minimale Wasserstand muss ca. 120 mm betragen.
Starten Sie die Pumpe (Kontroller Stufe 4), der MC 501 ist betriebsbereit.
Einstellung
Ist der Schaum zu nass, den Schaumtopf (5) weiter aus dem Gehäuse herausziehen.
Ist der Schaum zu trocken, den Schaumtopf weiter in das Gehäuse einschieben, alternativ kann das
Schaumbild auch mit dem Überlaufschieber (12) eingestellt werden.
Hinweis
-Bedingt durch den Filterschwamm und andere Stoffe auf den Materialoberflächen, kann es bis zu 48
stunden dauern, bevor der Abschäumer eingelaufen ist. Danach muss die endgültige Einstellung
vorgenommen werden.
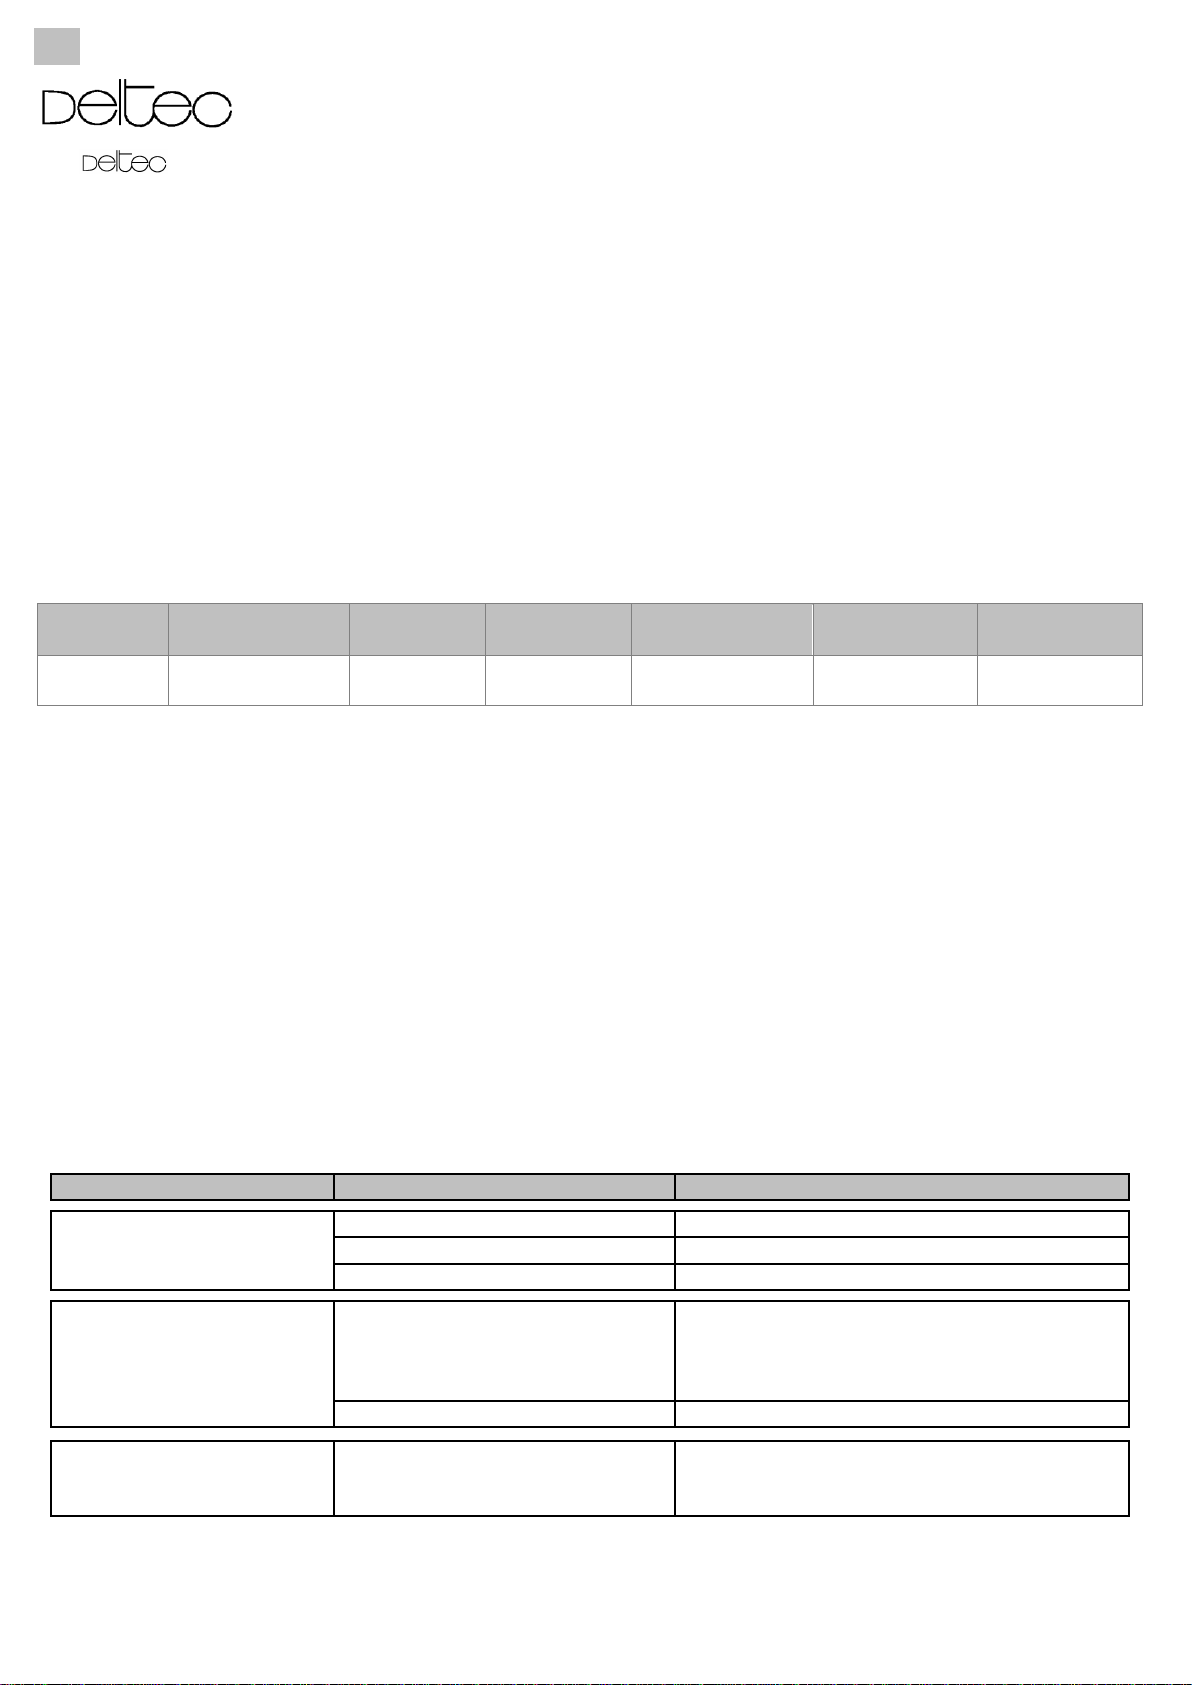
Technische
Daten
Maße (l/b/h) ca.
Strom-
Aufnahme
Luftleistung
ca.
Höhe für Außen-
filter Einbau ca.
Aquariumgröße
Aquariumgröße
MC 501
210x86x470mm
12 Watt
Stufe 4
400 Ltr./Std.
530mm
500 Ltr.
600 Ltr.
Hinweise
Sollten durch den Betrieb Abschäumers feine Luftblasen mit ins Aquarium kommen, kann dieses verschiedene
Ursachen haben:
a. frisches Meerwasser
Durch bestimmte Zusäte in vielen Meersalzen erzeugt der Abschäumer extrem
feine Luftblasen, die nicht zurückgehalten werden können, gleichzeitig wird sehr wässeriger Schaum
erzeugt. Wir empfehlen das Regulierungsventil (2) zu entfernen und durch häufiges Entleeren des
Schaumtopfes, die besagten Inhaltsstoffe im Aquariumwasser zu reduzieren.
b. Regulierungsventil (2) zu stark geschlossen, Luftschlauch im Abschäumer abgeknickt, Luftansaugstutzen
(10) durch Salzkristalle, Kalk und Staub verstopft.
Durch die reduzierte Luftmenge fördert die Pumpe proportional mehr Wasser,
die Fließgeschwindigkeit im Abschäumer erhöht sich und reißt anders als im Normalbetrieb Luftblasen in
den Rücklauf.
Wartung
Bei korrektem Einbau und Einstellung benötigen Deltec Abschäumer denkbar wenig Wartung. Durch
Kalkwassemischer und Kalkreaktoren kann es jedoch zu Kalkablagerungen in der Pumpe kommen, die zu
Funktionsstörungen führen können.
Es wird deshalb empfohlen bei Störungen oder alle 3-6 Monate den Rotor mit Keramikwelle (7 und 6 ) und
die Lufteinzugsdüse (10) auf freien Durchgang hin zu prüfen. Durch eintauchen der Teile in einen
handelsüblichen Entkalker lösen sich die Kalkablagerungen. Ein frühzeitiges Verstopfen der Lufteinzugsdüse
durch Luftstaub und Salzkristalle kann durch ca. 15-30 minütiges Abstellen der Pumpe 1 mal pro Woche
vermieden werden.

DE
Fehlersuche
Symptom
Ursache
Maßnahme
Pumpe läuft, jedoch keine oder zu
geringe Luftmenge
Luftzuleitung zur Pumpe
verstopft
reinigen
Ozongerät verschmutzt
reinigen
Luftschlauch abgeknickt
Schlauchführung ändern
Kontroller zu niedrig eingestellt
Einstellung erhöhen
Starke Luftperlung im Ablaufwasser
Kommt bei bestimmten
Seesalzen und bei Zugabe von
Wasseraufbereitungsmitteln vor
Andere Salze verwenden
Bei sehr starker Wasser-
Belastung nach Neueinrichtung
mit lebenden Steinen
Lufthahn ganz öffnen
Kontroller zu hoch eingestellt
Einstellung reduzieren
Pumpe läuft nach kurzem
Trockenlauf nicht mehr.
Trockenlaufschutz hat
eingeschaltet
Pumpe kurz vom Netz trennen
und wider einschalten.

EN
IMPORTANT SAFETY INSTRUCTIONS
WARNING To guard against injury, basic safety precautions should be observed, including the following.
1) READ AND FOLLOW ALL SAFETY INSTRUCTIONS.
2) DANGER –To avoid possible electric shock, special care should be taken since water is employed in the use of
aquarium equipment. For each of the following situations, do not attempt repairs by yourself; return the
appliance to an authorized service facility for service or discard the appliance.
a) If the appliance shows any sign of abnormal water leakage, immediately unplug it from the power source.
(Immersible equipment only)
b) Carefully examine the appliance after installation. It should not be plugged in if there is water on parts not
interned to be wet.
c) Do not operate any appliance if it has a damaged cord or plug, or if it is malfunctioning or has been dropped or
damaged in any manner.
d) To avoid the possibility of the appliance plug or receptacle getting wet, position aquarium stand and tank to one
side of a wall-mounted receptacle to prevent water from dripping onto the receptacle or plug.
A “drip-loop”, shown in the figure below, should be arranged by the user for each cord connecting an aquarium
appliance to a receptacle. The “drip-loop” is that part of the cord below the level of the receptacle, or the
connector if an extension cord is used, to prevent water travelling along the cord and coming in contact with
the receptacle.
If the plug or socket does get wet, DON´T unplug the cord. Disconnect the fuse or circuit breaker that supplies
power to the appliance. Then unplug and examine for presence of water in the receptacle.
3) Close supervision is necessary when any appliance is used by or near children.
4) Always unplug an appliance from an outlet when not in use, before putting an or taking off parts, and before
cleaning. Never yank cord to pull plug from outlet. Grasp the plug and pull to disconnect.
5) Do not use an appliance for other than intended use. The use of attachments not recommended or sold by the
appliance manufacturer may cause an unsafe condition.
6) Make sure an appliance mounted on a tank is securely installed before operating it.
7) Read and observe all the important notices on the appliance.
8) If an extension cord is necessary, a cord with a proper rating should be used. A cord rated for less amperes or
watts than the appliance rating may overheat. Care should bee taken to arrange the cord so that it will not be
tripped over or pulled.
9) This appliance has a polarized plug (one blade is wider than the other). As safety feature, this plug will fit in a
polarized outlet only one way. If the plug does not fit, contact a qualified electrician. Never use with an extension
cord unless plug can be fully inserted. Do not attempt to defeat this safety feature.
Exception: This instruction may be omitted for an appliance that is not provided with a polarized attachment plug.
Removing of the plug invalidates the warranty!
SAVE THESE INSTRUCTIONS
EN
Internal Protein Skimmer MC 501
The MC 501 is a Multi Compact high performance dual purpose skimmer for use inside the tank or
fitted within a sump.
Installation inside the aquarium
The skimmer is supplied with an adjustable bracket which can be fitted to the right or left hand side of the
unit and allows the height of the skimmer to be set above the water level. The skimmer housing must extend
by a minimum of 80mm above the water line as illustrated on the diagram. The bracket allows the unit to
hang from the edge of the aquarium and is secured to the skimmer body with 2 screws (B). If the skimmer
does not hang vertically within the tank, adjust screw (C) accordingly until this is achieved.
Installation inside a sump
The skimmer can be hung on the side of the sump as described above or can be free standing. Ensure that
the water intake and outlet are unobstructed. The minimum depth that the unit should be immersed for
satisfactory performance is 120mm. In a sump, correct setting of the weir plate is important and the air
should be closed a little to the 2 o’clock position.
Operation
After the skimmer is installed and the height adjustment water level is correct, the fine adjustment is done by
raising or lowering the skimmer cup. Allow app. 24 hours before doing so.
technical
data
dimensions
(l/w/h) appr.
power
consumption
air flow appr.
min. height for
sump installation
aquarium size
normal stocking
aquarium size
light stocking
MC 501
210x86x470mm
12 Watt
stage 4
400 l/h
530mm
500 ltr.
600 ltr.
Maintenance
The Deltec skimmer range should need very little adjustment and maintenance once set correctly however
due to the high levels of calcium in marine aquariums it is common for deposits to build up on moving parts
requiring periodical cleaning. The MC 500 is fitted with a Aqua Bee pump. Aqua Bee pumps are fitted with a
little flap (8b) inside the outlet of the pump, which flips from one side to the other depending on the direction
of rotation thus ensuring that the pump always operates at full duty. It is recommended every 3 months, or
when required, that the pumps are removed from the skimmer having first drained the body of Water.
Check and clean the impellor of debris. Make sure that the impeller rotates freely on the ceramic shaft. If not
submerge in lime scale remover.
A build up of calcium, dust and salt can restrict or block the venturi inlet on the connecting pipe work and
reduce the skimming efficiency. This should be checked and carefully cleaned with a toothpick or fine drill
rotated between the fingertips.
It is advisable to stop the pump for approximately 15 minutes once every week in order to dissolve any dust
or salt crystals that may have collected in the venture tube.
Fault finding
Malfunction
cause
remedy
Pump produces
insufficient air
airline or venturi blocked
clean
airline kinked
remove kink
ozonizer blocked
clean
excessive air bubbles in
aquarium water
caused by additives in certain
sea salts and water conditions
use different salt or feed heavily for a
period, empty skimmer cup frequently,
open air tap fully. This condition may last
for several weeks.
air tap closed to far
open air tap
Pump has stopped after it
has been running without
water
Dry running protection is
activated
Disconnect from mains, wait 1 minute and
restart.

IT
NORME DI SICUREZZA
AVVERTENZA: Per evitare incidenti si raccomanda di osservare le norme generali di sicurezza, tra cui le seguenti:
1) LEGGERE E SEGUIRE SCRUPOLOSAMENTE TUTTE LE NORME DI SICUREZZA.
2) PERICOLO –Considerato che l’uso di attrezzature per acquario avviene in presenza di acqua, agire sempre con
particolare cautela per evitare scosse elettriche. Per ognuna delle seguenti situazioni possibili, si raccomanda di
non tentare di eseguire da sé eventuali riparazioni, ma di portare l’apparecchio presso un centro assistenza
autorizzato o provvedere alla sua rottamazione.
a. (Solo per apparecchi ad immersione). Se l’apparecchio mostra perdite d’acqua anormali, scollegarlo
immediatamente dall’alimentazione.
b. Dopo avere installato l’apparecchio, eseguire un controllo accurato. Non collegare l’apparecchio
all’alimentazione nel caso si osservi la presenza di acqua in parti non destinate ad essere bagnate.
c. Non mettere in funzione l’apparecchio se il cavo d’alimentazione o la spina appaiono danneggiati, se
l’apparecchio è malfunzionante, se è caduto o ha subito un qualsiasi danno.
d. Per evitare il gocciolamento dell’acqua sulla presa o sulla spina, posizionare l’acquario e il mobile di fianco alla
presa montata a parete in modo che questa resti visibile.
Si raccomanda di fare eseguire al cavo una curva “anti-gocciolamento” come mostrato nella figura sottostante.
Eseguire l’operazione per tutti i componenti elettrici dell’acquario. In questo modo una parte di cavo si trova
sotto il livello della presa, o della spina di collegamento nel caso si usi una prolunga, impedendo così che l’acqua
gocciolando lungo il cavo venga a contatto con la presa.
Se la presa o la spina si bagna, NON disinserire il cavo, ma scollegare l’interruttore generale che porta corrente
all’apparecchio. Quindi scollegare la spina e verificare la presenza di acqua all’interno della presa.
3) Se l’apparecchio viene utilizzato da o in presenza di bambini, è necessaria un’attenta supervisione da parte degli
adulti.
4) Scollegare sempre il cavo d’alimentazione quando l’apparecchio è inutilizzato, prima di aggiungere o prelevare
delle parti e prima di effettuare la pulizia. Per scollegare il cavo d’alimentazione, afferrare bene la spina ed
estrarla dalla presa senza tirare mai direttamente il cavo.
5) Non utilizzare l’apparecchio per usi diversi da quelli a cui è destinato. L’uso di accessori non raccomandati o non
venduti dal produttore dell’apparecchio possono essere causa di condizioni di funzionamento non sicure.
6) Assicurarsi che gli apparecchi montati sull’acquario siano correttamente installati prima di avviarli.
7) Leggere ed osservare tutte le informazioni importanti sull’apparecchio.
8) Se è necessario l’uso di una prolunga, assicurarsi che il cavo sia adatto al voltaggio utilizzato. Se il cavo è messo
a punto per meno ampere or watt rispetto all’apparecchio, potrebbe surriscaldarsi. Fare attenzione che il cavo non
sia troppo teso o schiacciato.
9) (Solo per UK) Questo apparecchio è dotato di spina polarizzata (uno spinotto è più largo dell’altro). Come misura
di sicurezza, tale spina potrà essere inserita in un solo modo in una presa polarizzata. Se la spina non è adatta,
rivolgersi ad un elettricista qualificato. Non utilizzare una prolunga se la spina non si inserisce completamente.
Non tentare di eludere questa condizione di sicurezza.
Eccezione: Questa avvertenza può essere omessa se l’apparecchio non è dotato di spina polarizzata.
In caso di manomissione della spina decade ogni garanzia!
“CONSERVATE LE PRESENTI ISTRUZIONI”

IT
Schiumatoio per interno MC 501
MC 501 è uno schiumatoio compatto ad alta resa adatto sia all’installazione interna in sistemi
standard sia al funzionamento nel filtro esterno. Grazie all’esclusiva girante a spazzola brevettata il sistema
assicura prestazioni straordinarie.
Tutti i numeri tra parentesi che seguono si riferiscono all’elenco parti di ricambio.
Installazione in acquario
MC 501 è fornito di supporto (15) regolabile in altezza per il montaggio in acquario sia sul lato
sinistro che su quello destro. Fissare il supporto sul lato desiderato e regolare l’altezza dello schiumatoio in
modo che il contenitore si trovi almeno 80 mm sopra il livello dell’acqua. Regolare ora l’altezza del recipiente
di raccolta (5) che deve rimanere all’interno dello schiumatoio per ca. 50 mm. Azionare la pompa (livello 4
controller) assicurandosi che la valvola di regolazione(2) sia aperta. MC 501 è ora pronto per il
funzionamento.
Installazione nel filtro esterno
In base alle dimensioni del filtro lo schiumatoio può essere installato direttamente nella vasca del filtro
(assicurandosi che le zone di afflusso e deflusso non siano ostruite) oppure, come sopra descritto, fissato alla
vasca mediante il supporto.
L’aspetto della schiuma può essere regolato mediante paratia di tracimazione (12):
-Paratia più alta = schiuma asciutta
-Paratia più a fondo = schiuma bagnata
Il livello minimo dell’acqua deve essere di ca. 120 mm.
Azionare la pompa (livello 4 controller), MC 501 è pronto per il funzionamento.
Regolazione
Se la schiuma risulta troppo bagnata, estrarre un poco il recipiente di raccolta dal contenitore. Se la schiuma
è troppo asciutta, inserire maggiormente il recipiente di raccolta nel contenitore. In alternativa è possibile
regolare la schiuma mediante la paratia di tracimazione (12).
Nota
A causa della spugna del filtro o di altre sostanze presenti sulle superfici, possono trascorrere fino a 48 ore
prima che lo schiumatoio si assesti. La regolazione definitiva deve quindi essere eseguita dopo tale periodo.
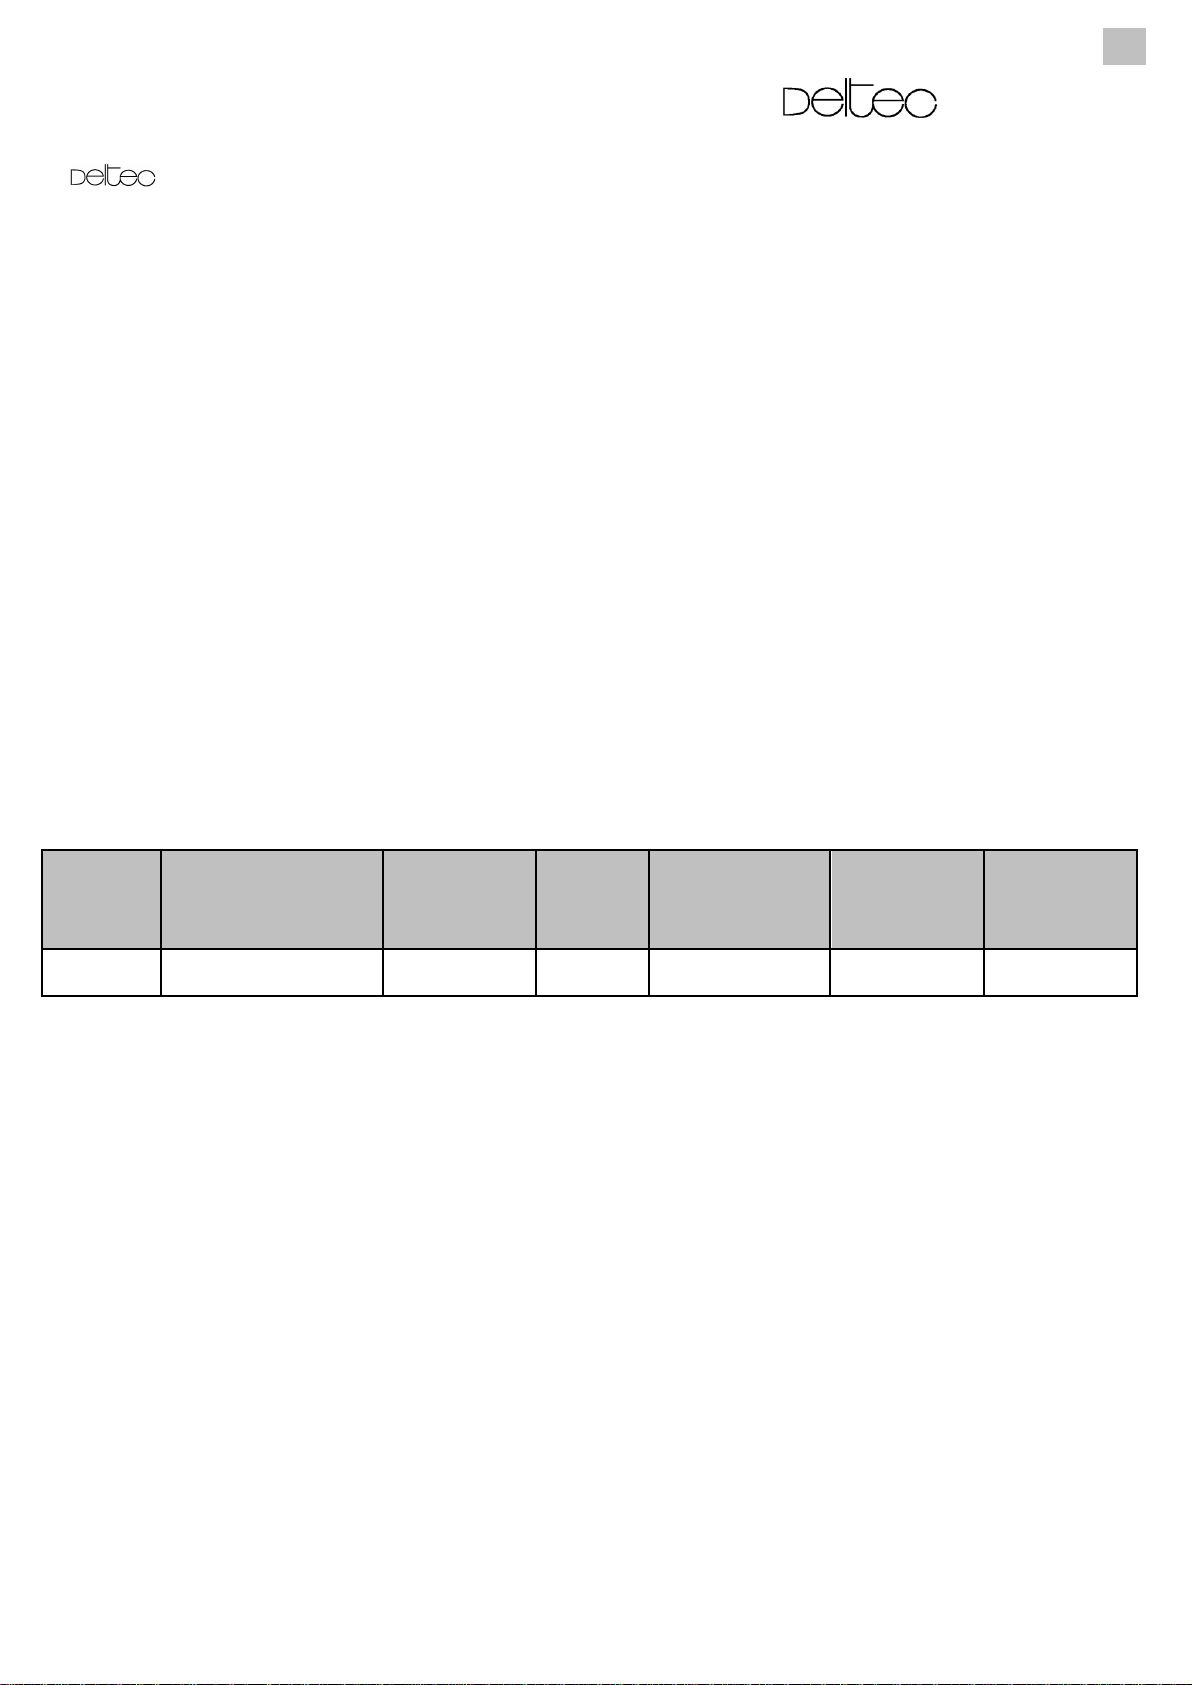
Dati tecnici
Dimensioni (l/b/h) ca.
Consumo
Resa ca.
Altezza per
installazione in filtro
esterno
X Acquari
normalmente
popolati
X Acquari
scarsamente
popolati
MC 501
210x86x470mm
12 Watt
livello 4
400 l/h
530mm
500 l
600 l
Avvertenze
Se durante il funzionamento dello schiumatoio bolle fini d’aria finiscono nell’acquario, le cause possono essere
diverse:
a. Acqua marina nuova
A causa di determinati integratori presenti in molti sali marini lo schiumatoio produce bolle d’aria
estremamente fini, che non possono essere trattenute, e nello stesso tempo una schiuma molto acquosa.
Consigliamo di togliere la valvola di regolazione (2) e di ridurre le citate sostanze nell’acqua dell’acquario
mediante il frequente svuotamento del recipiente di raccolta.
b. Valvola di regolazione (2) troppo chiusa, rottura del tubo dell’aria nello schiumatoio, bocchettone della
presa d’aria (10) ostruito da cristalli di sale, calcare e polvere.
A causa del ridotto apporto di aria la pompa immette in proporzione una maggiore quantità di acqua che
aumenta la velocità di flusso nello schiumatoio e genera bolle d’aria nel ritorno, cosa che normalmente
non succede.
Manutenzione
Una volta installati e tarati correttamente gli schiumatoi Deltec necessitano di poca manutenzione. Tuttavia,
l’uso di miscelatori di kalkwasser e di reattori di calcio può portare alla formazione di depositi calcarei che
possono causare inconvenienti nel funzionamento. Si raccomanda quindi di verificare all’occorrenza o
comunque ogni 3-6 mesi che il rotore con l’albero in ceramica (7 e 6), e l’ugello dell’aria (10) non siano
ostruiti. Eventuali depositi calcarei possono essere rimossi immergendo le parti in una soluzione con un
comune anticalcare.
Si consiglia di fermare la pompa per circa 15-30 minuti una volta alla settimana per evitare il deposito di
cristalli di polvere e sale nel raccordo d’entrata dell’aria.

IT
Ricerca errori
Problema
Causa
Rimedio
La pompa funziona, ma la quantità
d’aria è nulla o molto ridotta
Il tubo che immette l’aria nella
pompa è ostruito
Eseguire pulizia
Ozonizzatore sporco
Eseguire pulizia
tubo dell’aria deviato
modificare il percorso del tubo
Controllore troppo basso
aumento impostazione
Forte presenza di bolle d’aria
nell’acqua in entrata
Si nota in concomitanza con
l’uso di determinati sali marini
o condizionatori
Utilizzare prodotti con
caratteristiche diverse
Forte inquinamento dell’acqua
dopo nuovo allestimento con
rocce vive
ridurre la quantità d’aria
Controllore troppo alto
ridurre la regolazione
La pompa non lo fa, dopo un breve
periodo a secco.
Protezione funzionamento a
secco si è trasformata
staccare brevemente la pompa
dalla rete elettrica e accenderlo
di nuovo.
FR
Instructions de sécurité importantes
Avertissement : Pour protéger contre quelconques blessures, il faut respecter les mesures de prudence et les instructions
de sécurité suivantes :
1) Lire et respecter les instructions de sécurité.
2) Danger : Pour éviter une électrocution, il faut manipuler tous les appareils de l'aquarium avec prudence. Dans
aucun des cas indiqué plus bas, le client ne devrait pas essayer de procéder à une réparation. L’appareil doit être
délivré au service après-vente autorisé.
e) Si vous observez une fuite d'eau anormale sur l'appareil, il faut retirer immédiatement la prise de l’appareil.
b) Après l'installation, il faut vérifier soigneusement l'appareil. Il ne faut pas enficher sa prise quand de l'eau se
trouve sur des pièces qui doivent rester sèches.
c) Un appareil muni d’un câble ou d’une fiche détériorés ne doit pas être mis en service. Ceci est aussi valable
quand l’appareil ne fonctionne pas correctement, est tombé par terre ou a été détérioré d’une autre manière.
d) Pour éviter que la fiche de l'appareil ou la prise de courant se mouille, il faut placer le meuble de l’aquarium et le
bassin à côté de la prise de courant murale. Ainsi aucune goutte d'eau ne tombera sur la fiche ou la prise de
courant. Une « boucle d’égouttage » devrait être prévue entre l'aquarium et la prise de courant murale. La
« boucle d’égouttage » est la partie du câble qui fléchit sous la prise de courant en cas d’emploi d’une rallonge.
De cette manière, l'eau s'égouttera sous la prise de courant du câble et ne pourra pas entrer en contact avec
celui-ci. Si la fiche ou la prise de courant se mouille, NE PAS retirer le câble mais couper l’alimentation en courant
au fusible ou au sectionneur de puissance. Ne retirer la fiche qu’après avoir ceci et vérifier si de l'eau se trouve
dans la prise de courant.
3) Les enfants doivent être surveillés quand vous vous occupez de l'aquarium ou vous vous trouvez à proximité.
4) Pour éviter quelconques blessures, ne pas toucher les pièces mobiles ou chaudes, telles que les chauffages, les
réflecteurs, les ampoules etc.
5) Les fiche des appareils qui ne sont pas utilisés, avant le montage/démontage de pièces de ces appareils ou avant
leur nettoyage, doivent être retirées. Ne pas tirer au câble. Pour sortir le câble, toujours saisir la fiche.
6) Les appareils ne doivent être utilisés qu'aux fins prévues. L’emploi d’accessoires que le fabricant n'a pas
recommandés ou vendus, peut causer des conditions dangereuses.
7) Ne pas installer ou entreposer l’appareil à un endroit où il est exposé aux intempéries ou à des températures en
dessous de zéro.
8) Avant la mise en service d’un appareil monté à la paroi du bassin, il faut garantir que cet appareil est
correctement installé et fixé.
9) Toutes les indications de sécurité sur l'appareil doivent être lues.
10) S'il faut utiliser une rallonge, elle doit avoir la puissance nécessaire. Un câble qui est homologué pour peu
d’ampères ou de watts, peut se surchauffer. Le câble doit être posé de sorte que personne ne trébuche dessus ou
y reste accroché.
11) L’appareil est équipé d’une fiche à contact de protection. Cette fiche ne doit en aucun cas être modifiée ou
contournée.
Si la fiche est retirée, tout droit à garantie sera annulé !
Conserver ces instructions
FR
Écumeur de protéines interne MC 501
Mode d'emploi
Le MC 501 est un écumeur compact de haute performance à double fonction: il peut être placé
aussi bien dans la décantation que directement dans l'aquarium.
Installation dans l'aquarium
L'écumeur est livré avec un support réglable fixable aussi bien au bord gauche qu’au bord droit de
l'aquarium. Le support permet de fixer l'écumeur au-dessus de la surface de l’eau. Il faut que la boîte de
l'écumeur se trouve au-dessus de la surface de l’eau d'au moins 80 mm (voir le shèma ci-dessus).
Le support permet d'accrocher l'appareil au bord de l'aquarium et de le fixer à l'écumeur au moyen de deux
vis (B). Si la position de l'écumeur dans le bac n’est pas verticale, ajustez le vis (C) pour faire en sorte que la
position devienne verticale.
Installation dans une décantation
Il est possible d'installer l'écumeur au bord de la décantation suivant la procédure indiquée ci-dessus ou de
l'utiliser séparément. Assurez vous que l'eau puisse entrer et sortir librement. Il faut que l'appareil se trouve
à une profondeur d'au moins 120 mm pour assurer une performance satisfaisante. En plus, il est important
que le déversoir dans la décantation soit installé de façon correcte et que la vanne du tube d’air soit mise
dans la position 14 heures.
Opération
Après avoir installé l'écumeur et après avoir ajusté sa hauteur, vous pouvez calibrer ou baisser le gobelet de
l'écumeur pour optimiser la mise au point. Attendre environ 24 heures avant d'agir.
Maintenance
Il convient d'arrêter la pompe pendant quelque 15 minutes par semaine pour pouvoir enlever d'éventuels
particules et cristaux de sel qui se seraient déposés dans le tube Venturi.
Une fois par mois il faut rincer l’éponge biologique / de dégazage avec de l'eau de l'aquarium (hors du bac).
Une fois tous les trois mois il faut inspecter la pompe et éliminer d'éventuels trace de tartre du tube Venturi
/ de la vanne de la pompe. Pour cela, immerger toute la pompe dans une quantité de nettoyant anticalcaire
conventionnel. Ensuite rincer la pompe sous l'eau du robinet.
fiche
technique
dimensions (lxlxh)
env.
consommatio
n d’énergie
débit
d’air env.
hauteur min.
d'installation de
la décantation
volume de
l’aquarium à
plantation
normale
volume de
l’aquarium à
plantation
légère
MC 501
210 x 86 x 470 mm
12 Watt
400 l/h
530 mm
500 l.
600 l.

Deltec GmbH
Steller Straße 75
D-27755 Delmenhorst
Deutschland / Germany
www.deltec-aquaristic.com
Table of contents
Languages:
Other Deltec Ultrasonic Jewelry Cleaner manuals


