Deltran HYPERION 041-1002-HY-WH User manual

1
Instruction Manual
BLUETOOTH TIRE PRESSURE
MONITORING SYSTEM
4 WHEELS
P/N 041-1002-HY-WH
Read this material before using this product.
Failure to do so can result in serious injury.
Save this manual.
P/N 392-0426-RA
2
CONTENTS
Important Safety Instructions and Warnings………………...
Product Specifications…………………………………………..
Product Overview…………………………………………………
Tire Sensor Installation…………....…………………………….
Tire Sensor Battery Replacement…………....………………..
OBD Receiver Installation/Operation………………………….
Deltran APP Installation/Operation ……………………………
Regulatory Warnings ....…………………………………………
Supplier's Declaration of Conformity …………………………
Customer Service ………………………………………………...
Warranty ……………………………………………………………
3
4
5
6
9
13
14
26
27
27
28

3
IMPORTANT SAFETY INSTRUCTIONS & WARNINGS
1) SAVE THESE INSTRUCTIONS – This manual contains important safety and
operating instructions for the BLUETOOTH TIRE PRESSURE MONITORING
SYSTEM, P/N 041-1002-HY-WH.
2) Read all warning labels and instructions. Operating instructions must be
understood before using equipment.
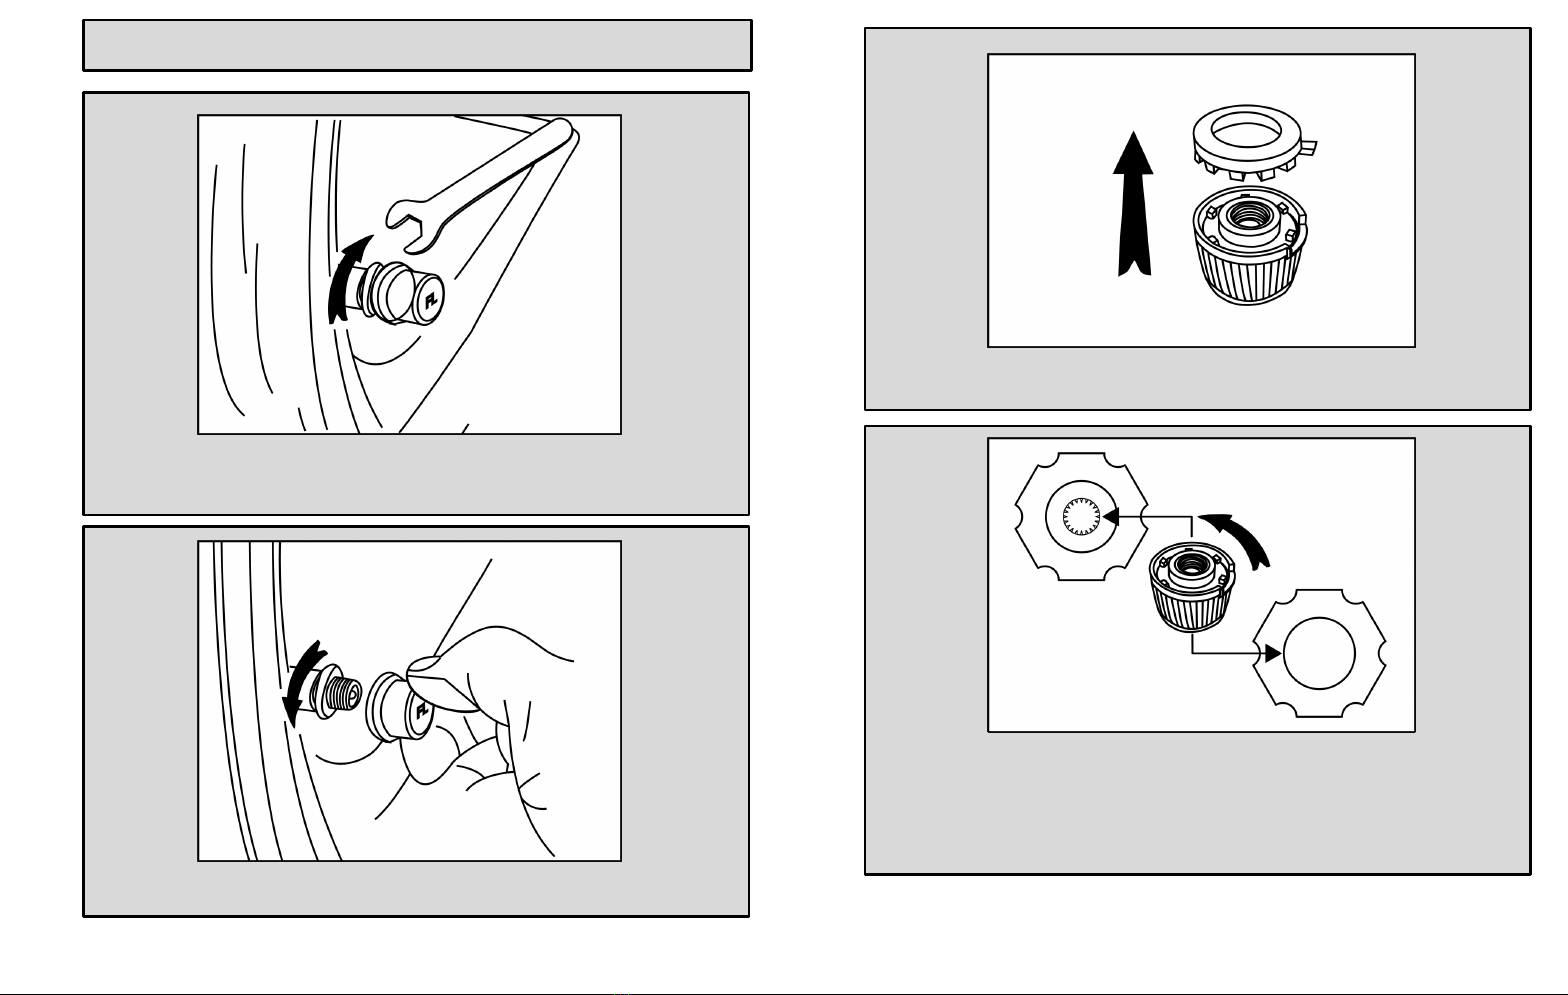
3) These sensors can only be used on vehicles with maximum tire pressures
below 50.8 PSI.
4) When an alert or warning is received, reduce vehicle’s speed and proceed to
a safe location to stop where the tire can be inspected and /or serviced.
5) Temporary resealing or re-inflation products containing internal sealants or
propellants in any tire assembly may adversely affect the operation of the
sensor/transmitter.
6) Caution: the system is wireless RF product; therefore, it may not receive a
signal due to the poor environment or incorrect operating or incorrect
installation.
7) Do not operate the App while driving. The company is exempt from all
responsibilities that result from driver’s carelessness and improper operation.
8) Before use, check the manufacturer’s instruction manual for the vehicle.
9) The warnings, precautions, and instructions discussed in this manual cannot
cover all possible conditions and situations that may occur. The operator must
understand that common sense and caution are factors, which cannot be built
into this product, but must be supplied by the operator
10) This product is not designed to be used by children.
11) Do not modify the equipment in anyway.
12) Do not use any accessories that are not recommended by the manufacture.
13) All cars and trucks built and sold in the United States after January 1, 1996
were required to be OBD II equipped. In general, this means all 1996 model
year cars and light trucks are compliant, even if built in late 1995.
14) Hyperion® is not responsible for any loss caused by an accident or for
providing any support regarding the outcome.
4
SPECIFICATIONS
External Sensor Related Parameters
Operating Temperature -13 - 185°F (-25 - 85°C)
Pressure Range 0 – 65 Psi
Pressure Sensitivity ±1.5 Psi
Temperature Sensitivity ±5.4°F (±3°C)
Transmission Power < 8dBm
Transmission Frequency 433.92MHz
Battery Life 2 years
Single Sensor Weight 0.28oz (8 grams)
Sensor Battery CR1632 Lithium (replaceable)

5
PRODUCT OVERVIEW
Below is a list of items that should be included in your retail box:
1) Receiver (Monitor) (1)
2) Tire Sensor (4)
3) Hexagonal Nut (5)
4) Plastic Hexagonal Sensor Wrench (1)
5) Metal Open Ended Wrench (1)
6) Replacement Tire Sensor O Rings (4)
7) Instruction Manual
oThank you for choosing our Bluetooth tire pressure monitoring system
(TPMS).
oThe sensors located on each wheel and are used to detect real-time
pressure and temperature of each tire.
oThen sensors will transmit the data to the receiver with RF.
oThe Corresponding phone APP can display the tire pressure and
temperature in real time after connecting Bluetooth.
oThe product can reduce fuel consumption, reduce tire wear and improve
Dynamic performance.
oPlease read this user manual carefully before using the product.
oThe alarm sounds for exceeding the limit of the tire pressure or the tire
temperature.
6
Tire Sensor Installation
WARNING IMPORTANT NOTICE
1) Each TPMS wheel sensor is marked (L-Front, R-Front, L-Rear and R-Rear)
and MUST be installed on the corresponding wheel as shown in the
diagram above.

7
1) Unscrew and remove the existing valve dust cap and store.
2) Obtain one of the supplied hex nuts and in a clockwise direction install onto
the valve stem until it bottoms out. Do not tighten.
1) Obtain the correct TPMS sensor (marked on the end of each sensor,
example “ FL”) for the wheel you working on. Refer to the diagram at the
start of this section.
2) In a clockwise direction install the sensor onto the valve stem and tighten
using the supplied black plastic tool.
8
1) Obtain the supplied metal open ended wrench.
2) Place the wrench on the previously installed hex nut and turn it anti-
clockwise until it is up against the bottom of the sensor.
3) Tighten the hex nut.
4) This is to prevent the sensor from becoming loose.
1) Check to see if any air is leaking by spraying the valve with soapy water.
2) If you see no bubbles then there are no air leaks.
3) If you see an air leak ensure the sensor is tight on the valve.

9
Tire Sensor Battery Replacement
1) Obtain the supplied metal open ended wrench.
2) Place the wrench on the installed hex nut and turn in a clockwise direction
until the hex nut is loose from the bottom of the sensor
1) Unscrew the sensor in an anti-clockwise direction by hand or by using
the supplied black plastic tool.
10
1) Remove the locking gasket by preying in an upwards direction.
1) Place the sensor into each half of the supplied black plastic tool.
2) Unscrew the top in an anti-clockwise direction to remove the sensor top
cover and expose the battery.

11
1) Simply slide the old battery out then replace with a new CR1632 Lithium
battery.
2) Reassembly the sensor in reverse order as shown in the previous two
diagrams.
1) Screw the sensor in a clockwise direction onto the valve stem.
2) Tighten with the provided tool.
12
1) Obtain the supplied metal open ended wrench.
2) Place the wrench on the installed hex nut and turn in an anti-clockwise
direction until the hex nut is tight up against the bottom of the sensor.

13
OBD Receiver Installation/Operation
1) Locate the OBD II port in your vehicle. Refer to the vehicles owner’s
manual to locate your OBD II port.
1) Once you have located the OBD II port plug the supplied OBD receiver into
the port.
14
Deltran Connected App Setup
1) Look for the Deltran Connected app within the iOS App Store or the Google
Play Store on Android. When opening the app, you will be prompted to either
sign in or register. Please create an account if you haven’t done so already.
You can then start with the setup process. Please note this APP is under
constant development so we can improve the customer experience.
a)

15
2) Once downloaded, open the app and sign in and tap on the + symbol to add a
device.
a)
16
3) Tap on “ADD TPMS”.
a)

17
4) By this point you should have the dongle plugged into the OBDII port on your
vehicle and it will show up after you tap on add TPMS, tap on it to add.
a)
18
5) After you add this it will prompt you to name the device and where it’s location
will be.
a)

19
6) Once added successfully you will see readings displayed.
a)
20
7) To change the desired tire pressure to match your vehicle’s required tire
pressure tap on the 3 horizontal dots as shown below.
a)

21
8) Next enter the value for the front and back tires. You only need to enter the
values once as the tires are a pair.
a)
22
9) If any of the tire pressures get out of tolerance an alert
will be sent to the APP warning you of the situation. The
following screens will also appear.

23
10) The dashboard will show the following screen if there is NO issue with any of
the tire pressures. Note the GREEN circle with the check mark.
24
11) The dashboard will show the following screen if there is an ISSUE with any
of the tire pressures. Note the RED circle with the X mark.

25
12) The following screen will appear showing with tire or tires that have an issue.
Note the tire pressure or pressures in RED.
26
REGULATORY WARNINGS
Federal Communications Commission (FCC)
FCC ID: 2APJX-041-001
Title 47 Subpart, 15.105(b)
Note: This equipment has been tested and found to comply with the limits for a
class B digital device, pursuant to part 15 of the FCC Rules. These limits are
designed to provide reasonable protection against harmful interference in
residential installation. This equipment generates, uses and can radiate radio
frequency energy and, if not installed and used in accordance with the
instructions, may cause harmful interference to radio television reception, which
can be determined by tuning the equipment off and on, the user is encouraged to
try to correct the interference by one or more of the following measures:
- Reorient or relocate the receiving antenna.
- Increase the separation between the equipment and receiver.
- Connect the equipment into an outlet on a circuit different from that to
which the receiver is connected.
- Consult the dealer or an experienced radio/TV technician for help.
This device complies with Part 15 of the FCC Rules. Operation is subject to
the
following two conditions: (1) this device may not cause harmful interference, and
(2) this device must accept any interference received, including interference that
may cause undesired operation.

27
CUSTOMER SERVICE
Supplier's Declaration of Conformity
47 CFR § 2.1077 Compliance Information
Trade Name: Hyperion
Model No.: 041-001
Responsible Party – U.S. Contact Information
Deltran USA LLC
801 International Speedway BLVD
Deland, Florida, 32724, USA
(386) 736-7900
For customer support please visit Deltran-Global.com/Hyperion. You can also
call our customer service hotline 877-456-7901
28
WARRANTY
The Hyperion ® TPMS Tire Pressure Monitoring System comes with a twelve
(12) month limited warranty against defects or failure (within one (1) year of
purchase).
THIS LIMITED WARRANTY IS VOID under the following conditions:
1) The product is misused, subjected to careless handling, or operated under
conditions of extreme temperature, shock, or vibration beyond our
recommendations for safe and effective use.
2) The product is misused, subjected to careless handling, or operated under
conditions of extreme temperature, shock, or vibration beyond our
recommendations for safe and effective use.
3) The product is disassembled or repaired by anyone who is not an
authorized service representative.
4) The product was purchased from an unauthorized source. Warranty is not
transferable from the original purchaser.
5) Any physical damage to the Tire Pressure Monitoring System or any
accessory after purchase.
6) Any modifications to the Tire Pressure Monitoring System.
Table of contents
Popular Automobile Accessories manuals by other brands

Mazda
Mazda KMV6V7210 installation instructions

Henderson's Line-Up
Henderson's Line-Up SuperSteer SS308 installation instructions

Thule
Thule 1193 instructions

Desay SV Automotive
Desay SV Automotive CHG-WIRELESS product manual

Metra Electronics
Metra Electronics 99-7606 installation instructions

K&N
K&N 57-2531 installation instructions

Touratech
Touratech 01-048-0431-0 Installation instruction

AL-KO
AL-KO MAMMUT manual

Car-Interface
Car-Interface CI-UCON7-JEEP manual

Power Electronics
Power Electronics NB WALL Series Hardware and installation manual

Thule
Thule Thule Rapid System Kit 1803 instructions

Buyers
Buyers SaltDogg 92451SS instruction manual