DENECKE TS-1 User manual

Denecke, Inc.
25030 Avenue Stanford, Suite 240, Valencia, CA 91355 (661) 607-0206, www.denecke.com email: [email protected]
1
The Dcode®TS-1 Time Code Slate was originally designed in 1986 for music playback. It has
since been upgraded to the TS-2(SB) with the addition of the built in Dcode®SB-2 Syncbox
Time Code Generator. There are numerous improvements in this new version, including: A 3-
position brightness switch, an “AA” battery pack, and a new 11” faceplate with an easy to
replace Lexan overlay. The TS-2(SB) is lighter than the original TS-1 and can be stored in the
camera front box. None of the original TS-1 features are lost with the TS-2(SB). In fact, the TS-
2(SB) is simply an upgrade from the TS-1 and SB-2.
The TS-1 can be used in live action filming as well as for sync playback work. One time code
Nagra with a pre-striped playback tape can now be used instead of using two tape machines
thus creating a music video technique that is free from re-recording the playback tape. Time
code also shows you the current position of the tape, no more confusion about which verse
you are filming.
Time Code is a sync pulse with the addition of hours, minutes, seconds, and frames in every
frame. There are several types of time code. The Denecke DCODE®Time Code Products are
designed to work specifically with SMPTE/EBU time code for both film and video production.
TS-1 Time Code Slate ____________________________________________________
The Dcode®TS-1 Time Code Slate is a simple battery operated time code reader connected to a
set of conventional clapper sticks. Time code is read on 1” LED’s which display hours, minutes,
seconds, and frames. The digit pairs are separated by decimal points while displaying time
code. The decimal points turn off when user bits are displayed. The display runs as long as the
sticks are open. When the sticks are closed, the time code display freezes for three frames then
changes to “User Bits” and holds the “User Bit” display for one second, then turns off.
Time Code can be sent to the slate from the Syncbox Time Code Generator or an outside time
code source such as a Nagra IVS-TC. Drop frame time code is indicated when a decimal point
appears above the “DF”.
There are many advantages to using the TS-1 Time Code Slate and Syncbox Time Code
Generator. In the long run, they will save you both time and money by eliminating the need
for work prints and mag transfers.

2
TS-1 OPERATION
1. Turn the slate on by selecting high or low brightness with the three position switch on the
back.
(Viewed from the back . . . Left = High, Center = Off, Right = Low.)
2. Connect the slate to the time code source by using the 1/4# jack or 4 pin cannon input.
3. Before the camera rolls, open the clapper. Running time code will be displayed. Film the
running code for approximately 1 second before clapping the sticks. Pre-roll is for sound.
Don’t pre-roll film. Make sure the display is readable for the telecine operator or editor. (IN
FOCUS, NO KICKS, RIGHT EXPOSURE, RUNNING CODE).
4. Live action audio must start recording sound at least 10 seconds before rolling camera to
allow for the videotape pre-roll necessary to automatically sync sound and picture by time
code.
5. Sync play back does not need pre-roll. The music has code from the beginning of the
song. Film one second of code at the head of each playback segment. Try to avoid tail
slates. If tail slates are used do not turn the slate upside down. (The telecine operator can’t
turn over his monitor.)
USING THE TS-1WITH THE ...
COMTEK M72 WIRELESS SYSTEM
Combining the TS-1with the Comtek Transmitter and Receiver is recommended for playback
when the camera and sound are close together on the set. Keep in mind that the maximum
range for the Comtek is about 300 feet.
Set the time code source according to Nagra IVS-TC Manual. Take the time code out from the
Nagra and reshape it with a “TC Lemo” cable to bring it down to a 1volt level. This is very
important, because you can overdrive the Comtek with the 5volt output out from the Nagra.
Make sure you are properly grounded so you don’t get time code bleed on the tape. Pin 1 of
the lemo connector must be connected to the shell of the connector.
Connect the antenna. Plug the Transmitter into time code playback or record source. If using a
Nagra S-TC, connect the Comtek M72 Transmitter to the TC socket on the right side of the
recorder via the “TC Lemo” cable. Locate the Transmitter away from the Nagra to minimize
crosstalk. Turn transmitter on and check gain (set to mid-range with green screwdriver
adjustment).
Attach the PR-72 Receiver with Velcro to the back of the slate. Connect the unit to the slate
with the “TC RX” cable by inserting a c” plug into the Receiver, and the 3” phone plug into the
side of the slate. Let cable hang loosely, as it serves as the antenna. DO NOT WRAP OR TUCK!
When the Comtek is mounted on the slate the receiver will turn on when the sticks are
opened. Make sure the Receiver and Transmitter frequencies match and that the gains are set to
mid-range.

3
WHEN USING THE TS-1 IN CONJUNCTION WITH COMTEK:
1. Test equipment around the shooting area to detect potential problems.
2. Monitor Receiver with headphones and listen for interfering signals.
3. Set the gain controls on both the Transmitter and Receiver to 50% for optimum results.
4. Separate microphone cables from the Transmitter to avoid recording time code
“cross talk” on the audio.
5. DO NOT PERMIT METAL PARTS TO TOUCH CABLE CONNECTORS.
USING THE TS-1 WITH THE
Dcode®“SYNCBOX” TIME CODE GENERATOR
1. Jam sync the Syncbox with code from the Nagra in the “TEST” position (time code is offset
in the “RECORD” position). A once per second blink at turn on indicates jam sunk code.
2. The internal frame rate of the Nagra and Syncbox should be the same (30FPS is standard for
film). Consult the telecine post house if there is any question.
3. Velcro the Syncbox to the back of the slate and connect it with the TC-RX cable (CA-2
cable).
4 Jam the Syncbox every 4 or 5 hours.
5. Keep an eye on the code. Check the numbers against the Nagra. Blank numbers or
“CODE” will be displayed in the user bits if the Syncbox has been reset by accident (it helps
to tape the cover closed).
THE TS-2(SB) TIME CODE SLATE _____________________________________
The TS-2 works in the same manner as the TS-1, with a few improvements. The power switch
is now separate from the brightness switch. The slate, including the Syncbox, receives powers
through the power switch. Jamming of the Syncbox is accomplished through the ¼” phone
jack on the side of the slate. Time code is set from your source. Turn on the master power
switch to jam the TS-2. A once per second blink on the LED mounted between the minutes
and seconds on the front display indicates Jam. To use a Comtek or to hard wire the slate
turn off the internal Syncbox power, located in the battery compartment. The frame rate of
the slate should match the frame rate of the tape machine’s time code. The brightness switch
now has a new LOW position. The TS-2 uses 8 “AA” batteries instead of “C” Cells. Battery life
is about 1/3rd in most circumstances. The new design will now fit into a standard 11” front
box.
The TS-1 is still recommended for bright exterior shoots. A plastic sun shade is available for
the TS-1, for use in direct sunlight. “C” cell batteries are needed when using the high
brightness position for extended periods.

4
TS-2(SB) OPERATION
1. Feed time code into the ¼” jack on the side. Turn on power. Both the time code and user
bits will be jammed. Be sure to set the proper time code rate on the Syncbox. A once per
second strobe indicates jam. A fast strobe indicates a non-jammed condition. The ¼” jack is
also an output that can be used to jam other equipment.
2. Set the slate to the desired brightness. Too much light will flare the numbers and wastes
the batteries. Keep the sticks closed to conserve power. A flickering or dim display
indicates a low battery condition. The brightness can be changed while jammed.
3. Turning off the master power will reset the Time Code and you will lose sync. Tell the slate
operator to NOT play with the power switch. Re-jam every 4 to 5 hours. Some DAT
machines have poor time bases so you may need to re-jam more often..
4. Transmitting the time code works the same as with the TS-1. Turn off the internal Syncbox,
(the SB-2 switch is located inside the battery pack on the back.) Then Velcro the Comtek
receiver onto the back of the TS-2, connecting it with a cable such as the CA-2 (Mini/RA
¼”.) The Comtek receiver will turn on when you open the sticks. The LED on the Comtek
receiver will indicate power on. The Comtek level controls should be set at about 50%.
Testing the radio system can be done with a set of headphones. You should hear code on
pin two of the XLR connector.
5. You will need approximately 10 seconds of tape running with time code (pre-roll) before
the film is slated. Pre-roll is only needed on the sound, no point in wasting ten seconds of
film. This pre-roll code must be continuous code. Make sure to not have any breaks in the
time code. Also run the tape a second or two longer than the camera in order to have
some post roll on the end.

5
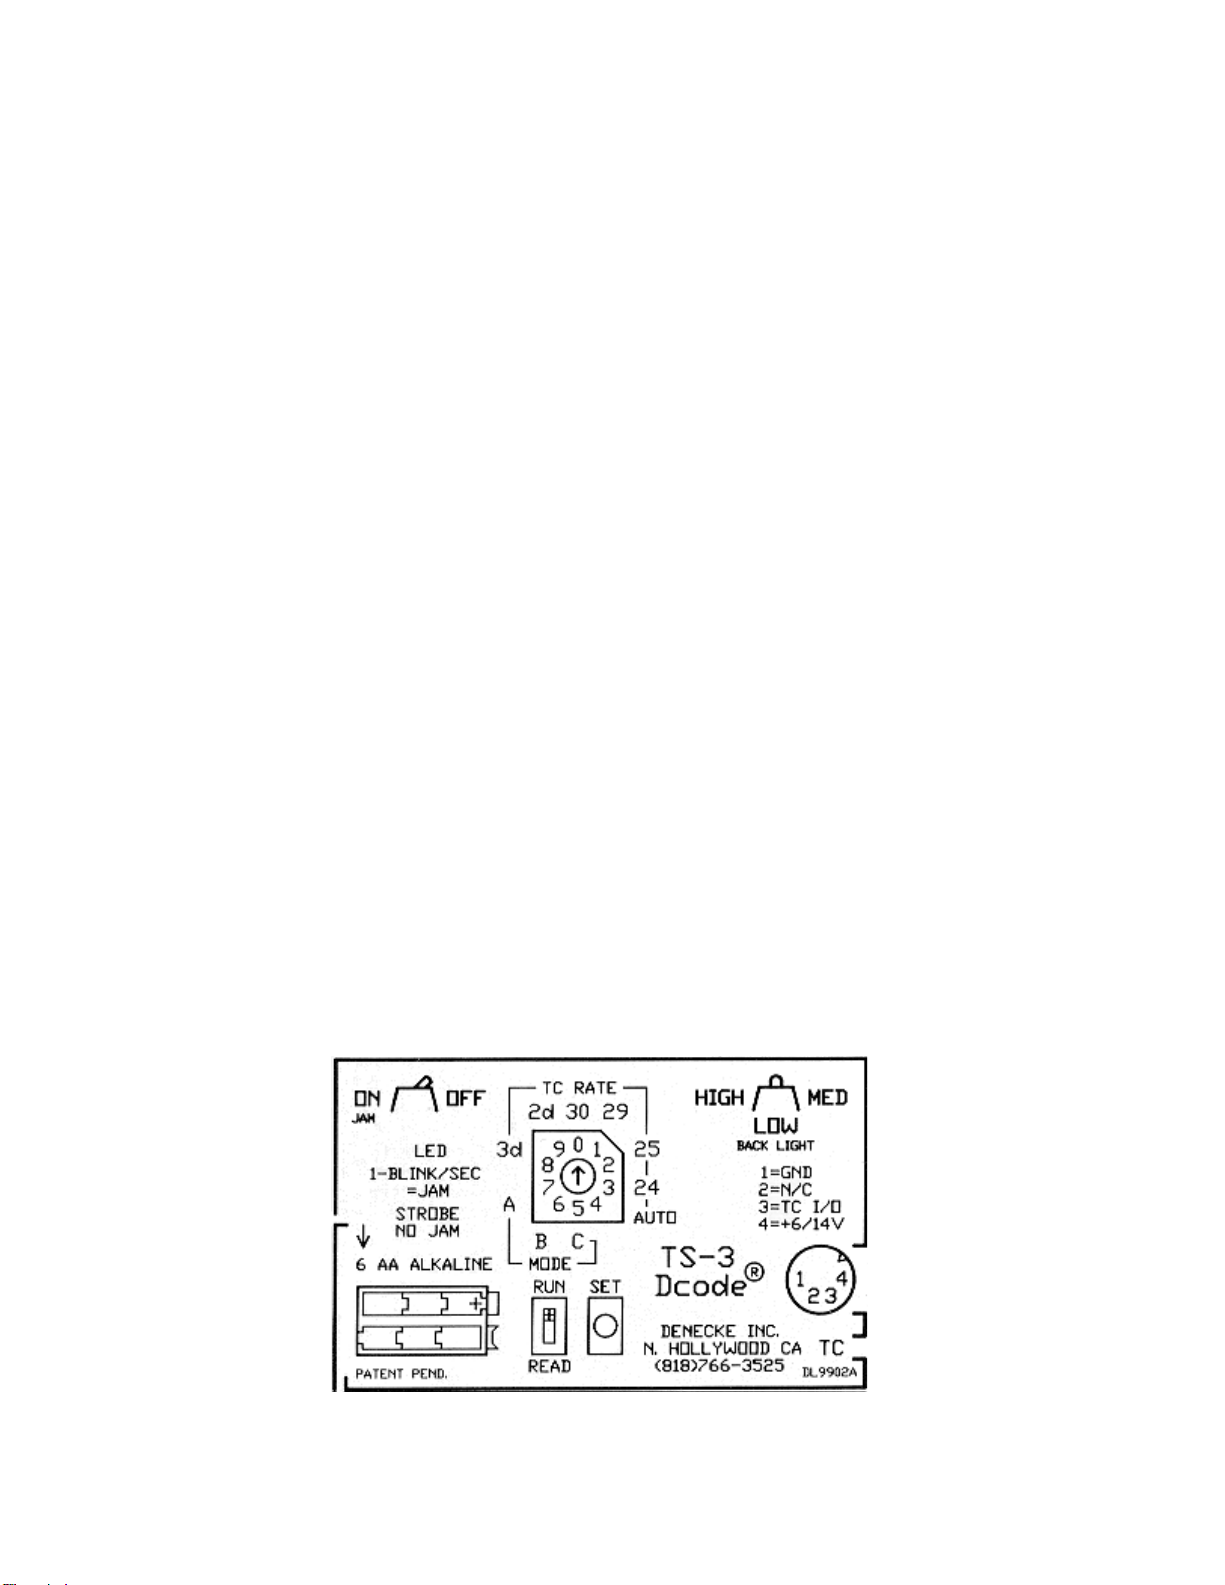
TS-3 and TS-C OPERATION
The TS-3 and the TS-C are the latest additions to Denecke, Inc.’s Dcode Time Code Product
Line. New functions and options are:
1) Auto Set to Jam to the same frame rate as the incoming time code.
2) Battery voltage readout at turn on.
3) Low and dead battery warning.
4) EL back light to light up scene and production information.
5) TCXO is standard (Temperature Compensated Crystal Oscillator).
6) Sync error display if there is a mismatch in time codes.
7) Mode selection in non-volatile memory (needs no backup power).
8) Quick change battery pack using 6 standard "AA" batteries.
9) Settable “time out” mode for open sticks to conserve batteries.
10) A flat back with a removable plate for camera logs (TS-3).
11) Scroll back display of the last 16 claps for logging.
12) EL over-voltage protection: The EL Backlight turns off if external power is 12.5 volts or
higher.
The mode switches are concealed behind the sliding battery door on the side of the slate
To set modes turn power off and place switch in position of mode A(7) or B(6). Turn power
back on and the selected mode will display. Use the rotary switch to cycle through available
functions. The display shows the function and status. To select the desired mode put the
run/read switch in run (on) or read (off). Push the button to enable or disable the chosen
function. Use Mode B(6) to set the value of the selected function. Pushing the button will
display the desired value. When all of the desired modes are set go to “Return”(0) and push
the button. The display will run.
[NOTE: the letter “M” is written as “n” on the 7 segment display.]
Mode "A" selects the mode while mode "B" selects the value of the selected modes. All setup
information is displayed on the LED readout. To reset to default (all modes off), go to mode B,
select Dflt(3) and push the button in run. Set will light and all functions will reset to the default
values.
SET UP CHART DISPLAY
Version 2.4 (TS-C is 1.9) Mode A Mode B
0) Start Return Return
1) Time out/Display Tout on/(off) 15,30,(60),120 Seconds
2) Feed warning in UB Feed " 2,(4),6,8 Hours
3) Jam lock Jloc " Dflt (Set)
4) Flash held frames Flsh " 1,(2),3,4,5 Frames
5) Hold clap frame Hold " (5),15,30,60,120 Seconds
6) EL backlight EL (on)/off node* B
7) Low brightness node* A LO brt (1), 2, 3 Intensity (TS-3 only)
8) Plus 1 frame reader PLS1 on/(off) -
9) - - -
* Note: M is displayed as n on the 7 segment display.
6
Default settings indicated by parenthesis.
“Time out” saves power by turning off the display after selected amount of time .
Feed is an internal timer to remind you to jam.
Jam lock inhibits free run code with out jamming.
Flash increases or decreases the brightness of the held frames.
Hold displays the clapped frame 2 seconds after the display goes out.
EL backlight lamp can be disabled in low brightness.
Low brightness selects lower light levels (1 = highest).
To display scrollback of the previous claps push the button while sticks are closed.
The memory is cleared at power off.
EXAMPLE: Enable the display timeout and set the timeout value to 120 sec.
Enable tout
1] Turn TS-3 power off.
2] Turn rotary switch to Position 7
3] Turn TS-3 power on. The display will read “node A”
4] Turn rotary switch to position 1. The display will read “tout OFF” (if disabled) or “tout ON”
(if enabled).
5] To enable the timeout mode turn toggle switch to On (run). Press the push button to
confirm change. The display will read “tout ON”.
6] To exit mode A turn rotary switch to position 0. Display will read “return”. Turn toggle
switch to on (run) and press the push button. The TS-3 will reset and time code will roll.
Set tout to 120 sec.
1] Turn TS-3 power off.
2] Turn rotary switch to Position 6.
3] Turn slate power on. The display will read “node B”.
4] Turn rotary switch to Position 1. The display will read “tout xx” (xx = previous setting).
5] To change the timeout value set the toggle switch to on (run). Press the push button to
change the timeout value.
6] To exit mode B turn rotary switch to position 0. The display will read “return”. Set the
toggle switch to on (run) and press the push button. The TS-3 will reset and time code will
roll.

7
RECOMMENDED PRACTICES
1. Pre-roll the sound transport for at least 10 seconds before camera starts when doing live
action recording.
2. Properly identify materials. Indicate film and Nagra time code speed (30/29/25/DF) on
your log. Do not use 24FPS code.
3. Indicate if tracks are stereo or mono.
4. Voice slate reels and film rolls.
5. Use same type of code for the entire production (non-drop preferred) and indicate the
frame rate on the sound report.
6. Jam time code at least every 4 hours when using the Syncbox. Make sure numbers are
always changing. Jam the Slate in the Test Position of the Nagra.
7. Make sure the camera gets a clear shot of the slate’s display and always close the clap-
stick for an audible back up in case the time code display malfunctions.
8. When in doubt, check with transfer house.
9. Keep in mind that when the Nagra IVS-TC is in “record” the time code that the slate is
displaying is offset by 4 frames (30 frame code at 7-1/2 IPS) from the code being
recorded on the tape. This will offset the slate when hard wired or when transmitting
code. Record this offset on sound log for transfer house.
TROUBLESHOOTING
If no time code is being transmitted:
1. Check if the antenna is plugged in on the Comtek.
2. Check connections by wiggling cables.
3. Use earphones to check for time code transmission. If you can hear code check the gain
control on the Receiver. Adjust the Receiver and the Transmitter taking care not to
overload the system.
CARE AND MAINTENANCE
1. Do not drop slate.
2. Use only alkaline batteries.
3. Do not leave clappers open when not in use.
4. Use dry erase Expo Marker for writing production information on the high gloss enamel
or Lexan Surface.
5. The operating temperature of this unit ranges from -20 to 120ºf. Temperature affects
battery life. (Example: 10 hours in “LOW” position at 72ºf = 1 hour in “LOW” at 0ºf).
ADDITIONAL INFORMATION
1. If incoming time code is lost for any reason, the slate will show the last time code
received with the clapper opened.
2. If the clapper is closed, it will retain the time code received at the moment it was last
open.
3. In playback, no offset occurs.
4. The conventional “clapper sync” is a back up feature.
5. If you have any questions about what kind of time code is being used, call the post
production facility where you are having the film transferred.
This manual suits for next models
4
Table of contents
Other DENECKE Recording Equipment manuals

Popular Recording Equipment manuals by other brands


Extron electronics
Extron electronics Inline CIA116-1 Operation manual

Supra
Supra Wireless TRACcess Interface Retrofit installation instructions

Roli
Roli Seaboard Block Creator Manual

Nav TV
Nav TV ZEN-A2B installation manual

Nav TV
Nav TV ZEN-V installation manual

Juzisound
Juzisound Total SOLO Sampler 2 quick start guide