Denver ASA-30 User manual

ASA-30
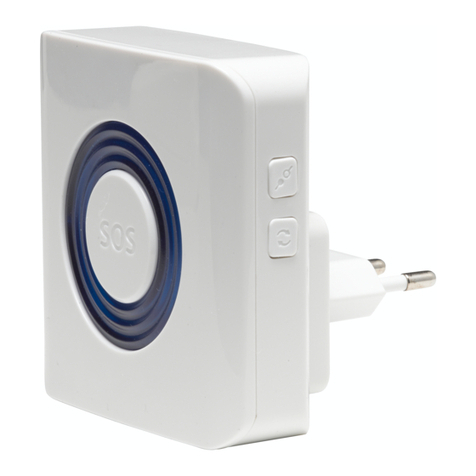
Indoor Siren


3
Features
The ASA-30 can be used either as an additional siren connected to
your alarm system or as an independent siren connected to a remote
control and/or wireless detectors.
- Wireless connection for an easy installation
- Radio-frequency security of the accessories: more than one
million of codes combinations
- Simplied connection to accessories
- Can be connected to all of Denver accessories
- Built-in 4.2V / 600mAh lithium batteries: 8-hour battery life in
standby mode
Box Content
1 x ASA-30
1 x User Manual
ENG

4
Layout
Switch / Power
Connect
General information
The ASA-30 is powered by its built-in AC 110-220V plug. Several ASA-30
can be installed throughout your home and connected to your alarm
system. When the alarm of your system is triggered, the ASA-30 rings
out and its LEDs switch on.
The ASA-30 can also be used as a standalone siren and can be
connected to wireless sensors and/or to a remote control.

5
Power on / o
Power on
The siren is powered oas per default settings. Plug the siren to a 110-
220V socket and you hear a beep: the siren is on. You can also turn the
siren on by long pressing (6 seconds) the Power button on the siren.
Enter Setup Mode / Power o
Enter Setup Mode by pressing the Power button once. Press again the Power
button for 6 seconds to turn the siren o.
Siren and light indications
When arming the system
The siren beeps once, the LED lights blink once and switch on.
When disarming the system
The siren beeps twice, the LED lights blink twice and turn o.
When armed / disarmed in Mute Mode from the control panel
The siren does not beep, the LED lights do not blink.

6
Use as an additional siren
If the siren is used as an additional siren, it must be registered to your alarm’s
control panel. If the alarm is triggered, the ASA-30 will ring out and its LED
lights will fast ash.
Register the ASA-30 in the control panel
Press the Connect button on the siren. The LED lights up: the siren is
now in Connection Mode.
Press the “SOS” or “Arm” button on the control panel of your alarm
system. You hear one beep: the siren has been registered in the control
panel successfully (if you hear 3 beeps, the siren has already been
connected). Press the Connect button again on the siren to exit the
Connection Mode.
Note
Do not trigger any alarm with a sensor when registering the siren in
the control panel.
Test
Press the “Arm” button on the control panel. Both the built-in siren of
the control panel and the ASA-30 beep: the connection is successful. If
not, the connection has failed, try registering the siren again.

7
Use as a standalone alarm system
Before using the ASA-30 as a standalone alarm system, it must be
connected to a remote control or an accessory (e.g. motion detector,
door / window contact).
When the system is armed, if a sensor is triggered, the siren will ring out
and the LED lights will fast ash.
Connect a remote control
Press the Connect button on the siren. The LED lights up: the siren is
now in Connection Mode.
Press any button on the remote control.
You hear one beep: the remote control has been connected to the siren
successfully (if you hear 3 beeps, the remote control has already been
connected).
Connect a wireless sensor
Press the Connect button on the siren. The LED lights up: the siren is
now in Connection Mode.
Trigger the sensor (e.g. walk in front of the sensor if you want to
connect a motion detector)

8
You hear one beep: the accessory has been connected to the siren
successfully (if you hear 3 beeps, the accessory has already been
connected).
The siren supports up to 10 remote controls and 10 wireless detectors.
Test
a) Test the connection to a remote control
Press the“Arm”button on the remote control.The siren beeps once: the
connection of the remote control is successful. If not, the connection
has failed, try registering the remote control again.
b) Test the connection to a wireless sensor
Arm the system. Trigger the sensor (e.g. walk in front of the sensor
if you have connected a motion detector). The siren rings out: the
connection of the sensor is successful. If not, the connection has failed,
try registering the sensor again.
Clear all accessories
Press the Connect button on the siren for 6 seconds until you hear two
beeps. The LED light on: all accessories and control panel connected to
the siren have been cleared.

9
Entry / Exit Delay
A delay before activation can be set for the siren if the sensor is assigned
to the Delay Zone*.
If the Entry / Exit Delay is activated, the siren beeps once every second
until the system is armed, during the period of delay set. If one of your
system’s sensors triggers the alarm, the ringing out of the siren will be
delayed accordingly.
* The name of the Delay Zone and the connection process may vary
depending on models. Refer to the user manual of your alarm system for
more information.
Set up the delay:
Enter Setup Mode by pressing the power button once. Press the power
button again
- once to set the delay to 10 seconds
- twice to set the delay to 20 seconds
- three times to set the delay to 30 seconds
- four times to deactivate the delay
Default setting: no delay.

10
The delay will be eective only if the sensors
have been assigned to the Delay Zone. To
assign a sensor to the Delay Zone, open its
cover and move the jumpers on the circuit
board according to the opposite drawing.
For more information, refer to the manual of
your alarm system.
Night Lamp mode
When used as a standalone alarm system, the ASA-30 can also be used
as an LED night lamp.
Press the “Home mode”button on the remote control twice: the siren
switches to Home Mode and the strobe light turns into a night lamp.
Press the “Home mode” button twice, then the “Arm” button once: the
siren is in monitoring mode with night lamp on. Press the “Disarm”
button: the siren is disarmed and the LED lights switch o.

11
Specications
Power supply
110-220V
Volume
90dB
Backup battery
4.2V / 600mAh Lithium
Static current
< 13mA
Alarm current
< 300mA
Radio frequency
315MHz or 433MHz (±75KHz)
Housing material
ABS plastic
Operating conditions
Temperature: -10°C ~ +55°C
Relative Humidity: ≤80% (non-
condensing)
Dimensions
81 x 80 x 76mm

12
Standards
ALL RIGHTS RESERVED, COPYRIGHT DENVER ELECTRONICS A/S
Electric and electronic equipment and included batteries contains materials,
components and substances that can be hazardous to your health and
the environment, if the waste material (discarded electric and electronic
equipment and batteries) is not handled correctly.
Electric and electronic equipment and batteries is marked with the crossed
out trash can symbol, seen below. This symbol sig that electric and
electronic equipment and batteries should not be disposed of with other
household waste, but should be disposed of separately.
As the end user it is important that you submit your used batteries to the
appropriate and designated facility. In this manner you make sure that the
batteries are recycled in accordance with legislature and will not harm the

13
environment.
All cities have established collection points, where electric and electronic
equipment and batteries can either be submitted free of charge at recycling
stations and other collection sites, or be collected from the households.
Additional information is available at the technical department of your city.
Imported by:
facebook.com/denverelectronics
DENVER ELECTRONICS A/S
Omega 5A
Soeften
DK-8382 Hinnerup
Denmark
Hereby, Inter Sales A/S declares that the radio equipment type ASA-30 is in
compliance with Directive 2014/53/EU. The full text of the EU declaration of
conformity is available at the following internet address: http://www.den-
ver-electronics.com/denver-asa-30/

14
Features
ASA-30 kan anvendes enten som en ekstra sirene tilsluttet dit
alarmsystem eller som en uafhængig sirene forbundet til en
ernbetjening og/eller trådløse detektorer.
- Trådløs tilslutning for nem installation
- Radiofrekvenssikkerhed på alle enheder: mere end én million
kodekombinationer
- Enkel tilslutning til enheder
- Kan forbindes til alle Denver alarmenheder
- Indbyggede 4.2V / 600mAh lithiumbatterier: 8 timers
batterilevetid på standby
Indholdet i æsken
1 x ASA-30
1 x Brugermanual
DEN

15
Oversigt
Tænd / Sluk / Power
Tilslut
Generelle oplysninger
ASA-30 drives via det indbyggede 110-220V-stik.
Du kan installere en række ASA-30-sirener i dit hjem og forbinde dem
til dit alarmsystem. Hvis din alarm udløses, starter ASA-30 sirenen, og
dens LED strobelys tænder.
ASA-30 kan også anvendes som uafhængig sirene og kan forbindes til
trådløse sensorer og/eller til en ernbetjening.

16
Tænd / Sluk
Tænde
Som standard er sirenen slukket. Sæt sirenen i en 110-220V stikkontakt
og . Du hører et bip: sirenen er tændt. Du kan også tænde sirenen ved
at trykke langt (6 sekunder) på dens Powerknap.
Åbne opsætningen / Slukke
Åben opsætningen ved at trykke én gang på Powerknappen. Tryk og hold
knappen Power i 6 sekunder, når du vil slukke sirenen.
Sirene og lysindikatorer
Når du aktiverer systemet
Sirenen bipper én gang, LED-lysene blinker én gang og lyser derefter konstant.
Når du deaktiverer systemet
Sirenen bipper to gange, LED-lysene blinker to gange og slukker så.
Når sirenen er aktiveret / deaktiveret i Lydløs tilstand fra kontrolpanelet
Sirenen bipper ikke, LED-lysene blinker ikke.

17
Anvendelse som ekstra sirene
Hvis sirenen skal anvendes som ekstra sirene, skal den registreres i dit
alarmsystems kontrolpanel. Hvis alarmen udløses, lyder ASA-30, og dens
LED-lys Blinker hurtigt. .
Sådan registreres ASA-30 i kontrolpanelet
Tryk på knappen Tilslut på sirenen. LED lyset er tændt: sirenen er nu i
tilslutningstilstand.
Tryk på knappen “SOS” eller “Arm/Aktivér” på dit alarmsystems
kontrolpanel. Du hører ét bip: sirenen er nu registreret i kontrolpanelet
(hvis du hører 3 bip, er sirenen allerede tilsluttet kontrolpanelet).
Tryk på Tilslutningsknappen på sirenen igen for at afslutte
tilslutningstilstanden.
Bemærk
Undlad at udløse alarmen med en sensor, mens du registrerer sirenen
i kontrolpanelet.
Test
Trykpå knappen“Arm/Aktivér”påKontrolpanelet. Bådekontrolpanelets
indbyggede sirene og ASA-30 bipper: forbindelsen er oprettet. Hvis du
ikke hører noget bip, er forbindelsen ikke oprettet, og du skal forsøge
at registrere sirenen forfra.

18
Anvendelse som uafhængigt
alarmsystem
Før du kan anvende ASA-30 som uafhængigt alarmsystem, skal
den forbindes til en ernbetjening eller andet udstyr (f.eks. en
bevægelsessensor eller en dør-/vindueskontakt).
Når systemet er aktiveret, vil sirenen lyde og LED-lysene Blinke, hvis en
sensor udløses.
Tilslutning til en ernbetjening
Tryk på sirenens Tilslutningsknap. LED lyset er tændt: sirenen er nu i
tilslutningstilstand.
Tryk på en hvilken som helst knap på ernbetjeningen.
Du hører ét bip: Sirenen er nu registreret i ernbetjeningen (hvis du
hører 3 bip, er sirenen allerede tilsluttet ernbetjeningen).
Tilslutning til en trådløs sensor
Tryk på sirenens Tilslutningsknap. Og LED tænder: sirenen er nu i
tilslutningstilstand.
Udløs sensoren (f.eks. ved at gå ind foran sensoren, hvis du vil tilslutte
en bevægelsessensor).
Du hører ét bip: Sirenen er nu registreret i sensoren (hvis du hører 3 bip,
er sirenen allerede tilsluttet sensoren).

19
Sirenen understøtter op til 10 ernbetjeninger og 10 trådløse sensorer.
Test
a) Test af forbindelsen til en ernbetjening
Tryk på knappen “Arm/Aktivér” på ernbetjeningen. Sirenen bipper én
gang: forbindelsen til ernbetjeningen er oprettet. Hvis du ikke hører
noget bip, er forbindelsen ikke oprettet, og du skal forsøge at registrere
sirenen i ernbetjeningen igen.
b) Test af forbindelsen til en trådløs sensor
Aktivér systemet. Udløs sensoren (f.eks. ved at gå ind foran sensoren,
hvis du har tilsluttet en bevægelsessensor). Sirenen lyder: forbindelsen
til sensoren er oprettet. Hvis du ikke hører noget bip, er forbindelsen
ikke oprettet, og du skal forsøge at registrere sirenen i sensoren igen.
Slette alt tilbehør
Tryk på Tilslutningsknappen på sirenen og hold den inde i 6 sekunder,
indtil du hører to bip. LED-Lyser op: Alle tilslutninger mellem tilbehør
og kontrolpanel/sirene er ophævet.

20
Forsinkelse ved ind- og udgang
Du kan indsætte en forsinkelse inden sirenen aktiveres, hvis sensoren er
allokeret til Enkelt Forsinkelseszone.
Hvis en forsinkelse ved ind- / udgang er aktiveret, bipper sirenen én
gang i sekundet i den valgte forsinkelsesperiode, når systemet er
blevet aktiveret.
* Hvis en af systemets sensorer udløser alarmen, vil sirenen lyde med en
tilsvarende forsinkelse.
Opsætning af forsinkelse:
Åben opsætningen ved at trykke én gang på Powerknappen. Tryk på
knappen Power igen
- én gang for at indsætte en forsinkelse på 10 sekunder
- to gange for at indsætte en forsinkelse på 20 sekunder
- tre gange for at indsætte en forsinkelse på 30 sekunder
- re gange for at deaktivere forsinkelse
Standardindstilling: ingen forsinkelse.
Other manuals for ASA-30
1
Table of contents
Languages:
Other Denver Security System manuals