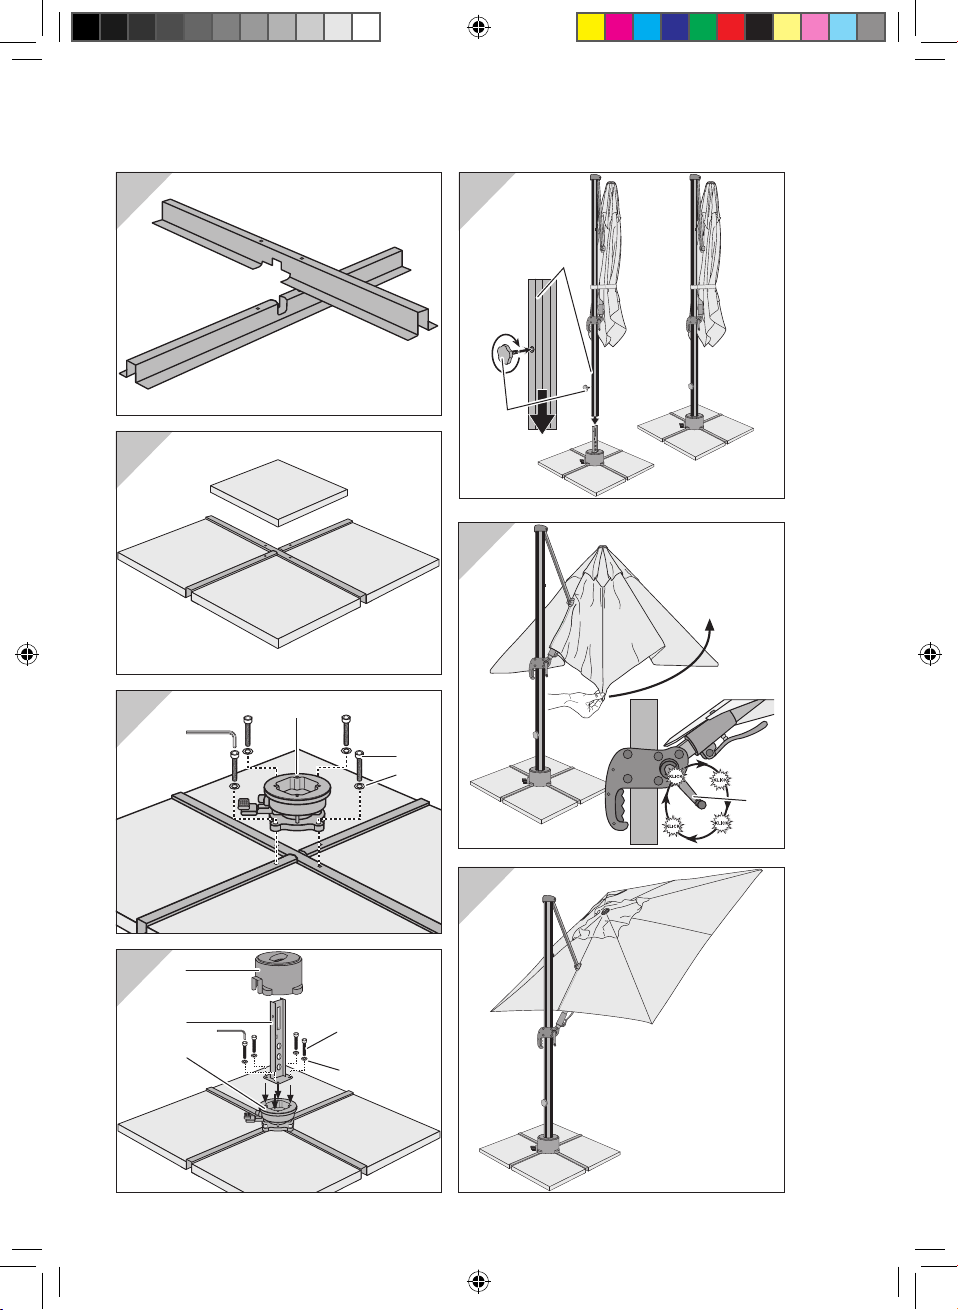
Derby Ravenna AX Installation instructions

Art. Nr.: 463528 (250 ×250)
483528 (275 ×275)
465250 (300 × 300)
436528 (330)
Anl.-Nr. 194380 20201105
Ravenna AX
Aufbau- und
Gebrauchsanleitung
194380 all in one 20201104.indd 1194380 all in one 20201104.indd 1 05.11.2020 11:44:5605.11.2020 11:44:56

D
G
A
B
C1
3
2
4
5
12
3
E
7
6
F
8
194380 all in one 20201104.indd 2194380 all in one 20201104.indd 2 05.11.2020 11:44:5705.11.2020 11:44:57

M
I
10
K
11
L
J
11
H
8
9
194380 all in one 20201104.indd 3194380 all in one 20201104.indd 3 05.11.2020 11:44:5705.11.2020 11:44:57

O
P S
QN
9
13
12
14
R
194380 all in one 20201104.indd 4194380 all in one 20201104.indd 4 05.11.2020 11:44:5705.11.2020 11:44:57

5
Ravenna AX –
Aufbau- und
Gebrauchsanleitung
Lesen Sie diese Aufbau- und
Gebrauchsanleitung, insbe-
sondere die Sicherheitshin-
weise, vollständig und sorgfältig durch.
Die Nichtbeachtung dieser Sicherheits-
hinweise kann zu Verletzungen oder zu
Schäden am Sonnenschirm führen. Be-
wahren Sie die Aufbau- und Gebrauchs-
anleitung zum späteren Nachschlagen
auf, und geben Sie sie stets ebenfalls
mit, wenn Sie den Sonnenschirm an Drit-
te weitergeben.
Ihre Sicherheit
Bitte beachten Sie die folgenden
Sicherheitshinweise. Für Schä-
den infolge von Nichtbeachtung
haftet der Hersteller nicht.
Sonnenschirm nur mit ausreichender
Ballastierung benutzen (siehe „Techni-
sche Daten“).
Stellen Sie den Sonnenschirm immer auf
einen festen und ebenen Boden.
Verwenden Sie für den Sonnenschirm
einen stabilen Standfuß.
Der Sonnenschirm sollte von einer kom-
petenten erwachsenen Person aufge-
stellt werden.
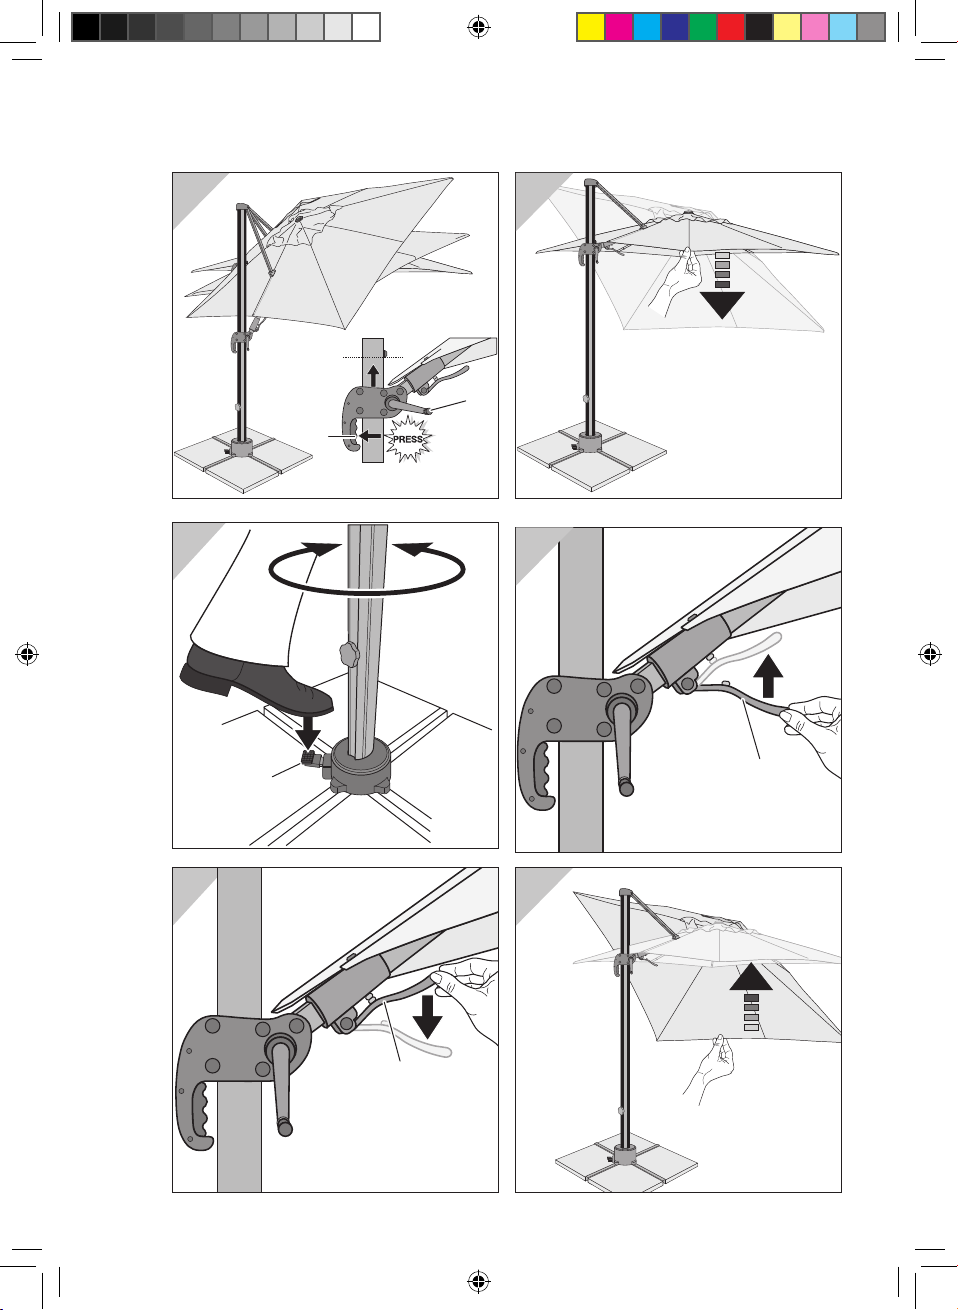
Beim Öffnen und Schließen des Son-
nenschirms achten Sie bitte darauf, dass
Ihre Hände nicht in den Klappmechanis-
mus geraten.
Bei aufkommendem Wind oder Gewit-
ter den Sonnenschirm schließen und mit
dem Klettband sichern. Er kann sonst
von einer Böe erfasst und umgeworfen
werden und dabei Schäden anrichten
oder selbst beschädigt werden.
Niemals offenes Feuer in der Nähe oder
unterhalb des Sonnenschirmes entfa-
chen. Der Sonnenschirm kann Feuer
fangen oder durch Funkenflug beschä-
digt werden. Halten Sie den Sonnen-
schirm fern von starken Hitzequellen wie
Terrassenheizstrahler, Grill etc.
Der Sonnenschirm ist kein Kinderspiel-
zeug. Kinder können sich die Finger
klemmen. Zudem besitzt der Sonnen-
schirm ein erhebliches Gewicht und
kann Kinder beim Umfallen verletzen.
An den Querstreben des Sonnenschirms
nichts aufhängen oder gar Klimmzüge
daran machen.
Der Sonnenschirm kann Ihre Haut vor
direkter UV-Strahlung aber nicht vor re-
flektierenden UV-Strahlen schützen.
Deshalb zusätzlich kosmetische Son-
nenschutzmittel verwenden.
Um den Sonnenschirm vor übermäßiger
Beanspruchung zu schützen, Sonnen-
schirm bei Regen oder Schnee schlie-
ßen und mit einem Klettband sichern.
Der Bezug ist nicht für Maschinenwä-
sche, chemisches Reinigen oder Blei-
chen geeignet.
Verwenden Sie keine aggressiven che-
mischen Reiniger oder Flüssigkeiten, Lö-
sungen, scheuernde Substanzen oder
Gegenstände, Bleichmittel, Hochdruck-
reiniger und starke Reinigungsmittel.
Bitte beachten Sie die eingenähten Pfle-
gehinweise.
Verwendungszweck
Der Sonnenschirm ist zum Schutz vor
direkter UV-Strahlung geeignet. Zum
Schutz vor Regen oder Schnee ist er
nicht gedacht.
Der Sonnenschirm ist nur zum Einsatz
im privaten Bereich bestimmt. Gewähr-
leistung erlischt bei gewerblicher Nut-
zung.
DE
194380 all in one 20201104.indd 5194380 all in one 20201104.indd 5 05.11.2020 11:44:5705.11.2020 11:44:57

6
Schirm aufbauen
Im Karton finden Sie:
8× 1×
8×
Sie benötigen zusätzlich:
z. B. 4 befüllbare Be-
schwerplatten 35 kg,
Bestellnr.: 85499BP35
Eine Schutzhülle für den Sonnenschirm
kann bei Bedarf im Fachhandel erwor-
ben werden.
1. T-Ständer montieren (siehe Bild A).
2. T-Ständer an den vorgesehenen
Platz stellen und die 4 befüllbaren Be-
schwerplatten einlegen (siehe Bild B).
3. Drehteller 1mit 4 der beiliegenden Un-
terlegscheiben 2sowie den Schrau-
ben 3auf dem T-Ständer montieren
(siehe Bild C).
4. Mastfuß 4mit weiteren 4 der beilie-
genden Unterlegscheiben 2sowie
den Schrauben 3auf dem Drehteller 1
verschrauben (siehe Bild D).
5. Kappe 5über den Mastfuß stecken.
Aussparung beachten!
6. Schirmmast 7über den Mastfuß stül-
pen und mit der Rändelschraube 6 fi-
xieren (siehe Bild E).
Der Sonnenschirm ist nun einsatzbereit.
Schirm öffnen
Bitte beachten!
– Vergewissern Sie sich vor dem Öff-
nen, dass der Sonnenschirm ausrei-
chenden Halt hat, d.h. der passende
Sockel verwendet wird.
1. Band und gegebenenfalls Schutzhül-
le abnehmen.
2. Sonnenschirm mit der Hand leicht öff-
nen, dabei die Kurbel 8drehen und
den Sonnenschirm ganz aufspannen
(siehe Bild Fund G).
Schirm neigen
• Zum Ändern der Neigung des Son-
nenschirms die Arretierung 9im
Handgriff drücken und den Hand-
griff nach oben oder unten schieben.
Handgriff an gewünschter Position
einrasten lassen (siehe Bild H).
Schirm drehen
• Um den Sonnenschirm zu drehen,
mit dem Fuß auf den Arretierungshe-
bel 10 drücken. Den Sonnenschirm
dann in die gewünschte Position dre-
hen (siehe Bild I).
Schirm schwenken
1. Hebel 11 nach unten drücken (siehe
Bild J).
2. Sonnenschirm mit der Hand in die ge-
wünschte Position schwenken (siehe
Bild K).
3. Hebel 11 wieder nach oben drücken
und loslassen (siehe Bild L).
Wenn das Schirmdach ausgelassen
wird, rastet der Hebel selbstständig
ein.
DE
194380 all in one 20201104.indd 6194380 all in one 20201104.indd 6 05.11.2020 11:44:5805.11.2020 11:44:58

7
Schirm schließen
Bitte beachten!
– Bei aufkommendem Wind, Regen
oder Schnee müssen Sie den Son-
nenschirm schließen. Schäden, die
anderenfalls entstehen, sind von der
Gewährleistung ausgenommen.
– Beim Schließen des Sonnenschirms
kann es vorkommen, dass der Be-
zug sich zwischen den Streben ein-
klemmt. In diesem Fall bitte den Be-
zug vorsichtig zwischen den Streben
hervorziehen.
1. Sonnenschirm ggf. zurück in die Waa-
gerechte schwenken (siehe Bild M).
2. Die Arretierung 9im Handgriff drü-
cken und den Handgriff nach unten
schieben (siehe Bild N).
3. Sonnenschirm mithilfe der Kurbel 8
schließen (vergleiche Bild F).
4. Falls der Bezug zwischen den Stre-
ben eingeklemmt ist, den Bezug vor-
sichtig zwischen den Streben hervor-
ziehen (siehe Bild O).
5. Sonnenschirm mit dem angebrach-
ten Band zusammenbinden, dann ggf.
mit der Schutzhülle abdecken (siehe
Bild O und P).
Bezug wechseln
Je nach Beanspruchung kann es sinnvoll
sein, den Bezug zu wechseln. Einen neu-
en Bezug können Sie über Ihren Händ-
ler beziehen.
1. Schirmspitze abschrauben (siehe
Bild Q).
2. Schutzkappe 12 von der Sicherungs-
schraube 13 abnehmen (siehe Bild R).
3. Sicherungsschraube 13 mithilfe ei-
nes Innensechskantschlüssels Grö-
ße 4 lösen (siehe Bild R).
4. Obere Lage des Bezugs 14 abziehen
(Klettverschluss). Untere Lage eben-
falls abziehen.
5. Bezug von den Streben abziehen (sie-
he Bild S).
6. Neuen Bezug in umgekehrter Reihen-
folge wieder aufziehen.
Pflege + Lagerung
Bezug säubern
Bitte beachten!
– Für Maschinenwäsche ist der Bezug
nicht geeignet!
– Verwenden Sie keinen Wäschetrock-
ner.
– Nicht bügeln.
– Verwenden Sie keine aggressiven
chemischen Reiniger oder Flüssig-
keiten, Lösungen, scheuernde Subs-
tanzen oder Gegenstände, Bleichmit-
tel, Hochdruckreiniger und starke Rei-
nigungsmittel.
– Halten Sie die Dosierungs-, Anwen-
dungs- und Einwirkvorschriften des
Herstellers ein.
• Waschen Sie den Bezug mit der
Handwäsche bei 40 °C.
Zum Reinigen des Bezugs verwen-
den Sie am besten eine weiche Bürs-
te und ein wenig Seifenlauge.
Schirmstock pflegen
• Säubern Sie den Schirmstock regel-
mäßig, um ein einwandfreies Gleiten
der beweglichen Teile zu gewährleis-
ten. Ggf. mit Silikon- oder Teflon-Gleit-
spray einsprühen.
• Überprüfen Sie regelmäßig alle tra-
genden Teile wie Streben, Schrau-
ben etc.
• Überprüfen Sie den Schirmstock re-
gelmäßig auf Roststellen, und bes-
sern Sie diese ggf. aus. Zur Reini-
gung lediglich ein wenig Seifenlauge
verwenden.
DE
194380 all in one 20201104.indd 7194380 all in one 20201104.indd 7 05.11.2020 11:44:5805.11.2020 11:44:58

8
Schirm lagern
• Zum Überwintern bauen Sie den
Sonnenschirm in vollkommen trocke-
nem Zustand ab, und lagern Sie ihn
in einem trockenen, gut durchlüfteten
Raum.
• Lagern Sie den Sonnenschirm wenn
möglich im Stehen und ohne Belas-
tung auf dem Sonnenschirm.
• Zu Saisonbeginn vergewissern Sie
sich, dass alle Komponenten und Be-
festigungsteile sicher sind. Verwen-
den Sie das Produkt nicht, wenn Sie
unsicher sind.
Gewährleistung
Die Gewährleistungsfrist für diesen Arti-
kel beträgt 24 Monate.
Sollten Sie während dieser Zeit einen
Defekt feststellen, wenden Sie sich bit-
te an Ihren Händler. Damit dieser Ihnen
schnell helfen kann, bewahren Sie bitte
den Kaufbeleg auf und nennen Sie uns
den Modellnamen und die Artikelnum-
mer.
Von der Gewährleistung ausgeschlos-
sen sind:
– normaler Verschleiß und Farbverän-
derungen der Textilbespannung;
– Lackschäden, die auf normale Abnut-
zung zurückzuführen sind;
– Schäden durch nicht-bestimmungs-
gemäßen Gebrauch (z.B. als Regen-
schutz);
– Schäden durch Wind, Überdrehen der
Kurbel, Umfallen des Sonnenschirms,
starkes Ziehen an den Schirmstreben;
– Schäden durch bauliche Veränderun-
gen am Artikel.
Service
Liebe Kundin, lieber Kunde,
obwohl wir unsere Artikel vor der Auslie-
ferung einer eingehenden Endkontrolle
unterziehen, kann es vorkommen, dass
einmal ein Zubehörteil fehlt oder dass ein
Teil während des Transports beschädigt
wurde. Wenden Sie sich in diesem Fall
an unsere Hotline und nennen Sie uns
den Modellnamen und die Artikelnum-
mer.
Hotline
Sie erreichen uns
Mo. bis Do. von 800 bis 1600 Uhr
Fr. von 800 bis 1200 Uhr
unter der Telefonnummer
in Österreich (07722) 63205-0
in Deutschland (08571) 9122-0
in Tschechien (0386) 301615
in Polen (0660) 460460
in Slowenien (0615) 405673
in Kroatien (0615) 405673
in Ungarn +43(0)7722 63205-107
in Russland (095) 6470389
Adresse
derby sunrain ltd.
Schloßstraße 24
A-5280 Braunau am Inn
www.dopplerschirme.com
DE
194380 all in one 20201104.indd 8194380 all in one 20201104.indd 8 05.11.2020 11:44:5805.11.2020 11:44:58

9
DE
Technische Daten
Ravenna AX 250 × 250
Artikelnr.: 463528
Ballastierung, mind. kg: 140
Höhe in cm, gesamt*): 262
Höhe Boden-Schirm in cm*): 205
Abmessungen in cm, ca.: 250 × 250
Gewicht in kg: 23
Regenabweisend: Ja
Ravenna AX 275 × 275
Artikelnr.: 483528
Ballastierung, mind. kg: 140
Höhe in cm, gesamt*): 262
Höhe Boden-Schirm in cm*): 205
Abmessungen in cm, ca.: 275 × 275
Gewicht in kg: 23
Regenabweisend: Ja
Ravenna AX 300 × 300
Artikelnr.: 465250
Ballastierung, mind. kg: 140
Höhe in cm, gesamt*): 276
Höhe Boden-Schirm in cm*): 195
Abmessungen in cm, ca.: 295 × 295
Gewicht in kg: 19
Regenabweisend: Ja
Ravenna AX 330
Artikelnr.: 436528
Ballastierung, mind. kg: 140
Höhe in cm, gesamt*): 261
Höhe Boden-Schirm in cm*): 200
Durchmesser in cm, ca.: 330
Gewicht in kg: 20
Regenabweisend: Ja
*) Ohne Sockel gemessen
Alle Angaben sind Zirka-Werte. Techni-
sche Änderungen vorbehalten.
194380 all in one 20201104.indd 9194380 all in one 20201104.indd 9 05.11.2020 11:44:5805.11.2020 11:44:58

10
Ravenna AX –
Assembly instructions and
user manual
Carefully read through the
complete assembly instruc-
tions and user manual, par-
ticularly the safety instructions. Failure to
heed these safety instructions may result
in severe injury or damage to the sun
shade. Store the assembly instructions
and user manual for future reference and
always include them when passing the
sun shade on to third parties.
Your safety
Please observe the following
safety instructions. The manu-
facturer is not liable for damage
as the result of failure to comply.
Only use the sun shade with sufficient
ballasting (see “Technical data”).
Always place the sun shade on a firm
and level surface.
Use a stable base for the sun shade.
The sun shade should only be erected by
a competent adult.
When opening and closing the sun
shade, please make sure to keep your
hands outside of the folding mechanism.
In the case of approaching wind or storm,
close the sun shade and secure with the
hook and loop strip. Otherwise, it could
be caught by a gust and overturned and
inflict damage in the process or sustain
damage as a result.
Never ignite an open fire in the vicini-
ty of or underneath the sun shade. The
sun shade may catch fire or be damaged
by airborne sparks. Keep the sun shade
away from intense heat sources such as
patio heaters, barbecue etc.
The sun shade is not a children’s toy.
Children could trap their fingers. Also,
the sun shade is heavy and could injure
children if it tips over.
Do not hang anything on the lateral brac-
es of the sun shade or even use them for
chin-ups.
The sun shade can protect your skin
from direct UV radiation, but not from re-
flected UV rays. For this reason, please
also use a cosmetic sun block.
In order to protect the sun shade from ex-
cessive strain, close the sun shade in the
event of rain or snow and secure it with a
hook and loop strip.
The cover is not suitable for machine
washing, dry cleaning or bleaching.
Do not use aggressive chemical cleaning
agents or fluids, solvents, abrasive sub-
stances or objects, bleaching agents,
high-pressure cleaners or strong clean-
ing products.
Please note the information on the care
label sewn into the sun shade.
Intended use
The sun shade is suitable for providing
protection against direct UV radiation. It
is not designed for providing protection
against rain or snow.
The sun shade is intended for domestic
use only. If used for commercial purpos-
es, the guarantee becomes void.
GB
194380 all in one 20201104.indd 10194380 all in one 20201104.indd 10 05.11.2020 11:44:5805.11.2020 11:44:58

11
Setting up the shade
In the box, you will find:
8× 1×
8×
You will also need:
e. g. 4 fillable ballast pla-
tes 35 kg,
order no.: 85499BP35
A protective sleeve for the sun shade
may be purchased separately in a spe-
cialist shop if needed.
1. Mount the T-stand (see figure A).
2. Set the T-stand up in the desired lo-
cation and insert the 4 cement slabs
(see figure B).
3. Mount the rotary plate 1on the T-
stand with 4 of the enclosed wash-
ers 2and the screws 3(see figure C).
4. Screw mount the pole foot 4on the ro-
tary plate 1with another 4 of the en-
closed washers 2and the screws 3
(see figure D).
5. Place the cap 5on the pole foot. Mind
the recess!
6. Slip the shade mast 7over the pole
foot and fix it in place with the knurled
screw 6(see figure E).
The sun shade is now ready for use.
Opening the shade
Please note!
– Before opening the sun shade, en-
sure that it has a sufficiently secure
position, that is, that the proper base
is used.
1. Remove the hook and loop strip and,
if necessary, the protective sleeve.
2. Gently open the sun shade by hand.
Turn the crank 8in the process and
open the sun shade completely (see
figure Fand G).
Tilting the shade
• To adjust the tilt of the sun shade,
push the locking mechanism 9in the
handle and slide the handle up or
down. Let the handle lock into place
in the desired position (see figure H).
Rotating the shade
• To rotate the sun shade, push the
locking mechanism lever 10 down
with your foot. Turn the sun shade to
the desired position (see figure I).
Pivoting the shade
1. Push the lever 11 down (see figure J).
2. Pivot the sun shade to the desired po-
sition by hand (see figure K).
3. Push the lever 11 back up and release
it (see figure L).
When you let go of the shade roof, the
lever will automatically lock into place.
Closing the shade
Please note!
– The sun shade must be closed in the
event of incoming wind, rain or snow.
Damages occurring as a result of a
failure to do so are not covered by the
warranty.
– When closing the sun shade, the cov-
er could get caught between the brac-
es. If this happens, please careful-
ly pull parts of the cover caught be-
tween the braces out.
1. If necessary, pivot the sun shade back
into a level position (see figure M).
2. Depress the locking mechanism 9in
the handle and slide the handle down
(see figure N).
GB
194380 all in one 20201104.indd 11194380 all in one 20201104.indd 11 05.11.2020 11:44:5805.11.2020 11:44:58

12
3. Close the sun shade using the crank 8
(compare figure F).
4. If the cover is caught between the
braces, carefully pull the cover be-
tween the braces out (see figure O).
5. Tie the sun shade up with the at-
tached hook and loop strip and then
cover it with the protective sleeve if
needed (see figure Oand P).
Changing the cover
Depending on the level of wear and tear,
it can be helpful to replace the cover.
New covers can be ordered from your
retailer.
1. Unscrew the shade tip (see figure Q).
2. Take the protective cap 12 off of the
lock screw 13 (see figure R).
3. Loosen the lock screw 13 with a size
4 hex key (see figure R).
4. Pull the top layer of the cover 14 off
(hook and loop fastener). Pull the bot-
tom layer off as well.
5. Slide the cover off the braces (see fig-
ure S).
6. Pull a new cover over by reversing the
steps.
Care + storage
Cleaning the cover
Please note!
– The cover is not suitable for machine
washing!
– Do not use a tumble-dryer.
– Do not iron.
– Do not use aggressive chemical clean-
ing agents or fluids, solvents, abra-
sive substances or objects, bleach-
ing agents, high-pressure cleaners or
strong cleaning products.
– Comply with the manufacturer’s dos-
ing, application and reaction instruc-
tions.
• Hand wash the cover at 40 °C.
To clean the cover, it is best to use
a soft brush and a small amount of a
soapy solution.
Maintaining the shade pole
• Clean the shade pole regularly to en-
sure that the mobile parts slide prop-
erly. If necessary, spray it with a sili-
con or Teflon lubricant spray.
• Check all load-bearing parts such as
braces, screws etc. regularly.
• Check the shade pole regularly for
rust spots and touch them up if neces-
sary. Use only a small amount of soap
solution for cleaning.
Storing the shade
• For over winter storage, take down the
sun shade in a completely dry state
and store it in a dry, well ventilated
room.
• If possible, store the sun shade up-
right and without any load on the sun
shade.
• At the start of the season ensure that
all components and fixings are se-
cure. If you are unsure, do not use the
product.
Warranty
The warranty period for this product is
24 months.
If you discover a defect during this time,
please consult your vendor. To ensure
that the vendor is able to promptly assist
you, please have your sales slip ready
and specify the model name and article
number.
The warranty does not cover:
– Normal wear and tear and discoloura-
tion of the textile cover;
– Damage to the paint coat attributed to
normal wear and tear;
– Damage as the result of improper use
(e. g. for protection against rain);
GB
194380 all in one 20201104.indd 12194380 all in one 20201104.indd 12 05.11.2020 11:44:5805.11.2020 11:44:58

13
– Damages caused by wind, overwind-
ing the crank, the sun shade falling
over, excessive pulling on the shade
braces;
– Damages due to structural modifica-
tions to the product.
Service
Dear customer,
Although our products are subject to
an in-depth final inspection prior to be-
ing shipped out, it is possible that an ac-
cessory is missing or that a part sustains
damage while in transit. In such a case,
please contact our hotline and provide us
with the model name and article number.
Hotline
You can reach us
Mon. to Thurs. from 8 a.m. to 4 p.m.
Fr. from 8 a.m. to 12 p.m.
at the following phone numbers
in Austria (07722) 63205-0
in Germany (08571) 9122-0
in the Czech Republic (0386) 301615
in Poland (0660) 460460
in Slovenia (0615) 405673
in Croatia (0615) 405673
in Hungary +43 (0)7722 63205-107
in Russia (095) 6470389
Address
derby sunrain ltd.
Schloßstraße 24
A-5280 Braunau am Inn
www.dopplerschirme.com
GB
Technical data
Ravenna AX 250 × 250
Article no.: 463528
Ballasting, min. kg: 140
Height in cm, overall*): 262
Height base-shade in cm*): 205
Dimensions in cm, approx.: 250 × 250
Weight in kg: 23
Rain repellent: Yes
Ravenna AX 275 × 275
Article no.: 483528
Ballasting, min. kg: 140
Height in cm, overall*): 262
Height base-shade in cm*): 205
Dimensions in cm, approx.: 275 × 275
Weight in kg: 23
Rain repellent: Yes
Ravenna AX 300 × 300
Article no.: 465250
Ballasting, min. kg: 140
Height in cm, overall*): 276
Height base-shade in cm*): 195
Dimensions in cm, approx.: 295 × 295
Weight in kg: 19
Rain repellent: Yes
Ravenna AX 330
Article no.: 436528
Ballasting, min. kg: 140
Height in cm, overall*): 261
Height base-shade in cm*): 200
Diameter in cm, approx.: 330
Weight in kg: 20
Rain repellent: Yes
*) Measured without the base
All data are approximate values. Techni-
cal changes reserved.
194380 all in one 20201104.indd 13194380 all in one 20201104.indd 13 05.11.2020 11:44:5805.11.2020 11:44:58

14
Ravenna AX –
Notice de montage et
d’utilisation
Veuillez lire cette notice de
montage et d’utilisation – par-
ticulièrement les consignes de
sécurité – entièrement et avec minutie.
Le non-respect de ces consignes de sé-
curité peut causer des blessures ou des
dommages sur le parasol. Conservez la
notice de montage et d’utilisation pour
pouvoir la consulter ultérieurement et
donnez-la toujours si vous cédez le para-
sol à une tierce personne.
Votre sécurité
Veuillez impérativement suivre
les consignes de sécurité sui-
vantes. Le fabricant n’est en rien
responsable des dommages
suite à un non-respect de la notice.
Utiliser le parasol uniquement avec une
charge suffisante (voir « Données tech-
niques »).
Posez toujours le parasol sur un sol so-
lide et plat.
Pour le parasol, utilisez un pied stable.
Le parasol devra être installé par une
personne adulte et compétente.
En ouvrant et fermant le parasol, veillez
à que vos mains ne soient pas coincées
dans le mécanisme de fermeture.
En présence de vent ou d’orage, fermer
le parasol et, si possible, le sécuriser
avec la bande auto-agrippante. Sinon, il
peut être renversé par un fort coup de
vent et provoquer des dommages ou être
endommagé lui-même.
Ne jamais allumer un feu à proximité ou
sous le parasol. Le parasol pourrait s’en-
flammer ou être endommagé par des
étincelles. Tenez le parasol éloigné des
fortes sources de chaleur comme des
chauffages de terrasse, des barbecues
etc.
Le parasol n’est pas un jouet. Les enfants
peuvent s’y coincer les doigts. De plus, le
parasol est très lourd et peut blesser des
enfants en tombant.
Ne rien suspendre sur les barres trans-
versales du parasol, ne pas s’en servir
de barre de gymnastique.
Le parasol peut protéger votre peau
contre les rayons UV directs mais pas
contre les rayons UV réfléchis. Pour
cette raison, utilisez en plus une protec-
tion solaire cosmétique.
Pour protéger le parasol contre toute
contrainte excessive, fermer le parasol
en cas de pluie ou de neige et le sécuri-
ser avec la bande auto-agrippante.
La toile n’est pas conçue pour être lavée
en lave-linge, ni pour le pressing ou le
blanchiment.
N’utilisez aucun produit d’entretien ou li-
quide chimique agressif, aucune solu-
tion, aucune substance abrasive ni au-
cun objet, aucun moyen de blanchiment,
aucun nettoyeur à haute pression ni au-
cun produit d’entretien puissant.
Veuillez respecter les consignes d’entre-
tien cousues.
Utilisation
Le parasol est destiné à protéger contre
les rayons UV direct. Il ne convient pas à
la protection contre la pluie ou la neige.
Le parasol est uniquement destiné à une
utilisation dans le privé. La garantie de-
vient caduque en cas d’utilisation com-
merciale.
FR
194380 all in one 20201104.indd 14194380 all in one 20201104.indd 14 05.11.2020 11:44:5905.11.2020 11:44:59

15
Assemblage du parasol
Dans le carton, vous trouverez :
8× 1×
8×
Vous aurez également besoin de :
par ex. 4 plaques de bé-
ton lavé de 35 kg pouvant
être remplies,
n° de commande :
85499BP35
Une housse de protection pour le parasol
peut, si nécessaire, être achetée dans le
commerce.
1. Assembler le pied en T (voir figure A).
2. Placer le pied en T sur l’emplacement
prévu et posez les 4 plaques de bé-
ton lavé pouvant être remplies (voir fi-
gure B).
3. Monter le plateau tournant 1avec les
4 rondelles fournies 2ainsi que les
vis 3sur le pied en T (voir figure C).
4. Visser le pied du mât 4avec les 4
autres rondelles fournies 2ainsi que
les vis 3sur le plateau tournant 1(voir
figure D).
5. Passer le capuchon 5sur le pied du
mât. Observer l’encoche !
6. Passer le mât du parasol 7sur le pied
du mât et fixer avec la vis moletée 6
(voir figure E).
Maintenant, le parasol est prêt à être uti-
lisé.
Ouvrir le parasol
Attention !
– Avant le l’ouvrir, assurez-vous que
le parasol est suffisamment stable,
c’est-à-dire que c’est le bon socle qui
est utilisé.
1. Retirer la bande et, éventuellement, la
housse de protection.
2. Ouvrir légèrement le parasol à la main
en tournant la manivelle 8et ouvrir to-
talement le parasol (voir figures F
et G).
Incliner le parasol
• Pour modifier l’inclinaison du parasol,
pousser le frein 9dans la poignée et
pousser la poignée vers le haut ou
vers le bas. Encliqueter la poignée
dans la position souhaitée (voir fi-
gure H).
Tourner le parasol
• Pour tourner le parasol, appuyez sur
le levier du frein 10 avec le pied. En-
suite, tourner le parasol dans la posi-
tion souhaitée (voir figure I).
Basculer le parasol
1. Appuyer le levier 11 (voir figure J).
2. Basculer le parasol à la main dans la
position souhaitée (voir figure K).
3. Relever le levier 11 et le relâcher (voir
figure L).
Lorsque le toit du parasol est relâché,
le levier se bloque automatiquement.
FR
194380 all in one 20201104.indd 15194380 all in one 20201104.indd 15 05.11.2020 11:44:5905.11.2020 11:44:59

16
Fermer le parasol
Attention !
– En présence de vent, de pluie ou de
neige, il faut fermer le parasol. Les
dommages pouvant en découler ne
sont pas couverts par la garantie.
– En fermant le parasol, il se peut que la
toile se coince entre les barres. Dans
ce cas, veuillez relever avec précau-
tion la toile entre les barres.
1. Si nécessaire, basculer de nouveau le
parasol en position horizontale (voir fi-
gure M).
2. Pousser le frein 9dans la poignée
puis pousser la poignée vers le bas
(voir figure N).
3. Fermer le parasol à l’aide de la mani-
velle 8(cf. figure F).
4. Si la toile se coince entre les barres,
tirez-la prudemment entre les barres
(voir figure O).
5. Replier le parasol avec la bande puis,
éventuellement, recouvrir avec la
housse de protection (voir figure O
et P).
Remplacer la toile
En fonction des contraintes, il peut être
nécessaire de remplacer la toile. Vous
pouvez commander une nouvelle toile
chez votre revendeur.
1. Dévisser la pointe du parasol (voir fi-
gure Q).
2. Retirer le capuchon de protection 12
de la vis de sécurité 13 (voir figure R).
3. Desserrer la vis de sécurité 13 à l’aide
d’une clé BTR taille 4 (voir figure R).
4. Retirer la couche supérieur de la
toile 14 (fermeture auto-agrippante).
Retirer également la couche infé-
rieure.
5. Retirer la toile des barres (voir fi-
gure S).
6. Placer la nouvelle toile en faisant les
opérations dans le sens inverse.
Entretien + rangement
Laver la toile
Attention !
– La toile ne peut pas être lavée en
lave-linge !
– N’utilisez aucun séchoir à linge.
– Ne pas repasser.
– N’utilisez aucun produit d’entretien ou
liquide chimique agressif, aucune so-
lution, aucune substance abrasive ni
aucun objet, aucun moyen de blanchi-
ment, aucun nettoyeur à haute pres-
sion ni aucun produit d’entretien puis-
sant.
– Respectez les consignes de dosage,
d’application et de temps d’action
fournies par le fabricant.
• Lavez la toile à la main à 40 °C.
Pour nettoyer la toile, utilisez de pré-
férence une brosse douce et un peu
d’eau savonneuse.
Entretien de la barre du parasol
• Nettoyez la barre du parasol réguliè-
rement pour garantir un parfait glisse-
ment des pièces mobiles. Si néces-
saire, pulvérisez de la silicone ou du
Téflon.
• Vérifiez régulièrement toutes les
pièces porteuses comme les barres,
les vis etc.
• Contrôlez régulièrement la barre du
parasol pour détecter des points de
rouille et pour éventuellement les sup-
primer. Pour le nettoyage, utilisez uni-
quement un peu d’eau savonneuse.
Ranger le parasol
• Pour passer l’hiver, démontez le pa-
rasol lorsqu’il est totalement sec et
rangez-le pour l’hiver dans une pièce
sèche et bien ventilée.
• Si possible, rangez le parasol debout
et sans aucune charge s’appuyant sur
lui.
FR
194380 all in one 20201104.indd 16194380 all in one 20201104.indd 16 05.11.2020 11:44:5905.11.2020 11:44:59

17
• Au début de la saison, assurez-vous
que tous les composants et toutes les
pièces de fixation sont en sécurité.
N’utilisez pas le produit lorsque vous
n’en êtes pas certain.
Garantie
Le délai de garantie accordé pour cet ar-
ticle est de 24 mois.
Si pendant cette période vous consta-
tiez un défaut, veuillez vous adresser à
votre revendeur. Afin de pouvoir vous ai-
der rapidement, conservez le justificatif
d’achat et indiquez-nous le nom du mo-
dèle et le numéro d’article.
Sont exclus de la garantie :
– usure normale et décoloration de la
toile ;
– dommages sur la peinture à cause de
l’usure normale ;
– dommages dûs à un usage non
conforme aux dispositions (par ex.
comme parapluie) ;
– dommages causés par le vent, la sur-
rotation de la manivelle, la chute du
parasol, une forte traction sur les ba-
leines ;
– dommages causés par des modifica-
tions de la construction de l’article.
Service
Chère cliente, cher client,
Bien que nous soumettions nos articles
à un contrôle final détaillé avant la livrai-
son, il se peut qu’une fois un accessoire
manque ou qu’une pièce soit endomma-
gée durant le transport. Dans ce cas,
veuillez vous adresser à notre service té-
léphonique en indiquant le nom du mo-
dèle et le numéro d’article.
Service téléphonique
Vous nous joignez
du lu. au jeu. de 8 h à 16 h
le ve. de 8 h à 12 h
au numéro de téléphone
en Autriche 07722) 63205 -0
en Allemagne (08571) 9122-0
en Tchéquie (0386) 301615
en Pologne (0660) 460460
en Slovénie (0615) 405673
en Croatie (0615) 405673
en Hongrie +43 (0)7722 63205-107
en Russie (095) 6470389
Adresse
derby sunrain ltd.
Schloßstraße 24
A-5280 Braunau am Inn
www.dopplerschirme.com
FR
194380 all in one 20201104.indd 17194380 all in one 20201104.indd 17 05.11.2020 11:44:5905.11.2020 11:44:59

18
Données techniques
Ravenna AX 250 × 250
No d’article : 463528
Contrepoids, au moins kg : 140
Hauteur en cm, totale*) : 262
Hauteur sol-parasol en cm*) : 205
Dimensions en cm, env. : 250 × 250
Poids en kg : 23
Repoussant la pluie : Oui
Ravenna AX 275 × 275
No d’article : 483528
Contrepoids, au moins kg : 140
Hauteur en cm, totale*) : 262
Hauteur sol-parasol en cm*) : 205
Dimensions en cm, env. : 275 × 275
Poids en kg : 23
Repoussant la pluie : Oui
Ravenna AX 300 × 300
No d’article : 465250
Contrepoids, au moins kg : 140
Hauteur en cm, totale*) : 276
Hauteur sol-parasol en cm*) : 195
Dimensions en cm, env. : 295 × 295
Poids en kg : 19
Repoussant la pluie : Oui
Ravenna AX 330
No d’article : 436528
Contrepoids, au moins kg : 140
Hauteur en cm, totale*) : 261
Hauteur sol-parasol en cm*) : 200
Diamètre en cm, env. : 330
Poids en kg : 20
Repoussant la pluie : Oui
*) mesuré sans socle
Toutes les indications sont des valeurs
approximatives. Sous réserve de modi-
fications techniques.
FR
194380 all in one 20201104.indd 18194380 all in one 20201104.indd 18 05.11.2020 11:44:5905.11.2020 11:44:59

19
Ravenna AX –
Istruzioni di montaggio e
d’uso
Leggere attentamente e fino
alla fine le presenti istruzioni di
montaggio e d’uso, soprattutto
le avvertenze di sicurezza. La non osser-
vanza di queste avvertenze di sicurezza
può comportare lesioni o danni all’om-
brellone. Conservare le istruzioni di mon-
taggio e d’uso per riferimenti futuri e con-
segnarle a terzi in caso di cessione
dell’ombrellone.
Per la vostra sicurezza
Si prega di osservare le se-
guenti avvertenze di sicurez-
za. Il produttore rifiuta ogni re-
sponsabilità per i danni insorti
in seguito alla loro non osservanza.
Utilizzare l’ombrellone solo con un’ade-
guata zavorra (vedi “Dati tecnici”).
Collocare l’ombrellone sempre su un fon-
do rigido e in piano.
Utilizzare una base per ombrellone sta-
bile e robusta.
Si consiglia di far installare l’ombrellone
da una persona adulta competente.
Aprendo e chiudendo l’ombrellone, far
attenzione a non infilare le mani nel mec-
canismo di apertura-chiusura.
Chiudere l’ombrellone se minaccia ven-
to o temporale e fissarlo con la chiusu-
ra a strappo. Altrimenti rischia di essere
investito e travolto da un raffica di vento,
causando o subendo danni.
Non accendere mai fiamme libere in
prossimità o al di sotto dell’ombrellone.
L’ombrellone può prendere fuoco o su-
bire danni per via delle scintille svolaz-
zanti. Tenere l’ombrellone lontano da for-
ti fonti di calore, quali radiatori da terraz-
za, barbecue e simili.
L’ombrellone non è un giocattolo per
bambini. I bambini possono schiacciar-
si le dita. Inoltre l’ombrellone ha un no-
tevole peso e rovesciandosi può ledere
i bambini.
Non appendere nessun oggetto alle
stecche dell’ombrellone, né usarle come
barre per flessioni ginniche.
L’ombrellone protegge la pelle dai rag-
gi UV diretti, ma non da quelli riflessi.
Si raccomanda pertanto di utilizzare un
prodotto cosmetico anti-sole.
Per non sottoporre l’ombrellone ad ec-
cessivi carichi, chiuderlo e legarlo con la
chiusura a strappo in caso di pioggia o
di neve.
Il tessuto della capote non è idoneo al la-
vaggio in lavatrice, a secco e nemmeno
al candeggio.
Non utilizzare detergenti chimici o liqui-
di aggressivi, soluzioni o sostanze abra-
sive e nemmeno corpi estranei, candeg-
gina, pulitrici ad aria compressa o deter-
sivi potenti.
Si raccomanda di osservare le indicazio-
ni riportate in etichetta.
Impiego conforme alla
destinazione
L’ombrellone è destinato a proteggere
dai raggi UV diretti. Non è pensato come
riparo dalla pioggia o neve.
L’ombrellone è destinato esclusivamente
all’uso privato. La garanzia si estingue in
caso d’uso in ambito professionale.
IT
194380 all in one 20201104.indd 19194380 all in one 20201104.indd 19 05.11.2020 11:44:5905.11.2020 11:44:59

20
Montare l’ombrellone
Nel cartone troverete:
8× 1×
8×
Occorrono inoltre:
ad. es. 4 piastre di zavor-
ra 35 kg,
n. ordine: 85499BP35
Se occorre, si può acquistare un rivesti-
mento protettivo per l’ombrellone presso
i negozi specializzati.
1) Montare la base a T (vedi figura A).
2) Collocare la base a T sul luogo pre-
scelto e inserire le 4 piastre di zavor-
ra (vedi figura B).
3) Montare il piatto rotante 1con le 4
rondelle 2e le viti 3in dotazione sulla
base a T (vedi figura C).
4) Avvitare il base del bastone 4con le
altre 4 rondelle 2e le viti 3in dotazio-
ne sul piatto rotante 1(vedi figura D).
5) Mettere un tappo 5sulla base del ba-
stone. Notare la rientranza!
6) Mettere il bastone dell’ombrellone 7
sulla base del bastone e fissarlo con
la vite zigrinata 6(vedi figura E).
L’ombrellone è ora pronto all’uso.
Aprire l’ombrellone
Attenzione!
– Prima di aprire l’ombrellone assicu-
rarsi che sia sufficientemente stabi-
le, cioè che sia impiegato lo zocco-
lo adeguato.
1. Rimuovere il nastro ed eventualmen-
te il rivestimento protettivo.
2. Aprire leggermente l’ombrellone a
mano, ruotare la manovella 8e apri-
re completamente l’ombrellone (vedi
figura Fe G).
Inclinare l’ombrellone
• Per modificare l’inclinazione dell’om-
brellone, premere il fermo 9sull’impu-
gnatura e spingere l’impugnatura ver-
so l’alto o verso il basso. Far arrestare
l’impugnatura nella posizione deside-
rata (vedi figura H).
Ruotare l’ombrellone
• Per ruotare l’ombrellone, premere con
un piede sulla leva di arresto 10. Quin-
di ruotare l’ombrellone nella posizione
desiderata (vedi figura I).
Orientare l’ombrellone
1) Spingere la leva 11 verso il basso
(vedi figura J).
2) Orientare manualmente l’ombrellone
nella posizione desiderata (vedi figu-
ra K).
3) Spingere nuovamente la leva 11 verso
l’alto e rilasciarla (vedi figura L).
Se la capote viene rilasciata, la leva
scatta in modo autonomo.
Chiudere l’ombrellone
Attenzione!
– Se si alza il vento oppure minac-
cia pioggia o neve, bisogna chiude-
re l’ombrellone. In caso contrario gli
eventuali danni insorgenti saranno
esclusi dalla garanzia.
– Durante la chiusura dell’ombrellone, è
possibile che il tessuto si blocchi tra le
stecche. In questo caso, sfilarlo con
attenzione dalle stecche.
1) Eventualmente riportare l’ombrello-
ne in posizione orizzontale (vedi figu-
ra M).
IT
194380 all in one 20201104.indd 20194380 all in one 20201104.indd 20 05.11.2020 11:44:5905.11.2020 11:44:59
This manual suits for next models
4
Table of contents
Languages:
Other Derby Patio Furniture manuals
Popular Patio Furniture manuals by other brands

Sunnydaze Decor
Sunnydaze Decor MERANTI STR-480 manual

Atleisure
Atleisure Seasons Sentry UMB-955258 Series Assembly, care & use manual

Savin
Savin SM350NY Assembly instructions

Fontanot
Fontanot SZ Assembly lnstructions

Glatz
Glatz FORTANO Installation and operating instructions

JARDINICO
JARDINICO UBOGB-FP-4G-MEDIUM Assembly and user's manual

Alice's Garden
Alice's Garden CALVI manual

Proshade
Proshade 1500086 Assembly instructions

BarlowTyrie
BarlowTyrie Arundel 2ARX28 Assembly

PotteryBarn
PotteryBarn Trigger Lift Cantilever umbrella instruction manual

Polywood
Polywood ECC76 Assembly instructions

HAMPTON BAY
HAMPTON BAY URM062003C-1 Use and care guide