Desisti SOFT LED 1 XL User manual
This Manual is applicable to Soft LED1 XL Revised on June 2020
ILT ITALY srl
Via Cancelliera, 10/a
00041 Albano Laziale (Rome) Italy
tel. +39 06-902901 fax +39 06-90231051
www.desisti.it
SOFT LED 1 XL
120W LED SOFTLIGHT 90-250V 50/60 Hz
(white light, either Tungsten or Daylight balanced)
INSTRUCTION MANUAL
MANUFACTURER
REPRESENTATIVE
ILT Italy S.r.l.
Via Cancelliera # 10a, 00041 Albano Laziale (Rome- Italy).
Tel. +39/06/902901 Fax. +39/06/90231051
U.R.L.:
www.desisti.it
1.
INTRODUCTION
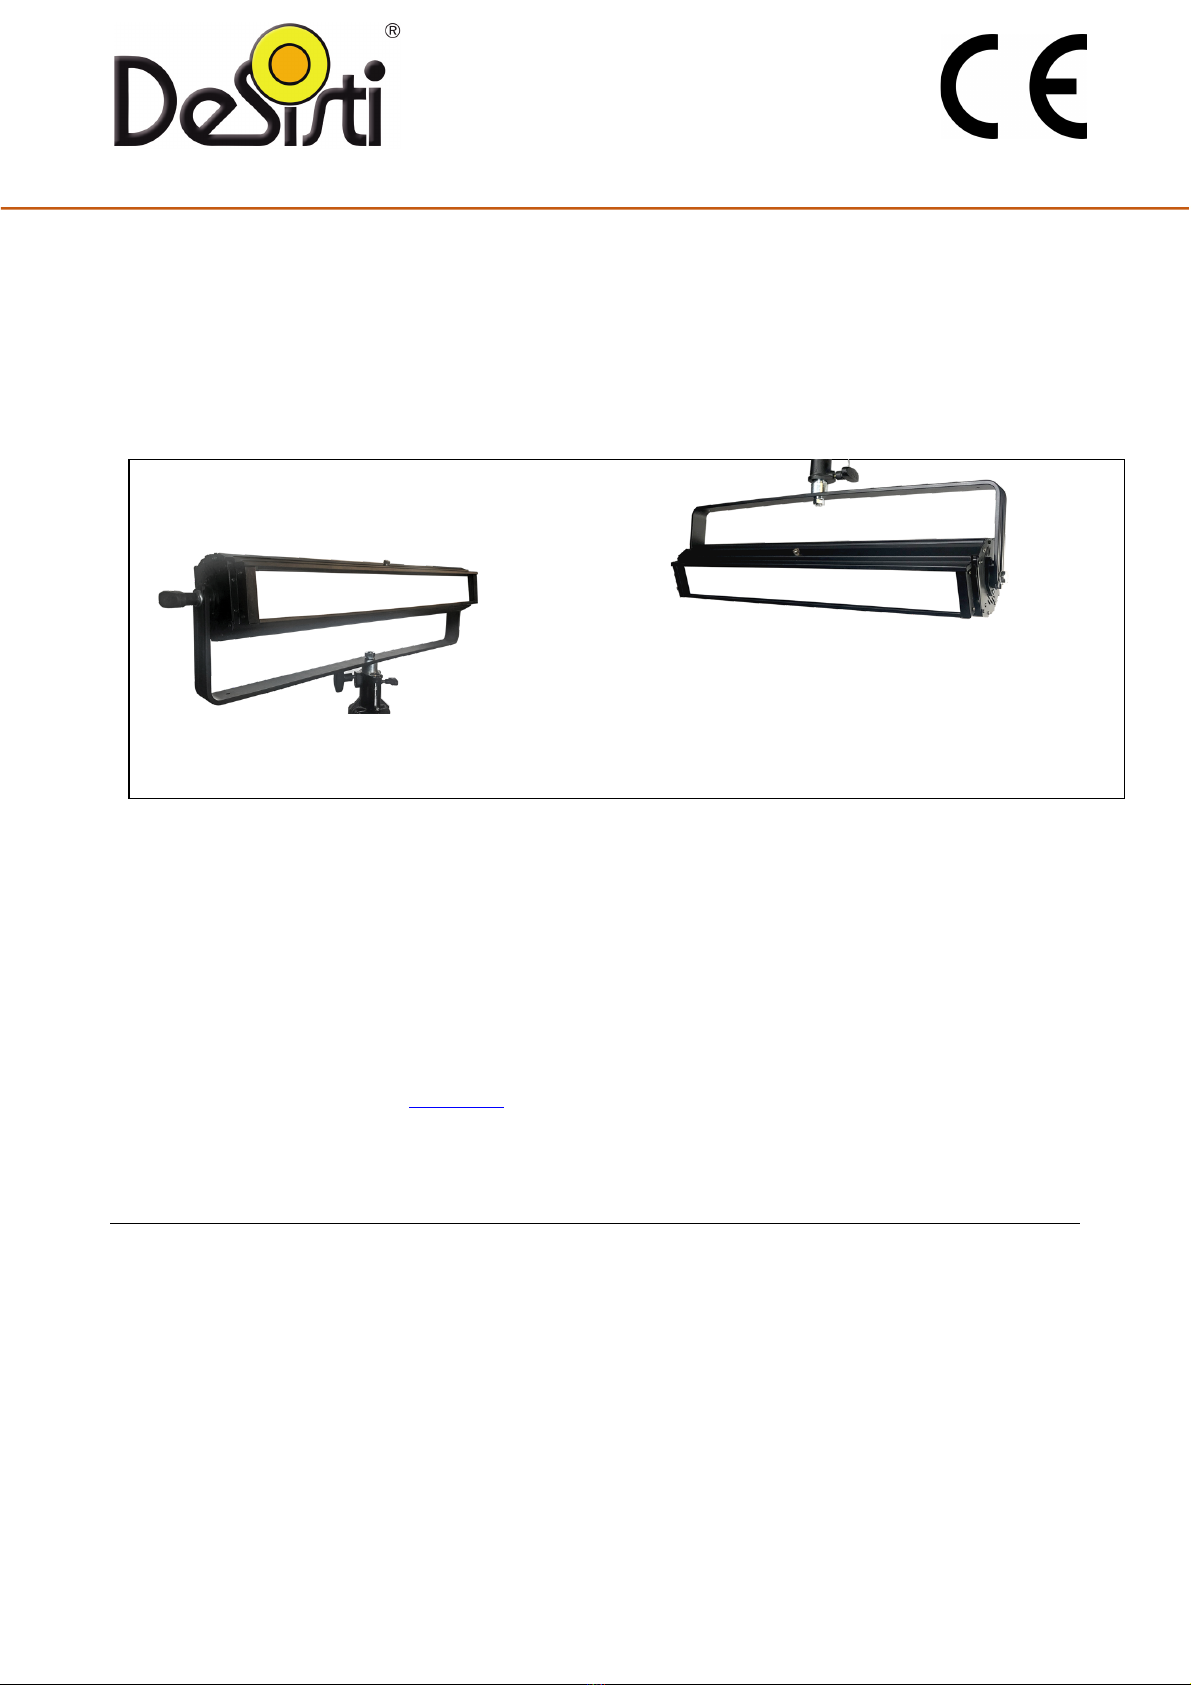
Congratulations on your purchase of a SOFT LED 1 XL lighting fixture.
Our commitment to Total Customer Satisfaction and our consolidated experience and leadership in design innovation and manufacturing of
lighting products for the professional Entertainment Industry means you can depend upon the quality of this product.
The SOFT LED 1 XL is a innovative Remote Phosphors 120W LED SOFTLIGHT, with a COLOR RENDERING INDEX – CRI higher than 95 for the
Tungsten CCT and Higher than 91 for the Daylight CCT; it provides a smooth and soft shadow projecting beam, yet within a controlled field that
makes it ideal for multiple camera set ups.
The Lighting Fixture is DMX Controlled and includes a number of parameters that can be set locally, it is equipped with either a 90-250V
50/60Hz power supply for AC feed and the front Remote Phosphors Panel is easily interchangeable and it is available with either Tungsten or
Daylight Balanced CCT.
Standard accessories are available such as Black or White Honeycombs with either narrow or medium cells for different beam shaping and
control, Colour Frame, Beam Intensifier and a special yoke for multiple fixtures configuration, for background lighting applications.
Manual Operated
(Pole Operated available, not shown)
This Manual is applicable to Soft LED1 XL Revised on June 2020
ILT ITALY srl
Via Cancelliera, 10/a
00041 Albano Laziale (Rome) Italy
tel. +39 06-902901 fax +39 06-90231051
www.desisti.it
2.
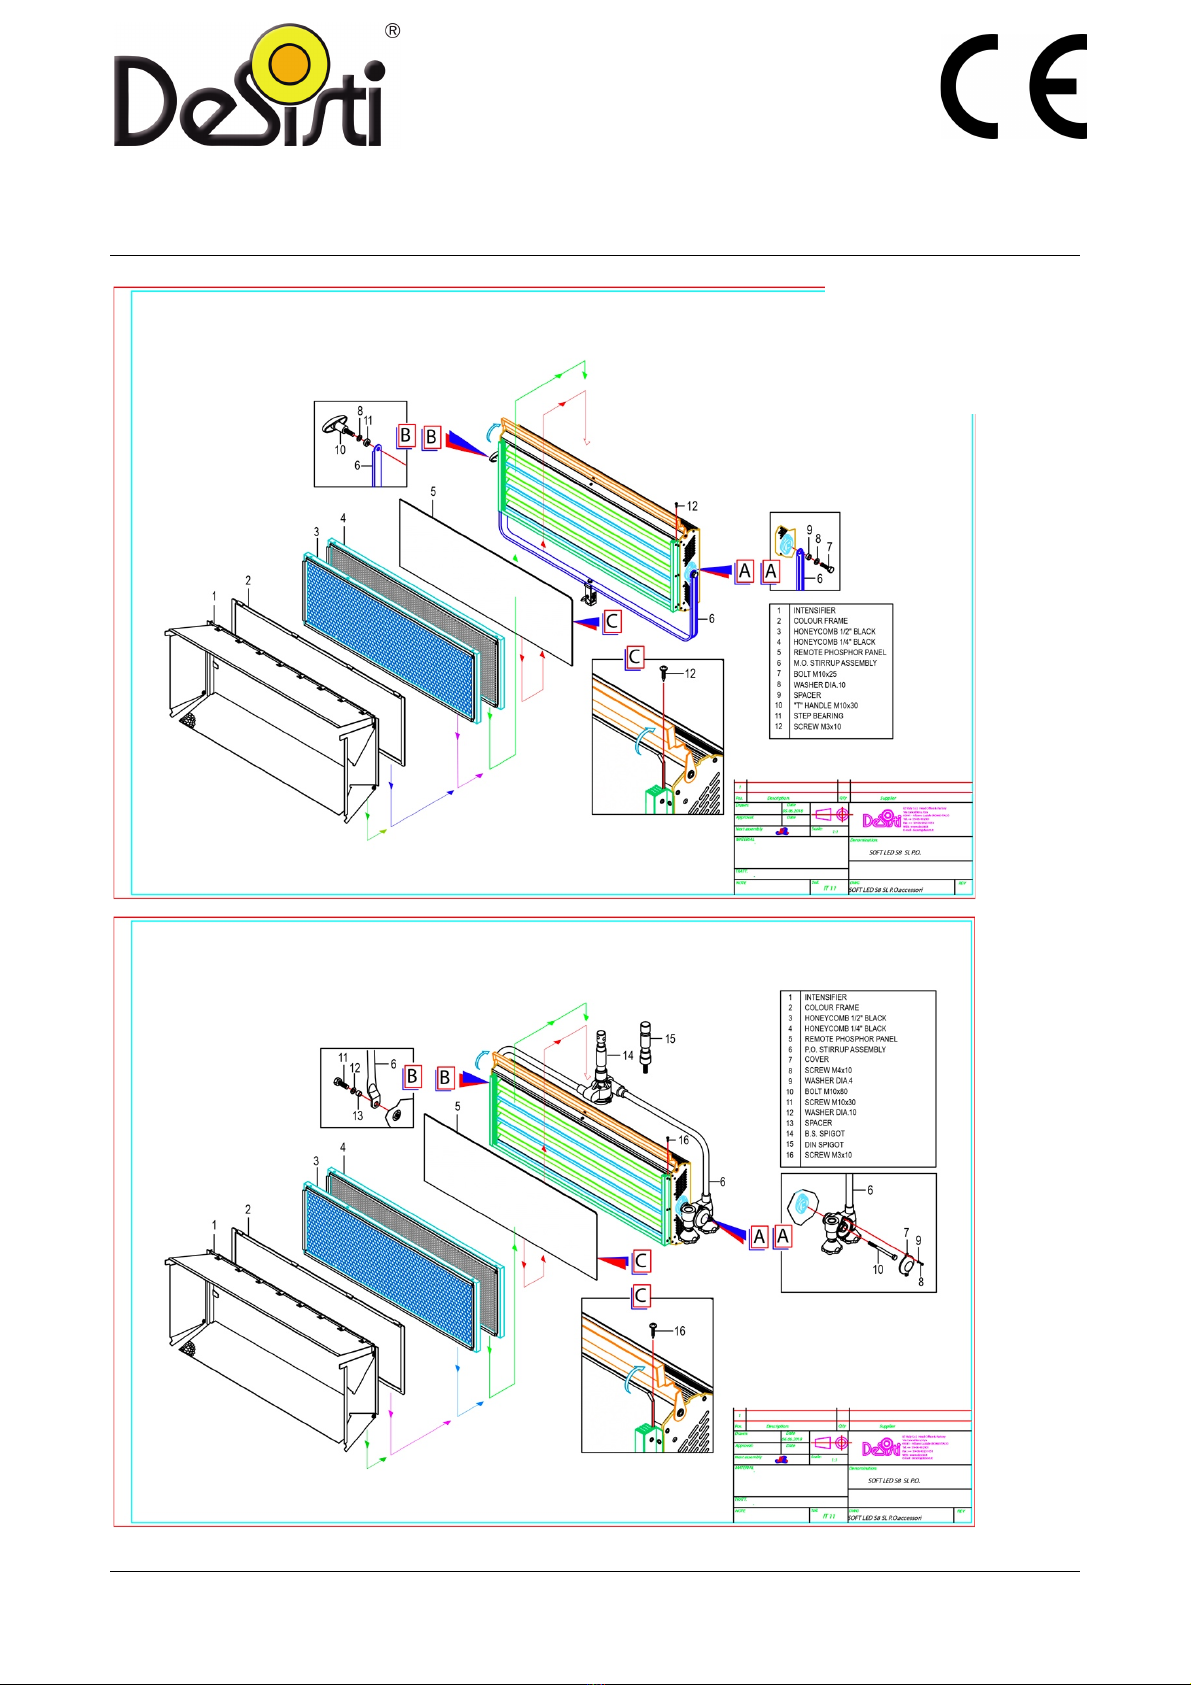
YOKE AND ACCESSORIES ASSEMBLY

This Manual is applicable to Soft LED1 XL Revised on June 2020
ILT ITALY srl
Via Cancelliera, 10/a
00041 Albano Laziale (Rome) Italy
tel. +39 06-902901 fax +39 06-90231051
www.desisti.it
3.
POWER AND DMX DAISY CHAIN
The SOFT LED permits both POWER and DMX DAISY CHAIN.
In fact each Fixture is respectively equipped with:
For DMX:
• 1 XLR5 pin Panel Mount Male (DMX IN)
• 1 XLR5 pin Panel Mount Female (DMX OUT)
For Mains Supply
• 1 20A Powercon NAC3MPA BLUE (POWER IN)
• 1 20A Powercon NAC3MPB WHITE (POWER OUT)
It is recommended to Daisy Chain a Max of 10 fixtures, even if the limitations imposed by DMX Standards are for an higher q.ty of units and even
if the Powercon Connections are rated for 20A max.
4.
SAFETY INSTRUCTIONS
Ü Professional use: This luminaire has been designed for professional use and must be operated by qualified personnel only. Not for residential
use.
Ü Grounding: WARNING: THIS LUMINAIRE MUST BE GROUNDED
Ü WARNING: Disconnect Power CORDS before
any maintenance work or opening the FUSE HOLDER.
Risk of serious injury.
Ü Electrical connections: IMPORTANT The cores in this mains lead are colored in accordance with the following code:
Europe
America
Ground
Green & yellow
Green or green & yellow
Neutral
Blue
White
Live
Brown
Black
In case the colors of the cores do not correspond to the colors of the connection points on your plug, please proceed as follows:
• the green or green and yellow core must be connected to the connection point marked with the letter E or with the symbol or colored
in green or in green - yellow;
• the blue (or white) core must be connected to the connection point marked with the letter N or colored in black;
• the brown (or black) core must be connected to the connection point marked with the letter L or colored in red.
Ü Working Position
Lighting fixture: Max. Tilting ±90° from horizontal
Ü Ambient Temperature, ta
at the place of installation and Storage
Minimum 10°C, maximum +40°C
Ü Humidity
at the place of installation and Storage
25-80% (not condensing)
Ü Minimum distances from inflammable
surfaces
Top
Back
Sides
Front
0,2 m.
0,1 m.
0,1 m.
0,75 m.
The luminaire should never be OPERATED close to inflammable materials. The ones indicated in the above table are the minimum distances
recommended. Other requirements for safe use are:
A.
Do not cover the apertures of the luminaire housing. They are essential for correct ventilation.
B.
Use only original accessories and spares from De Sisti Lighting.
This Manual is applicable to Soft LED1 XL Revised on June 2020
ILT ITALY srl
Via Cancelliera, 10/a
00041 Albano Laziale (Rome) Italy
tel. +39 06-902901 fax +39 06-90231051
www.desisti.it
C.
Before hanging the luminaire ensure that the suspension point (or the stand) is properly rated to accept the luminaire weight.
D.
In case of pole operated use, fit only a P.O. stirrup from De Sisti Lighting.
E.
A suitable secondary safety suspension device (safety cable, chain or equivalent) must be fitted between the suspension point and the eyelet
at the front of the body
F.
WARNING : DO NOT MOUNT THE LUMINAIRE ON A NORMALLY FLAMMABLE SURFACE
5.
INSTALLATION INSTRUCTIONS
The following procedure should be adopted:
Before connecting the luminaire to the electrical mains ensure that:
A.
Earth line is present on the power socket.
B.
The mains voltage is within the rated range of the luminaire (see technical data on the rating label)
C.
The front safety Shield is present and in good condition.
It consists of a Remote Phosphors Panel 305 x 107 mm.
WARNINGS :
• Do not operate the product if the ambient temperature exceeds 40° C
• Provide a minimum clearance of 0,1m (4 in.) around fans and air vents.
• SHIELDS, LENSES SAFETY OR DICHROIC GLASSES SHALL BE CHANGED IF THEY HAVE BECOME VISIBLY DAMAGED TO SUCH
AN EXTENT THAT THEIR EFFECTIVENESS IS IMPAIRED, FOR EXAMPLE BY CRACKS OR DEEP SCRATCHES.
• THE LUMINAIRE SHALL ONLY BE USED COMPLETE WITH ITS PROTECTIVE SHIELD
D.
Applying power:
Never connect to dimmer power. Install a power plug on the power cable using the following pin assigment:
1 : Neutral 2 : Live Green/Yellow : Ground - This fixture must be connected to ground.
Make sure the local power voltage is within the range specified. If so; connect the power cable and turn the power on.
E.
Stand Alone operation:
Using the navigation buttons and display readout ( refer to the “Local Menu” chapter )
navigate to Manual and set the desired intensity (for additional operations see “Local Menu” chapter)
F.
DMX operation:
Connect a DMX cable
Navigate to Address mode (Addr) and set the desired address, (refer to the “Local Menu” chapter).
Connect to DMX controller (refer to the “Channel Setting” in the “Local Menu” chapter) and Use it.
6.
LOCAL MENU
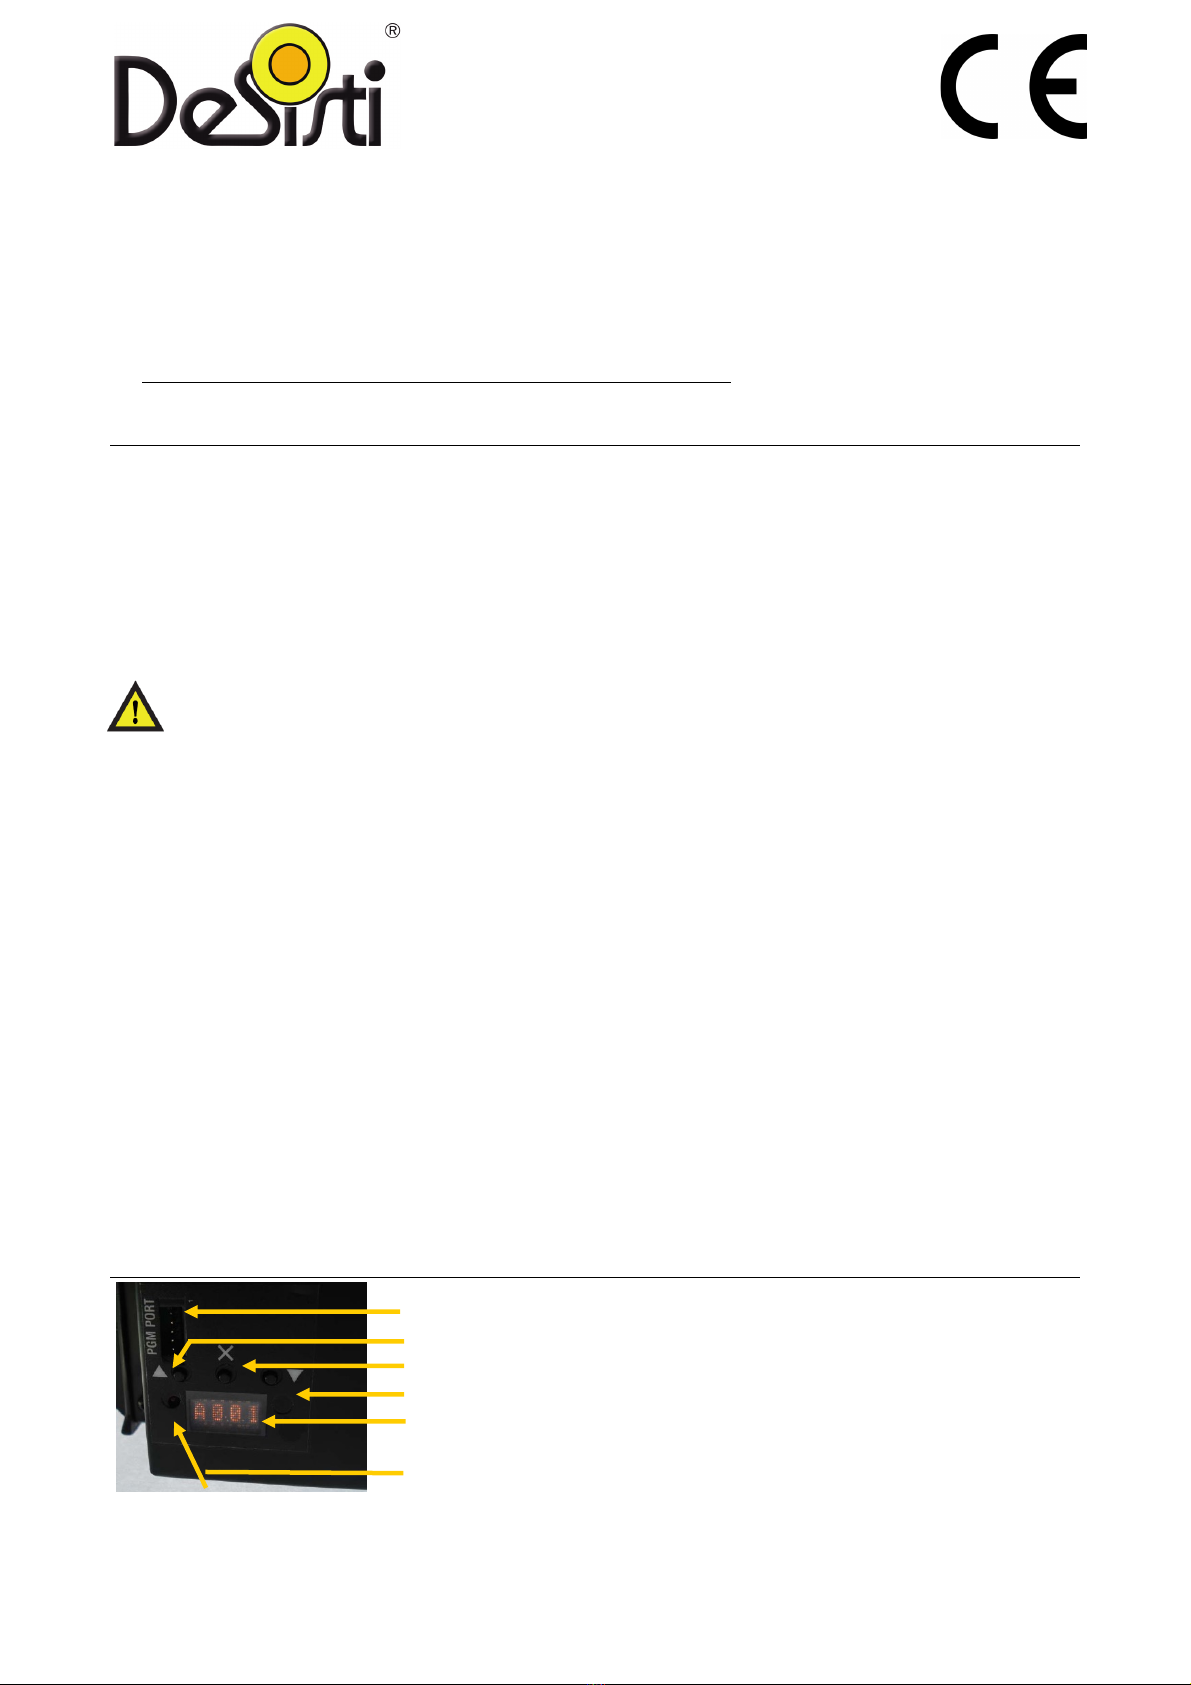
PGM PORT For Firmware Upgrade
ÙFUNCTION 1 Scrolling UP / Increases value “function key”
ENTER Select / Confirm
ÚFUNCTION 2 Scrolling DOWN / Decreases value “function key”
Display When the push button are not used for more than 15 seconds the display
will go OFF. It will go ON again anytime a push button is activated.
DMX Presence Shows the presence of DMX (LED lit = DMX present)
DEFAULT SETTINGS ARE INDICATED IN BOLD LETTERS ON THE FOLLOWING TABLE:
The following are the BASIC FUNCTIONS and COMMANDS that are provided on the LOCAL MENU of the LED FRESNEL. The unit is provided with
a USER MENU accessible instantly on the product.
The unit has also a SERVICE MENU that is only accessible through a PASSWORD and is reserved for QUALIFIED and TRAINED PERSONNEL:
This Manual is applicable to Soft LED1 XL Revised on June 2020
ILT ITALY srl
Via Cancelliera, 10/a
00041 Albano Laziale (Rome) Italy
tel. +39 06-902901 fax +39 06-90231051
www.desisti.it
1st MENU
Displayed
(scrolling with the
Ù
and the
Ú
buttons)
2nd MENU
Displayed
(after pressing the
X
that stands for
ENTER
)
Explanation of Each MENU FUNCTION
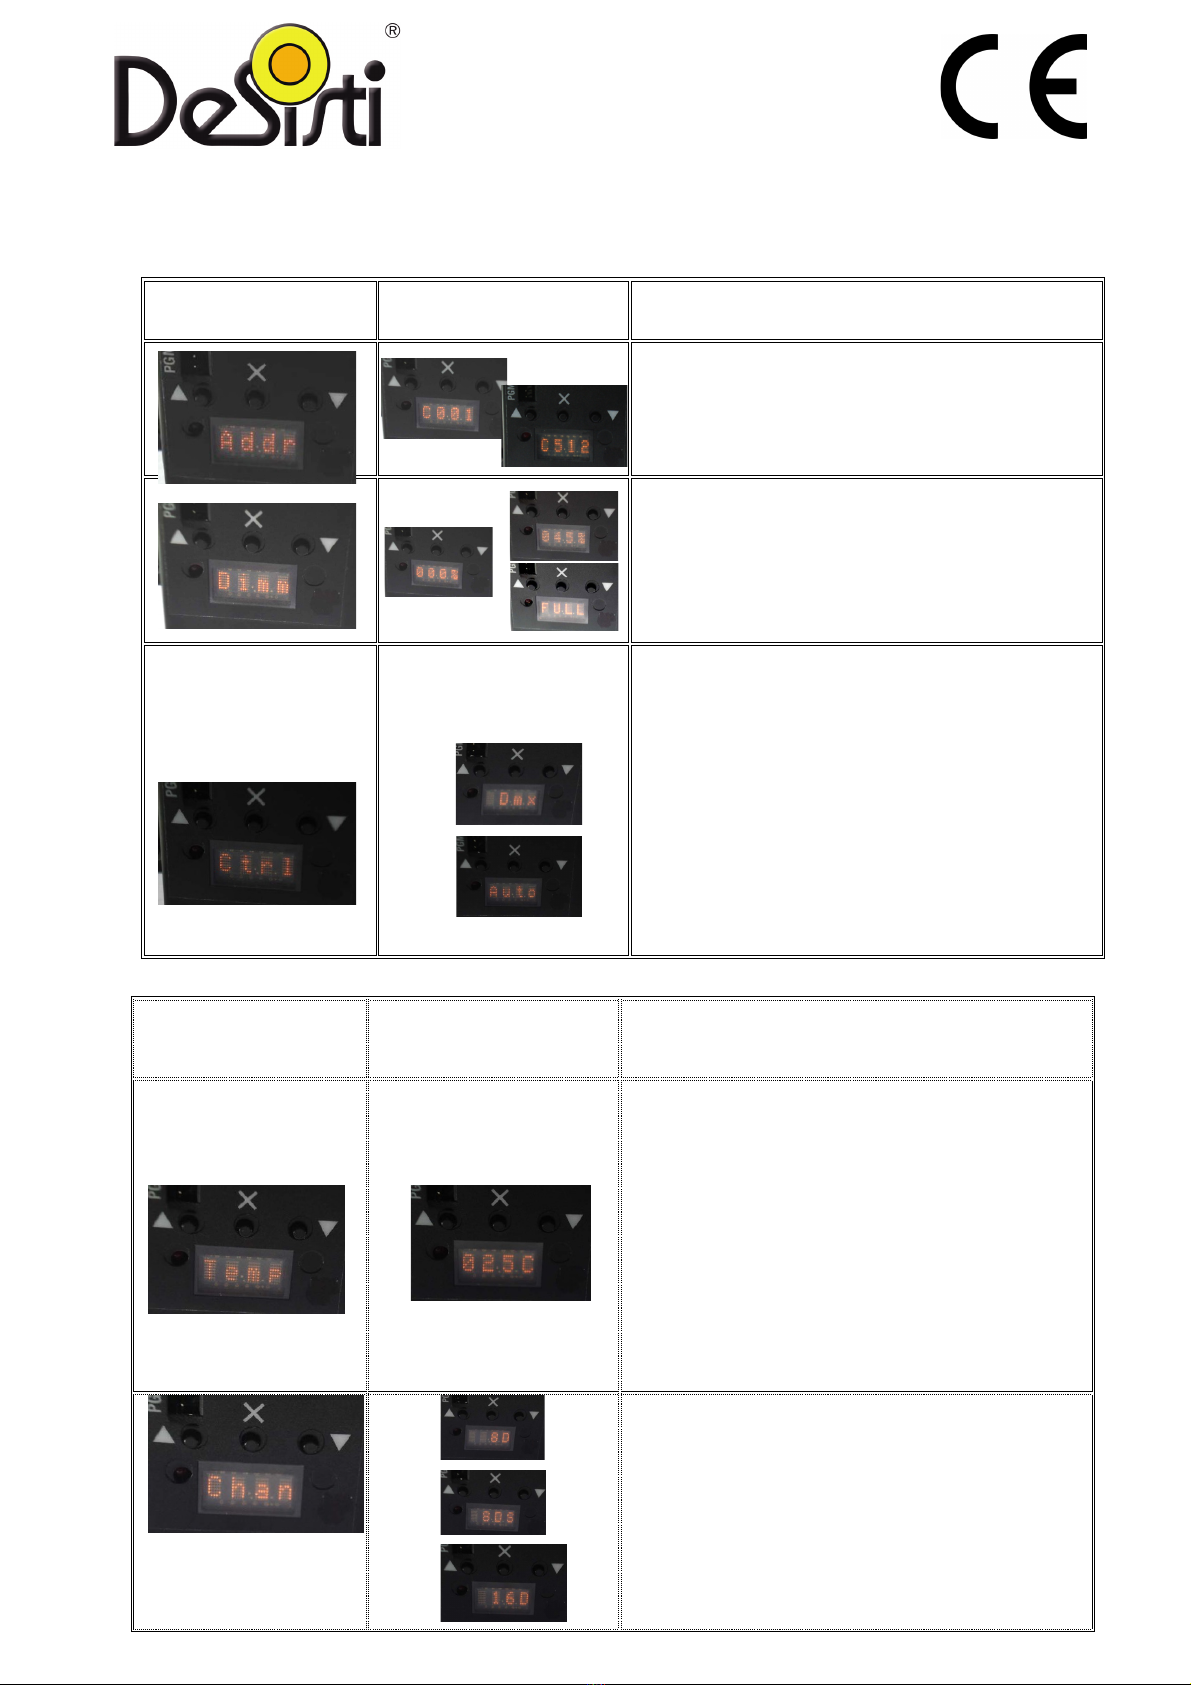
DMX ADDRESS
This Function is to SET the DMX address from 1 to 512 (Product is delivered with default settingof the DMX
address at 1)
Once the C001 is displayed, act on the Ùbutton to increase the address to the desired value.
Temporary push will increment the value by 1, if the button is kept pushed the increment on numbers is
getting fast.
Once the desired Address number is accomplished press X (“ENTER”) to make it active
LOCAL DIMMING CONTROL
This Function is to LOCALLY DIM the LED INTENSITY from 0 to 100% (Product is delivered with default setting
of the DIMMER at 0).
The intensity goes in increments of 1/100% so the display will show 000% with the dimmer at 0% and FULL
with the dimmer at 100%.
Temporary push will increment the value by 1/100, if the button is kept pushed the increment on numbers is
getting fast.
Once the desired Lighting Level is accomplished and it is wanted to leave that level and go to other functions
of the MENU, press “ENTER”.
LOCAL OR REMOTE CONTROL SETTINGS
The LED Fresnel has the facility to block the LOCAL DIMMING SETTING and maintain it when the POWER is
turned first OFF and than ON again.
This allows for the LIGHT to be TUNED and FOCUSED locally and its dimming level can be blocked, so that for
instance a system lighting a SET can be operated by a remote switch or simple brakers by TURNING POWER
ON.
The relevant menu to access this function is CTRL, to enter in this menu press X (“ENTER”), it is than possible
to select either DMX or AUTO by acting on the Ùor Úbutton and than press X (“ENTER”) again. The
machine is set to DMX as default.
• In DMX mode: the Fixture accepts DMX control….if in this mode the local DIMMING CONTROL is SET
to a level the Light behaviour will follow the HTP (Highest Takes Precedence) modality, in other words
it will keep the local DIMMING setting until the DMX level of the specific channel will be higher, from
that level onwards the DMX level will take precedence. In this condition if the DMX connection is
removed, the light will keep the last level….until power is ON. It will reset and Start at 0after Power
OFF and ON again.
In AUTO mode: the light will ignore any DMX control. In this mode any local dimming setting will be
maintained and will be automatically recalled after power off, when turning the power on again.
1st MENU
Displayed
(scrolling with the Ùand the Ú
buttons)
2nd MENU
Displayed
(after pressing the X that stands for
ENTER)
Explanation of Each MENU FUNCTION
TEMPERATURE
This function Displays in real time the LED BAR Case temperature in °C.
When pressing Enter again you exit from the temperature display.
The steady state TEMPERATURE of the LED BAR reaches approx. 55°C after many hours of continuous
operation with an ambient temperature of 25-30°C.
The Thermal Handling of the LED is Automatically handled by the local electronics and the LED will operate
until the LED BAR temperature reaches 80°C, that anyway is still way within the prescribed maximum
nominal prescribed by the LED BAR manufacturer that is 105°C.
In case the LED BAR temperature reaches 80°C the unit will automatically turn off.
Even in extreme Ambient temperature conditions the LED BAR shall never reach the 80°C limit.
The above protection threshold is there to protect the LED BAR from stressed working conditions in case some
other failures or specially critical working conditions are causing an over-temperature.
CHANNEL SETTING (RESOLUTION & FUNCTION)
This Function is to set the DIMMING RESOLUTION either at 8 bits or at 16 bits.
Once CHAN is displayed, act on the Ùor Úbuttons to scroll through the following choises:
• 8D: 8 bits resolution (the display will show 8D and this is the default setting).
The Fixture utilises 1 DMX Circuit for the Light Dimming, which is the
BASE CIRCUIT set in the ADDRESS.
• 8DS: NOT ACTIVE (for future use):
The foreseen function for this setting is: 8 bits resolution and STROBE (the display will show 8DS).
The Fixture will utilise 2 DMX Circuits,
the BASE CIRCUIT set in the ADDRESS will be the LIGHT DIMMING
and the second circuit (BASE +1) will be the STROBE

This Manual is applicable to Soft LED1 XL Revised on June 2020
ILT ITALY srl
Via Cancelliera, 10/a
00041 Albano Laziale (Rome) Italy
tel. +39 06-902901 fax +39 06-90231051
www.desisti.it
7.
CHARACTERISTICS AND PERFORMANCE DATA
DESCRIPTION
VALUE
DESCRIPTION
VALUE
Ü LED Power
120 W
Ü Protection Type
IP 22
Ü Power Consumption
140W @230V / 150W @ 120V
Ü Max Housing temperature
70 °C
Ü DMX Data link
USITT DMX512-A
Ü 5-pin XLR for DMX in & out.
Ü Use shielded data cables. Do
not overload the daisy chain.
Ü Up to a maximum of 32
devices can be used on a single
DMX chain.
Ü Weight of Fixture
With yoke (integrated PSU)
M.O.
P.O.
4,1 kg.
5,3 kg.
Ü DMX Channels:
Ü 1 at 8bit: Dimmer
Ü 2 at 16bit: Dimmer
Ü Size & types of Remote
Diffuser Panels
CRI>95
TLCI >96
Ü Front Fixture’s Opening
Front *********
Ü Protection Class
Class 1–ground connection required
Specifications subject to change without notice.
• 16D: 16 bits resolution (the display will show 16D).
The Fixture utilises 2 DMX Circuits,
the BASE CIRCUIT set in the ADDRESS is the Coarse Dimming,
the second Circuit (BASE +1) is the Fine Dimming.
• 16DS: NOT ACTIVE (for future use):
The foreseen function for this setting is: 16 bits resolution and STROBE (the display will show 16DS).
The Fixture will utilise 3 DMX Circuits,
the BASE CIRCUIT set in the ADDRESS will be the Coarse Dimming,
the second Circuit (BASE + 1) will be the Fine Dimming.
the third CIRCUIT (BASE + 2) will be the STROBE
Of course the 16 bits function is useful if the corresponding circuits on the DMX LIGHTING BOARD are also set
at 16 bits.
WARNING: if the LED FRESNEL is set at 16 bits, but more units are having a consecutive unitary address (for
instance first fixture set at Address 1, second fixture set at Address 2 and so forth, the DMX Channel
controlling the Coarse Dimming of the second unit, will also control the fine dimming of the first unit. In this
case it is recommended that all fixtures are set to 8 bits resolution).
DMX LEVEL
It Shows the DMX Input level on percentage (0-99% and FULL) received effectively from the Fixture.
Press ENTER to exit this MENU.
This Manual is applicable to Revised August 2018
SOFT LED 8
ILT ITALY srl
Via Cancelliera, 10/a
00041 Albano Laziale (Rome) Italy
tel. +39 06-902901 fax +39 06-90231051
www.desisti.it
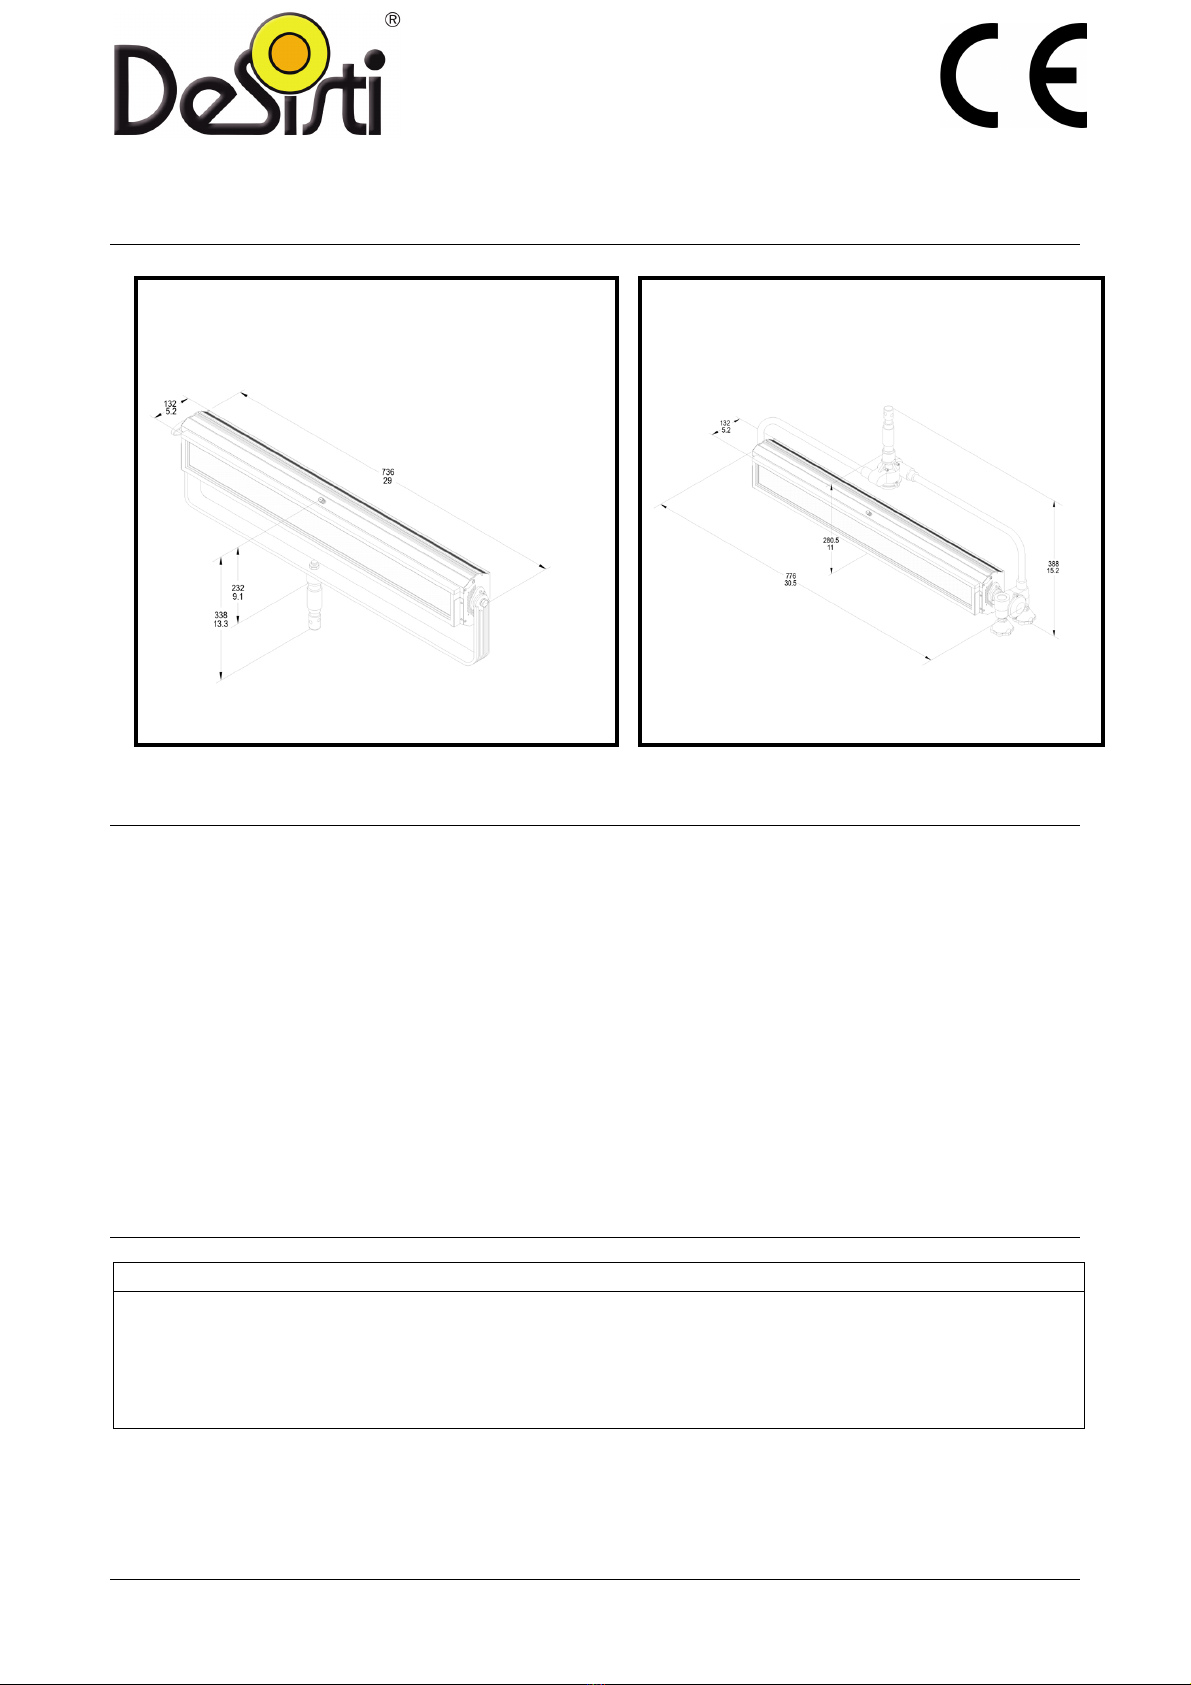
8.
DIMENSIONS
9.
PERIODIC INSPECTION & MAINTENANCE
This product requires very little routine maintenance, if any, but has special cleaning instructions:
Disconnect fixture from power and allow it to cool for 10 min.
1. Vacuum or gently blow away any dust from fan blades and grills
2. Very gently clean the LED with Isopropyl alcohol.
3. Clean the Phosphors Panel with a soft damp cloth.
4. Check the condition of the safety shield (see chapter: Installation Instructions) before every use.
5. Check Power supply cable and DMX control cable proper conditions
10.
SAFETY STANDARDS
Europe: The product conforms the Applicable European Directives & Standards
Ü Low Voltage Directive: 73/23/EEC (as amended by 93/68/EEC)
Ü EMC Directive: 89/336/EEC (as amended by 92/31/EEC & by 93/68/EEC)
Ü Europen Standards:: EN 60598-2-17, EN 60598-1 , EN 55015 , EN 61547
Disposing of this product:
Help preserve the environment! Ensure that this product is recycled at the end of its life.
This product is in compliance with the RoHS and WEEE directives.
Dimensions: Black=mm. Red=inches
Dimensions: Black=mm. Red=inches
Table of contents
Other Desisti Lighting Equipment manuals

Desisti
Desisti Piccoletto VW User manual

Desisti
Desisti SOFT LED 1 Vari-White User manual

Desisti
Desisti LEONARDO User manual

Desisti
Desisti SOFT LED 1 User manual

Desisti
Desisti SUPER LED F14 User manual

Desisti
Desisti Soft LED 2 Vari-White User manual

Desisti
Desisti BOTTICELLI 1.250 User manual

Desisti
Desisti LED MAGIS 40W User manual
Popular Lighting Equipment manuals by other brands


OCEM
OCEM LIRE Series Instruction Manual for Use, Installation and Maintenance

Airam
Airam ECO26 KLASSIKKO manual

Luminetic
Luminetic HMX Series installation manual

Somogyi
Somogyi home FLP20SMD instruction manual

Loevschall
Loevschall 15-12D Instructions for use

Lightolier
Lightolier Lytecaster 1000LVE specification