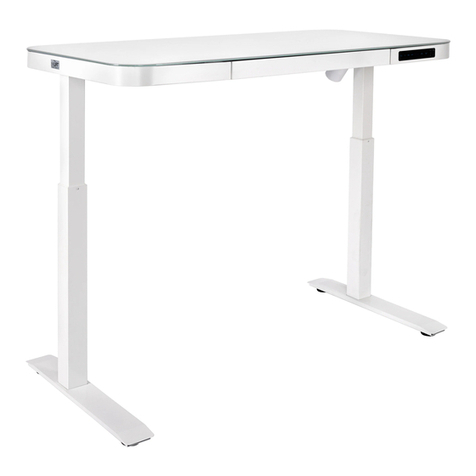
DESKHAUS APEX/2 User manual

APEX/2
PRODUCT ASSEMBLY INSTRUCTIONS

APEX/2
APEX/2
PARTS QTY
1. Column 2
2. Top Support 2
3. Foot 2
4. Collapsing Channel 2
5. Control box 1
6. Hand switch 1
7. Power Cord 1
8. M6 14mm Screw 12
9. M6 10mm Screw 16
10. Feet pads 4
TOOLS NEEDED:
PARTS INCLUDED:
TAPE MEASURE
CORDLESS DRIVERPHILLIPS BIT
X16
X12 X7 X2
4mm HEX KEY
X20
M6 14mm M6 10mm 7/8 WOOD SCREW 16mm WOOD SCREW CABLE TIES
1
2
3
4

ASSEMBLE COLUMNS TO
COLLAPSING CHANNELS
APEX/2
Assemble using the M6 10mm length screws.
These are the shorter screws that are included.
(4 per column)
Notes
*You may need to extend the channels out to expose the screw holes
when attaching columns.
1
IMPORTANT: Do not tighten machine screws fully until the end of each step to allow for proper centering. PARTS QTY
Column 2
Collapsing Channel 1
M6 10mm Screw 8
X8

APEX/2
2CONNECT FEET TO COLUMNS
Secure feet to columns using M6 14mm Screws.
These are the longer screws that are included.
(4 per foot)
IMPORTANT: Do not tighten machine screws fully until the end of each step to allow for proper centering. PARTS QTY
Foot 2
M6 14mm Screw 8
X8

APEX/2
ASSEMBLE TOP SUPPORTS TO COLUMNS
Assemble using the M6 14mm length screws.
These are the longer screws that are included.
(2 per top support)
3
IMPORTANT: Do not tighten machine screws fully until the end of each step to allow for proper centering. PARTS QTY
Top Support 2
M6 14mm Screw 4
X4

APEX/2
4FASTEN FRAME TO DESK SURFACE
Assemble using the 7/8" length wood screws.
(7 screws total)
*Notes - Center base on desk surface leaving 2" on right and left sides.
Pre-drilling holes is required for solid wood tops and optional for HPL tops.
X7
PARTS QTY
7/8" Wood Screw 7

APEX/2
5LOCK ADJUSTABLE CHANNELS
Assemble using the M6 10mm Screws. These are the
shorter screws that are included. (8 per channel)
Make sure the control box and hand switch
are fastened in a location where all the cables
will connect without being in tension.
PARTS QTY
M6 10mm Screw 8
X8

APEX/2
6
PARTS QTY
Control Box 1
Hand Switch 1
16mm Wood Screw 2
Wood Screw 2
(Included with hand switch)
ATTACH CONTROL BOX
& HAND SWITCH
Secure control unit with 16mm wood screws
(2 screws total)
Secure hand switch with the (2) wood screws
that are included with your hand switch.
X2
(Included with hand switch)
X2

APEX/2
7CONNECT POWER CORDS
Connect hand switch to control box.
Connect (2) column power cords to control box.
Connect power cord to control box.
*Note - Use column cable extensions if needed.
X1
X1
X1
X2

APEX/2
OPERATION INFORMATION
Note: When using your handset for the first time, you may need to reset the handset if the display shows
“Reset” to ensure that it is properly calibrated. To reset the handset, keep pressing the paddle down to
the lowest height and release. Then press the paddle down again for 5 seconds until the display shows
"Reset" and returns back to a normal digital number to finish the reset. Your handset is now ready to use.
RAISING THE TABLE
Hold the paddle up and the height adjustable desk will rise. Release the paddle and it will stop.
LOWERING THE TABLE
Hold the paddle down and the height adjustable desk will lower. Release the paddle and it will stop.
USING THE MEMORY FUNCTION
Setting the memory for seated height
Adjust the desk to your preference below 35.5 inches (seated height). Press the side button on
the handset once and the ♥will show on the display. Press the side button one more time to
save the current height. The display should show ♥-2
Setting the memory for standing height
Adjust the desk to your preference above 35.5 inches (standing height). Press the side button on the
handset once and the ♥will show on the display. Press the side button one more time to save the
current height. The display should show ♥ -1
HEIGHT CALIBRATION
1. Hold the down button/direction (SmartPaddle) on the handset until the desk reaches
its lowest height, then release.
2. Measure the height from the floor to the top of your desktop. If the displayed height
does not match your measurement, follow the next steps.
3. Hold the down button/direction (SmartPaddle) again until the LED display reads “Reset”.
4. Press the “M” or side button (SmartPaddle) until the numeric display begins flashing.
5. Press Up or Down until the read out matches your measurement.
6. Wait for the display to return to “Reset”, hold the down button/direction
(SmartPaddle) until the desktop lowers slightly and rises slightly and the display
changes back to the numeric height setting, then release.

APEX/2
ADDITIONAL FEATURES
UPPER AND LOWER LIMIT
Enter the settings menu and navigate with the paddle to the upper and lower limit settings.
Press the side button to enter the settings, and select an upper limit, or to cancel the limit.
LOCKING HANDSET
If you want to lock the handset, enter the settings menu and navigate to the lock settings
with the paddle. Press the side button to enter the settings, and choose to lock the handset.
We don't recommend locking your handset as it should be easily adjustable.
VIBRATION MODE
Enter the settings menu and navigate to the vibration settings. Press the side button to enter
the settings and toggle this on or off with the paddle.
RESETTING THE HANDSET
If the display reads an error code, hold the paddle down until display reads "Reset" then lower frame to the
lowest height and release. The frame will move slower than normal. Reset is complete once the display shows
the height number displayed. (For a list of Error codes see our Troubleshooting on the next two pages.)
AUTOMATICALLY REACH THE STANDING HEIGHT
If you have saved a standing height, then pressing the handset paddle up twice quickly will automatically adjust
the desk from sitting to standing height.
AUTOMATICALLY REACH THE SITTING HEIGHT
If you have saved a sitting height, then pressing the handset paddle down twice quickly will automatically
adjust the desk from sitting to standing height.
SETTING UP ACTIVITY REMINDERS
Press and hold the side button on the handset for 5 seconds to enter the settings. Pressing the
side button again will enter the activity reminder settings. Here, you can use the paddle to adjust
the duration of the timer between 30 min, 40 min, and 50 min. Press the side button to confirm.
If you want to cancel the reminder, enter this menu again.
OPERATION INFORMATION CONTINUED

APEX/2
TROUBLESHOOTING
SOLUTION
Column plugged into M1 Port
Column plugged into M2 Port
Column plugged into M3 Port
Column plugged into M4 Port
Column plugged into M5 Port
Column plugged into M6 Port
Column plugged into M1 Port
Column plugged into M2 Port
Column plugged into M3 Port
Column plugged into M4 Port
Column plugged into M5 Port
Column plugged into M6 Port
E01
E02
E03
E04
E05
E06
E07
E08
E09
E10
E11
E12
ERROR
CODE PARTS AFFECTED CONDITION
1. Column has been modified in a
way that prevents movement
2. Column has exceeded the
weight limit
3. Control box tells column to travel
beyond its mechanical limits
4. Column has a mechanical failure
1. Check that there is no interference, then perform base reset
2. Check that weight limit has not been exceeded then perform base reset
3. If column doesn’t slow down before stop (makes clunk sound)
control box may need to be exchanged.
4. If none of the above conditions, column needs to be replaced.
1. Column is not plugged into
port correctly
2. Column cord/plug is damaged
3. Control box port is damaged
1. Verify that all plugs are seated within the control box port then
perform base reset
2. Unplug columns, turn control box around, plug columns back in,
if a new port error code is displayed, then the column needs replaced
3. Unplug columns, turn control box around, plug columns back in,
if the same error code is displayed, then the control box needs replaced
SOLUTION
Control box error with master
/ slave connection
E13
H01
LOC
ERROR
CODE PARTS AFFECTED CONDITION
1. Cord not plugged in correctly
2. Cord/plug is damaged
3. Control box problem
1. Verify that all plugs are seated within the control box port then
perform base reset
2. Inspect cord/plug for damage, replace if needed
3. If above is correct then control box replacement is required
(note that Master/Slave system is a custom install customer service
may be required)
Control box duty cycle 1. Continuous movement of
columns over 4 minutes
2. Room temperature too high
for heating elements
1. Desk must rest for 16 minutes
2. Environment temperature may be too high for operation.
Control box / handset lock 1. Control box program has
the handset locked
2. There is a handset circuit error
1. Perform the handset un-lock operation
2. Replace handset if un-lock doesn’t solve problem

WWW.DESK.HAUS
Table of contents
Other DESKHAUS Indoor Furnishing manuals
Popular Indoor Furnishing manuals by other brands
Alvarado
Alvarado Media Stand Assembly instructions

Otto
Otto LIVING 504400 Assembly instructions

Lista International Corporation
Lista International Corporation 1006 Proper Usage and Installation

Emmezeta
Emmezeta JKBL1165 Assembling Instruction
Kvik
Kvik MH470,060 Assembly guide
Habitat
Habitat Manford Table Assembly instructions
HOMCOM
HOMCOM 835-883V00 manual
Office Star Products
Office Star Products WorkSmart EM60930C operating instructions

StyleWell
StyleWell Riverbed FCS00015J-RB Use and care guide

Blumfeldt
Blumfeldt 10034813 manual
RiverRidge
RiverRidge TWO DOOR SPACESAVER Assembly instructions
Blanco
Blanco BLANCOSPEX 501-102 Specifications
