DESKHAUS VERTEX 2T/C User manual

VERTEX 2T/C
VERTEX 2T/C
PRODUCT ASSEMBLY INSTRUCTIONS

VERTEX 2T/C
VERTEX 2T/C
PARTS
QTY
1. J-Rail 2
2. Column 2
3. Top Support 2
4. Foot 2
5. M6x1.0 12mm Screw 16
6. Hand switch 1
7. Control box 1
8. Power Cord 1
9. M10x1.5 20 mm Screw 4
10. Feet pads 4
TOOLS NEEDED:
FASTENERS INCLUDED:
X16 X4 X20
C-LEG
VARIATION
1
3
5
8
6
7
2
10
3
8
9
4
6mm 4mm
VERTEX 2T/C
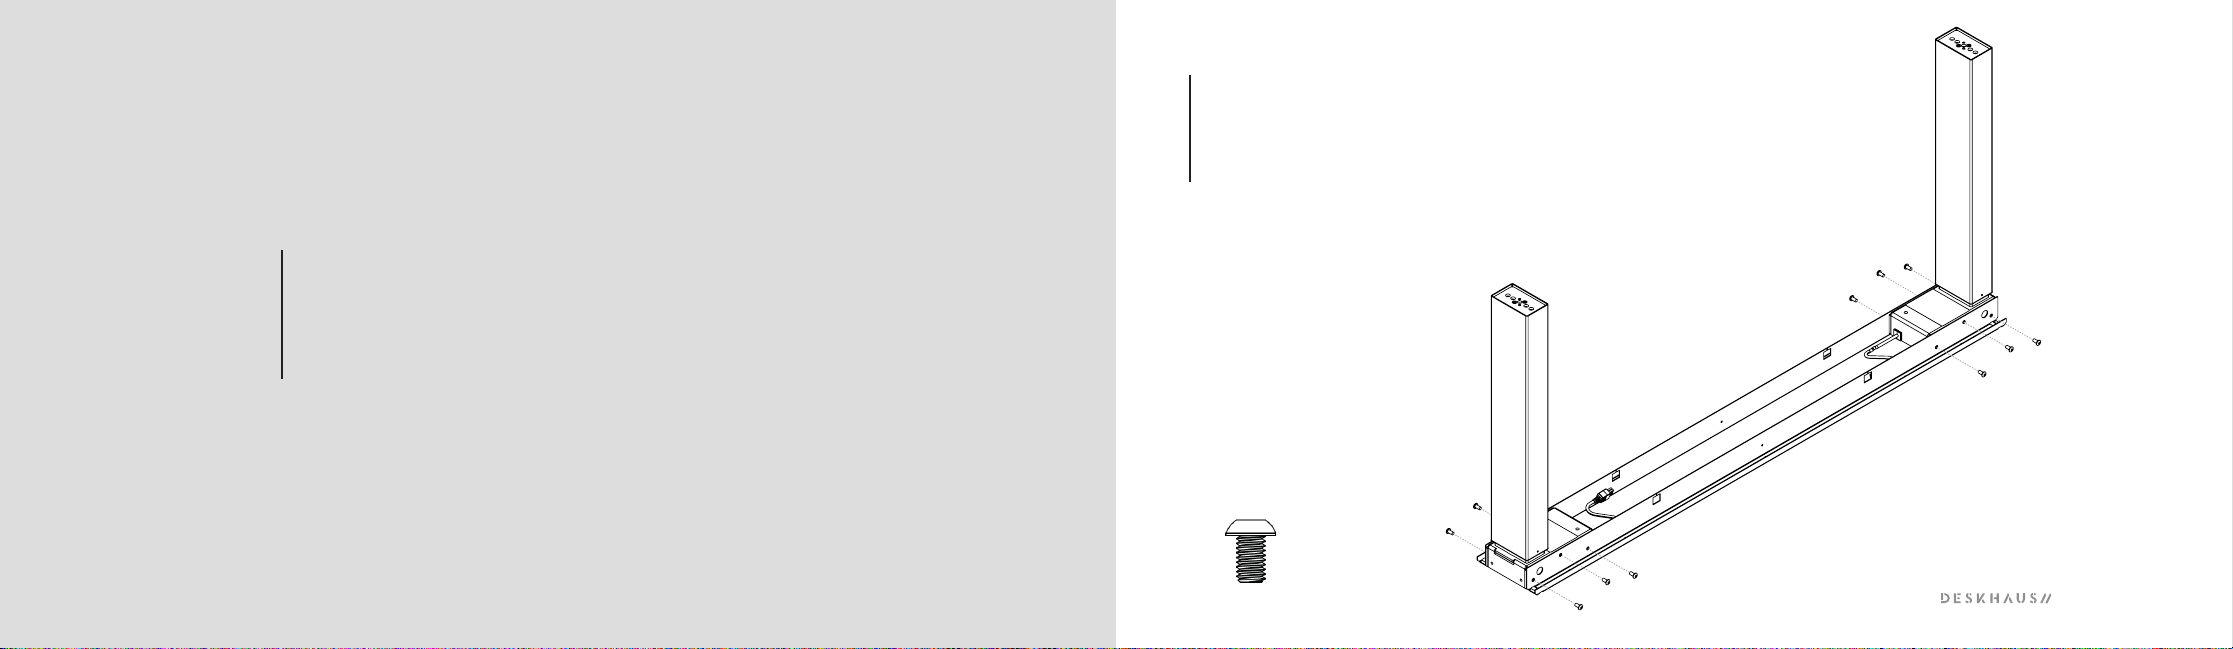
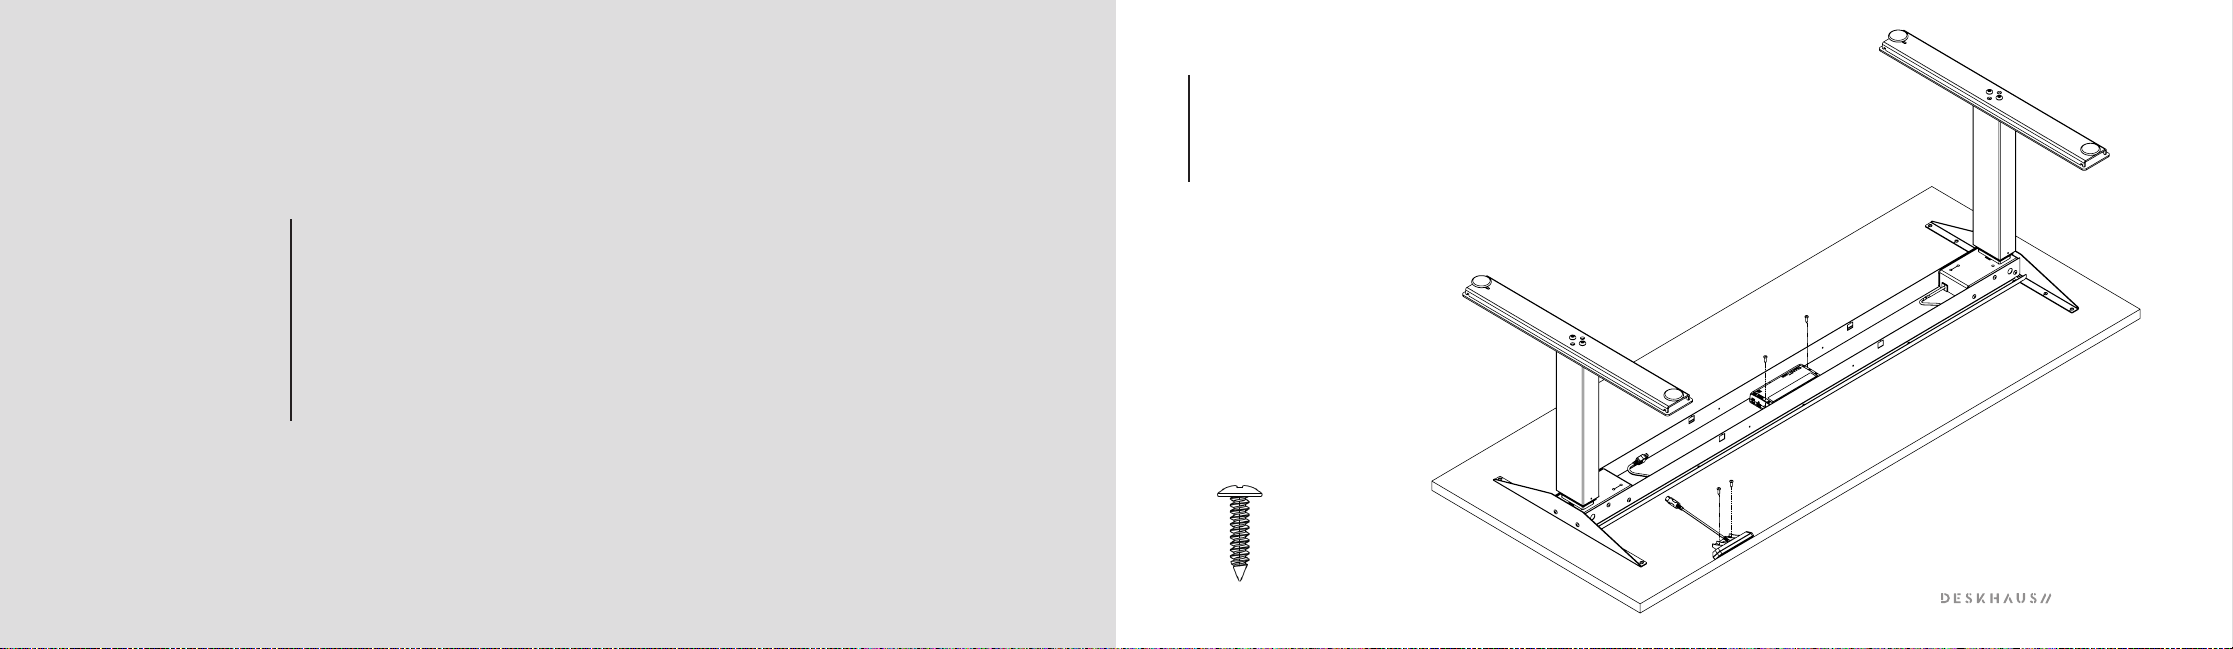
ASSEMBLE COLUMNS TO J-RAIL
Assemble using the M6x1.0 12mm length screws.
These are the shorter screws that are included.
(6 per column)
1
PARTS QTY
Column 2
J-Rail 2
M6x1.0 12mm Screw 12
X12
VERTEX 2T/C
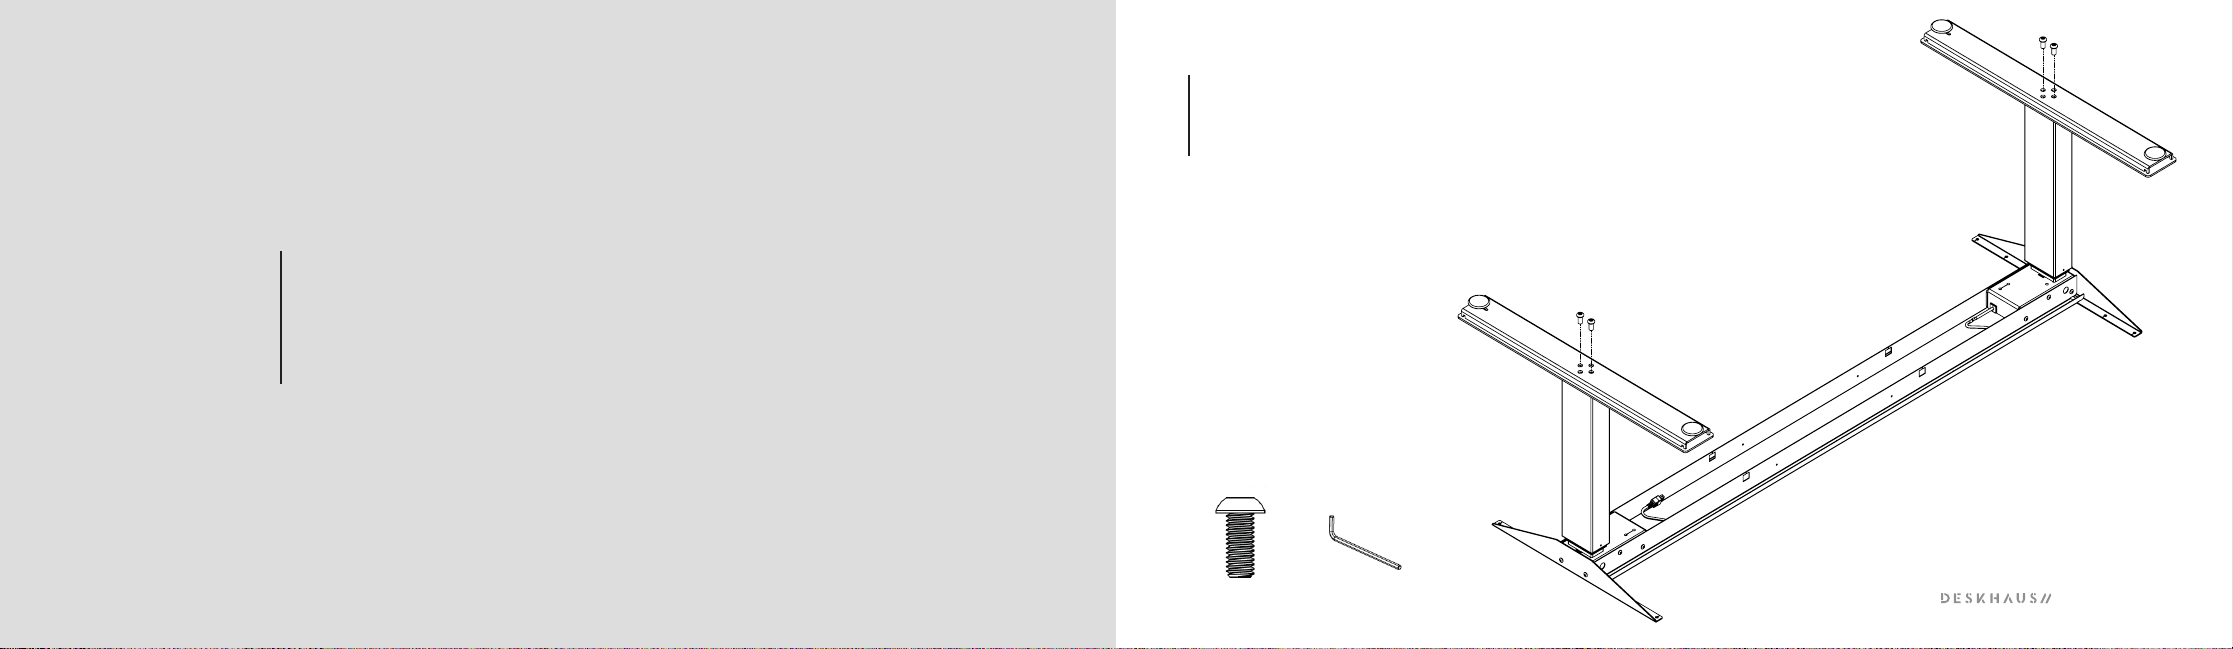
ASSEMBLE TOP SUPPORTS TO COLUMNS
Assemble using the M6x1.0 12mm length screws.
These are the shorter screws that are included.
(2 per top support)
2
PARTS QTY
Top Supports 2
M6x1.0 12mm Screw 4
X4
VERTEX 2T/C
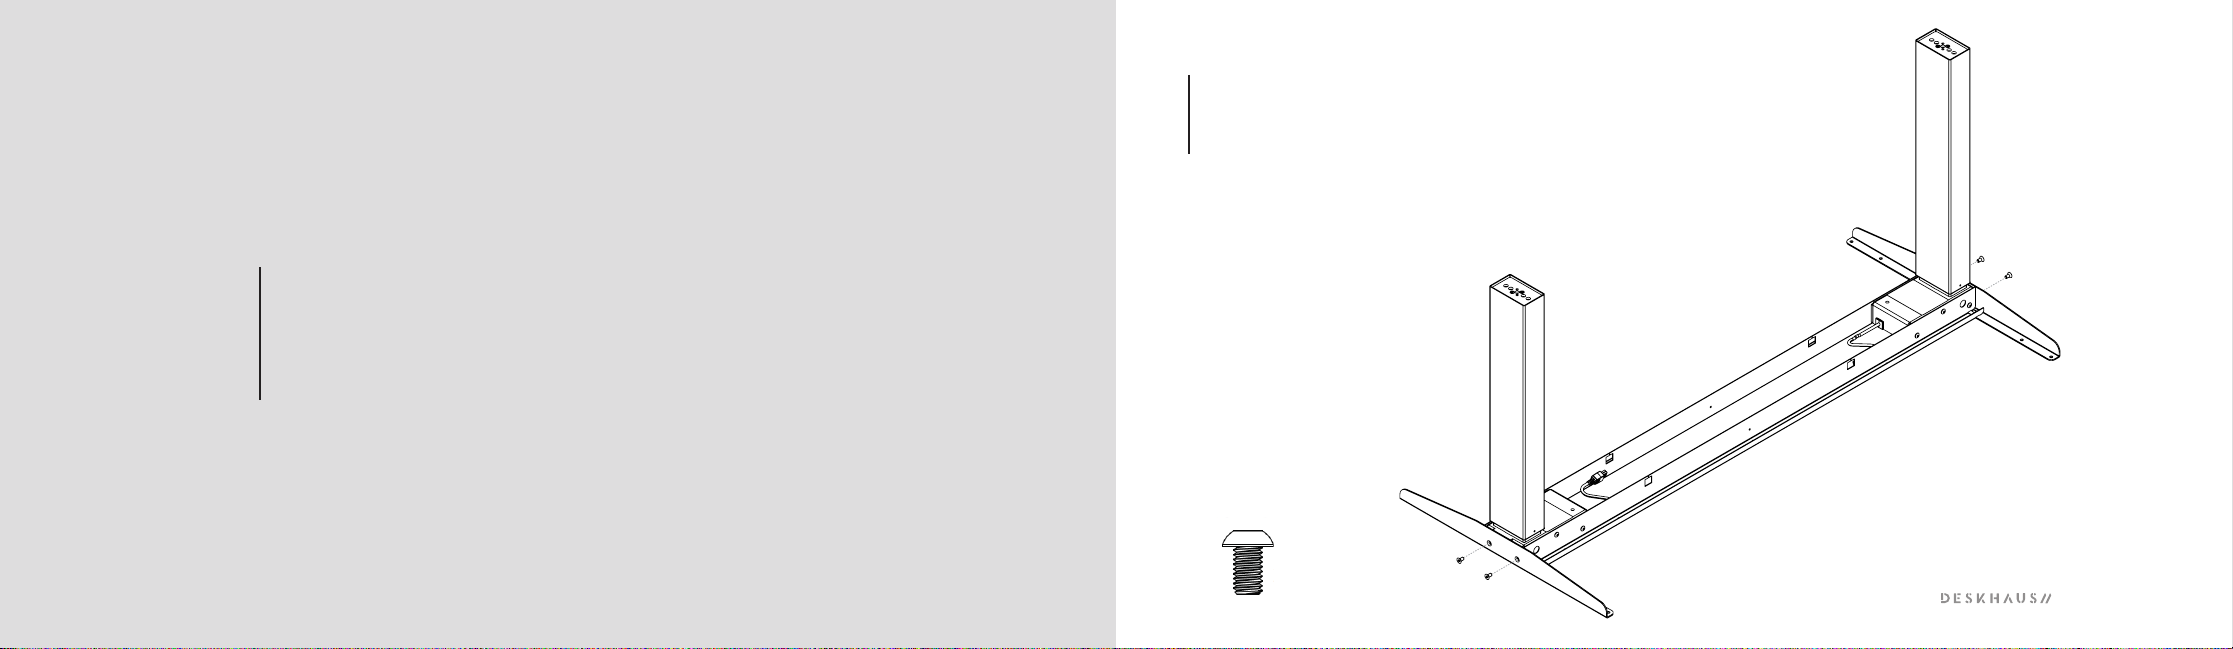
ASSEMBLE FEET TO COLUMNS
Assemble using the M10x1.5 20mm length screws.
These are the longer screws that are included.
(2 per column)
3
PARTS QTY
Foot 2
M10 x 1.5 20mm Screw 4
X4 6mm
VERTEX 2T/C
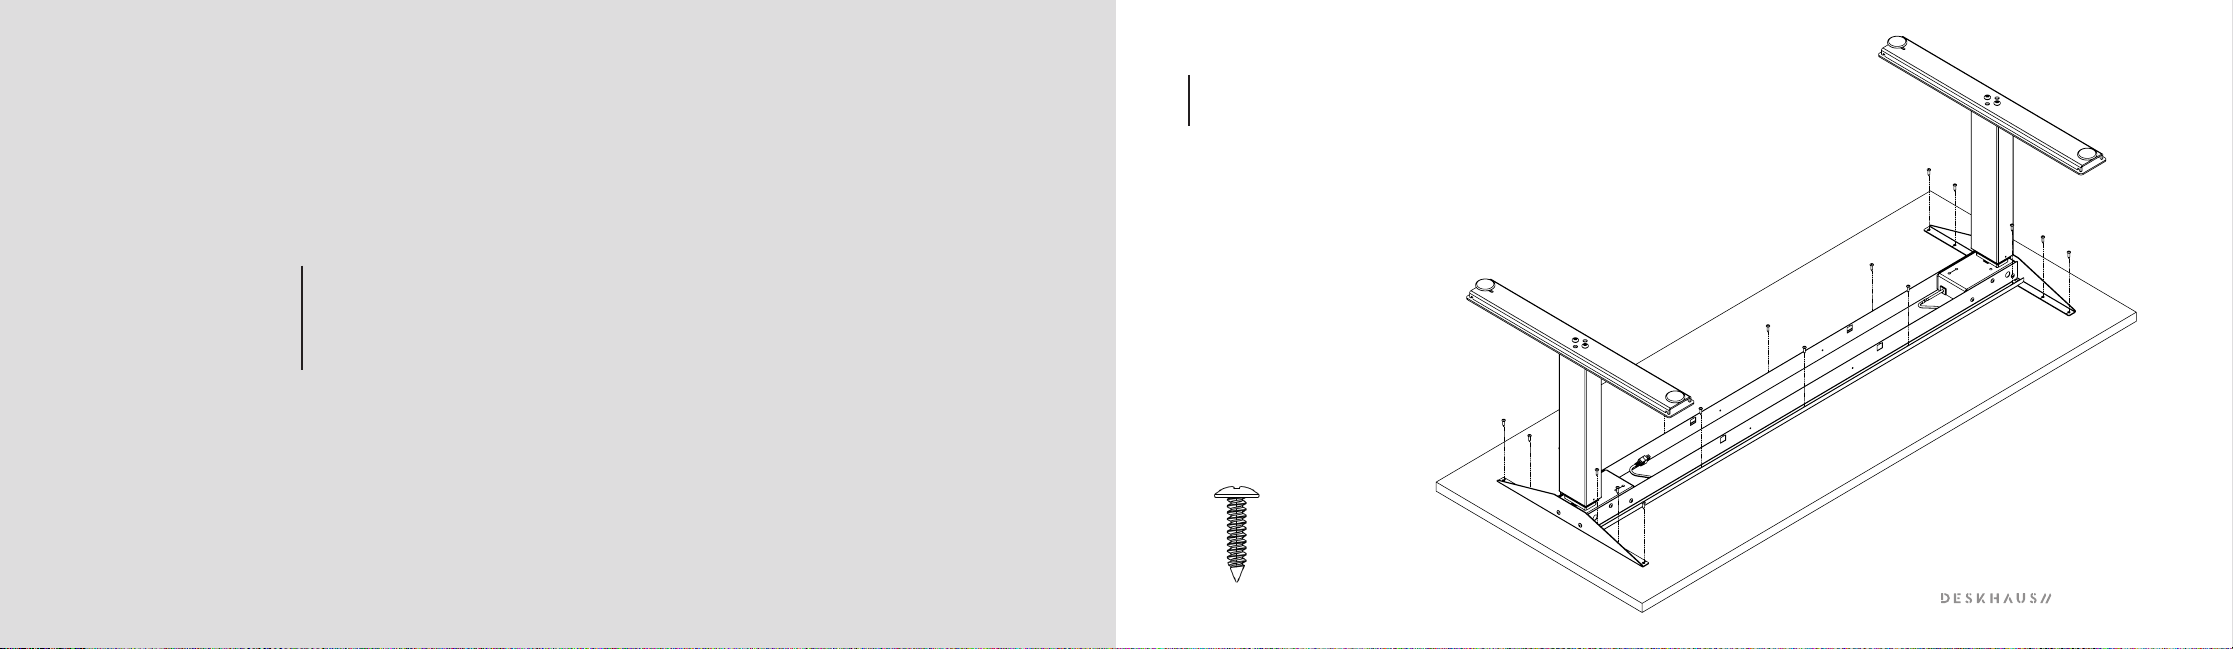
FASTEN FRAME TO DESK SURFACE
Assemble using the 7/8" length wood screws.
(16 per frame)
4
PARTS QTY
#10 7/8" Wood Screw 16
X16
VERTEX 2T/C
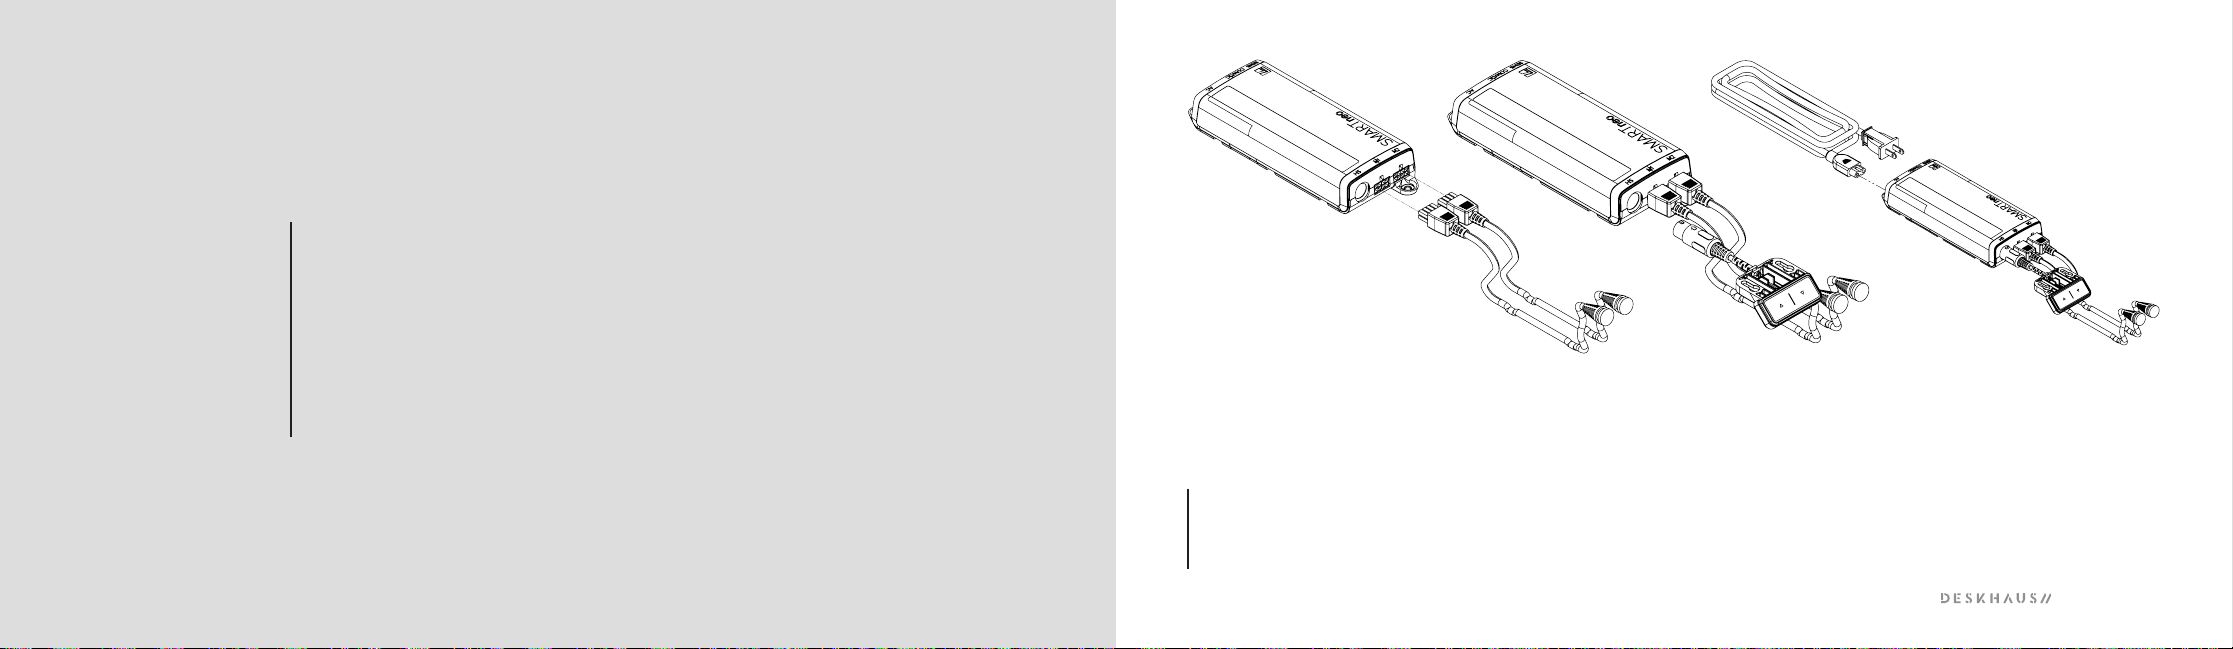
FASTEN CONTROL BOX AND
HAND SWITCH TO DESK SURFACE
Assemble using the 7/8" length wood screws.
Make sure the control box and hand switch
are fastened in a location where all the cables
will connect without being in tension.
5
PARTS QTY
Control Box 1
Hand switch 1
#10 7/8" Wood Screw 4
X4
VERTEX 2T/C
CONNECT CABLES TO CONTROL BOX
Make sure the control box and hand switch
are fastened in a location where all the cables
will connect without being in tension.
- Plug in power cord last.
NOTE: SECURE ALL CABLES TO TABLE FRAME OR UNDERSIDE
OF SURFACE TO AVOID DAMAGE DURING OPERATION.
6
PARTS QTY
Control Box 1
Hand switch 1

VERTEX 2T/C
OPERATION INFORMATION
INITIALIZATION/RESET
The desk must be initialized/reset after any of the following:
• After assembly
• After disconnection from the power supply
• After any impact on the table top.
To initialize/reset, move the table to the lowest position by pressing the DOWN button on the
hand switch until the columns reach the lowest position. Press the DOWN button again until the
table moves slightly down to the machine zero point and back up to the operation zero point.
Release the DOWN button. If the button is released too soon, the table legs will not move up.
Repeat the reset process.
The control box is programmed with a parameter file which controls the table legs’ lower and
upper travel limits. Under no circumstance should a control box from one table be moved to another.
NORMAL HAND SWITCH OPERATION (for all hand switch types)
By pressing the UP or DOWN buttons, the table will move up or down to the desired position.
Once the desired position is reached, let go of the UP or DOWN button. The table legs will stop
once they reach the lower or upper height limits.
PROGRAMMABLE HAND SWITCH OPERATION (optional)
This programmable hand switch is equipped with a display for showing the current table height
in centimeters or inches.
The hand switch also will display an error code if an error is detected by the control box.
When an error is detected, the display will show an error code “EXX,” instead of the current table height. To
resolve the error, see the Troubleshooting Section (p. 16-17 of this guide).
The programmable hand switch also has the ability to save up to four different height positions.

VERTEX 2T/C
PROGRAMMABLE HAND SWITCH OPERATION (continued)
CHANGE THE HEIGHT UNIT (inches or centimeters)
The hand switch can display the table height in either centimeters or inches. With the help of the
S5-menus, the unit of measure can be changed.
To change the unit of measure, follow these steps:
1. Press and hold the 1, 2, and UP buttons until the display shows “S 5”.
2. Confirm by pressing the “S” button. Now the display will have changed.
To exit the menu without making a selection, wait until the height display appears again.
CHANGE THE HEIGHT DISPLAY
If the displayed value does not match the actual height of the table top, the display can be
corrected as follows:
1. Press and release the “S” button.
2. Press and hold the DOWN button until the display starts to flash.
3. Change the height shown on the hand switch by pressing the UP or DOWN button to the
desired height.
Confirm by pressing the “S” button.
To exit the menu without making a selection, wait until the height display appears again.
SAVE MEMORY POSITION
1. Move the table up or down to the desired height.
2. Press the “S” button (in the display “S -” is shown.)
3. Select a position by pressing one of the four number buttons, 1-4, (if 1 is selected, the display
will show the setting as “S1”).
4. The saved position is confirmed by a double click sound from the control box. The display shows the current
table height. Repeat steps to save a maximum of four different positions.
RECALL MEMORY POSITION
Press and hold the desired memory button (1, 2, 3 or 4) the table moves from the current position
into the saved position. The button must be pressed until the position is reached. If the button is
released, the table will stop short of the desired height.
VERTEX 2T/C
TROUBLESHOOTING
PROBLEM SOURCE SOLUTION
Table does
not move
No power supply Plug in the power cord or check the connection on the
control box
No connection or a loose
connection to the drives
Verify the plug connections of the motor cable to the
control box
No connection or a loose
connection to the hand switch
Verify the plug connections of the motor cable to the
control box
Max lifting capacity
is exceeded
Reduce the weight or load on the desktop
Max time limit is exceeded Control is activated automatically after approx. 9 minutes
Defective drive Contact customer service
PROBLEM SOURCE SOLUTION
Table does
not move
Defective control box Contact customer service
No connection or a loose
connection to the drives
Verify the plug connections of the motor cable to the
control box and reset the control box
Defective drive Contact customer service
Defective hand switch Replace hand switch
Table moves
down at a
slow rate
Control box expects
new reset
Reset control box
During operation,
table moves at a
slow rate
Max lifting capacity is
exceeded
Reduce weight
Table moves on one
side only
briefly and then
stops
VERTEX 2T/C
TROUBLESHOOTING
ERROR CODE SOURCE SOLUTION
HOT The control box monitors the duty
cycle (time-controlled) and its max
temp. A value has been exceeded
Wait until the "HOT" display goes out - the table is
working properly again
M1-Internal Fault
M2-Internal Fault
M3-Internal Fault
M1-Defect
M2-Defect
M3-Defect
M1-Over-current
M2-Over-current
M3-Over-current
E00
E01
E02
E12
E13
E14
E24
E25
E26
Unplug and contact customer service
Unplug.
Correct the external short circuit and/or verify the cable
to the drives. Plug cables into the control box and re-run
table.
Collision resolve if necessary
➤
Max load exceeded remove excess load from the table
If the problem persists, contact customer service
ERROR CODE SOURCE SOLUTION
M1-Not connected
M2-Not connected
M3-Not connected
Over-current drive 1
Over-current drive 2
Drive 1 - Synchronization is lost
Drive 2 - Synchronization is lost
Collision identified
Drive replaced
E36
E37
E38
E48
E49
E55
E56
E60
E61
Motor not connected.
Check cable / connector to the drive.
Reset the table
Max load exceeded remove excess load from the table
The connection to the drive is interrupted or a new drive
is connected. Reset the table.
Collision resolve if necessary
➤
If necessary, reduce the load on the table
Reset the table
Option ISP function. Remove source.
CONTINUED
➤
➤

WWW.DESK.HAUS
Table of contents
Other DESKHAUS Indoor Furnishing manuals


Popular Indoor Furnishing manuals by other brands


BRW
BRW TESS REG 1W Assembly instructions

&Tradition
&Tradition Drop Leaf HM5 instructions

Furniture of America
Furniture of America CM6266BL-CH Assembly instructions

aspenhome
aspenhome I206-451 Assembly instructions

Ergotron
Ergotron Zido 2-drawer Enclosure user guide

Numark
Numark IRVINGTON 5PCS owner's manual

Crate&Barrel
Crate&Barrel Atwood manual

Lightolier
Lightolier Lytespan 8216WH specification

Next
Next HIDEAWAY DINING SET manual

Itatiaia
Itatiaia BALC CANTO 4PT HOR Assembly instructions

Henderson
Henderson IMPERIAL PATIO KIT Fitting instructions

Atlantic Furniture
Atlantic Furniture LEXI AH12234 Assembly instructions