DeVilbiss Healthcare 306DS Manual
306DS
DeVilbiss iGo®Portable Oxygen System
EN
WARNING– Read instruction guide before operating this equipment.
CAUTION– Federal (U.S.A.) law restricts this device to sale by or on the order of a physician.
DANGER–NO SMOKING
DeVilbiss iGo® AR
0044
A-306-AR2
7
15
13
14
8
1
10
306D-037 Rev C
LPM
124b 4a 6b
7
6a
5a
5b
34c
IMPORTANT PARTS
IGO CONTROL PANEL / IGO
2
43A
5
91
B
D
1
E
6
11
12
16
C

3 - ARA-306-AR
1.65
166
3- AR ........................................................................................................................................................................................
14 - EN..................................................................................................................................................................................ENGLISH

4 - AR A-306-AR
.DeVilbiss
.®
60140
DeVilbiss
10
6 1
2
. 3
. 4
5
. 6
10DeVilbiss 1
2
3
4
203 5
6
DeVilbiss
7
8
DeVilbiss
5 - ARA-306-AR
PD
306
)2
)A-EDeVilbiss iGo
1
2
3
4
5
6
7
8
9
10
11
12
13
14
15
16
17
18
)1iGO
1
30PD 2
603
.
3
15.3b
4
.4b
DeVilbiss
5
.5b
6
.6b
6 7

6 - AR A-306-AR
iGo
DeVilbiss
10
.
IGO
1.65 iGo
iGo
1
2
3
4
.8 5
166 6
iGo
. 1
2
3
:
50
7 4

7 - ARA-306-AR
5
iGo
321
iGo
1
2
.DeVilbiss
15 1
2
3
4
5
1.04.05.4
2.02.44.7
3.01.64.0
4.03.5
5.03.2
6.03.0
DeVilbissiGoDeVilbiss

8 - AR A-306-AR
60140
401041050
45
3
1
4.5 2
4.5
IGO
iGo
1
2
3
iGo
4
3515.250
10.5
5
1
2
1
2
20
®
6
6030
.
. iGo

9 - ARA-306-AR
.
7
DeVilbiss
8
1
2
.DeVilbiss
3
1
2
3
DeVilbiss
DeVilbiss
.DeVilbiss
DeVilbiss
DeVilbiss
.DeVilbiss
11
22
3.DeVilbiss3
1
1
22
33
4.DeVilbiss4
55
6.DeVilbiss6

10 - AR A-306-AR
11
22
33
44
55
66
7
7
1.DeVilbiss1
2.DeVilbiss2
11
22
11
22
3
.3b
11
22
11
11
11
2
2
33
11
2
11
2.DeVilbiss2
151
DeVilbiss
11
22
33
1.%1001
22
33
44
.1
DeVilbiss

11 - ARA-306-AR
.DEVILBISSIGO
1
2
3
3
1
2
DeVilbiss
DeVilbissiGo
1
2
1
2
.DeVilbiss
3
DeVilbiss Healthcare
1
® 2
3
4
5
6

12 - AR A-306-AR
20.0 28.0 x38.08 x11 x15 xx
7.015.58.619
61.....................................................................................................................................................................
31
370
40
537
631
%3%91
103.515
734.51.05.0....................................................................................................................................
2882.4%95%10
60+140+
%95%10
1010640 933
13,1230 933
340
483
55
%20138%2020
%84
%75
1...............................................................................
21
8.8DeVilbiss
12
DeVilbiss

13 - ARA-306-AR
DEVILBISS
EMC
IEC 60601
.%30
2.7803
3
1503
80
1
2
3
0.5%95
5%60
25%70
5%95

EN - 14 A-306-AR
TABLE OF CONTENTS
IImportant Safeguards................................................................................................................................................................................................................................. EN - 14
Dangers/Warnings/Cautions/Notes..................................................................................................................................................................................................... EN - 14
Physician Notes........................................................................................................................................................................................................................................... EN - 15
Provider Checklist ....................................................................................................................................................................................................................................... EN - 15
IEC Symbols and Symbol Definitions.......................................................................................................................................................................................................... EN - 16
Indications for Use....................................................................................................................................................................................................................................... EN - 16
Important Parts of Your DeVilbiss iGo Personal Oxygen System
iGo Portable Oxygen System and Accessories.................................................................................................................................................................................. EN - 16
iGo Control Panel .............................................................................................................................................................................................................................. EN - 16
Accessories ............................................................................................................................................................................................................................................... EN - 17
Setting Up Your iGo Portable Oxygen System .......................................................................................................................................................................................... EN - 17
Before Operating Your iGo ................................................................................................................................................................................................................. EN - 17
Selecting the iGo Power Source ....................................................................................................................................................................................................... EN - 17
AC Operation ............................................................................................................................................................................................................................... EN - 18
DC Operation............................................................................................................................................................................................................................... EN - 18
Battery Operation......................................................................................................................................................................................................................... EN - 18
Initial Battery Operation......................................................................................................................................................................................................... EN - 19
Typical Battery Recharge Time ............................................................................................................................................................................................. EN - 19
Operating Your iGo ..................................................................................................................................................................................................................................... EN - 19
Travel........................................................................................................................................................................................................................................................... EN - 20
Reserve Oxygen System............................................................................................................................................................................................................................. EN - 20
Troubleshooting .......................................................................................................................................................................................................................................... EN - 20
Caring for Your iGo System ....................................................................................................................................................................................................................... EN - 21
Provider’s Notes ......................................................................................................................................................................................................................................... EN - 22
Specifications .............................................................................................................................................................................................................................................. EN - 22
Guidance and Manufacturer’s Declaration.................................................................................................................................................................................................. EN - 23
IMPORTANT SAFEGUARDS
When using electrical products, especially when children are present, basic safety precautions should always be followed. Read all instructions before using. Important
information is highlighted by these terms:
DANGER Urgent safety information for hazards that will cause serious injury or death.
WARNING Important safety information for hazards that might cause serious injury.
CAUTION Information for preventing damage to the product.
NOTE Information to which you should pay special attention.
Important safeguards are indicated throughout this guide. Pay special attention to all safety information.
READ ALL INSTRUCTIONS BEFORE USING.
SAVE THESE INSTRUCTIONS
DANGER
DANGER - NO SMOKING
• Oxygen causes rapid burning. DO NOT SMOKE WHILE USING YOUR DEVILBISS OXYGEN EQUIPMENT, or when you are near a person utilizing oxygen therapy.
Keep matches, cigarettes, burning tobacco or candles away from the area where the system is being stored or operated.
• Toreducetheriskofre,burnsorinjurytopersons:
Oxygen,thoughnon-ammable,vigorouslysupportsandacceleratesburningofanyammablematerial.Ifyouknoworsuspectoxygenhasescapedotherthanthrough
normal operation, open doors and windows to ventilate the area.
• To prevent high concentrations of oxygen:
Do not leave iGo running when not in use. Do not leave cannula unattended while unit is delivering oxygen. High concentrations of oxygen can cause rapid burning.
Keep the equipment in a well-ventilated area.
• KeeptheiGoatleast5feet(1.6m)fromhot,sparkingobjectsoropensourcesofame.Positionyourunitatleast6inches(16cm)fromwalls,draperiesoranyother
objectthatmightpreventtheproperowofairinandoutofyouriGo.TheiGoshouldbelocatedsoastoavoidpollutantsorfumes.
• Use no oil or grease. A spontaneous and violent ignition may occur if oil, grease or other petroleum substances come into contact with oxygen under pressure. Keep
these substances away from the oxygen system, tubing and connections and any other oxygen source. DO NOT use any petroleum based or other lubricants.
• Avoid creation of any spark near oxygen equipment. This includes sparks from static electricity created by any type of friction.
• Neveruseaerosolspraysorammableanestheticsneartheequipment.
• Electric Shock Hazard. Do not disassemble. The DeVilbiss iGo Portable Oxygen System contains no user-serviceable parts. If service is required, contact your DeVilbiss
provider or authorized service center.
WARNING
• Keep all units away from children. Do not allow unauthorized or untrained individuals to operate the equipment. Never tamper with or try to repair the equipment yourself.
If you have any questions or suspect your equipment is not operating properly, contact your oxygen provider.
• IftheiGohasadamagedcord,ACtoDCadapterorplug,isnotworkingproperlyorhasbeendropped,damagedorsubmersedinwater,donotuseandcallaqualied
technician for examination and repair.

EN - 15A-306-AR
• The iGo is equipped with a High Pressure Relief Valve to ensure the user’s safety.
• ChangingtheL/min.settingwillaffectthedoseofoxygendelivered.DONOTreadjusttheL/min.settingunlessdirectedbyyourphysician.
• DO NOT ignore alerts. The iGo is not intended for life supporting or life sustaining applications, nor does it provide any patient monitoring capabilities. Consult your
physician for the type of back-up system required.
• DO NOT leave the iGo or DC Adapter plugged into the vehicle without the engine running or attempt to start the vehicle while the DC Adapter is connected to the vehicle.
This may drain the vehicle’s battery.
• DO NOT operate device or accessories in standing water and DO NOT submerse or expose to water. Electric shock or damage to the unit may result.
• ProtecttheBatteryandAC/DCAdaptersfromuidspillsordripstoavoidpossibleshockhazards.
• TheRechargeableBatterymayexplodeandcausepotentialinjuryifexposedtoordisposedofinare.
• DONOTshortcircuitthebattery’smetalcontactswithmetallicobjectssuchaskeysorcoins.Itmaycausesparksorexcessiveheat.
• DO NOT disassemble, puncture or crush the Battery. Rechargeable Battery electrolytes may be toxic if swallowed and can be harmful to skin and eyes. Use of a
damagedBatterymaycausepersonalinjury.KeeptheBatteryawayfromchildren.
• This device contains electrical and/or electronic equipment. Follow local governing ordinances and recycling plans regarding disposal of device components.
• Equipmentnotsuitableforuseinthepresenceofaammableanestheticmixturewithair,oxygenornitrousoxide.
CAUTIONS
• Federal (U.S.A.) law restricts this device to sale by or on the order of a physician.
• Do not use in an area where the air may be contaminated with carbon monoxide or hydrocarbons, as this may shorten the life of the unit (i.e. near running gasoline
engines, furnace or heater).
• Use only the iGo AC Adapter and DC Adapter supplied with your iGo. Use of another power supply will void the warranty. Do not use parts, accessories or adapters other
than those authorized by DeVilbiss.
• Locate oxygen tubing and power supply cords to prevent tripping hazards and reduce the possibility of entanglement or strangulation.
• Donotusewithotherequipment(i.e.humidier,nebulizer,etc.)wheninPulseDose®delivery mode.
• DONOTexposeunittotemperatureoutsideofspeciedoperatingorstoragetemperatures,asthismaydamagetheunit.DONOTexposetheRechargeableBatteryto
temperatures above 140°F (60°C) such as in a vehicle parked in the sun or on a hot day.
• IftheExternalPowerlightashesandtheaudiblealertsounds,buttheunitisnotoperating,thereisnopowertotheunit.RefertoTroubleshootingandcontactyour
DeVilbiss provider if necessary.
• Donotplacethisdevicenearotherequipmentordevicesthatcreateorattractelectromagneticelds.Placingtheunitinelectromagneticeldsgreaterthan10V/mcan
affectitsoperation.Examplesofsuchequipmentaredebrillators,diathermyequipment,cellulartelephones,CBradios,radio-controlledtoys,microwaveovens,etc.
PHYSICIAN’S/RESPIRATORY THERAPIST’S NOTES
1. Useonlycontinuousowmodeofoperationwithpatientswhobreathebelow6BreathsPerMinute(BPM).Refertospecicationsformaximumbreathrate.
2. Useonlycontinuousowmodeofoperationwithpatientswhoconsistentlyfailtotriggerequipment(i.e.mouthbreathingwithclosedsoftpalates).
3. PulseDosesettingsshouldbedeterminedforeachpatientindividually.SettingsfromcontinuousowapplicationsmaynotbeapplicabletoPulseDosemode.
4. Verify patient is getting adequate Pa02 or Sa02 levels in PulseDose delivery mode.
5. UseonlystandardnasalcannulawithPulseDosedelivery.Donotusepediatric(low-ow)nasalcannulawithPulseDosedelivery.Anynasalcannulacanbeusedwith
continuousowdelivery.
6. Donotusewithotherequipment(i.e.humidier,nebulizer,etc.)wheninPulseDosedeliverymode.
PROVIDER’S CHECKLIST
1. Upon arrival, check the iGo for damage that may have occurred during shipping and notify DeVilbiss of any damage. (Obvious shipping damage should be reported
within 10 calendar days after arrival.) Do not use damaged equipment. Save the carton, noting the position of the unit and placement of the packing material for possible
future return.
2. Record the number of hours on the hour meter underneath the unit.
3. Verifythattheairlterisinplaceinthehandlecavity.
4. Plug the unit into an electrical outlet, turn the unit ON and check the audible and visible alerts.
5. Settheowto3LPMincontinuousowmodeandlettheunitrunforatleast20minutes.
6. Use an oxygen analyzer to check the concentration.
NOTE–Iftheunitfailstooperateproperly,oxygenconcentrationisnotwithinspecication,orexternal/internaldamageisfound,contactDeVilbissforinstructions.
7. Instruct the user on the safe operation of the portable oxygen system. Review the Important Safeguards and observe all Warnings and Cautions on the product and in
the instruction guide.
8. Leave a copy of this instruction guide with the user.
NOTE–DeVilbissrecommendsleavingareserveoxygensupplywiththepatientwhensettinguptheiGoandinstructingthepatienttoalwayskeepreserveoxygenonhand.
EN - 16 A-306-AR
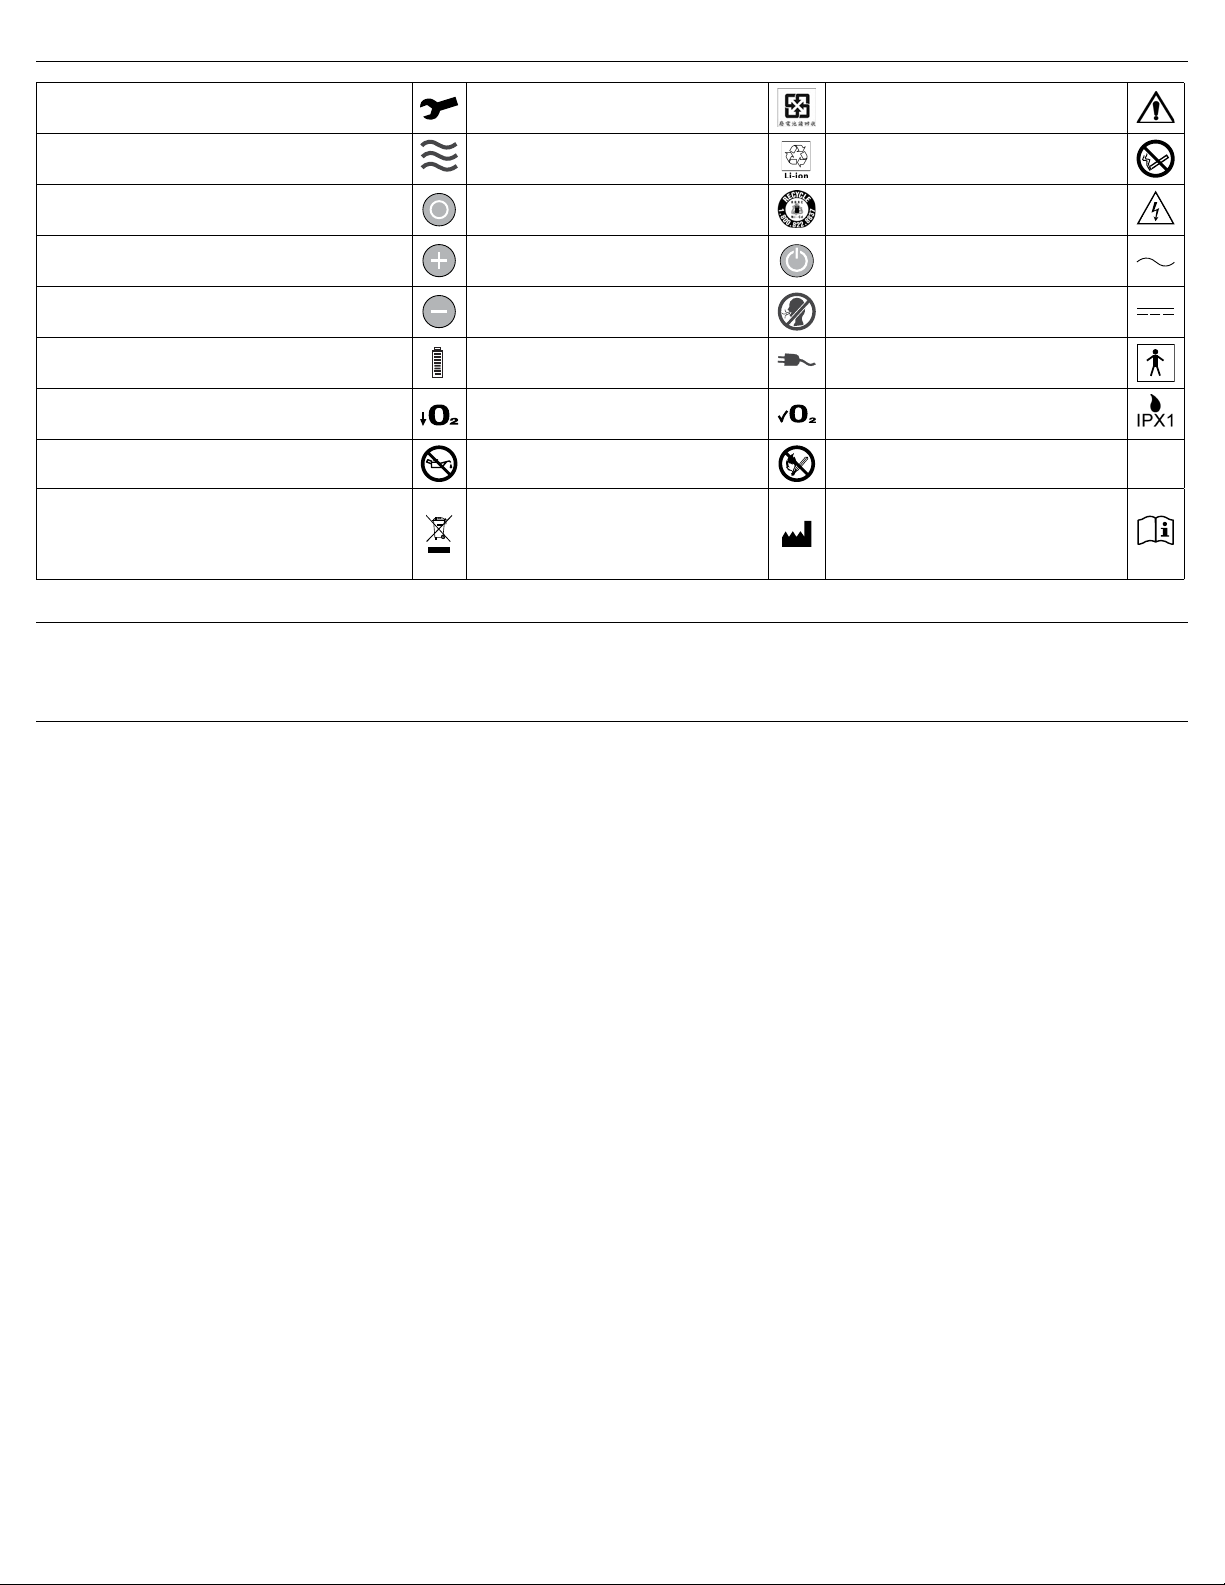
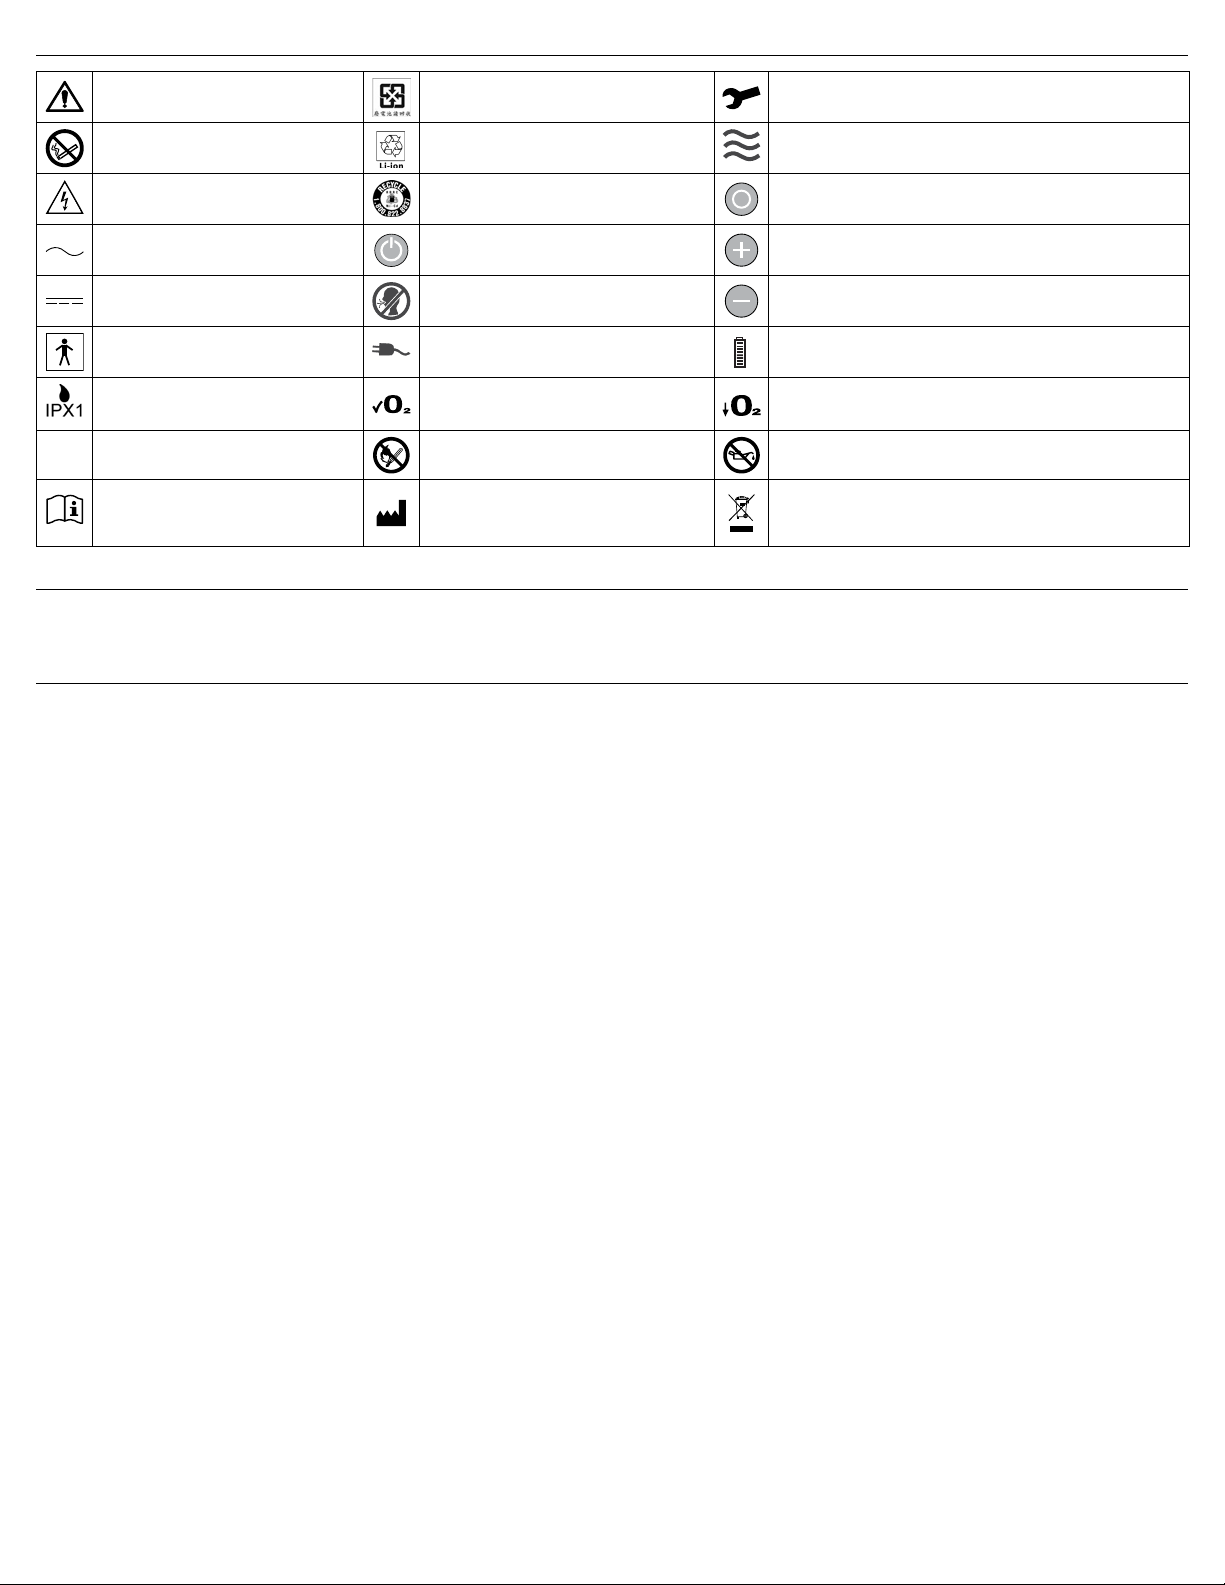
IEC SYMBOLS AND SYMBOL DEFINITIONS
Attention - Consult Instruction Guide WEEE Taiwan Service Required
Danger-No Smoking or Naked Flame Recyclable Li-ion Battery Flow Indicator
Electric Shock Hazard RBRC Recycle Mode Select (Continuous Flow/PulseDose) Button
Alternating Current Power Button Increase Flow Setting
Direct Current (DC Power) No Breath Detected in PD Mode with
audible alert Decrease Flow Setting
Type BF Equipment External Power Present Indicator (solid
light).PowerFailAlarm(ashinglight) Rechargeable Battery Status Symbol
Drip Proof Equipment IPX1 Normal Oxygen Low Oxygen
Non-protected (ordinary equipment) No Naked Flames Use no oil or grease
Follow instructions for use Manufacturer
The device contains electrical and/or electronic equipment
that must be recycled per EU Directive 2012/19/EU - Waste
Electrical and Electronic Equipment (WEEE)
INDICATIONS FOR USE
The Model 306 DeVilbiss iGo Portable Oxygen Concentrator System is indicated for the administration of supplemental oxygen. The device is not intended for life support, nor
does it provide any patient monitoring capabilities.
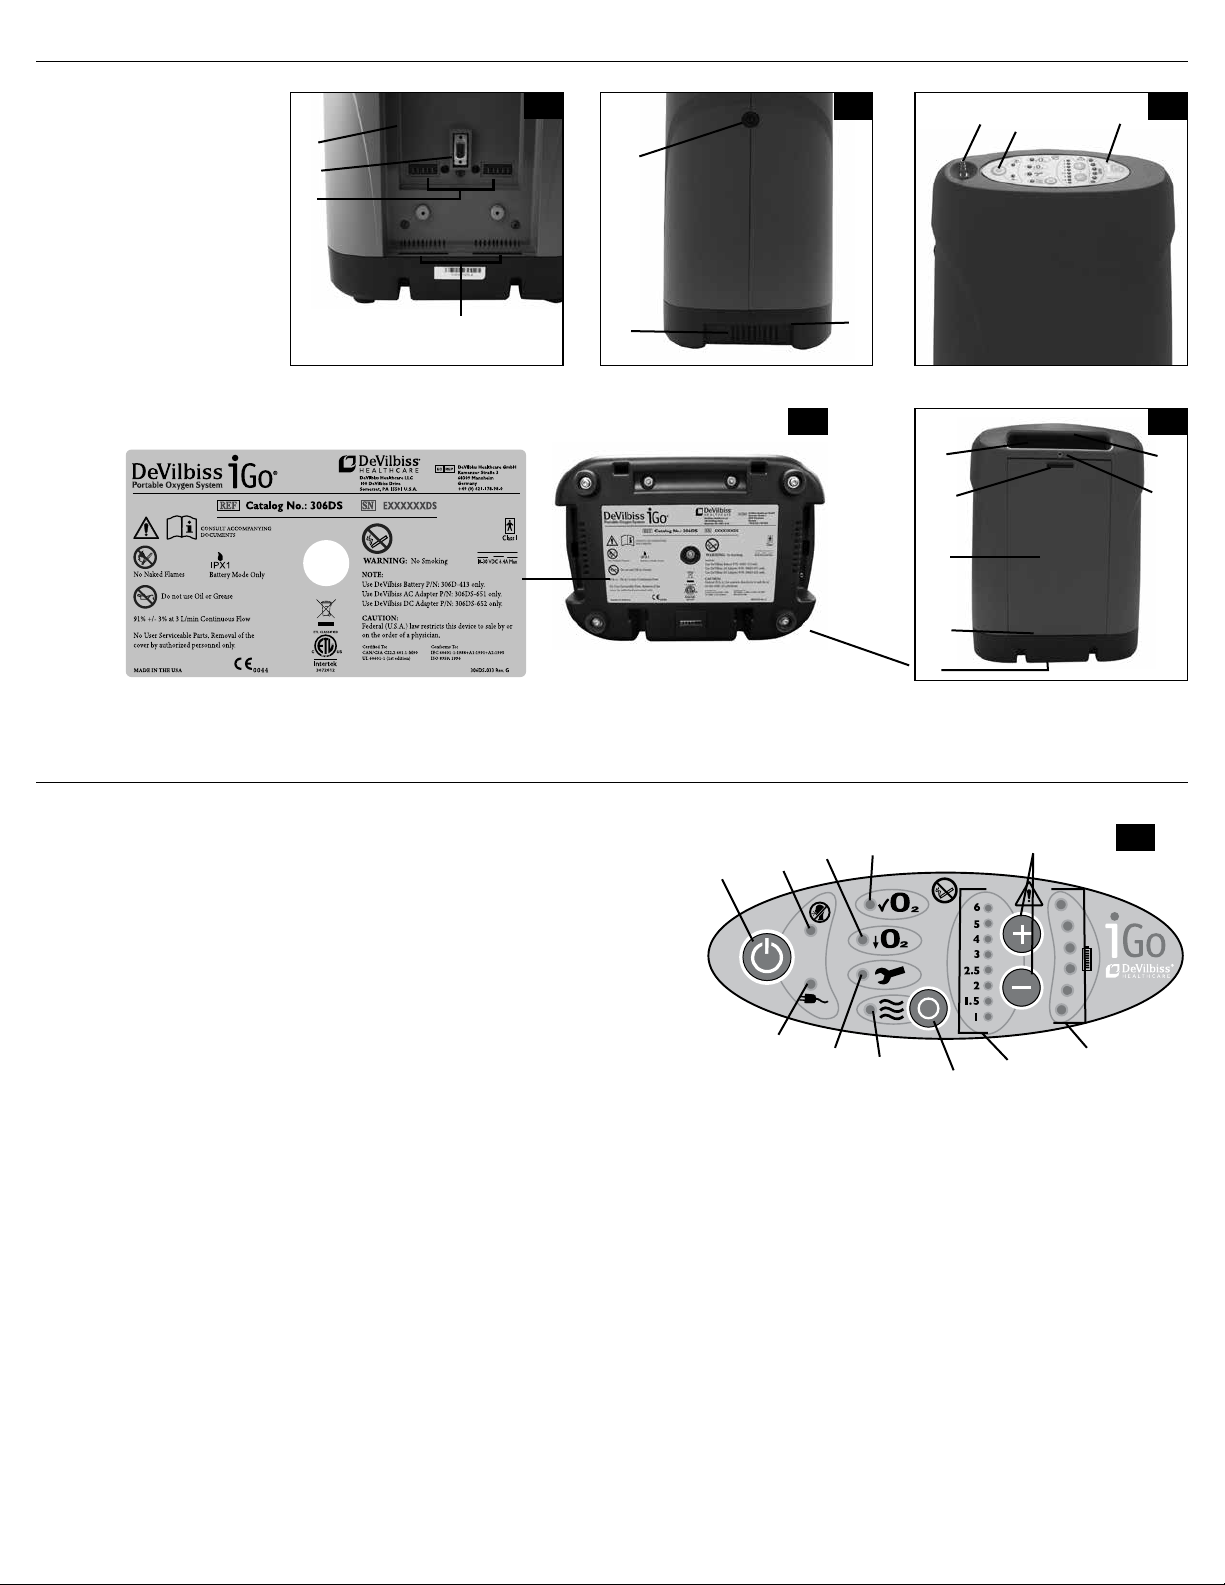
IMPORTANT PARTS (Page 2)
DeVilbiss iGo Portable Oxygen System (Fig. A-E)
1. Handle (one on top rear/two on bottom-sides)
2. Control Panel - Refer to iGo Control Panel below
3. Power Button - Press and hold the Power On/Off
Button to turn your unit on or off.
4. Oxygen Outlet - oxygen is dispersed through this
port.
5. Power Input - Connect either AC or DC power.
6. Communication Port - This port allows service
personnel to diagnose and monitor iGo
performance. It is not for patient use.
7. Air Filter
8. Rating Label (on bottom)
9. Exhaust Vents (on each side)
10. Cart Connection
11. Battery Bay
12. Slot in Battery Bay
13. Rechargeable Battery
14. Battery Tabs
15. Battery Latch
16. Battery Contacts
17. AC Adapter
18. DC Adapter
iGo Control Panel (Fig. 1)
1. Power Button - turns the system ON or OFF
2. NoBreathDetectedinPulseDoseModeLight--WhentheiGoisinPulseDosemodeanddoesn’tsenseanybreathingfor30seconds,alightashesandanaudiblealert
will beep every 3 seconds when this activates. If a breath is detected during the alert, the alert condition is cleared. If a breath is not detected during the alert, the unit
changes to Continuous Flow mode after 60 seconds of alerting. NOTE–OncetheunitchangestoContinuousFlow,usetheModeSelectButtontochangebackto
PulseDose.
3. External Power Present Light/Power Fail Alert
3a. External Power Present Light – Light illuminates when the iGo system is connected to either AC or DC power.
3b. PowerFailAlert–AudibleAlertsoundsinconjunctionwithashinglightfor15minuteswhenPowerFailAlertactivates.PressingthePowerButtonstopsthealert.
4. Oxygen Concentration Lights
4a. Green Normal Oxygen Light = Normal Operation, Acceptable Oxygen Level; illuminates when your iGo is operating properly.
4b. Yellow Low Oxygen Light = Operating Below an Acceptable Oxygen Level; illuminates when there is a problem with your unit. Refer to Troubleshooting for
instructions
4c. Red Service Required Light = Abnormal Operation/Malfunction, Concentration Below an Acceptable Oxygen Level. Illuminates with an audible alert when there is a
problem with your unit. Switch to your reserve oxygen system. Refer to Troubleshooting and/or call your DeVilbiss provider for instructions. Do not attempt any other
maintenance.
5. Mode Select Button and Flow Indicator Light
5a. Use Mode Select Button to select either PulseDose or Continuous Flow.
5b. Flow Indicator Light pulses with every breath when in PulseDose mode and illuminates continuously when in Continuous Flow mode
6. Green Flow Rate Setting Lights (1-6) and Flow Rate Setting Buttons
6a. YourproviderhassetyourprescribedowratesforbothPulseDoseandContinuousFlow.Donotchangethesesettingsunlessitisundertheorderofyour
physician.
6b. IncreaseFlowRateSettingButtonandDecreaseFlowRateSettingButton–usebuttonstoincreaseordecreaseyourowrateifachangeisorderedbyyour
physician.
7. Battery Status Gauge and Low Battery Alert – when a Battery is installed, this indicates the charge remaining in battery. All 6 lights illuminate Green when fully charged.
As battery becomes depleted, the top lights will go out. When battery gets to lowest operating level, the lowest light will turn Yellow, and one short, audible alert will
sound. The lights cycle when battery is being charged.

EN - 17A-306-AR
ACCESSORIES
WARNING
Certain oxygen accessories not specied for use with the iGo Portable Oxygen System may impair the performance. ONLY use recommended oxygen delivery
accessories. Only manufacturer approved power supply, cords, and adapters must be used with this product to ensure proper operation and safety.
Humidifier Kit includes Remote Stand and Elbow Adapter (only for use in Continuous Flow mode).......................................................................................................... 306DS-627
Elbow Humidifier Adapter Kit............................................................................................................................................................................................................................. 444-507
Bubble Humidifier ..........................................................................................................................................................................................................Salter Labs 7600 or equivalent
DeVilbiss Rechargeable Battery..................................................................................................................................................................................................................... 306D-413
Deluxe Rolling Carry Case........................................................................................................................................................................................................................... 306DS-635
Detachable Wheeled Cart ............................................................................................................................................................................................................................ 306DS-626
Air Filter........................................................................................................................................................................................................................................................ 306DS-611
DC Adapter................................................................................................................................................................................................................................................... 306DS-652
AC Adapter................................................................................................................................................................................................................................................... 306DS-651
AC Power Cords
USA Power Cord ....................................................................................................................................................................................................................................306DS-601
Continental Europe Power Cord............................................................................................................................................................................................................. 306DS-602
UK Power Cord.......................................................................................................................................................................................................................................306DS-603
Australia Power Cord..............................................................................................................................................................................................................................306DS-604
China Power Cord ..................................................................................................................................................................................................................................306DS-605
iGo Accessory Bag....................................................................................................................................................................................................................................... 306DS-655
iGo Battery Charger ............................................................................................................................................................................................................................................306CH
Therearemanytypesofhumidiers,oxygentubingandcannulas/masksthatcanbeusedwiththisdevice.Certainhumidiersandaccessoriesmayimpairthedevice’s
performance.Useonlystandardnasalcannulacapableofsupportingaminimumowrateof10LPMwithPulseDosedelivery.Donotusepediatric(low-ow)nasalcannulaor
maskwithPulseDosedelivery.Amaskoranynasalcannulacanbeusedwithcontinuousowdeliveryandmaybesizedaccordingtoyourprescriptionasrecommendedby
your homecare provider who should also give you advice on the proper usage, maintenance and cleaning.
NOTE–Theoxygensupplyaccessory(patienttubing)shallbeequippedwithameansthat,incaseofre,stopsthedeliveryofoxygentothepatient.Thismeansofprotection
shouldbelocatedasclosetothepatientaspracticableandnotadverselyaffectthedeliveryofoxygenduringnormaluseineithercontinuousoworPulseDosemodesof
operation.
SETTING UP YOUR IGO OXYGEN SYSTEM
DANGER
Keep the iGo at least 5 feet (1.6 m) from hot, sparking objects or open sources of ame. Do not locate near ammable materials or in the direct path of any heat
source, such as a heat register or car heater.
WARNING
Before moving or repositioning the iGo, always disconnect the power cord. Failure to do so may result in damage to the unit or personal injury.
1. DonotoperatetheiGoPortableOxygenSystemwithoutrstreadingtheImportantSafeguards.ObserveallWarningsandCautionsontheproductandintheinstruction
guide.
2. Position the iGo so that alerts can be heard.
3. Do not use in a closet or any small, enclosed space.
4. Routeoxygentubingsuchthatitdoesnotkinkandisnotsubjecttoocclusion.
5. If this is a new unit, or you have installed a New Battery, refer to Initial Battery Operation section on page EN-19.
6. Positionyourunitnearanelectricaloutletatleast6inches(16cm)fromwalls,draperiesoranyotherobjectsthatmightpreventtheproperowofairinandoutofyour
iGo. The iGo should be located so as to avoid pollutants or fumes and placed in a well-ventilated place so that the air inlet and exhaust are not blocked. Do not cover unit
with a blanket, towel, quilt or other covering, as the unit may overheat.
NOTE– DonotconnecttheiGotoanextensioncordortoanelectricaloutletcontrolledbyawallswitch.Nootherappliancesshouldbepluggedintothewalloutlet.
Before Operating Your iGo
1. AlwayschecktoseethattheAirFilterisclean.PropercleaningofthislterisdiscussedintheCaringforYouriGoSystemsection.
2. Check to be sure that the Exhaust Vents are not blocked.
3. Attach the appropriate accessories to the oxygen outlet.
Oxygen Tubing Connection:
a. Attach the tubing to the oxygen outlet. Make sure it is securely attached.
Oxygen Tubing Connection with Humidication:
NOTE–
A humidier can be used in Continuous Flow mode ONLY. Do not use a humidier when in PulseDose mode:
a. Attachtheelbowhumidieradapterdirectlytothehumidierbottle.Attachoxygentubing(50’max)totheelbowhumidieradapterandoxygenoutlet.Makesureit
issecurelytightened.Placethehumidierbottleonthehumidierstandandsecurethestandonasturdy,atsurfacenearthepatientwhereitwillbesafeandwill
notbeknockedover.Thehumidierbottlemustremainuprighttopreventwaterfromenteringthecannula.
4. Your physician has prescribed a nasal cannula. In most cases, they are already attached to the oxygen tubing. If not, follow the manufacturer’s instructions for
attachment.Attachthecannulatubing(7’max)directlytothehumidierbottle.
NOTE–UseonlystandardnasalcannulawheninPulseDosemode.Donotusepediatric(low-ow)nasalcannulawithPulseDosedelivery.Anynasalcannulacanbe
used with Continuous Flow mode.
5. For portable use, ensure fully charged battery is installed, and necessary accessories (e.g. AC or DC cords/adapters) are packed.
Selecting the iGo Power Source
The iGo is a lightweight, portable oxygen concentrator capable of being operated directly from three different power sources: (1) AC Power (2) DC Power or (3) Rechargeable
Battery.

EN - 18 A-306-AR
WARNING
Do not expose any power cords/adapters to water or other liquid spills or drips. Electric shock or serious injury may result.
Improper use of the power cords, plugs and/or adapters can cause a burn, re or electric shock hazard. Do not use any power cord/adapter that is damaged.
Do not operate device or accessories in standing water and do not submerse or expose to water. The iGo enclosure does not provide protection against the
harmful effects of liquid ingress. Electric shock or damage to the unit may result.
AC Operation
The iGo includes a universal AC Adapter which attaches to the AC Power Cord for use at home or where standard AC power is available. To use AC power:
1. Connect the AC Adapter by aligning the arrow on the plug locking ring with the white dot on the receptacle of the unit. Push until the locking ring twists slightly
counterclockwise then snaps back into alignment with the dot on the receptacle. To disconnect: grasp the plug, twist counterclockwise and pull. When properly
connected, a green indicator light on the AC Adapter will illuminate, and the External Power Present light will appear on the control panel.
2. Connect the AC Power Cord to the AC Adapter and to a grounded power outlet. Do not connect the iGo to an extension cord or to an electrical outlet controlled by a wall
switch. No other appliances should be plugged into the wall outlet.
NOTE–Usewithgrounded,3-pinreceptacle.DONOTremovegroundpinfromcord.UseonlywithDeVilbissapprovedcords.
NOTE–TheACPowerCordusedwiththeiGomustmeettherequirementsofthecountrywheretheproductisused.
DC Operation
Your iGo includes a DC Adapter that allows the system to operate from DC accessory power port outlets such as those found in motor vehicles.
1. Determine the Fuse rating in your motor vehicle. The rating must be 15 AMP or greater—-consult the Operator’s Manual for your vehicle or look at your fuse panel in the
vehicle.
2. Start your vehicle. NOTE–DONOTleavetheiGoorDCAdapterpluggedintothevehiclewithouttheenginerunningorattempttostartthevehiclewhiletheDCAdapter
is connected to the vehicle. This may drain the vehicle’s battery.
3. Insert the DC Adapter into the Power Input on the side of the iGo. Connect the adapter by aligning the arrow on the plug locking ring with the white dot on the receptacle
of the unit. Push until the locking ring twists slightly counterclockwise then snaps back into alignment with the dot on the receptacle. To disconnect: grasp the plug, twist
counterclockwise and pull.
4. Ensure the DC accessory power port is clean, and a good connection can be made. Insert the other end of the DC Adapter into the vehicle’s DC accessory power port.
When properly connected and receiving power from the DC source, a green indicator light on the DC Adapter and the External Power Present light on the control panel
will illuminate.
5. Secure the iGo and the DC Adapter in your vehicle and make sure the air inlet and exhaust vents are not blocked.
NOTE–ThebatterywillnotchargewhenconnectedtoaDCaccessorypowerport.
Battery Operation
WARNING
Electronics are static-sensitive and may be an electric shock hazard. When the battery is removed, do not touch the contacts in the Battery Bay or on the battery.
The communication port is also static-sensitive and should not be touched.
The iGo can also be powered by a Rechargeable Battery. If the battery is installed, and adequate power is available, the iGo will charge the battery any time AC power is
present, and the battery temperature is below a safe charging temperature. If external power is disconnected, the iGo will automatically switch over to the battery (if installed).
When external AC power is restored, the iGo will accept power from the external source and charge the battery.
Installing the Battery:InsertthebatterytabsintotheslotsintheBatteryBayandpushthebatteryuntilitissecureandushwiththebackofthesystem.Whenthebatteryis
properly installed and the iGo is On, the Battery Status Gauge will appear on the Control Panel. (If you DO NOT have a Battery installed, the Status Gauge will not light up).
Removing the Battery: Push down on the Battery latch. The Battery will tilt so that you can grasp it for removal. CAUTION–When the battery is removed, the Communication
Portisexposed.Donotattachanycablestothisport.Itisforserviceonly.TheBatteryContactsinsidethebayandonthebatteryarealsoexposedandshouldnotbe
touched.
Battery Capacity:ThecapacityoftheBatteryislituponthecontrolpanel.Avarietyoffactors,suchasbatteryage,owrateandPulseDoseorContinuousFlowMode
operation, determine the duration of operating time. The following table provides estimates of amount of time that a new, fully charged iGo Battery will operate.
Typical New Battery Operation Time
Setting Continuous Flow PulseDose (20 BPM)
1.0 4.0 hours 5.4 hours
2.0 2.4 hours 4.7 hours
3.0 1.6 hours 4.0 hours
4.0 — 3.5 hours
5.0 — 3.2 hours
6.0 — 3.0 hours
NOTE–Besuretocheckthebatterychargelevel before travel. Battery will discharge over time.
WARNING
Do not short circuit the Battery’s metal contacts with metallic objects such as keys or coins. It may cause sparks or excessive heat.
Do not tamper with, disassemble, puncture or crush the Battery. There are no serviceable parts inside the Battery. Do not open. Battery electrolytes may be toxic if
swallowed and can be harmful to skin and eyes. Keep the Battery away from children.
Exposing the Battery to water or other liquids may cause personal injury.
Replace the Battery with only approved DeVilbiss Rechargeable Battery. The iGo system can only work with a DeVilbiss Battery. Use of a damaged battery or a
non-approved Battery may damage the unit, present a risk of re or explosion, cause personal injury and void the warranty.
The Battery used in this device may present a risk of re or chemical burn if mistreated. DO NOT disassemble, incinerate or heat above 140°F (60°C) such as in a
vehicle parked in the sun or on a hot day.

EN - 19A-306-AR
Return your Battery to your provider for proper disposal.
CAUTION–DONOTdroptheBatteryorexposeittomechanicalshock.
CAUTION–Only use the Battery for its intended purpose.
NOTE–Operating time will degrade with Battery use and age.
NOTE–Store your Battery in a cool, dry location when not in use to help assure the longevity of your Battery.
NOTE–Charging the Battery below 50°F (10°C) or above 104°F (40°C) may degrade the performance. The Battery will not charge above 45°C.
NOTE–Fully recharge battery after each use.
NOTE–Unit run time will also be reduced by letting the battery sit at a discharged state.
STORAGE NOTE–Battery should be charged at least once every 3 months.
Initial Battery Operation
ThenewbatterypackagedwithyouriGoPortableOxygenSystemisnotfullycharged.BeforeusingyouriGoforthersttime,youmustinstallandfullydischargethenfully
charge the battery.
1. Using battery power only, operate the iGo until the battery is fully drained. The unit will turn off and the power failure alarm will sound.
2. Connect the AC Power Cord and plug in to completely charge the battery. This may require up to 4.5 hours of uninterrupted charging.
In the event of a power interruption, the iGo Portable Oxygen System will automatically switch to the battery operation if installed. When AC power is restored, the battery will
automatically start recharging. If the battery is not present during a power interruption, the Power Fail alert will activate, and the iGo will stop operation. When power is
restored, unit will resume oxygen production unless the Power Button was pressed to stop the Power Fail Alert.
Typical Battery Recharge Time
Thetypicaltimetorechargeyourbatteryfromafullydischargedconditionis2.0hoursto4.5hoursdependentupontheowsetting.IftheBatteryistoowarm,chargingwill
notbeginuntilitsufcientlycools.Extremetemperature(highorlow)mayextendchargetime.
OPERATING YOUR IGO
WARNING
Do not leave iGo running when not in use. Do not leave cannula unattended while unit is delivering oxygen. High concentrations of oxygen can cause rapid
burning. Keep the equipment in a well-ventilated area.
1. Checktoseeiftheairlterisinplacebeforeusing.Iftheairlterneedstobecleaned,washwithsoapywaterandallowtodrybeforeusing.Ifnecessary,replacewitha
newairlter.
2. Plug unit into AC Power, DC Power or make sure there is a charged Battery installed.
NOTE–Everytimeabuttonispressedorwhenachangetothepowersourceoccurs,theiGowillgiveashort,audiblechirp.
3. Connect the tubing to the oxygen outlet and the cannula.
DANGER
If tubing becomes disconnected during operation, iGo does not alert. Check ow at the cannula to verify oxygen delivery.
4. Attach a standard nasal cannula to the oxygen outlet and to your nose and face. Breathe normally through the cannula.
CAUTION–Toensurethereisadequateowtodeliveroxygen,thelengthofthetubingmustnotexceed50feet(15.2m)whenusingContinuousFlowModeandmustnot
exceed35feet(10.5m)whenoperatinginPulseDoseModeforadequatebreathdetection.
5. PressandholdthePowerButtontoturnyouriGoOn.WhentheunitisturnedOn,allthelightsonthecontrolpanelwillilluminatebriey,andanaudiblealertwillbriey
activate.
a. When using External Power:
1) In PulseDose mode: After a few seconds, the External Power, Normal Oxygen and Flow Rate lights will remain lit. The Flow Indicator Light will pulse with each
breath. If a battery is installed, the Battery Status Lights will either illuminate to indicate battery charge level or cycle to indicate battery is charging.
2) In Continuous Flow mode: After a few seconds, the External Power, Normal Oxygen, Flow Indicator and Flow Rate lights will remain lit. If a battery is installed,
the Battery Status Lights will either illuminate to indicate battery charge level or cycle to indicate battery is charging.
b. When using Battery Power:
1) In PulseDose mode: After a few seconds, the Normal Oxygen and Flow Rate lights will remain lit. The Battery Status Gauge Lights will also be lit indicating
battery charge level. The Flow Indicator Light will pulse with each breath.
2) In Continuous Flow mode: After a few seconds, the Normal Oxygen, Flow Rate and Flow Indicator lights will remain lit. The Battery Status Gauge Lights will
also be lit indicating battery charge level.
NOTE–TheDeVilbissiGohasanoxygensensingdevice(OSD®)tomonitoroxygenpurityoncetheoxygenstabilizationprocessiscomplete(afterapproximatelytherst
20minutesofoperation).Oncestabilized,theOSDmonitorstheoxygenpurityandwillalertifpurityfallsbelowanacceptablelevel.
6. TochangeyourDeliveryMode,presstheModeSelectbutton.TheiGowillcomeonatthelastmodeandowsettingused.
a. ContinuousFlowOperation-WhenoperatinginContinuousFlowMode,acontinuoussupplyofoxygenwillowthroughyourtubingandnasalcannula.
b. PulseDose Operation - When operating in PulseDose mode, an alert will beep after 30 seconds if a breath is not detected. If another 60 seconds elapses, and no
breath is detected, the unit will switch to Continuous Flow at the last Continuous Flow setting used.
NOTE–PulseDosedramaticallyextendstheusetimeoftheiGoPortableOxygenSystemtoofferincreasedmobilitywithimprovedcomfortandincreasedefciency.Many
usersndPulseDoseoxygendeliverymorecomfortablethancontinuousowdeliverysystems.
WARNING
PulseDose Flow settings should be determined for each patient individually. Settings from Continuous Flow applications may not be applicable to PulseDose
Mode.
As with conserving devices, the iGo may not be able to detect some respiratory efforts in PulseDose mode.
CAUTION–Donotusewithotherequipment(i.e.humidier,nebulizer,etc.)wheninPulseDosedeliverymode.TheiGowillnotdetectabreathandwilldefaulttoContinuous
Flow.
NOTE–Apediatricorlow-owcannulashouldnotbeusedinPulseDosedeliverymode.Thereduceddiameterofthecannulacausestoomuchbackpressureandwillaffect
the oxygen volume delivered.
NOTE–PulseDosedeliversoxygeninaveryshort“puff.”Itdoesnotdeliveroxygencontinuously.ThelengthoftimethatPulseDosedeliversoxygenwillnotvaryfrombreathto

EN - 20 A-306-AR
breath. The time is set in correlation to the patient’s prescription setting.
NOTE–YouwillgetlongeroperatingtimeonyourBatteryifyouoperateyouriGoinPulseDosemode.
7. ChecktheFlowRatetomakesureitissettoyourprescriptionsetting.Ifadjustmentisneeded,usetheFlowRateSettingbuttonstoadjusttheowratetothesetting
prescribed by your physician. NOTE– YourDeVilbissprovidermayhavesettheowsothatitcannotbeadjusted.
WARNING
Under certain circumstances, oxygen therapy can be hazardous. Seeking medical advice before using an oxygen concentrator is advisable. It is very important to
follow your oxygen prescription. Do not increase or decrease the ow of oxygen - consult your physician.
8. WhenyouhavenishedusingtheiGo,pressandholdthePowerButtontoturnOff.StoretheiGoinacool,drylocationwhennotinuse.
TRAVEL
The iGo has two options for portability. Both are for use on pedestrian surfaces:
Rolling Carry Case
1. Place the iGo in the carry case.
2. Thecarrycasehasanopeningforthecannulaandoneforexternalpowerconnections.Italsohasseveralscreenedopeningsforairow.Neverblocktheairopenings.
Do not use a carry case other than one approved by DeVilbiss.
3. Toadjustthehandleheighteitherpulluponthehandleand/orpressthebuttonandpushdownonthehandle.
CAUTION–TheiGoshouldbetakenasacarry-onitemiftravelingbyair.IfyouarecheckingtheiGoasluggage,itmustbepackedinaprotectivecase.TheRolling
CarryCasedoesnotprovideadequateprotectionifcheckingtheiGo.
Detachable Wheeled Cart
1. Align the locator holes on the bottom of the unit to the tabs on the cart.
2. Align the screw to the insert on the back of the iGo and hand-tighten the knob on the cart.
3. Pushthebuttononthecarthandletoadjusttheheight.
CAUTION–WhentransportingtheiGo,careshouldbetakentoavoidexcessiveshock.
NOTE–Beforestartingatrip,checkwithyourDeVilbissproviderforoptions(e.g.extrabattery/ACCordforuseatdestination).RefertoAccessoriesforappropriatecord.
RESERVE OXYGEN SYSTEM
As a precaution, your DeVilbiss provider may supply you with a reserve oxygen system. If your unit loses electrical power or fails to operate correctly, the Patient Alert System
will sound to signal you to switch to your reserve oxygen system (if provided). Contact your DeVilbiss provider.
WARNING
Availability of an alternate source of oxygen is recommended in case of power outage or mechanical failure. Consult your physician for the type of back-up
system required. Do not ignore alerts.
TROUBLESHOOTING
The following troubleshooting chart will help you analyze and correct minor iGo malfunctions. If the suggested procedures do not help, switch to your reserve oxygen system
and call your DeVilbiss homecare provider. Do not attempt any other maintenance.
WARNING
To avoid electric shock hazard, do not remove the covers. There are no user-serviceable internal components. The covers should only be removed by a qualied
DeVilbiss provider/DeVilbiss homecare technician.
SYMPTOM POSSIBLE CAUSE REMEDY
Unit does not operate. No lights are
illuminated and nothing happens when power
button is pressed and held for 1 second.
1. Power button was not held. 1. Press Power button and hold for 1 second.
2. No External Power and no charged battery installed. 2. Plug into external power or install charged battery.
3. Unit malfunction. 3. Contact your DeVilbiss provider.
Unit does not operate. External Power Light
asheswithaudiblealert.PowerFailAlertis
activated.
1. AC power cord not properly inserted into wall outlet
or DC adapter not attached.
1. Check power cord connection at the wall outlet and adapter connection to
unit.
2. Charged battery not installed or defective battery. 2. Install charged battery or contact your provider for a replacement battery.
3. No power at wall outlet. 3. Check your home circuit breaker and reset if necessary. Use a different wall
outlet if the situation occurs again.
4. Faulty AC Adapter. 4. Contact your DeVilbiss provider.
5. Faulty DC accessory power port outlet. 5. Check automotive fuse.
6. Faulty DC Adapter. 6. Contact your DeVilbiss provider.
NoBreathDetectedlightashingandaudible
alert sounding (PulseDose Mode only).
Unit set up for PulseDose mode but changed
to Continuous Flow because no breath was
detected.
1. Obstructed cannula or oxygen tubing. 1.Detachcannula.Ifproperowisrestored,cleanorreplaceifnecessary.
Disconnecttheoxygentubingattheoxygenoutlet.Ifproperowisrestored,
check oxygen tubing for obstructions or kinks. Replace if necessary.
2.Cannulaisnotadjustedproperly. 2.Checkallcannulaconnectionstomakesuretheyaretight,andadjustthe
cannulatotcomfortablyinyournose.Ensuretubingisnotkinked.
3. Tubing/cannula too long. 3. Replace with shorter tubing/cannula.
4.Humidierattached. 4.Removehumidier.
5.Lowowcannulabeingused. 5. Replace with standard cannula.
6. Atmospheric Pressure Port obstructed. 6. Remove obstruction.
7. Patient not candidate for PulseDose delivery.
NOTE-UnitwillautomaticallychangetoCFModeif
this condition is not corrected.
7. Use CF delivery for patients that fail to trigger equipment (e.g. mouth
breather with closed soft palate.)
Table of contents
Languages:
Other DeVilbiss Healthcare Oxygen Equipment manuals


Popular Oxygen Equipment manuals by other brands

Invacare
Invacare Platinum IRC9LXO2AWQ user manual

Precision Medical
Precision Medical 1900 Series Setting up

laerdal
laerdal Upright user guide

Seahorse
Seahorse XF96 Installation and operation manual

ResMed
ResMed VPAP AUTO 25 user guide

Precision Medical
Precision Medical EasyPulse PM4150 Series user manual


