DI BLASI R32 Installation guide

GB
D
NL
I
F
E
R
Mod. R32
patented
www.diblasi.it
TRICICLO PIEGHEVOLE
Istruzioni per l’uso
TRICYCLE PLIANT
Manuel d’utilisation
TRICICLO PLEGABLE
Instrucciones para el uso
FOLDING TRICYCLE
Operation and maintenance
KLAPPBARES DREIRAD
Gebrauchsanleitung
VOUWDRIEWIELER
Gebruiksaanwijzing

I F E
ADVERTENCIA
Antes de conducir el triciclo DI BLASI, efectuar
los controles de seguridad pre-escritos en este
manual.
Este triciclo no puede ser utilizado en recorridos
de terracería, para carreras, para transportar
mercancía, etc.: éste puede ser utilizado solo
como un normal triciclo de paseo.
NORMAS DE PRUDENCIA
* Respetar escrupulosamente el código del
tránsito y las normas de prudencia.
*Reducir la velocidad en las calles en bajada
o con asfalto arruinado.
* Evitar maneobras bruscas o azardadas.
*Tener cuidado con los vehículos motorizados.
* Tener presente que en carretera mojada la
distancia de frenada aumenta
consideradamente.
* No usarlo en la nieve o en el hielo.
* Permitir a los niños de ir en el triciclo sólo
si tienen una edad adecuada y sólo después
de que un adulto ha efectuado los controles
necesarios de seguridad.
*El triciclo lo puede llevar sólo una persona.
AVVERTENZA
Prima di condurre il triciclo DI BLASI, effettuare
i controlli di sicurezza prescritti in questo
manuale.
Questo triciclo non può essere utilizzato su
percorsi fuori strada, per corse, per trasporto
merci, ecc.: esso può essere utilizzate solo come
normale triciclo da passeggio.
NORME DI PRUDENZA
* Rispettare scrupolosamente il codice della
strada e le norme di prudenza.
* Ridurre la velocità nelle strade in discesa o
con fondo sconnesso.
* Evitare manovre brusche o azzardate.
* Fare attenzione ai veicoli motorizzati
* Tenere presente che su strada bagnata la
distanza di frenata aumenta considere-
volmente.
* Non andare sulla neve o su ghiaccio.
* Permettere ai bambini di andare sul triciclo
solo se hanno un’età adeguata e solo dopo
che un adulto ha effettuato i necessari
controlli di sicurezza.
* Il triciclo può portare solo una persona
CONSEILS D’UTILISATION
Avant de conduire le tricycle DI BLASI, effectuez
les contrôles de sécurité prescrits dans ce Manuel
d’Utilisation et tenez compte qu’il ne doit pas
être utilisé sur parcours non routiers, ou comme
tricycle de course, ou pour des transports lourds:
il peut être utilisé seulement comme un tricycle
de tourisme normale.
NORMES DE PRUDENCE
* Respectez scrupuleusement le code de la
route et les notions de prudence.
* Réduisez la vitesse en descente ou si le
revêtement routier n’est pas en bon état.
*Evitez les manoeuvres précipitées et brutales.
* Faire attention aux véhicules motorisés.
*Faire attention que si la chaussée est mouillée
ou polluée les distances de freinage peuvent
augmenter de façon considérable.
* Ne roulez pas sur la neige ni sur le verglas.
*Ne laissez pas les enfants partir sans contrôler
le bon état du tricycle et sans avoir effectué
les contrôles de sécurité.
* Le tricycle peut transporter seulement une
personne

GB D NL
HINWEIS
Bevor Sie das DI BLASI Dreirad verwenden,
müssen Sie die in diesem Handbuch
vorgeschriebenen Sicherheitskontrollen
durchführen.
Dieses Dreirad darf nicht für Geländestrecken,
Rennen, Gütertransport usw., sondern nur als
normales Dreirad zum Spazieren fahren
verwendet werden.
VORSICHTSANWEISUNGEN
* Die Straßenverkehrordnung und
Vorsichtsanweisungen genauestens einhalten.
* Auf Straßen mit Gefällen oder unebenem
Untergrund die Geschwindigkeit reduzieren.
* Keine plötzlichen oder riskanten Manöver
ausführen.
* Die Fahrzeuge mit Motor beachten.
*Beachten Sie, dass auf der nassen Straße der
Bremsweg viel länger ist.
* Nicht mit dem Dreirad auf Schnee oder Eis
fahren.
* Kinder dürfen das Dreirad nur verwenden,
wenn sie alt genug sind und nachdem ein
Erwachsener die erforderlichen
Sicherheitskontrollen ausgeführt hat.
*Das Dreirad kann nur eine Person befördern.
WAARSCHUWING
Voer de veiligheidscontroles die in deze
handleiding staan beschreven uit voordat u met
de DI BLASI driewieler gaat rijden.
Deze driewieler is niet geschikt voor terreinrijden,
wielrennen, goederentransport, enz.: de driewieler
is alleen bedoeld voor gebruik als normale
toerfiets.
VEILIGHEIDSVOORSCHRIFTEN
* Houd u aan de verkeersregels en de
veiligheidsvoorschriften.
*Verminder uw snelheid op aflopende wegen
of op wegen met een slecht wegdek.
* Vermijd plotselinge of gevaarlijke
manoeuvres.
* Let goed op gemotoriseerde voertuigen.
* Denk eraan dat op natte wegen de remweg
aanzienlijk langer is.
* Rijd niet op sneeuw of ijs.
*Laat kinderen alleen op de driewieler rijden
als ze daar de leeftijd voor hebben en nadat
een volwassene de benodigde
veiligheidscontroles heeft uitgevoerd.
* De driewieler is geschikt voor het dragen
van slechts één persoon
IMPORTANT NOTICES
Before riding the DI BLASI tricycle, carry out all
the safety checks prescribed in this manual.
This tricycle must not be used as an off road, or
as a racing or as a carrier tricycle: it can be used
only as a normal touring tricycle.
RIDING RULES
* Obey all traffic signals and regulations and
ride with caution.
* Reduce the speed in downhill or bad roads
*Avoid abrupt manoeuvring and zig zag. riding
* Be on guard for all motorized vehicles.
*Pay attention that if the road is wet the braking
distance can increase considerably
* Do not ride on snow or on gravel road.
*Allow the children to ride the tricycle only if
they are grown-up enough and only after that
an adult carried out the safety checks.
*The tricycle is built only for one rider, never
ride two.

I F E
INDICE
Aprire il triciclo 2
Cambio di velocità: modalità d’uso 4.4
Cambio di velocità: regolazione 5.5
Campanello 5.9
Cannotti sella: regolazione gancio 5.3.2
Caratteristiche tecniche 1
Deragliatore: regolazioni 5.5
Freni: modalità d’impiego 4.3
Freni: regolazioni e manutenzione 5.6
Gancio cannotti sella: regolazioni 5.3.2
Gancio manubrio: regolazioni 5.1
Guarnitura: regolazioni 5.8
Luci 4.5
Manubrio: regolazione gancio 5.1
Manutenzione 6
Modalità d’uso 4
Pedali 4.2
Pneumatici: pressione 5.4
Ripiegare il triciclo 3
Ruote: regolazioni cuscinetti 5.7
Sellino: regolazione altezza 5.3.1
Trasmissione: regolazioni 5.5
Regolazioni 5
INDEX
Caractéristiques techniques 1
Changement de vitesse: mode d’emploi 4.4
Changement de vitesse: réglages 5.5
Colonnes de selle : réglages crochet 5.3.2
Conduite 4
Crochet de la colonne de selle: réglages 5.3.2
Crochet du guidon: réglages 5.1
Déplier le tricycle 2
Dérailleur : réglages 5.5
Eclairage 4.5
Entretien 6
Freins: mode d’emploi 4.3
Freins: réglages et entretien 5.6
Guidon: crochet 5.1
Instructions de marche 4
Pédales 4.2
Pédalier: réglages 5.8
Plier le tricycle 3
Pneus: gonflage 5.4
Réglages 5
Roues: réglage des roulements 5.7
Selle: réglage de la hauteur 5.3.1
Sonnette 5.9
INDICE
Ajuste de la altura del sillín 5.3.1
Antes de montar en el triciclo 4.1
Cada tres meses 6.2
Cambio de velocidad 4.4
Características técnicas 1
Consideraciones preliminares 4.1.1
Controles de seguridad 4.1.2
Frenos 4.3
Gancho del manillar 5.1
Hinchado de los neumáticos 5.4
Instrucciones de uso 4
Luci 4.5
Mantenimiento 6
Mensual 6.1
Para desplegar el triciclo 2
Para replegar el triciclo 3
Pedales 4.2
Regulaciones 5
Regulación del sillín 5.3
Regulación del gancho de
los tubos porta-sillín (tijas) 5.3.2
Regulaciones del cambio de velocidad 5.5
Regulación de los frenos 5.6
Regulación de las ruedas 5.7
Regulación del plato 5.8
Timbre 5.9

GB D NL
INDEX
Adjustments 5
Approach the tricycle 4.1
Bell 5.9
Brake adjustments and maintenance 5.6
Brake operation 4.3
Crankset adjustment 5.8
Derailleur adjustment 5.5
Folding the tricycle 3
Gear ratio adjustments 5.5
Gear ratio operation 4.4
Handlebar hook adjustments 5.1
Hook: handlebar hook adjustments 5.1
Hook: seat post hook adjustments 5.3.2
Lighting 4.5
Maintenance 6
Operations 4
Pedals 4.2
Seat height adjustment 5.3.1
Seat posts: hook adjustments 5.3.2
Technical specifications 1
Tyre pressure 5.4
Unfolding the tricycle 2
Wheel bearings adjustment 5.7
INHALTSVERZEICHNIS
Antrieb: Einstellungen 5.5
Aufklappen des Dreirads 2
Bremsen: Benutzung 4.3
Bremsen: Einstellungen und Wartung 5.6
Beschlag: Einstellungen 5.8
Einstellungen 5
Gangschaltung: Benutzung 4.4
Gangschaltung: Einstellung 5.5
Gebrauchsanweisung 4
Kettenschaltung: Einstellung 5.5
Klingel 5.9
Lampen 4.5
Lenkstangengelenk: Einstellung 5.2
Lenkstange: Hakeneinstellung 5.1
Lenkstangenhaken: Einstellungen 5.1
Pedale 4.2
Räder: Lagereinstellung 5.7
Reifen: Druck 5.4
Sattelstangen:
Einstellung des Arretierhakens 5.3.2
Sitz: Höhenverstellung 5.3
Technische Daten 1
Wartung 6
Zusammenklappen des Dreirads 3
INHOUD
Aandrijving: afstellingen 5.5
Banden: druk 5.4
Bel 5.9
Borghaak stuur: afstellingen 5.1
Borghaak zadelstangen: afstellingen 5.3.2
De driewieler openen 2
De driewieler opvouwen 3
Derailleur: afstellingen 5.5
Gebruiksaanwijzing 4
Instellingen 5
Kettingset: afstellingen 5.8
Onderhoud 6
Pedalen 4.2
Remmen: afstellingen en onderhoud 5.6
Remmen: gebruiksaanwijzing 4.3
Stuur: afstelling borghaak 5.1
Technische kenmerken 1
Verlichting 4.5
Versnelling: afstelling 5.5
Versnelling: gebruiksaanwijzing 4.4
Wielen: afstellingen lagers 5.7
Zadel: afstelling hoogte 5.3.1
Zadelstangen: afstelling borghaak 5.3.2

I F E
1. CARATTERISTICHE TECNICHE 1. CARACTERISTIQUES TECNIQUES 1. CARACTERÍSTICAS TÉCNICAS
* Versioni:
• Standard
• Junior
* Dimensioni
• Ripiegato: cm 68x28x62,5 (h)
• Aperto:
- Passo: 100 cm
- Carreggiata: 66 cm
* Peso: 21,4 kg circa
* Pneumatici: 20 x 1.35
*Ruote con raggi inox e cerchi in lega leggera
* Guarnitura
• standard: 42 denti – 170 mm
• junior: 40 denti – 150 mm
* Trasmissione: a catena con deragliatore e
ruota libera a 5 pignoni (14/28)
* Freni:
• Due freni anteriore a V indipendenti
• Dispositivo di parcheggio operante su uno
dei due freni
* Regolazione altezza sellino
• Versione Standard: 3 posizioni
- Altezza dal suolo:
81 – 85,5 – 90 (cm)
- Altezza dal pedale nella posizione
più bassa:
75 – 79,5 – 84 (cm)
• Versione Junior: 2 posizioni
- Altezza dal suolo:
77,5 – 82 (cm)
- Altezza dal pedale nella posizione
più bassa:
69,5 – 74 (cm)
* Carico massimo: 100 kg
* Portapacchi posteriore (accessorio):
• Dimensioni: 28 x 20 (cm)
• Carico massimo: 10 kg
* Versions:
• Standard
• Junior
* Dimensions
• Plié: cm 68x28x62,5 (h)
• Déplié:
- Empattement: 100 cm
- Voie: 66 cm
* Poids: 21,4 kg environ
* Pneus: 20 x 1.35
*Roues: rayons inox et jantes en alliage léger
* Pédalier
• Version standard: 42 dents – 170 mm
• Version Junior: 40 dents – 150 mm
* Transmission: par chaine avec dérailleur
et roue libre a 5 pignons (14/28)
* Freins:
• Deux freins à V indépendants sur la
roue avant
• Dispositif de parking agissant sur un
des deux freins.
* Réglage en hauteur de la selle
• Version Standard: 3 positions.
- Hauteur du sol:
81 – 85,5 – 90 (cm)
- Hauteur de la pédale plus basse:
75 – 79,5 – 84 (cm)
• Version Junior: 2 positions.
- Hauteur du sol:
77,5 – 82 (cm)
- Hauteur de la pédale plus basse:
69,5 – 74 (cm)
* Charge maximum: 100 kg
* Porte bagage arrière (accessoire)
• Dimensions: 28 x 20 (cm)
• Charge maximum: 10 kg
* Versiones:
• Estándar
• Júnior
* Dimensiones
• Plegado: 68 x 28 x 62,5 (h) cm.
• Desplegado:
- Distancia entre ejes: 100 cm.
- Carrilera (ancho): 66 cm.
* Peso: 21,4 Kg. aprox.
* Neumáticos: 20 x 1,35
* Ruedas con radios de acero inoxidable y
llantas de aleación ligera
* Pedalier
• Estándar: 42 dientes – 170 mm.
• Júnior: 40 dientes – 150 mm.
* Transmisión: por medio de cadena con
desviador, rueda libre de 5 piñones (14/28)
* Frenos:
• Dos frenos anteriores en V, independientes
• Dispositivo de aparcamiento con acción
sobre uno de los dos frenos
* Regulación de la altura del sillín
• Versión Estándar: 3 posiciones
- Altura desde el suelo:
81 – 85,5 – 90 (cm.)
- Altura desde el pedal en su posición
inferior:
75 – 79,5 – 84 (cm.)
• Versión Júnior: 2 posiciones
- Altura desde el suelo:
77,5 – 82 (cm.)
- Altura desde el pedal en su posición
inferior:
69,5 – 74 (cm.)
* Carga máxima: 100 Kg.
* Cesta portaobjetos posterior (accesorio):
• Dimensiones: 28 x 20 (cm.)
• Carga máxima: 10 Kg.

GB D NL
1. TECHNISCHE DATEN 1. TECHNISCHE KENMERKEN1. SPECIFICATIONS
* Versions:
• Standard
• Junior
* Dimensions
• Folded: cm 68x28x62,5 (h)
• Unfolded:
- Wheelbase: 100 cm
- Track: 66 cm
* Weight: 21,4 kg approx
* Tyres: 20 x 1.35
* Wheels: stainless steel spokes and light
alloy rims
* Chainset
• Standard version: 42 teeth – 170 mm
• Junior version: 40 teeth – 150 mm
* Chain drive with index derailleur and 5
sprockets freewheel (14/28)
* Brakes:
• Two independent V-brakes on the front
wheel
• Parking device acting on one of the two
brakes.
* Seat height adjustment.
• Standard version : 3 positions.
- Height from the ground:
81 – 85,5 – 90 (cm)
- Height from the pedal in the lowest
position:
75 – 79,5 – 84 (cm)
• Junior version: 2 positions.
- Height from the ground:
77,5 – 82 (cm)
- Height from the pedal in the lowest
position:
69,5 – 74 (cm)
* Max load: 100 kg
* Rear carrier (accessory):
• Dimensions: 28 x 20 (cm)
• Max load: 10 kg.
* Ausführungen
• Standard
• Junior
* Abmessungen
• Zusammengeklappt: cm 68x28x62,5 (h)
• Offen:
- Radstand: 100 cm
- Spurweite: 66 cm
* Gewicht: etwa 21,4 kg
* Reifen: 20 x 1.35
* Räder mit Edelstahlspeichen und
Leichtmetallfelgen
* Beschlag
• Standard: 42 Zähne – 170 mm
• Junior: 40 Zähne – 150 mm
*Antrieb: Kettenantrieb mit Kettenschaltung
und Freilauf mit 5 Ritzeln (14/28)
* Bremsen:
• Zwei unabhängige vordere
Innenbackenbremsen
• Parkvorrichtung mit Einwirkung auf eine
der beiden Bremsen
* Einstellung der Sattelhöhe
• Standardausführung: 3 Stellungen
- Höhe vom Boden:
81 – 85,5 – 90 (cm)
- Höhe vom Pedal in der niedrigsten
Stellung:
75 – 79,5 – 84 (cm)
• Juniorausführung: 2 Stellungen
- Höhe vom Boden:
77,5 – 82 (cm)
- Höhe vom Pedal in der niedrigsten
Stellung:
69,5 – 74 (cm)
* Höchstbelastung: 100 kg
* Gepäckträger hinten (Zubehör):
• Abmessungen: 28 x 20 (cm)
• Höchstbelastung: 10 kg.
* Uitvoeringen:
• Standaard
• Junior
* Afmetingen
• Opgevouwen: cm 68x28x62,5 (h)
• Geopend:
- Wielbasis: 100 cm
- Spoorbreedte: 66 cm
* Gewicht: circa 21,4 kg
* Luchtbanden: 20 x 1.35
*Wielen met roestvrij stalen spaken en velgen
van lichtmetaallegering
* Kettingset
• standaard: 42 tanden – 170 mm
• junior: 40 tanden – 150 mm
* Aandrijving: via ketting met derailleur en
freewheel met 5 versnellingen (14/28)
* Remmen:
• Twee onafhankelijke V-remmen op voorwiel
• Parkeerrem op één van de twee remmen
* Hoogteinstelling zadel
• Standaarduitvoering: 3 standen
- Hoogte vanaf de grond:
81 – 85,5 – 90 (cm)
- Hoogte vanaf het pedaal in de laagste
stand:
75 – 79,5 – 84 (cm)
• Junioruitvoering: 2 standen
- Hoogte vanaf de grond:
77,5 – 82 (cm)
- Hoogte vanaf het pedaal in de laagste
stand:
69,5 – 74 (cm)
* Maximale belasting: 100 kg
* Bagagedrager achter (accessoire):
• Afmetingen: 28 x 20 (cm)
• Maximale belasting: 10 kg.
I F E
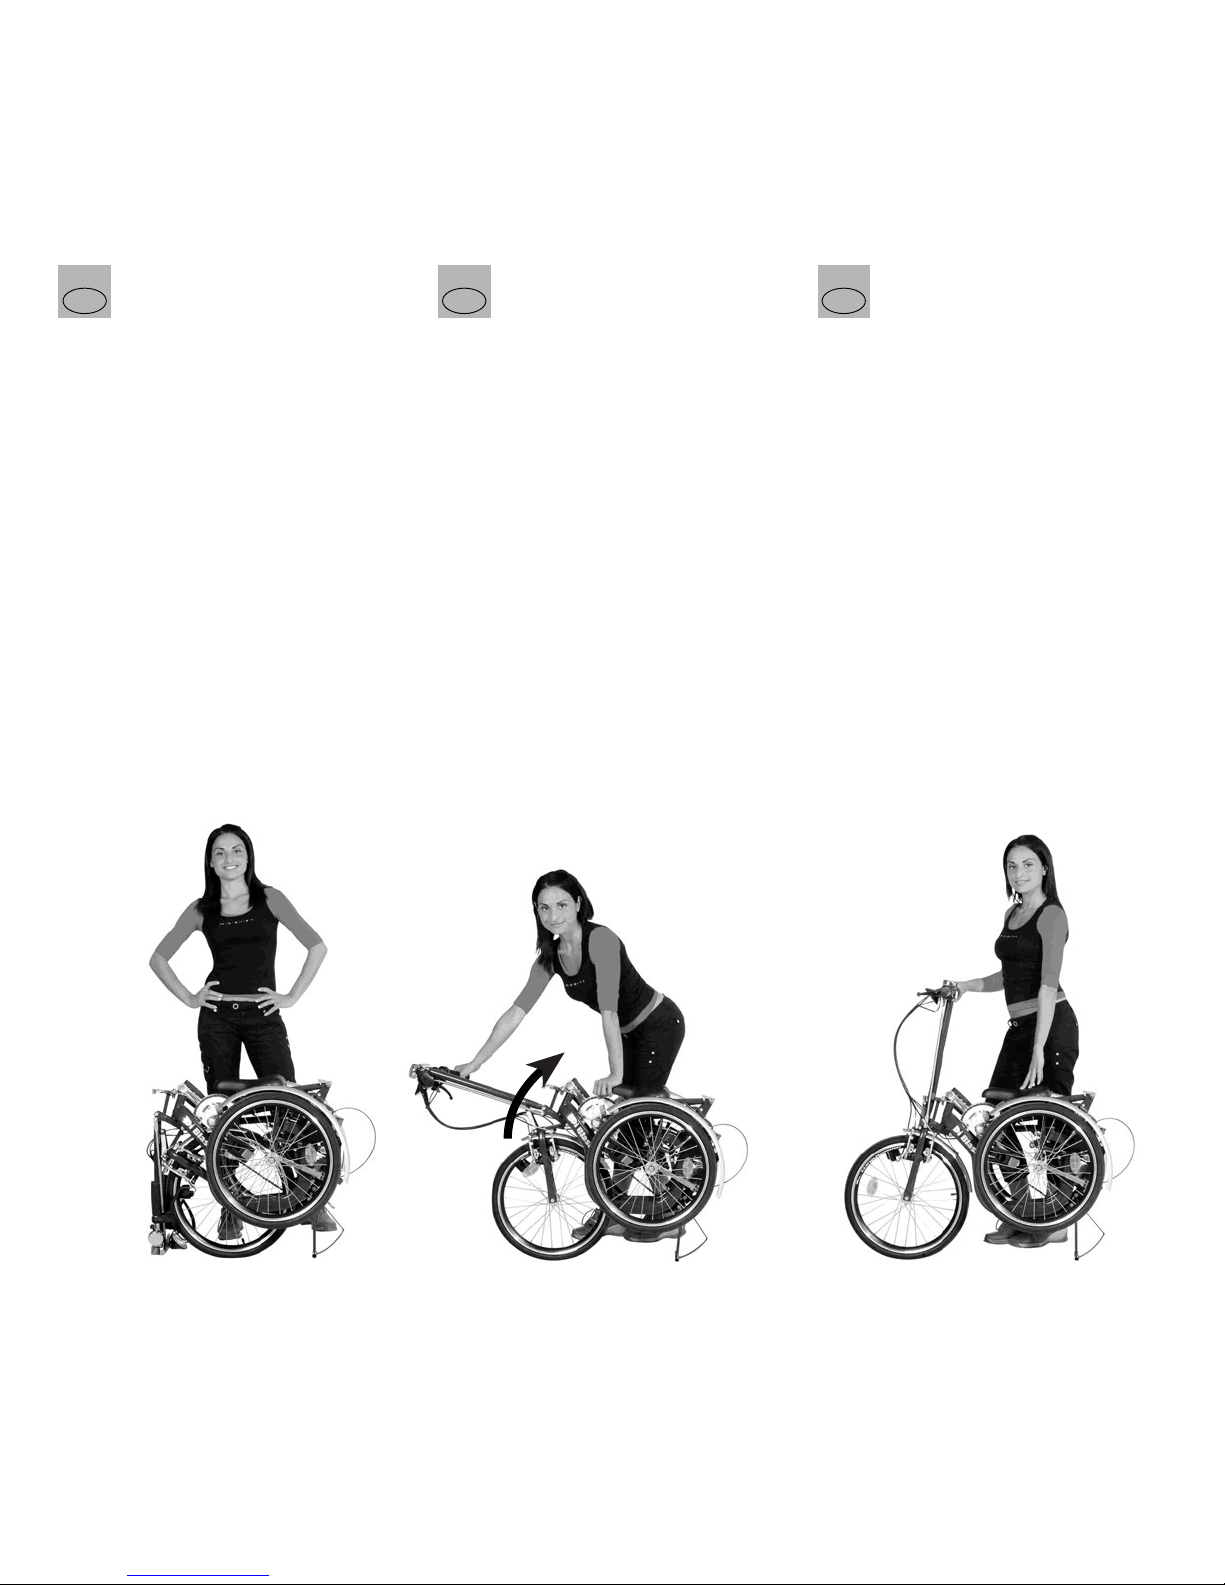
2. PER APRIRE IL TRICICLO
Quando il triciclo è ripiegato, esso sta in piedi
poggiato sul cavalletto (fig. 1).
Sollevare il manubrio per una delle impugnature
(fig. 2/1) e spingerlo con decisione contro il gancio
posto alla sommità della forcella finché esso resta
bloccato in posizione verticale (fig. 2/2).
Sollevando il manubrio, le impugnature si aprono
automaticamente in posizione di guida.
Assicurarsi che il piantone del manubrio ade-
risca completamente e senza gioco alla parte
interna del gancio e che la molla che tira il
gancio agisca efficacemente. (ved. cap. 5.1).
Tirare la sella prima verso l'alto (fig. 3/1) e poi
indietro (fig. 3/2) finché il triciclo resta bloccato
in posizione aperta dal gancio posto a sinistra
dei tubi reggisella (fig. 4).
Aprire i pedali (ved. cap. 4.2).
Prima di partire, effettuare i controlli di sicurezza
(ved.cap. 4.1.2).
2. POUR DEPLIER LE TRICYCLE
Quand le tricycle est plié, il tient debout sur sa
béquille (fig. 1).
Relevez le guidon par une des poignées (fig. 2/1)
et poussez le franchement contre le crochet d’arrêt
placé au sommet de la fourche (claquement net),
jusqu’à ce qu’il reste bloqué verticalement (fig.
2/2).
En relevant le guidon, les poignées s’ouvrent
automatiquement en position d’usage.
Assurez vous que le crochet adhère comple-
tement et sans jeu à la colonne du guidon et
que le ressort qui tire sur le crochet soit bien
actif (voir 5.1).
Tirez la selle vers le haut (fig. 3/1) et puis vers
l’arrière (fig. 3/2) jusqu’à encliqueter le crochet
de sécurité placé à gauche des colonnes de la
selle (claquement sec) (fig. 4).
Dépliez les pédales (voir 4.2).
Avant de rouler, effectuez les contrôles de
sécurités (voir 4.1.2).
2. PARA DESPLEGAR EL TRICICLO
Mientras el triciclo está plegado, se mantiene en
posición “de pie”, apoyado sobre su pata de cabra
(Fig. 1).
Levantar el manillar por una de sus empuñaduras
(Fig. 2/1) y empujarlo con decisión contra el
gancho en el vértice de la horquilla, hasta que
quede bloqueado en posición vertical (Fig.2/2).
Al levantar el manillar, las empuñaduras se abren
automáticamente adquiriendo la posición de uso.
Cerciorarse de que la horquilla inferior del
manillar se adhiera totalmente y sin juego
alguno a la parte interior del gancho, y que
el muelle que tracciona el gancho actúe en
modo eficiente (ver párrafo 5.1).
Tirar del sillín hacia arriba (Fig. 3/1) y luego
hacia atrás (Fig. 3/2) hasta que el triciclo quede
bloqueado en su posición abierta por acción del
gancho que está a la izquierda del tubo porta-
sillín (tija) (Fig. 4).
Desplegar los pedales (ver párrafo 4.2).
Antes de usar el triciclo, realice los controles de
seguridad (ver 4.1.2).
Fig. 1
Abb. 1
Afb. 1
Fig. 2/2
Abb. 2/2
Afb. 2/2
Fig. 2/1
Abb. 2/1
Afb. 2/1

GB D NL
Fig. 3/1
Abb. 3/1
Afb. 3/1
2. AUFKLAPPEN DES DREIRADS
Zusammengeklappt steht das Dreirad auf dem
Ständer (Abb. 1).
Die Lenkstange an einem der beiden Griffe
anheben (Abb. 2/1) und fest gegen den Haken
am oberen Ende der Gabel drücken bis sie in
senkrechter Stellung einrastet (Abb. 2/2).
Bei Anheben der Lenkstange öffnen sich die
Griffe automatisch in Fahrstellung.
Kontrollieren, dass die Steuersäule der
Lenkstange ohne Spiel auf der Innenseite des
Hakens vollkommen anliegt und die Zugfeder
des Hakens wirksam eingreift. (Siehe Kap.
5.1).
Den Sattel zuerst nach oben (Abb. 3/1) und dann
nach hinten (Abb. 3/2) ziehen bis das Dreirad in
offener Stellung durch den Haken links vom
Sitzhalterohr blockiert wird. (Abb 4).
Die Pedale öffnen (siehe Kap. 4.2).
Vor dem Abfahren die Sicherheitskontrollen
durchführen (siehe 4.1.2).
2. TO UNFOLD THE TRICYCLE
When the tricycle is folded, it stands up on its
stand (fig. 1).
Lift the handlebar by one of its grips (fig. 2/1)
and push it resolutely against the hook located
on the top of the fork, until it is locked in vertical
position (fig. 2/2).
While lifting the handlebar, the bars automatically
open in the riding position.
Check that the handlebar hook adheres to the
handlebar stem completely and without any
slack and that the spring pulls the hook
powerfully (see sec 5.1).
Pull the seat upward (fig. 3/1) and backward (fig.
3/2) until the seat posts are locked by the hook
on their left side (fig. 4) .
Unfold the pedals (see sec. 4.2).
Before riding, carry out the safety checks (see
sec. 4.1.2).
2. DE DRIEWIELER OPENEN
Als de driewieler dichtgevouwen is, kan hij op
de standaard staan (afb. 1).
Til het stuur omhoog aan één van de handgrepen
(afb.. 2/1) en duw het krachtig tegen de borghaak
die op het uiteinde van de vork zit, tot het stuur
in de verticale stand geblokkeerd blijft (afb.2/2).
Wanneer het stuur wordt opgetild, gaan de
handgrepen automatisch open in de rijpositie.
Controleer of de stuurbuis volledig en zonder
speling in de borghaak zit en of de veer die
de borghaak aanspant dat ook daadwerkelijk
doet (zie hfdst. 5.1).
Trek het zadel eerst omhoog (afb. 3/1) en
vervolgens naar achteren (afb. 3/2) tot de
driewieler in de geopende stand geblokkeerd
blijft, dankzij de borghaak die zich links van de
zadelbuizen bevindt (afb. 4).
Open de pedalen (zie hfdst. 4.2).
Voer de veiligheidscontroles uit voordat u gaat
fietsen (zie 4.1.2).
Fig. 4
Abb. 4
Afb. 4
Fig. 3/2
Abb. 3/2
Afb. 3/2

I F E
Fig. 5
Abb. 5
Afb. 5
Fig. 6/1
Abb. 6/1
Afb. 6/1
3. PER RIPIEGARE IL TRICICLO
Portare la pedivella sinistra indietro e in posizione
orizzontale. Ripiegare i pedali in modo che le estremità
vadano a vincolarsi nelle pedivelle (ved. cap. 4.2).
Liberare i cannotti reggisella dal gancio posto alla loro
sinistra (fig. 5) e spingere la sella in avanti (fig. 6/1)
e verso il basso (fig. 6/2) finché i cannotti assumono
la posizione orizzontale e vengono a contatto con
l’elemento sottostante (fig. 7). Mentre si spinge la sella,
tirare la leva del freno in modo da tener fermo il triciclo.
Per agevolare il ripie-gamento, mentre si spinge la
sella verso il basso tirare anche verso l’alto la maniglia
posta fra le due pedivelle (fig. 6/3) (*);
Liberare il piantone del manubrio dal gancio posto alla
sommità della forcella, e, tenendo il manubrio dritto
per una delle impugnature, farlo ruotare in avanti verso
il basso (fig. 8/1) fino ad accostarlo al pneumatico (fig. 8/2).
Mentre il manubrio viene abbassato, le impugnature
si accostano automaticamente al piantone.
Il triciclo sta in piedi sul cavalletto. Quando il triciclo
è ripiegato, non sedersi né porre dei carichi sulla sella,
per evitare di deformare il cavalletto.
(*) Se risulta difficoltoso abbassare la sella, non
forzare ma rimuovere i possibili ostacoli che ne
impediscono il ripiegamento:
*Un pedale urta contro la ruota: portare la pedivella
sinistra indietro e in posizione orizzontale.
*Il cardano della trasmissione è inceppato: girare
un pò la ruota sinistra.
3. POUR PLIER LE TRICYCLE
Portez la manivelle gauche en arrière et en position
horizontale. Rabattez les pédales jusqu’à ce que elles
soient bloquées sur les manivelles de pédalier (voir
par. 4.2).
Déverrouillez le crochet de sécurité situé à gauche des colonnes
de selle (fig. 5) et repoussez la selle en avant (fig. 6/1) et puis
vers le bas (fig. 6/2) jusqu’à ce que les colonnes prennent la
position horizontale et viennent à contact avec l’élément situé
en dessous (fig. 7). En poussant la selle, tirez le levier du frein
de façon a tenir le tricycle ferme. Pour faciliter le pliage, quand
repoussez la selle vers le bas tirez aussi vers le haut la poignée
située parmi les deux manivelles (fig. 6/3) (*);
Déverrouillez le crochet d’arrêt de la colonne du guidon
et, tenant le guidon bien droit par une des poignées,
basculez le en avant vers le bas (fig. 8/1) jusqu’à
l’approcher du pneu (fig. 8/2).
En rabattant le guidon, le poignées s’approchent
automatiquement à la colonne.
Le tricycle se tient debout sur sa bequille. Quand le
tricycle est plié, ne vous assoyez ni posez des poids
sur la selle pour éviter de déformer la béquille.
(*) Si vous n’arrivez pas à baisser la selle, ne la forcez pas
mais éliminez les obstacles qui empêchent le repliement:
*Un pédale est coincé contre la roue: portez la mani-
velle gauche en arrière et en position horizontale.
*Le cardan de la transmission est bloqué: tournez
un peu la roue gauche.
3. PARA REPLEGAR EL TRICICLO
Llevar la biela izquierda hacia atrás, en posición horizontal.
Plegar los pedales de modo que los extremos
se vinculen a las bielas (ver párrafo 4.2).
Liberar los tubos porta-sillín (tijas) del gancho a su izquierda
(Fig. 5) y empujar el sillín hacia delante (Fig. 6/1) y hacia
abajo (Fig. 6/2) hasta que los tubos asuman la posición
horizontal y queden en contacto con el componente inferior
(Fig. 7). Mientras se empuja el sillín, tirar de la palanca del
freno de modo de mantener el triciclo firme y quieto. Para
facilitar el plegado, tirar hacia arriba de la manilla entre las
dos bielas mientras se empuja el sillín hacia abajo (Fig. 6/3)
(*).
Liberar la horquilla inferior del manillar del gancho de la parte
superior de la horquilla y manteniendo el manillar derecho
por una de las empuñaduras, girarlo hacia delante y hacia
abajo (Fig. 8/1) hasta acercarlo al neumático (Fig. 8/2).
Mientras el manillar baja, las empuñaduras se acercan
automáticamente a la horquilla inferior.
El triciclo queda así “de pie” apoyado sobre su pata de cabra.
Una vez que se ha plegado el triciclo no sentarse ni apoyar
cargas sobre el sillín para evitar que la pata de cabra se deforme.
(*) No debe forzarse el movimiento para bajar el
sillín. Si resulta dificultoso, elimine todo posible
obstáculo que impide el plegado:
* Un pedal choca contra la rueda: lleve la biela
izquierda hacia atrás y a la posición horizontal.
El cardán de transmisión está trabado: gire la
rueda izquierda.
Fig. 6/2
Abb. 6/2
Afb. 6/2

GB D NL
Fig. 8/1
Abb. 8/1
Afb. 8/1
3. TO FOLD THE TRICYCLE
Turn the left crank backwards in horizontal position.
Fold the pedals in such a way that the tips are hooked
by the pedal crank (see Sec 4.2).
Release the hook located on the left side of the seat
posts (fig. 5) and push the seat forward (fig. 6/1) and
downward (fig. 6/2) until the seat posts are in horizontal
position and come near to the frame below (fig. 7).
While pushing the seat, pull the brake lever in order
to held the tricycle fast. To make easier the folding,
when pushing the seat downward at same time pull
upwards the handle placed between the two cranks
(fig. 6/3) (*).
Release the handlebar hook and, keeping the handlebar
straight by one of its grips, fold it forward and downward
(fig.8/1) until it comes near to the tyre (fig. 8/2).
While lowering the handlebar, the bars automatically
come near to the stem.
The tricycle stand up on its stand. When the tricycle
is folded do not seat neither put loads on the seat to
avoid to deform the stand.
(*) If it is difficult to lower the saddle, do not force
it but remove the obstacles which hinder the
folding:
*A pedal hits against the wheel: tTurn the left crank
backwards in horizontal position.
* The cardan joint is blocked: turn a little bit the
left wheel.
3. ZUSAMMENKLAPPEN DES DREIRADS
Die linke Tretkurbel nach hinten ziehen und in waagrechte
Stellung bringen.
Die Pedale so hochklappen, dass ihre Enden in die Tretkurbeln
einrasten (siehe Kap. 4.2).
Die Sattelhalterohre von dem Haken an ihrer linken Seite
befreien (Abb. 5) und den Sattel nach vorne (Abb. 6/1) und
nach unten (Abb. 6/2) drücken bis die Sattelhalterohre
waagrechte Stellung einnehmen und mit dem darunter
liegenden Gestell (Abb. 7) in Berührung kommen. Während
man den Sattel drückt, den Bremshebel ziehen, damit das
Dreirad fest steht. Um das Zusammenklappen zu vereinfachen,
beim Herunterdrücken des Sattels auch den Griff zwischen
den beiden Tretkurbeln (Abb. 6/3) (*) nach oben ziehen.
Die Steuersäule der Lenkstange von dem Haken oben auf
der Gabel befreien und, während die Lenkstange mit einem
der beiden Griffe gerade gehalten wird, dieselbe vorwärts
nach unten drehen (Abb. 8/1) bis sie am Reifen (Abb. 8/2)
anliegt. Während die Lenkstange nach unten gedrückt wird,
legen sich die Griffe automatisch an die Steuersäule an.
Das Dreirad steht gerade auf dem Ständer. Sich nicht auf
das zugeklappte Dreirad setzen oder Lasten auf den Sattel
stellen, damit der Ständer sich nicht verbiegt.
(*) Sollten beim Herunterstellen des Sattels
Schwierigkeiten auftreten, keine Gewalt anwenden,
sondern eventuelle, das Zusammenklappen
verhindernde Hindernisse beseitigen:
* Ein Pedal schlägt gegen das Rad: Die linke
Tretkurbel nach hinten ziehen und in waagrechte
Stellung bringen.
*Die Gelenkwelle des Antriebs ist verklemmt: Das
linke Rad leicht drehen.
3. DE DRIEWIELER OPVOUWEN
Plaats de linker crank naar achteren en in de horizontale
stand. Vouw de pedalen zo dicht dat de uiteinden ervan
vast komen te zitten in de cranks (zie hfdst. 4.2).
Maak de zadelbuizen los van de borghaak aan de
linkerkant ervan (afb. 5) en duw het zadel naar voren
(afb. 6/1) en omlaag (afb. 6/2) tot de buizen de
horizontale stand aannemen en in aanraking komen
met het onderliggende frame (afb. 7). Terwijl u op het
zadel duwt, trekt u aan de remhendel, zodat de
driewieler op zijn plaats blijft. Om het opvouwen te
vergemakkelijken kunt u, terwijl u het zadel omlaag
duwt, de handgreep die zich tussen de twee cranks
bevindt omhoog trekken (afb. 6/3) (*).
Maak de stuurbuis los van de borghaak op het uiteinde
van de vork. Terwijl u het stuur bij één van de
handgrepen recht houdt, laat u het stuur naar voren en
omlaag draaien (afb. 8/1) tot het ter hoogte van de
band komt (afb. 8/2).
Terwijl het stuur omlaag geplaatst wordt, zullen de
handgrepen automatisch de stuurbuis naderen.
De driewieler kan op de standaard staan. Wanneer de
driewieler opgevouwen is, niet op het zadel gaan zitten
of er gewichten op plaatsen, om vervormingen van de
standaard te voorkomen.
(*) Als het u niet lukt het zadel omlaag te plaatsen,
moet u dit niet forceren, maar de mogelijke
obstakels verwijderen die het opvouwen
belemmeren:
* Een pedaal botst tegen het wiel: plaats de linker
crank naar achteren en in de horizontale stand.
* De cardankoppeling van de aandrijving zit vast:
draai een beetje aan het linkerwiel.
Fig. 7
Abb. 7
Afb. 7
Fig. 6/3
Abb. 6/3
Afb. 6/3
Fig. 8/2
Abb. 8/2
Afb. 8/2
4. MODALITÁ D’USO
4.1 Prima di condurre il triciclo
4.1.1 Primo approccio
Prima di usare il triciclo per la prima volta in una strada
pubblica, è bene familiarizzarsi con esso in un’area
chiusa al traffico: regolare l’altezza della sella (ved.
5.3), provare i freni e il cambio, prendere confidenza
con la guida, ecc.
4.1.2 Controlli di sicurezza
Prima di usare il triciclo, effettuare i controlli di
sicurezza prescritti in questo manuale ed in particolare:
* Controllare i pedali (ved. cap. 4.2).
*Controllare il corretto agganciamento del manubrio
alla forcella (ved. par. 5.1).
* Controllare il corretto agganciamento del tubo
reggisella al telaio principale (ved. par 5.3.2).
*Verificare l’efficacia dei freni (ved. par. 4.3 e 5.6).
*Verificare la pulizia dei catarifrangenti (anteriore,
posteriore e alle ruote) (ved. par. 4.5).
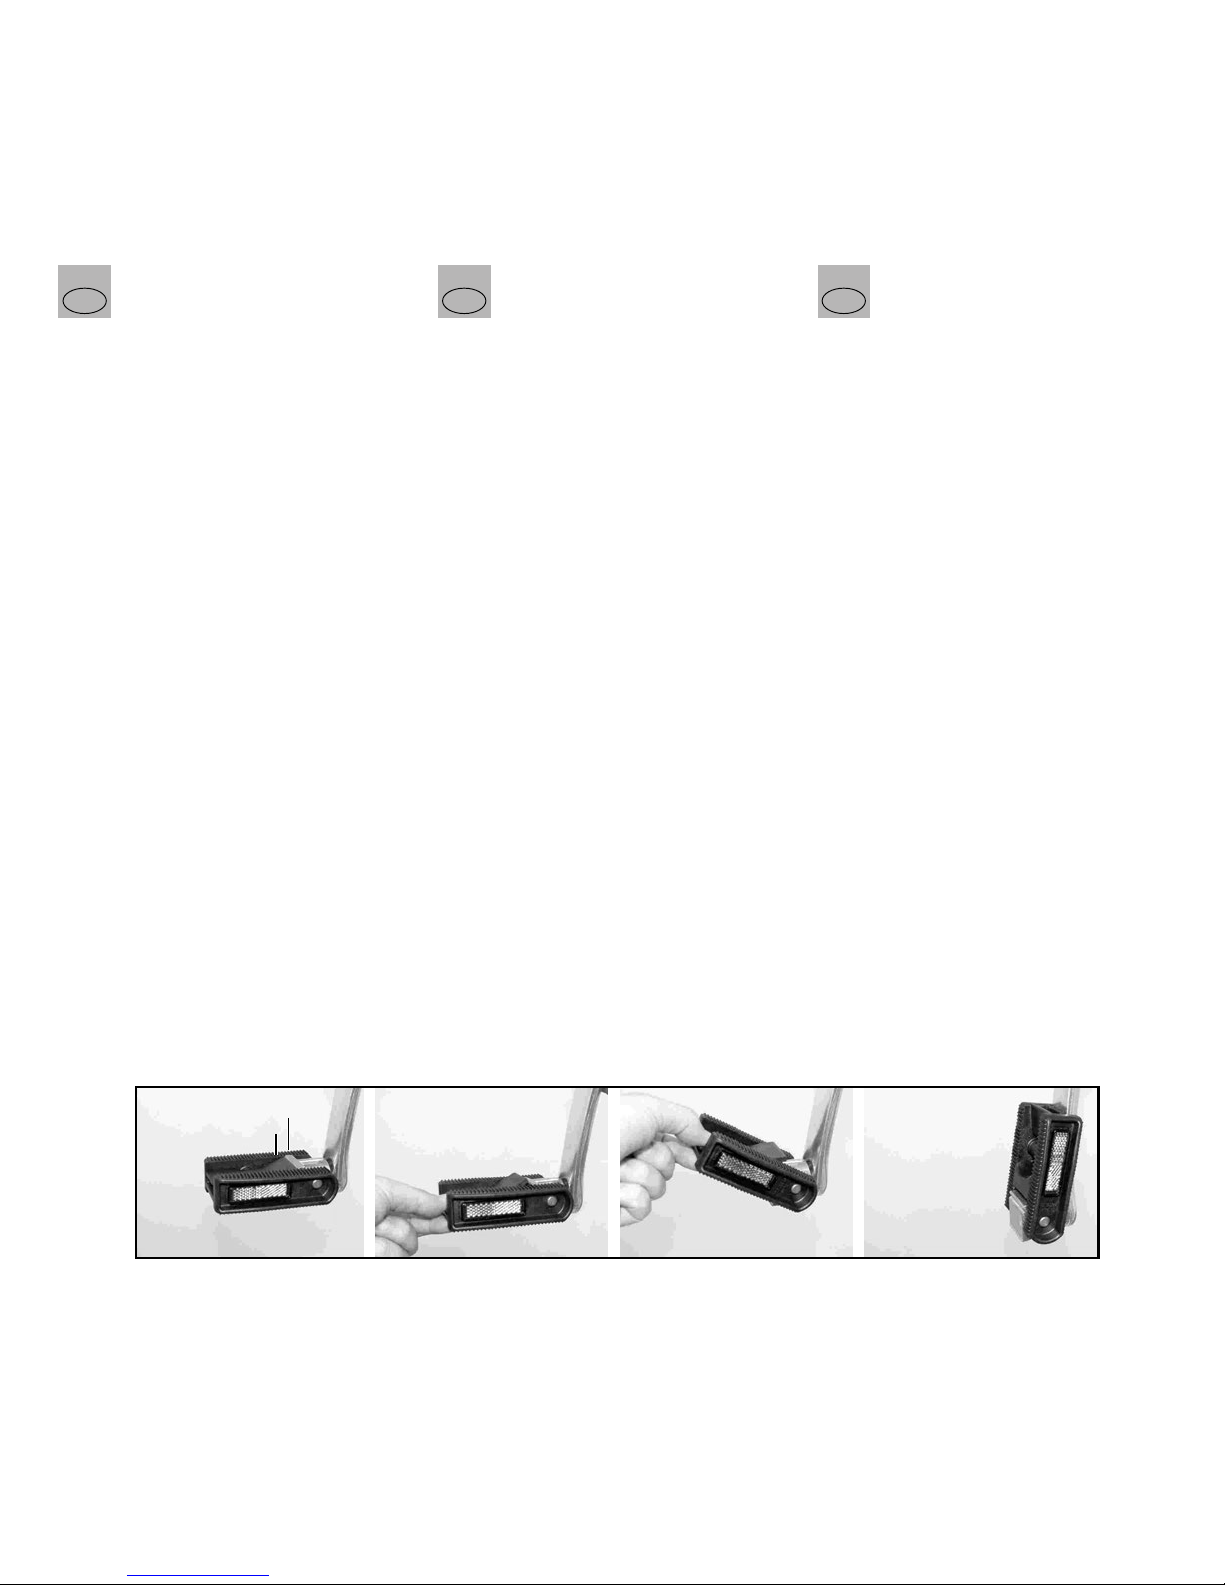
4.2 Pedali
* Per porre il pedale in posizione d’uso, girare la
staffa poggiapiedi fino a sentire lo scatto secco
che si produce quando essa è a 90° rispetto alla
pedivella. Controllare che la linguetta (A) sia
completamente inserita nella tacca (B) del mozzo
(fig. 9).
*Per ripiegare il pedale, premere sull’estremità della
linguetta (A) in modo da disimpegnare l’altra
estremità dalla tacca (B) del mozzo e quindi girare
la staffa poggiapiedi dal lato della linguetta finchè
non resta bloccata contro la pedivella (fig.9).
Dopo una caduta o un sovraccarico accidentali
verificare l’integrità dei pedali. Evitare di percorrere
strade sconnesse in piedi sui pedali: un sovraccarico
accidentale potrebbe provocarne una pericolosa
rottura.
4. INSTRUCTIONS DE MARCHE
4.1 Avant de conduire le tricycle
4.1.1Première approche
Avant de conduire pour la première fois votre tricycle,
mettez vous en confiance dans un terrain dégagé: réglez
la hauteur de la selle selon vos exigences (voir 5.3),
apprenez à connaître son comportement, essayez les
freins et le dérailleur, etc.
4.1.2 Contrôles de sécurité.
Avant de conduire le tricycle, effectuez les contrôles
de sécurité prescrits dans ce manuel et en particulier:
* Contrôlez les pédales (voir par. 4.2).
* Contrôlez le correcte accrochage du guidon à la
fourche (voir par. 5.1).
*Contrôlez le correcte accrochage de la colonne de
selle au cadre principal (voir par. 5.3.2).
*Vérifiez l’efficacité des freins (voir par. 4.3 et 5.6).
*Vérifiez que les catadioptres (avant, arrière et aux
roues) soient bien propres (voir par. 4.5).
4.2 Pédales
* Pour la mise en route, dépliez les pose-pieds des
pédales jusqu’au déclic sec qui se produit quand
elles sont a 90° par rapport aux manivelles.
Contrôlez que la languette (A) est complètement
engagée dans le cran (B) du moyeu (fig. 9).
* Pour le repliement, appuyez sur l’extrémité
extérieure de la languette (A) afin d’en dégager
l’autre extrémité du cran (B) du moyeu et en même
temps rabattre le pose pied contre la manivelle,
ce qui fixe la pédale à plat.
Vérifiez l’intégrité des pédales après une chute ou
une surcharge accidentelle. Evitez de descendre
des côtes abruptes en mauvais terrain debout sur
les pédales: un choc violent pourrait malheureu-
sement provoquer une dangereuse rupture.
I F E
4. INSTRUCCIONES DE USO
4.1 Antes de montar en el triciclo
4.1.1 Consideraciones preliminares
Antes de usar el triciclo por primera vez en la vía
pública, conviene familiarizarse con el mismo en un
área cerrada al tráfico: ajustar la altura del sillín (ver
5.3), probar los frenos y el cambio, tomar confianza
con el manejo, etc.
4.1.2 Controles de seguridad
Antes de usar el triciclo, realizar los controles de
seguridad indicados en este manual. En particular:
* controlar los pedales (ver Párr. 4.2).
*controlar que el manillar acople perfectamente en
la horquilla (ver Párr. 5.1).
*controlar que el tubo porta-sillín acople perfecta-
mente al cuadro principal (ver Párr. 5.3.2).
* comprobar la eficiencia de los frenos (ver Párr.
4.3 y 5.6).
*controlar que los elementos refringentes (anterior,
posterior y sobre las ruedas) estén limpios (ver
Párr. 4.5).
4.2 Pedales
* Para llevar el pedal a la posición de uso, girar el
estribo reposapiés hasta oír el “clic” seco que se
produce cuando se posiciona a 90° respecto de la
biela. Controlar que la lengüeta (A) quede
completamente introducida en la ranura (B) del
cubo (Fig. 9).
* Para plegar el pedal, presione el extremo de la
lengüeta (A) de modo de liberar el otro extremo
de la ranura (B) del cubo y girar entonces el estribo
del lado de la lengüeta hasta que quede bloqueado
contra la biela (Fig.9).
En caso de caída o de sobrecarga accidental,
controle los pedales para determinar su integridad.
Evite recorrer vías secundarias en condiciones
extremas totalmente apoyado (de pie) sobre los
pedales: una sobrecarga accidental podría provocar
su rotura y generar riesgos o peligros.
AB
Fig. 9
Abb. 9
Afb. 9

4. OPERATIONS
4.1 Before riding
4.1.1 First riding
Before taking your first ride, test the brakes and gear
systems. Learn the feel of the tricycle and its handling
characteristics. This should be done in an area free of
traffic and other obstructions.
To receive the maximum benefit, comfort and safety
from your tricycle, the seat height should be adjusted
(Sec. 5.3) so that while sitting, the rider’s heel just
touches the pedals when the leg is fully extended.
Of course, this is done with the pedal in its lowest
position.
4.1.2 Safety checks
Before riding the tricycle, carry out all the safety checks
prescribed in this manual, and in particular:
* Check the pedals (see sec. 4.2).
*Check the correct hooking of the handlebar to the
fork (see sec 5.1).
* Check the correct hooking of the seat post to the
main frame (see sec 5.3.2).
* Check brakes efficiency (see sec. 4.3 et 5.6).
* Check that front, rear and wheels reflectors are
clean (see sec. 4.5).
4.2 Pedals
* Before riding the bicycle, unfold the pedal foot
rests until hearing a clack when they are at
90° with the cranks. Check that the locking device
(A) is fully engaged in the notch (B) of the pedal
hub (Fig. 9).
* To fold the pedal, press the external tip of the
locking device (A) (Fig. 9) so to release the other
tip from the notch (B) of the hub and then turn the
foot rest toward the locking device side against
the crank which will prevent the footrest to turn.
Check the pedals for any crack after accidental
crash or surcharge. Avoid to stand up on the pedals
when riding on uneven roads: an abrupt surcharge
could cause their dangerous breakage.
GB D NL
4. GEBRUIKSAANWIJZING
4.1 Voordat u gaat fietsen
4.1.1 De eerste kennismaking
Voordat u de driewieler op een openbare weg gebruikt,
is het verstandig om er eerst vertrouwd mee te raken
in een gebied zonder verkeer: stel de hoogte van het
zadel in (zie 5.3), probeer de remmen en de versnelling,
raak vertrouwd met hoe de driewieler rijdt, enz.
4.1.2 Veiligheidscontroles
Voordat u met de driewieler gaat rijden, voert u de
veiligheidscontroles uit die in deze handleiding staan.
Met name:
* Controleer de pedalen (zie hfdst. 4.2).
* Controleer de correcte bevestiging van het stuur
op de vork (zie par. 5.1).
*Controleer de correcte bevestiging van de zadelbuis
op het hoofdframe (zie par 5.3.2).
* Controleer de doeltreffende werking van de
remmen (zie par. 4.3 en 5.6).
* Controleer of de reflectors schoon zijn (voor,
achter en op de wielen) (zie par. 4.5).
4.2 Pedalen
* Om de pedalen in de gebruikspositie te zetten,
draait u het gedeelte waar de voet op rust tot u een
klik hoort – wanneer het voetgedeelte op 90° ten
opzichte van de crank staat. Controleer of de lip
(A) volledig in uitsparing (B) van de naaf (afb.
9) geplaatst is.
* Om het pedaal weer in te klappen drukt u op het
uiteinde van de lip (A) zodat het andere uiteinde
los komt uit uitsparing (B) van de naaf. Draai
vervolgens het voetgedeelte naar de kant van de
lip totdat het tegen de crank blijft vastzitten (afb.9).
Na een val of na overbelasting van de pedalen
dient u te controleren of de pedalen intact zijn. Ga
niet op de pedalen staan op straten met een slecht
wegdek: door plotselinge overbelasting kunnen
de pedalen afbreken.
AB
Fig. 9
Abb. 9
Afb. 9
4. GEBRAUCHSANWEISUNG
4.1 Vor Benutzung des Dreirads
4.1.1 Vor dem ersten Fahrversuch
Vor der erstmaligen Benutzung des Dreirads auf einer
öffentlichen Straße, empfehlen wir, es zuerst in einer
verkehrsfreien Zone auszuprobieren: Die Sattelhöhe
einstellen (siehe 5.3), Bremsen und Kupplung
ausprobieren und sich mit der Lenkung etc. vertraut
machen.
4.1.2 Sicherheitskontrollen
Vor Benutzung des Dreirads die in dem vorliegenden
Handbuch vorgeschriebenen Sicherheitskontrollen
durchführen und zwar insbesondere:
* Die Pedale kontrollieren (siehe Kap. 4.2).
* Kontrollieren, ob die Lenkstange in die Gabel
eingerastet ist (siehe Kap. 5.1).
* Kontrollieren, ob die Sattelstange richtig in den
Hauptrahmen eingerastet ist (siehe Kap. 5.3.2).
*Die Effizienz der Bremsen prüfen (siehe Abschnitte
4.3 und 5.6).
*Prüfen, ob die Rückstrahler (vorne, hinten und an
den Rädern) sauber sind (siehe Abschnitt 4.5).
4.2 Pedale
* Um das Pedal in Fahrtstellung zu bringen, muss
der Bügel der Fußraste so lange gedreht werden
bis man den Knack hört, der dann eintritt, wenn
der Bügel in einem Winkel von 90° zur Tretkurbel
einschnappt. Prüfen, ob der Federkeil (A)
vollständig in die Kerbe (B) der Nabe eingerastet
ist (Abb. 9).
* Zum erneuten Zuklappen des Pedals, das Ende
des Federkeils (A) drücken, damit das andere Ende
aus der Kerbe (B) der Nabe ausklinkt und
anschlieend den Bügel der Fußraste seitlich vom
Federkeils so lange drehen bis er gegen die
Tretkurbel blockiert wird (Abb. 9).
Nach einem Sturz oder nach einer versehentlichen
Überbelastung muss geprüft werden, ob die Pedale
unversehrt sind. Auf unebenen Straßen darf nicht
im Stehen auf den Pedalen gefahren werden: Eine
unbeabsichtigte Überbelastung könnte einen
gefährlichen Bruch der Pedale verursachen.

I F E
4.3 Freni
Il triciclo è equipaggiato con due freni indipendenti
che agiscono entrambi sulla ruota anteriore. Ogni freno
è comandato da una delle due leve poste sul manubrio.
Salvo che in caso di emergenza, non frenare mai in
modo brusco, soprattutto se la strada è bagnata o in
cattivo stato o in curva.
Per la regolazione dei freni ved. cap. 5.6
Per parcheggiare il triciclo, tirare la leva destra e tenerla
bloccata in questa posizione mediante il dispositivo
color rosso posto alla sua estremità (fig. 10/1).
Ricordarsi di sbloccare la leva prima di ripartire (fig.
10/2).
4.4 Cambio di velocità
Il cambio di velocità (INDEX) è comandato tramite la
manopola girevole posta sul lato destro del manubrio
(Fig.11). Essa consente di spostare la catena da un pignone
all’altro, cambiando così il rapporto di trasmissione.
* Quando la manopola è posizionata in
corrispondenza del punto (1) la catena va ad
ingranare il pignone più grande, ciò che consente
un avanzamento lento ma con minore sforzo.
* Quando la manopola (A) è posizionata in
corrispondenza del punto (5) la catena va ad
ingranare il pignone più piccolo, ciò che consente
un avanzamento veloce ma con maggiore sforzo.
* Quando la manopola è posizionata in
corrispondenza di uno dei punti intermedi, la
catena va ad ingranare il pignone intermedio
corrispondente.
Per non danneggiare il cambio, osservare le regole
seguenti:
- Non azionare la manopola a ruota ferma.
- Quando viene azionata la manopola, è
consigliabile ridurre lo sforzo sui pedali.
Non pedalare all’indietro quando viene azionata
la manopola.
4.3 Freins
Le tricycle est equipé avec deux freins indépendants
qui agissent tous les deux sur la roue avant. Chaque
frein est activé par un des deux leviers placés sur le
guidon.
Sauf qu’en cas de necessité, ne freinez jamais de façon
brusque, surtout si la route est humide ou en mauvaises
conditions et en virage.
Pour le réglage des freins, voir 5.6.
Pour parquer le tricycle, tirez le levier droit et bloquez
le dans cette position au moyens du dispositif rouge
(fig. 10/1).
Débloquer ce dispositif avant de démarrer (fig. 10/2).
4.4 Changement de vitesse
Le changement de vitesses indexé est commandé depuis
le guidon par une poignée tournante (A) (Fig. 11).
*Quand la poignée est dans la position (1), la chaîne
est engagée sur le grand pignon arrière: le rapport
de transmission permet des progressions aisées
mais lentes, et des ascensions plus faciles.
*Quand la poignée est dans la position (5), la chaîne
est engagée sur le petit pignon arrière: le rapport
de transmission permet une progression rapide
moyennant un effort accru.
* Quand la poignée est dans une position
intermédiaire, la chaîne est engagée sur un pignon
intermédiaire correspondant.
Pour ne pas endommager la transmission, observez
les règles suivantes:
- Ne jamais actionner la poignée quand la roue
arrière ne tourne pas.
- Pendant le transfert de chaîne d’un pignon à
l’autre, allégez la pression sur les pédales;
Ne pédalez pas en arrière quand vous actionnez
la poignée.
4.3 Frenos
El triciclo cuenta con dos frenos independientes que
actúan sobre la rueda anterior. Se han previsto dos
mandos (palancas) de accionamiento en el manillar:
uno para cada freno.
A menos que se trate de una emergencia, nunca frene
bruscamente, en especial si la carretera está mojada,
si se encuentra en una curva o si la superficie de la
calzada/del terreno no está en buenas condiciones.
Para aparcar el triciclo, basta tirar de la palanca derecha
y mantenerla bloqueada en esta posición con el dispo-
sitivo de color rojo en su extremo (Fig. 10/1).
Recuerde desbloquear la palanca antes de volver a
partir (Fig. 10/2).
4.4 Cambio de velocidad
Una palanca giratoria posicionada del lado derecho
del manillar permite efectuar el cambio de velocidad
(mecanismo INDEX) (Fig.11). Esta palanca de cambio
permite desplazar la cadena de un piñón a otro, variando
así la relación de transmisión.
* Cuando la palanca de cambio se encuentra en la
posición (1), la cadena engrana en el piñón más
grande, consintiendo un avance lento pero con
menor esfuerzo.
*Cuando la palanca de cambio (A) se encuentra en
la posición (5), la cadena engrana en el piñón más
pequeño, consintiendo un avance rápido pero con
mayor esfuerzo.
* Si la palanca de cambio se encuentra en una
posición intermedia, la cadena engrana en el piñón
intermedio correspondiente.
Para no dañar el cambio, deben respetarse algunas
simples reglas:
- Nunca accione la palanca de cambio de
velocidad con la rueda detenida.
- Se recomienda reducir el esfuerzo ejercido
sobre los pedales cuando se acciona la palanca
de cambio de velocidad.
No pedalee hacia atrás al accionar la palanca de
cambio de velocidad
Fig. 11
Abb. 11
Afb. 11
Fig. 10/1
Abb. 10/1
Afb. 10/1 A
Fig. 10/2
Abb. 10/2
Afb. 10/2

GB D NL
4.3 Bremsen
Das Dreirad ist mit zwei unabhängigen Bremsen
versehen, die beide auf das Vorderrad einwirken.
Beide Bremsen werden durch einen der beiden Hebel
an der Lenkstange gesteuert.
Von Notfällen abgesehen, sollte heftiges Bremsen
vermieden werden und zwar besonders dann, wenn
die Straße nass, schlecht oder kurvenreich ist.
Einstellen der Bremsen: siehe Kap. 5.6
Zum Parken des Dreirads den rechten Hebel ziehen
und ihn mit Hilfe der roten Vorrichtung an dessen
Ende in dieser Stellung sperren (Abb. 10/1). Vor dem
Weiterfahren darauf achten, den Hebel wieder
freizusetzen. (Abb. 10/2).
4.4 Gangschaltung
Die Gangschaltung (INDEX) wird mit einem Griff
rechts an der Lenkstange gesteuert (Abb. 11). Dieser
Griff gestattet die Versetzung der Kette von einem
Ritzel auf das andere, wodurch das Übersetzung-
sverhältnis geändert wird.
* Wenn der Griff die Stellung an Punkt (1) der
Kette einnimmt, greift die Kette in das größte
Ritzel ein, was eine langsame Fortbewegung bei
geringem Kraftaufwand ermöglicht.
* Wenn der Griff (A) die Stellung an Punkt (5)
einnimmt, greift die Kette in das kleinste Ritzel
ein, was eine schneller Fortbewegung bei größerem
Kraftaufwand gestattet.
*Befindet sich der Griff in einer Zwischenstellung,
greift die Kette in das entsprechende
Zwischenritzel ein.
Um Schäden am Antrieb zu vermeiden, sind olgende
Regeln einzuhalten:
- Den Griff der Gangschaltung nicht betätigen
während das Rad steht.
-Wenn der Griff betätigt wird, die Beanspruchung
der Pedale verringern.
Bei Betätigung des Griffs den Rücktritt nicht
verwenden.
4.3 Remmen
De driewieler is uitgerust met twee onafhankelijke
remmen die beide op het voorwiel werken. Iedere rem
wordt door één van de twee remhendels op het stuur
bediend.
Rem altijd geleidelijk en nooit plotseling heel hard -
behalve in noodgevallen – vooral als de weg nat is of
in slechte staat verkeert of in bochten.
Zie hoofdstuk. 5.6 voor het afstellen van de remmen.
Voor het parkeren van de driewieler trekt u de rechter
remhendel aan en blokkeert u deze in die positie met
het rode mechanisme dat zich op het uiteinde bevindt
(afb. 10/1). Vergeet niet de hendel te deblokkeren,
voordat u weer vertrekt (afb. 10/2).
4.4 Versnelling
De versnelling (INDEX) wordt bediend via de hendel
op de rechterkant van het stuur (afb. 11). Hiermee kunt
u de ketting van het ene tandwiel naar het andere
verplaatsen en zo de aandrijfverhouding veranderen.
*Als de hendel op punt (1) staat, wordt de ketting
om het grootste tandwiel gezet, waardoor u
langzaam maar met minder inspanning vooruit
gaat.
* Als de hendel (A) op punt (5) staat, wordt de
ketting om het kleinste tandwiel gezet, waardoor
u snel vooruit gaat, maar met meer inspanning.
* Als de hendel op één van de punten hiertussen
staat, loopt de ketting om het bijbehorende
tandwiel.
Om schade aan het aandrijfmechanisme te voorkomen,
dient u de volgende regels in acht te nemen:
- De hendel nooit verzetten wanneer het wiel
stilstaat:
- Verminder de kracht op de pedalen tijdens het
verzetten van de hendel.
Trap niet achteruit tijdens het verzetten van de hendel.
4.3 Brakes operation
The tricycle is equipped with two independent brakes,
both acting on the front wheel. Each brakes is activated
by one of two levers placed on the handlebar.
Except that in case of emergency, never activate
abruptly the brakes, especially in sharp turns or on wet
pavement or on gravel or otherwise loose surface.
To adjust the brakes see Sec.5.6
To park the tricycle, pull the right lever and keep it in
this position by turning counterclockwise the red device
located at its end (fig. 10/1). Remember to unlock the
lever before riding again (fig. 10/2).
4.4 Gear ratio operation
The derailleur is activated by a cable connected to
twist grip (A) located on the right side of the handlebar
(fig.11). The derailleur works by moving the chain
sideways from one freewheel sprocket to another of
different size, so changing the gear ratio.
*When the grip is positioned at notch (1) the chain
engages the larger sprocket, requiring a more
comfortable pedalling pressure but allowing a
smaller riding speed.
*When the grip is positioned at notch (5) the chain
engages the smaller sprocket allowing higher
riding speed but requiring an increased pedalling
pressure.
* When the lever is positioned at an intermediate
notch the chain engages a correspondingly
intermediate sprocket.
To avoid damages, it is important to observe these
rules:
-Shift only when pedals and wheels are in motion;
-Reduce pedalling pressure while shifting gears;
Never back-pedal while shifting gears.
Fig. 11
Abb. 11
Afb. 11
Fig. 10/1
Abb. 10/1
Afb. 10/1 A
Fig. 10/2
Abb. 10/2
Afb. 10/2

I F E
4.5 Luces
Es aconsejable ir en triciclo de noche sólo si es
indispensable y con mucha prudencia.
El triciclo está equipado con un faro anterior y
un farolito posterior alimentados por dínamo.
Además está equipado con catarifrangente blanco
anterior (incorporado en el faro anterior), con
catarifrangente rojo posterior (incorporado en el
faro posterior), con catarifrangentes en las ruedas
y pedales.
Es importante que los faros y los catarifrangentes
estén siempre limpios y en posición correcta para
que tengan la máxima eficacia.
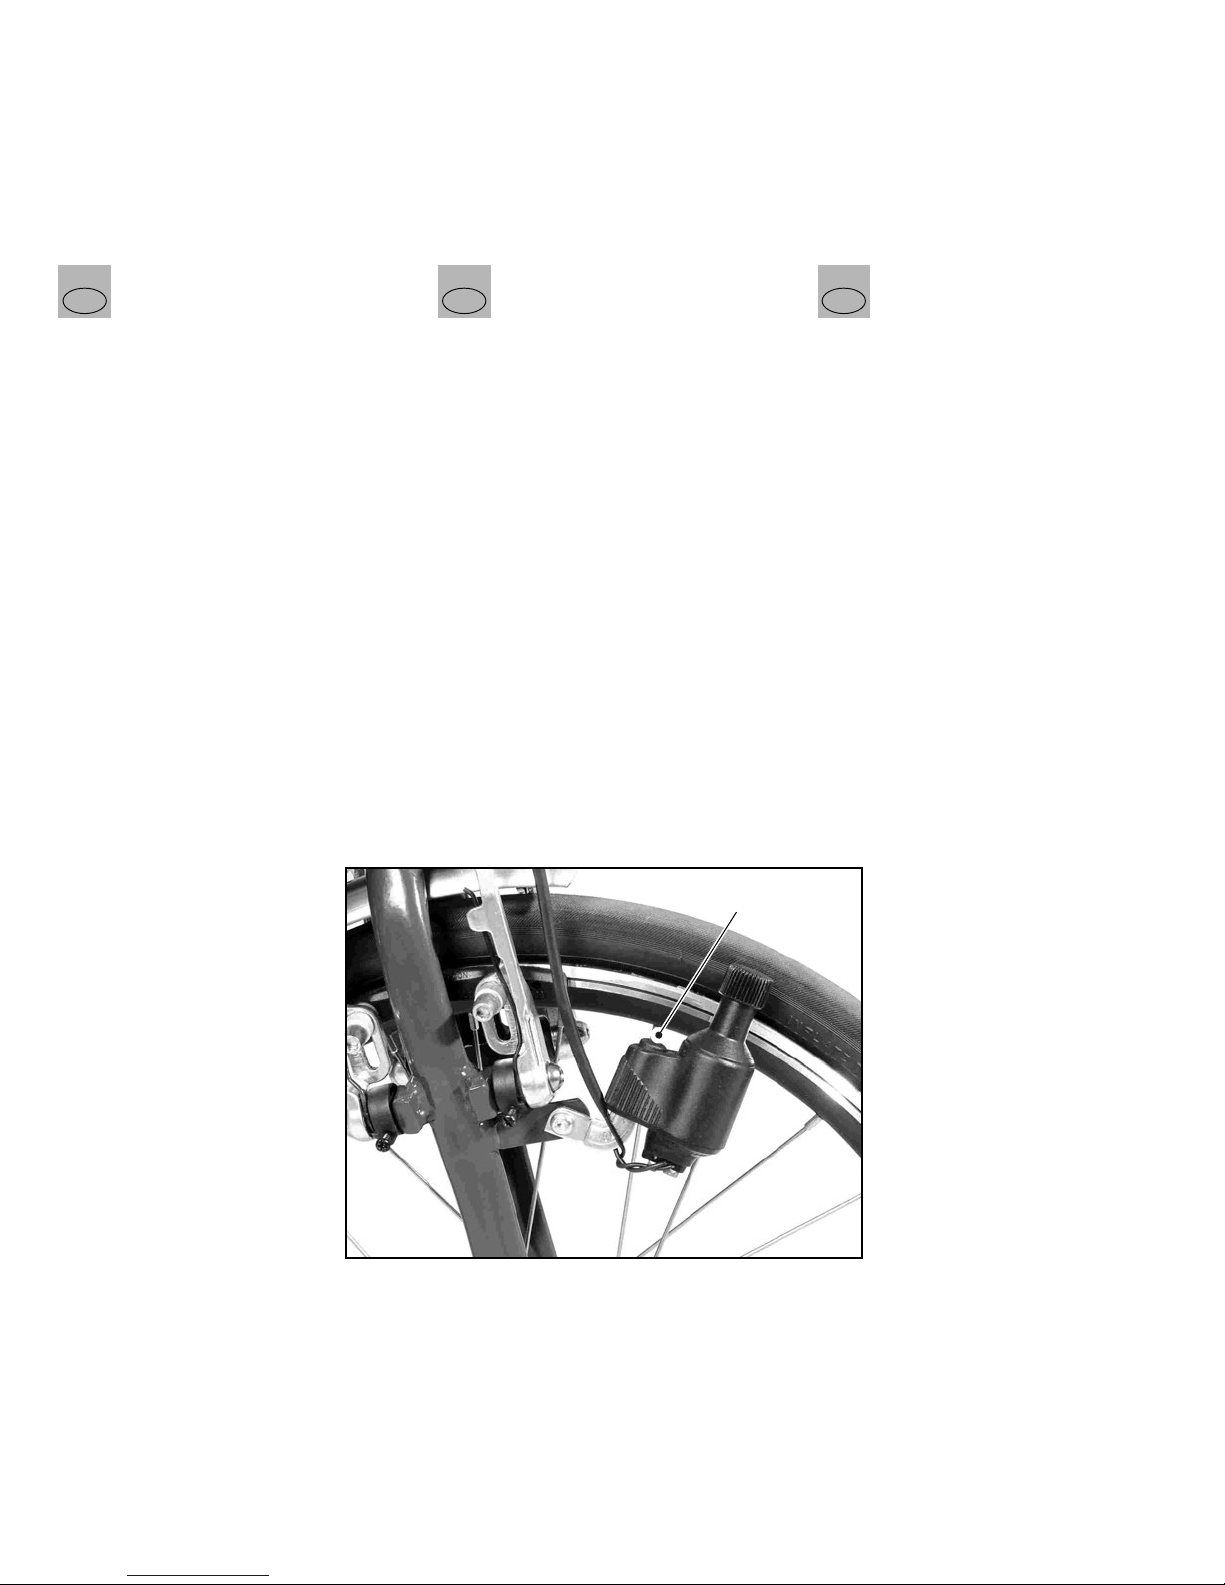
La dínamo está situada en el lado derecho de la
horquilla anterior (Fig. 12): oprimiendo el botón
(A) ésta se baja en la rueda y genera corriente
cuando la rueda gira. Para traer la dínamo en
posición de no funcionamiento alejar el rodillo
de arrastramiento de la rueda: la dínamo queda
bloqueada automáticamente en esta posición.
Antes de usar el triciclo, controlar el funciona-
miento de la dínamo y de las luces.
4.5 Luci
È consigliabile andare in triciclo di notte solo se
strettamente necessario e con molta prudenza.
Il triciclo è equipaggiato con un faro anteriore e
un fanalino posteriore alimentati da dinamo.
Inoltre è equipaggiato con catarifrangente bianco
anteriore (incorporato nel fanalino anteriore),
con catarifrangente rosso posteriore (incorporato
nel fanalino posteriore), con catarifrangenti alle
ruote e ai pedali.
È importante che i fanalini e i catarifrangenti
siano sempre tenuti puliti e nella posizione
corretta perché abbiano il massimo di efficacia.
La dinamo è situata sul lato destro della forcella
anteriore (Fig.12): premendo il bottone (A) essa
si abbassa sulla ruota e genera corrente quando
la ruota gira. Per riportare la dinamo in posizione
di non funzionamento allontanarne il rullo di
trascinamento dalla ruota: la dinamo resta blocca
ta automaticamente in questa posizione.
Prima di avviarsi col triciclo, controllare il funzio-
namento della dinamo e delle luci.
4.5 Eclairage
Il est conseillé de conduire le tricycle de nuit
seulement en cas de nécessité et avec beaucoup
d’attention.
Le tricycle est équipé de feux avant et arrière
alimentés par dynamo. En plus il est équipé de
catadioptre blanc avant (incorporé dans le feu
avant), de catadioptre rouge arrière (incorporé
dans le feu arrière), de catadioptres aux roues et
aux pédales. Il est très important que feux et
catadioptres soient maintenus toujours propres
et dans la position correcte pour conserver le
maximum d’efficacité.
La dynamo est située à droite de la roue avant
(fig. 12). Elle s’abaisse contre le pneu quand
vous déprimez le bouton (A) de relevage. Pour
la remettre en position d’attente écartez douce-
ment la molette motrice d’environ 1 cm du pneu.
La dynamo fonctionne seulement quand la roue
tourne.
Vérifiez avant chaque sortie que les contacts de
câbles électriques sont corrects et que les ampou-
les n’ont pas été survoltées et “grillées”.
A
Fig. 12
Abb. 12
Afb. 12
GB D NL
4.5 Verlichting
Gebruik de driewieler alleen in het donker als
dat echt noodzakelijk is en wees daarbij zeer
voorzichtig.
De driewieler heeft een koplamp en een achter-
licht die door een dynamo worden gevoed.
Verder heeft de driewieler een witte reflector
voor (in de koplamp), een rode reflector achter
(in het achterlicht) en reflectoren op de wielen
en op de pedalen.
Het is belangrijk dat de lampen en de reflectoren
altijd schoon zijn en in de juiste positie staan
voor de beste werking.
De dynamo bevindt zich aan de rechterkant van
de voorvork (afb. 12): als u op de knop (A) drukt,
komt de dynamo tegen het wiel te staan en wordt
er stroom opgewekt wanneer het wiel draait. Om
de dynamo in de ruststand terug te zetten, hoeft
u alleen de aandrijfrol van de dynamo van het
wiel weg te trekken: de dynamo blijft dan vanzelf
in die positie staan.
Controleer voordat u op de driewieler gaat fietsen
of de dynamo en de verlichting werken.
4.5 Lichter
Es wird empfohlen, bei Nacht das Dreirad nur
mit größter Vorsicht und wenn es unbedingt
nötig ist zu verwenden.
Das Dreirad ist mit einem Vorder- und einem
Rücklicht ausgestattet, die durch einen Dynamo
angetrieben werden.
Außerdem ist es vorne mit weißen Rückstrahlern
(im Vorderlicht), hinten mit roten Rückstrahlern
(im Rücklicht) und mit Rückstrahlern auf den
Rädern und Pedalen ausgestattet.
Für die beste Wirkung ist es sehr wichtig, dass
die Lichter und Rückstrahler immer sauber sind
und sich in der korrekten Position befinden.
Der Dynamo befindet sich rechts von der
vorderen Gabel (Abb. 12): Durch das Drücken
des Knopfs (A) wird er auf das Rad abgesenkt
und erzeugt durch die Raddrehung Strom. Um
den Dynamo wieder in die Ruheposition zu
bringen, muss er von der Antriebsrolle des Rades
entfernt werden. Der Dynamo bleibt dann
automatisch in dieser Position.
Bevor Sie mit dem Dreirad wegfahren, müssen
Sie die Funktionstüchtigkeit des Dynamos und
der Lichter kontrollieren.
A
Fig. 12
Abb. 12
Afb. 12
4.5 Lighting
The tricycle should be ridden after dark only if
necessary and then with extreme care and
awareness.
The tricycle is equipped with front and rear lights
powered by a dynamo. It is also equipped with
front white reflector (incorporated in the front
light), rear red reflector (incorporated in the tail
light), spoke reflectors and pedal reflectors.
It is most important that lights and reflectors are
kept clean at all times and remain in the correct
position as installed for maximum effectiveness.
The dynamo which provides electricity for the
headlamp and the tail light is located on the right
side of the front fork (fig.12). It should be used
when night time bicycling is necessary. To engage
the dynamo merely depress the small button (A):
the generator works as soon as the front wheel
turns. To disengage the dynamo, simply grasp
it and move its drive wheel away from the tyre:
it will snap into position.
Before riding, check that dynamo and lights work
properly.
I F E
5. REGOLAZIONI
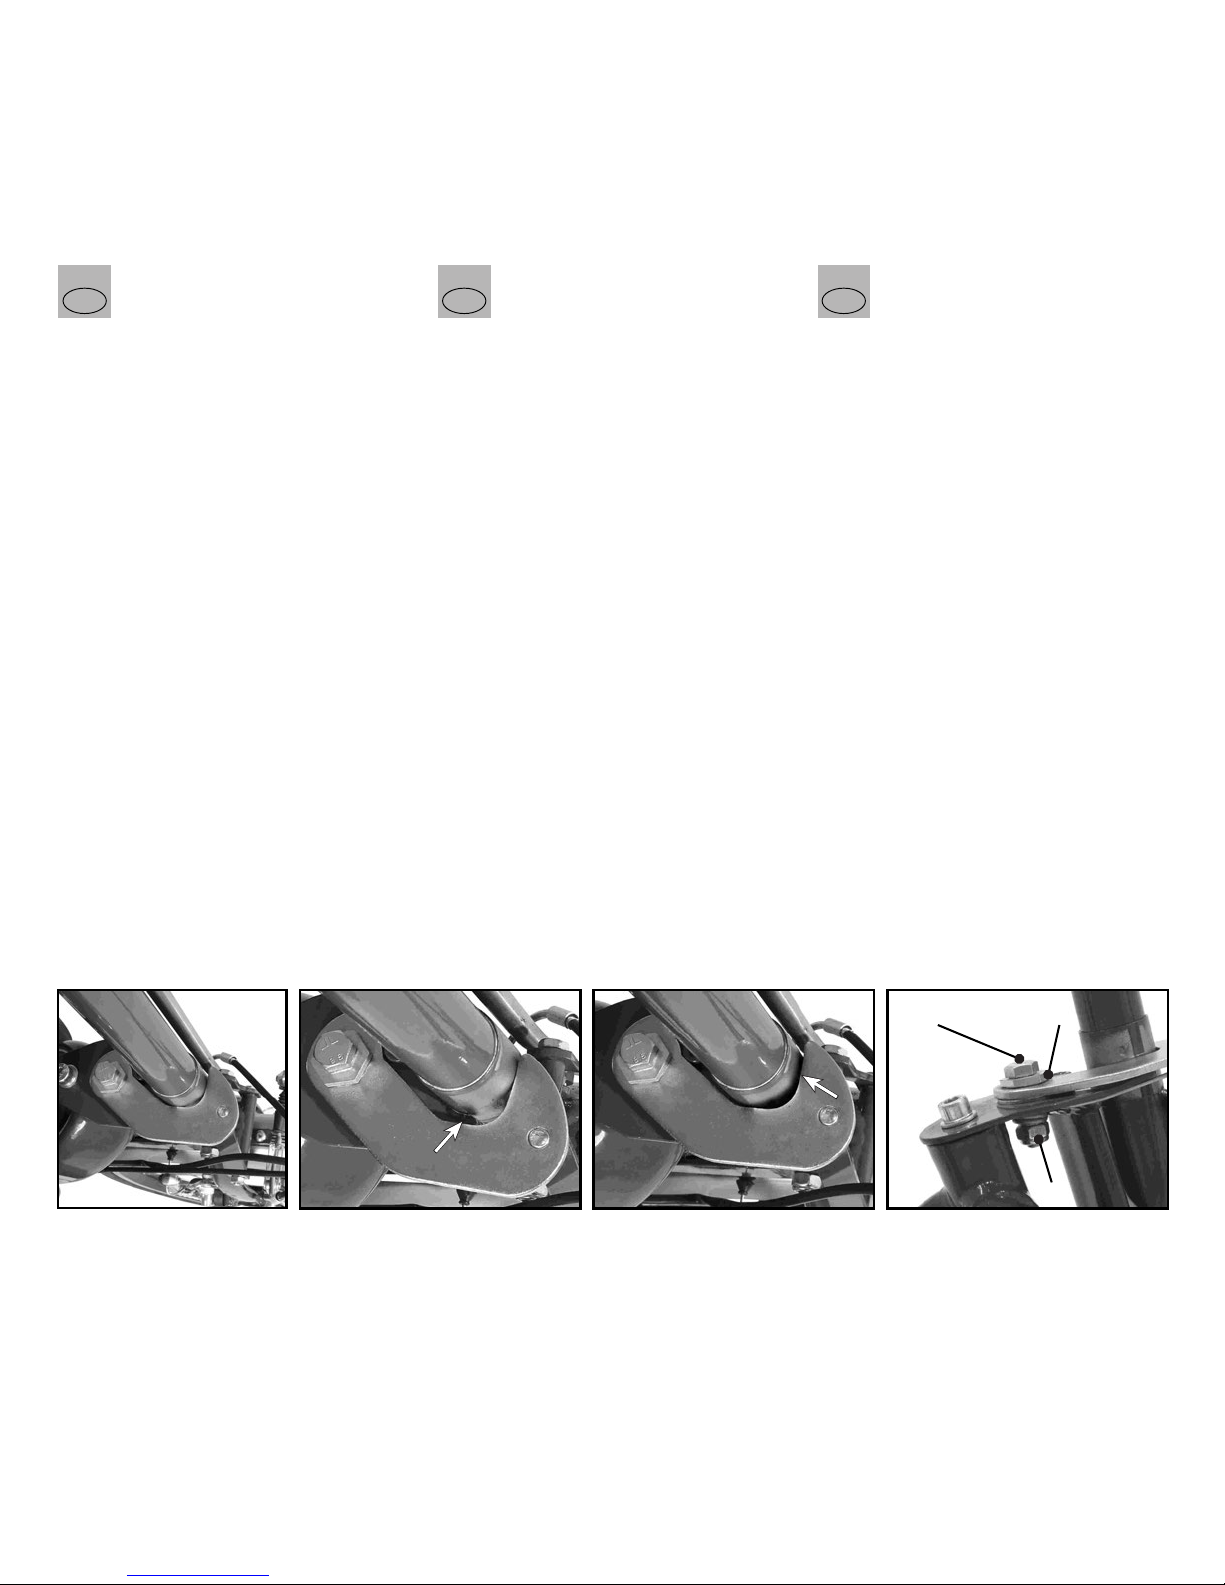
5.1 Gancio manubrio
Il piantone del manubrio è bloccato in posizione
verticale da un gancio posto sulla testa della forcella.
Prima di usare il triciclo:
*Verificare che il piantone del manubrio aderisca
completamente e senza gioco alla parte interna
del gancio, come mostrato in fig. 13.
*Verificare che la molla che tira il gancio agisca
efficacemente.
Non condurre il triciclo se il gancio manubrio si
trova in una delle posizioni errate mostrate in fig.
14 e 15 oppure se la molla tira poco o male il gancio
stesso.
Se il gancio assume la posizione errata illustrata in
fig. 14 (cioè se il gancio non aderisce completamente
al piantone) o in fig. 15 (cioè se il gancio ha del
gioco rispetto al piantone), ripristinare la posizione
corretta mostrata in fig. 13 nel seguente modo:
*Tenendo bloccata la vite (A) svitare un pò il dado (C)
(fig. 16).
* Far girare l’anello eccentrico (B - fig. 16) in
un senso o in un altro per una frazione di giro
finché il gancio si pone come mostrato in fig. 13.
*Tenendo bloccata la vite (A), serrare il dado (C)
(fig. 16).
* Aprire e chiudere il manubrio per controllare
se la posizione del gancio è corretta.
Se la molla tira poco o male il gancio stesso,
provvedere alla sua sostituzione.
5. REGLAGES
5.1 Crochet du guidon
La potence du guidon est bloquée en position
verticale
par un crochet qui la retient contre la fourche.
Avant de partir:
* Vérifiez que la potence du guidon s’est bien
engagée au contact complet de la courbe
intérieure du crochet, comme montré en fig. 13.
* Vérifiez que le ressort pousse efficacement le
crochet contre la potence du guidon.
Ne conduisez jamais le tricycle, si le crochet du
guidon est dans une des positions déréglées mon-
trées en fig. 14 et 15 ou si le ressort pousse faible-
ment le crochet.
Si le crochet est dans la position déréglée montrée
en fig. 14 (c.à.d. le crochet n’est pas complètement
engagé à la potence du guidon) ou en fig. 15 (c.à.d.
il y a du jeu entre le crochet et la potence), rétablissez
la position correcte montrée en fig. 13 comme suit:
*Tenant bloquée la vis (A), desserrez un peu l’écrou (C)
(fig. 16).
* Faites tourner sur elle même la rondelle
excentrée (B -fig. 16), dans un sens ou dans
l’autre, pour une fraction de tour jusqu’à ce
que le crochet de blocage se place comme
montré en fig. 13.
*Tenant bloquée la vis (A), serrez l’écrou (C)
(fig. 16).
* Contrôlez à nouveau si la position du crochet
de blocage est correcte en repliant et ouvrant
à nouveau le guidon.
Si le ressort pousse faiblement le crochet du
guidon, remplacez le.
5. REGULACIONES
5.1 Gancho del manillar
La horquilla inferior del manillar está bloqueada
en posición vertical por un gancho colocado en la
cabeza de la horquilla.
Antes de utilizar el triciclo:
*Comprobar que la horquilla inferior del manillar
esté correctamente colocada en la parte interna
del gancho como puede verse en la Fig. 13, y
que no presente juego.
* Comprobar que el muelle que tracciona el
gancho actúe eficazmente.
No andar en el triciclo si el gancho del manillar
está en una de las posiciones que se muestran como
erróneas en las Fig. 14 y 15, o bien si el muelle
tracciona el gancho poco o incorrectamente.
Si el gancho asume una posición errónea, tal como
la ilustrada en la Fig. 14 (o sea, si el gancho no se
adhiere totalmente a la horquilla inferior del
manillar), o como se ilustra en la Fig. 15 (es decir,
si el gancho presenta juego respecto de la horquilla
inferior), ajustar en la posición correcta, tal como
se muestra en la Fig. 13 de la siguiente forma:
*Manteniendo bloqueado el tornillo (A), girar
desenroscando un poco la tuerca (C) (fig. 16).
*Hacer girar la arandela excéntrica (B - Fig. 16)
en uno u otro sentido por una fracción de vuelta,
hasta que el gancho se posicione como en la Fig.
13.
*Manteniendo bloqueado el tornillo (A), apretar la
tuerca (C) (fig. 16).
*Abrir y cerrar el manillar para controlar que la
posición del gancho sea correcta.
Si el muelle tracciona el gancho poco o mal,
reemplazarlo.
NO
Fig. 13
Abb. 13
Afb. 13
Fig. 15
Abb. 15
Afb. 15
Fig. 16
Abb.16
Afb. 16
Fig. 14
Abb. 14
Afb. 14
NO
A B
C

GB D NL
5. INSTELLINGEN
5.1 Borghaak stuur
De stuurbuis wordt in verticale positie geblokkeerd
door een borghaak op het uiteinde van de vork.
Voordat u met de driewieler gaat fietsen dient u:
* Te controleren of de stuurbuis volledig en
zonder speling in de borghaak vastzit, zoals te
zien is op afb. 13.
* Te controleren of de veer die de borghaak
aanspant goed werkt.
Niet op de driewieler rijden als de borghaak niet
goed zit, zoals in afb. 14 en 15 getoond wordt, of
als de veer de borghaak te weinig of slecht aanspant.
Als de borghaak een foute positie aanneemt, zoals
afb. 14 toont (de borghaak zit niet volledig in de
stuurbuis), of afb. 15 (de borghaak heeft een speling
ten opzichte van de stuurbuis), dan kan de correcte
positie, getoond in afb. 13, als volgt hersteld worden:
*Houd schroef (A) geblokkeerd en draai moer (C)
een beetje los (afb. 16)
*Draai de excentrische ring (B - afb. 16) een klein
stukje de ene of de andere kant op, totdat de
borghaak de positie van afb. 13 aangenomen heeft
*Houd schroef (A) geblokkeerd en draai moer (C)
vast (afb. 16).
*Open en sluit het stuur om te controleren of de
positie van de borghaak juist is.
Indien de veer de borghaak weinig of slecht
aantrekt, moet de veer vervangen worden.
5. ADJUSTMENTS
5.1 Handlebar hook adjustment
The handlebar stem is blocked in the vertical, riding
position by the hook located on the top of the front fork.
Before riding:
* Check that the hook is properly positioned: it
should adhere completely and without slack
to the handlebar stem, as shown in fig. 13;
*Check that the spring pulls powerfully the hook.
Never ride the tricycle is the handlebar hook is in
one of the wrong positions shown in fig. 14 and 15
or if the spring pulls weakly the hook.
If the hook is in the wrong position shown in fig.
14 (i.e. the hook does not adhere completely to the
stem) or in fig. 15 (i.e. there is a play between the
hook and the stem), readjust the hook to the right
position shown in fig. 13 as follows:
*While keeping blocked the screw (A), loosen the
nut (C) (fig. 16).
*Turn the eccentric ring (B – fig. 16) for a
fraction of turn, until the position of the hook
is that shown in fig. 13;
*While keeping blocked the screw (A), tighten the
nut (C)
* Tighten the screw (A- fig. 16)
*Check again for the proper position of the hook
by folding and opening the handlebar.
If the spring pulls weakly the hook, replace it.
5. EINSTELLUNGEN
5.1 Lenkstangenhaken
Die Steuersäule der Lenkstange wird durch einen
Haken oben an der Gabel in senkrechter Stellung
gesperrt.
Vor Benutzung des Dreirads:
* Prüfen, ob die Steuersäule der Lenkstange
vollkommen anliegt und der innere Teil des
Hakens, wie in Abb. 13 dargestellt, Spiel
aufweist.
*Prüfen, dass die Zugfeder des Hakens wirksam
eingreift.
Nicht mit dem Dreirad fahren, wenn der
Lenkstangenhaken sich in einer den in Abb. 14 und
15 dargestellten Fehlstellungen befindet oder wenn
die Feder den Haken nur gering oder schlecht zieht.
Wenn der Haken die in Abb. 14 (das heit, wenn
der Haken nicht vollkommen an der Lenkstange
anliegt) oder die in Abb. 15 (das heit, wenn der
Haken zur Lenkstange Spiel aufweist) gezeigte
Fehlstellung einnimmt, die in Abb. 13 dargestellte
richtige Stellung wie folgt wieder herstellen:
*Während man die Schraube (A) festhält, die
Mutter (C) leicht lockern (Abb. 16).
*Den Exzenterring (B – Abb. 16) ) um den
Bruchteil einer Drehung so lange leicht in die
eine oder die andere Richtung drehen bis der
Haken die in Abb. 13 gezeigte Stellung
einnimmt.
*Während man die Schraube (A) festhält, die
Mutter (C) festziehen (Abb. 16).
* Die Lenkstange zur Prüfung der richtigen
Hakenstellung öffnen und schlieen.
Die Feder ersetzen wenn diese nicht ausreichend
oder schlecht zieht.
NO
Fig. 13
Abb. 13
Afb. 13
Fig. 15
Abb. 15
Afb. 15
Fig. 16
Abb.16
Afb. 16
Fig. 14
Abb. 14
Afb. 14
NO
A B
C
I F E
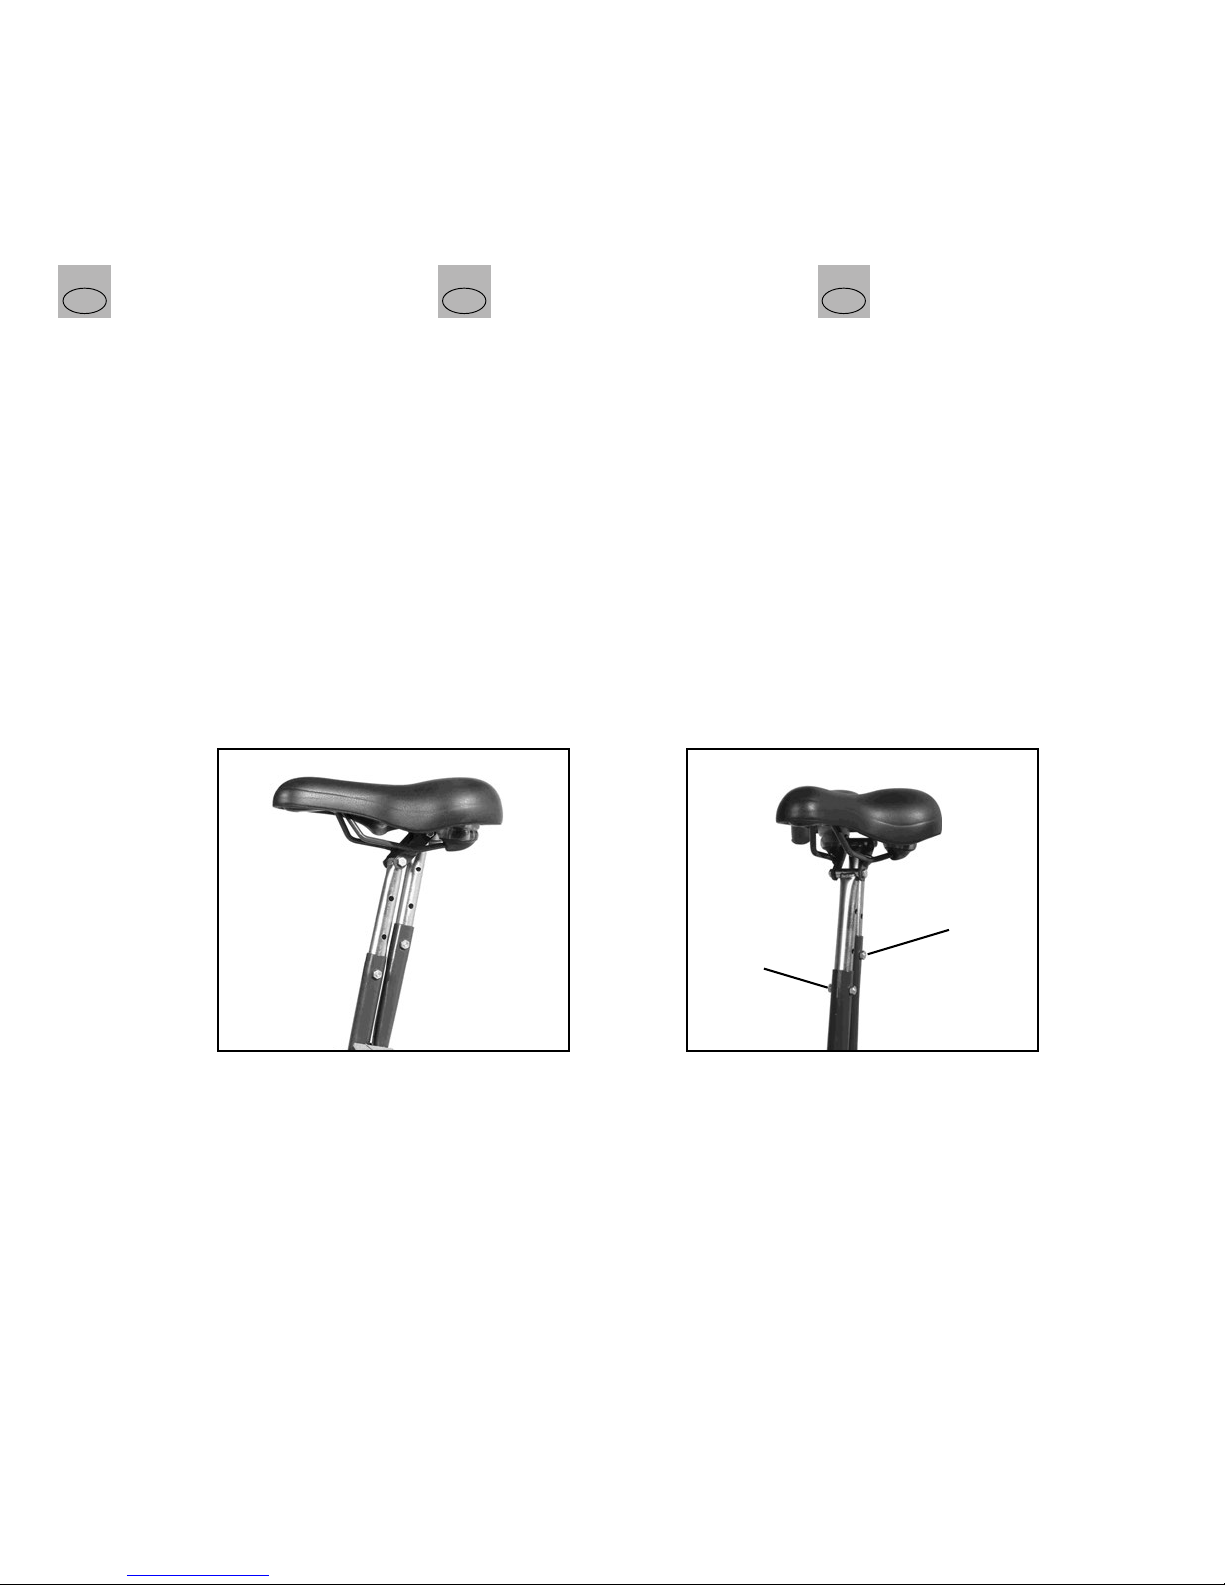
5.3 Regolazioni sella
5.3.1 Regolazione dell’altezza della sella
L’altezza della sella è regolabile:
* in 3 posizioni nella versione Standard.
* in 2 posizioni nella versione Junior.
La regolazione deve essere effettuata a triciclo
aperto e su entrambi i cannotti sella (fig. 17/1).
* Svitare i dadi (A) ed estrarre le viti (B);
* Regolare l’altezza della sella in modo che i
fori dei cannotti superiori corrispondano con
quelli dei cannotti inferiori e che il sellino
sia orizzontale.
Introdurre le viti nei fori, avvitare i dadi.
5.3 Réglages de la selle
5.3.1 Réglage de la hauteur de la selle
La hauteur de la selle est réglable:
* en 3 niveaux dans la version Standard.
* en 2 niveaux dans la version Junior.
Le réglage se fait quand le tricycle est en
position ouverte et sur les deux colonnes de
selle (fig. 17/1).
* Devissez les écrous (A) et enlevez les vis
(B).
* Réglez la selle au niveau préféré de façon
que les trous des colonnes supérieures
correspondent à ceux des colonnes inférieures
et que la selle soit en position horizontale.
Montez à nouveau les vis de blocage et serrez
leurs écrous.
5.3 Regulación del sillín
5.3.1 Ajuste de la altura del sillín
La altura del sillín puede regularse:
* en 3 posiciones en la versión Estándar.
* en 2 posiciones en la versión Júnior.
La regulación de la altura del sillín debe hacerse
con el triciclo desplegado. Deben regularse ambos
tubos porta-sillín (Fig. 17/1) siguiendo las
instrucciones dadas a
continuación.
*Aflojar las tuercas (A) y extraer los tornillos
(B).
* Regular la altura del sillín de modo que los
orificios de los tubos superiores se
correspondan con los de los tubos inferiores,
de modo que el sillín quede horizontal.
Colocar los tornillos en los orificios y apretar
las tuercas.
Fig. 17/1
Abb. 17/1
Afb. 17/1
AB
Table of contents
Other DI BLASI Bicycle manuals


