manuals.online logo
Brands
  1. Home
  2. •
  3. Brands
  4. •
  5. Klever
  6. •
  7. Bicycle
  8. •
  9. Klever Y Muse 45 User manual

Klever Y Muse 45 User manual

Other Klever Bicycle manuals

Klever N Pinion 45 User manual

Klever

Klever N Pinion 45 User manual

Klever Y Muse 25 User manual

Klever

Klever Y Muse 25 User manual

Klever B Lux 25 User manual

Klever

Klever B Lux 25 User manual

Klever X Alpha 45 User manual

Klever

Klever X Alpha 45 User manual

Klever Y Gala 45 User manual

Klever

Klever Y Gala 45 User manual

Klever X SPEED User manual

Klever

Klever X SPEED User manual

Popular Bicycle manuals by other brands

Grace ONE manual

Grace

Grace ONE manual

Woosh Gran Camino manual

Woosh

Woosh Gran Camino manual

Razor FLASHRIDER 360 user manual

Razor

Razor FLASHRIDER 360 user manual

TAUBIK SOHO 2.0 user manual

TAUBIK

TAUBIK SOHO 2.0 user manual

Oxybul FREEbul 331067 manual

Oxybul

Oxybul FREEbul 331067 manual

Cycle Force Group BICYCLE BABY TRAILER & JOGGER Assembly instructions

Cycle Force Group

Cycle Force Group BICYCLE BABY TRAILER & JOGGER Assembly instructions

Giant TWIST FREEDOM DX datasheet

Giant

Giant TWIST FREEDOM DX datasheet

RAMBO R1000X2M-FF-BFD manual

RAMBO

RAMBO R1000X2M-FF-BFD manual

Vermeiren SAFARI Maintenance manual

Vermeiren

Vermeiren SAFARI Maintenance manual

Velec A2/36V owner's manual

Velec

Velec A2/36V owner's manual

Cervélo S3 2019 Assembly manual

Cervélo

Cervélo S3 2019 Assembly manual

Festo EGSC-BS-KF Instructions & Operating

Festo

Festo EGSC-BS-KF Instructions & Operating

Gio Electric H1 Volt owner's manual

Gio Electric

Gio Electric H1 Volt owner's manual

Huka orthros manual

Huka

Huka orthros manual

DAHON CIAO - 2009 manual

DAHON

DAHON CIAO - 2009 manual

Aprimatic ONDA 500 Installation, use and maintenance instructions

Aprimatic

Aprimatic ONDA 500 Installation, use and maintenance instructions

Greyp G6 Series user manual

Greyp

Greyp G6 Series user manual

Babboe Carve-E user manual

Babboe

Babboe Carve-E user manual

manuals.online logo
manuals.online logoBrands
  • About & Mission
  • Contact us
  • Privacy Policy
  • Terms and Conditions

Copyright 2025 Manuals.Online. All Rights Reserved.

Model
User manual
Klever Y Muse 

km/h
This technical documentation has been compiled by: Klever Mobility NL bv.
June 2022
www.klever-mobility.com 3
Contents
Contents
Introduction
. QuickStart
. What type of Ebike?
. Getting started & safety check
. Behaviour in road trac
Klever’s Ebike drive train
. Klever’s proprietary propulsion  the BIACTRONsystem
. Sensors & their function
. Levels of electric motor support
. Regeneration of battery capacity
. Display
... Function of each button
... Display content
... Settings of the menu & the submenu’s
. Rechargeable battery
.. Charging the battery
.. Battery range
.. Removal & mounting of the battery
.. Transport of the battery
. Elementary diagnostics & troubleshooting of the electric system
Bicycle parts of your Ebike
. Bicycle parts
. The Klever  km/h Ebike, a Typeapproval vehicle with dedicated parts
.. Horn
.. Brake light
.. Wing mirror
. Saddle & handlebar adjustment
. Suspension front fork
. Disc brakes
. Mechanical drive train & gearshift
. Lighting
. Wheels and tyres
. Luggage carrier & transport of luggage
. Antitheft protection
. Accessories
www.klever-mobility.comwww.klever-mobility.com4 5
Ebike care
. Wear, maintenance & inspections
. Storage & transport of your Klever Ebike
. FAQ’s
Legal & environment
. Klever Y Muse  Typeapproval & EC Certificate of Conformity CoC
. Intended use of your Klever  km/h Ebike
. Product liability & warranty
. Disposal & transportation
Data
. Technical data Klever Y Muse 
. Klever Ebike passport
. Klever inspection plan
. Imprint
ContentsContents
www.klevermobility.comwww.klevermobility.com6 7
Introduction Introduction
. QuickStart
Dear customer,
On the first pages you will find instructions for a QuickStart
with your new Klever 45 km/h E-bike. For more technical
information read the additional instructions on the following
pages. Should you have any further questions, please ask
your local Klever dealer or contact our technical hotline. The
hotline’s contact details are to be found in chapter 2. and at
the end of this manual.
Enjoy your Klever 45 km/h E-bike, we wish you a lot of fun,
The Klever Mobility team.
Image 1.1
Safety check
Before starting your E-bike always check the operation of the
brakes and the tyre pressure.
Launch of the electric drive
You can start the system with or without inserting the dedicated E-KEY
(image 1.2). Check for the function of the E-KEYsection 5.4.3. Menu &
submenus for settings.As soon as you insert the E-KEY into the display,
the system will be activated and will start itself.With the E-KEY already
in the display while the system is off, there are two ways to activate the
system:
1. Press the on/o button (image 1.3), after a 3 seconds
system check your E-bike is ready to be pedalled.
2. Or just start pedalling and the electric system will
wake up automatically. After a 3 seconds system check, the
electric drive will start to support.
NNo support, electric
system active
ECO Low support
TOUR Medium support
MAX Strongest support
The á(TURBO) button on the display has 3 functions:
1. Walk-assist: actuate the á(TURBO) button while
walking next to your E-bike. The maximum speed is 4
km/h.
≤ 4 km/h Pushing aid while
taking your
E-bike by the hand.
2. TURBO-mode WITHOUT pedalling of the cyclist.
The maximum speed is 4 km/h.
≤ 4 km/h
Additional support at
standstill or in case you
do not want to pedal.
3. TURBO-mode WITH pedalling of the cyclist. While
actuating the á(TURBO) button in ECO- or TOUR-
mode the electric support will be increased to MAX-
mode.
≤ 45 km/h Additional support
while riding hills or
strong headwinds.
Image 1.2
Image 1.3
E-KEY
www.klevermobility.comwww.klevermobility.com8 9
IntroductionIntroduction
Charging the rechargeable battery
Caution! The battery should only be charged with the
dedicated Klever 6A charger (image 1.4).
The battery can be charged on (image 1.6) and o bike (image
1.7). For removal of the battery from its docking station see
section 5.5.3. Connect the charger with the power plug to
the wall socket. If the LED on the charger shows constant red
light, the charger is ready for use. Connect the charger plug
of the charger to the charging socket on the battery (images
1.4 + 1.5). The charging process starts automatically. Once the
LED on the charger constantly lights green the operation is
completed and the battery is charged. Unplug the power plug
from the wall first, then remove the charger lead from the
battery charger.
State of
charge
Charger LED Battery LED Note
Flashing red Error code: check connections
Steady red Charger ready to charge
0% Flashing yellow Flashing red Capacity very low; charging starts
< 35% Steady yellow Flashing red Normal charging
35 – 75% Steady yellow Flashing yellow Normal charging
75 – 90% Steady yellow Flashing green Normal charging
> 90% Flashing green Flashing green Final charging
100 % Steady green No LED colour
Fully charged
The charging of an empty rechargeable battery of 850 Wh (from 0% to 96%) will take about 3.5
hours with the dedicated 6A charger.
The charging of an empty rechargeable battery of 1,200 Wh (from 0% to 96%) will take about 5
hours with the dedicated 6A charger.
Image 1.7
Image 1.6
Image 1.5
Charging socket
Image 1.4
Charger
Power plug
Power cable
LED
. Introduction & which type of
E-bike?
Congratulations!
With the purchase of this Klever 45 km/h
E-bike you are the owner of a high-quality E-bike. For a
trouble free, pleasurable riding experience, carefully read
this manual. You will find everything you need to know in
terms of specifications, operation, maintenance and care.
For additional information look in the separate manuals
which come with some of the components.
Pay particular attention to sections in bold which
are marked with the "Caution!" symbol. The most
important information is summarised. It should be
observed to avoid possible accidents and danger to life
and limb.
Bold sections marked with the “Please note!” symbol
contain information about your E-bike, its accessories
and its handling.
Operations marked with the “Tool” symbol are to be
executed by authorised Klever dealers. These operations
require specific expertise and dedicated tools.
Furthermore, in case you need any additional information or
advice, please contact
Klever Benelux bv technical hotline at +31 (0)302102905
(Monday - Friday from 8h00 – 17h00 CET)
Or contact an authorised Klever retailer.The latest available
information on our products, other technical information and
videos can be found on our website: www.klever-mobility.com.
E-bikes & speed E-bikes
Over the last 15 years the E-bike category has become
enormously popular. Today you will find all sorts of E-bikes.
The current market of E-bikes with pedal assistance consists
of two main types of E-bikes with their own legal framework:
• Regular E-bikes with a maximum pedal assisted speed up to
25 km/h, called EPAC’s (Electrically Pedal Assisted Cycles).
www.klever-mobility.comwww.klever-mobility.com10 11
IntroductionIntroduction
• And Type-approved E-bikes with a maximum pedal assisted
speed up to 45 km/h, called speed pedelecs or speed
E-bikes. Klever Mobility oers E-bikes in both categories, 25
km/h EPAC’s as well 45 km/h speed E-bikes
EC Type-approval
Your new Klever 45 km/h E-bike is not a regular E-bike, it is
a speed E-bike. It has been equipped according to the EC
Type-approval Regulation 168/2013. And has been classified
as a vehicle in category L1e-B. Therefore, you can safely use it
on public roads in Belgium, the Netherlands and all other 25
countries of the EC.
A 45 km/h E-bike must be equipped with a well audible horn,
a wing mirror on the LH-side (UK RH-side), a lighting system
with quality marks for the head light and the tail light with
integrated brake light, reflectors and with 2 sets of brakes
independently actuating the front and rear wheel.
The electric pedal assistance is limited to max. 45 km/h, and
thus complies with the statutory requirements for an L1e-B
vehicle. Due to the fact that our new Klever 45/h E-bike is a
type-approval vehicle it must be registered at your national
road safety authority (e.g., DIV in Belgium, DREAL in France,
KBA in Germany, RDW in the Netherlands, or DVSA in the
United Kingdom). In addition, you will need a license plate
(as proof of your local registration & insurance), a liability
insurance and a driving license. Moreover, you will need to
wear an approved helmet for 45 km/h E-bikes as well.
In the legal section (chapters 11. & 12.), you will find more
information on the Type-approval, the EC Certificate of
Conformity and the legal aspects and usage of a 45 km/h
E-bike.
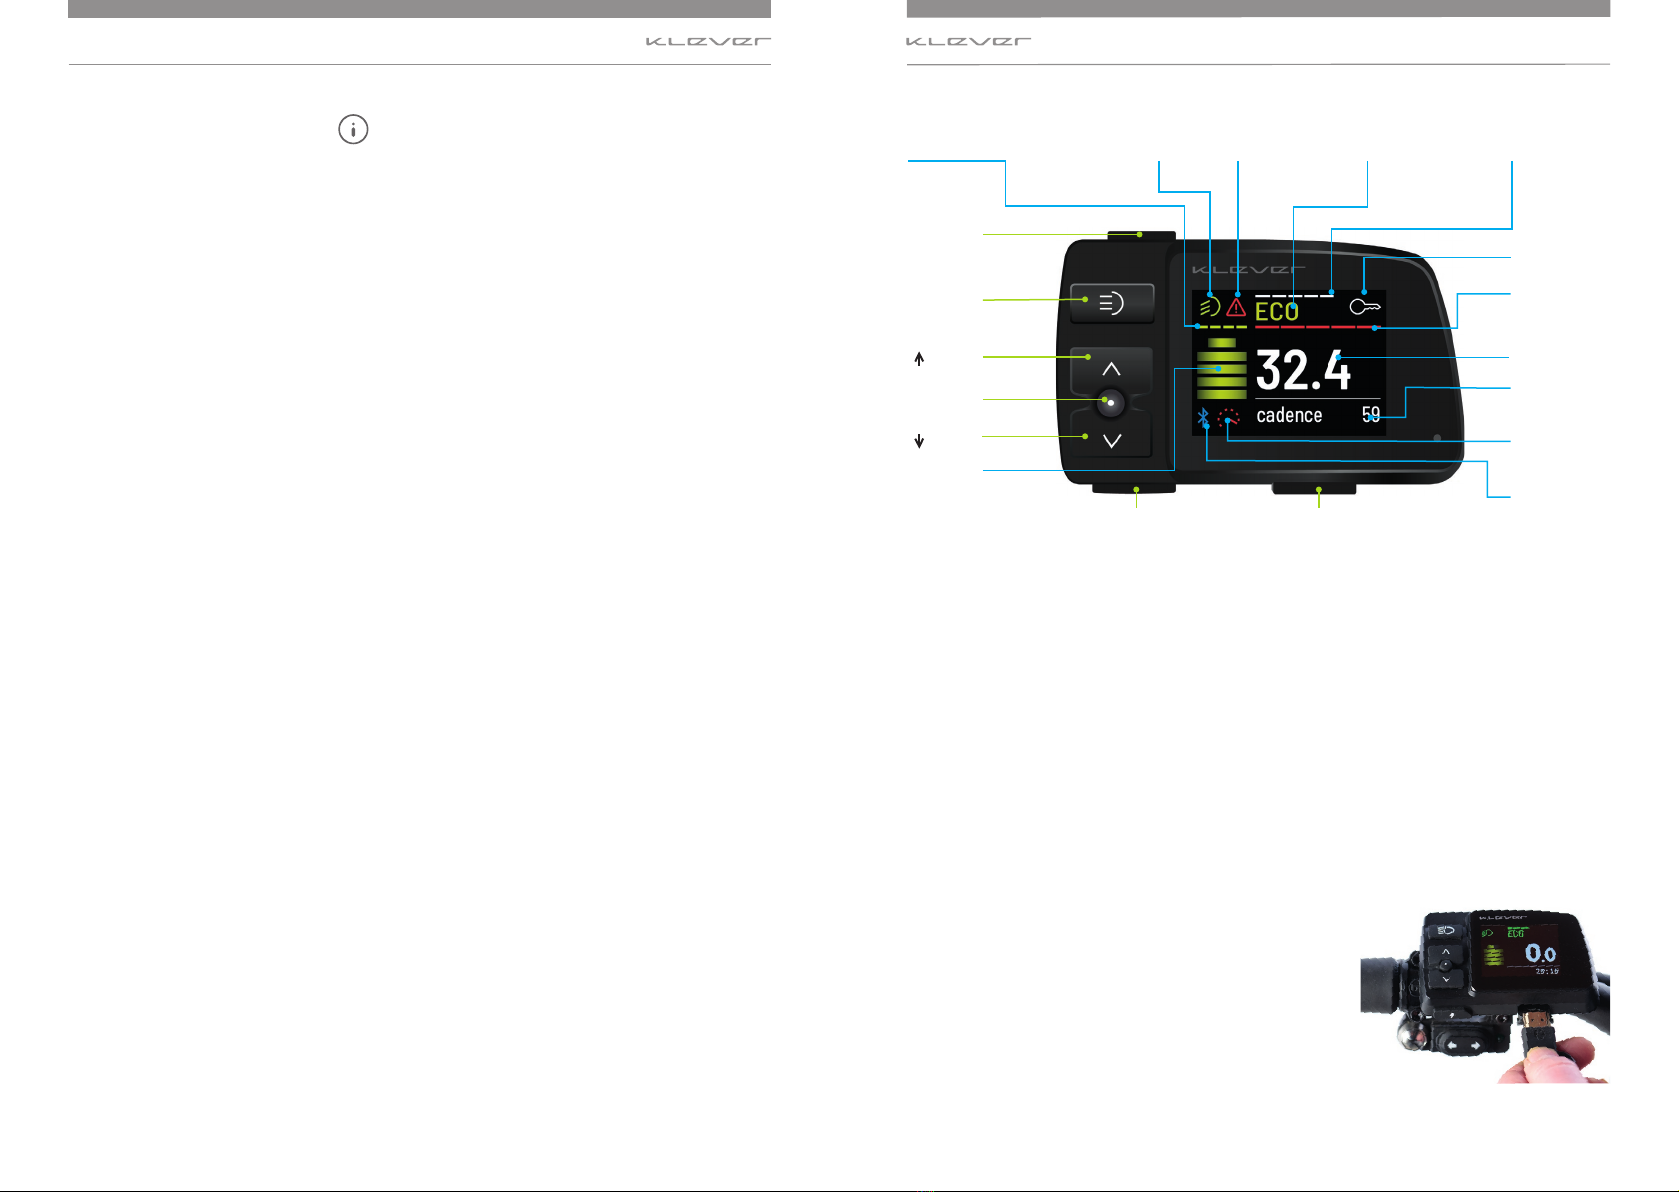
. Getting started and safety
check of your Klever  km/h
Ebike.
Your E-bike has been subjected to an end-of-line-check on the
assembly line of our factory. Afterwards it has been checked
at your local Klever dealer. Yet, the transport and the use over
time may have caused some changes. Therefore, prior to your
first ride, and occasionally thereafter, you should consider to
check following points.
• Make yourself familiar with this speed pedelec and the
functioning of its electric motor support, before the first ride
in public trac.
• Setting of the saddle and the handlebars.
• Function of the brakes.
• Air pressure and the profile depth of the tyres.
• Proper operation of the lighting system.
• Tightness of the bolts and nuts of the wheels.
• Minimum insertion of the seat post.
Caution! Do not start when you identify deficiencies in
one of these points. While riding a defective E-bike this
can cause accidents and endanger your life. If in doubt,
contact your dealer or our technical hotline.
Caution! Through extreme weather and road conditions
there is wear and tear in everyday riding. Because of
the dynamic loads the parts & components of your
E-bike experience dierent material fatigue and wear.
Therefore, it is recommended to inspect your E-bike on a
regular basis and look for wear of parts and changes in
scratches or cracks, or the discolouring of parts. These
could indicate damage of the part. Needless to say, that
damaged parts must be repaired or replaced.
Please note! Following the inspection plan in chapter
16., you best bring your E-bike to your Klever dealer for
inspection, service, maintenance and repair.
www.klever-mobility.comwww.klever-mobility.com12 13
Please note! Since this Klever 45 km/h E-bike is Type-
approved vehicle, make sure to only use original Klever
Type-approved spare parts for replacement. The same
applies to upgrades (e.g., winter tyres or suspension seat
post). Only select components from the Klever Type-
approval list. In case you are not sure whether to use
Type-approved spare parts, always contact your ocial
Klever dealer or otherwise call our technical hotline.
IntroductionIntroduction
. Behaviour in road trac
With the help of your Klever 45 km/h E-bike’s electric pedal
assistance, you reach high speeds and you accelerate
substantially faster and easier than you are used to with a
regular E-bike. Therefore, you should intensively familiarise
yourself with this 45 km/h E-bike on a trac-calmed road or
parking lot before going in public trac. During riding on the
road, you should follow these guidelines:
• It is compulsory to always wear an approved 45 km/h
E-bike helmet.
• Make yourself familiar with the trac rules and stick
to the rules.
• Be ready to brake at any time and expect misconduct
of others.
• Ride defensively and be considerate to other road users.
• Always keep your E-bike in a perfect condition.
• Use your E-bike only in accordance with its intended
purpose (see chapter 11. Intended use).
• Do not use a mobile phone nor a headset while riding.
• Be sure to observe the maximum weight of cyclist + E-bike
+ luggage of 150 kg (see chapter 14. Technical Data).
• Have your E-bike checked according to the recommended
service intervals by authorised Klever dealers.
www.klevermobility.comwww.klevermobility.com14 15
. Klever’s proprietary electric
propulsion  the BIACTRON
system
You have purchased a 45 km/h E-bike that helps improve
your day-to-day mobility with its electric propulsion. Slopes
can be better managed and wind resistance can be better
overcome.
Klever’s electric BIACTRON system consists of the following
components (image 5.1):
• Rechargeable battery
• Motor
• Control unit / Display
• Motor controller
• Torque sensor
• Pedal Sensor
• Charger (image 5.2)
Klever’s E-bike drive train
Image 5.2
Image 5.1
Front light
Tail light
Motor
Pedal sensor
Torque sensor
Motor controller
Battery
Display /
dashboard
Klever’s E-bike drive train
Powerful system benefits
The brushless Klever BIACTRON rear wheel motor comes with
3 powerful advantages:
1. Contrary to centre motor drive trains, with a motor around
the bottom bracket, the direct drive rear wheel motor is
whisper-quiet.
2.The motor in the rear wheel is at the end of the drive train.
For this reason, the electric motor support has no negative
impact on the shifting performance and the wear of the
drive train. By contrast, in E-bikes with a centre motor,
the joined forces and torque of both cyclist + motor go
through all components of the drive train. Consequently,
shifting gears goes less smoothly and the wear of drive
train components such as chain, chainwheel, sprockets and
derailleurs goes twice as rapidly.
3.Last but not least, with the rear wheel motor the drive train
has no eciency loss. Motor power and motor torque go
instantly from the tyre to the road surface without any
drive train losses.
Once you turn on the system and you start pedalling, the
motor will support you as long as you continue to pedal, up
to a maximum speed of 45 km/h.
The five levels of motor support of the BIACTRON system can
be selected according to the external circumstances (e.g.,
climbing uphill or riding with headwind) or to your personal
preferences. Please note that a higher level of motor support
consequently means a higher battery consumption. And
reduces the range of the system and battery.
In case you ride faster than 55 km/h (e.g., downhill),
automatically the recuperation of pedal energy (i.e.,
technical regeneration) will be activated. In that case the
motor operates as a generator and partly re-charges the
battery. The recuperation of pedal energy and battery
capacity = REGENERATION will be explained in section 5.3.
Recuperation of battery capacity.
www.klever-mobility.comwww.klever-mobility.com16 17
Klever’s E-bike drive trainKlever’s E-bike drive train
.. Sensors and their function
This Klever 45 km/h E-bike is equipped with a torque sensor in
the frame’s rear dropout. In conjunction with the pedal sensor,
this torque sensor precisely monitors the cycling eort of the
cyclist. The motor controller then calculates the sensor values
and manages precisely the amount of electric support from the
motor. Hence generating a perfect synergy between cyclist and
E-bike.
In addition, you can define the amount of motor support
by yourself as well, choosing between ascending levels of
support (N, ECO, TOUR, MAX, TURBO). This makes the system
very ecient and economic, saving power consumption and
maximising range.
The additional speed sensor sets the power of the electric motor
to zero once you have reached a speed of 45 km/h or more. Above
45 km/h this E-bike functions like a conventional bicycle, the
only way to maintain the propulsion of the vehicle is by pedalling
solely.
The electric motor support only kicks in under the condition that
you actively pedal. Therefore, from a standstill to get started
either you have to pedal or you have to actuate the á (TURBO)
button on the display. From standstill without pedalling the
motor will take you to a maximum speed of 4 km/h. Convenient
when starting uphill. The á(TURBO) button can also be used in
case the speed E-bike has to be pushed while walking alongside
your bike.
. Levels of electric motor support
The BIACTRON-system oers five levels of electric motor
support:
• N
• ECO
• TOUR
• MAX
• TURBO
Depending on topography, weather conditions and your
personal preferences, you can choose the motor support using
↑ (Up arrow) and ↓ (Down arrow) button and the á (TURBO)
button.
System level Amount of support
Situation (recommended)
N No support, electric system active Downhill
ECO Low support Flat roads
TOUR Medium support Slight hills / headwind
MAX Strongest support Steep hills / fierce headwinds
á(TURBO) (MAX) while
pedalling ≤ 45 km/h.
Strongest support Steep ramps / violent gusts
á(TURBO) (MAX) without
pedalling ≤ 4 km/h.
Strongest support Starting from standstill
áTURBO) (ECO) walking
with your E-bike ≤ 4 km/h.
Walk-assist, low support Walking with your E-bike or
pushing it uphill
Please note! In case you actuate the á(TURBO) button,
there are three scenarios:
1. You walk alongside the E-bike and/or you push it out of
your garage. While pushing the á(TURBO) button you
will activate the Walk-assist mode and you will trigger a
moderate electric motor support up to 4 km/h. In this way
you can walk with your vehicle comfortably and easily.
2. You are sitting on your E-bike and intend to start from
standstill on a ramp without pedalling. Push the á
(TURBO) button and you will get the strongest support
up to 4 km/h.
3. You are sitting on your E-bike. You are pedalling with
for instance TOUR support and you need the strongest
support momentarily. Push the á(TURBO) button
while pedalling and you will trigger the strongest
support regardless your speed (from 0 to 45 km/h).
www.klevermobility.comwww.klevermobility.com18 19
Turbo (á)
Klever’s E-bike drive trainKlever’s E-bike drive train
Please note! These 3 options will only function while
you keep the á(TURBO) button pushed. As soon as you
release the á(TURBO) button, the electric motor support
will stop. Except in the latter case of pedalling: in that
case after releasing the á(TURBO) button the level of
electric motor support will go back to the preselected
level (TOUR as in the example of scenario 3).
In order to save battery power, the support level will
automatically be limited to the TOUR level when the battery
capacity drops to 10%.When the battery capacity drops to 5%
the support level will be limited to the ECO level and in the
case of a battery capacity of 2% or less the level will be N. No
pedal assistance, but the electric system remains active for
lighting, display, motor locking and alarm.
. Recuperation of battery capacity:
regeneration
The Klever BIACTRON system has a unique feature: the recovery of
battery capacity, also known as regeneration. Every time the drive
system goes into freewheel, coasting mode,the BIACTRON system
will start braking the motor.The motor friction is being converted
into electricity that is being restored into the battery.The freewheel
mode starts once you do not pedal and roll out to a traffic light or you
coast down a hill or mountain without having to pedal.
Also, when actuating the brake levers with the built-in brake
sensors, the regeneration function will be activated while the disc
brakes start to brake the wheels.
Section 5.4.3 (Menu for settings) explains how this function can
be activated and adjusted to your personal preferences.The
regeneration function is a nice addition to the consumption
and range of your battery. The more and longer you ride in a
mountainous environment,the more you will benefit from this
function. However, the recovery of electricity is limited and depends
to a large extent on your riding behaviour, the environment and the
chosen regeneration settings.
( )
()
Info (•)
Image 5.3
Support level
details
Support
level name
High/low
beam lights
E-Key
indicator
Power
consumption
Regen power
General warnings
* Visit your dealer if the
warning signal continues to
appear on the display
Bluetooth
Warning
icon
LIGHT
Power
ON/OFF
Battery
indicator
E-KEY port
Current
speed
D-Info
. Display
With the display you start and control the BIACTRON-system.
Upon purchase your Klever dealer will pair the E-bike with a
set of two E-KEYs with a unique ID code. After the pairing your
E-bike will only function and start with these E-KEYs with the
dedicated and programmed ID code. It is impossible to activate
your E-bike with other E-KEYs from other bikes.
Now you can start the system WITH or WITHOUT
inserting the E-KEY (see section 5.4.3).
Every press of a display button will be confirmed with a short
acoustic signal. As soon as you insert the E-KEY into the display
(image 5.4), the system will start. With the E-KEY already in the
display while the system is o, there are two ways to activate
the system:
1. Press the On/O button (image 5.3), after a 3 seconds
system check your E-bike is ready to be pedalled.
2. Just start pedalling, the electric system will wake up
automatically. After a 3 seconds system check, the electric
drive will start to support.
E-KEY
Image 5.4