15
14
Butchers & Bicycles Butchers & Bicycles
MK1-E MY18 (A_01) MK1-E MY17-18 (A_01)
BEFORE FIRST RIDE
Read the user manual, as well as the
separate manual for Bosch eBike System
available at
butchersandbicycles.com/support.
Ensure that the position of seat and
handlebar is adjusted to your body.
Check the assembly and settings of brakes.
Ensure that you can easily reach the brake
levers and that you know which lever
operates which brake.
Check that the wheels are securely
fastened to the frame.
Check the air pressure in the tires. The
correct pressure is usually found on the
tire sidewall. Do not exceed the minimum
or maximum tire pressure!
Familiarise yourself with your new cargo
bike’s handling, braking, operation of gears
and the Bosch eBike system components
while riding away from roads with heavy
traffic. Do not ride with passengers or
cargo before you feel confident riding the
cargo bike.
Charge the Bosch battery according to
instructions in the Bosch eBike system
manual.
If your cargo bike is fitted with pedals
having a plastic or rubber surface,
Familiarise yourself with their grip. Pedals
like these may get slippery when wet.
BEFORE EACH RIDE
Before each ride make sure to follow this safety
checklist.
The brakes work and are properly
fastened.
The light system works.
The bell works.
All Bosch eBike batteries are securely
seated in their mounts.
All bolted connections are tight.
The rims and tires are free of damage,
eccentricity or foreign bodies.
Tires have sufficient tread depth and are
inflated to the correct pressure. Do not
exceed the minimum and maximum tire
pressure!
Quick release connections are securely
tightened.
There is no damage to the frame or front
suspension.
The handlebars, stem, seat post and seat
are securely fastened and set up in the
correct position for the rider.
ADJUSTING THE CARGO
BIKE TO THE RIDER
e correct cycling position is important for
comfort and safety. Before cycling adjust the
seat height, seat forward/aft position and han-
dlebar height.
Make sure you can comfortably reach the
handlebar and all controls, particularly the
brake levers.
Check that you can safely reach the
ground with your feet. If not, position the
seat lower.
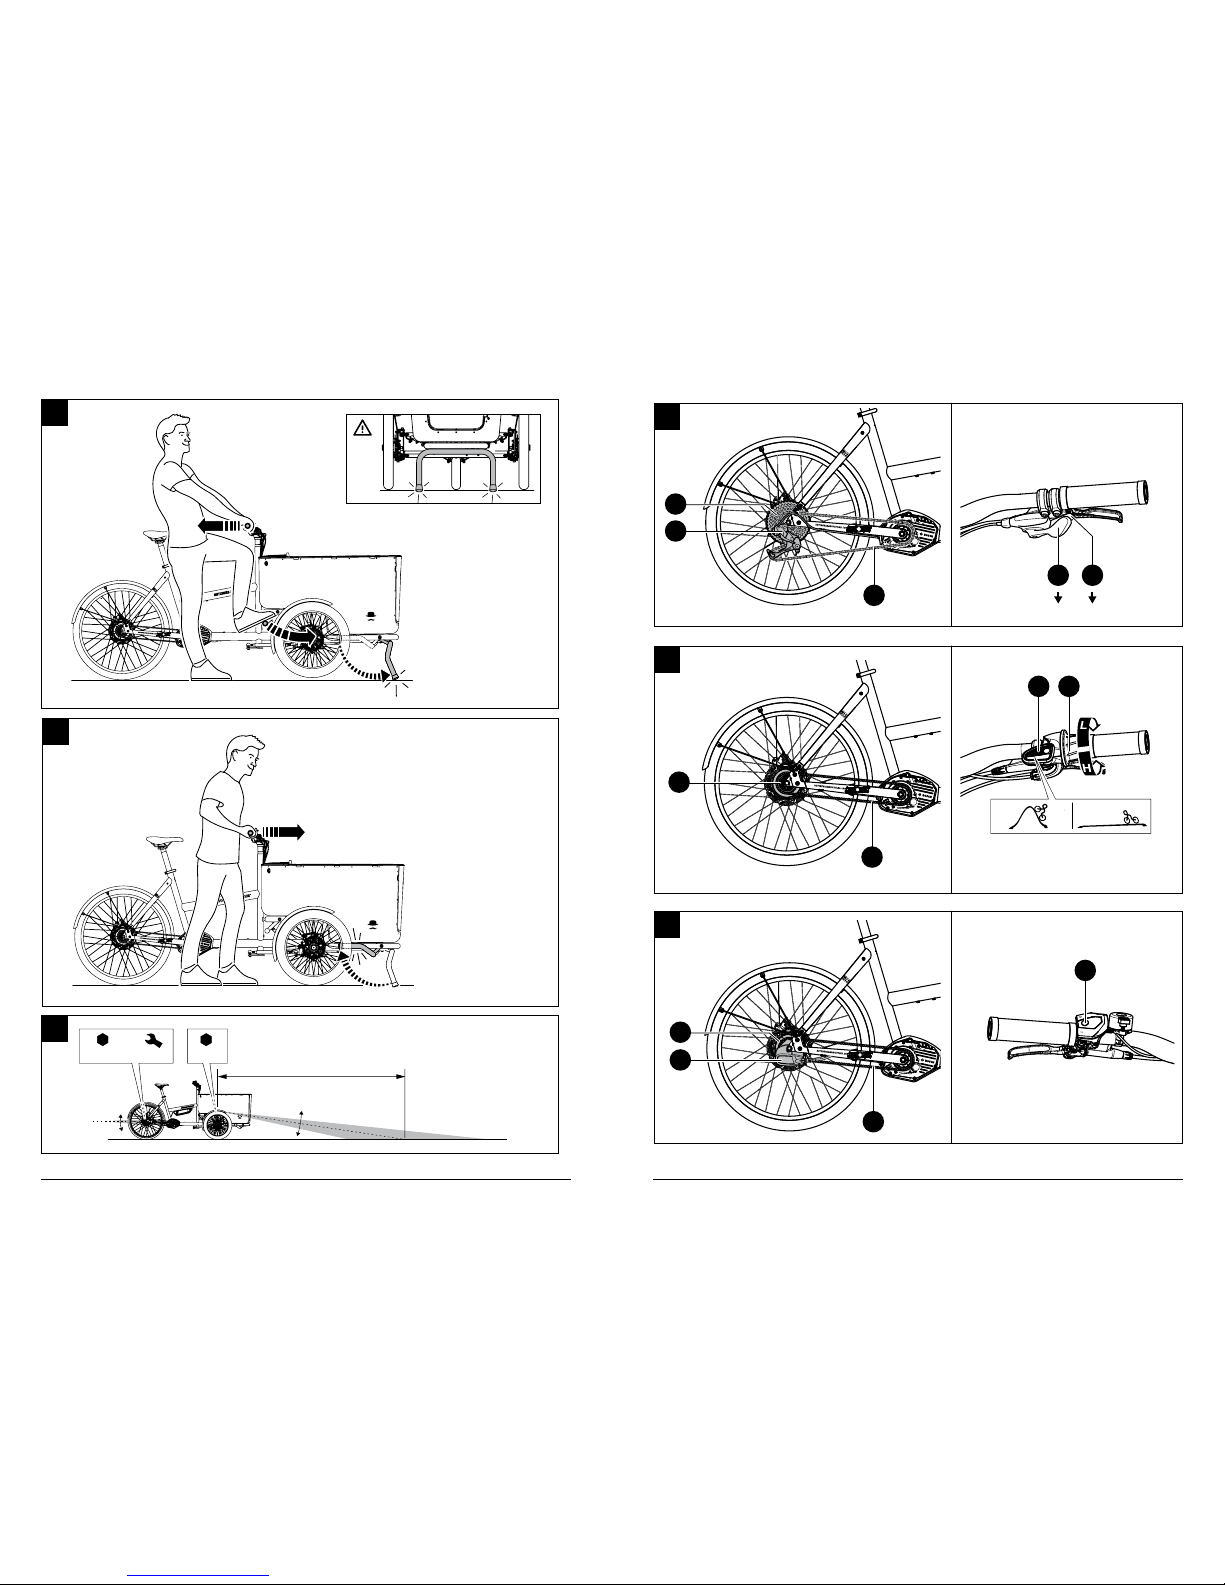
Finding the optimal seat height
See illustration E
Sit in the seat with your hands holding the
handlebar (you can put the cargo bike on
the parking stand to make this easier).
Position the crank arms vertically. With
the heel of your foot on the lower pedal,
the leg should be fully outstretched. Adjust
seat height so this is the case. Refer to
"Adjusting seat height" on page 15.
This ensures that when you pedal normally
(where the front part of your foot is on the
pedal) the leg will remain slightly bent at
the knee — even with the pedal in lowest
position.
It is a good idea to set the seat hight a
little lower when learning to ride the cargo
bike. This way you can get off the seat faster
should you suddenly need to put your feet
on the ground.
Finding the optimal seat position
See illustration F
Adjust the seat to optimal height before
you adjust seat position.
Sit in the seat with your hands holding the
handlebar (you can put the eBike on the
parking stand to make this easier).
Position the crank arms horizontally.
With the front of your foot on the forward
pedal, your kneecap and the pedal axle
should form a vertical line.
If the knee is behind the pedal axle, slide
seat forwards. If the knee is in front of the
pedal axle, slide seat backwards. Refer to ""
on page 15.
The correct seat position lets you get
the most power out of your pedalling effort
and helps prevent knee pain.
Adjusting seat height
See illustrations G
The seatpost clamp (1) on MK-E cargo bike is
equipped with a quick release mechanism for
tool free adjustment of seat height.
Open the lever (a) to the position marked
on the illustration.
Move the seat to desired height. Make sure
that the nose of the seat points forward.
Close the lever (a) until it is flush with
the seat post clamp — position marked
on the illustration. There should be
considerable resistance.
Try to rotate the seat sideways. If it
rotates, the seatpost clamp is too loose.
Do not ride the cargo bike if the seat is not
properly secured!
If the quick release lever (a) is very
tight and you can’t close it with just your
hand, open the lever, loosen the locknut
(b) a little by turning it counter-clockwise
and try to close the lever again. Repeat if
necessary.
If the quick release lever (a) closes
without resistance, open the lever,
tighten the locknut (b) a little by turning it
clockwise and try to close the lever again.
Repeat if necessary.
DANGER Do not extend the seat post
past the minimum insertion mark printed
on the seatpost! The minimum insertion
mark [MIN INSERT] must not be visible
above the end of the seat tube. Riding the
cargo bike with the seatpost extended too
far may lead to serious injury!