DiabloSport Predator User manual

REV. JUNE-10-2006
CAN Predator

b
DiabloSport, LLC.
Predator Satisfaction Guarantee/
Return Policy
Predator Reflash
Policy
All DiabloSport
products have a guarantee of
satisfaction. If in the first 30 days from date
of purchase you are not satisfied with the results
the Predator generates in your vehicle, simply
restore the factory tune to your vehicle and return the Predator to the
selling dealer. Pending examination of the tool by DiabloSport, you will
receive a refund from your selling dealer. Under no circumstances will
DiabloSport accept the return of a Predator unit that does not
have a performance tune remaining in it.
The Predator will marry to the vehicle upon
upload of the factory tune and cannot be
reflashed for any reason, back to a
blank tool. This marrying of the Vin#
to the tool is what makes it possible
for the vehicle to be reflashed by GM,
and still be reprogrammed again by the
Predator. Reflashing of the Predator is not
possible without the complete disassembly,
replacement and reprogramming of criti-
cal components of the Predator tool.
Predator Revisions:
In an effort to keep the Diablosport Predator
at the forefront of technology, Diablosport will
offer revisions to the Predator when necessary.
Updates are available via the web or you
can return the Predator for a revision update.
Please contact Diablosport for a Return Mer-
chandise Authorization Number (RMA) and an
address to ship to. Predators shipped without
an RMA number clearly on the outer box will
be refused. The updates will be provided free
of charge. The customer is responsible for all
freight expenses.

c
DiabloSport, LLC.
Predator Satisfaction Guarantee/
Return Policy
Predator Reflash
Policy
All DiabloSport
products have a guarantee of
satisfaction. If in the first 30 days from date
of purchase you are not satisfied with the results
the Predator generates in your vehicle, simply
restore the factory tune to your vehicle and return the Predator to the
selling dealer. Pending examination of the tool by DiabloSport, you will
receive a refund from your selling dealer. Under no circumstances will
DiabloSport accept the return of a Predator unit that does not
have a performance tune remaining in it.
The Predator will marry to the vehicle upon
upload of the factory tune and cannot be
reflashed for any reason, back to a
blank tool. This marrying of the Vin#
to the tool is what makes it possible
for the vehicle to be reflashed by GM,
and still be reprogrammed again by the
Predator. Reflashing of the Predator is not
possible without the complete disassembly,
replacement and reprogramming of criti-
cal components of the Predator tool.
End User License Agreement, Warranty and Disclaimer
THIS END USER LICENSE AGREEMENT (the “Agreement”) is an agree-
ment between you, as the purchaser (the “Purchaser”) of either the Diablo
Module (the “Module”) or the ToolRama hand-held computer unit (the “Unit”),
and , DiabloSport, LLC or ToolRama, LLC (collectively, “ToolRama”), as the
manufacturer of the Product. The Product and the Unit shall be referred to
collectively herein as the “Product.”
1. Acknowledgment And Acceptance Of Agreement. If you do not
agree to the terms and conditions of this Agreement, do not use the Prod-
uct. Instead, promptly contact the distributor from which you purchased the
Product in writing, requesting a refund of the purchase price. Any use of the
Product by you will constitute your agreement to the terms and conditions
contained herein.
2. Grant Of License. The parties hereto acknowledge that ToolRama is
granting a non-transferable restricted license to Purchaser to use the Product
for the sole purpose of installation in Purchaser’s vehicle. ToolRama shall
retain all title, ownership rights and intellectual property rights in and to
the Product. Purchaser agrees that Purchaser shall not, directly or indirectly,
modify, translate, reverse engineer, decompile, disassemble, or create deriva-
tive works based on the Product. Purchaser further agrees not to permit any
third parties to modify, translate, reverse engineer, decompile, disassemble,
or create derivative works based on the Product. 3. Disclaimer.The Product
is being sold with no warranties of any kind, express or implied. The Product
is not endorsed by the manufacturer of your vehicle and there is no affilia-
tion between ToolRama and the manufacturer of your vehicle. Installation of
the Product in your vehicle or use of the Product with your vehicle may limit
or void your rights under any warranty provided by the manufacturer of your
vehicle, and ToolRama assumes no responsibility in such event. Any warranty
not provided herein, and any remedy which, but for this provision, might arise
by implication or operation of law, is hereby excluded and disclaimed. The
implied warranties of merchantability and of fitness for any particular purpose
herein are expressly disclaimed. 4. No Liability For Damages, Injuries
Or Incidental, Special Or Consequential Damages. Under no cir-
cumstances shall ToolRama, Inc., DiabloSport, LLC or ToolRama, LLC, or any
other party related to ToolRama, be liable to Purchaser or any other person for
any damage to Purchaser’s vehicle, loss of use of Purchaser’s vehicle, or for
personal injuries suffered by any person, or for any incidental, special or con-
sequential damages, whether arising out of negligence, breach of warranty,
breach of contract, or otherwise. ToolRama’s liability for any damages, loss
and/or claims associated with the Product shall be limited to the price of the
Product paid by purchaser. Purchaser hereby releases ToolRama from all
liability, claims and damages associated with the Products, with the sole excep-
tion of ToolRama’s liability for the refund of the purchase price of the Product to
Purchaser in the event that a court of competent jurisdiction determines the Pur-
chaser suffered damages directly resulting from the malfunction of the Product.
5.Warranty. Notwithstanding the provisions of the End User License Agree-
ment, DiabloSport warrants the Product to be free from all defects in material
and workmanship for the life of the Product. This limited warranty applies only
to the original Purchaser of the Product. This limited warranty does not cover
damage caused by modification, alteration, repair or service of the Product
by anyone other than DiabloSport, physical abuse, misuse, use in a manner
contrary to the instructions, which accompany the Product, or any damage
caused by acts of God. Contacting your Distributor or Dealer may make claims
for repair service or replacement of the Product pursuant to this limited warranty.
The Chip will either be repaired or replaced, at the option of DiabloSport, at
no cost to Purchaser, if the defective Product is covered by this limited warranty.
DiabloSport’s liability pursuant to this limited warranty and for any damages,
loss and/or claims associated with the Product shall be limited to the price of the
Product paid by Purchaser, or, at DiabloSport’s option, repair or replacement
of the Product. 6. State Law. Some states do not allow limitations of implied
warranties, or the exclusion or limitation of incidental, special or consequential
damages, so the above limitations may not apply to you. In such states, liability
shall be limited to the greatest extent permitted by applicable law.
7. Governing Law & Venue. This Agreement shall be governed by and
construed in accordance with the laws of the State of Florida, and venue for any
legal proceeding or action at law arising out of or construing this Agreement
shall lie in the state or federal courts of Orange County, Florida, and the parties
specifically waive any other venue.
DISCLAIMER Not legal for sale or use on any pollution controlled
motor vehicles. Legal in California only for racing vehicles which
may never be used upon a highway.
End User License Agreement,
Warranty and Disclaimer


1
Before Installing the Performance Tune
OBD II Diagnostic Port Location 2
Fuse Removal 3
Display and Keypad Description 4
Preparing the Vehicle for the Tune Installation 5
Installing the Performance Tune
Duramax Tune Descriptions 6
Installing the Performance Tune 7
Modify Tune Procedures 8
Installing the Original Backup
How to Install the Original Backup 10
Vehicle Diagnostics, Predator Options
& Troubleshooting
Vehicle Diagnostics 11
Troubleshooting 13
Predator Options 15
How to Update your Predator 16
Table of contents
Table of Contents
2
OBD II Diagnostic Port and
Fuse Location
Please read through this manual before installing any
tune into your vehicle. Failure to follow the instructions
can result in a damaged or disabled ECU (Engine
Control Unit).
The user must ensure that the original GM Factory Tune
is in the vehicle’s ECU before installing the DiabloSport
tune. (GM dealer reflashes are the same as a factory
tune).
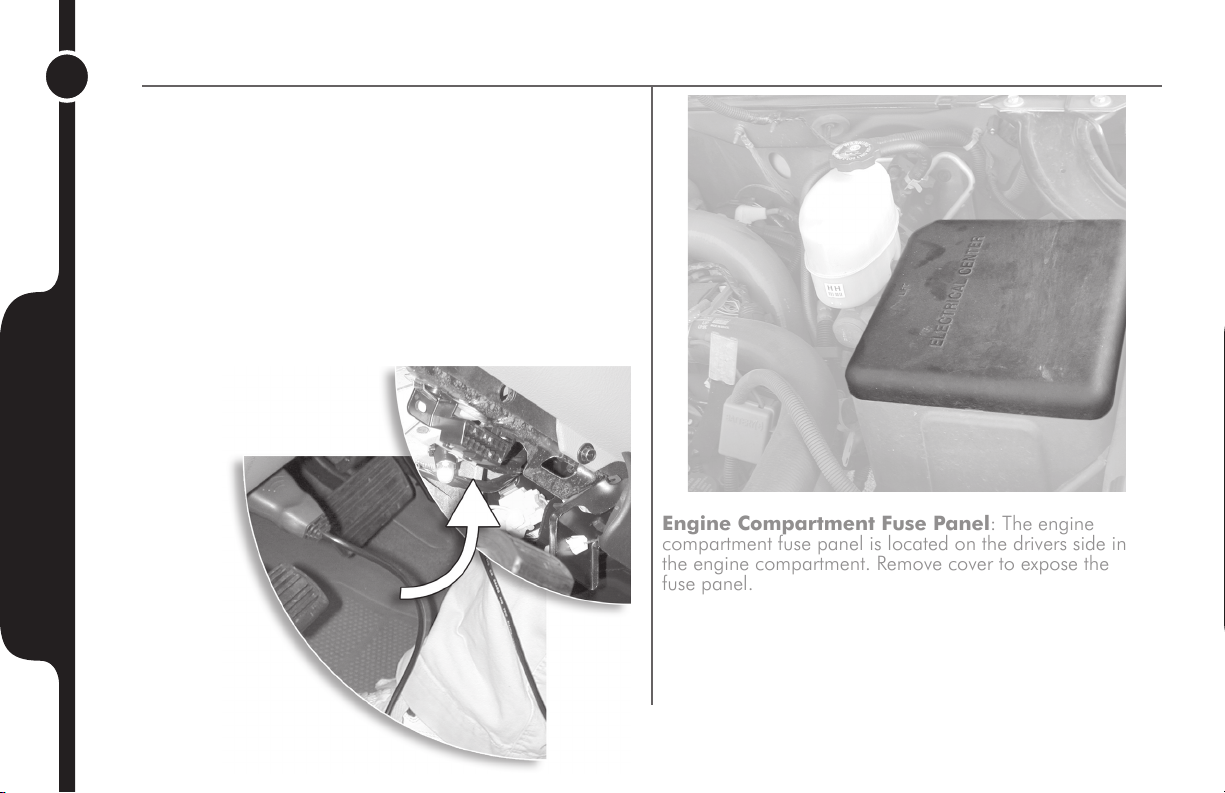
OBD II Diagnostic Port and Fuse Location
Engine Compartment Fuse Panel: The engine
compartment fuse panel is located on the drivers side in
the engine compartment. Remove cover to expose the
fuse panel.

3
Fuses to be removed prior to
programming.
The 3 fuses are located in the en-
gine compartment fuse box.
1/RADIO
2/RADIO AMP
3/INFO
With the ignition in the OFF posi-
tion, remove these fuses before
programming vehicle.
Fuse Removal
Fuse Removal
4
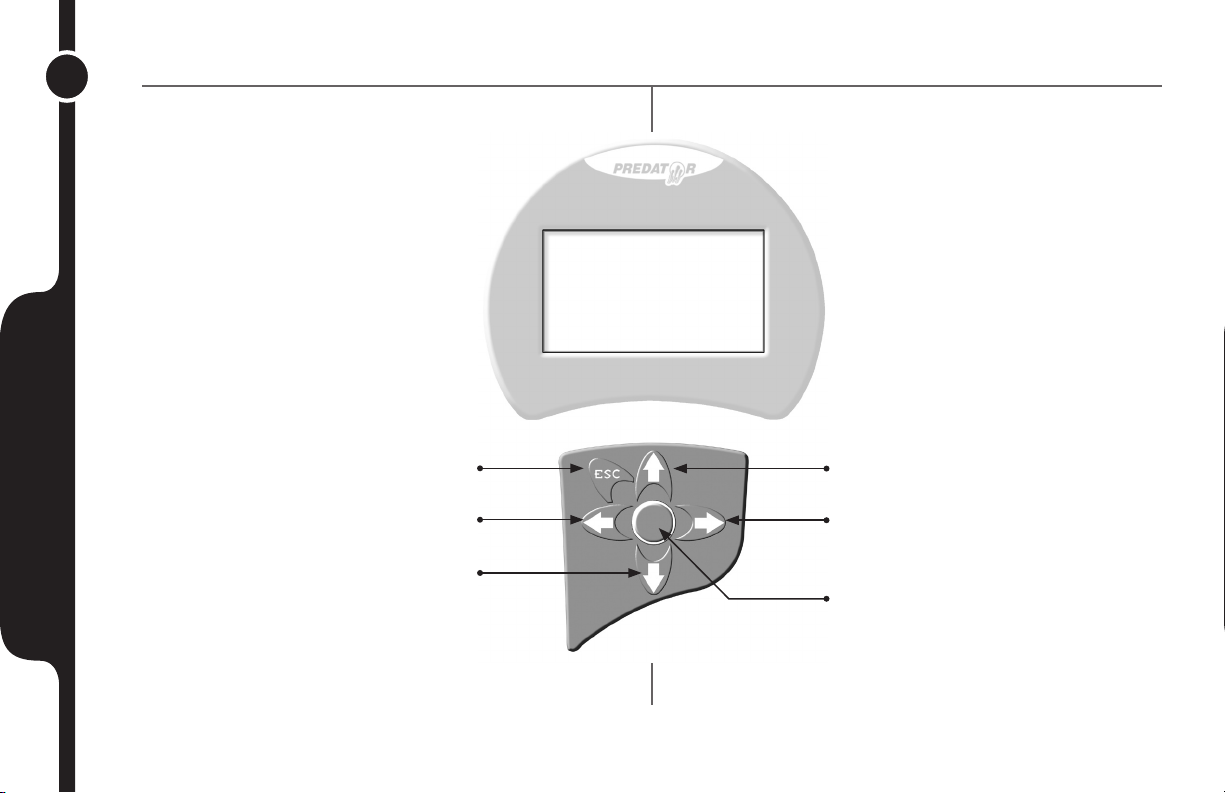
Display and Keypad Description
FOR UP TO DATE
INFORMATION VISIT:
WWW.DIABLOSPORT.COM
ESC Key:
Jump back to previous menu
or jump to top of menu selection.
Left arrow:
Set gauge value left
Down arrow:
Scroll down the menu
Up arrow: Scroll up the menu
Right arrow: Set gauge value
right
Enter Key/continue: Select
the highlighted item
Display and Keypad
Description
Display and Keypad
Description.

5
Preparing the Vehicle for Performance Tune Installation
Very important!
Do not perform any operations on the Predator
(except real time data diagnostics) while the
vehicle is running. The vehicle must be parked
and engine OFF.
• Always have all of the doors closed while installing the
DiabloSport Performance Tune. Keep them closed until
the process is complete.
• Do not activate any electrical accessories while installing the
DiabloSport Performance Tune. Ensure that there are
no electronic aftermarket accessories wired or plugged
into the vehicle that can cause a substantial voltage drop.
Please contact DiabloSport if you are uncertain about the
effect of devices that are installed on your vehicle.
• Certain cellular phones or radio equipment may also
cause interference. Please remove or turn these
devices off.
• Do not try to install any tune on a vehicle with a low battery
voltage - charge your battery if necessary.
• Never turn the ignition key OFF while the Predator is plugged
into diagnostic port.
• Never unplug the Predator while it is installing the DiabloSport
Performance Tune or the Original Backup.
*Important Note:
All electronic aftermarket add-on parts
can create a potential power draw.
• tachometer • electrical fans
• shift light • audio/video equipment.
• gauges • trailer/ tow accessories.
Any change in voltage during flash programming procedures WILL
interrupt the writing process, and potentially disable the vehicle.
Please disconnect or disable any such add on part.
In the event of such an occurrence, unplug the tool, wait 5 sec-
onds and then plug it back in. The Predator will recognize that an
interrupted writing error has occurred and will automatically install
the original back up. The vehicle will then be in its original state.
Please attempt to locate the voltage draw before the Predator is
used again.
Please feel free to contact DiabloSport directly at any time with
questions related to this process. 561-908-0040
IT IS NOT NECESSARY TO CONTACT THE VEHICLE MANUFAC-
TURER SHOULD SUCH ERRORS OCCUR. ANY AND ALL COSTS
RELATED TO SUCH ACTIONS ARE THE RESPONSIBILITY OF THE
END USER - NOT DIABLOSPORT OR ITS DEALERS.
Preparing the Vehicle for
Tune Installation

6Performance Tunes for Duramax
DiabloSport Tow (Tow Tune) is designed to add power
and torque specifically for towing, weight limitations are
the same as the stock tune, and inclines must also be
factored in.
DiabloSport 65hp (Economy Performance Tune)
is designed to add power and torque, but with fuel
economy in mind. Fuel mileage is always subject to
driving style and may vary from vehicle to vehicle. Towing
can be done with this tune with a weight limitation of
8,000 lbs. Inclines must also be factored in.
DiabloSport 85hp (Performance Tune) is designed to
add power and torque, but with fuel economy in mind.
Fuel mileage is always subject to driving style and may
vary from vehicle to vehicle. Towing can be done with this
tune with a weight limitation of 6,000 lbs. Inclines must
also be factored in.
DiabloSport 120hp (Extreme Performance Tune)
is designed to add power and torque. Towing is NOT
recommended with this tune, and exhaust gas tempera-
ture gauge is recommended using this tune to ensure
safe operation during varying conditions.
The DiabloSport Predator contains several predefined
performance tunes. These tunes are extensively devel-
oped, thoroughly tested and approved by DiabloSport.
When you use the Predator for the first time, the Predator
becomes ‘married’ to, and only to, your vehicle until the
original backup is restored.
If there is ever a need to send the Predator back to
DiabloSport, the Original Backup must be put back into
your vehicle, as described in the section “Reinstalling the
Original Factory Backup”, otherwise your Predator will
not be accepted by the re-seller. To find out which tune
was last written to your vehicle, go to ‘Predator Options /
Show Last Tune Written’ in the Predator.
Performance Tunes for GM Duramax Vehicles
Modify Stock Tune, allows the user to adjust the
parameters such as speed limit and tire size on the factory
tune.
NOTE: This tune does not reset the Predator, select
Original Backup to restore the original backup and reset
the Predator.
Installing the Performance
Tune
Installing the Performance Tune

7
Installing the Performance
Tune
The very first time the Predator is used on a vehicle it
will automatically create a backup of the original factory
tune. This process takes approximately 4 minutes.
(Installing the DiabloSport Performance Tune)
1. Plug the Predator into the Diagnostic Port of the vehicle,
located under the driver’s side dash.
2. The first screen you will see is the startup screen with the
name of the vehicle the Predator supports.
3. The three main menu choices:
• Performance Tune
• Diagnostics
• Options
4. Select “Performance Tune” by pressing the “enter” key
5. A disclaimer will appear, - read & press “enter”
6. Turn the ignition key to the RUN position. DO NOT START
VEHICLE- press “enter”
7. Highlight the tune you would like to install by using the arrow
keys. Press “enter” to continue.
8. Press “enter” on Install Tune.
9. Follow the prompts to turn the ignition on & off (do not start
the car at any time) press “enter” when prompted.
10. The tune will now be installed in the vehicle. Do not
interrupt this process or ECU damage can occur.
11. When the process is complete, the message “ {xxxxxx} tune
is now in vehicle. You may drive it now. Please unplug the tool”
Unplug the Predator from the diagnostic port. Turn the
ignition to the OFF position. You are now ready to enjoy
the power of the Predator tune!!
Vehicles equipped with the Allison automatic
transmission. Upon installing ANY performance tune
the Allison transmission will require some time to adapt
its shifting strategy to the added power. The shift quality
will be reduced during this learn process. Please allow
4-6 driving cycles for the shift strategy to learn.
NOTE: When switching from one Predator tune to
another, there is no need to restore the original backup
before writing another tune. You can safely go from any
Predator tune to another without the need to restore the
original backup.
Installing the Performance Tune
8
NOTE: Parameters vary between applications.
1. When selecting the “Modify Tune” function, a disclaimer
will appear. Read, and press the “enter” key to continue.
2. The “Modify Performance Tune menu will appear. You will
have 2 choices:
• Modify Parameters
• Reset all Parameters
3. Highlight the appropriate choice by using the arrow keys &
press “enter”
4. In the “Modify Parameters” Menu the following choices
will appear:
Modifying Parameters
Modifying Parameters
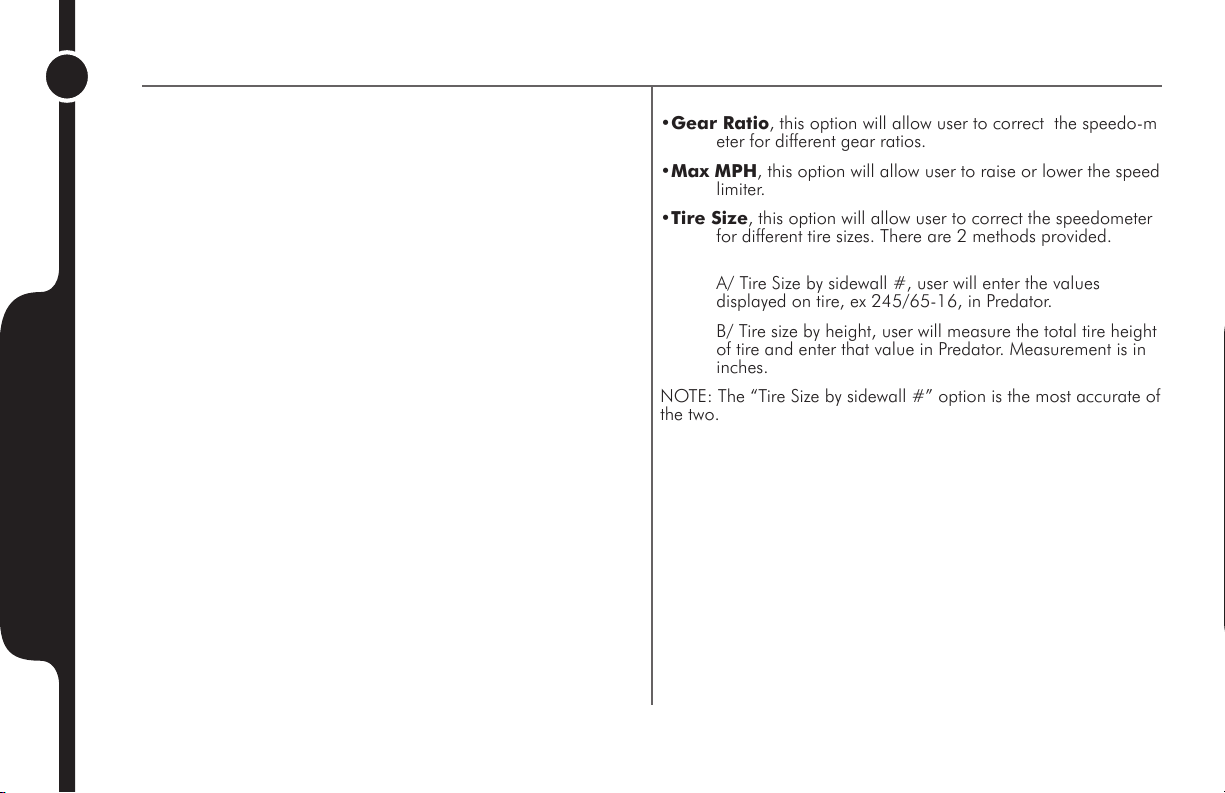
Modify Tune Procedures
•Gear Ratio, this option will allow user to correct the speedo-m
eter for different gear ratios.
•Max MPH, this option will allow user to raise or lower the speed
limiter.
•Tire Size, this option will allow user to correct the speedometer
for different tire sizes. There are 2 methods provided.
A/ Tire Size by sidewall #, user will enter the values
displayed on tire, ex 245/65-16, in Predator.
B/ Tire size by height, user will measure the total tire height
of tire and enter that value in Predator. Measurement is in
inches.
NOTE: The “Tire Size by sidewall #” option is the most accurate of
the two.

9
5. Highlight the appropriate choice by using the arrow keys &
press “enter”
6. Modify the appropriate parameter by using the arrow keys
& press “enter” to continue.
7. Verification will display “Are you sure?” Press “enter” to
continue.
8. The Predator will “this change will take effect next time you
install the tune” display – Press “enter”.
9. Use the “ESC” key to go back through the menus and
either continue to change parameters or go to the “install
tune now?” menu. Press “enter “ to continue.
10. The tune should now be building. Do not interrupt this
process or ECU damage can occur.
11. Follow the prompts to turn the ignition ON & OFF (do
not start the car at any time) press “enter” if prompted.
12. The tune should now be writing. Do not interrupt this
process or ECU damage can occur.
During programming do not touch any buttons or open and
close doors. The dash gauges will become inoperative during
programming.
13. Follow the prompts to turn the ignition ON & OFF (do
not start the car at any time) press “Enter” if prompted.
14. When the process is complete, the Message “ {xxxxxx}
tune is now in vehicle. You may drive it now. Please unplug
the tool” Unplug the Predator from the diagnostic port. Turn
the ignition to the OFF position. You are now ready to enjoy
the power of the Predator tune!!
NOTE If the tune is not installed at the install tune prompt
the adjusted parameters will not be lost, they will be saved,
just not installed in the vehicle.
To reset parameters, simply select the “Reset Parameters”
item.
The adjusted parameters will remain the same when
switching from the Performance Tunes, Modify Stock Tune
tune or Custom tune. There is no need to re-adjust them
between tune changes. The changes will be applied to any
tune installed from the Predator.
Modifying Parameters
Modify Tune Procedures

10
There are three occasions when one needs to
install the original backup into the vehicle:
- When going to the dealer for vehicle mainte-
nance or repair.
- When returning the Predator to an authorized
Diablosport dealer.
- Using the Predator to program another
vehicle.
To restore the original backup select Perfor-
mance Tune and then select original backup.
NOTE: The Modify Stock Tune tune is NOT the
same as original backup. The Modify Stock Tune
tune will NOT reset the Predator. To restore and reset
the Predator, the original backup must be selected.
When the Predator starts to write the original backup
into your vehicle, a progress bar will indicate the
writing process. Follow all instructions on the Preda-
tor screen. The process will complete in about 1
minute.
Once the original backup is restored the Predator
can be used to program another vehicle
How to Install the Original Backup
Installing
the Original Backup
11
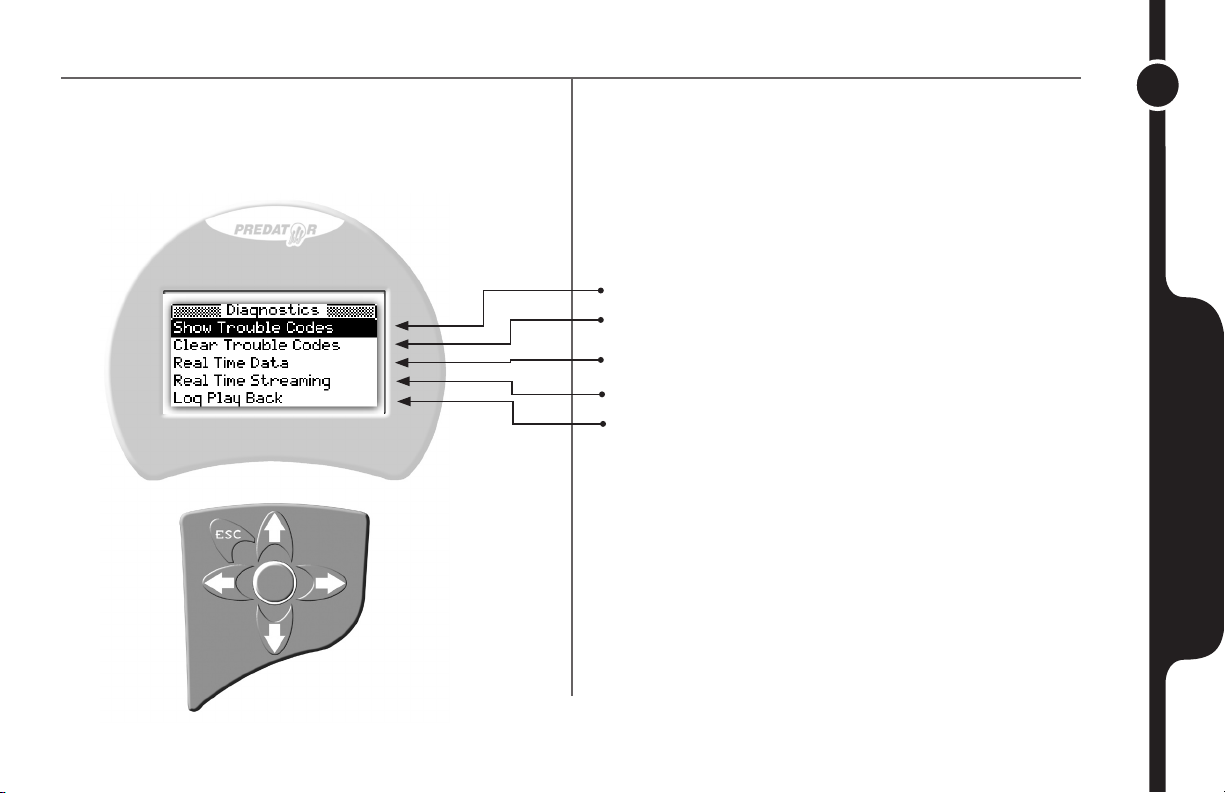
Vehicle Diagnostics
Vehicle Diagnostics
Select the “Diagnostics“ item from the main menu of
the Predator, then press the Enter key.
Allows user to view the vehicle trouble codes
Allows user to clear the trouble codes from the vehicle
Displays real time data* (live data)
Stream live data to view on PC DAT Viewer*
View logged data*
For more information on OBD-II diagnostics and
trouble codes, please visit www.kotzigpublishing.com.
*Not applicable on all applications

12
Show Trouble Codes = Display any current diag-
nostic trouble codes
Clear Trouble Codes = Delete any current trouble
codes
Real Time Data = View real time data, this section
is set up in groups of parameters to view.
NOTE: When switching the Predator from one vehicle to
another vehicle you must go into the “Options” menu and
press “Live table reset”
Each group (when selected) allows the user to show spe-
cific values or all of the values in the group. To see specific
values choose “Show Select”. Then based on what sample
rate you would like choose “Slow” or “Fast” the next
screen will show all parameters available. Highlight and
press the enter button next to the value you would like to
display, once completed press the “ESC” button.
You will now be asked if you wish to data log (record data)
or just view the parameters without data logging.
Data Logging
All live data groups can be data logged.
When specifying parameters to view you will be asked to
choose “Slow” or “Fast” rate.
Fast rate will sample the values at a higher rate and will be
able to log data for about 45 min, the more parameters you
select the lower the granularity for values will be. We recom-
mend no more than 8 for good sample rates.
Slow rate will be able to log data for about 1hr 30min. When
choosing to view all values the default rate is slow.
Once the proper sample rate is selected, the next screen will
ask “DATALOG yes or no”, select “YES” and the data logging
will start.
To stop data logging, press the “ESC” button.
Log Playback
To view the logged values, go back to the main diag-
nostic menu and select “Log Play Back”.
-Top right hand corner will display the total time data
logged
-Top left hand will display elapsed time.
-Top Center will display the progress bar and mode of
view.
To start viewing the data press the enter button. To
pause press the enter button.
While paused, you can use the left and right arrow keys
to move forward or backward in the log file. Once the
desired point is reached press the enter key to start
displaying the values from that specific point.To exit out
of the data log, press the “ESC” button.
Vehicle Diagnostics
Vehicle Diagnostics
13
Troubleshooting
Troubleshooting
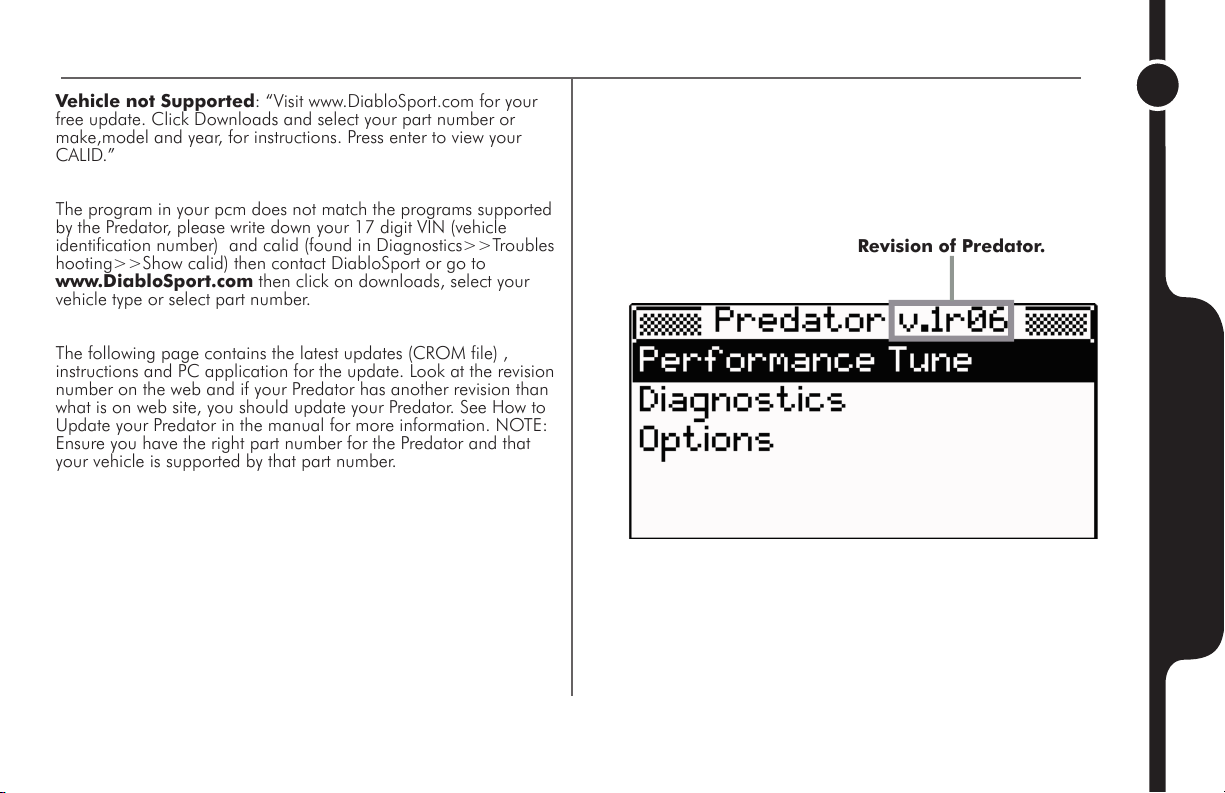
Vehicle not Supported: “Visit www.DiabloSport.com for your
free update. Click Downloads and select your part number or
make,model and year, for instructions. Press enter to view your
CALID.”
The program in your pcm does not match the programs supported
by the Predator, please write down your 17 digit VIN (vehicle
identification number) and calid (found in Diagnostics>>Troubles
hooting>>Show calid) then contact DiabloSport or go to
www.DiabloSport.com then click on downloads, select your
vehicle type or select part number.
The following page contains the latest updates (CROM file) ,
instructions and PC application for the update. Look at the revision
number on the web and if your Predator has another revision than
what is on web site, you should update your Predator. See How to
Update your Predator in the manual for more information. NOTE:
Ensure you have the right part number for the Predator and that
your vehicle is supported by that part number.
How to identify the revision of Predator: Allow the
Predator to boot to the main screen where you see Perfor-
mance Tune. At the top of the screen you will see, Predator
v.xrxx, the number after “Predator v.xr” is your revision number.
Revision of Predator.

14
What to do if write fails: If for any reason the write process
fails, please ensure that the battery is fully charged, the proper
fuses have been pulled and all aftermarket electronic accessories
are turned off. Then follow the prompts in the Predator to restore
the vehicle back to its original calibration. If this process fails,
please contact us at 561-908-0040. We will need you to be in the
vehicle with the Predator during this process. Please ensure you
are able to do so before contacting us.
Invalid License: This message means that the original backup
that is stored in the Predator does not match the program that is
in the vehicle. The most common cause for this error is when the
performance program is left in the vehicle when taken to a dealer
and the dealer re-flashed the vehicle’s ecu. If this happens, the
Predator will ask to take a new copy of the original backup so
you will have the latest updates as a new backup, once backup is
complete you can use the Predator as usual again.
Could not see Ignition ON: Ensure ignition is turned to the
ON position with the engine not running.
Troubleshooting
Troubleshooting
15
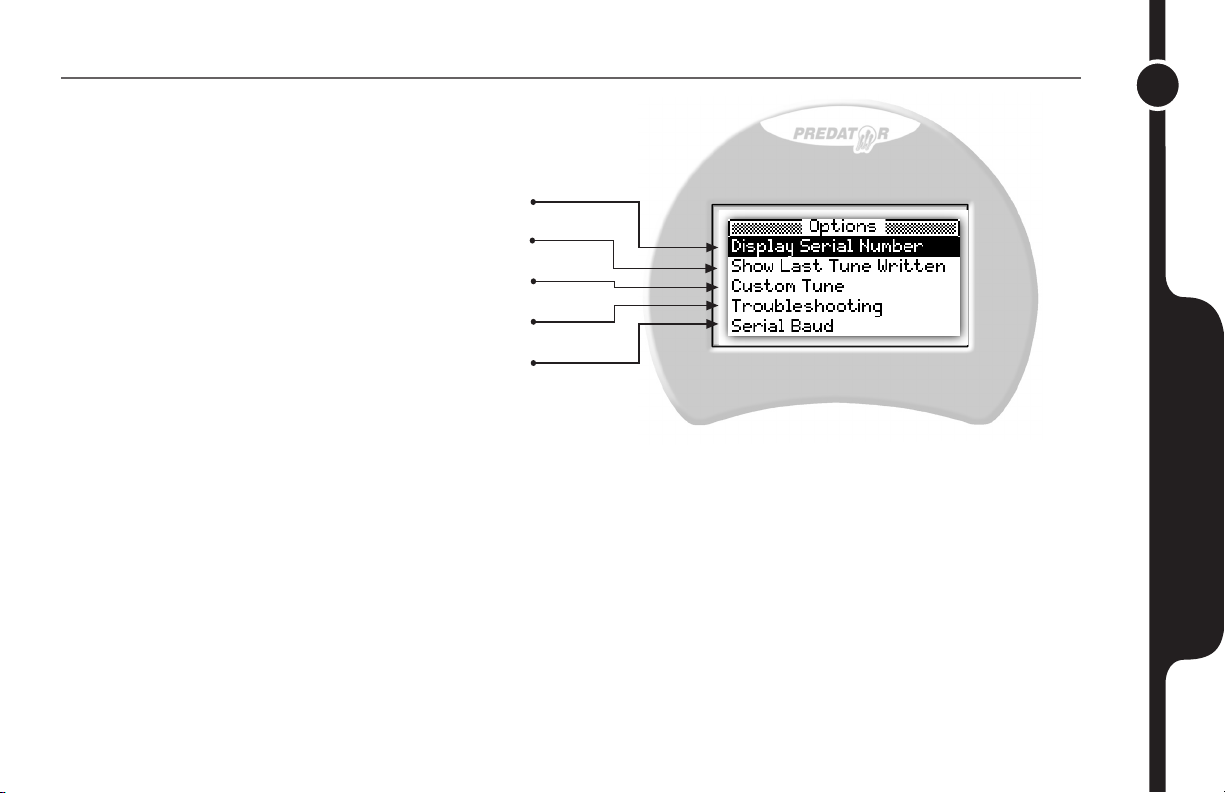
Predator Options
When you select “Options” the following screen will be displayed:
The options menu is mainly for use by your DiabloSport Dealer.
Troubleshooting Menu
Show Calibration ID = Displays the hex code on the vehicle
Show VIN = Shows vehicles VIN number
Read Extra Tune = Reads the tune in the vehicle for export to PC
Restore Original Backup = Restores the Original Backup and resets
the tool for use on another vehicle.
Log Upload = Upload data log file to PC, see Diagnostics section.
Live Table Reset = Reset this when Predator is used on a different
vehicle, this is so the Predator will look for supported PID’s for
the new vehicle.
Verification = This is a troubleshooting feature and should only be
used with the supervision of DiabloSport tech support.
Options Menu
Display Serial Number = Show the Predators serial number
Show Last tune Written = Displays the last tune written to vehicle
Custom Tune = Custom tune menu (see Custom Tunes section)
Troubleshooting = See Troubleshooting section
Serial Baud = Set the serial baud rate of communications for Predator.
NOTE: When switching tool from one vehicle to another
vehicle you must go into the options menu and press live
table reset.
• This option shows the Predator serial number
• Displays the name of the last tune written to the vehicle
• Brings up the submenu for Custom Tunes from DiabloSport
• Brings up the Troubleshooting submenu
• Alter the serial port baud rate
Predator Options

16 Predator Update
How to update your Predator
How to update your
Predator
HARDWARE ITEMS
Before you begin, a serial cable and an AC to DC power adapter must be ob-
tained. DiabloSport offers both of these items in a package that can be obtained
through any authorized DiabloSport dealer. The part number for this item is
U7777. Alternatively, these items can be purchased locally from any Radio Shack
or similar electronics retailer. The descriptions, part numbers and recommended
source for these items are presented below.
1) Serial Cable:
- For PC’s with DB-9 serial communications port(s):
A standard, RS-232C, straight through, DB-9 male to DB-9 female cable is
required to connect the PC to the Predator.
Recommended Source: Radio Shack part number: 26-117, 6-ft DB9 male to
DB9 female shielded RS-232C cable
- For PC’s with USB ports only:
If the PC only has USB ports available, a USB to RS-232C converter
cable is required. This cable will convert a USB port to a serial port to connect to
the Predator.
Recommended Source: Radio Shack part number: 26-183, 6-ft USB to
Serial Port Adapter Cable
2) Power Adapter:
The Predator requires a 12 Volt, 1 Amp power source to turn it on. An
AC to DC power adapter allows the Predator to be turned on when not
connected to the vehicle. The Power Adapter’s plug tip is 2.5mm in
diameter and 5.5mm in length. The required polarity is center contact is
positive and the outer contact is ground.
Recommended Source: Radio Shack part number: 273-1776,
12V/1000mA AC to DC Power Adapter (This item includes a Plug
Adapter. Please specify part number: 273-1717 to obtain the correct
adapter.
* Note: If the update will be performed with a laptop computer, the
vehicle’s OBDII port can be used to substitute for the Power Adapter.
Before you begin:
Restore the “Original Backup” to the vehicle with the Predator.
From the Predator’s main menu select “Options” then select
“Troubleshooting”. In this menu you’ll find “Restore Original
Backup”. Select this item and follow the on-screen prompts to
return the vehicle to its stock configuration.
Other manuals for Predator
3
Table of contents
Other DiabloSport Motherboard manuals


